Keeping a full backup of your website is one of the smartest ways to protect it from unexpected issues. Every website owner should have regular backups in place to safeguard their content and settings.
We’ve explored and tested various solutions, which you can see in our list of the best WordPress backup plugins. Each plugin offers unique features to consider, so it’s essential to evaluate which one best fits your needs.
In this guide, we will show you how to create a complete WordPress backup for free using BackWPup. It’s a reliable option to keep your site data safe without any added costs.
Why Create a WordPress Backup?
Backups are your first line of defense against any mishaps, hacking attempts, or malware.
We have learned this the hard way, and now we ensure that all our WordPress websites have automatic backups safely stored on multiple cloud locations.
Creating regular backups is essential for every website owner to ensure that important data stays safe, even if something unexpected happens.
From our experience, several factors can threaten your website’s data, including:
- Malware attacks that inject harmful code into your site.
- Ransomware that can lock and restrict access to your site data.
- Human or server errors lead to the accidental deletion of important files or data.
While it’s true that some WordPress hosting providers offer backups, we’ve found that these backups can be inconsistent and unreliable.
In some cases, hosting companies may even lose your data or suspend your account, leaving you without access. This is why we strongly recommend setting up your own WordPress backups for peace of mind.
Fortunately, you can automate the entire backup process using one of these trusted WordPress backup plugins to ensure continuous protection for your site.
Note: We use Duplicator on our own websites. It is a BackWPup alternative, and we use it for the following features:
- Secure backups with military-grade encryption
- Easier one-click restore points
- Multiple cloud storage options supported
- Easily clone and migrate WordPress websites
To learn more, see our complete Duplicator review.
That being said, let’s look at how to create a WordPress backup using BackWPup easily
Creating WordPress Backup Using BackWPup
For this tutorial, we will use BackWPup to create a free WordPress backup.
First, you need to install and activate the BackWPup plugin. For more details, see our tutorial on how to install a WordPress plugin.
Step 1: Create a Backup Job
Upon plugin activation, you need to visit the BackWPUP » Add new job page.
A job in BackWPup is a set of instructions you provide the plugin about the backup you want to make.
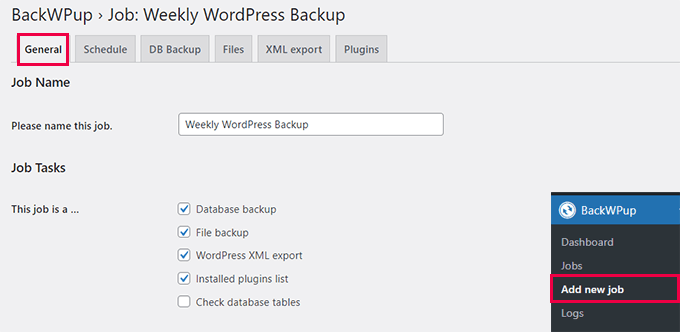
First, provide a name for your job. This could be anything that helps you remember what this backup does. In our example, we are using “Weekly WordPress Backup”.
Below that, select the tasks you want this backup job to perform. We recommend checking all the options.
Scroll down a little to the ‘Job Destination’ section. This is where you can select where you want to store the backup.
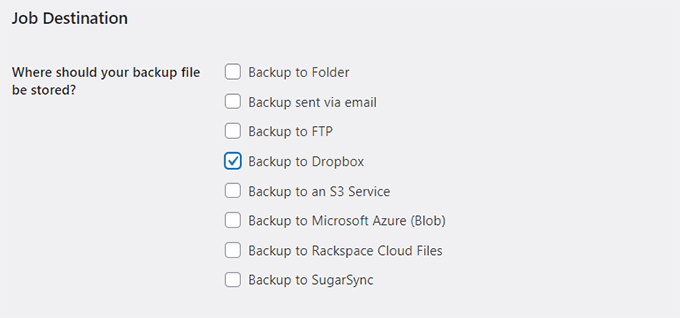
It can store backup files on your server, send them via email, back them up to FTP, and upload them to Dropbox, Amazon S3, Windows Azure, Rackspace, and SugarSync.
Whatever you do, DO NOT store the backups on your server. This defeats the purpose of creating the backup, which is to have a saved copy of your website stored elsewhere.
For this tutorial, we will be using Dropbox.
Choosing an option will add a new tab to the Job menu.
Important: Don’t forget to click on the ‘Save changes’ button to store your settings.
Now, switch to the new tab named after the destination where you want to store your backup. For instance, if you choose Dropbox, then you will see a tab titled ‘To: Dropbox’.
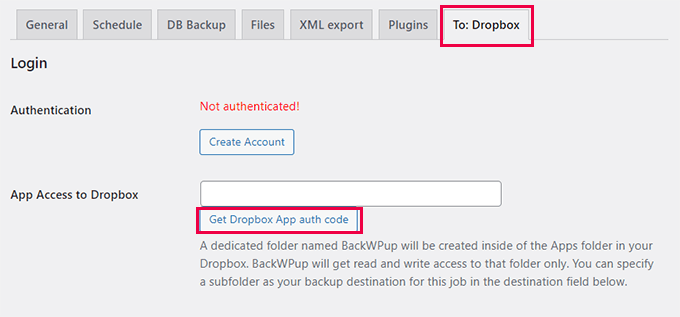
From here, you can configure your cloud account settings. For instance, if you selected Dropbox, then just click on the ‘Get Dropbox App auth code’ button to set it up. Then, you will be prompted to allow the app access to your Dropbox account and set up a folder for your backups.
After that, click on the ‘Save changes’ button to save your settings.
Step 2: Schedule Your Backup
Next, you need to switch to the Schedule tab. Under the ‘Start job’ option, choose the ‘with WordPress cron’ option.
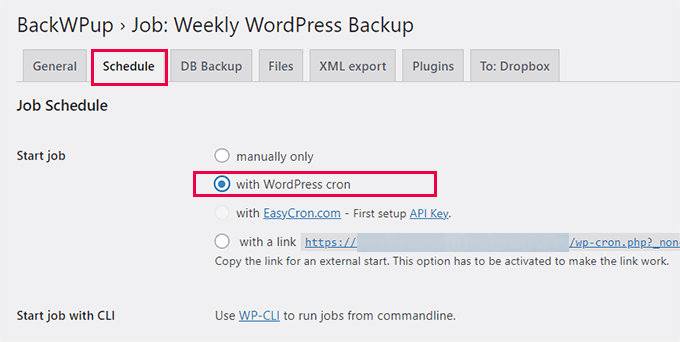
WordPress cron is the built-in WordPress system that is used to run scheduled tasks.
Now, scroll down a little and choose your backup job frequency. We recommend choosing a weekly or monthly schedule, depending on how frequently you update your website content.
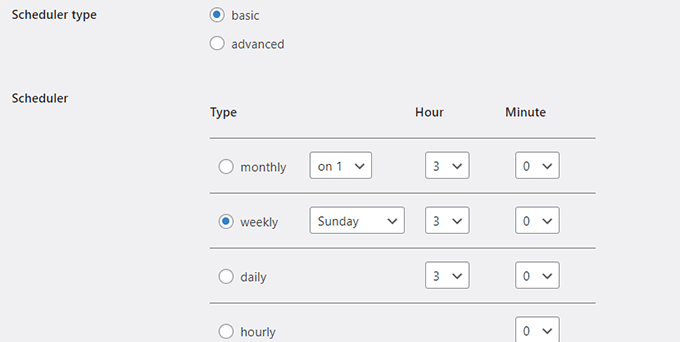
After that, click on the ‘Save changes’ button to store your settings.
Step 3: Select What to Include in the Backup
Now, you need to choose what you want to include or exclude from the backup.
Switch to the ‘DB Backup’ tab and choose the tables you want to include in your backup. If you are unsure, then you should select all the tables.
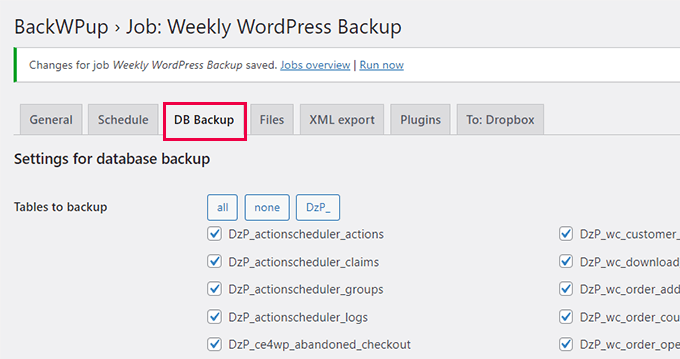
Click on the ‘Save changes’ button to store your settings.
Afterward, switch to the ‘Files’ tab. From here, you can choose which files to exclude from your backup.
If you are unsure, then leave the default options as they are.
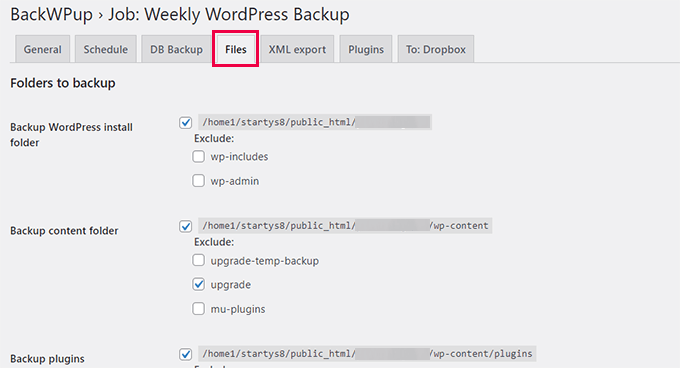
Again, click on the ‘Save changes’ button to store your settings.
Now, you need to switch to the ‘XML export’ tab. From here, you can generate a WordPress-compatible XML export file of all your content.
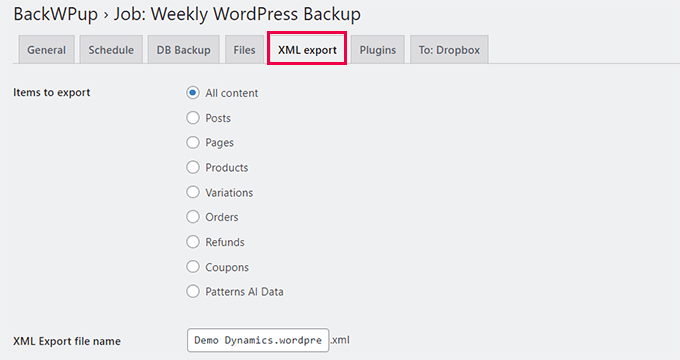
Default options will work for most websites.
Save your changes and then move to the ‘Plugins’ tab.
Here, the backup plugin will generate a text list of all the plugins installed on your WordPress website.
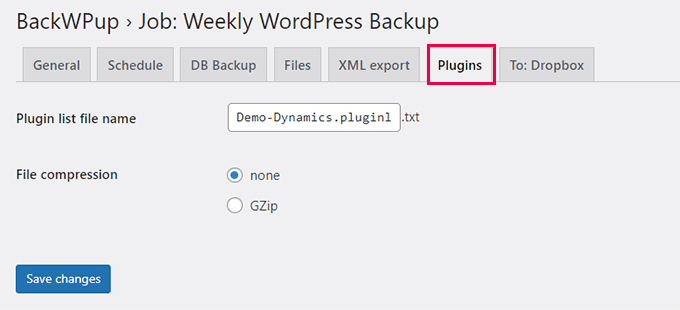
Finally, click on the ‘Save changes’ button to store your settings.
Step 4: Run the Backup Job
Now that you have created a backup job, you need to run it for the first time.
Go to the BackWPup » Jobs page and click on the ‘Run now’ link below the job you created earlier.
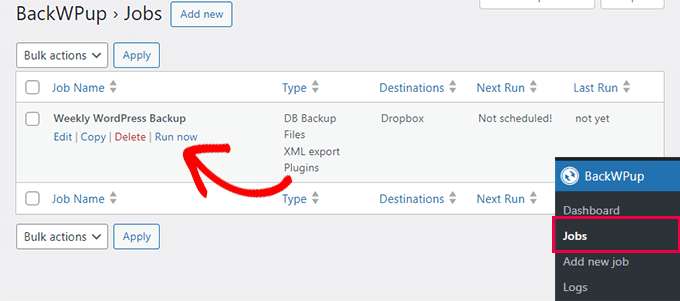
The plugin will now run the backup job and show you the progress.
This may take a while, depending on the size of your website. Once it has finished, you will see a success message.
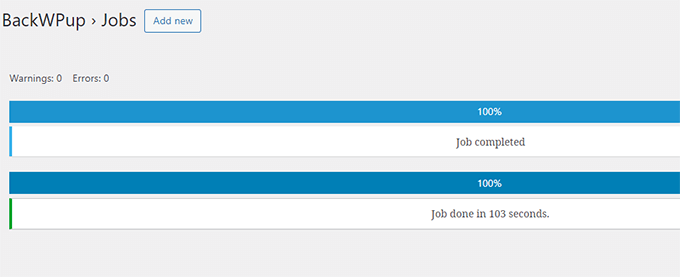
You can now verify the backup file by visiting the destination source (like Dropbox or the other storage option you chose earlier).
Troubleshooting WordPress Backup Jobs in BackWPup
Running a backup job may cause an extra load on your hosting server. This can result in unfinished backup jobs.
Also, on most shared hosting services, there is a limit to how much time or memory a script can consume. When your server stops BackWPup for crossing the time or memory limit, it waits for a while and then resumes the process. In this case, it will take a while for a backup job to finish.
The first thing you should do to fix this is increase your PHP memory limit, then go to BackWPup » Settings and click on the ‘Jobs’ tab.
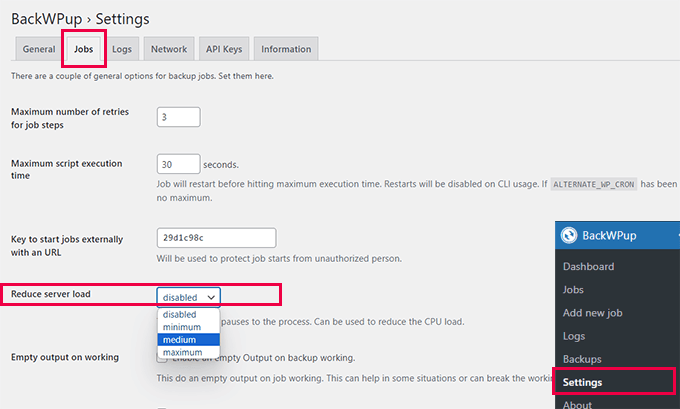
Increase the ‘Maximum number of retries for the job steps’ option. The default value is 3, and you can increase it to 5 and see if this works for you.
After that, you must scroll down to the ‘Reduce server load’ option and select either the ‘medium’ or ‘minimum’ server load option.
Finally, make sure to click the ‘Save changes’ button at the bottom to store your settings.
Restoring Your Website From Backup
BackWPup offers an easy way to restore your website.
First, you need to go to the BackWPup » Backups page and click ‘Download’ under the backup you want to restore.
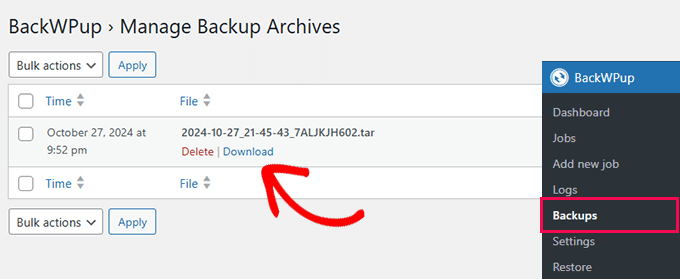
Once you have downloaded the backup file, you will be able to restore it.
Simply go to the BackWPup » Restore page and click the ‘Select Archive’ button to upload the backup file you downloaded earlier.
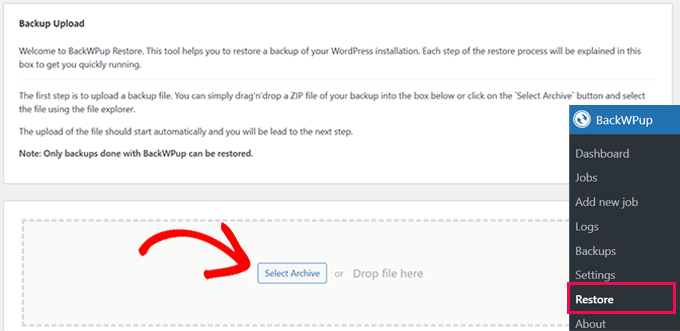
Note: BackWPup can only restore backups created using BackWPup plugins.
Once you upload the backup file, the plugin will extract the data and restore your website from the backup.
Troubleshooting:
In case your BackWPup restore fails for some reason. You can still manually restore your website from the database and file backup.
For detailed instructions, see our article about how to restore WordPress from backup and follow the manual restore instructions for database and WordPress files.
If you would like a WordPress backup plugin with an easier restore option, we recommend Duplicator. There is also a free version of Duplicator with fewer backup options.
Additional Backup Resources:
The following are some additional useful resources to help you manage your WordPress website backups:
- How to Make a WordPress Database Backup Manually (Step by Step)
- How to Restore WordPress Using Database Backup Only
- How to Backup Your WordPress Site (5 Easy Ways)
We hope this article helped you create a complete WordPress backup with BackWPup. You may also want to see our WordPress security guide for more tips for protecting your website or our expert pick of the best WordPress security plugins to protect your site.
If you liked this article, then please subscribe to our YouTube Channel for WordPress video tutorials. You can also find us on Twitter and Facebook.


Eloise
BackWPUp just changed the way the plugin accesses / stores backup files in Dropbox. The info they have given is pretty rubbish! Please can you update this article to reflect those changes, and advise users on how best to re-connect BackWPUp with Dropbox? Cheers!
WPBeginner Support
We will certainly look into updating this article. If you reach out to BackWPUp they should be able to help and clarify on anything that is confusing in their documentation as well
Admin
Duncan McCormack
Hey guys, I’ve just had a look at this backup plugin on its page.
You have to BUY the pro version to do a RESTORE!!!
That right??? Sure reads that way to me.
WPBeginner Support
They created a method to restore the backup using the plugin rather than manually and that feature they are requiring pro, you can still restore your site manually without the pro version.
Admin
James
In the dropbox tab, for me today 2/10/19, next to the Authentication it said ” not Authenticated “, and said create an account. but i already have an account so it would not give me the allow the plugin option. However, I clicked on the dropbox Authentication button, it then brought up my dropbox and it displayed a code. Copy and pasted that code into the box and it then went to the allow BackWPup. Just in case anyone else comes across that problem. But thanks for the tutorial, one of many that I use..
WPBeginner Support
Thanks for sharing this solution should someone else run into this error
Admin
Monika
Can this create a WooCommerce backup as well or do I need a specific plugin for that one?
Chris
If you cant see the re-authenticate option in your drop box account then you need to just click on the button below this one in your backup plugin settings. It will then prompt you to allow access and grant a code.
I had the same issue and it worked for me.
Chris
Eloise
Hi,
The layout on BackWPup seems to have changed bit since this article was written – the Jobs tab now seems to be called Schedule, and when I go in there I can’t find an option to set the number of server re-tries..?
Every other site I’m using BackWPup on works fine. But one site that I manage is having a few problems; the site is quite large, lots of plugins, and I keep getting error messages that ZIP files are not closing properly during execution. Any thoughts/revisions that might be helpful please?
Many thanks!
WPBeginner Support
Hi Eloise,
We will update the article. Meanwahile, please contact plugin support and see if they can help you out.
Admin
john moses
Nice writeup. Ihave done backup before but I wasn’t able to restore my Media Library images. When you bakup with this plugin, and you restore, will the will the media library images be restored too?
WPBeginner Support
Hey John,
Yes they will be included. However, make sure that you create a complete WordPress backup and not just the Database backup.
Admin
Ravi Dixit
A very helpful post.
Can you tell me how to save backups files to the local disk of the computer with BackWPup plugin?
moumita
wpbeginner, you are my only destination whenever I face any wp issues. Really cant imagine using wordpress without your help
Olga
Very useful! Thanks a lot ;-))
Pierre BLAZER
Hi there ! I just installed BackWPup, and I can see there are several possibilities to archive the backup in the GENERAL tab: ZIP, TAR, TAR GZIP etc. Afterward, under the DATABASE tab for example, the choice to compress is only: GZIP or NOTHING, so I’m a bit confused. What should I do if I chose ZIP as an archive? Should I choose GZIP ?? Thanks.
WPBeginner Support
Hi Pierre,
Yes, you should choose Gzip. It is a compression format just like zip.
Admin
anders
Does this have support with Azure ARM Storage. I get this error:
400 Value: The value for one of the HTTP headers is not in the correct format.
Seems like there is a issue with the API this version is using. Anyone have managed to do this successfully with ARM Cold Storage account?
Don Saroos
Thanks but one thing missing i cant actually connect to dropbox any little help will be highly welcomed
Aakarshit Choudhary
hey bro!
I am a wordpress begineer!
Please tell me how I can use this backup on my website if my website crashes?
Jane Bonney
I found the instructions fairly clear and helpful, although sometimes the phrasing could be a little better to make the instructions better.
When I backed up I got the following error mesages:
ERROR: Dropbox API: (56) SSL read: error:00000000:lib(0):func(0):reason(0), errno 104
ERROR: Job has ended with errors in 5150 seconds. You must resolve the errors for correct execution.
So what do I do please?
JANE BONNEY
I discovered this was because my dropbox was full. So the solution was simply to delete some of the media I had uploaded and not used or increase dropbox space allowance.
Rachel
Hi! Thanks for this great post! When creating a job – I say to back up to Dropbox but it doesn’t say ‘Reauthenticate’….It just says Create account. I already have a Dropbox account, so when I click on Create Account it doesn’t request permission as shown in this post, it tells me how much available space I have and prompts me to get more. I’m stuck on what to do.
Chris
same here for me too. I tried everything but not sure if its because you need to have a paid account that supports API integration.
Francis
I use BackWPup on my site and it shows it has backed up correctly and the test mail has also arrived but I do not get the backups sent to my email. I tried different email accounts but it doesn’t send anything unless there is an error. How can I get the backups sent to email and how can I download them? Thanks very much.
WPBeginner Support
Please contact the plugin support.
Admin
Nikhil Ganotra
Earlier I was using backupWordPress and it was consuming too much bandwidth. This plugin is awesome!
Deja
Hi, I have the same error: “Not expected HTTP response body: 429 Too many requests body { padding-top: 60px; /* 60px to make the container go all the way to the bottom of the topbar */ } Error 429 Too many requests”
Does anyone know the solution for this? Many thanks in advance.
Gil Andrei
Hi, on your past article you said that restoring WordPress from BackWPUp is simple, how would you do that? Thanks!
Sacha
Thanks for the great post, BackWPup looks like a very good option for me. But how would you restore from a backup?
Tracey
Another great post. I really don’t know what I’d do without your website. its he first thing I turn to if I get stuck with something on my blog! Many, many thanks.
Obidigwe Kenechukwu
Thanks for this great article, I love what you people.
I just got one question: what is the role of wordpress default “Blog import and export” as regard backing up of site?
Please I need to know.
Thanks once again.
Karan
Hello,
Does it really create a full backup including all the settings, posts, media etc? Will this backup enough to restore a completely formatted site?
Thanks
Karan
Melinda
Thanks for the article! I tried using this plugin message, but I received an error message when backing up.
Not expected HTTP response body: 429 Too many requests body { padding-top: 60px; /* 60px to make the container go all the way to the bottom of the topbar */ } Error 429 Too many requests
I’m not very knowledgeable about coding, can you help!
Anna
I’m exploring this topic because I’m about to set up my first WP site. I’m wondering, however, if every site really needs so much attention paid to back-up? Our site will essentially be static, that is, it’s not a blog so there are no posts, nor are there comments: its content comprises text and photos which are ours and are backed-up elsewhere.
I will be using a purchased theme so those files, as well, are elsewhere. Of course the entire site once created will position the photos and text according to the theme and that will involve customization and work. That I can see the value of backing-up, but a one-time ought to do it, no?
I’d appreciate someone experienced helping me clarify this! Thanks.
Leonid
If you have a static site, you don’t need WordPress for it. Just build HTML/CSS site.
Aniket
Hey
Thanks for coming up with an important topic. I am already using backwpup on my site.
I am using the dropbox option. But, the dropbox comes with a limited space of 2GB.
What should I do after this?
Should I delete some of the previous files to generate space? If yes, which files should I delete?
WPBeginner Support
You can download older backups to your computer.
Admin
Hasnain Abid Khanzada
Hello Bro,I Have Done All The Things But I Am Getting The Error When Trying To Run The Backup..The Error Is ” The HTTP response test get an error “Failure when receiving data from the peer “…Hope That You Will Solve The Problem.
Thanks.
WPBeginner Support
Please contact the plugin support. They will be able to help you better.
Admin
Andy Lawrence
Hey, I’ve been trying this for a while but when I run the script to back up, it doesn’t ever finish. I’ve followed all the instructions but it’s not working.
Kenrick
hi great summary! To bad i am getting this errorwhen I try to back up
ERROR: Signal 15 is sent to script!
How to fix this?
Thanks.
Ayesha
Thanks, I just backed up my site using this method, before I was just using another free backup plugin and this works just as well
Michale
Did you ever try to restore a site from a backup made using BackWPup? Since BackWPup doesn’t have a “Restore backup” option, that would be an interesting post..
Ziacinzia
HI, thank you for this article. I have an issue though, my dropbox is almost full and as my site grows, it takes more and more space, so I wonder what i should do when I run out of space? Is there a similar alternative to dropbox to save the backup jobs? Many thanks
WPBeginner Staff
You can purchase more space. Alternately you can try saving your backups to Google Drive.
Ziacinzia
I read that Google Drive does not encrypt files and is not a safe option. May I please have your view on that? Thank you