Many WordPress users have shared horror stories of lost data, hacked sites, and the frustration of not having a reliable backup when they needed it most.
We get it. The thought of losing your hard work is terrifying, and the technical jargon around backups can be overwhelming.
After running WPBeginner for over a decade, we’ve found tried and true ways to back up your website, even if you have no money. One of them is to use Google Drive.
In this tutorial, we’ll walk you through a free and easy method to safeguard your website. This way, you can leverage the 15GB of free cloud storage you already have with your Google account.
Why Back Up Your WordPress Site to Google Drive?
Backing up your WordPress website on Google Drive is important because it keeps a safe copy of your website. If something goes wrong, like a hacker messing things up or you accidentally delete something, you can easily fix it by restoring a backup.
Think of it like having a spare key for your website. If the main key doesn’t work, you use the spare to get things back to normal.
People also make backups before making big changes to their site, like editing their WordPress homepage or installing a new theme. This way, if something breaks, they can go back to the way it was.
Putting your backup on Google Drive is smart because it means even if a hacker attacks your main website or your computer, your backup is safe on cloud storage. Plus, it won’t use up space on your WordPress hosting plan.
Creating a Google account gives you 15GB of free space for backups and other files. If you need more space, you can get 100GB for just $1.99 per month.
With that in mind, let’s see how you can back up your website to Google Drive. You can use the quick links below to navigate through the tutorial:
How to Back Up Your WordPress Site to Google Drive Automatically
WordPress does not come with a built-in backup solution. However, there are several great WordPress backup plugins that make it easy to back up and restore your site.
UpdraftPlus is one of the best backup plugins for WordPress. This free plugin lets you create scheduled backups, so you can automatically back up your WordPress site to Google Drive.
Alternative: If you’re looking for a premium solution with advanced features, we highly recommend Duplicator Pro.
Besides Google Drive backups, you will also get recovery points to quickly roll back to a previous version of your site and an easy site importer via a URL.
Step 1: Set Up UpdraftPlus and Connect It With Google Drive
First, you’ll need to install and activate the UpdraftPlus plugin. For more details, see our step-by-step guide on how to install a WordPress plugin.
Once you’ve activated UpdraftPlus, you can configure your backup settings and choose Google Drive as a storage destination.
To do this, head over to UpdraftPlus Backups in your WordPress dashboard. Then, simply click on the ‘Settings’ tab.
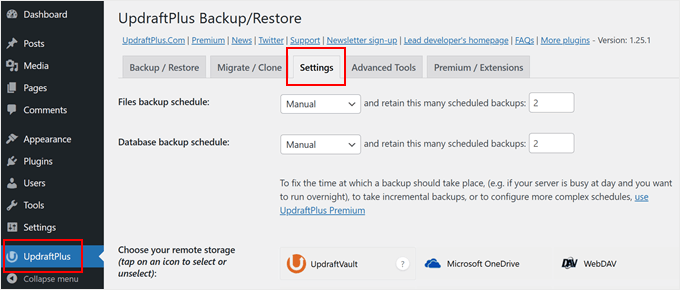
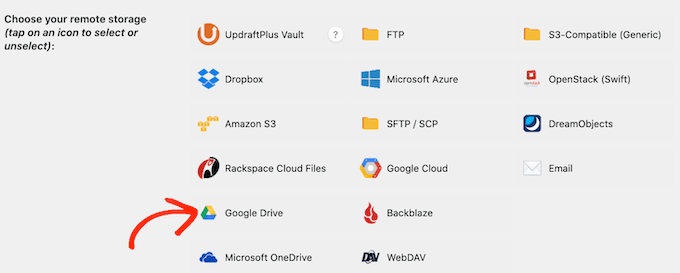
UpdraftPlus makes it easy to save your backups to different online storage services including Dropbox, Amazon S3, Microsoft OneDrive, and many others.
Since you want to back up your WordPress site to Google Drive, go ahead and click on ‘Google Drive’ in the section titled ‘Choose your remote storage.’
After choosing Google Drive as your storage location, you’ll need to give UpdraftPlus access to your Google account.
To get started, click on the ‘Sign in with Google’ button.

Now, follow the onscreen instructions to give UpdraftPlus access to your Google account.
After reading the disclaimer, you can click on ‘Complete setup’ if you’re happy to go ahead and authorize UpdraftPlus access to your Google Drive.
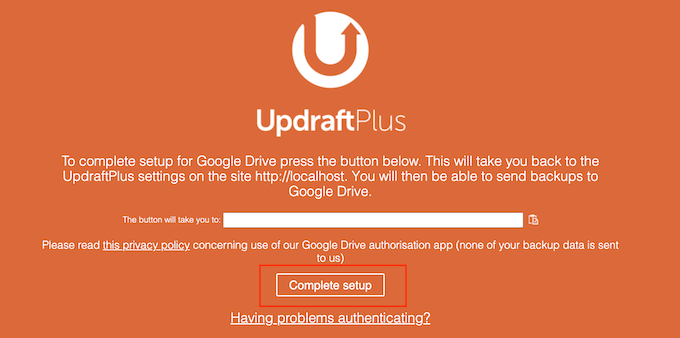
Once you’ve done that, UpdraftPlus will take you back to its main settings page in the WordPress dashboard.
Step 2: Create an Automatic WordPress Backup Schedule
After choosing Google Drive as your storage location, you’re ready to create an automatic backup schedule.
Still in the ‘Settings’ tab, scroll to the bottom of the page and click on the Save Changes button. UpdraftPlus will now automatically back up your site based on your schedule.
UpdraftPlus breaks WordPress backups into two parts: files and database.
Let’s start with files. As part of this backup, UpdraftPlus will create a copy of your site’s code files, plugin and theme files, and images.
To get started, simply open the ‘Files backup schedule’ dropdown and choose how frequently UpdraftPlus should back up your WordPress website.
You can choose from once every month, right through to once every 2 hours.

When creating a schedule, think about how often you update or add new content to your site. For example, if you publish two blog posts each week, then you may want to back up your WordPress blog once a week instead of daily.
If you update your site more frequently, then you’ll need to backup more frequently.
In particular, if you run an online store then you’ll typically want to back up your site as often as possible. This way, you can avoid losing important information such as new orders or a customer’s payment details.
After choosing a frequency for your backups, you’ll need to choose how many different backups UpdraftPlus should keep. This will help you optimize the storage space you use.
You can do this by entering that number into the text field next to ‘…retain this many scheduled backups.’

You can change these settings at any point, so if you’re unsure then you can start by saving a larger number and then reduce it if the backups are using too much space.
Once UpdraftPlus reaches your set number, the plugin will replace the oldest copy with newer WordPress backups.
Next, you need to create a backup schedule for your WordPress database in the ‘Database backup schedule’ section.
WordPress stores all of its posts and pages, comments, links, and website settings in the database, so it’s just as important to create backups of the database regularly as it is for the files.
You can tell UpdraftPlus how frequently it should make backups of your database, and how many of them it should keep by following the same process described above.

Step 3: Choose What to Back Up on Google Drive
By default, UpdraftPlus will include all your WordPress plugins, themes, and uploads in your Google Drive backups.
In the ‘Settings’ tab, scroll down to the ‘Include in files backup’ section. Here, you can choose whether to include WordPress themes, plugins, or uploads in your backup.
To create a complete clone of your WordPress website, you’ll want to leave the default 3 checkboxes selected.
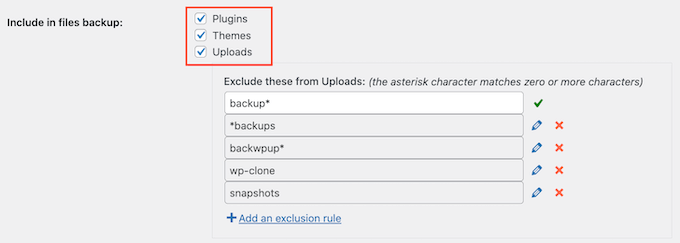
If you don’t need to include plugins, themes, or uploads in your backups, then you can just uncheck the box next to that setting. Doing so can reduce the size of your backups and take up less space on your Google Drive.
If you leave the ‘Uploads’ box checked, then you can create some rules about the kind of uploads that UpdraftPlus will exclude from its backups.
There are already some exclusion rules. For example, the plugin defaults to excluding all files that have the word ‘backup’ in their file name. To create more rules about the kind of content UpdraftPlus will exclude, simply click on ‘Add an exclusion rule.’
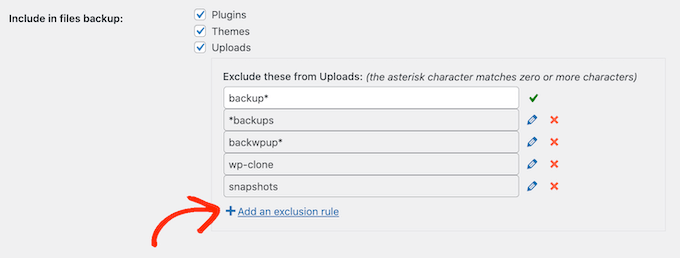
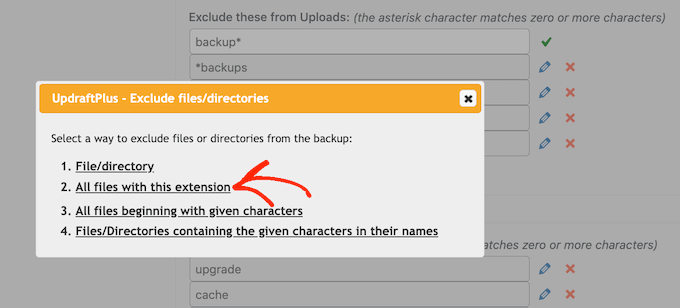
You can then follow the onscreen instructions to create your exclusion rule.
For example, if you wanted UpdraftPlus to ignore all PDF files, then you would start by clicking on ‘All files with this extension’ and type ‘PDF’ in the field that appears.
By default, UpdraftPlus also excludes some files from the wp-content folder.
You can see all of UpdraftPlus’ default exclusion rules in the ‘Any other directories found inside wp-content’ section.
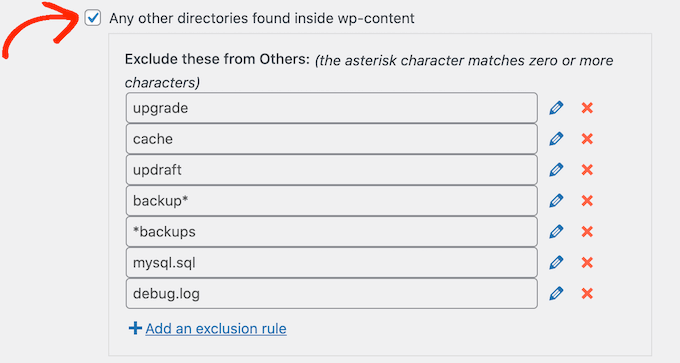
Do you need UpdraftPlus to exclude even more content from the wp-content folder? Simply click ‘Add an exclusion rule’ in this section and repeat the same process described above.
If you’re not sure about what to exclude, then we recommend sticking to the default settings. They are a good fit for most websites.
Don’t forget to click on the ‘Save’ button at the top to store your changes.
How to Know if an UpdraftPlus Backup to Google Drive was Successful?
Every time UpdraftPlus successfully creates a backup, it can send an email notification to your site’s admin email address that confirms the backup has been completed. If a backup fails, then you won’t get an email.
In the ‘Settings’ tab, scroll to the ‘Email’ section. You can now enable these notifications by checking the box in this section.

Now, every time UpdraftPlus creates a backup it will send you an email notification.
Once you’ve done all that, click on ‘Save Changes.’ UpdraftPlus will now back up your site to Google Drive automatically.
If you don’t get any emails from UpdraftPlus, then it’s a good idea to check that the plugin is successfully creating backups in your Google Drive.
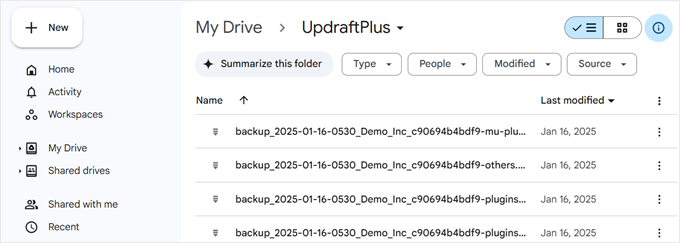
If you’re using the free version of UpdraftPlus, then you should find a new ‘UpdraftPlus’ folder in your Google account. Simply open this folder to see whether it contains any WordPress backups.
In the following image, you can see an example of how a few backups may look in your Google Drive account.
If UpdraftPlus is creating its backups successfully, but you’re not receiving the email notifications, then there is most likely a problem with how your emails are configured on your WordPress site.
To solve this, you can install the WP Mail SMTP plugin, which has solved WordPress email deliverability issues for over 3 million websites. Read our guide on how to fix WordPress not sending emails to ensure they are sent correctly.
How to Back Up Your WordPress Site to Google Drive Manually
Automated backups are a great way to protect your site. However, even after creating an automatic schedule you may sometimes still need to create a manual backup.
It’s a good idea to create a manual backup before making any big changes, such as updating your version of WordPress. You might also create a manual backup after publishing lots of new content.
To create a backup of your WordPress site on Google Drive manually, go to UpdraftPlus Backups. You can then simply click on the ‘Backup/Restore’ tab.
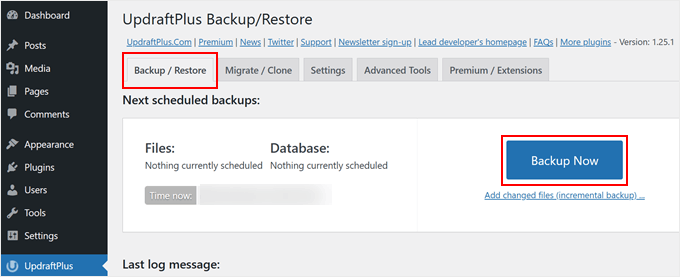
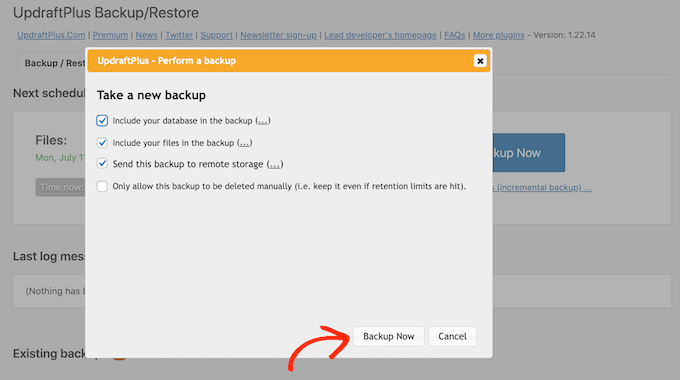
To go ahead and create a manual backup now, you just need to click on the ‘Backup Now’ button. UpdraftPlus will show some basic settings that you can use to configure the manual Google Drive backup.
As with an automated backup, UpdraftPlus defaults to backing up all of your files and the WordPress database. It will also use the same remote storage location that you use for your automated backups. For us, this is Google Drive.
The default settings should be good enough for most websites, so when you’re ready click on the ‘Backup Now’ button.
How to Restore Your WordPress Backup From Google Drive
Creating backups with UpdraftPlus is easy, but the really useful part is the ability to restore the backups from Google Drive with the same ease.
If your WordPress site was hacked or you just want to start fresh, then the first step is deleting everything and installing WordPress again.
Once you’ve done that, you will need to install and activate the UpdraftPlus plugin again on your new WordPress website. If you need help, then please see our guide on how to install a WordPress plugin.
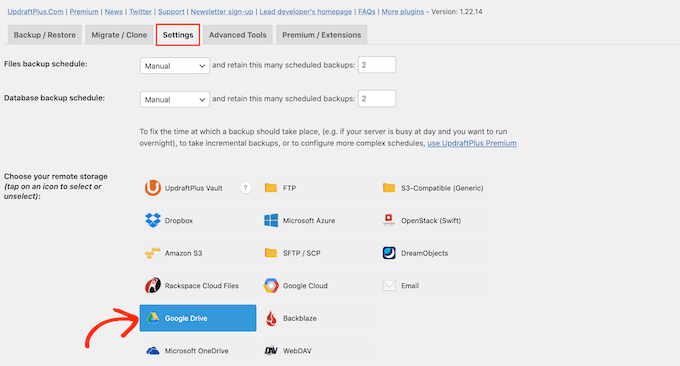
Upon activation, head over to Settings » UpdraftPlus Backups page and click on the ‘Settings’ tab.
In the ‘Choose your remote storage’ section, click on Google Drive.
You can now follow the onscreen instructions to give UpdraftPlus access to the Google account where you saved all of your website’s backups in Drive.
After connecting UpdraftPlus to your Google account, click on the ‘Backup/Restore’ tab.
UpdraftPlus will now scan your Google Drive and list all the backups that it discovers. Once complete, you can simply find the backup that you want to restore and click on ‘Restore.’

After that, choose the components that you want to restore. If you are restoring to a fresh WordPress installation, checking all the boxes is probably the best idea.
After choosing your components, go ahead and click on the ‘Next’ button.
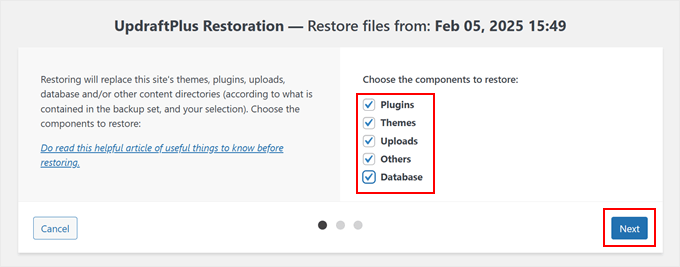
UpdraftPlus will now get all the files that it needs to restore the WordPress backup from your Google Drive.
Once it’s successfully imported all the files it needs, you just need to click the ‘Restore’ button. UpdraftPlus will now restore your backup from Google Drive.
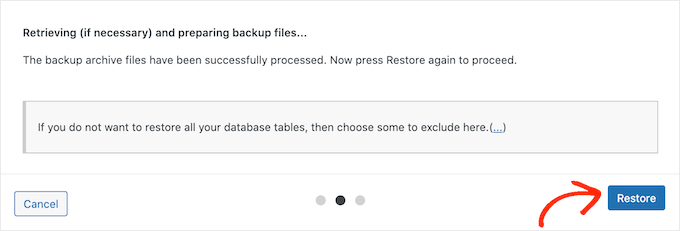
This may take a few minutes depending on the size of your backup, and the speed of your Internet connection.
Once it’s finished, you’ll see a ‘Restore Successful’ message at the end of an Activity log. At this point, you can click the ‘Return to UpdraftPlus configuration’ button to return to the settings and finish things up.
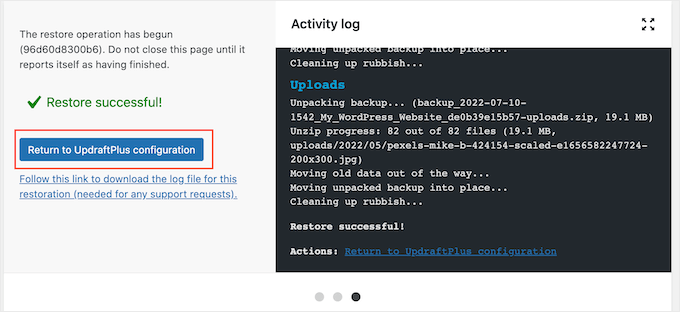
That’s it! You’ve now successfully restored your WordPress website from Google Drive.
Need a More Secure Backup? Check Out Our Pro Maintenance Services
Worried about the safety of your WordPress site? Our WPBeginner Pro Maintenance Services offer more than just backups. We provide a comprehensive solution to keep your website secure, up-to-date, and running smoothly.

Here’s what you get:
- 24/7 expert WordPress support
- Comprehensive security monitoring
- Regular updates and cloud backups
- Performance optimization
- Detailed maintenance reports
- Dedicated account manager
As a business owner, you shouldn’t have to stress about website technicalities. Let us handle the behind-the-scenes work while you focus on growing your business.
If you’re ready to safeguard your WordPress site with expert care, you can book a free consultation call with our team today.
We hope this article helped you learn how to back up your WordPress site to Google Drive. You can also go through our guide on how to make a WordPress disaster recovery plan and the most common WordPress errors and how to fix them.
If you liked this article, then please subscribe to our YouTube Channel for WordPress video tutorials. You can also find us on Twitter and Facebook.


Olaf
When it comes to website backups, it’s important to ensure they are, first, automatic and, second, stored outside the website’s FTP. There’s a security reason for this, if the entire FTP content is deleted or the provider shuts down the site for some reason… there are many possible issues. This solution offers both automatic backups and off-FTP storage, making it ideal for regular backups.
Dmitro Yaroshenko
One of the best tutorials for back up I have ever seen, Thank you!
WPBeginner Support
You’re welcome!
Admin
Dennis Muthomi
This comprehensive guide on backing up WordPress sites to Google Drive is incredibly valuable, especially for those of us who’ve experienced the panic of data loss.
One thing I found particularly useful was the advice on creating exclusion rules for backups.
As someone who manages a media-heavy site, I’ve learned the hard way that backing up everything can quickly eat up storage space.
The tip about excluding certain file types (like PDFs) is a game-changer for optimizing backup size.
Thank you for this detailed guide.
Corrado
Doing the backup this way does not prevent situation when a hacker is taking control over your website as an admin and goes to the UpdraftPlus settings and manually cancels all the backups saved at the Google Drive (or the other online drive), isn’t it? So I guess we should also make a copy of the backups created at the Google Drive UpdraftPlus backups folder and archive them in the other folder or tjhe other place (computer drive for example), where there is no access from the website cockpit.
WPBeginner Support
Most hackers would try to automate the actions rather than manually editing your content but for safety it can be a good idea to store a copy of your backups to be extra certain.
Admin
Mrteesurez
This guide is indeed useful as Google drive provide free storage of 15GB when most beginners bloggers run on low budget in the start. I have created a backup of one of my blogs with this method to Google drive. Thanks for sharing this guide.
Clayton
I’m guessing the updraftplus folder will only show in the drive if a backup has been made. Just implemented the settings, but still no folder in the drive.
WPBeginner Support
If it was not created with installation then it should be visible after creating a backup
Admin
Jiří Vaněk
From my own experience, I’d just like to add that with this plugin, you need enough space on FTP for the backup. The plugin backs up the entire website by temporarily uploading it to an FTP folder, from where it’s then sent, for example, to the cloud. You must have at least as much (preferably more) free space on FTP as the size of the website itself. Otherwise, the backup will fail.
Israel King
AWESOME.
Thank YOU so much.
Keep up the god work.
WPBeginner Support
Glad you found our guide helpful!
Admin