When we first started helping Etsy sellers build their WordPress sites, many thought they had to choose between Etsy or their own website. The truth is, you can use both platforms together to maximize your sales potential and build a stronger brand presence.
We’ve discovered that the key to success isn’t just displaying your Etsy products on WordPress – it’s about creating a seamless experience that makes it easy for customers to buy your products.
The easiest way to do this is with a plugin. After testing different options, we’ve found that the free Etsy Shop plugin works best. It’s simple to use and helps you connect your store without any hassle.
In this article, we will guide you through the easy steps for adding your Etsy store to WordPress.
Why Add Your Etsy Store in WordPress?
Etsy shops are somewhat limited in features when compared to other popular eCommerce platforms. This is because Etsy is an online marketplace for creative goods, while WooCommerce and Shopify are complete eCommerce platforms.
Etsy shops have strict product guidelines with limited payment options, which may not be available in many countries. You also don’t have the ability to add advanced features to your Etsy Shop like you can do with a WooCommerce online store.
However, Etsy offers you more exposure to a niche clientele looking for handcrafted, artistic, and unique products. It’s very easy to use, and you don’t have to spend much time finding customers and converting leads because they are already on the site.
If you want to expand your business, then you may want to use WordPress to create a website to showcase your Etsy shop products better.
With that in mind, let’s take a look at how to easily add your Etsy store to WordPress.
Adding Your Etsy Store in WordPress
The first thing you need to do is install and activate the Etsy Shop plugin. For more details, see our guide on how to install a WordPress plugin.
Upon activation, you need to go to Settings » Etsy Shop and enter your Etsy API key to connect your shop with the plugin.
Note: If you don’t have an Etsy API key, then simply follow the link to get one from your Etsy store.
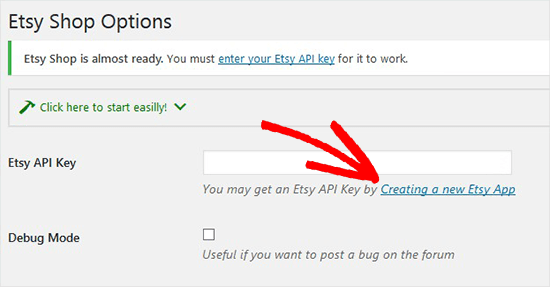
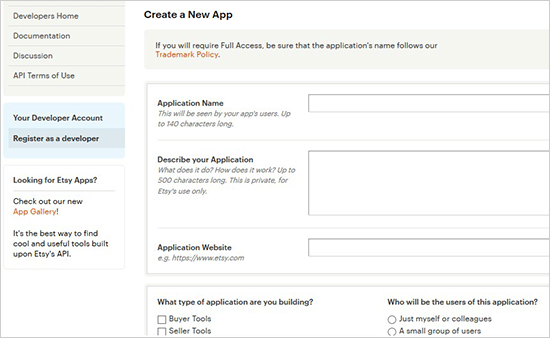
Once you click on the link, it will ask you to create a new app, which is just another term for your WordPress shop.
You’ll need to add the name of your shop, describe it, and then add your WordPress site URL.
After that, you need to select the best choices for your website and then click the ‘Create App’ button below.
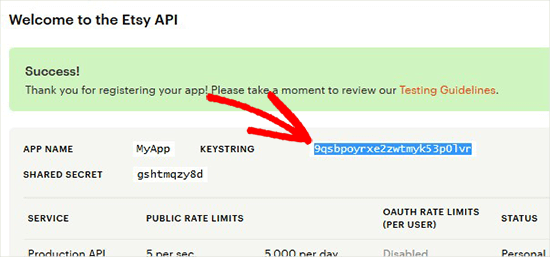
You will now see a success message with your Etsy API key.
Go ahead and copy the key from here.
Next, you need to go back to your WordPress admin area and paste the Etsy API key.
Once done, click the ‘Save Changes’ button, and the plugin will validate your API key and connect to your Etsy shop.
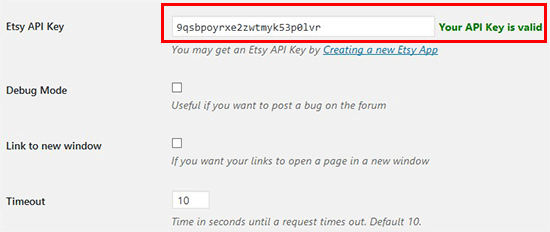
After connecting your Etsy store successfully, you can display and sell products from your Etsy shop right on your WordPress blog.
To add the Etsy store products to WordPress, you’ll need to create a new page or edit an existing page.
In the content editor, let’s click the ‘+’ button to add a ‘Shortcode’ block to your new store page.
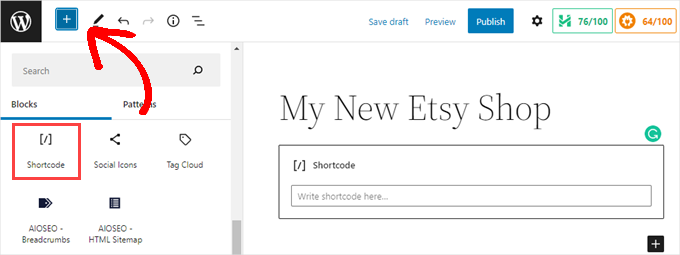
Then, you will just paste the following shortcode into the field. Don’t forget to replace the shop name and section ID in this shortcode with your Etsy shop name and ID.
[etsy-shop shop_name="MyShopUSDesign" section_id="55895579"]
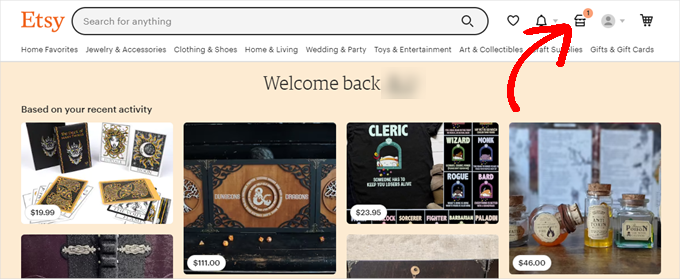
To get the ‘Shop Name’ and ‘Section ID,’ you need to go to the Etsy homepage and log in to your account.
You want to do this in a new window or tab so you can return to your WordPress site and paste the ‘Shop Name’ and ‘Section ID’ into the shortcode.
Then, on the Etsy homepage, you can click on the ‘Shop Manager’ icon at the top-right corner of the screen.
On the next screen, you need to scroll to the bottom of the left-hand menu.
Let’s click the link in the left menu to access your shop. The ‘Shop Name’ will be the one you choose when creating the shop. It will be displayed in small, light-grey text.
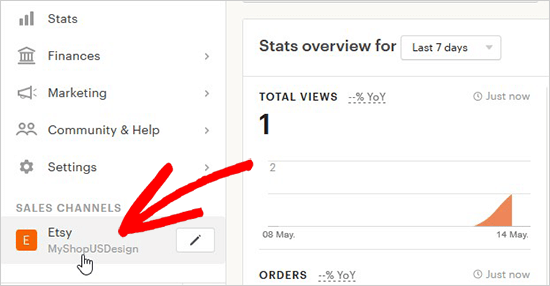
You’ll want to copy that down so that you can enter it in the shortcode when you return to WordPress.
Next, you’ll need to click on the ‘Edit Shop’ button.

From here, you’ll visit your Etsy store’s homepage to find your ‘Section ID.’
Note that you must already have sections created for your shop for this to appear.
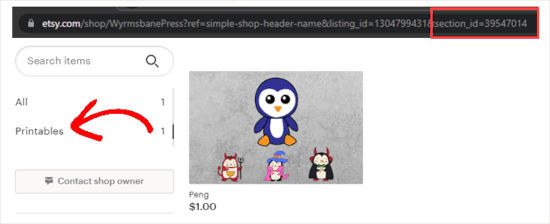
To the left of your shop’s main page, navigate to the ‘Items’ area, and beneath the search field, click on a section. Now, as you can see in the image above, the section ID will be in the URL field of your browser.
Go ahead and copy the ID, and then return to your WordPress website.
You are now able to add the ‘Shop Name’ and ‘Section ID’ to the shortcode block on the page you created.
Be sure to click ‘Update’ or ‘Publish’ to store your settings.
Now, when you visit that page on your WordPress site, the products within that section are displayed for your users to purchase.
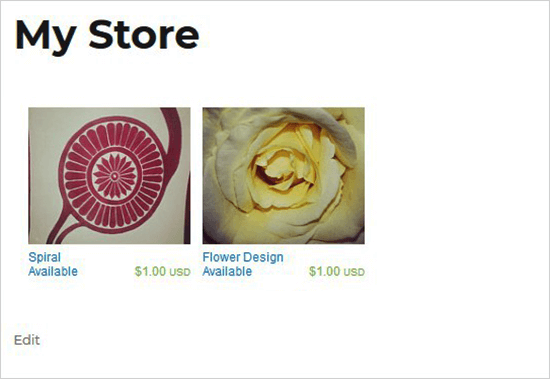
You can add the same shortcode to multiple posts or pages in WordPress to display different sections and products from your Etsy shop. Just make sure that you change the section ID in the shortcode.
Bonus Tip: Creating an Etsy-Like Store with WordPress
Want to create an Etsy-inspired store instead?
We all probably know that Etsy is a popular marketplace for selling handmade and unique items like crafts, jewelry, and clothing. One downside is that Etsy has limited features and takes a cut of your earnings.
WordPress, on the other hand, is a powerful website builder that lets you create eCommerce stores using WooCommerce.
You can sell anything, including physical and digital products, without paying listing or transaction fees. Plus, WordPress offers more flexibility for growing your business.
For more details, you can read our guide on how to create an Etsy-like store with WordPress.
We hope this article helped you learn how to add your Etsy store in WordPress. You may also want to see our expert list of the best eCommerce solutions growing in popularity or our guide on how to choose the best products to sell online.
If you liked this article, then please subscribe to our YouTube Channel for WordPress video tutorials. You can also find us on Twitter and Facebook.


Linda Banning
I read your very helpful article here on installing the Etsy plugin, however when I followed the download link, this message appeared:
“This plugin hasn’t been tested with the latest 3 major releases of WordPress. It may no longer be maintained or supported and may have compatibility issues when used with more recent versions of WordPress.”
I contacted the author, but I thought you should know. Are there alternatives?
Thanks, Linda
WPBeginner Support
It appears that the author has updated their plugin since your message. For that specific message we would recommend taking a look at our guide below that explains the reasoning behind the message and why contacting the author like you did is a good practice
https://www.wpbeginner.com/opinion/should-you-install-plugins-not-tested-with-your-wordpress-version/
Admin
Cynthia
Am I stupid or something? I see this:
Note: If you don’t have an Etsy API key, then simply follow the link to get one from your Etsy store.
Then the next sentence is: Once you click on the link, it will ask you to create a new app
What link!?
WPBeginner Support
You are not stupid, the link is in the plugin itself. Our screenshot has an arrow pointing to the link in the plugin
Admin
Ravi
Thanks for the Post. Its useful for me to Replicate my Etsy Store Products to my Woocommerce Website.
WPBeginner Support
Glad to hear our guide was helpful!
Admin
Jenn Summers
Hi, I followed your tutorial thank you so much. I seem to have a glitch though. My listings appear but the writing under each is all smushed together. Any advice on how to fix this?
WPBeginner Support
We would recommend checking with the plugin’s support to see if there is a styling issue
Admin
Gregory
Do you create the etsy shop first?
Thanks all the world.
WPBeginner Support
If you haven’t created the etsy store yet, we would recommend first taking a look at our article below:
https://www.wpbeginner.com/wp-tutorials/how-to-create-an-etsy-like-store-with-wordpress-step-by-step/
Admin
Keith
Thanks for posting this walkthrough, I’ve installed it and it works great. I’m going back through some of my evergreen content to add my shop link to the base of those posts. Thanks again.
WPBeginner Support
You’re welcome, glad our guide was helpful
Admin
venkat
hai sir is there any plugin to remove or rewrite watermark and links in pdf files
avo
You mentioned that you can sell your Etsy products right on your Wordpress site once they are connected. So the look and feel will be the same as that of your shop on Etsy itself? How about the customer interaction part? On Etsy, there’s this feature called Conversations where customers reach out with questions. Does that appear on your WP site too? Perhaps you could talk more about what appears on the WP site, just the products or other features on your Etsy shop as well? How about all the fees that you incur when an order occurs? Will you still have to pay all the fees even though the order takes place outside the Etsy shop now?