Are you looking to add a Stripe donate button to your WordPress site?
At WPBeginner, we’ve helped countless users integrate secure and efficient payment solutions into their websites. Stripe stands out as one of the top online payment processors globally, making it incredibly easy to accept online payments, including donations.
In the past, adding payment options required complex eCommerce plugins. However, for those looking to collect donations or sell a few products, a simple payment form is all you need.
In this article, we’ll guide you through the process of adding a Stripe donate button to your WordPress site.

What You Need to Accept Stripe Donations on Your Website
You’ll need to create a Stripe account. You can create an account for free and will only be charged for transactions.
You’ll also need a WordPress website with SSL enabled. SSL adds a security layer to your website making it safe for accepting payments. To learn more, see our guide on how to get a free SSL certificate for your website.
Lastly, you’ll need a WordPress extension to connect your Stripe account. We’ll show you two different options, WP Simple Pay (free) and WPForms (Pro), so you can choose the one that best suits your needs.
We will also share a bonus plugin that offers full-donor management features if you’re looking for a more advanced solution.
That being said, let’s take a look at how to add a Stripe donate button in WordPress.
Video Tutorial
If you don’t like the video or need more instructions, then continue reading.
Method 1. Adding the Stripe Donate Button in WordPress with WP Simple Pay
WP Simple Pay is one of the best Stripe payment plugins for WordPress. You can use it to easily accept one-time or recurring donations on your website.
You can quickly get started with the free version of the plugin. But for the sake of this tutorial, we’ll be using the premium version so we can demonstrate all the additional features.
First, you need to install and activate the WP Simple Pay plugin on your WordPress site. For more details, see our step-by-step guide on how to install a WordPress plugin.
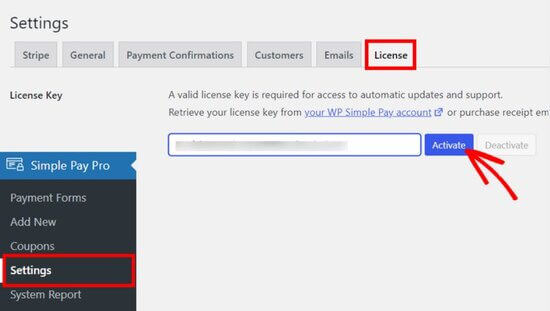
Once the plugin is activated, you need to go to the WP Simple Pay » Settings page and click on the License tab.
Copy the license key from your account on the WP Simple Pay website, paste it into the field provided, and hit the ‘Activate’ button.
Next, you need to connect your Stripe account.
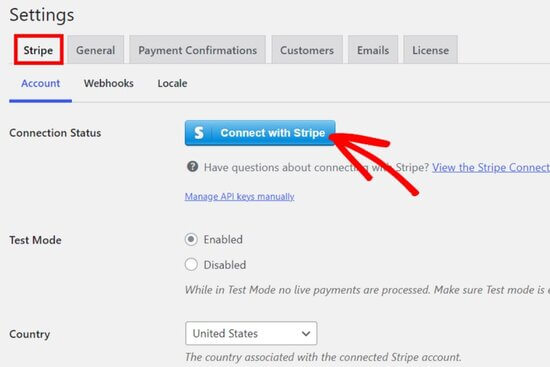
On the Settings page, click the Stripe tab and then click on the ‘Connect with Stripe’ button.
After that, you’ll see the Stripe website where you can log into your account.
If you don’t have a Stripe account, you can create a new one.

When you’re finished connecting your account, you’ll be taken back to the settings page on your admin dashboard.
Don’t forget to click on the Save Changes button to save your Stripe account connection.
Now, you can create a Stripe donation form.
Creating a Stripe Donation Form in WordPress with WP Simple Pay
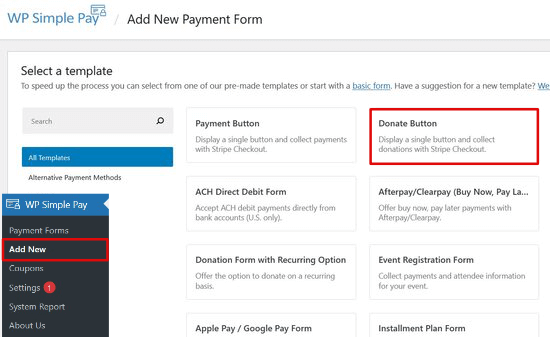
To create a new donation form, go to the WP Simple Pay » Add New page. From here, you can select a template to speed up the process of making a form.
Hover over the Donate Button template option and click the ‘Use Template’ button.
Next, you’ll see the General Settings tab for your donation form.
This is where you can add a form title and description, as well as choose the form type.
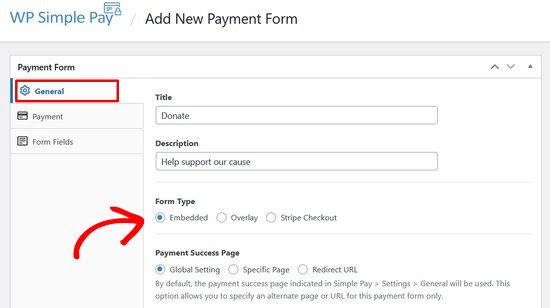
For this tutorial, we’ll choose the ‘Embedded’ form type. This will allow you to embed the donation form directly on any WordPress post or page.
Next, click on the Payment tab. WP Simple Pay allows you to add multiple donation options so that donors can choose how much they want to give.
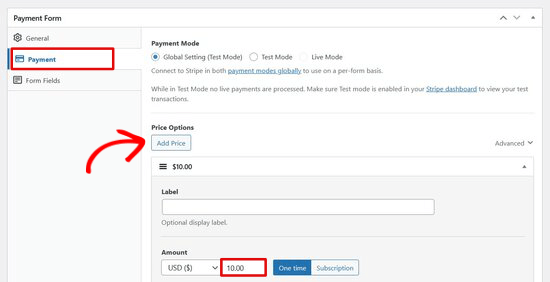
For example, you can create donation options for $1, $5, and $10. Simply click the ‘Add Price’ button and enter the amount. Repeat this process to add as many options as you want.
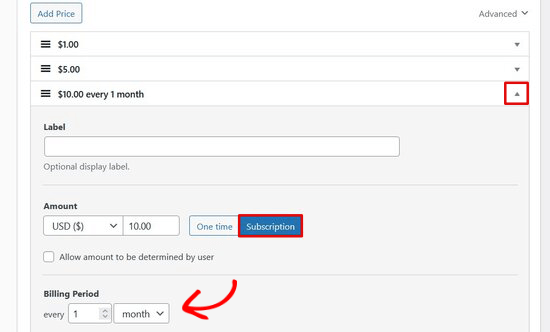
If you want to accept recurring donations, click on the dropdown arrow next to a pricing option. Then, click the ‘Subscription’ button and select the billing period you want.
Next, click on the Form Fields tab.
The donation form template already includes all of the fields you need, including pricing options, checkout button, and payment button.
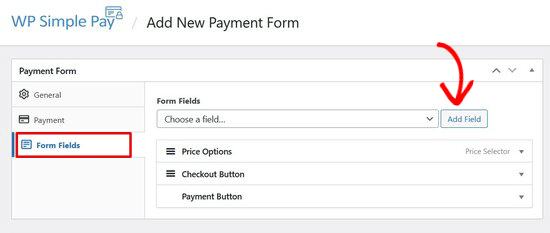
If you want to add additional form fields like name or email address, you can choose it from the dropdown menu and click the ‘Add Field’ button.
You can rearrange the form fields by dragging and dropping them into place. You can also click on any of the fields to customize the button text or choose the button style.
Adding the Stripe Donation Form in WordPress with WP Simple Pay
To add your donation form to any post or page, click the Publish button on the right side of the screen.
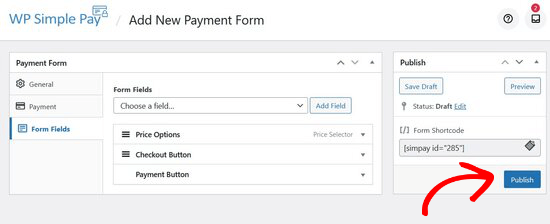
Next, you need to copy the simple shortcode above the Publish button.
It looks like this: [[simpay id=”285″]]
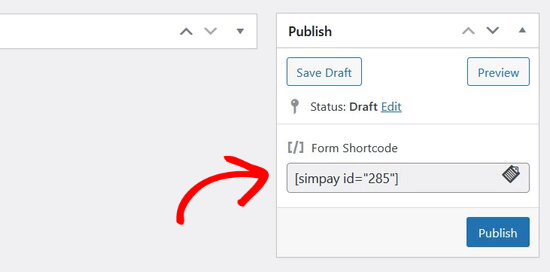
Then, you can paste the shortcode into any WordPress post or page.
Once you add the shortcode to the WordPress editor, the shortcode widget will be automatically added.
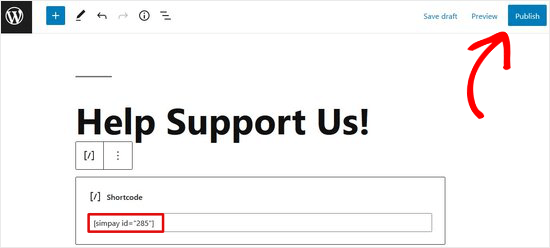
Then, publish the post or page.
You can now visit your website to see how your donation form looks on the front.
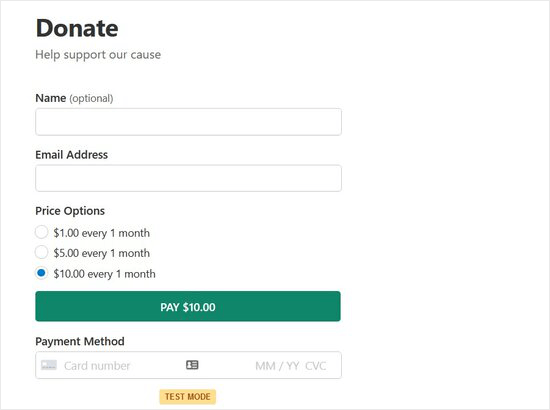
Note: WP Simple Pay is set to test mode automatically. This is to ensure no live transactions are processed on your site before the form is ready. You can read this guide to learn how to take your payment form from test mode to live mode.
Method 2. Adding the Stripe Donate Button in WordPress with WPForms
WPForms is the best WordPress form plugin that’s used by over 5 million website owners. It comes with a Stripe addon that allows you to accept donations, one-time payments, and even subscription payments on your website.
You’ll need at least their PRO plan to access the Stripe Pro addon, which offers the recurring option and zero additional transaction fees. You’ll also get advanced features like conditional logic, multi-page forms, surveys & polls, 700+ form templates, and more.
Note: There is a free version of WPForms that allows you to collect one-time Stripe payments. But there’s a 3% transaction fee on payments made through your forms.
The first thing you need to do is install and activate the WPForms plugin. For more details, see our step-by-step guide on how to install a WordPress plugin.
Upon activation, you need to visit the WPForms » Settings page to enter your license key. You can find this information, under your account on the WPForms website.
Once you enter your license key, click on the ‘Verify Key’ button.
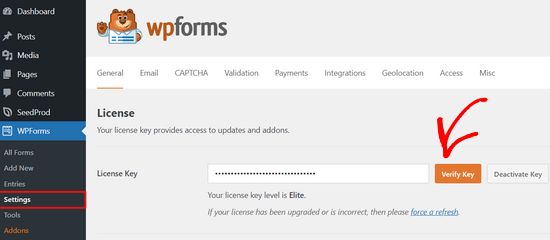
Next, you need to visit WPForms » Addons page and click on the ‘Install Addon’ button next to the Stripe addon.
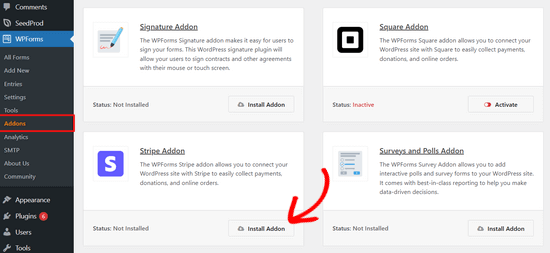
WPForms will now install and activate the Stripe addon for you.
Now, let’s connect WPForms to your Stripe account to receive payments. To do that, you need to visit WPForms » Settings page and click on the Payments tab. From there, click on the ‘Connect with Stripe’ button.
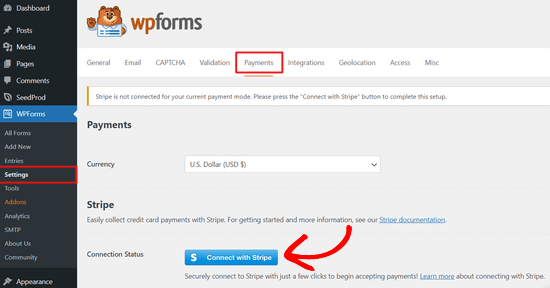
After that, you’ll be asked to authorize the connection between your forms and Stripe.
What you see on the screen will differ based on whether you’ve activated your Stripe account.

Simply follow the steps in the Stripe Connect wizard to authorize the connection.
When you’re finished, you’ll be redirected back to the WPForms Settings page. Here, you should see a green checkmark in the Connection Status section.
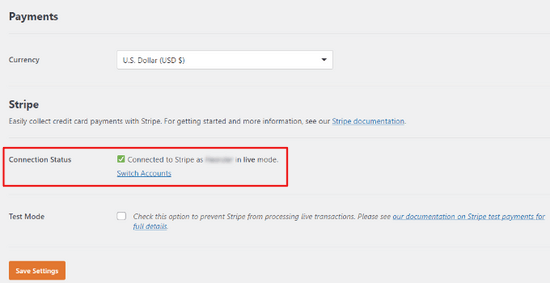
You can also optionally enable test mode from the Payment settings page.

This will allow you to test your Stripe integration without actual payments. However, you must uncheck this option when your website is ready to accept donations on your website.
Don’t forget to click on the ‘Save Settings’ button to store your changes.
Now that you have set up the payments, it is time to create a Stripe donate form for your website.
Making a Stripe Donation Form in WordPress with WPForms
First, you need to visit the WPForms » Add New page to create a new form. You will be asked to provide a title for your form and choose a template. You need to select the ‘Donation Form’ template.
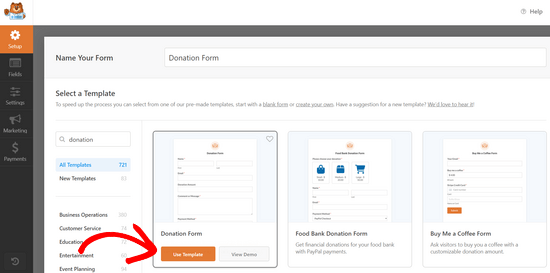
This will launch the WordPress forms builder interface with your selected donations form template.
Also, this template will already have the common fields required to create a donation form like name, email, donation amount, and message.
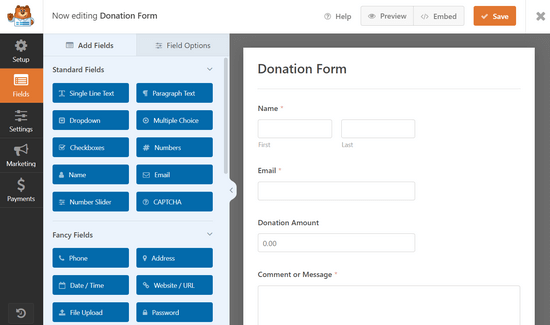
This is a drag-and-drop form builder. You can edit form fields by clicking on them, rearranging them, or adding new fields from the left column.
Since you are creating a Stripe payments form, you need to add the ‘Stripe Credit Card’ field to your form. You’ll find it under the Payments Fields section on the left column.
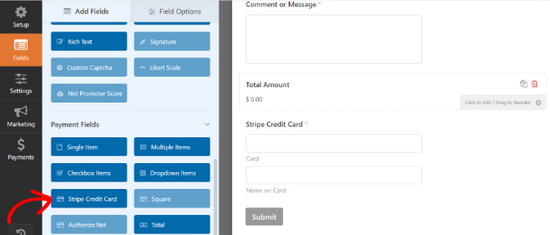
Simply click to add the field to your form and then drag and drop to rearrange its position in the form.
Once you are satisfied with the form, click on the ‘Payments’ tab in the left corner to edit the payment settings. From here, you need to select Stripe as your payment method and then check the box next to the ‘Enable Stripe Payments’ option.
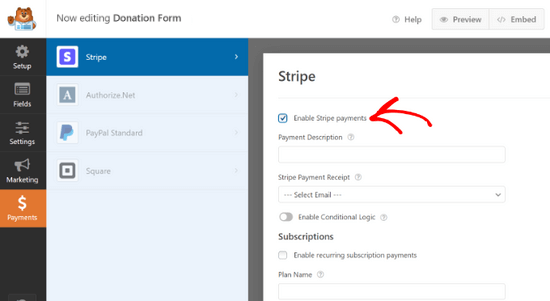
You can provide a description for the payment and select the email field to send the donors a receipt.
WPForms also supports Stripe recurring payments. You can use this option to set up recurring donations or subscriptions.

If you choose to enable recurring subscription payments, additional settings will appear. For example, you can choose how often recurring payments should occur: Daily, Weekly, Monthly, Quarterly, Semi-Yearly, or Yearly.
The next step is to set up confirmation settings, which are what your users will see after they fill out the form. Click on the Settings tab and then select the ‘Confirmations’ option.
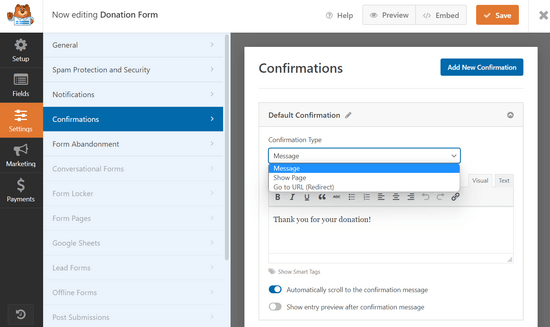
From here, you can select different types of confirmation types. For example, you can thank users with a simple message, or redirect them to a thank you page or any other URL.
Once done, click on the Save button to store your changes.
Adding The Stripe Donation Form in WordPress with WPForms
WPForms makes it super easy to add your forms anywhere on your website.
Simply click the ‘Embed’ button at the top of the form builder and choose either an existing page or create a new page. For this tutorial, we’ll click on the ‘Select Existing Page’ option.
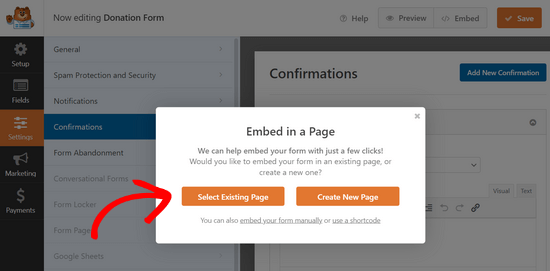
Next, choose which existing page you want to embed the form on using the dropdown menu.
Then, click the ‘Let’s Go!’ button.

WPForms will now automatically add the form to your WordPress content editor.
You can also do this manually by editing the post or page where you want to add the donation form. Next, add the WPForms block to your content and select the donation form you created earlier.

WPForms will now fetch and embed the form for you. You can now visit your website to see it in action.
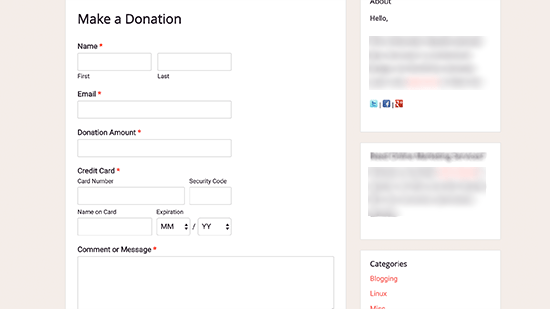
In addition, you can add the donation form to your blog’s sidebar or any other widget-ready area. Head over to the Appearance » Widgets page and add the WPForms widget to a sidebar.
Then, you need to select your Stripe donation form from the dropdown menu.
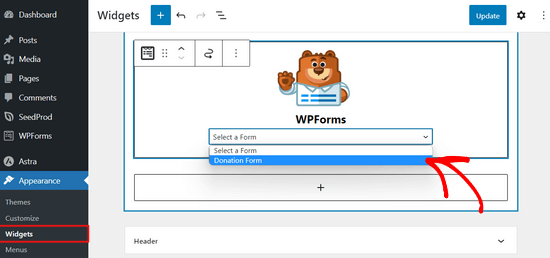
Don’t forget to click on the Save button to store your widget settings.
Bonus: Full-Featured WordPress Donation Plugin
While both WP Simple Pay and WPForms allow you to create a Stripe donate button, they don’t offer full donor management and other advanced features that non-profits need.
If you’re looking for a full WordPress donation plugin, then we recommend using WP Charitable. Over 10,000+ non-profit organizations and website owners across the world use Charitable to create fundraising campaigns and raise more money online.

It comes with all the features you need including fully customizable donation forms, ability to accept one-time or recurring donations, easy donation management dashboard, GDPR compliance, annual donor receipts, gift giving in honor of someone else, fee relief which allows donors to cover payment process fees, and more.
You can also use Charitable for peer-to-peer fundraising campaigns, and it even lets you create your own crowdfunding platform like GoFundMe or Indiegogo.
Charitable has built-in payment integrations for Stripe, PayPal, Authorize.net, Braintree, Mollie, GoCardless, Paystack, Payfast, Payrexx, Windcave, and more.
You can also use the free version of Charitable to get started.
We hope this article helped you easily add a Stripe donate button to your WordPress site. You may also want to see our guide on the must-have WordPress plugins for every website or see our tutorial on how to improve your WordPress SEO rankings.
If you liked this article, then please subscribe to our YouTube Channel for WordPress video tutorials. You can also find us on Twitter and Facebook.


Myriam
Hi, Nice article but you were a bit vague on how the recurring option is set up and works.
WPBeginner Support
Thanks for your feedback, we’ll be sure to look into that when we update the article
Admin
Bathri Vijay
Thanks for your ultimate article, it is really amazing.
WPBeginner Support
You’re welcome, glad you like our content
Admin