Do you want to add an Amazon-like magnifying zoom for images in WordPress? A magnifying zoom is more than just a fancy feature, it’s a useful tool that lets your visitors see small details in images that they can’t see normally.
We highly recommend adding a zoom feature for online stores, where customers want to see the texture and quality of items. It’s also helpful for photography websites, where viewers want to see every detail in an image.
By adding a magnifying zoom to your images, you can improve the user experience, keep users interested longer, and you can even boost sales.
In this article, we’ll show you how to easily add magnifying zoom for images in WordPress.
Why Add a Magnifying Zoom for Images?
Adding a magnifying zoom feature on your WordPress website will allow visitors to view the intricate details of the images clearly.
If you have a photography website, then adding a magnifying feature will allow users to zoom in on your photographs to view the finer details.
Similarly, if you run an online store, then your customers will be able to zoom in on product images.
Many big eCommerce websites already use magnifying zoom for product images. It allows customers to examine the product and creates a better shopping experience in your store.
That being said, we’ll show you how to easily add a magnifying zoom for images in WordPress using three different methods. You can use the links below to jump to the method you prefer.
- Method 1: Add a Magnifying Zoom For Images in WordPress with Envira Gallery (Recommended)
- Method 2: Add a Magnifying Zoom For WordPress Images with WP Image Zoom
- Method 3: Add a Magnifying Zoom for Images in WordPress with WPCode
Method 1: How to Add a Magnifying Zoom For Images in WordPress with Envira Gallery (Recommended)
Envira Gallery is the best gallery plugin for WordPress. You can use it to easily create beautiful image galleries for your WordPress website. It also comes with a Zoom Addon, which lets you add zoom functionality to your gallery images.
Other powerful Envira features include a drag and drop builder, pre-made gallery themes, lightbox popups, image compression, image protection, and more.
To get started, you need to install and activate the Envira Gallery plugin. For more details, you can follow our tutorial on how to install a WordPress plugin.
Note: There is a free version of Envira Gallery that you can use. However, you need to upgrade to the premium plugin’s ‘Plus’ plan to access the Zoom Addon.
Upon activation, you need to go to the Envira Gallery » Settings page and enter your license key. You can find the license key in your Envira Gallery account area.
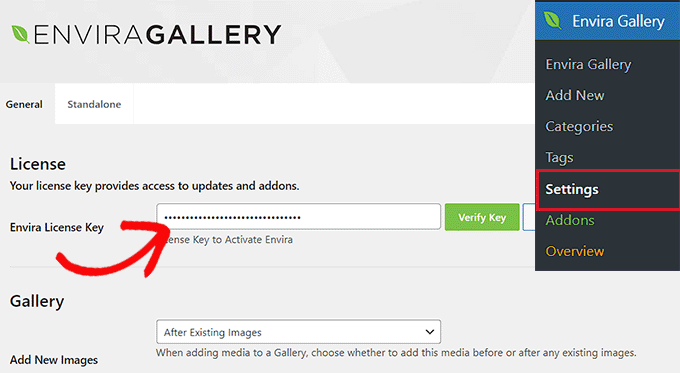
After that, click the ‘Verify Key’ button.
Next, you need to go to Envira Gallery » Addons. From here, scroll down to find the Zoom Addon and click on the ‘Install’ button.
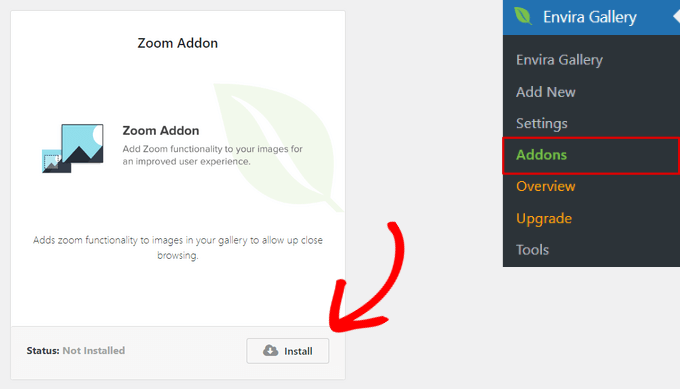
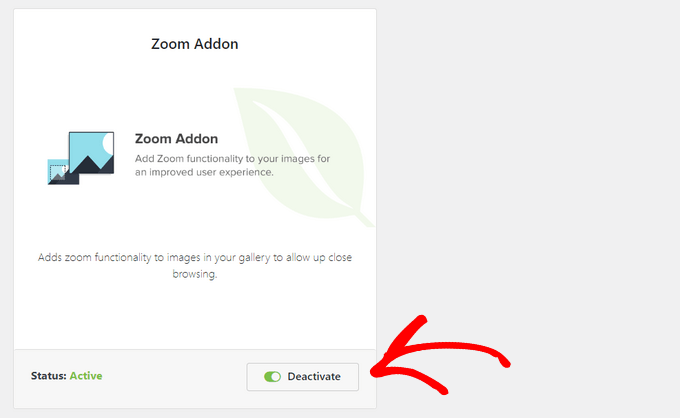
Once the Zoom Addon is installed, you also need to activate it by toggling the switch.
The next step is to add a new gallery. To do that, go to Envira Gallery » Add New from the WordPress dashboard.
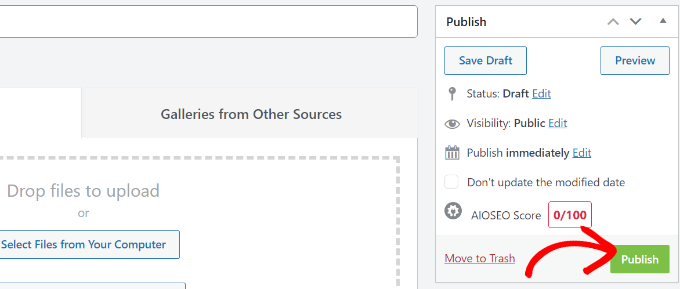
From here, you can enter a name for your gallery and click the ‘Select Files from Your Computer’ button to upload images to your gallery.
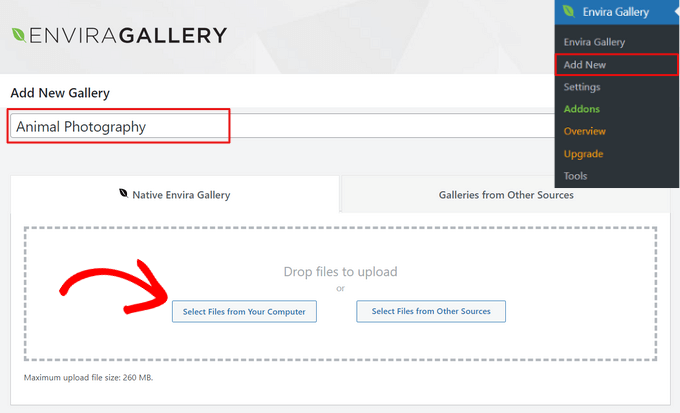
You can also click the ‘Select Files from Other Sources’ button to add images from the WordPress media library to your gallery.
Once you’ve uploaded images to your gallery, you can rearrange them by dragging and dropping the thumbnails into place.
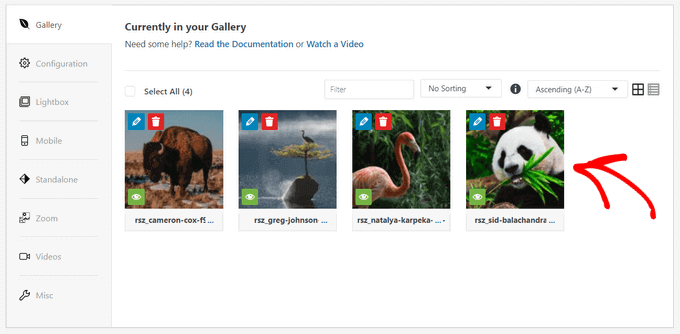
There are also other options for customizing your image gallery. For example, you can select a gallery layout, add image titles and alt text, enable the gallery lightbox, show image captions, edit image dimensions, and more.
For more details, see our guide on how to create responsive image galleries with Envira.
Configure Image Zoom Settings
To add a magnifying zoom to your gallery images, click on the ‘Zoom’ tab. Then, check the box to enable zoom functionality.
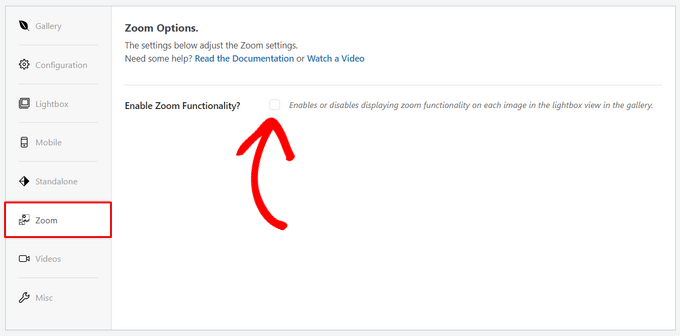
Once zoom functionality is enabled, the settings for adding zoom to your images will appear.
You can configure settings like zoom on hover, zoom effect, zoom type, zoom window position, zoom window size, tint color, and more.
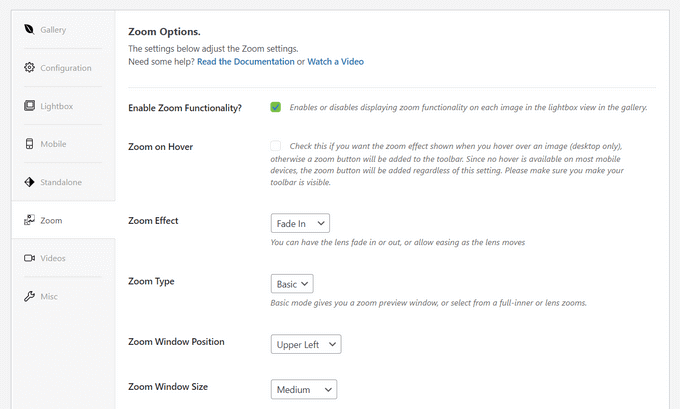
When you’re happy with the zoom settings, click the ‘Publish’ button to store your changes and make this gallery available.
Embedding Your Image Gallery with Magnifying Zoom
Now that your gallery is ready, you can add it directly to any page or post in WordPress.
From the WordPress content editor, simply click the ‘+’ button to add the Envira Gallery block. Then, click on the dropdown menu inside of the Envira Gallery block to choose which gallery to display.
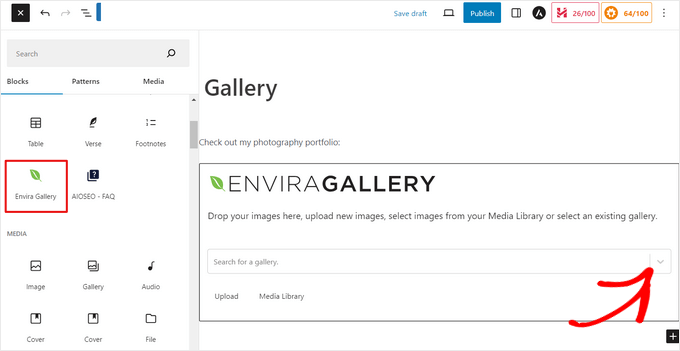
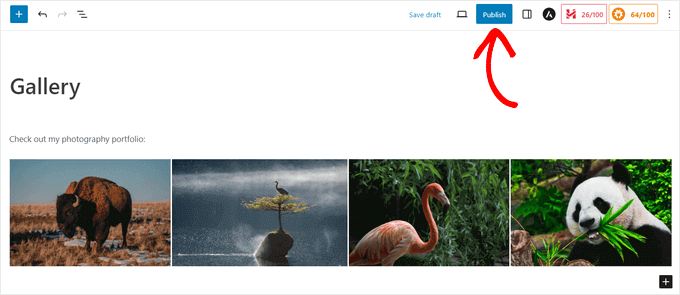
Next, you’ll see a preview of your image gallery in the WordPress block editor. If you’re happy with how it looks, you can publish the post or page.
Now you can visit your website to see the magnifying zoom feature in action.
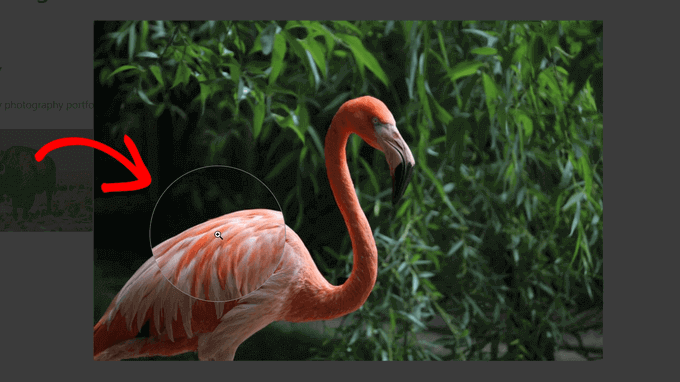
Envira Gallery is a great plugin for adding zoom functionality to photography websites. But, it also works perfectly for online stores.
To learn more, see our guide on how to create a WooCommerce product image gallery.
Method 2: How to Add a Magnifying Zoom For Images in WordPress with WP Image Zoom
WP Image Zoom is a free WordPress plugin that allows you to easily create a magnifying glass on your images.
First, you need to install and activate the WP Image Zoom plugin. For more details, please see our step-by-step guide on how to install a WordPress plugin.
We will be using the free version in this tutorial, but if you want more customization options, you may want to check out WP Image Zoom Pro. You can learn more about the plugin in our WP Image Zoom review.
Upon activation, you need to head over to the WP Image Zoom » Zoom Settings page from the WordPress admin sidebar.
Next, you need to configure the zoom effect settings by switching to the ‘Zoom Settings’ tab and choosing a lens shape that you want to use.
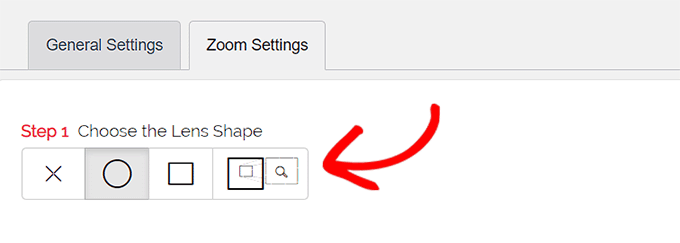
You can choose from circle, square, and zoom window lens shapes. You can even choose a ‘No Lens’ (⨯) option if you don’t want to use a shape for magnifying effect.
After choosing your preferred lens, you need to scroll down to the next step where you can preview an image with the selected lens to see how it works. The plugin has a preview image that you can use to test your changes.

Next, you need to switch to the ‘General’ tab.
From here, you can select a cursor type, set an animation effect, enable the zoom on mouse hover or mouse click, and define a zoom level.
If you want even more options, some of the features are only available for the pro version of the WP Image Zoom plugin.
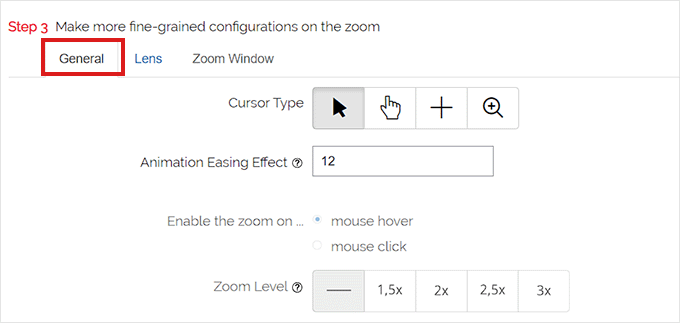
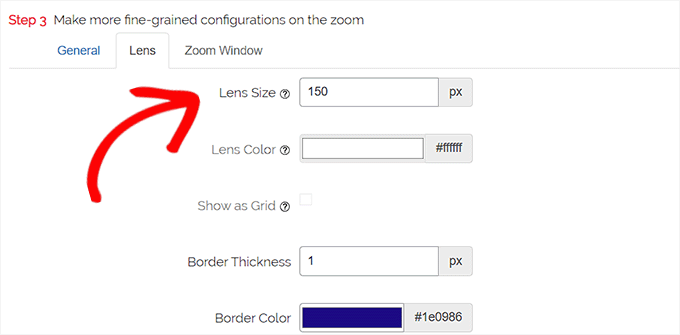
After making your choices accordingly, simply go to the ‘Lens’ tab from the top.
You can now configure settings like lens size, lens color, lens border options, and more if you selected the ‘circle’ or ‘square’ lens in Step 1.
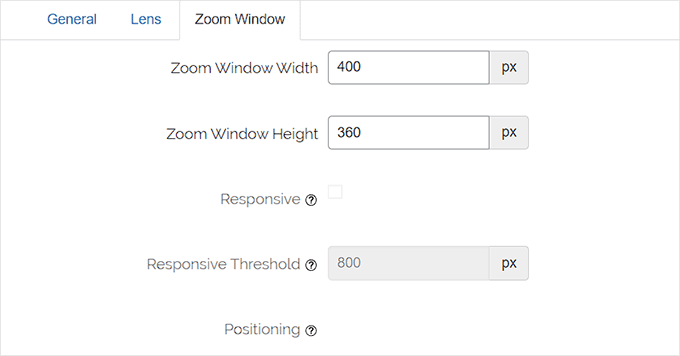
If you selected the Zoom Window Lens, then you need to switch to the ‘Zoom Window’ configuration tab.
From here, you can change the width and height of the zoom window, positioning, distance from the main image, border colors, and more.
Next, you need to simply click the ‘Save Changes’ to store your settings.
After that, all you have to do is configure a few general settings.

Configure General Plugin Settings
Next, you need to switch to the General Settings tab under the plugin settings.
From here, you can now enable features like zoom on WooCommerce product images, thumbnails, mobile devices, attachment pages, product category pages, and more.
All you need to do is simply check the boxes next to these options.
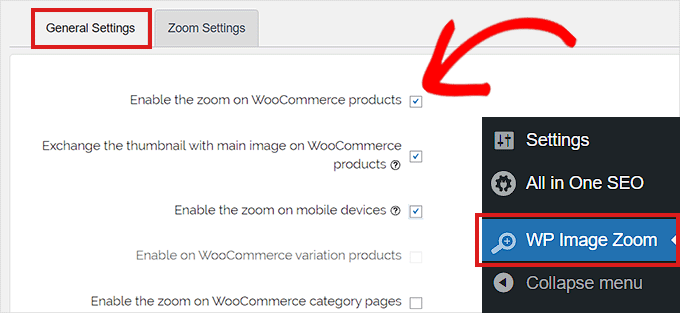
You can also remove the lightbox effect, so users can smoothly zoom images.
However, you would need the Pro version of the plugin for this feature.

If you are not going to remove the lightbox for images, then you need to scroll down to the ‘Enable inside a Lightbox’ option and check the box next to it.
Note: You can see supported lightboxes to make sure that the zoom works fine inside a lightbox on your site.

Once you are done adjusting the settings, don’t forget to click on the ‘Save Changes’ button to store your settings.
Magnifying zoom will now be enabled for WooCommerce products.
You can go visit your online store to check our zoom feature.

However, if you want to enable zoom for images on WordPress posts and pages, you need to follow the step below.
Enable Magnifying Zoom for Images in Block Editor
By default, the magnifying zoom is not enabled for images on your posts and pages. You need to do it manually after adding an image to your content.
First, you need to open a post you want to edit in the block editor.
Next, you need to upload an image to that post from the media library or your computer.
Once you do that, simply click on the image to open up its’ Block Settings panel on the right corner of the screen.
From here, simply go to the ‘Styles’ tab and click on the ‘With Zoom’ button to apply magnifying zoom to your image.
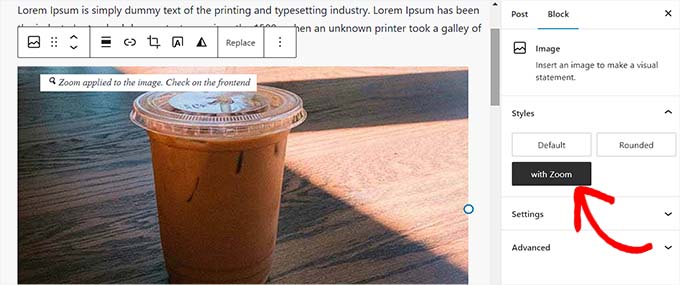
After that, simply click the ‘Update’ or ‘Publish’ button at the top to store your settings.
The zoom feature will look like this on your site:

Note: You will need to repeat this step each time you want to add the zoom effect to an individual image.
Method 3: How to Add a Magnifying Zoom for Images in WordPress with WPCode
You can also add a magnifying zoom feature to your images in WordPress using the free WPCode plugin.
WPCode is the best code snippets plugin on the market, allowing you to safely and easily add custom code to your website. It comes with 393+ ready-made code snippets that you can add in just a few clicks, including a magnifier glass for images.
To get started, you need to install and activate the free WPCode plugin. If you need help, see our tutorial on how to install a WordPress plugin.
Note: The free version of WPCode has everything you need to add custom code in WordPress. But, if you want advanced features like scheduled snippets, AI snippet generator, eCommerce tracking, and more, you can upgrade to WPCode Pro.
Upon activation, go to Code Snippets » Library from your WordPress dashboard.
This will bring you to the Snippets Library, where you can see all the different snippets that you can add to your site.
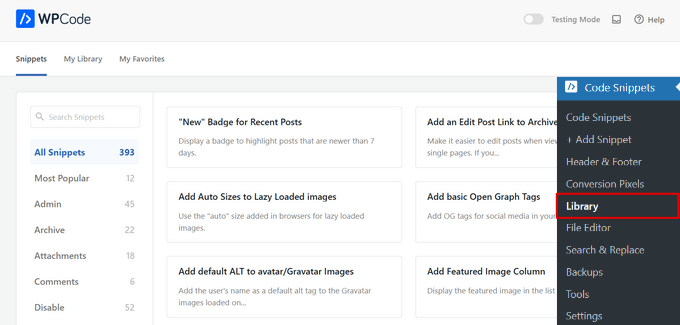
From here, simply search for the ‘Magnfier Glass for Images’ snippet in the library.
Once you find it, hover your mouse over it and click the ‘Use snippet’ button.
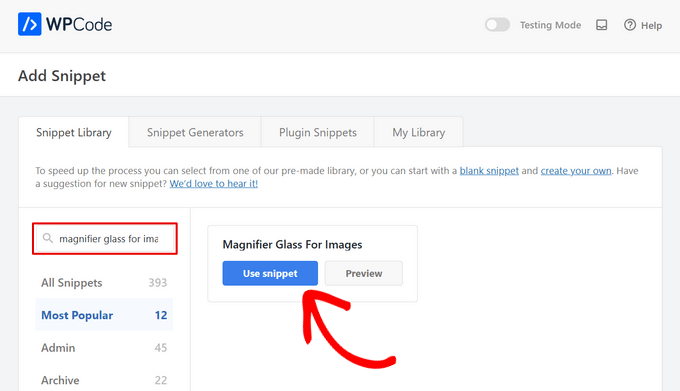
WPCode will then automatically add the code for you, as well as select the proper insertion method.
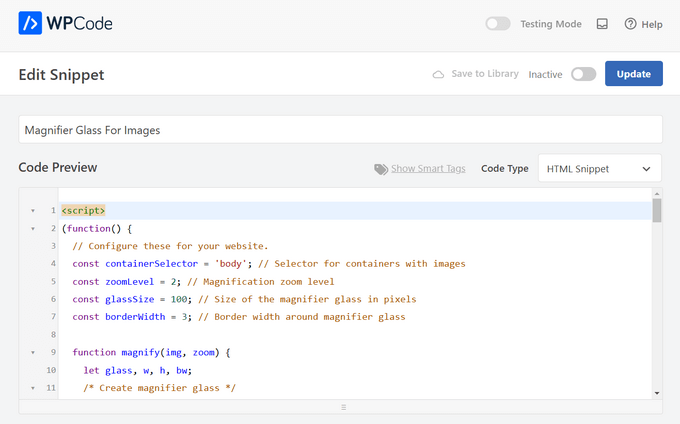
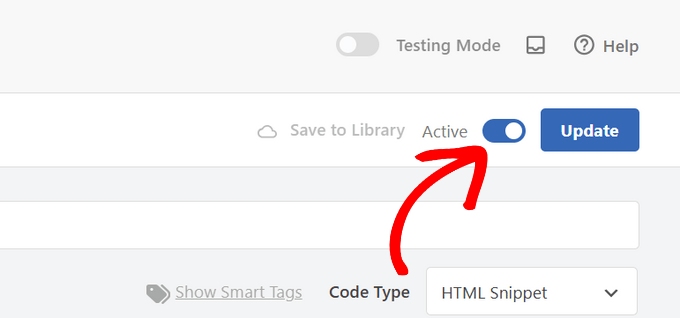
Now, all you need to do is toggle the switch from ‘Inactive’ to ‘Active’ and then click on the ‘Update’ button.
That’s it! When you visit your WordPress website, you will see that all of your images will have a magnifier glass that appears when you hover over them.

Note: We recommend using high-quality images for the zoom feature to look great. High-quality images are normally larger in file size and take longer to load which will affect your website speed and performance.
To solve this issue, you need to optimize your images for the web before uploading them to WordPress.
Video Tutorial
If you’re not a fan of written tutorials, you can watch our video tutorial instead:
We hope this article helped you learn how to add magnifying zoom for images in WordPress. You may also want to see our guide on how to optimize images for search engines and our top picks for the best image compression plugins.
If you liked this article, then please subscribe to our YouTube Channel for WordPress video tutorials. You can also find us on Twitter and Facebook.


Jiří Vaněk
I really love this effect in online stores, where you can zoom in on products exactly where and how you need. I had searched for ways to achieve this before, but either the effect was unattractive or I couldn’t make it work at all. For a while now, I’ve been looking for a plugin to replace the galleries I create in Elementor PRO. I’m looking for something with more features that looks more professional. I really like the Envira Gallery, and since it has this “zoom” effect, it will most likely be my choice. Despite being a paid plugin, I’m leaning toward it. This tutorial definitely helped me make that decision.
Sofie
Thanks for this article. Can you help me understand how I can use this for a page/blog when I use the divi builder? Where can I then add something so this function works?
WPBeginner Support
You would want to reach out to the plugin’s support for the current method to use the plugin with a page builder.
Admin
Kenny
Any chance that there is a zoom plugin that will work with LayerSlider images? I want the background of my LayerSlider slide to zoom in with a magnifying glass so that people can see the image larger on screen.
WPBeginner Support
We would first recommend reaching out to LayerSlider’s support to see if they have a recommended plugin for adding zoom
Admin
michel hissi
can you please tell me about image size. if image size of website is low then can we use this plugin.
WPBeginner Support
Yes, you can still use this plugin if you are optimizing your images
Admin
santhosh muralidhar
please show the steps by using the new Wordpress editor. I think in the new editor there is no option to add a zoom magnify feature for the image. I searched and tried a lot but could not find that option.
WPBeginner Support
We will certainly look to update our articles as we are able, for this, the option to add the CSS class that the plugin needs for an image would be in the block’s settings.
Admin
Tony
Please could you tell me how to add image zoom to product images in woocommerce? the article instruct how to add zoom to post and pages only.
WPBeginner Support
The plugin should still work for WooCommerce, if it is not applying to WooCommerce then you would need to reach out to the plugin’s support for them to take a look.
Admin
Eliezer Braun
I keep getting this message when I press on the magnifying glass after I have selected the image for zoom.
First you have to select the image to which you want to add the zoom feature
Eileen Bednarz
I’d love to get this to work on my site, but I have a Pinterest plug-in that I can’t deactivate. I suspect that plug-in interferes with this plug-in. Any suggestions on removing to odious Pinterest plug-in are welcome.
Eileen Bednarz
P.S. I’m not a programmer and don’t dare go into the FTP or whatever it’s called.