Do you run a photography blog, sell stock images, or take amazing photos that you want to share with the world? In that case, your audience may be interested in your EXIF data.
These tags can help visitors learn more about your photos or even find images they want to buy.
However, finding this information manually and then adding it to every single photo would be a frustrating and tedious task – that’s definitely time you could spend better elsewhere.
In this article, we’ll show you how to automatically add EXIF tags to your photos so you can share the story behind your images without having to add any tags yourself.

Why Display EXIF Tags in Your WordPress Image Captions?
If you’re a photographer, then WordPress is a great way to show off your work. It has tons of beautiful themes for WordPress photographers and plugins that can help promote your images, build your brand, and even get more customers.
However, there is a big drawback you may have already noticed. By default, WordPress doesn’t show any of your exchangeable image file format (EXIF) tags, such as the camera manufacturer and model, resolution and exposure, and the location and time the photo was taken.
This data can be useful for visitors to know, especially if you’re selling digital photos and graphics online.
EXIF tags are also useful if you’re running a photography blog, as they can help readers learn more about your photos.
Getting this data and then adding it to your website manually would take time and effort, especially if you have lots of different photos. If you add this information manually each time, then it may also be difficult to create a consistent design.
With that said, let’s see how you can add EXIF photo tags to your captions automatically using a plugin. Both these methods can save you a ton of time while displaying your tags in a consistent way.
Simply use the quick links below to jump straight to the method you want to use:
Method 1: Adding EXIF Tags to Specific Photo Captions
Sometimes, you may want to show the EXIF tags for specific photos only. For example, you might show the location tags for photos of a famous landmark but hide this information on images of your house.
Exif Caption lets you add EXIF tags to specific photos, so you can save time while still staying in control.
The first thing you need to do is install and activate the Exif Caption plugin. For more details, see our step-by-step guide on how to install a WordPress plugin.
Upon activation, go to Media » Exif Caption in the WordPress dashboard. Here, you’ll see all the photos that have EXIF data.
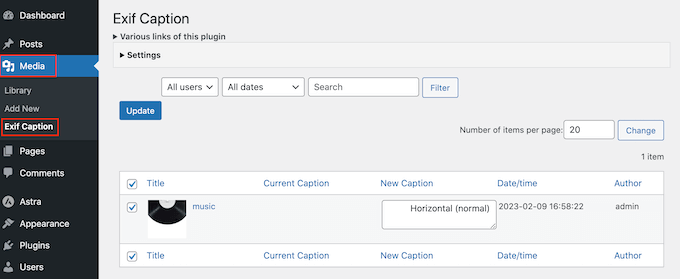
To configure Exif Caption, go ahead and click to expand the ‘Settings’ section.
To start, you can choose whether to replace the current image caption with EXIF data or show the tags next to the original caption.
If you don’t want to override the current captions, then select either ‘Insert to left’ or ‘Insert to right.’ The plugin will then add the tags before or after the original image caption on your WordPress blog.
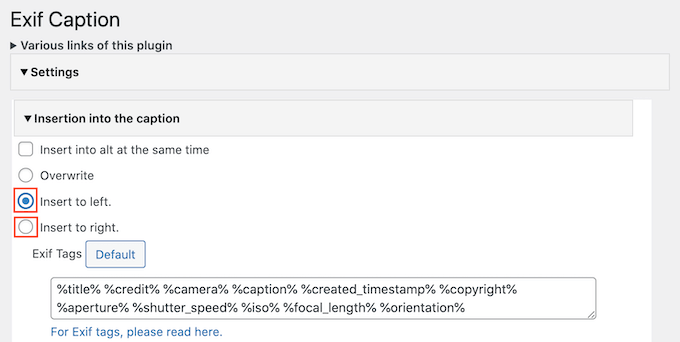
Next, you’ll see a box with all the EXIF tags you can add to the image captions.
By default, Exif Caption adds all the available tags, so simply delete any you don’t want to use.

If you delete a tag and then change your mind, then just click on the ‘Default’ button. This re-adds all the available EXIF tags.
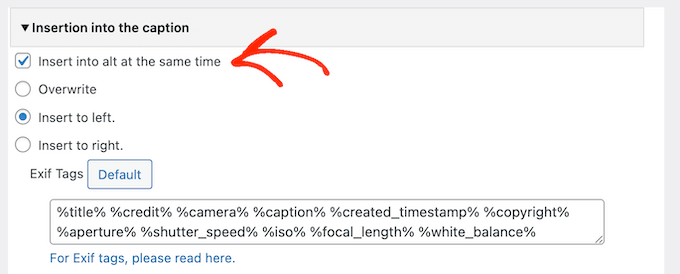
The plugin can also add EXIF data to the image’s alt text. This may improve your SEO, but it can also result in duplicate content, so we recommend using it carefully.
To go ahead and add EXIF tags to your alt text, check the box next to ‘Insert into alt at the same time.’
When you’re happy with how the plugin is set up, don’t forget to click on ‘Save Changes.’
With that done, you’re ready to add EXIF data to your image captions. Simply go down the list of images and check the box next to each photo where you want to show EXIF data.

To go ahead and add EXIF tags to these image captions, simply click on ‘Update.’
If you selected ‘Insert into alt at the same time,’ then the plugin will also copy the tags into the image alt field.
Now, every time you add these photos to a page or post, WordPress will automatically show the EXIF tags in the image’s caption.

Method 2: Automatically Display EXIF Data For All Your Photos
Do you want to show EXIF tags for all your images? Then it makes more sense to use a plugin that adds this information to your captions automatically, as it’s the ultimate time-saver.
Exif Details shows detailed EXIF information in the WordPress admin dashboard. It can also add these tags to your image captions automatically, so they’re displayed in a consistent way.
Be aware that you’ll need to write some custom code, so this isn’t the most beginner-friendly method.
Exif Details also gets the EXIF information when you first upload the image to WordPress. This means it won’t show EXIF tags for any images that you’ve already added to the media library.
That said, this plugin tends to work the best if you’re just starting your photography blog or you’ve only uploaded a small number of images so far.
First, you need to install and activate the Exif Details plugin. For more information, see our step-by-step guide on how to install a WordPress plugin.
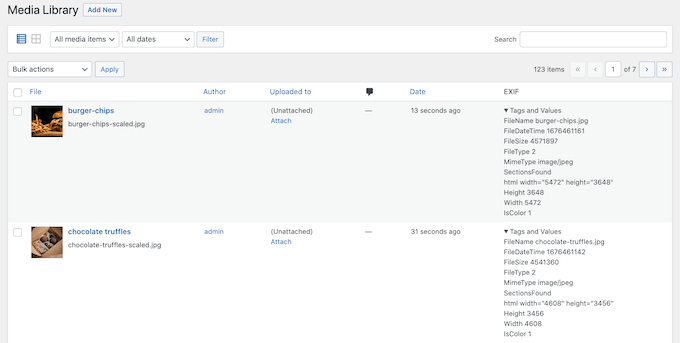
Upon activation, go to Media » Library and take a look at the ‘EXIF’ column.
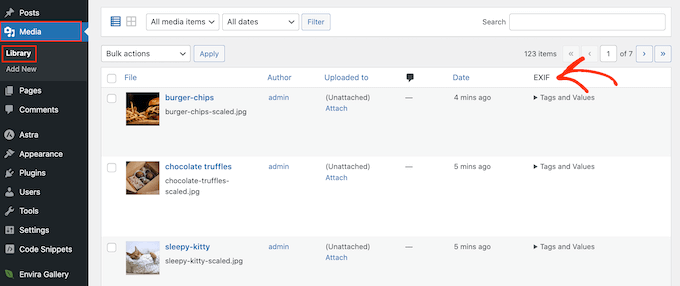
To see the tags for a specific image, simply click on its ‘Tags and Values’ text.
Now, make a note of the EXIF codes for the data you want to display. For example ‘DateTimeOriginal’ shows the date and time when the file was created.
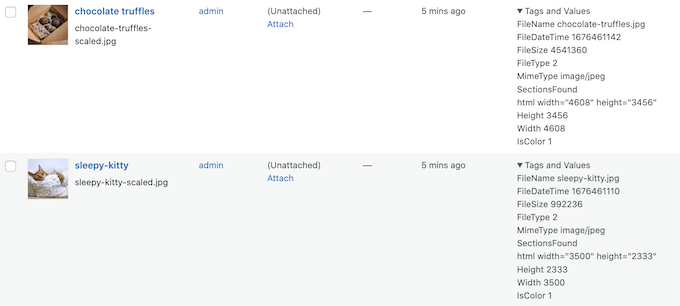
For a complete list of the available tags, take a look at the EXIF Tags page.
Once you have these tags, it’s time to add custom code to WordPress. Often, guides ask you to edit your theme’s functions.php file directly, but this can cause all sorts of common WordPress errors.
You’ll also lose the custom code the next time you update your WordPress theme. For that reason, we recommend using WPCode instead.
WPCode is the best code snippet plugin for WordPress and allows you to add an unlimited number of PHP, CSS, HTML, and JavaScript snippets to your website. That said, you can use it for all kinds of tasks and with different plugins, and not just with Exif Details.
The first thing you need to do is install and activate the free WPCode plugin. For more details, see our step-by-step guide on how to install a WordPress plugin. Upon activation, head over to Code Snippets » Add Snippet.
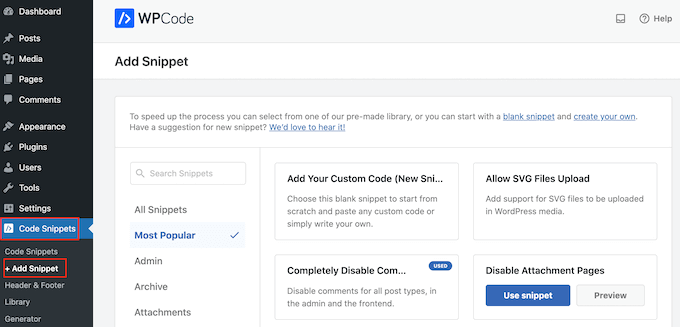
Here, you’ll see all the ready-made WPCode snippets you can add to your site. These include snippets that add a featured image column to your admin panel, allows users to upload images to your website, disables attachment pages, and much more.
Simply hover your mouse over ‘Add Your Custom Code,’ and then click the ‘Use snippet’ button when it appears.

To start, type in a title for the custom code snippet. This can be anything that helps you identify the snippet in the WordPress dashboard.
After that, open the ‘Code Type’ dropdown and select ‘PHP Snippet.’
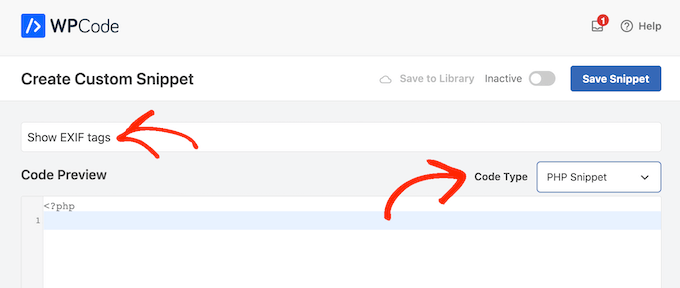
In the ‘Code Preview’ editor, you need to add a snippet that gets the EXIF tags and then adds this information to the image’s caption.
For example, here’s a snippet that gets the file’s shooting date and time:
function exif_details_change( $exifdatas, $id ) {
    if ( array_key_exists( 'DateTimeOriginal', $exifdatas ) ) {
        $shooting_date = str_replace( ':', '-', substr( $exifdatas['DateTimeOriginal'], 0, 10 ) );
        $shooting_time = substr( $exifdatas['DateTimeOriginal'], 10 );
        $exifdatas['DateTimeOriginal'] = $shooting_date . $shooting_time;
    }
    return $exifdatas;
}
add_filter( 'exif_details_data', 'exif_details_change', 10, 2 );

function media_caption( $metadata, $id ) {
    $mime_type = get_post_mime_type( $id );
    if ( in_array( $mime_type, array( 'image/jpeg', 'image/tiff' ) ) ) {
        do_action( 'exif_details_update', $id );
        $exifdatas = get_post_meta( $id, '_exif_details', true );
        if ( ! empty( $exifdatas ) ) {
            $camera = null;
            $f_number = null;
            $s_speed = null;
            $iso = null;
            $date = null;
            $googlemap = null;
            if ( array_key_exists( 'Model', $exifdatas ) ) {
                $camera = 'Camera:' . $exifdatas['Model'];
            }
            if ( array_key_exists( 'ApertureFNumber', $exifdatas ) ) {
                $f_number = 'F-number:' . $exifdatas['ApertureFNumber'];
            }
            if ( array_key_exists( 'ExposureTime', $exifdatas ) ) {
                $s_speed = 'Shutter speed:' . $exifdatas['ExposureTime'];
            }
            if ( array_key_exists( 'ISOSpeedRatings', $exifdatas ) ) {
                $isodata = json_decode( $exifdatas['ISOSpeedRatings'] );
                if ( is_array( $isodata ) ) {
                    $iso = 'ISO:' . $isodata[0];
                } else {
                    $iso = 'ISO:' . $isodata;
                }
            }
            if ( array_key_exists( 'DateTimeOriginal', $exifdatas ) ) {
                $date = 'Date:' . $exifdatas['DateTimeOriginal'];
            }
            if ( array_key_exists( 'latitude_dd', $exifdatas ) && array_key_exists( 'longtitude_dd', $exifdatas ) ) {
                $googlemap = '<a href="https://www.google.com/maps?q=' . $exifdatas['latitude_dd'] . ',' . $exifdatas['longtitude_dd'] . '">Google Map</a>';
            }
            $caption = sprintf( '%1$s %2$s %3$s %4$s %5$s %6$s', $camera, $f_number, $s_speed, $iso, $date, $googlemap );
            $caption = rtrim( $caption );
            $caption = preg_replace( '/\s(?=\s)/', '', $caption );
            $media_post = array(
                'ID'           => $id,
                'post_excerpt' => $caption,
            );
            wp_update_post( $media_post );
        }
    }
    return $metadata;
}
add_filter( 'wp_generate_attachment_metadata', 'media_caption', 10, 2 );
To show different EXIF data, simply tweak the code snippet above.
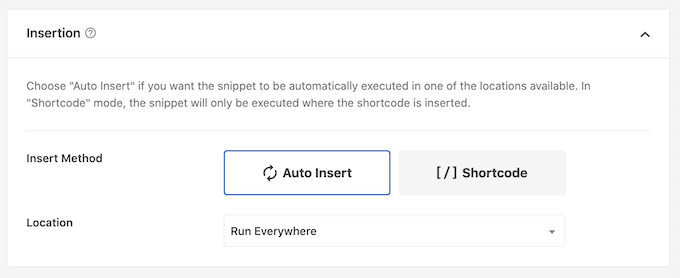
When you’re happy with your code, scroll to the ‘Insertion’ section. WPCode can add your PHP to different locations, such as after every post, frontend only, or admin only.
We want to use the custom PHP across our entire WordPress website, so click on ‘Auto Insert’ if it isn’t already selected. Then, open the ‘Location’ dropdown and choose ‘Run Everywhere.’
After that, you’re ready to scroll to the top of the screen and click on the ‘Inactive’ toggle, so it changes to ‘Active.’
Finally, click on ‘Save Snippet’ to make the PHP snippet live.
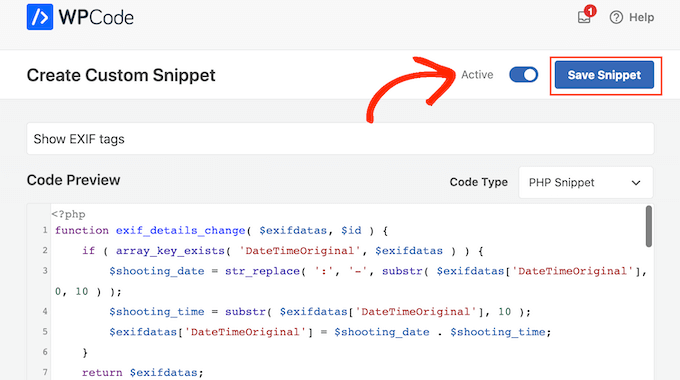
Now, Exif Details will get the tags every time you upload a new image. It will then add this information to the image caption automatically.
To try this out, head over to Media » Library and then click on ‘Add New.’
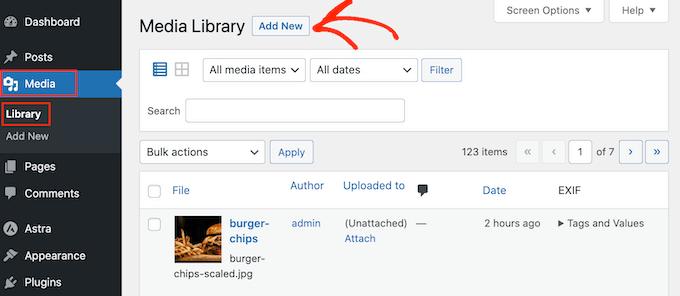
You can now upload an image from your computer.
After that, head back to Media » Library and click to expand the image’s ‘Tags and Values.’
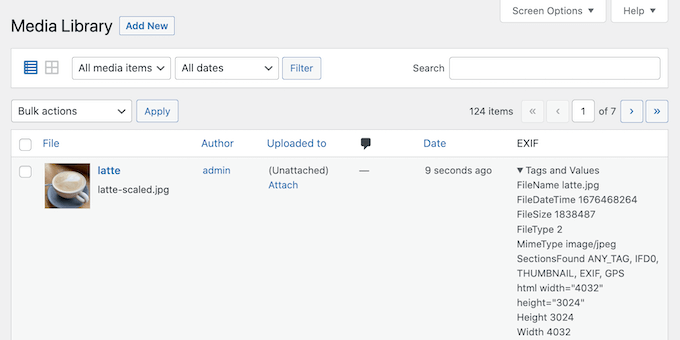
Assuming the photo has the right EXIF tags, WordPress will add this information to the caption automatically.
For example, in the following image, you can see that WordPress has already added the shooting date and time to the image caption.

We hope this tutorial helped you learn how to add EXIF photo tags in WordPress. You may also want to learn how to create a photo gallery with albums or see our expert pick of the best WordPress slider plugins.
If you liked this article, then please subscribe to our YouTube Channel for WordPress video tutorials. You can also find us on Twitter and Facebook.


vadakkus
Hello,
I would like to display EXIF data of pictures on a pre-configured location within a DIV. I tried using the code you provided here through a shortcode generated in WPCODE but nothing shows up. What am I doing wrong? Thanks!
WPBeginner Support
Please ensure that the photo was uploaded with the EXIF data by using the plugin at the start of method 2 as that is the most likely cause. The second likely cause would be if your theme’s design hides the caption of the images in which case you would need to reach out to your theme’s support and they could help
Admin