Is your WordPress site looking messy? Do you have long menus, big sidebars, or content that doesn’t fit well? Adding a custom scrollbar to these lengthy elements can help fix these problems.
Unfortunately, it’s not easy to find a simple plugin for this. Some other guides also suggest using code, but that can be scary if you’re new to it. But it doesn’t have to be.
We have built hundreds of websites, including the ones for our own brands, so we know how to do things like adding scrollbars quickly, efficiently, and easily.
In this guide, we will show you how to add a custom scrollbar to any part of your site using a page builder. If that doesn’t suit your needs, then you can read our beginner-friendly method of custom CSS to add a scrollbar.
When to Add a Scrollbar to Specific Elements on Your WordPress Site
Adding a scrollbar for WordPress elements can greatly improve your site’s user experience. But when should you use this WordPress design feature?
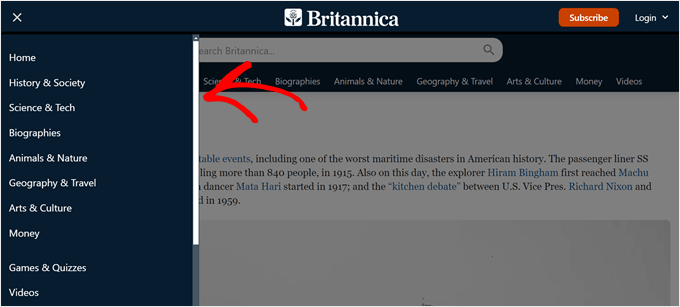
Here are some common WordPress elements that can benefit from custom scrollbars:
- Navigation Menus – Perfect for blogs with 20+ categories and subcategories that would otherwise stretch down the entire page.
- Sidebar Widgets – Ideal for content-rich sidebars where you want to keep all widgets without compromising space.
- Product Descriptions – Keeps lengthy product details contained while maintaining a clean layout.
- Comment Sections – Neatly displays hundreds of comments without overwhelming the page.
- Image Galleries – Showcases multiple images in a gallery while maintaining accessibility.
With that in mind, we’ll show you two options to add a custom scrollbar to any element on your WordPress website.
We recommend going with option 1 if you are just starting out with your site and want to use a page builder with a custom scrollbar functionality. This is because if you’ve already been using a different theme, then you will need to change your theme for this method.
On the other hand, if you like your current theme, then you can go with option 2 to add a custom scrollbar using CSS code. Don’t worry, we’ll break down the process step by step so that it’s easy for anyone to follow.
You can use the quick links below to skip to your preferred method:
💡 Do you want to change the scrollbar of your entire WordPress website instead? If so, then check out our guide on how to add a custom scrollbar in WordPress.
Option 1: Use a Page Builder With Element-Specific Custom Scrollbars (No Code)
One way to add a custom scrollbar in a specific element is to use a page builder with a scrollbar feature. This way, you can easily customize the scrollbar without touching any code.
For this method, we will use Thrive Architect. Besides a scrollbar feature, Thrive Architect has 300+ templates to quickly create professional-looking pages and dynamic content features to personalize your visitor’s experience.
The drag-and-drop interface is user-friendly, making it ideal for those new to WordPress. For a more detailed look at this tool, check out our Thrive Architect review.
While Thrive Architect doesn’t offer a free version, you can use our special Thrive Themes discount code to save up to 50% on your initial purchase.
Step 1: Set Up Thrive Architect and Thrive Themes
To begin, we need to install the Thrive Architect plugin. You can access this by signing into your account on the Thrive Themes website.
Next, download and install the Thrive Product Manager plugin. If you need help, refer to our guide on installing WordPress plugins for beginners.
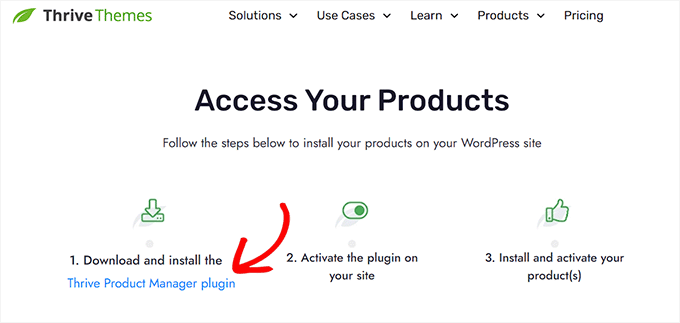
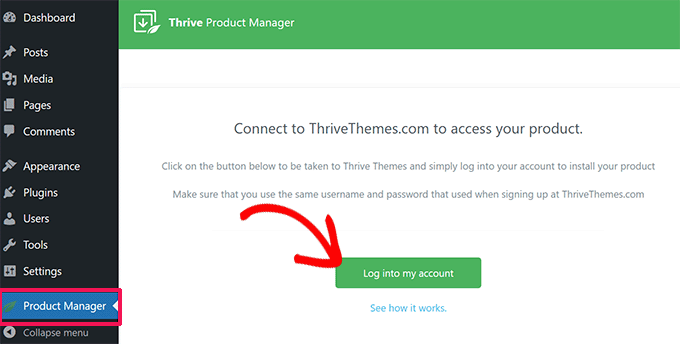
After activating the plugin, navigate to Product Manager in your WordPress dashboard.
Click on ‘Log into my account’ to link your WordPress site with your Thrive Themes account.
You should now see a list of Thrive Themes products available in your account.
Find ‘Thrive Architect’ and tick the ‘Install Product’ box.
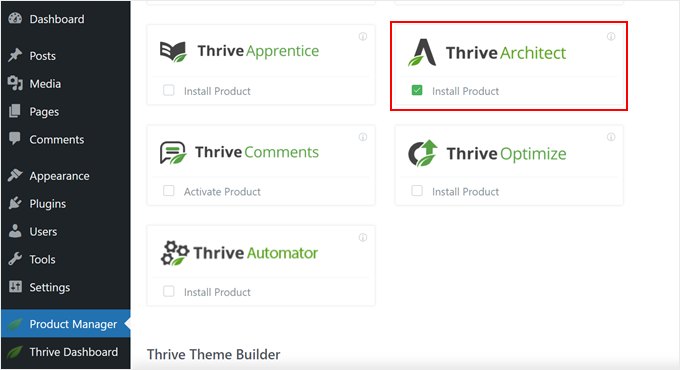
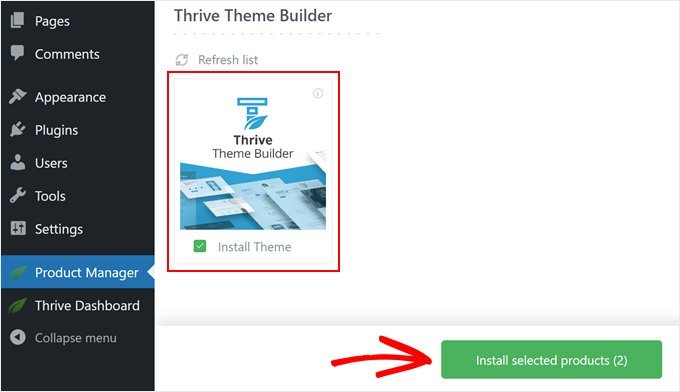
Scroll down to find ‘Thrive Theme Builder‘ and select the ‘Install Theme’ option.
Then, click ‘Install selected products.’ This step is necessary as Thrive Architect works together with Thrive Theme Builder.
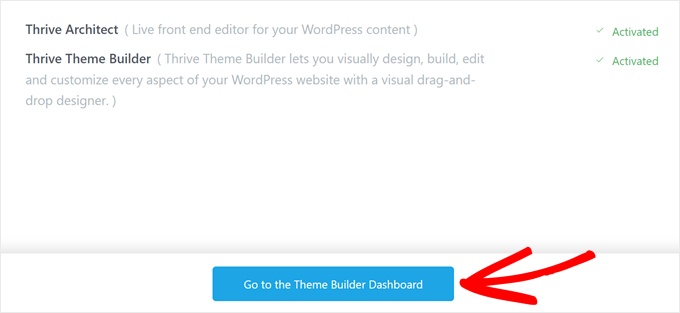
The next screen will show Thrive Product Manager installing and activating Thrive Theme Builder.
Once completed, select ‘Go to the Theme Builder Dashboard.’
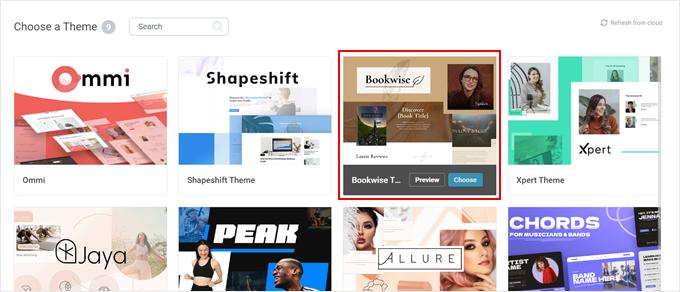
Now, it’s time to select a base design for your site using Thrives’s theme library.
If you’re unsure which to choose, use the ‘Preview’ button to see how each theme looks. Once you’ve decided, click ‘Choose.’
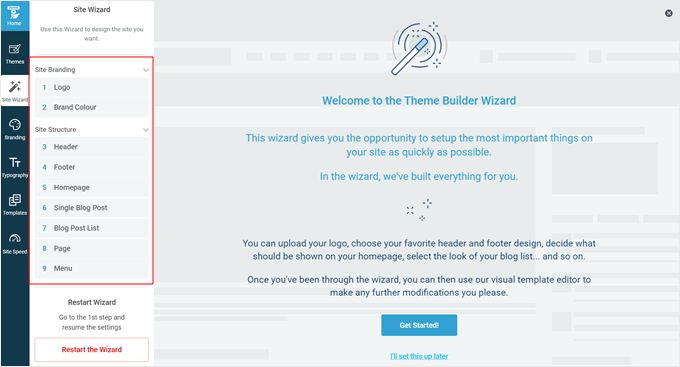
You’ll now enter the Theme Builder Wizard.
This wizard will guide you through uploading your logo, selecting brand colors for your theme, and setting up various theme structures and templates.
Make sure to complete the setup wizard before moving to the next step.
Step 2: Add a Content Box Element to Your Theme
Let’s now add a content box element to your WordPress theme, which has the scrollbar feature by default.
In Thrive Themes, a content box is a block you can use as a container to group multiple blocks together. This can be handy if you need a set of elements to be styled the same way or managed as a group.
For this example, we will add a content box that contains a long list of blog post categories. In this scenario, we want to be able to display all of the categories in the sidebar without making it super lengthy.
First, visit any page or post on your WordPress blog where you want the scrollbar to be on.
Then, on the top admin toolbar, click ‘Edit Theme Template [name]’ or ‘Edit with Thrive.’
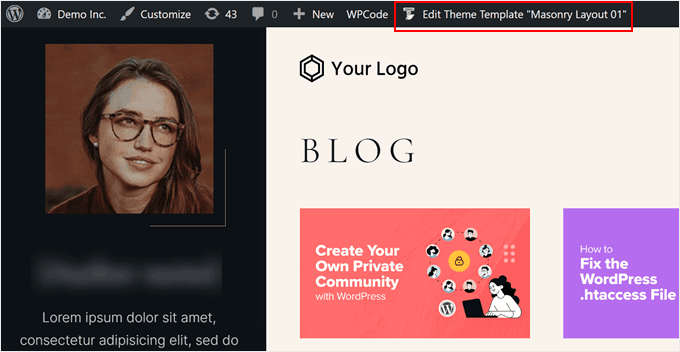
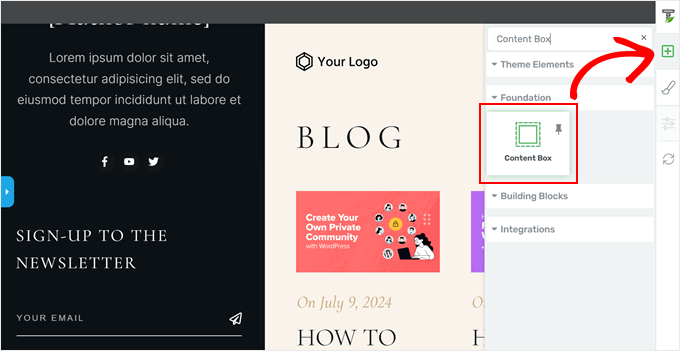
You should now arrive at the editing interface of Thrive Architect. To add the content box block, click the ‘+’ sign on the right side of the page and select the ‘Content Box’ element.
Then, drag and drop it wherever you want the element with the scrollbar to be placed in.
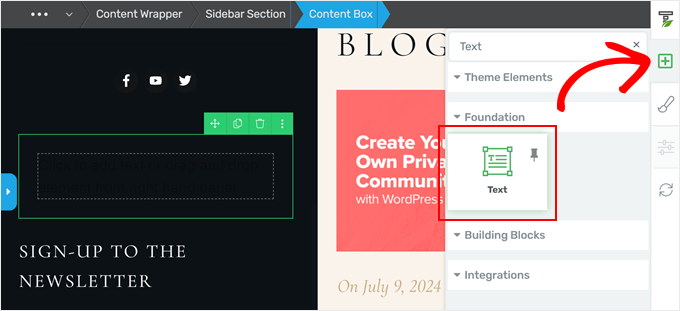
You can now add more content elements to the content box. For example, you could click the ‘+’ sign again and add the ‘Text’ block to it. Then, you could type in any text you want.
Thrive Themes offers tons of visual elements, from basic ones like text and images to forms and pricing tables.
Since we want to add a list of categories to the sidebar, we will also add the ‘Dynamic Styled List’ element to the content box.
This block basically pulls data from your website to dynamically display a list, like categories, tags, or authors. The block will automatically update itself as you build your website.
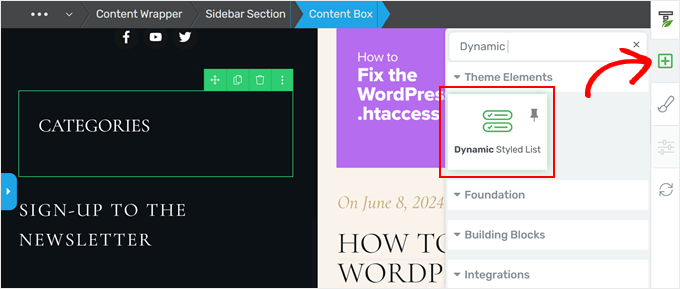
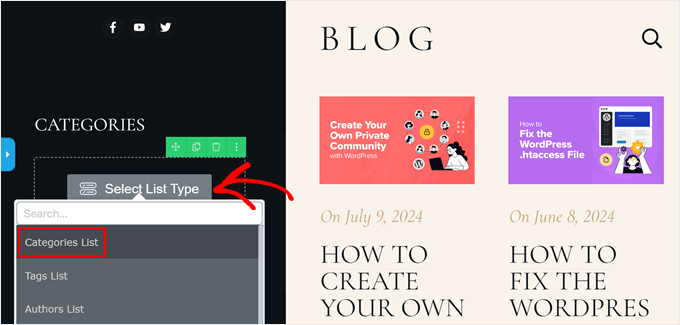
Once you have dragged and dropped the dynamic-styled list to the content box, click the ‘Select List Type’ button.
Then, click ‘Categories List.’
Now, your list of categories, your text block, and any other elements you add to the content box are in the same container.
And as you can see, the list is pretty long, and that’s why we want to add a scrollbar to it.
Step 3: Enable the Scrollbar in the Content Box
If you select that container and click on the blue arrow on the left, you will see many options to customize your content box.
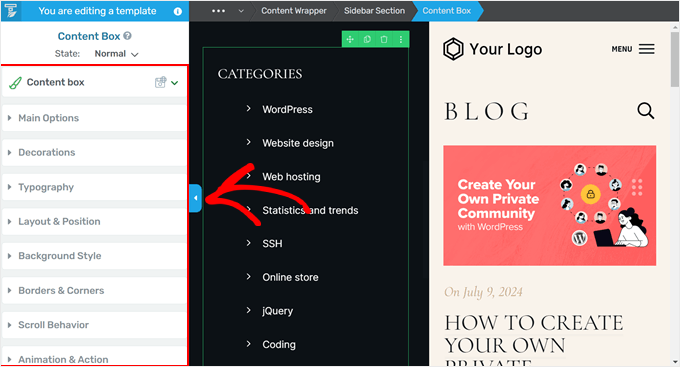
The settings to add a scrollbar are inside the ‘Layout & Position’ tab. This is where you can adjust the box’s padding, margin, width, height, alignment, and so on.
The first thing we did was click on the white arrow inside the blue padding area, right below the ‘Margins & Padding’ section. We just did this to make sure the content box aligns with the rest of the elements in the sidebar.
Feel free to explore other options here to make sure your box looks well-proportioned.
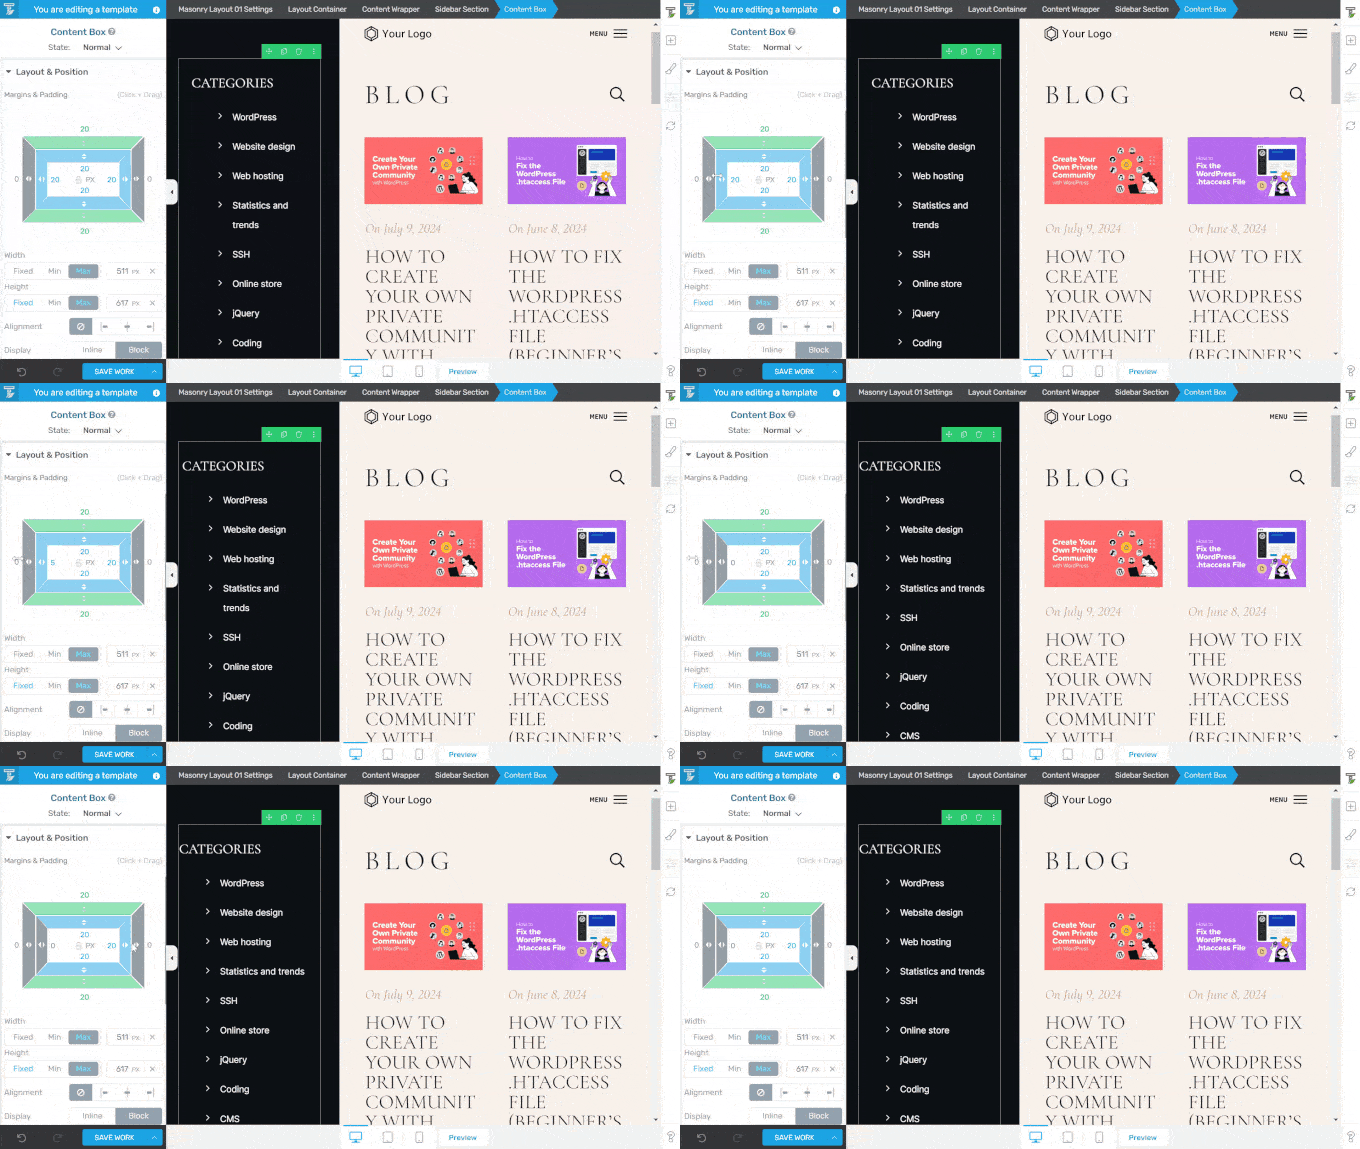
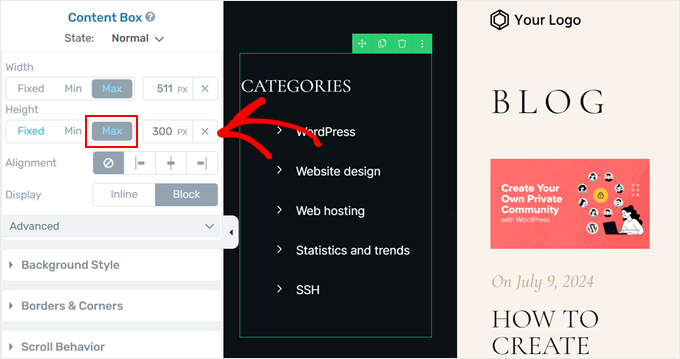
Next, let’s scroll down to the Height section. Go on and click the ‘Max’ button and change the pixel height to a much smaller number. In this case, we went from 617px to 300px.
This will make the content box a lot shorter, making the category names in the bottom section disappear.
With that done, move down the panel again and open the ‘Advanced’ tab. Then, select ‘Scroll’ in the Overflow settings and activate the ‘Style scrollbar’ option.
A scrollbar should be automatically added to your content box block.
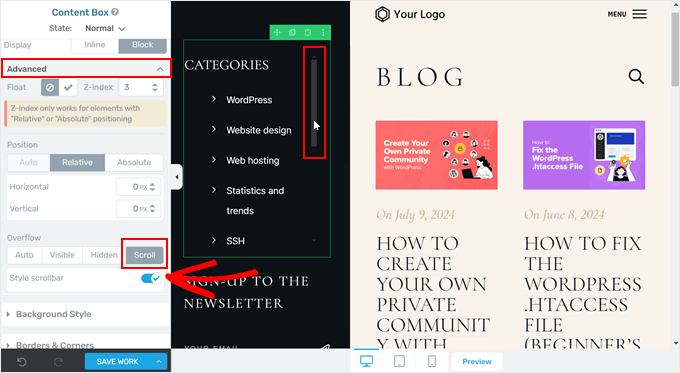
And that’s all for adding a custom scrollbar with Thrive Architect. You can continue editing your WordPress theme, page, or post, or click ‘Save Work’ at the bottom to publish your changes.
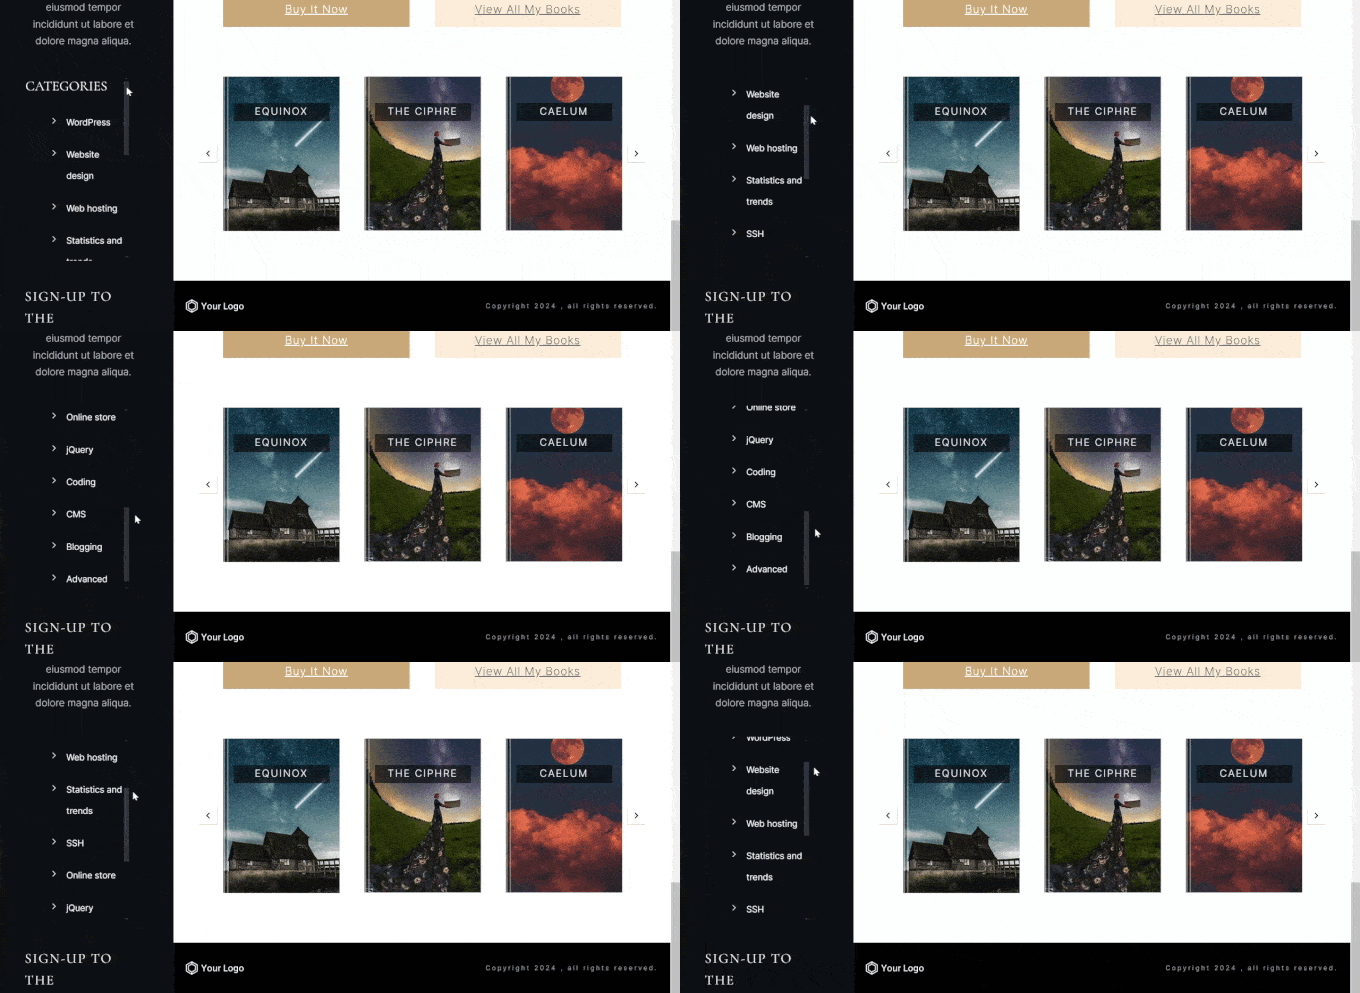
Here’s what our scrollbar looks like on the demo site:
🚨 Want to create a custom WordPress theme that suits all your needs? Skip the hassle of DIY website building – our expert WordPress designers from WPBeginner Pro Services will create a stunning, high-performing site that perfectly reflects your brand.
Ready to bring your vision to life? Book a free consultation call today!
Option 2: Use CSS Code to Add a Custom Scrollbar to a Specific Element
If changing your WordPress theme and using a page builder to create a custom scrollbar feels like too much, you can use CSS code instead. This method allows you to customize the scrollbar directly on your WordPress page.
Don’t worry if you’re new to working with code snippets. We’ll guide you through the process step by step, making it easy to enable this feature on your WordPress site.
First, let’s understand how CSS works. CSS stands for Cascading Style Sheets. It’s a language that tells web browsers how to display elements on a webpage. In our case, we’ll use CSS to add and style a custom scrollbar.
To use custom CSS, we need two things:
- A CSS class: This is like a name tag for an element on your page. We add this to the element we want to change.
- CSS code: This is the set of instructions that tells the browser how to style the element with the CSS class.
So, to add a custom scrollbar, we’ll first give a CSS class to the element we want to change. Then, we’ll add CSS code that creates the scrollbar for elements with that class.
You will add the CSS class scroll-bar to your element. We’ll show you how to do this below. And this is the full CSS code snippet that will add the scrollbar:
.scroll-bar {
  max-height: 100px;  /* Adjust the maximum height as needed */
  width:250px;  /* Adjust the width as needed */
  overflow-y: scroll; /* Enable vertical scrolling */
  overflow-x: hidden; /* Hide horizontal scrollbar */
}


/* Customizing the vertical scrollbar for Webkit-based browsers (Chrome, Safari) */
.scroll-bar::-webkit-scrollbar {
  width: 10px; /* Width of the vertical scrollbar */
}


.scroll-bar::-webkit-scrollbar-track {
  background: #eaeaea; /* Background of the scrollbar track */
}


.scroll-bar::-webkit-scrollbar-thumb {
  background: grey; /* Color of the scrollbar thumb */
  border-radius: 15px; /* Rounded corners for the thumb */
}


/* Hover state for the scrollbar thumb */
.scroll-bar::-webkit-scrollbar-thumb:hover {
  background: black; /* Change color when hovered */
}


/* For Firefox */
.scroll-bar {
  scrollbar-width: thin; /* Define scrollbar width */
  scrollbar-color: #888 #f1f1f1; /* Scrollbar thumb and track color */
}
Step 1: Add the CSS Class to Your Element
There are several ways to add a CSS class to an element on your WordPress site.
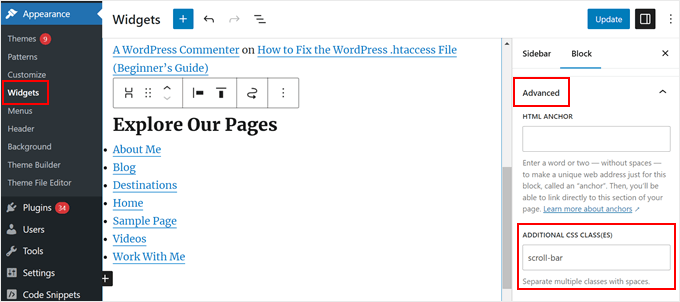
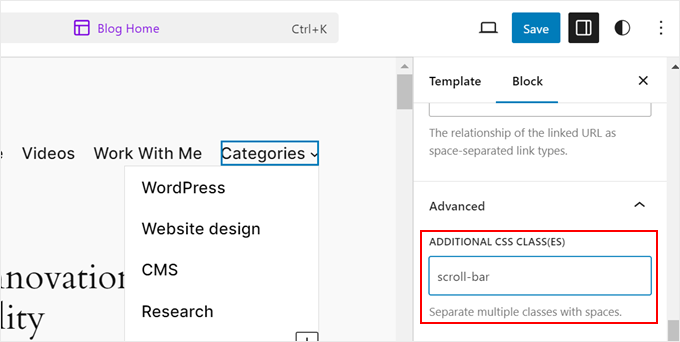
If you’re in the block editor or full-site editor, then you can just click on any block on your page, post, or block theme template. Then, on the block settings sidebar, open the ‘Advanced’ tab and insert your CSS class in the ‘Additional CSS Class(es)’ field.
Once done, just click Update, Publish, or Save.
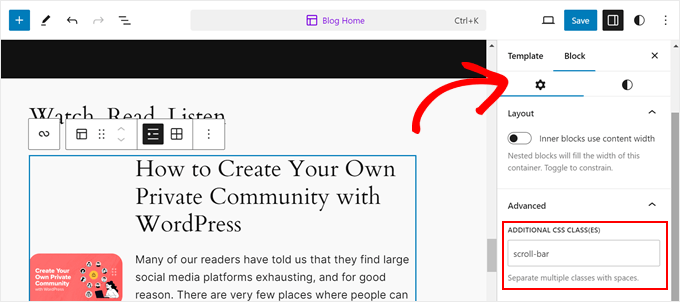
If you use a classic theme, this process also works with the block-based widget editor. Go to Appearance » Widgets, and click on any block you want to add the CSS class to.
After that, you will see the same Advanced tab in the block settings sidebar. Just enter the CSS class in the ‘Additional CSS Class(es) field’ like earlier.
Step 2: Add the CSS Code to Your Theme
Now, let’s go ahead and add our custom CSS code. We will show you 3 ways to do it: using the theme customizer, full-site editor, and WPCode.
The first option is for classic theme users. Plus, it’s a built-in feature, so you don’t need a plugin to insert the code or even open your theme files.
To do this, you can open the WordPress theme customizer by going to Appearance » Customize.
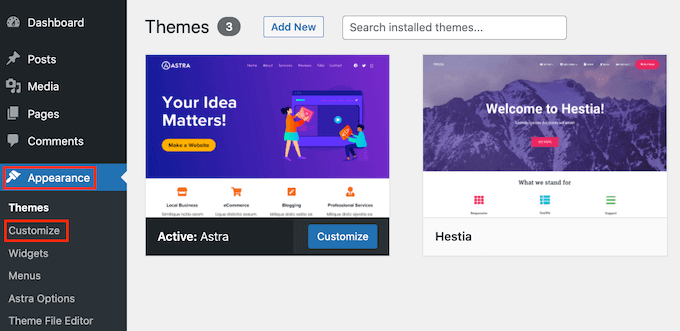
Note: If you’re not seeing this setting on your WordPress, then you are probably using a block theme and can use the next method instead. For more information, check out our guide on how to fix missing theme customizer in WordPress.
Method 1: Adding CSS To Classic Themes
Inside the customizer, find and click on ‘Additional CSS.’
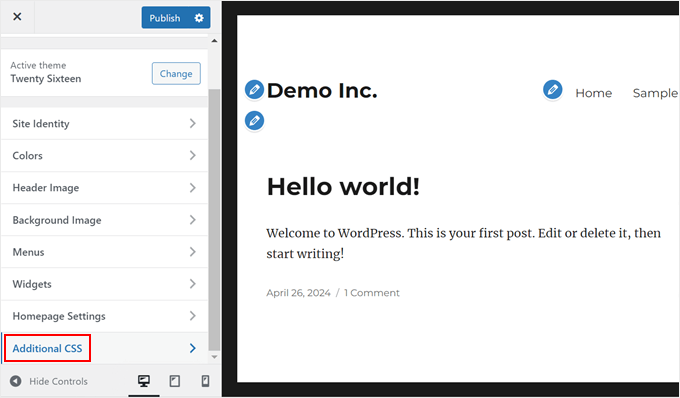
Here, simply paste the code we showed you earlier.
You will automatically see the changes on your theme once you’ve added the code.
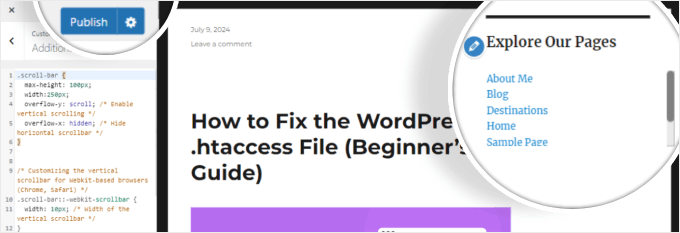
As you can see, the element you added the CSS to class now has a scrollbar. Then, you can simply click ‘Publish.’
Method 2: Adding CSS Using The Full-Site Editor
If you have a block theme, you will need to add CSS code using the full-site editor, then just go to Appearance » Editor.
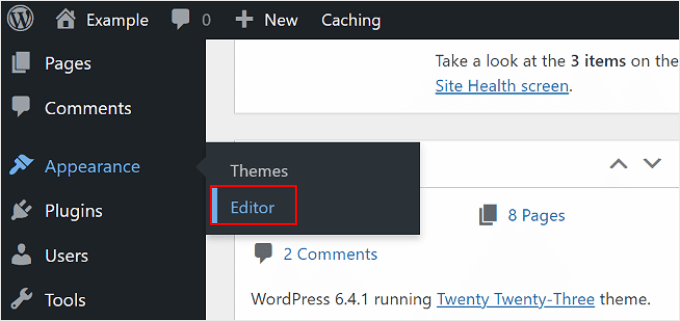
You will find some menu options to customize your block theme.
Here, click ‘Styles.’

On this page, there should be some block theme designs for you to choose from.
We will just ignore that and click on the ‘Edit’ button. It is shaped like a pencil.
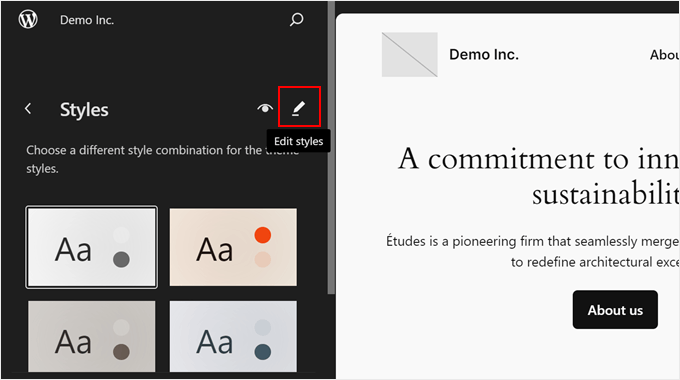
You are now inside the editing interface.
On the right side panel, click the three-dot menu next to the revisions icon and select ‘Additional CSS.’
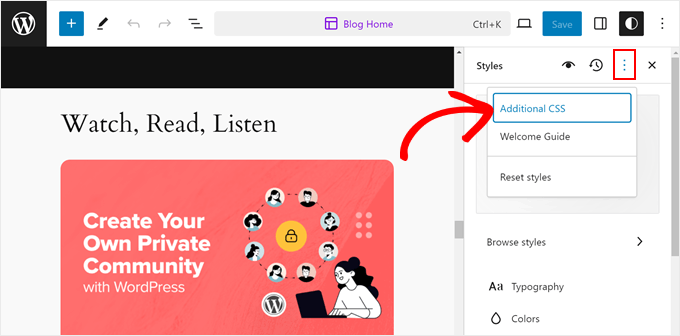
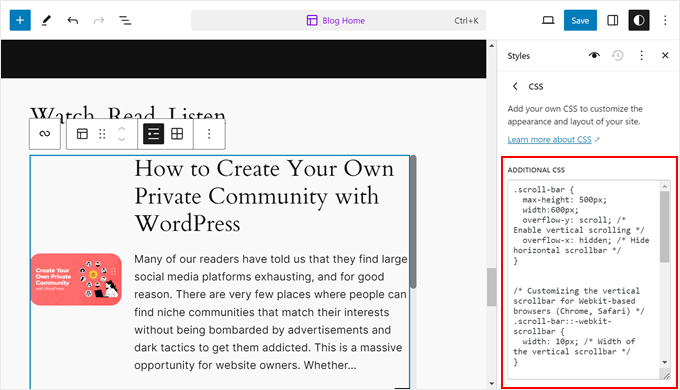
Now, just paste the code snippet from earlier. You should see your changes automatically.
Once done, click ‘Save.’
One downside of using the theme customizer and full-site editor to insert your CSS is that if you decide to update or change your theme, you may risk losing your CSS customization.
That’s why we recommend using WPCode to edit your site’s CSS, especially if you are using the full-site editor and a block-based theme. You can follow that method below, and it will work with classic themes, too.
Method 3: Adding CSS Using WPCode
If you’re scared of customizing your site using code, then WPCode is the perfect solution for you. This code snippet plugin makes it safe to insert custom code, as you won’t need to interact with your theme files directly.
If an error occurs, WPCode will automatically detect and deactivate the code that causes the issue. This way, there’s minimal chance of you breaking your site.
First, install the WPCode plugin on your website. You can read our beginner’s guide on how to install a WordPress plugin for more information.
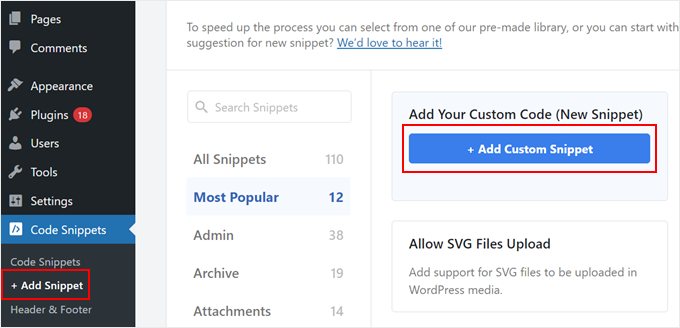
Then, go to Code Snippets » + Add Snippet in your WordPress dashboard. Choose ‘Add Your Custom Code (New Snippet)’ and click ‘+ Add Custom Snippet’.
Now, give your new custom code snippet a name. It can be something simple like ‘CSS Scrollbar.’
After that, change the Code Type to ‘CSS Snippet.’
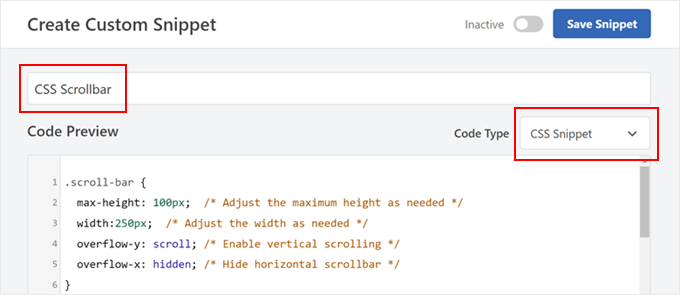
In the Code Preview box, go ahead and paste the snippet we showed you earlier.
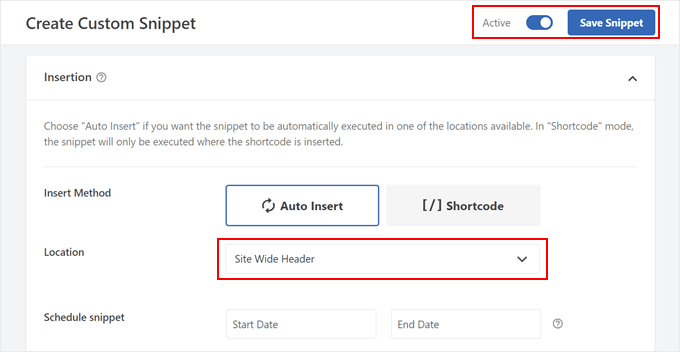
Once done, scroll down the page to the ‘Insertion’ section. There, make sure the Insert Method is ‘Auto Insert’ and the Location is ‘Site Wide Header.’
With that done, just toggle the button at the top right corner so that it says ‘Active’ and click ‘Save Snippet.’
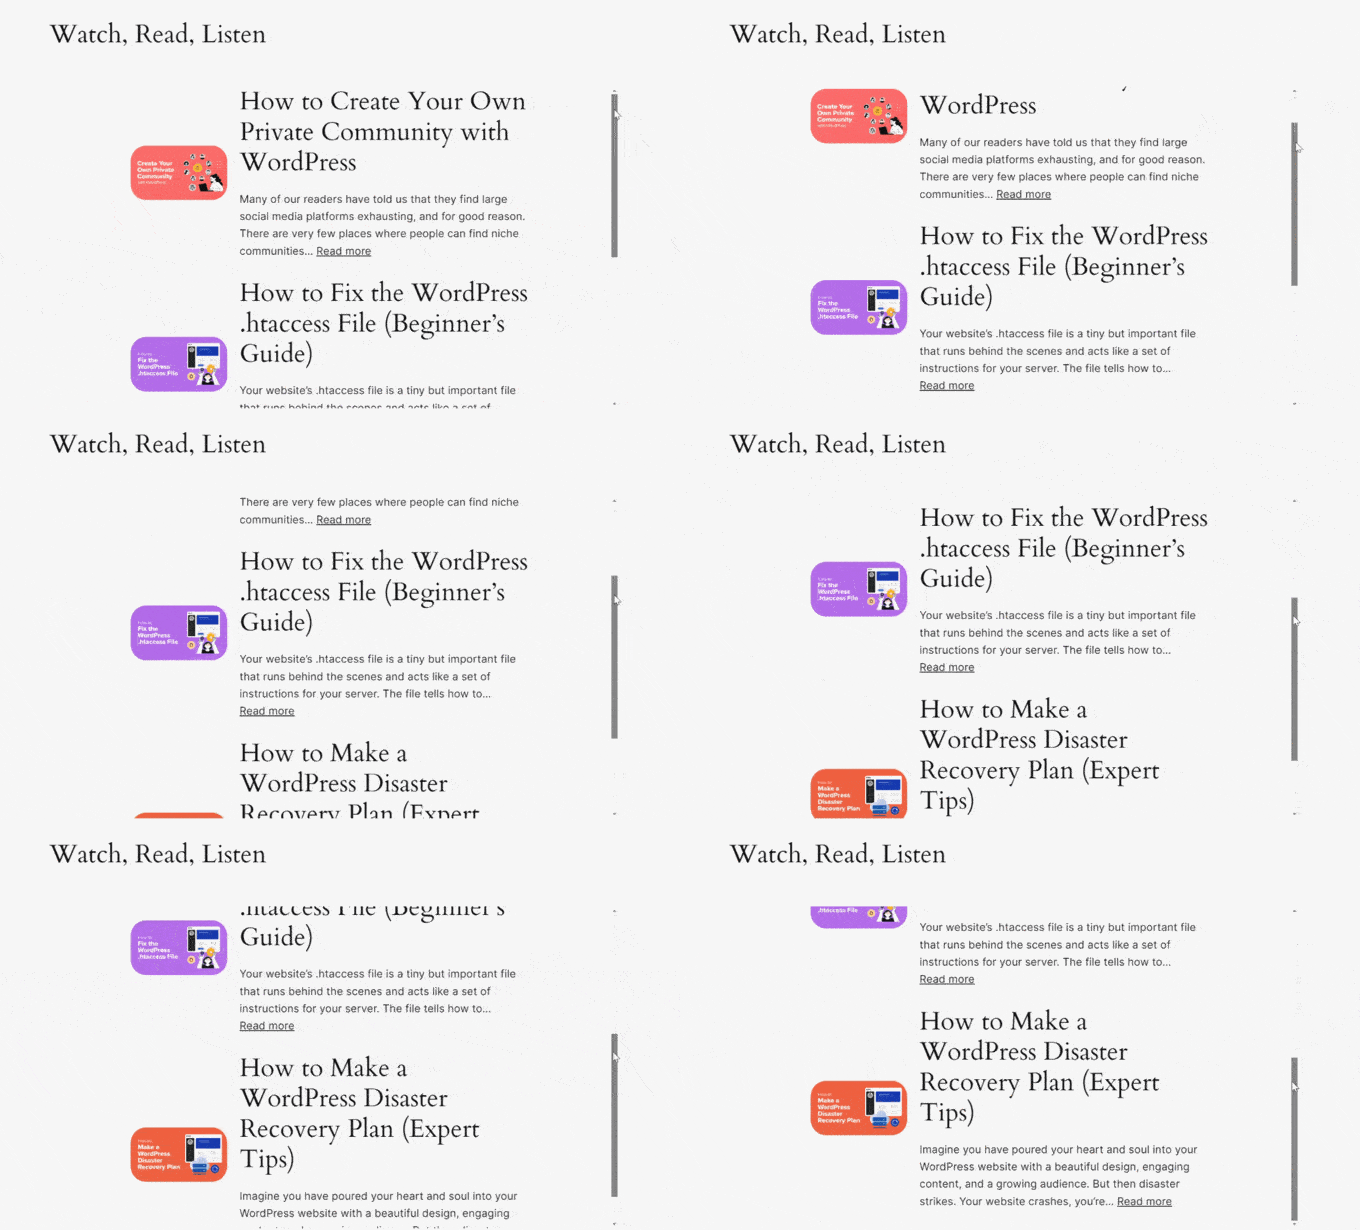
You should now see a scrollbar on the element you’ve added the CSS class to.
Here’s an example of us adding a scrollbar to a list of recent posts:
How to Add a Custom Scrollbar to a Menu Item With Multiple Submenus
One of the things readers are curious about is how to add the scrollbar to your navigation menu item that has a long list of submenus.
The process is actually pretty similar to the one we’ve just shown you. But there are some little tweaks here and there depending on the theme you’re using.
If you use a classic theme, then you should only add the scroll-bar class to your main menu item. You don’t need to add it to your submenu items.
To add a CSS class to your menu, you can open the theme customizer.
Then, click the ‘Menus’ button.
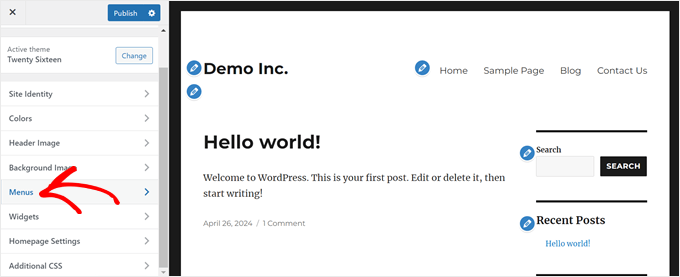
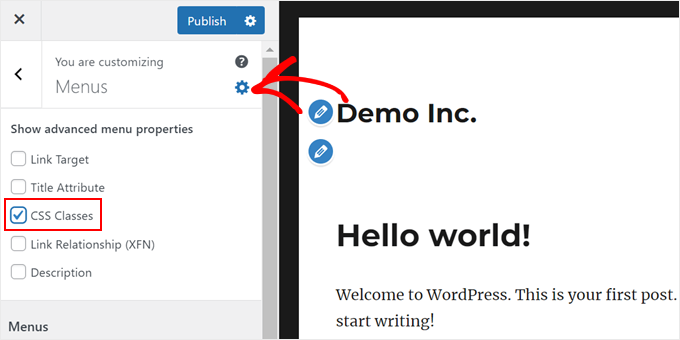
Next, click the gear ‘Settings’ icon and then select ‘CSS Classes.’
This lets you add a CSS class to each menu item.
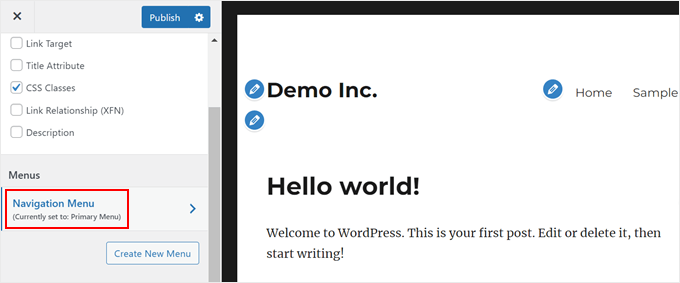
Now, move down the sidebar panel.
Then, open your primary menu.
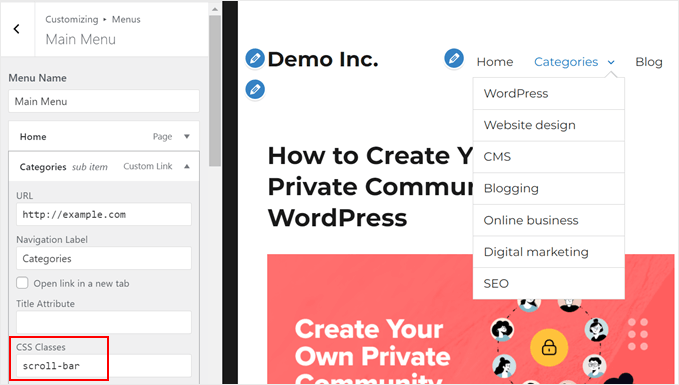
At this stage, you can select the menu item you want to add the CSS class to and click to expand it.
There should be a field called ‘CSS Classes,’ and you can add the class there.
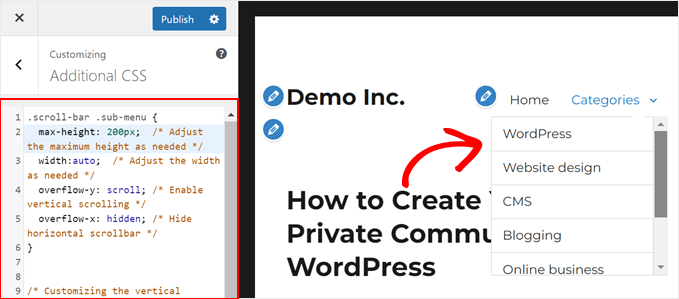
Other than that, you want to make sure to add the sub-menu class after every mention of the scroll-bar class in your CSS code, like so:
.scroll-bar .sub-menu {
  max-height: 100px;  /* Adjust the maximum height as needed */
  overflow-y: scroll; /* Enable vertical scrolling */
  overflow-x: hidden; /* Hide horizontal scrollbar */
}
/* Do the same to the rest of the code */
Here’s what the navigation menu should look like:
The same principle goes for block themes.
You only need to add the scroll-bar class to your main menu item, not the submenus.
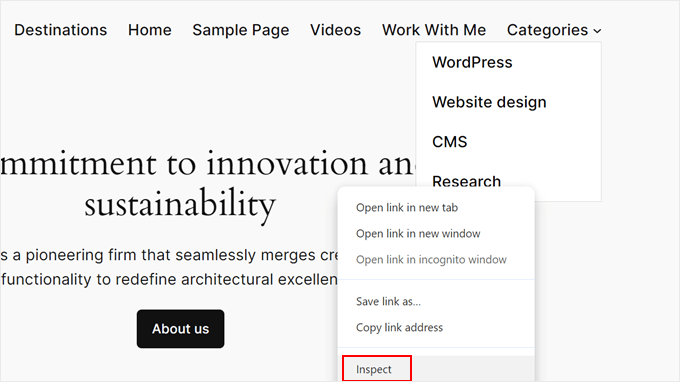
Now, here’s where things differ. You have to visit your WordPress website and open your browser’s inspect tool.
For Chrome users, just right-click on your menu item with submenus and select ‘Inspect.’
On your keyboard, press CTRL/Command + F to activate the Find feature. Then, locate the <ul></ul> HTML code that contains the scroll-bar class.
The exact code will be different from theme to theme, but here’s what ours looks like:
<ul data-wp-on-async--focus="actions.openMenuOnFocus" class="wp-block-navigation__submenu-container scroll-bar wp-block-navigation-submenu">...</ul>
You will know you’re selecting the right line of code if all of the submenu items are highlighted.

Now, you want to copy all of these CSS classes between class=" and ">.
In the CSS code, replace the scroll-bar class with all of those classes and a period (.) before it to indicate it’s a class. It’s also good to add !important on every line that customizes the scrollbar to make sure the theme doesn’t override these settings.
Here’s an example:
.wp-block-navigation__submenu-container.scroll-bar.wp-block-navigation-submenu {
 max-height: 100px !important; /* Adjust the maximum height as needed */
 overflow-y: auto !important; /* Enable vertical scrolling */
 overflow-x: hidden !important; /* Hide horizontal scrollbar */
}
/* Do the same to the rest of the code */
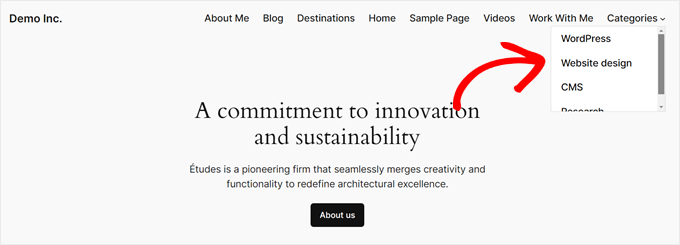
Once you have added this code, your navigation menu should look like this:
How to Customize the Custom Scrollbar’s Design
Now that you’ve added a custom scrollbar, you might want to make it match your website’s design. You can easily change the scrollbar’s appearance using CSS. Let’s look at how to customize its size, color, and shape.
Say you want to change the maximum height of the element that you’re adding a scrollbar to. In this case, you can change the number in max-height: at the top to any number you want so long as it’s in pixels.
You can also adjust the number in width: to make the width of the element with the scrollbar wider or narrower.
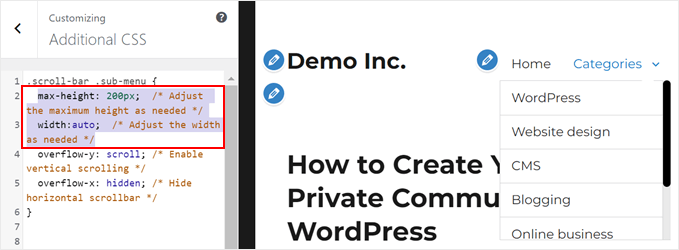
To adjust the size of the scrollbar, find the line width: 10px; under the .scroll-bar::-webkit-scrollbar selector.
Increase this number to make the scrollbar wider, or decrease it to make it narrower. For example, width: 15px; will create a wider scrollbar, while width: 5px; will make it thinner.
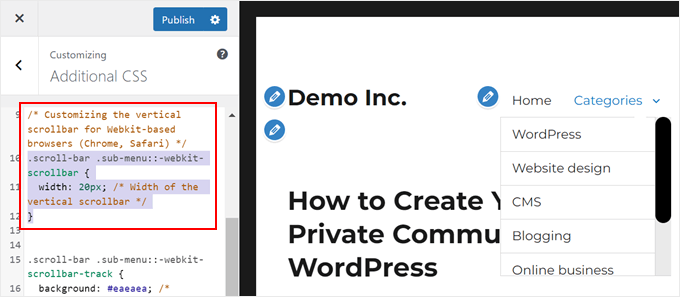
To change the color of the scrollbar, find the line that says background: grey; under the .scroll-bar::-webkit-scrollbar-thumb selector.
Replace ‘grey’ with any color you like, like ‘blue’ or any color using the hex color code (e.g. #0000FF).
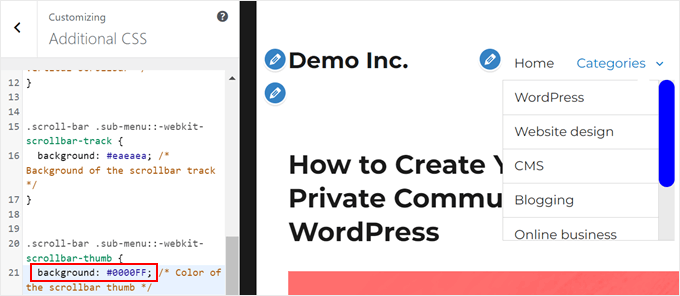
If you want to make the scrollbar more rounded, look for the border-radius property.
The higher the number, the more rounded the corners will be. Try changing border-radius: 15px; to border-radius: 20px; for a more rounded look, or border-radius: 0px; for sharp corners.
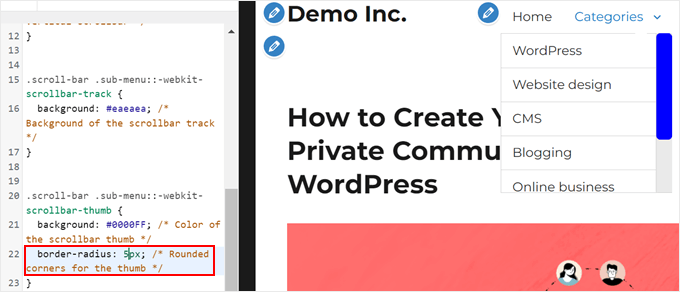
Note that the changes above will only affect Webkit-based browsers like Chrome and Safari.
For Firefox, you’ll need to adjust the scrollbar-color property. The first color is for the thumb (the part you drag), and the second is for the track (the background). For example, scrollbar-color: blue #eaeaea will create a blue scrollbar on a light grey track in Firefox.
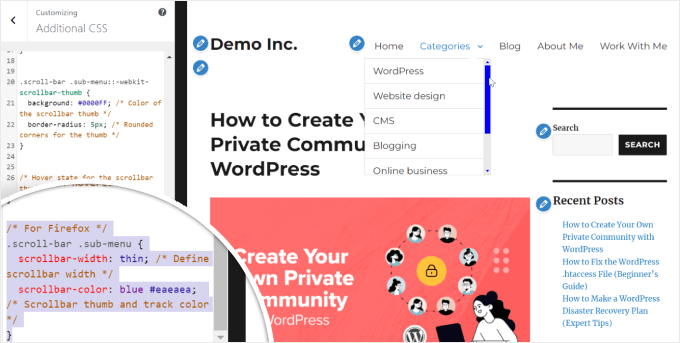
After making these changes, save your CSS and refresh your WordPress page to see the new, customized scrollbar in action. Feel free to experiment with different colors and sizes until you find the perfect look for your website.
Learn More Ways to Improve Your WordPress Web Design
Now that you’ve learned how to add custom scrollbars to your WordPress site, why not explore other ways to improve your website’s design and functionality? Here are some helpful guides to take your WordPress skills to the next level:
- If you’re looking to showcase your pages in a visually appealing way, check out our tutorial on how to easily show a page list with thumbnails in WordPress.
- For blogs with lots of content, infinite scroll can greatly improve user experience. Learn how to add this feature step by step.
- To add some visual flair, try adding a parallax effect to your WordPress theme. It’s easier than you might think.
- For improved accessibility, consider adding a font resizer to your site. We’ve got a simple guide to help you do just that.
- If you’re not happy with your sidebar’s current position, we can show you how to change the sidebar side in WordPress.
We hope this article has helped you learn how to add a custom scrollbar to any element on your WordPress site. You may also want to check out our expert picks of the best WordPress theme builders and our guide on how to add a reading progress bar in WordPress.
If you liked this article, then please subscribe to our YouTube Channel for WordPress video tutorials. You can also find us on Twitter and Facebook.


kzain
How does customizing the scrollbar affect page load times and overall performance? I’m keen on optimizing my site’s speed, and I’d love to hear if there are any best practices for balancing aesthetics with performance. Thanks for the detailed instructions and the resources provided!
WPBeginner Comments
While the CSS does require rendering to the page, it’s not likely to slow things down for something this simple unless the device or computer is much older.
Vaka
Thank youuu!
WPBeginner Support
You’re welcome
Admin
alex
Hello I cannot seem to get my custom scroll bar to display vertically??? I have it set to a wordpress text widget with the height at 400 px and the width at 100 px and it comes up horizontal which is not what I need. thank you
WPBeginner Support
Your content may not be tall enough, you may want to reach out to the plugin’s support and they should be able to assist.
Admin
irit
hi
Thank you for sharing the plugin
i have a very long image that i would like to put a scroll bar on.
i know i have the right selector since the element does change, unfortunately it just “squishes” to whatever size i put into height (i used Elementor to create that page)
thank you
WPBeginner Support
You would want to first reach out to Elementor as their page builder may be preventing the image from going beyond the size of the section you have set up.
Admin
Danny
This is exactly my idea – to use it and make visitors spend more time on my site. My frontpage is such that I can combine several pages. So there is this particular page that is part of my front page, but it is long, so i want to use the scrolling to keep it short yet visitors can scroll just within it.
My problem is that I dont know the Target Element ID.
Can you assist?
WPBeginner Support
If you reach out to your theme’s support for the specific section you want they should be able to let you know the element they’re using.
Admin
Danny
I want to add scrolling on a particular page – the page itself, not the sidebar or any widget.
What will the Target ELement ID be?
I right-clicked on the page body, but I dont know what to look out for. Can anybody advice?
WPBeginner Support
It would depend on the specific theme but normally for what you’re wanting it would be the content area.
Admin
Danny
I am using the free version of raratheme’s lawyer landing page and I dount the developer can offer me such info as a free user.
Sure, its the content area, and I wonder what the Element ID is called. Any ideas?
WPBeginner Support
It would be called something similar to content area normally, where you right click should have brought up a specific area of the html that when you hover over it should highlight the section to show you what it is targeting. You may want to take a look at our guide on how to use inspect element here: https://www.wpbeginner.com/wp-tutorials/basics-of-inspect-element-with-your-wordpress-site/
Alexandre
Very nice and easy to custom widget. However, it took me a couple of hours to find what to enter in the Target Element Sector section while using Elementor. It finally worked with the following line: “.elementor-element-6daf57c”. The dot (“.”) at the beginning is important.
Thank you!
WPBeginner Support
Thanks for sharing this specification to help other users
Admin
Rushikesh
This is working for desktop view, but I don’t want this scrollbar work on mobile devices. Because it’s ruin responsiveness. How can I do it to stop working on mobile devices?
Rosie Malik
This tool is such a tremendous help to website appearance and functionality! You can select your featured items (pictures, posts, etc.) and put them almost anywhere … and several times, too! Your site visitor will spend more time on your site and interract with more content, etc. This is a total win/win!
igor Griffiths
Thanks for sharing this plugin and more importantly how to set it up, I would never have thought to use the Chrome inspect element to find the target id without many hours of experimentation.
Looks like a very flexible plugin that with a little imagination could be put to many powerful and engaging uses
igor