Adding beautiful pricing tables that are easy to scan allows users to select the right product and simplifies the decision-making process.
Several of our partner brands offer different pricing plans and have created pricing tables to showcase them. They make their tables visually appealing with a colorful CTA button and a clear design that matches their brand. 🎨
This creates a cohesive look and encourages their users to make a purchase.
In this article, we will show you how to easily add beautiful pricing tables in WordPress without writing any code.

Why Add Pricing Tables Using a WordPress Plugin?
There are two ways to add new features to your WordPress website. You can program them manually, using code, or you can use a WordPress plugin.
If you are familiar with HTML and CSS, then you may wish to create a pricing table using code. The programming and design skills required aren’t particularly advanced, and you will have complete control over the design of the table.
However, writing and testing the code will take time. And you will also have to consider your users who use mobile devices or different web browsers. You may end up with an unattractive pricing table that doesn’t look right to all of your users.
Using a WordPress plugin is quicker and easier, and it’s the best solution if you don’t have design or coding experience.
Having said that, let’s have a look at how to add beautiful pricing tables in WordPress without writing any code. We will cover two different WordPress plugins, and you can choose the one that works for you:
Method 1: Add Beautiful Pricing Tables With Easy Pricing Tables
This method allows you to add pricing tables to an existing page or post. If you need to customize the rest of the page, you should use method 2 instead.
First, you need to do is install and activate the Easy Pricing Tables plugin. For more details, see our step-by-step guide on how to install a WordPress plugin.
For this tutorial, we will use the free plugin. There’s also a premium plugin that offers more features and starts at $49 for a single site license. You’ll need the premium version if you wish to access additional templates, add images, or integrate the table with WooCommerce.
Step 1: Creating the Pricing Table
Upon activation, head over to the Pricing Tables » Add New page from the WordPress admin sidebar.
Here, you will be asked where you want to add your table to your site. Simply select the ‘New Page With Pricing Table’ option.
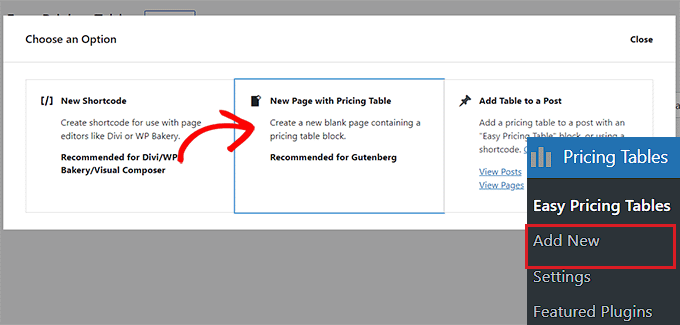
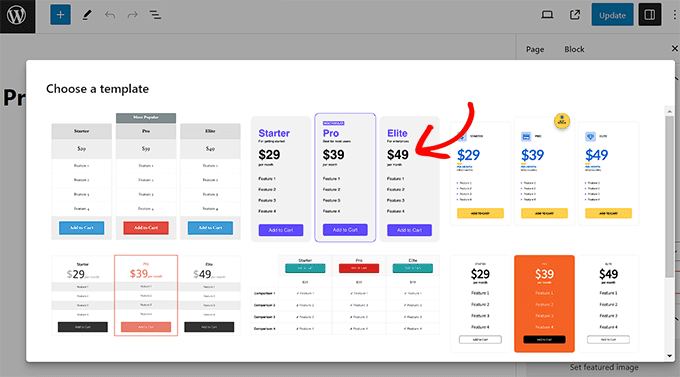
This will open a new pricing page in the WordPress block editor, where a ‘Choose a template’ prompt will appear on the screen.
From here, select a design of your liking to embed the pricing tables on your WordPress page.
Step 2: Customizing the Pricing Table
Customizing the pricing table is super easy. For example, you can start by changing the headings for the pricing plans.
After that, you can click on the table to start adding subheadings, features, pricing, and more.
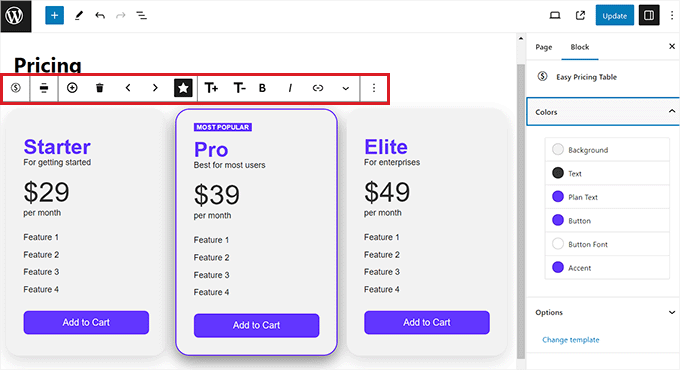
You can use the block toolbar at the top of the table block to add a new column, change the alignment of rows and columns, reorder the columns, and change their sizes.
Often in pricing tables, one plan is marked as ‘featured’ or ‘most popular’. You can do this by selecting the column you want to highlight and then clicking the star icon on the toolbar.
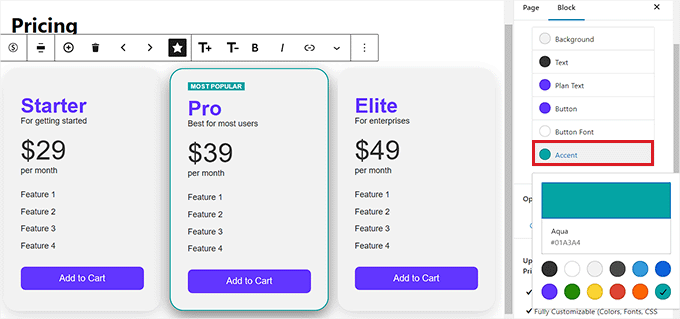
You can also change the table’s visual appearance from the block panel in the right corner of the screen.
For example, you can change the accent color to highlight the best pricing plan or change the button color at the bottom of the table.
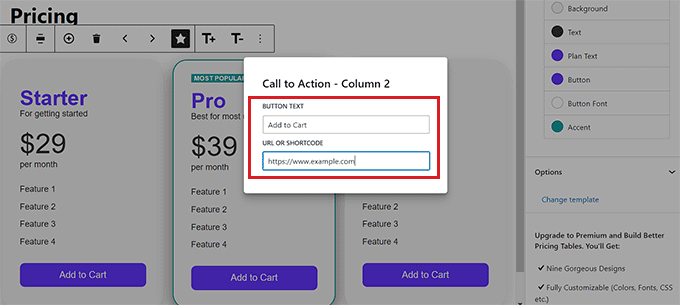
You can also click on the buttons to edit their labels.
Once you do that, you can add a label and a URL of your choice to the fields.
Step 3: Publishing the Pricing Table
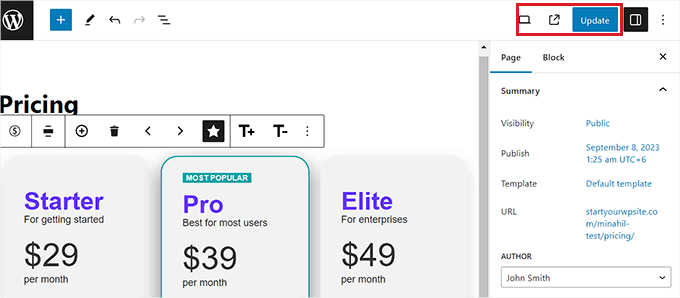
To publish the pricing table on your WordPress site, simply click the ‘Update’ or ‘Publish’ button at the top right corner of the screen.
You can also click on the ‘Preview’ link to see your page before making it live on your website.
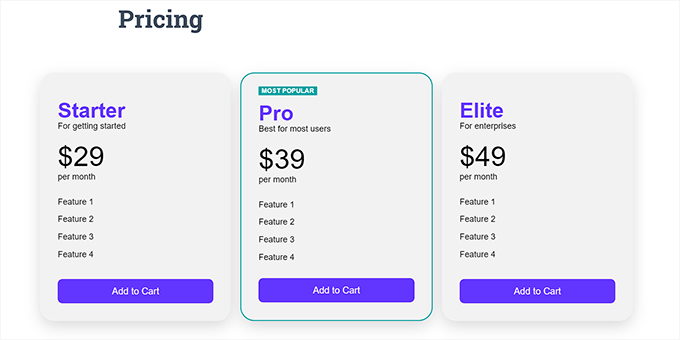
Now, you can visit your website to see the final result.
Method 2: Add Beautiful Pricing Tables With a Page Builder
This method is best if you want complete control over your pricing page design.
For this, we recommend SeedProd. It is a drag-and-drop WordPress page builder for businesses, bloggers, and website owners, and the best choice for creating high-converting pricing pages.
Several of our partner brands have redesigned their entire websites with it and their users have loved the new aesthetic. To learn more, see our detailed SeedProd review.
First, you need to install and activate the SeedProd plugin. For more details, see our step-by-step guide on how to install a WordPress plugin.
Note: The plugin has a free plan. However, you’ll need the Pro or Elite plan to access the pricing table block we use in this tutorial.
Upon activation, go to the SeedProd » Settings page to enter your plugin license key. You can find this information under your account on the SeedProd website.

After entering your license key, we’ll start by creating a new landing page, and then add a pricing table block.
Creating a New Landing Page
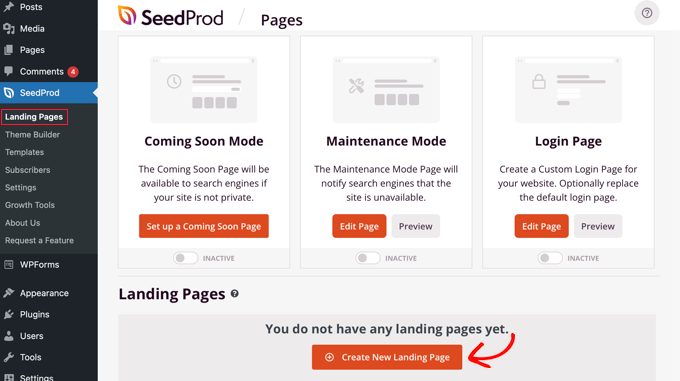
To create the landing page for your pricing table, you need to head to SeedProd » Landing Pages and then click the ‘Create a New Landing Page’ button.
On the next screen, you’ll be asked to choose a landing page theme. SeedProd comes with dozens of beautiful landing page templates neatly organized for different campaign types.
Simply click to select a template that you want to use as a starting point.
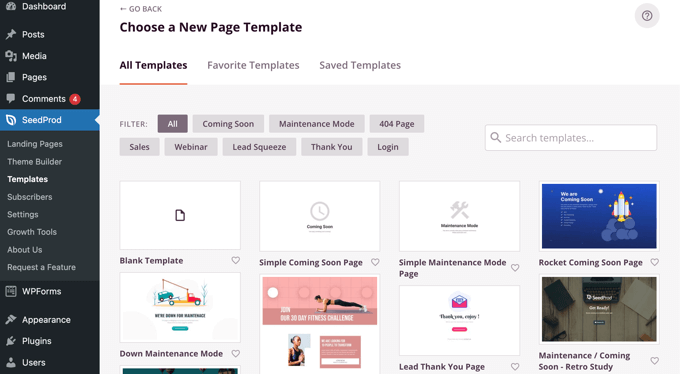
You can learn how to customize the page and add new blocks in our guide on how to create a landing page with WordPress. When you are ready, we will move on and add the pricing table.
Adding a Pricing Table
First, you need to add some columns, so you have somewhere to place the pricing table blocks.
You can drag the ‘Column’ block onto the page and then select enough columns to display your prices. For this tutorial, we’ll select three columns.
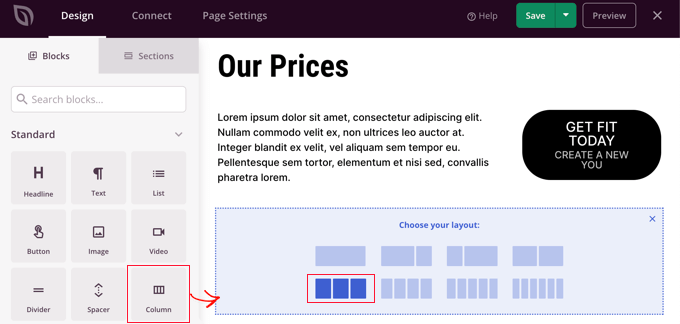
After that, you have to locate the ‘Pricing Table’ block and drag it onto the words ‘Drag New Block Here’ in each of the cells you just created.
For this tutorial, you’ll need to drag the block onto the page three separate times, once for each column.
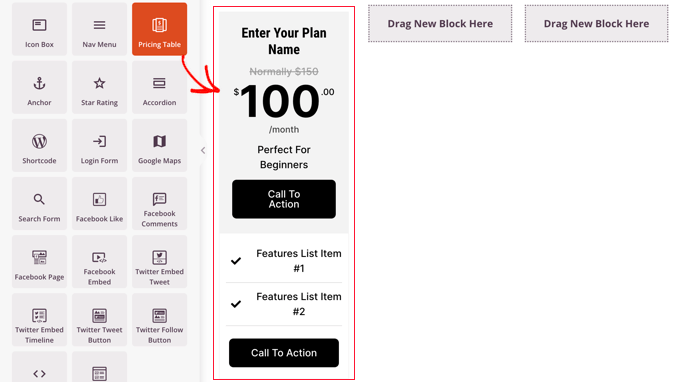
To edit a pricing table, simply click on it.
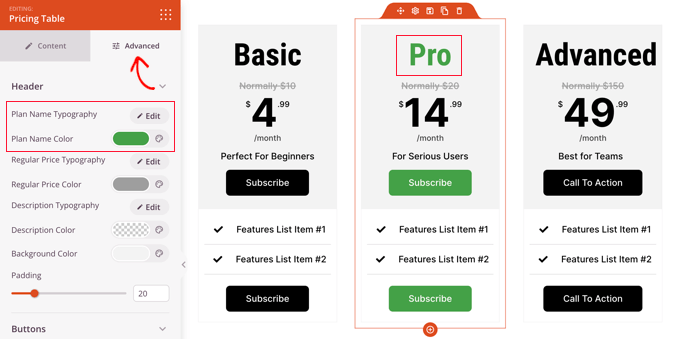
You can now use the settings on the Content tab to edit the plan name and enter the name of your product or service. You can also change the price and currency, add the price that the item normally costs when not on sale, and more.
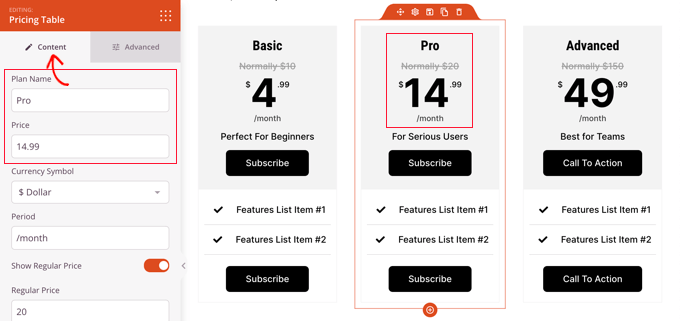
After that, you must switch to the Advanced tab to customize the text font and size, button color and size, spacing, hover effects, and more.
For example, you can make one pricing tier stand out more than others, encouraging your users to choose that option.
Publishing the Pricing Table
Once you are happy with your landing page and pricing tables, it’s time to publish it.
Simply click the dropdown arrow on the ‘Save’ button and click ‘Publish’.
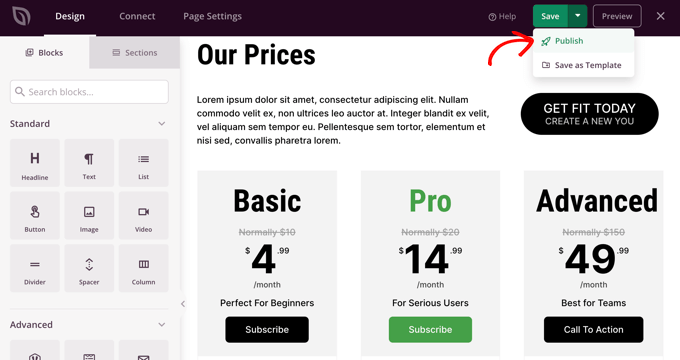
You will see a notification letting you know that your page has been published.
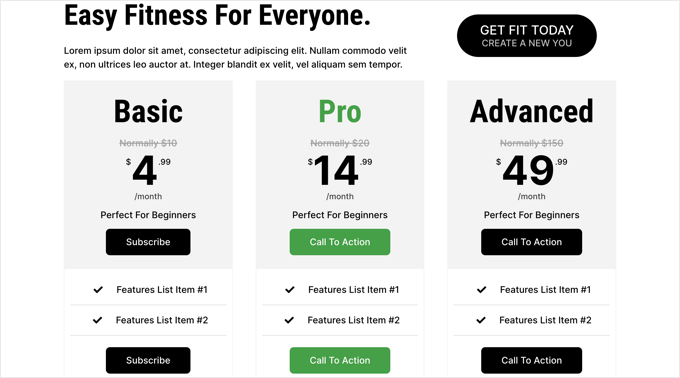
You can also click the ‘See Live Page’ button to see how your new WordPress pricing page looks.
Bonus: Boost Pricing Page Conversions
Once you have created an attractive pricing page, it is important to optimize it for conversions and to encourage users to make a purchase.
To do this, you can offer discounts to new users on a specific pricing plan. This can act as an incentive and motivate users.
To create a discount coupon, we recommend using the Advanced Coupons plugin. For details, you can see our tutorial on how to create smart coupons in WooCommerce.

Another tip to boost sales on your pricing page is to create a sense of urgency. This can build FOMO amongst users and incite them to take action.
You can do this by adding countdown timers, offering limited products, time-sensitive discounts, and more.
Additionally, you can use TrustPulse, which is the best WordPress social proof plugin on the market.

It displays live customer activity on your website like purchases and signups to increase conversions. For more tips, you can see how to grow pricing page conversions by 30%.
We hope this tutorial helped you learn how to add beautiful pricing tables in WordPress with no coding required. You may also want to see WordPress eCommerce setup guide for beginners and see our list of popular digital products you can sell online.
If you liked this article, then please subscribe to our YouTube Channel for WordPress video tutorials. You can also find us on Twitter and Facebook.


Karthik
how can we add pricing table with with multiple currency wordpress
WPBeginner Support
It would depend on how you mean specifically, as an example the Easy Pricing Table plugin has a toggle option to swap between currencies that you could use.
Admin
Dennis Muthomi
As a small business owner I’ve had trouble creating nice pricing tables in the past for my services. Actually I had to create one from scratch and it does not look that great.
This step by step guide for using Easy Pricing Tables is exactly what I needed.Thanks!
Mrteesurez
Adding pricing tables to a WordPress site without coding is a game-changer, especially when using a Pagebuilder, I used both Elementor and Seedprod. I’ve found that using a Pagebuilder makes creating these tables incredibly intuitive, allowing you to focus on design and clarity. This approach ensures that the pricing information is both attractive and easy for users to understand, which is crucial for conversions. For me, a well-designed pricing tables can significantly impact user decisions when all essential features of the products or services are listed accordingly, that is why I found this guide particularly valuable.
Moinuddin Waheed
Pricing table is a must have feature for any website that is making an online sale of products and services.
Having a good looking, informative and call to action pricing table helps make quick purchase decision.
it also helps make a comparison of different available options for some tweak of the costs, thus helps make informed decisions regarding the plan that best suits the need.
Mrteesurez
I totally agreed with you on the importance of pricing page and want elements should be present. It contains different pricing plans to choose by users. Users will be able to compare to select one that is most affordable to them.
Anika
Hi
I want to make pricing table and add buy now button, on clicking on the buy now button wordpress admin will get an email notification of the plan choosed by the user
Is it possible with this plugin
Alex
I’ve created a really nice price table, which i can preview in table editing, but when I copied the ‘deployed’ text into the wanted webpage, nothing shows up. In page editing the deployed text is just written and in preview the page is blank
So 2 questions: 1) where do you insert the deployed text? 2) after copying the text how do you activate it, so it is visible on the webpage?
Thanks!
Donna Heath
I don’t sell anything. I want to do reveiws on animal products and thus get advertisers. But, I am having a hard time gettig my followers numbers up. Should I go ahead write the reviews and contact the companies and ask for them to advertise on my page for a fee. When they say yes, hopeful thinking, how do I put advertisements on my site?
WPBeginner Support
Hey Donna,
Check out our guide on how to manage ads in WordPress with Adsanity.
Admin
Allan Jackson
This plugin sounds good but a bit pricey to my mind. Elementor does the same thing and much, much more for $45. I guess this would work if you couldn’t use a page builder for some reason.
Farukh hussain
This is a very useful article for me. I was just finding some way to make these tables. Thanx for sharing.
Krishna
Please make a tutorial video on how to make left navigation bar or WordPress custom page .just like any tutorial website like w3school . threy have a beautiful navigation sidebar on their website . I want this feature in WordPress website too.please do fast and notify me via email