Want to add music to your WordPress site? 🎶
Whether you’re a music lover or run a blog where sound plays a big role, this can make your site way more fun and interesting.
But there’s a small catch. While WordPress makes it easy to add basic features, integrating a music player can be a little tricky.
After researching the best methods for adding an audio music player to WordPress, we found 2 simple options: using the Audio block and the HTML5 Audio Player plugin. Each option has its perks, depending on whether you want a simple player or a more customizable one.
In this guide, we’ll walk you through how to add an audio music player widget to your WordPress site.
Why Add an Audio Music Player Widget in WordPress
A music player widget lets visitors listen to audio directly on your WordPress website. This feature is particularly valuable for podcasters, content creators, and musicians looking to showcase their work.
It can encourage people to visit your website directly rather than playing your audio on other platforms. Once these people are on your site, you may be able to make more money by showing ads on your WordPress blog or selling the audio file as a digital download.
Even if you don’t create any original audio, embedding content from third-party platforms such as Spotify is an easy way to create a more engaging website. This approach can keep visitors on your site longer, improving important website metrics like time-on-site.
Plus, an audio player widget isn’t limited to just music. It can be used for podcasts, audiobooks, or educational content, making your site more versatile to a wider audience, including those who prefer audio content or have visual impairments.
With that in mind, we will show you how to add an audio music player in WordPress using 2 methods. You can use the quick links below to jump straight to the method you want to use:
Let’s explore how to bring the power of music to your WordPress website! 🎧
Method 1. How to Add an Audio Music Player Widget Using the Audio Block (Easy)
With this method, you can create a simple audio player using the built-in WordPress Audio block. This block can play any audio file format, including .mp3, .m4a, .ogg, or .wav files.
WordPress’s built-in audio player is very simple compared to most plugins. It has a play/pause button, volume controls, a download button, and a button to change the playback speed.
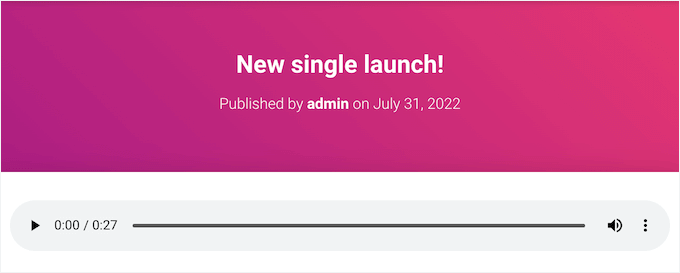
It’s a good choice if you want to add a few short audio clips to your site without needing any advanced features.
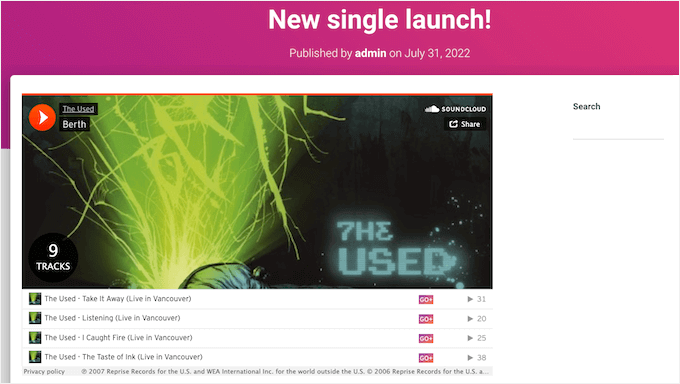
If you embed content from a supported third-party platform such as Spotify or SoundCloud, the Audio block will show the playback controls for that platform. It may also show some extra content from the platform, such as the artist’s name and the cover image.
For example, here is an Audio block with embedded SoundCloud content.
To add a simple audio music player to your WordPress website, you can open any page or post and click the ‘+’ icon.
In the popup that appears, type ‘Audio’ into the search bar to find the right block. You can then click on the Audio block to add it to your page.
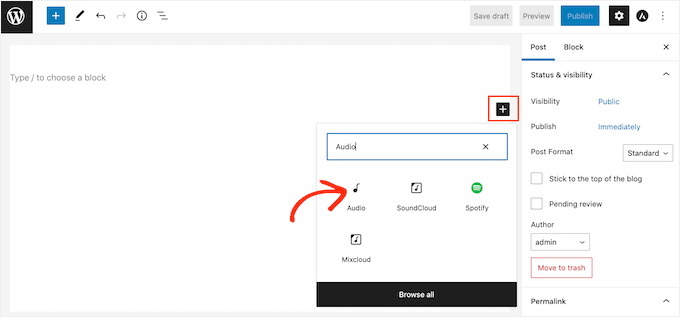
At this point, you can either add an audio file or embed an audio clip from another platform.
Note: In most cases, we recommend hosting your audio and video files on a third-party site for many reasons, including quality optimization and saving on bandwidth. Here’s why you should never upload a video to WordPress.
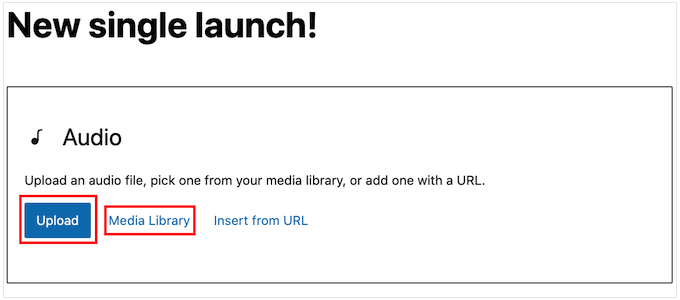
To add an audio file from your computer, click ‘Upload’ and then choose the file from your computer’s local drive.
Another option is to click the ‘Media Library’ button and then choose an existing file in your WordPress media library.
If you upload the full audio, you may want to give visitors the option to support your work as a musician or podcaster by sending you a donation. For a step-by-step walkthrough, you can see our guide on how to add a Stripe donate button in WordPress.
Do you want to embed audio from another platform instead?
This works like adding videos to WordPress. You just paste the YouTube link, and WordPress will put the player on your page automatically.
Just be aware that most platforms only embed a preview of the full audio file. The block may even encourage people to leave your website and visit the third-party platform in order to hear the full audio.
In the following image, the Audio block drives visitors towards the Spotify website.

If you’re a musician, then this might increase your royalties by encouraging visitors to play your content on other platforms. However, it can also drive people away from your website and onto other platforms.
To embed audio from a third-party platform, you can start by clicking the ‘Insert from URL’ button. This will open a small ‘Paste or type URL’ bar.
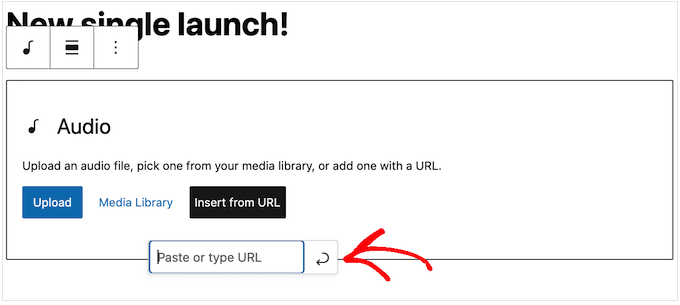
You can now enter the URL of the audio clip that you want to embed on your WordPress blog.
Typically, you just need to visit the song or audio you want to embed and then open its ‘Share’ settings.
After that, you can copy the URL provided.
For example, let’s see how you can embed any Spotify song on your site.
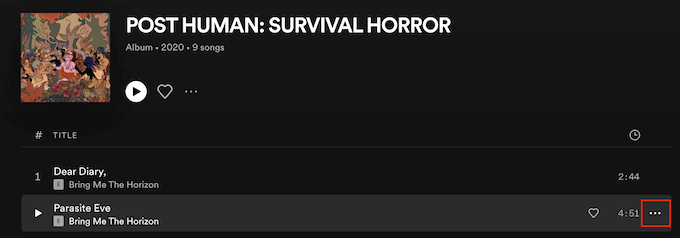
To start, find the song or playlist you want to add to your WordPress website. Then, simply click on the three dots that Spotify shows next to the playlist or song.
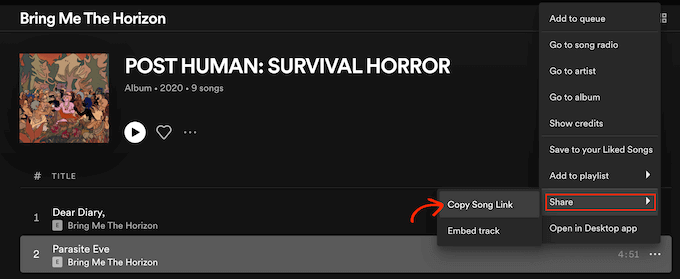
Once you’ve done that, click Share » Copy Song.
To add the audio to the music player widget, go ahead and paste the link into the Audio block.
In our Spotify example, WordPress will turn the Audio block into a Spotify block.
This change happens automatically, so it’s not something you need to worry about.
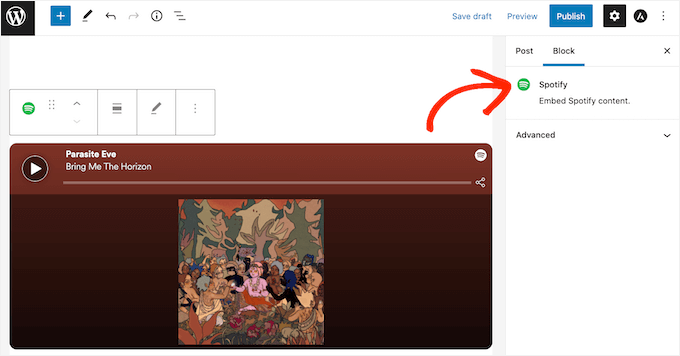
After adding an audio file, you can click on the Audio block to see what settings you can configure for that block.
The settings you see may vary depending on whether you uploaded an audio file or embedded a preview from a third-party site. For example, you can often set the audio to autoplay by clicking on the ‘Autoplay’ toggle.
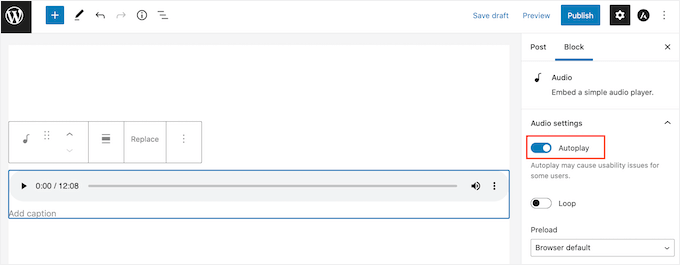
Most of these settings are self-explanatory, so it’s a good idea to explore them to see what works best for your site.
You can update or publish the page when you’re happy with how the block is set up.
Now, if you visit the page on your site, you’ll see the audio music player live. You can also listen to the audio using the block’s playback control buttons.
Method 2. How to Add an Audio Music Player Widget Using a Plugin (More Customizable)
The WordPress audio block is a simple tool for adding audio players. It’s easy to use, but it doesn’t offer many options to change how it looks or works.
Also, you can’t create one player and use it in different parts of your site. You’ll have to add a new player each time you want to use one.
If you do want more advanced features and re-usable audio players, then we recommend HTML5 Audio Player.
Similar to WordPress’s audio block, this plugin can play various audio file formats, like an mp3, .wav, or .ogg file. But it does come with more customization options.
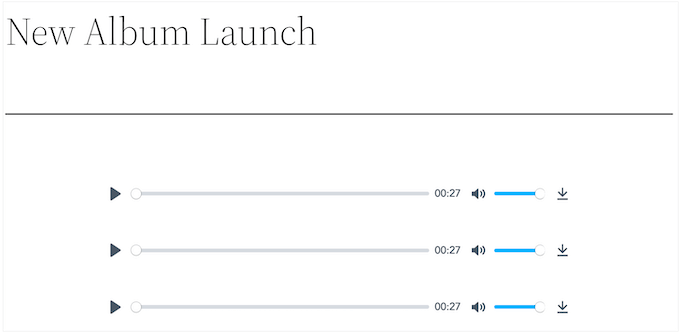
Now, while the plugin can only play one audio file per player, you can create as many audio players as you want. As a result, you can still play lots of different tracks across your WordPress site.
Moreover, you can even add multiple audio players to the same page.
To get started, you’ll need to install and activate the plugin. If you need help, then please see our guide on how to install a WordPress plugin.
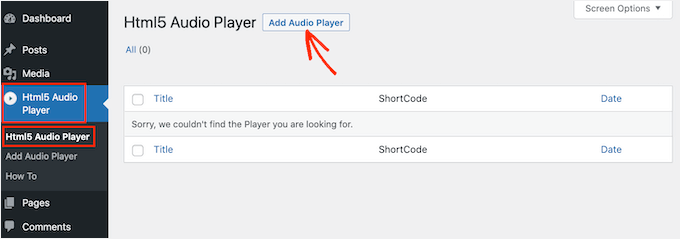
Upon activation, you’re ready to build your first audio player by going to HTML5 Audio Player » HTML5 Audio Player.
Here, go ahead and click on the ‘Add Audio Player’ button.
The next step is to type a name for the audio player into the field that shows ‘Add title.’
This is just for your reference, so you can use any title you want.
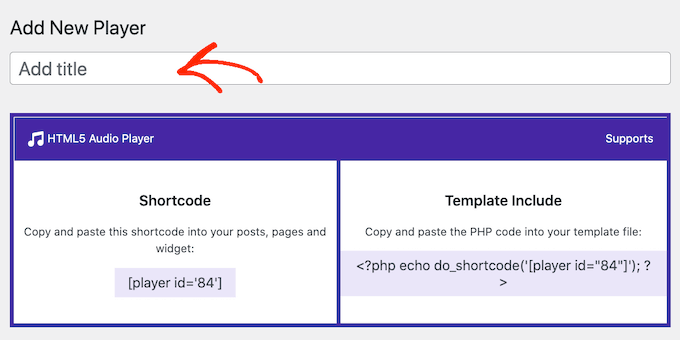
Once you’ve done that, you’ll want to scroll to the ‘Player Configuration’ section.
In this area, you can add an audio file to the player by clicking on the ‘Add Audio’ button.
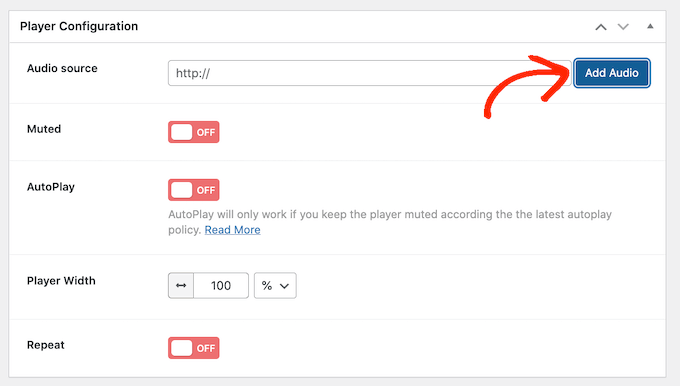
You can now select any audio file from the media library or upload a file from your computer.
After choosing a file, you’re ready to customize the audio player. By default, the visitor just needs to click on the ‘Play’ button, and the audio will start playing with the volume turned up.
This is how most visitors expect an audio player to act, so you’ll typically want to use these default settings. However, there are also options to mute the audio by default, autoplay, repeat, and more. So, feel free to explore these settings.
Once you’re happy with how the player is set up, simply scroll to the top of the screen and click on the ‘Save’ button.
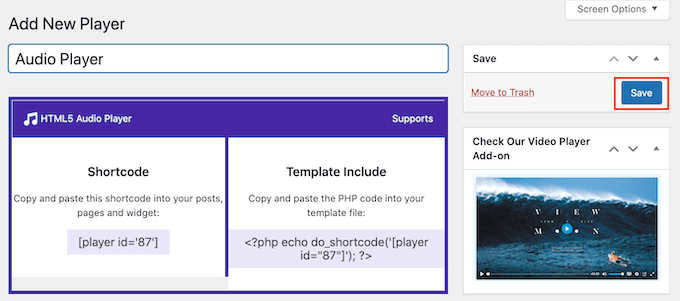
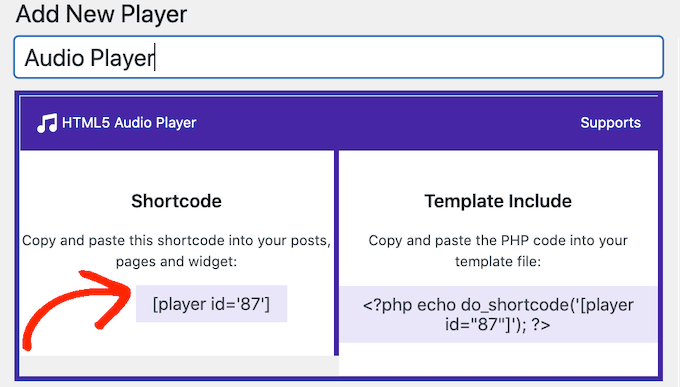
Then, you can add the audio player to your site using either shortcode or the HTML5 Audio Player block.
The block is the easiest method. However, if you do want to place the player using a shortcode, then you’ll find the code towards the top of the screen.
For more details on how to place the shortcode, you can see our guide on how to add a shortcode in WordPress.
To add the audio music player using a block, you’ll need to open any page or post and click the ‘+’ button.
In the popup that appears, simply type ‘HTML5 Audio Player’ to find the right block. Once you click on the ‘HTML5 Audio Player – Insert’ block, it will add the block to your page.
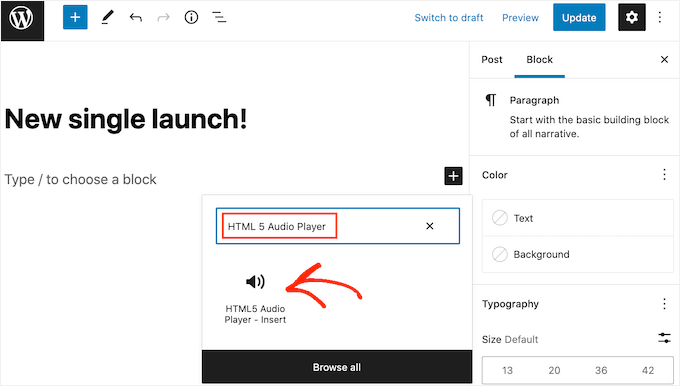
Next, you can open the ‘Select a Player’ dropdown to see the list of all the audio players that you’ve created.
You can now click on an audio player to add it to the page or post.
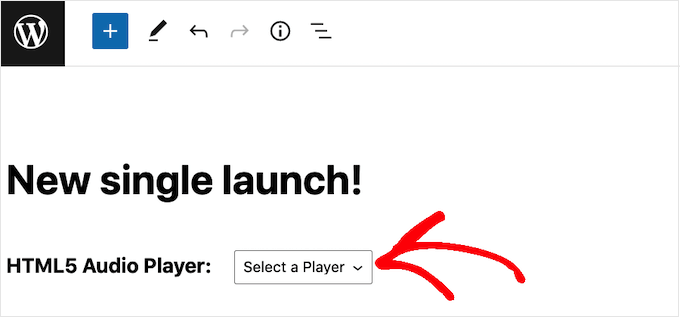
You might then notice that the WordPress page editor doesn’t show the audio player.
However, if you click on the ‘Preview’ button, then you’ll be able to see how the player will look to your website visitors. In this mode, you can even listen to the audio and test the different playback buttons yourself.
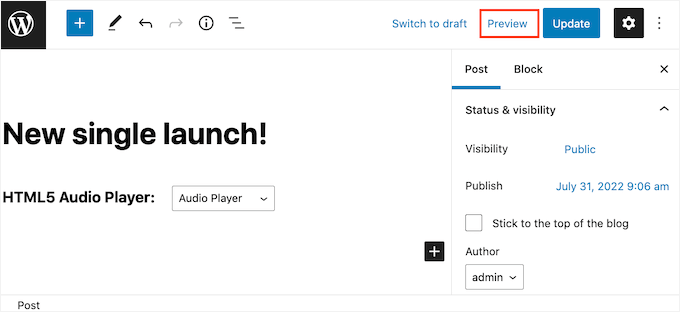
When you’re happy with how the audio player looks and functions, you can update or publish the page.
Now, if you visit this page on your WordPress website, you’ll see the audio player live.
Do you want to add other audio tracks to your site? Then, you can simply follow the process described above to create more audio players and add them to your WordPress website.
Bonus Tip: Make Your Site More Fun Using Image and Video Galleries
Want to make your site more fun and engaging? Consider adding image and video galleries to go hand-in-hand with your audio music player widget.
While adding images to your WordPress posts is a breeze with the Image block, things can get a bit messy when you’re adding multiple images. They’ll stack up one after another, requiring users to scroll a lot. That’s definitely not the most visually appealing setup. 😬
By creating a gallery, you can showcase your photos in a neat grid layout, saving space and making your site look way more professional. Thumbnails let visitors preview images, and they can click to see them in full.
For example, if you’re a photographer, a well-organized gallery can showcase your work in a sleek, visually stunning way. 📸✨
With WordPress, creating a gallery is super simple using the Gallery block in the Gutenberg editor. And if you want even more features, there are plenty of gallery plugins that can take your image display to the next level, like Envira Gallery.

For detailed instructions, see our guide on how to create an image gallery in WordPress.
Additionally, while images are great, videos can be even better. A video slider can showcase everything from product demos and reviews to customer testimonials, all in one dynamic space.
For example, a real estate site could feature virtual property tours. Meanwhile, a travel site could highlight destinations and experiences to entice visitors.
With a video slider, you can use engaging content to show off your best features, whether it’s testimonials, case studies, or product highlights. The best part? Soliloquy can help you create one with ease.
To learn more, check out our guide on how to create a video slider in WordPress.
All in all, whether it’s an album gallery, a product showcase, or video tutorials, interactive galleries can boost your site’s overall appeal and keep users engaged longer. 🚀
We hope this article has helped you learn how to add an audio player widget in WordPress. Next, you might also want to read our expert picks of the best audio player plugins for WordPress and our guide on how to start a podcast.
If you liked this article, then please subscribe to our YouTube Channel for WordPress video tutorials. You can also find us on Twitter and Facebook.


Jiří Vaněk
Thank you for this guide. I have many of my texts on the website converted to spoken language using artificial intelligence, and I was wondering how to integrate them into the website. The first method using the block editor seems great because it’s non-invasive regarding the website’s appearance. Excellent. Thank you for the tips.
Diao
I have a question. How to auto play the song in this widget?
TiBs
this is cool, but how to have the music plays in background from the start?
WPBeginner Staff
Please see this article, it explains what kind of plugins should be considered abandoned or outdated.
Brian Visagie
Thank you for responding.
Brian Visagie
Hi, I subscribe to WPBeginner
and appreciate your input to the Wordpress community – I regard it as
invaluable.
How is it then that you, sir, in the present unsafe and hacker
infested internet environment, recommend plugins (a widget in this case), that
are not up to date?
I get scores of bruteforce attacks everyday on my
websites and I regard the use and recommendation of out-dated plugins as
irresponsible.