Setting up age verification on your WordPress site is very important if you offer content or products that are subject to age restrictions. This feature ensures compliance with legal requirements and provides a safe browsing environment for your visitors.
Luckily, it’s easy to add age verification in WordPress using a free plugin. And in this guide, we will show you how to do it, step by step.
Why Add Age Verification in WordPress?
If your WordPress website offers certain types of content or products, then you will need to add age verification to comply with the law.
For example, if you have an online store that sells alcoholic beverages, then adding age verification will prevent minors from buying your products.
This can protect your brand reputation by showing that you take extra care to ensure that your content is only viewed by users who are of the appropriate age.
Having said that, let’s take a look at how to easily add verification in WordPress, step by step.
Video Tutorial
If you don’t want to watch the video tutorial, then just continue reading the instructions below.
How to Add Age Verification in WordPress
The easiest way to add an age verification page to WordPress is by using the Age Gate plugin. Using it can restrict your content based on age without stopping search engine bots from seeing your pages or posts.
In this way, you can stop minors from accessing mature content without negatively affecting your WordPress SEO.
First, you need to install and activate the Age Gate plugin. For more details, see our step-by-step guide on how to install a WordPress plugin.
Upon activation, visit the Age Gate » Restrictions page from the WordPress dashboard and type in how old visitors must be to access your content next to the ‘Age Limit’ option.
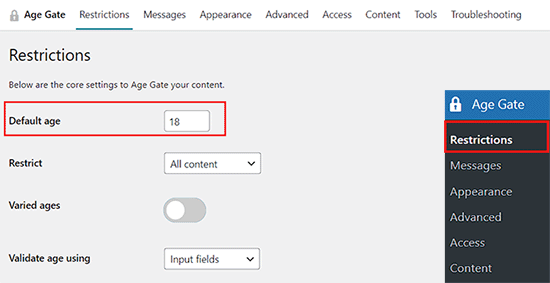
By default, Age Gate restricts access to all your content. However, you may want to stop minors from visiting specific pages only.
For example, if you run an online store using a plugin like WooCommerce, then you might restrict access to specific products on your site.
To do this, simply open the ‘Restrict’ dropdown and choose ‘Selected content’.
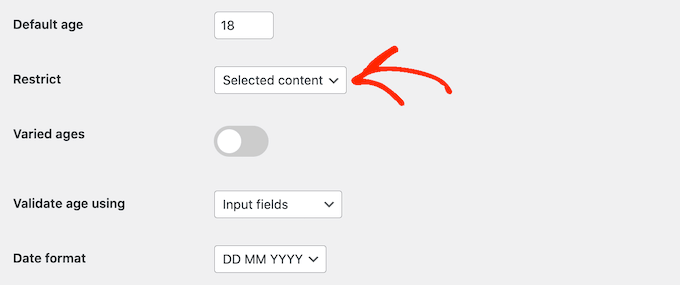
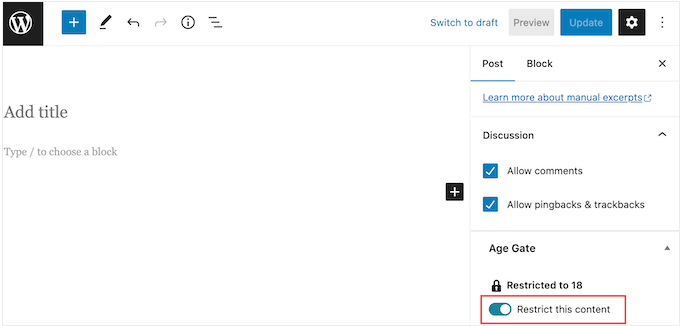
If you choose this setting, then all your posts and pages will be unrestricted by default.
To add age verification to a page or post, you must open it in the editor and then enable the ‘Restrict this content’ toggle in the right-hand menu.
When it comes to age verification, you have three options.
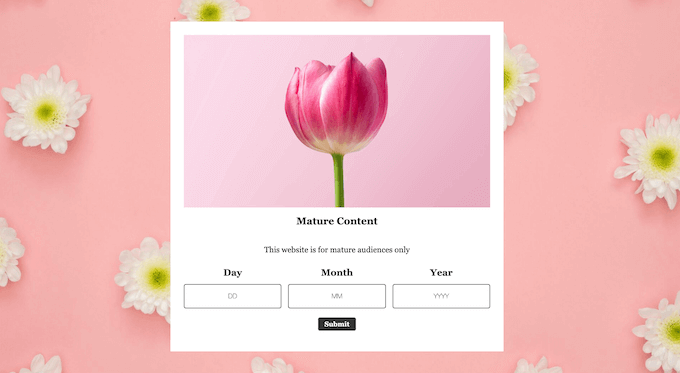
One option is asking visitors to type their date of birth into a form, as you can see in the following image.
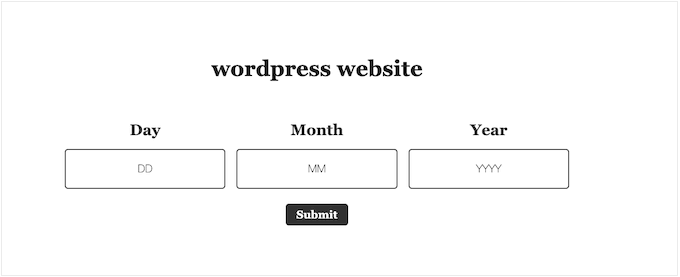
Visitors can also enter their date of birth using a dropdown menu.
Finally, you can simply ask visitors whether they are old enough to access your content by showing ‘Yes/No’ buttons.
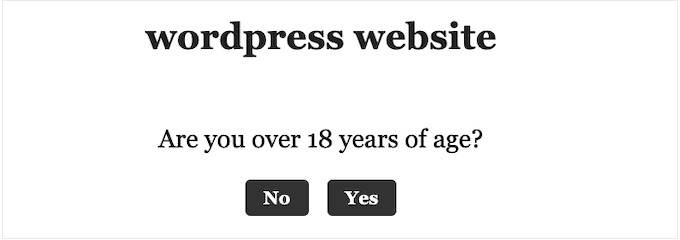
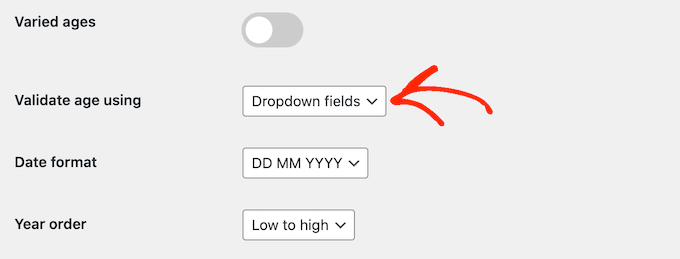
To choose between these options, simply open the ‘Validate age using’ dropdown.
Then, select either Input fields, Dropdown fields, or Yes/No buttons.
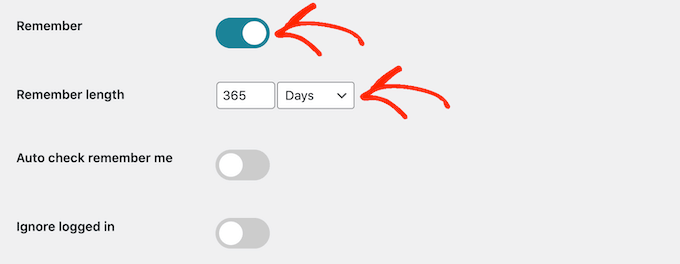
By default, people must verify their age every time they visit your website.
If you prefer, then you can enable ‘Remember me’ so that visitors don’t have to pass the verification every single time. After that, you can use the ‘Remember Length’ settings to change how long Age Gate will remember the visitor’s age.
This can save users time, especially if they visit your website regularly.
When you are happy with how the plugin is set up, go ahead and click on the ‘Save settings’ button. You can now visit your WordPress blog to see the age verification screen live.
The default age verification screen is pretty basic, so let’s see how you can customize it to better suit your website.
Customizing Age Verification Screen and Message
To change how the age verification page looks, you need to click on the ‘Messages’ tab on the plugin’s settings page.
Here, you can add a headline and sub-headline, which will be displayed above the area where visitors verify their age.
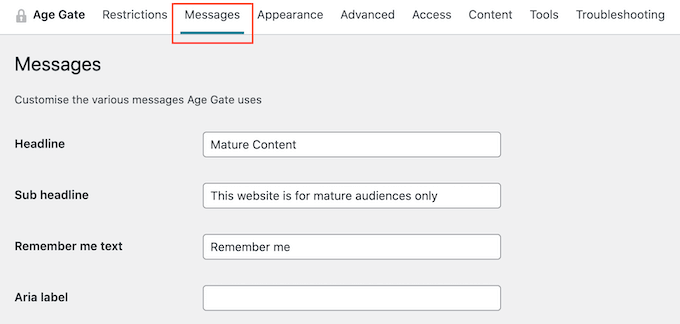
On this screen, you can also change the ‘Remember Me’ text, add a link to your privacy policy, customize the different error messages, and more. Most of these settings are self-explanatory, so you can work your way through the different options.
When you are happy with the messaging, just click on the ‘Save settings’ button.
After that, click on the ‘Appearance’ tab. From here, you can change the background color, foreground color, background image, text color, and more.
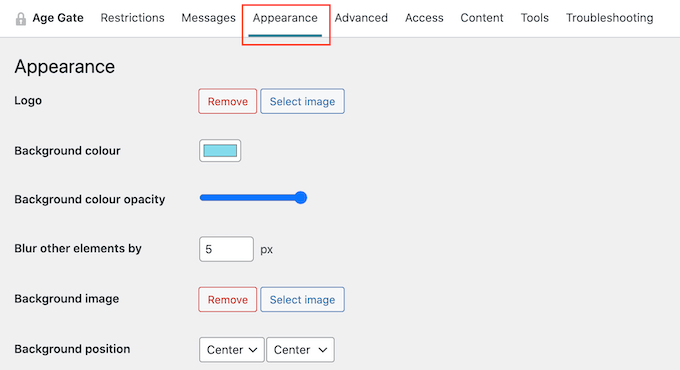
When you are happy with the changes you have made, don’t forget to scroll to the bottom of the screen and click on ‘Save settings’.
You can now visit your website using Incognito mode to see the custom age verification screen in action.
Allowing Access to Archives and 404 Pages
Sometimes, you may want to allow people to access your archive pages in WordPress without passing age verification. You might also want to allow free access to your 404 page, especially if you have created a custom 404 error page design.
The easiest way to do this is by selecting the ‘Content’ tab.
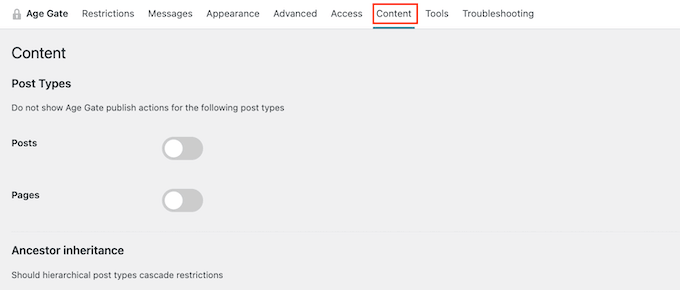
You can now restrict and restrict all of your site’s archive pages and the 404 error page by using the various toggles.
Advanced Age Verification Settings
Sometimes, a WordPress caching plugin or the caching enabled by your WordPress hosting service can cause plugin conflicts.
If you are having problems with the age verification page, then just open the ‘Advanced’ tab in the plugin’s settings.
Here, you need to open the ‘Method’ dropdown and choose’ No caching (JavaScript)’.
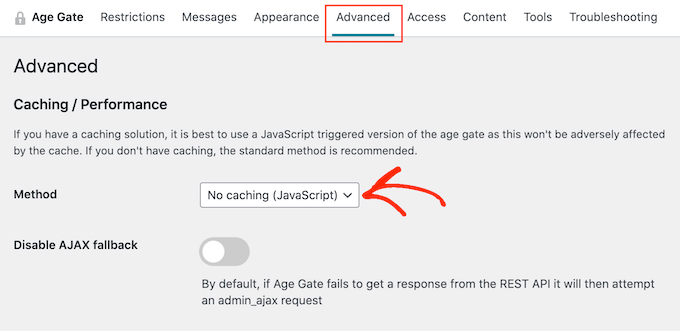
You can also change other advanced settings from this page, like adding custom CSS rules and enabling anonymous age verification.
If you would like to see more options, you can also check out our expert picks for the best age verification plugins for WordPress.
Bonus: Limit WordPress Entry Based on Age
If you have a WordPress form on your site, then you can limit the form entries based on age as well. For example, if you have a registration form and only want users above 21 to fill it in, then you can limit your form submission according to it.
To do this, you will need WPForms, which is the best contact form plugin on the market. It comes with a drag-and-drop builder, premade templates, and complete spam protection.
Upon plugin activation, simply visit the WPForms » Addons page from the WordPress admin sidebar and install and activate the ‘Form Locker Addon.’
Once you do that, create a simple contact form in the WPForms builder. For more details on this, you can see our tutorial on how to create a contact form in WordPress.
Next, switch to the Settings » Form Locker screen from the left column and toggle the ‘Form Verification’ switch. After that, select the ‘Age’ option from the dropdown menu.
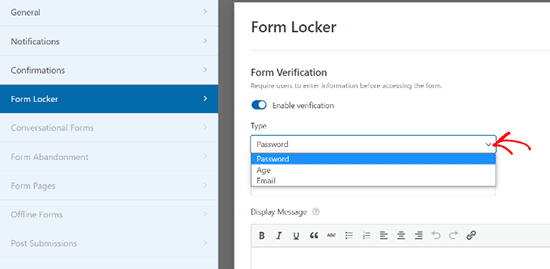
You can then set a minimum, maximum, or exact age verification for your form entries. Finally, click the ‘Save’ button at the top to store your settings.
Once that’s done, you can open a page and add the WPForms block from the block column to embed the form on your website.
For detailed instructions, see our tutorial on how to limit the number of WordPress form entries.
We hope this article helped you learn how to add age verification in WordPress. You may also want to see our guide on how to display a user’s IP address in WordPress or see our expert picks for the best WordPress content protection plugins.
If you liked this article, then please subscribe to our YouTube Channel for WordPress video tutorials. You can also find us on Twitter and Facebook.


Jiří Vaněk
Great and detailed information. I created a really small shop for a friend selling coffee. Since premium alcohol is also part of the sale in addition to coffee, we had to consider the age limit information for purchasing such products due to the laws in the Czech Republic. Thank you very much for the demonstration of how Age Gate works. It is perfectly sufficient for our needs.
Dennis Muthomi
I made an online store for a close friend & I know how critical it is to have proper age checks, especially when selling regulated products.
Thanks for covering important considerations like customizing the verification screen, and advanced settings.
Your bonus tip on limiting WPForms entries by age is invaluable as well.
Brendie
Can AgeGate be incorporated into the Register page?
My site doesn’t have mature adult topics, items, videos, etc. or anything else of that nature. I am currently setting it up but don’t want anyone under the age of 18 on there.
WPBeginner Support
You would want to reach out to the plugin’s support for if that is an option with what you are using for your registration page.
Admin
Brendie
No Add-on?
mikhil
how to add a code verification instead of age verification
Abhishek Bhardwaj
how i can customize it,
Pauline Cahill
I am running Windows Vista (I can’t afford anything newer!) and have installed it but have no ‘Activation page’ showing, nor an .exe file. Any idea where they might be. I have moved the folder from ‘verifications’ into my documents folder but that made no difference
WPBeginner Support
We think you are probably trying to do something else. This is a WordPress plugin it does not come as an exe file.
Admin
Joe
This plugin stopped working on Android.
Peter
This would be OK only I need this for a French website! Can you have an option so that the text can be changed so I can write this in French?
kachan64
Would be cool, if was an option to put that on top of a post or video.
Steve Gibson
The plugin doesn’t work well on iPhone. Opens very small, then when you start to complete it, it opens too large.
joe
is there a way to redirect a user who is underage to google or some other site?
Liam
thanks for sharing!
very useful!
Joel Eade
Awesome, this is exactly what I need. I had another solution (the name escapes me) but it was buggy. Thanks!