Handling restaurant reservations can quickly become chaotic—missed calls, double bookings, and last-minute changes are stressful for both staff and customers.
If you run a restaurant, then having an easy-to-use online booking system can save you time, reduce mistakes, and make your customers’ experience much smoother.
I’ve tested the three most effective and easiest ways to set up restaurant bookings on WordPress, and in this guide, I’ll show you how to add each one.
From a simple request form to a full-featured, advanced booking system, you’ll be able to choose the solution that fits your restaurant’s needs.🍽️
💡Quick Answer: Add a Reservation System in WordPress
Don’t have time for the full details? Here are the 3 best ways to add a restaurant reservation system:
- For a simple request form: Use the WPForms plugin to create a ‘Dinner Reservation’ form. Customers submit their requests, and you confirm with them manually.
- For a free booking system: Try the Five Star Restaurant Reservations plugin. The free version lets you accept and manage booking requests inside WordPress. However, online payments and automatic confirmation are only available in the pro version.
- For an advanced, all-in-one system: Sugar Calendar Bookings offers everything — online payments, detailed availability control, multiple services and locations, and full automation. It’s ideal for restaurants that want a hands-free booking setup.
Why Add a Restaurant Reservation System in WordPress?
Adding a reservation system to your WordPress restaurant website gives you more control, saves time, and improves the customer experience.
It lets you:
- Eliminate phone calls and long hold times – Customers can book tables online in just a few clicks.
- Show real-time availability – Diners can select their preferred time and table.
- Centralized booking management – Organize all reservations in one place to avoid overbooking.
- Gain valuable customer insights – Track dining preferences, table sizes, and special requests to improve marketing and service.
Now, let’s look at the three easiest ways to add a restaurant reservation system in WordPress.
You can jump to the method that suits your needs:
- Method 1: Add a Restaurant Reservation Form With WPForms (Simple Reservations)
- Method 2: Add a Reservation System in WordPress With a Free Plugin
- Method 3: Add an Advanced Reservation System With Sugar Calendar Bookings
- Bonus: Create an Online Restaurant Menu in WordPress
- Frequently Asked Questions About Adding a Reservation System in WordPress
Method 1: Add a Restaurant Reservation Form With WPForms (Simple Reservations)
If you’re looking for a simple way to collect reservations for your restaurant, I’ve found that using WPForms works really well.
It is the best WordPress contact form plugin and comes with a drag-and-drop form builder, over 2000 premade form templates, and complete spam protection.
I use WPForms for all my contact forms, and it makes it super easy to set up a dinner reservation form without needing a full booking system.
However, keep in mind that the plugin isn’t connected to a calendar and will only allow users to submit their requests and preferences. It is still a good choice if you want to directly confirm bookings with customers yourself.
To learn more about its features, I recommend checking out our detailed WPForms review.
Step 1: Install and Activate WPForms
First, you need to install and activate the WPForms plugin. For details, see our tutorial on how to install a WordPress plugin.
📌 Note: WPForms has a free plan, but you will need the pro version to unlock the ‘Dinner Reservation’ template.
However, you can still create a basic reservation form from scratch with the free version by adding the fields you need, like Name, Email, and Date.
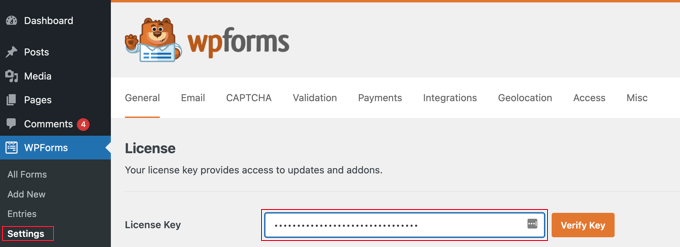
Upon activation, visit the WPForms » Settings page from the WordPress dashboard to enter your license key.
You can get this information from your account on the WPForms website.
Step 2: Create Your Reservation Form
Next, head over to the WPForms » Add New page from the admin sidebar. Here, you can start by adding a name for the form that you are about to create.
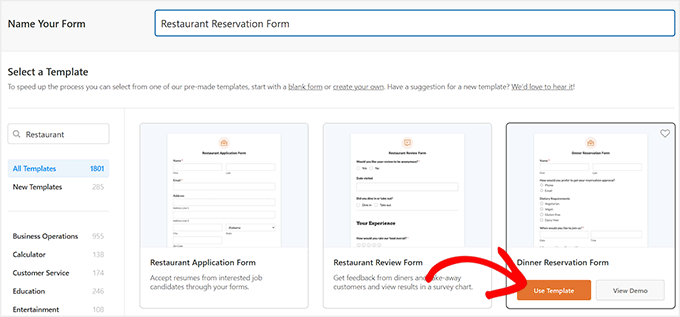
WPForms comes with over 2,000 pre-made templates, but for this tutorial, I’ll show you how to use the ‘Dinner Reservation Form’ template.
Type it into the search box on the left, and once it appears, click ‘Use Template’ to load it.
Step 3: Customize Your Form Fields
This will open the WPForms drag-and-drop builder, where you will notice a form preview on the right and form fields in the left column of the screen.
By default, the form will already have fields for the customer’s name, email, phone, dietary requirements, date, time, additional requests, and seating arrangement. You can now add, remove, or rearrange them as you like.
💡 Expert Tip: If you plan to use the phone for reservation approvals, I recommend using a business phone tool. For details, see our top picks for the best business phone services.
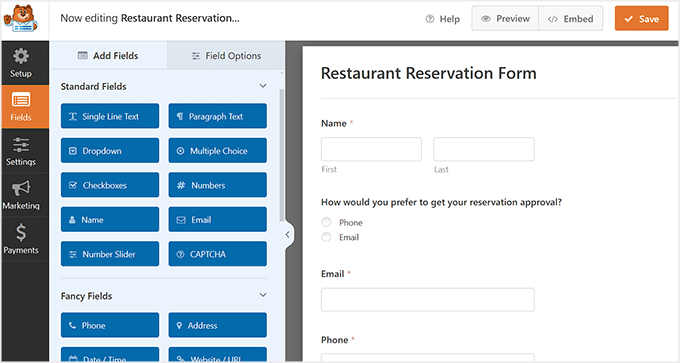
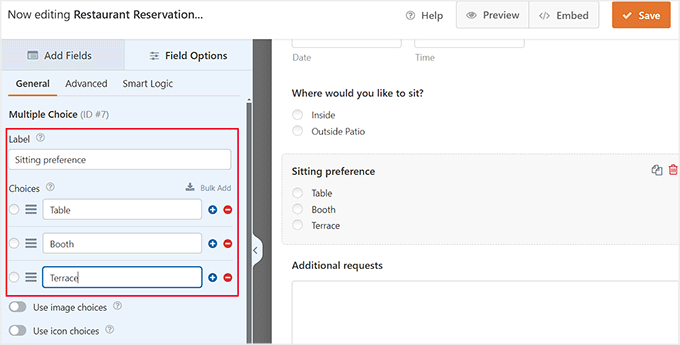
You can also change the labels and content for different fields already added to the form. For example, if you offer multiple seating options to customers, you can click on the ‘Seating Preference’ field.
This will open its settings in the left column, where you can click the ‘+’ icon to add more choices or just change the labels for the given options.
For more details, you can see our tutorial on how to set up online food ordering in WordPress.
Once you are done, just click the ‘Save’ button to store your settings.
Step 4: Add the Form to Your Website
Now, open the WordPress page or post where you want to add the restaurant reservation form.
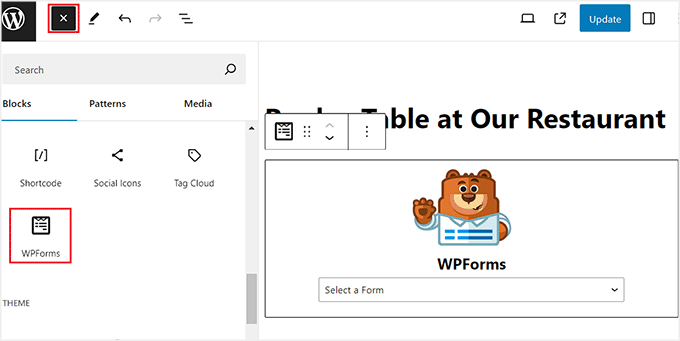
Here, click the ‘+’ Add Block button in the top left corner and add the WPForms block. Then, select the form from the dropdown menu within the block itself.
Click the ‘Update’ or ‘Publish’ button to store your settings.
When a customer submits a request, WPForms will send you an email notification. You can then contact the customer directly to confirm their booking, which adds a great personal touch to your service.
💡 Expert Tip: If you don’t receive reservation email notifications, it’s likely because your WordPress emails aren’t being delivered properly.
I recommend using WP Mail SMTP to fix this issue. It improves email deliverability by connecting your site to trusted mailers like Gmail, Outlook, or SendLayer, ensuring that every booking request reaches your inbox.
To get started, see our tutorial on how to properly configure your WordPress email settings.
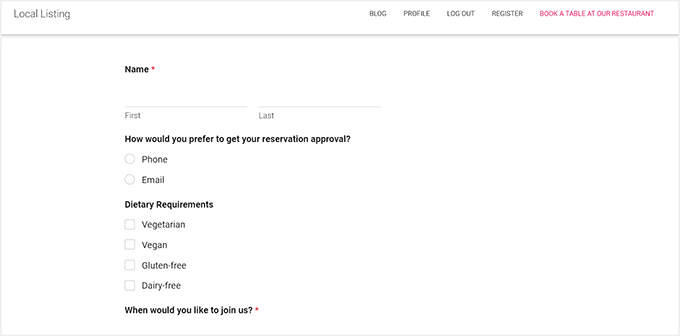
Finally, you can visit your WordPress site to view the reservation form in action.
Step 5: View Your Reservation Entries
Once users start submitting the form, you can view all the bookings by navigating to the WPForms » Entries page in your WordPress dashboard.
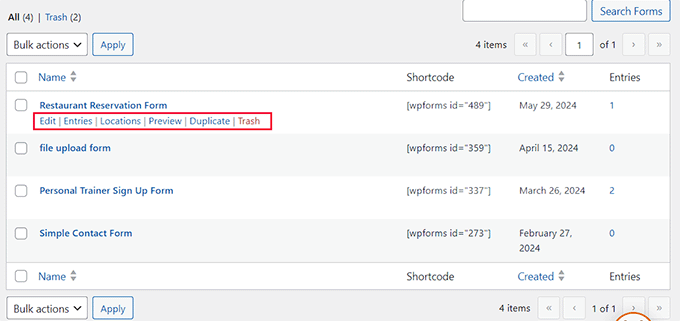
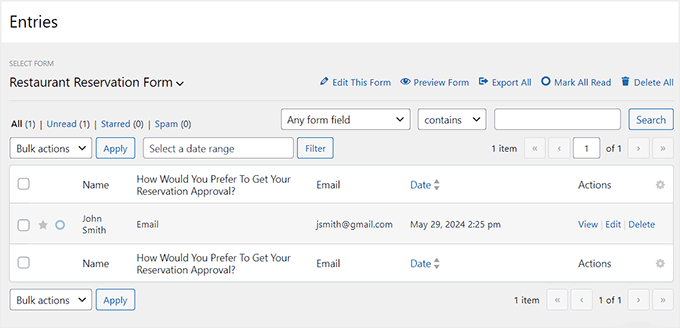
Here, simply select your reservation form to see a list of all submissions.
You can also view the details for their reservation by clicking the ‘View’ link next to each entry.
Method 2: Add a Reservation System in WordPress With a Free Plugin
If you are looking for a free plugin to add a simple restaurant reservation system, then I recommend using Five Star Restaurant Reservations.
The free version makes it easy to collect and manage booking requests directly from your WordPress dashboard. However, if you want to accept online payments, you’ll need to upgrade to the Pro version of the plugin.
Step 1: Install and Activate the Plugin
First, you need to install and activate the Five Star Restaurant Reservations plugin.
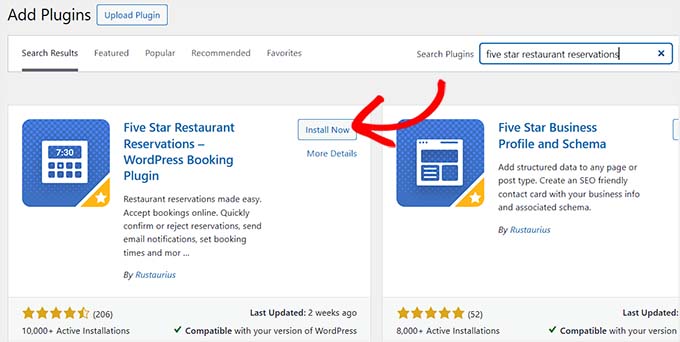
If you’re unsure about how to do that, then see our beginner’s guide on installing a WordPress plugin.
Step 2: Configure Your Booking Schedule
Upon activation, visit the Bookings » Settings page from the WordPress dashboard. Here, you can start by choosing the days when you accept restaurant reservations.
For instance, if your restaurant is closed on Sunday, then you can uncheck that box.
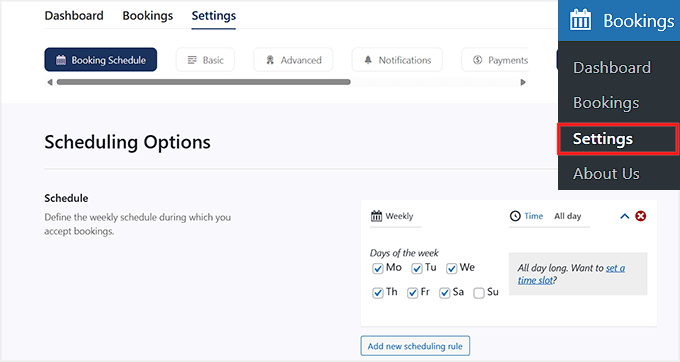
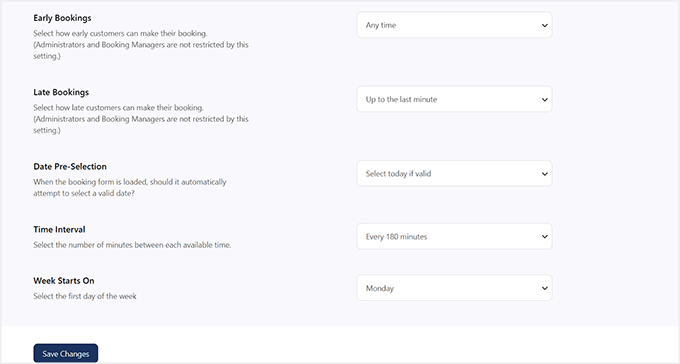
After that, you can scroll down and choose how early and late a customer can book a reservation, select a time limit for user cancellation, choose the number of minutes between each time interval, and more.
Once you are done, just click the ‘Save Changes’ button to store your settings.
Step 3: Set Up Your Form and Booking Rules
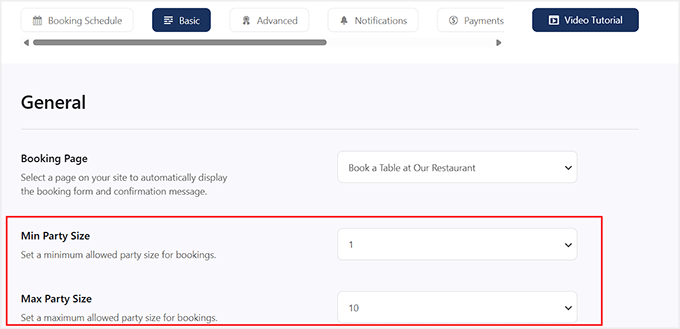
Then, scroll back to the top and switch to the ‘Basic’ tab. Here, you can start by selecting a page where you want to add the reservation form using the ‘Booking Page’ dropdown.
You can then set a minimum and maximum party size that the user can make reservations for. You can also require guests to enter their party size by enabling the ‘Blank Party Options’ setting.
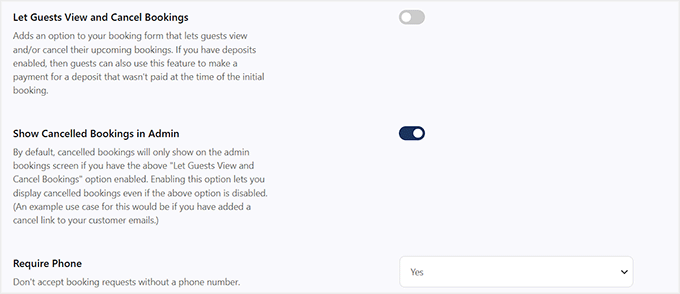
Next, toggle the ‘Let Guests View and Cancel Bookings’ switch if you want to allow users to view and cancel their reservations at any time.
I also recommend toggling the ‘Show Cancelled Bookings in Admin’ switch to be notified every time someone cancels their booking.
Once that is done, you can choose ‘Yes’ from the ‘Require Phone’ option if you don’t want to accept bookings without getting the customer’s phone number.
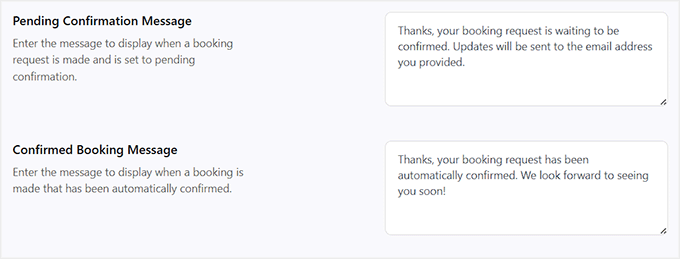
After that, type in the messages that will be shown to users upon pending confirmation, confirmed booking, cancellation redirect page, pending redirect page, confirmation redirect page, and refresh bookings page.
Upon completing that, I suggest taking a look at the other settings on this page and configuring them if needed. Don’t forget to click the ‘Save Changes’ button to store your settings.
Step 4: Configure Email Notifications
Next, switch to the ‘Notifications’ tab. Here, you can add the email address where a summary of daily reservations will be emailed every day and select a specific time for it.
After that, choose the name and email address that will be used when sending emails to customers.
💡 Tip: For a reservation system, your confirmation and notification emails must be delivered reliably. WordPress emails can often end up in spam folders.
I strongly recommend using WP Mail SMTP to make sure your customers and staff always receive important booking alerts. For details, see our guide on how to fix the WordPress not sending email issue.
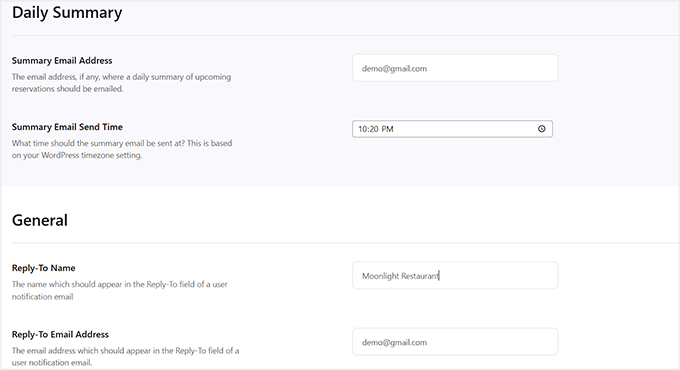
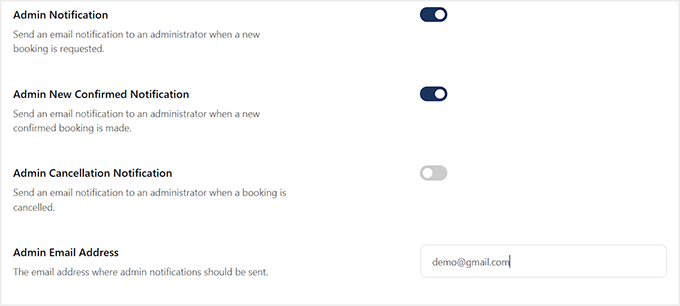
Then, toggle the ‘Admin Notification’ switch if you want to be notified every time a new booking request is made on your website.
You can also toggle the ‘Admin New Confirmed Notification’ switch to be alerted when a booking is confirmed.
Similarly, toggling the ‘Admin Cancellation Notification’ switch will send you a message when someone cancels their reservation.
Finally, enter your admin email again and click the ‘Save Changes’ button to store your settings.
Step 5: Manage Your Bookings
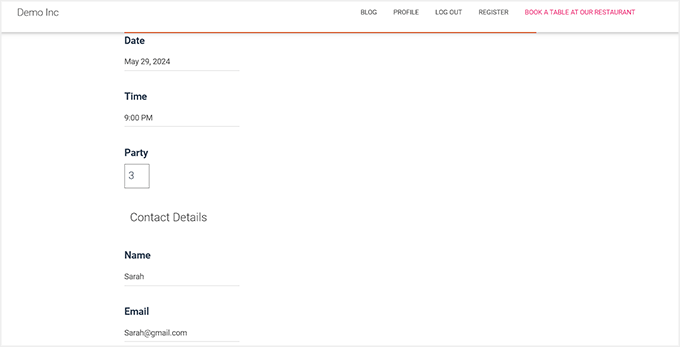
Now open the page you selected for the reservation system.
Here, you will see a simple booking form that users will submit for reservations.
To see all these reservations, you must visit the Bookings page from the WordPress dashboard.
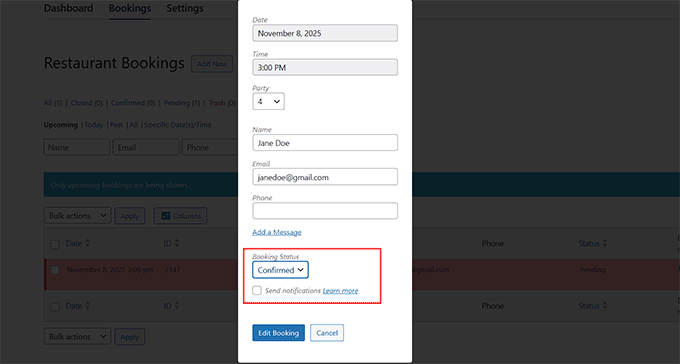
Here, you will see that the pending reservations are flagged red. Now click the ‘Edit’ link under a booking.
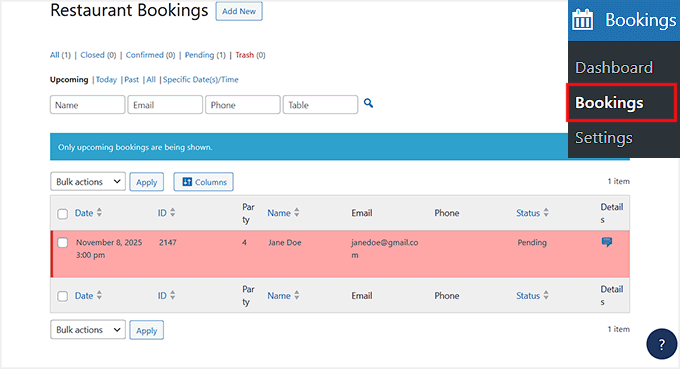
This will open a prompt on the screen, where you can select ‘Confirmed’ as the booking status.
Then, click the ‘Edit Booking’ button to store your settings. You’ve now set up a basic reservation system that handles manual bookings inside WordPress.
It’s great for restaurants that prefer to review and confirm reservations themselves, but if you need payment processing or multiple location support, you’ll need a more advanced plugin.
Method 3: Add an Advanced Reservation System With Sugar Calendar Bookings
If you’re ready to move beyond a basic booking form, then Sugar Calendar Bookings is a great next step.
It’s a premium-level booking and appointment plugin that goes beyond simple reservations — you can accept online payments, set up custom availability, manage multiple restaurant locations, and automate the entire booking workflow.
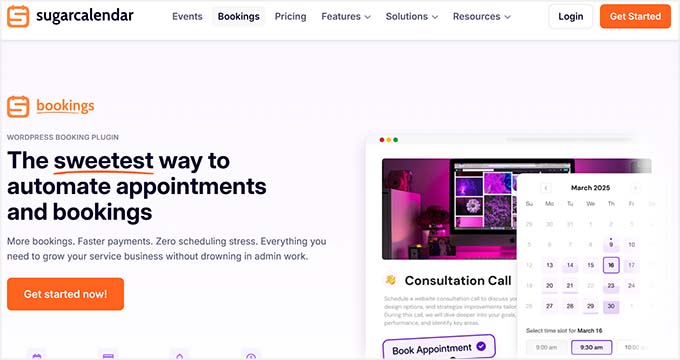
It’s perfect for busy restaurants that want a hands-off, all-in-one system.
The only reason I’ve added it as the third method is because its free plan doesn’t allow you to accept online payments or configure availability. You’ll need the Pro plan to unlock its full potential.
For more information, you can also take a look at our Sugar Calendar Bookings announcement.
Step 1: Install And Activate the Sugar Calendar Bookings Plugin
First, you’ll need to install and activate the Sugar Calendar Bookings plugin.
If you’re not sure how to do that, then please see our step-by-step guide on how to install a WordPress plugin.
📌 Note: Sugar Calendar Bookings does offer a free plan that you can use to create a basic restaurant reservation form. However, you won’t be able to accept payments or configure availability with it.
In this tutorial, I’ll be using the Pro version of the plugin to show you all the advanced features it offers.
Upon activation, head over to the Bookings » Settings page in your WordPress dashboard and enter your license key.
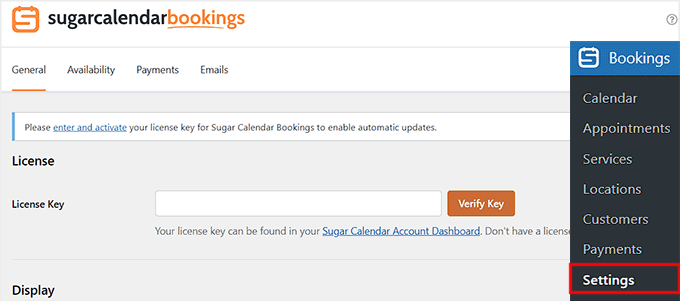
You can find this information in your account on the Sugar Calendar website.
Step 2: Configure Your Display and Booking Settings
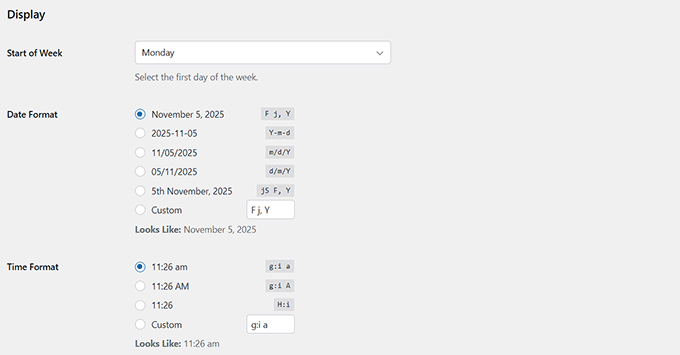
After that, scroll down to the ‘Display’ section on the Settings page.
Here, you can customize how your calendar and bookings will appear on your restaurant website. Start by selecting the ‘Start of Week’, which is usually set to Monday by default.
You can adjust this if your business week starts on a different day.
Next, choose your preferred ‘Date Format’ and ‘Time Format.’ This will determine how reservation dates and times are shown to you and your customers.
You can pick from several display options or even use a custom format that best matches your website’s design and region.
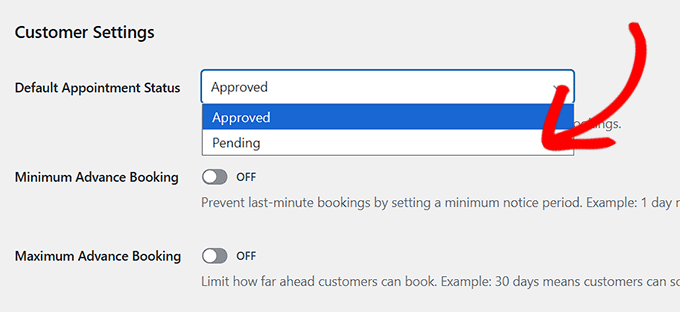
Once done, scroll to the ‘Customer Settings’ section. Here, you can choose the default appointment status for new reservations as ‘Pending’ or ‘Approved’ from the dropdown menu.
I recommend setting it to ‘Pending’ so you can review each booking request before confirming it. This prevents overbooking and ensures that your staff manages table availability efficiently.
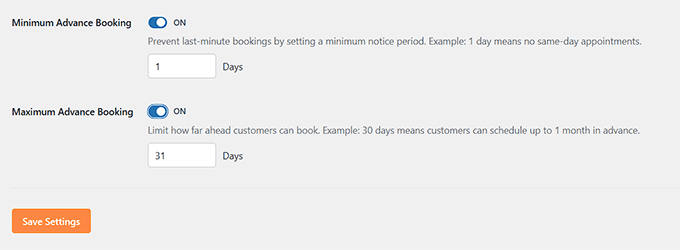
You can also set a minimum and maximum advance booking window by toggling the switches.
It will prevent last-minute reservations and ensure that customers can only book within a specific time frame, such as a day in advance or up to a month ahead.
Finally, click the ‘Save Settings’ button at the bottom to store your changes.
Step 3: Set Up Your Restaurant’s Availability
Now it’s time to configure your restaurant’s availability.
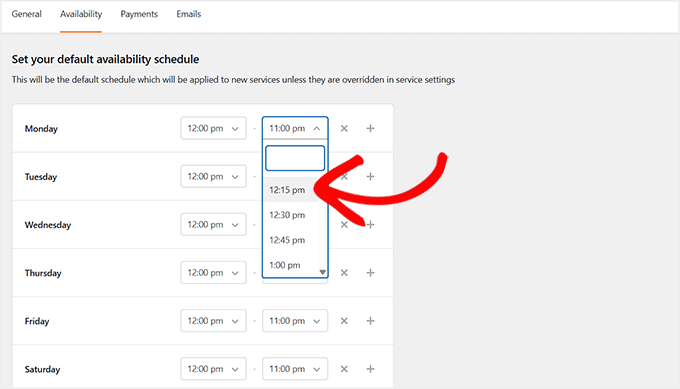
To do this, switch to the ‘Availability’ tab at the top of the settings page. Here, you’ll see all the days of the week listed, each with two dropdown menus beside it.
From these dropdowns, you can set your restaurant’s opening and closing times for each day. This tells the system when customers can make reservations.
For example, if your restaurant operates from 12:00 PM to 11:00 PM, you can set those exact hours for each open day, ensuring bookings are only accepted during your service hours.
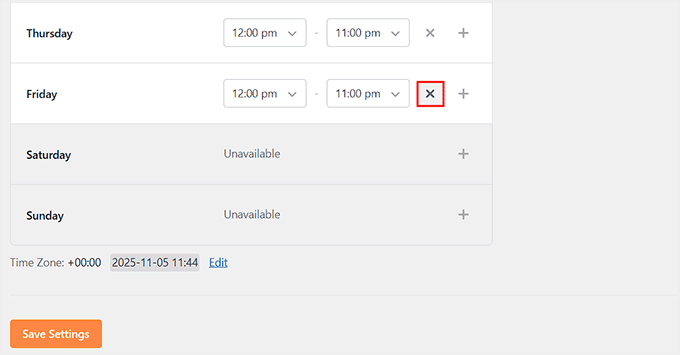
If your restaurant is closed on a particular day, simply click the cross icon next to that day’s name to make it unavailable.
Once you do this, that day will no longer appear in the booking calendar, and customers won’t be able to select it when making a reservation.
This ensures your booking system accurately reflects your restaurant’s real schedule and prevents reservations from being made on closed days.
After that, click the ‘Save Changes’ button at the bottom.
Step 4: Configure Your Payment Options
Now it’s time to switch to the ‘Payments’ tab. By default, Sugar Calendar Bookings allows you to offer two payment methods: On-site and Stripe.
Keep in mind that the free version only supports the on-site option. If a customer chooses this method, it means they’ll pay when they arrive at your restaurant.
However, if you want to collect an advance deposit or accept online payments, you can connect your site to Stripe. I’ll show you how to set the actual deposit for your reservations later in this tutorial.
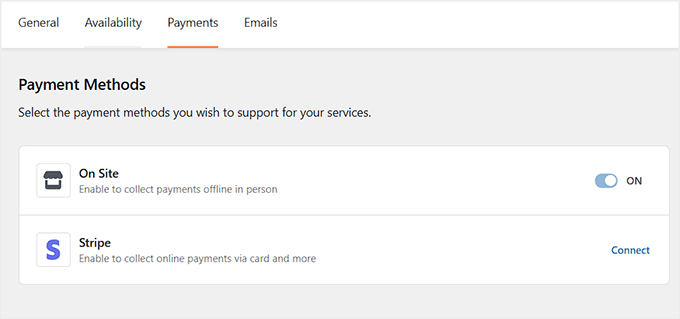
Go ahead and click the ‘Connect’ link. This will open a pop-up where you can follow the on-screen instructions to link your Stripe account with Sugar Calendar Bookings.
Once the connection is successful, don’t forget to click ‘Save Changes.’
These payment methods will now be automatically added to your booking form — no extra setup required.
Step 5: Set Up Email Notifications
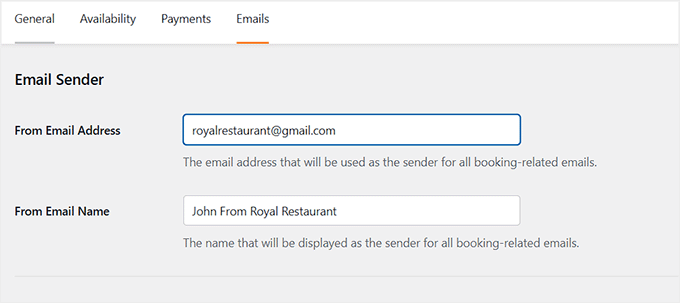
Finally, switch to the ‘Emails’ tab. Here, you’ll configure all the emails that will be sent to customers from your restaurant’s reservation system.
💡Expert Tip: Before setting up your confirmation emails, make sure your site can actually send them. WordPress sometimes struggles to deliver emails reliably, which means your customers might not receive their booking details.
To fix this, I recommend using WP Mail SMTP. It connects your website to trusted mailers like Gmail, Outlook, or SendLayer, ensuring every reservation email reaches your customers’ inboxes.
To get started, enter the email address that will be used to send these notifications, and choose a ‘From Name’ that will appear in the customer’s inbox.
For example, you can use something like “John from Royal Restaurant” or any other name that matches your restaurant’s branding.
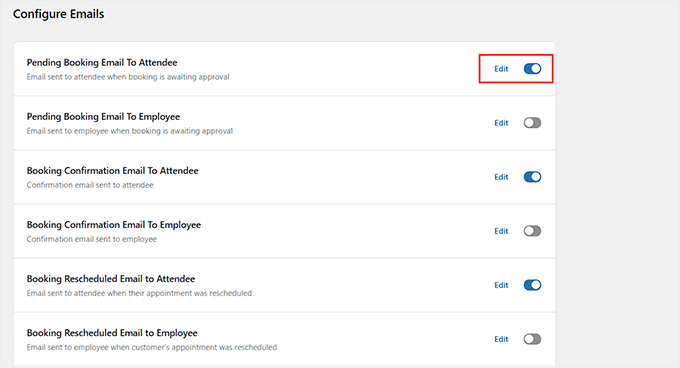
Next, scroll down to the ‘Configure Emails’ section. By default, all email toggles are turned on, meaning every notification type will be sent. However, you might not need them all.
I recommend enabling these key notifications:
- Pending Booking Email to Attendee
- Booking Confirmation Email to Attendee
- Booking Cancellation Email to Attendee
- Booking Reschedule Email to Attendee
- Appointment Reminder Email to Attendee
After that, click the ‘Edit’ link next to any email template you want to customize. This will open the text editor, where you can edit the subject line and message to reflect your restaurant’s tone and values better.
You can also use smart tags to include dynamic details such as the reservation start and end time, the customer’s name, and other booking information.
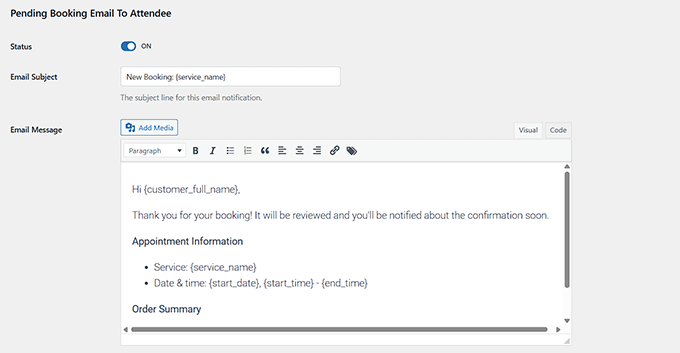
Once you’re happy with your changes, click the ‘Save Changes’ button. You can then repeat this process for each email template you want to configure.
Step 6: Add a Location for Your Restaurant
Now it’s time to add a location for your restaurant. This step is super important because you can’t create a booking form without setting up at least one location first.
It’s also very useful if your restaurant has multiple branches, as it helps customers select the one closest to them for convenience.
To add a location, head over to the Bookings » Locations page from your WordPress dashboard and click the ‘+ Add New’ button.
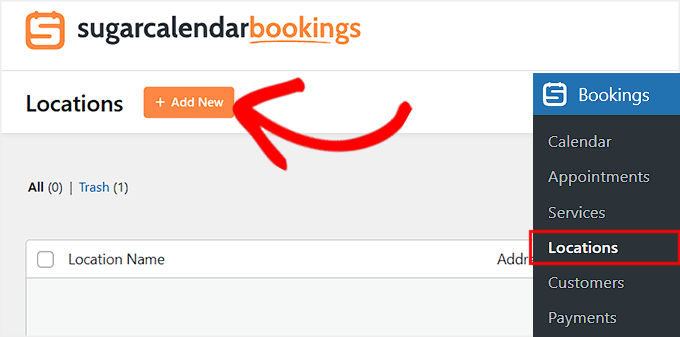
This will open a prompt directly on the screen where you’ll first need to add a name for your location.
If your restaurant only has one branch, you can simply enter your restaurant’s name here.
However, if you have multiple branches, I recommend making the name clearer, such as ‘Royal Restaurant – Houston Branch’ or ‘Royal Restaurant – Downtown.’
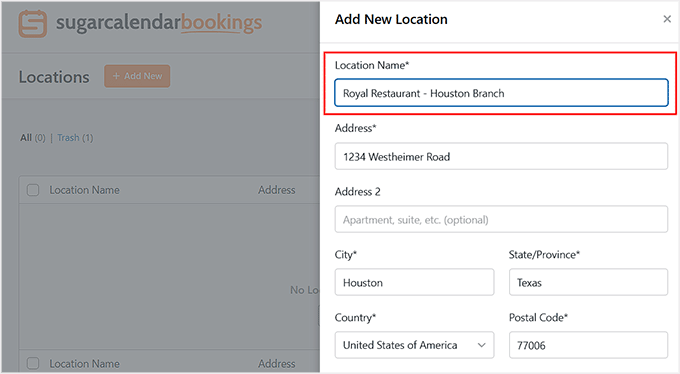
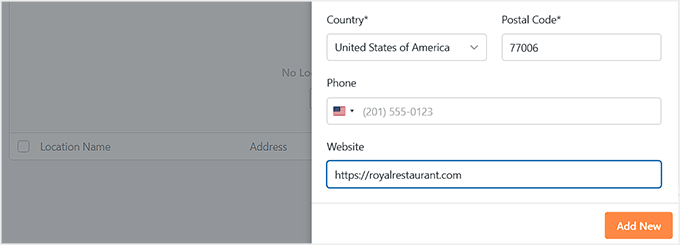
After that, enter the full address of your restaurant and add your website URL in the provided field. Once done, click the ‘Add New’ button to save it.
If your restaurant has more than one branch, you can repeat this process to add the rest of your locations.
Step 7: Create a Bookable Service for Your Restaurant
Once you’ve added your restaurant’s location, it’s time to create a bookable service that your customers can reserve directly from your website.
In Sugar Calendar Bookings, services are what customers actually book — for example, a ‘Dinner Reservation’ or ‘Private Dining Experience.’
💡Quick Tip: Think of Locations as your physical restaurant branches and Services as the types of bookings you offer at those branches (like ‘Dinner Reservation’ or ‘Weekend Brunch’).
You can also create multiple services for your restaurant to cover different offerings or experiences. Each service can have its own duration, price, and availability, giving you full flexibility to manage all the ways customers can book with you.
To create your first service, go to Bookings » Services from your WordPress dashboard and click the ‘+ Add New’ button.
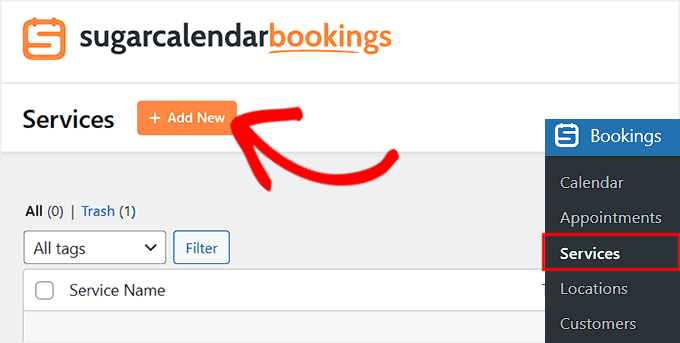
This will open the service editor, where you can set up all the details for your reservation.
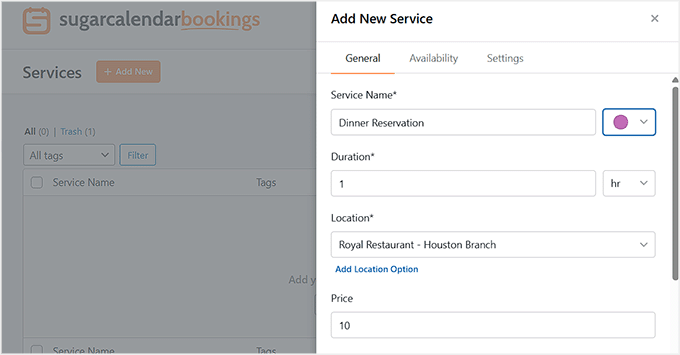
Start by giving your service a clear name, such as Dinner Reservation or Weekend Brunch Table.
Then, you need to set the duration of each booking by entering a specific time, such as 1 hour or 90 minutes. If you charge customers to reserve a table, scroll to the ‘Price’ section.
Here, you can enter a deposit amount that customers must pay upfront when booking. This helps secure the reservation and can later be deducted from the customer’s final bill once they dine at your restaurant.
Keep in mind that deposits only work if you’ve connected Stripe in the earlier step, since payments are processed immediately and sent directly to your account.
Otherwise, you can leave it blank to allow free reservations.
Once that’s done, choose the location for your service from the dropdown menu. If your restaurant has multiple locations, please select the one that best suits this service. You can even create a new location directly from this screen if needed.
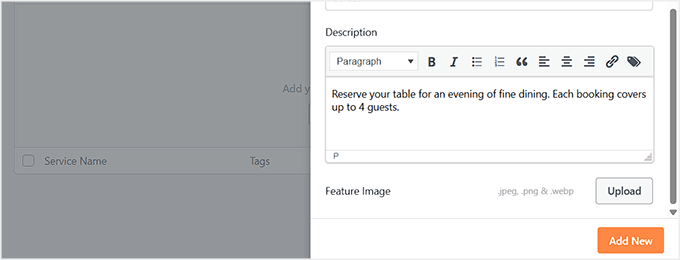
Next, scroll down to the ‘Description’ box and add any important details you’d like your customers to know, such as ‘Reserve your table for an evening of fine dining. Each booking covers up to 4 guests.’
You can also upload a featured image to make your reservation option more visually appealing on your booking form.
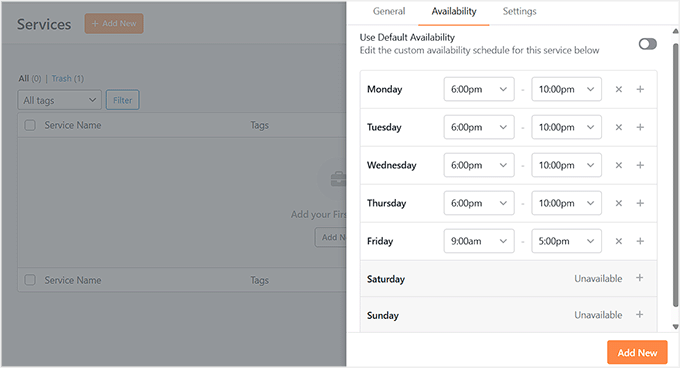
Now switch to the ‘Availability’ tab. If you are creating a simple booking form that applies to anyone at any time in your restaurant, leave the site-wide availability as is. This works well for general reservations with no restrictions.
However, if you want a service to be available only at specific times or for particular experiences, you can customize the availability to match your schedule.
For example, for a Dinner Reservation service, you can limit bookings to specific dinner hours, such as 6:00 PM to 10:00 PM. This ensures customers can only book during the times you want, giving you full control over your restaurant’s schedule.
To do this, turn off the default availability toggle and add the new schedule.
Once everything looks good, click the ‘Add New’ button to save your service.
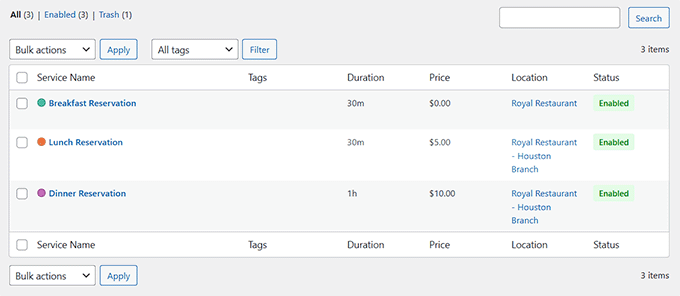
You can also repeat this entire process to create as many services as you want for your restaurant.
Step 8: Add the Restaurant Booking Form to Your Website
Now it’s time to add your restaurant booking form to your website’s front end so that users can actually reserve a spot.
For this, open the page or post where you want to display the booking form. Once the block editor opens, click the ‘Add Block’ button to open the block menu, then search and add the ‘Booking Form’ block.
💡Pro Tip: For the best results, I recommend adding your form to a dedicated ‘Reservations’ page.
You can also include other helpful details on that page, like your restaurant’s address, hours, and phone number, so customers have everything they need in one place.
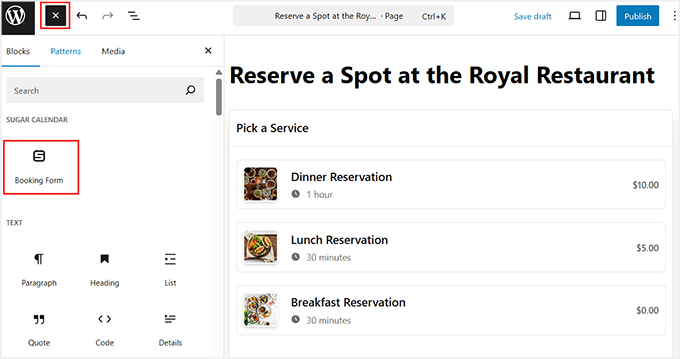
You will see a preview of the form in the editor, showing all the services you have created. Once everything looks good, click ‘Publish’ or ‘Update’ to save your changes.
Next, visit your website on the front end to see the restaurant reservation system in action.
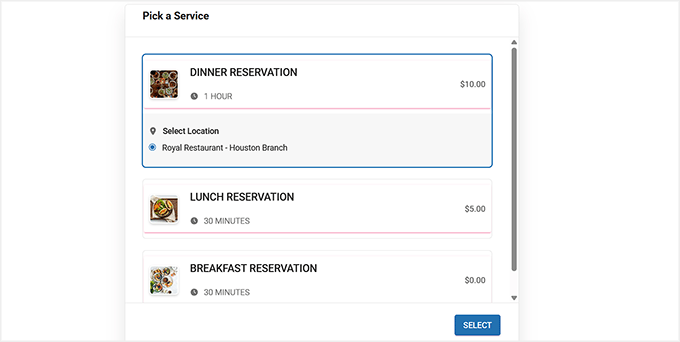
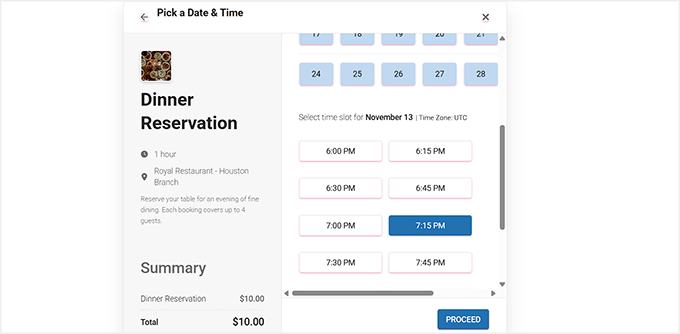
From this form, users can easily select the location, choose a date and time slot from the calendar, and make a booking.
If your service requires payment, they can complete it directly through the form as well.
Step 9: Managing Appointment Bookings
Once your booking form is live, it’s essential to know how to manage all the reservations coming in. Sugar Calendar Bookings provides a simple dashboard to view every appointment, track customer details, and handle payments, all from WordPress.
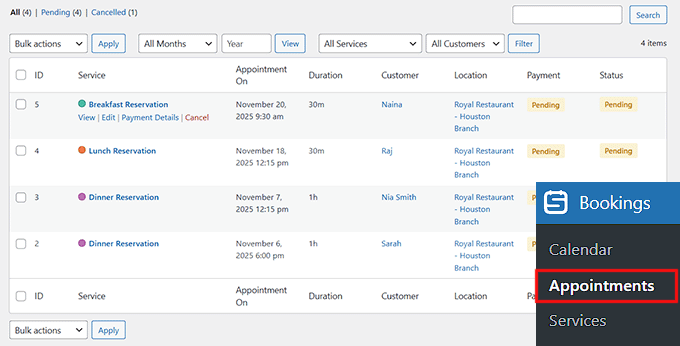
To view all appointments, simply go to Bookings » Appointments in the WordPress dashboard.
Here, you can see every reservation, including the customer’s name, service, location, payment status, and whether it’s approved or pending.
You can also find specific appointments using the search bar and filters to look up reservations by month, service, or customer name.
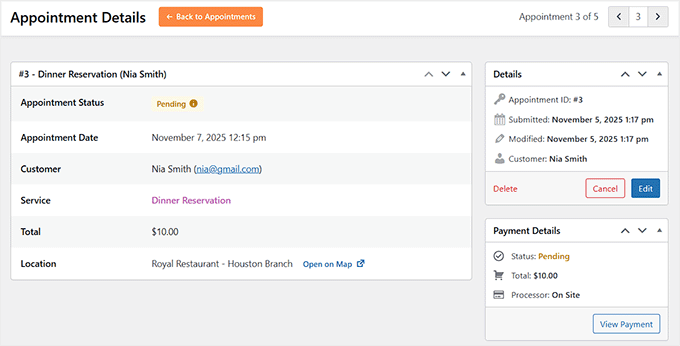
Other than that, clicking ‘View’ on any appointment opens the full details for that booking.
You can now view reservation details, including location, timing, name, and more.
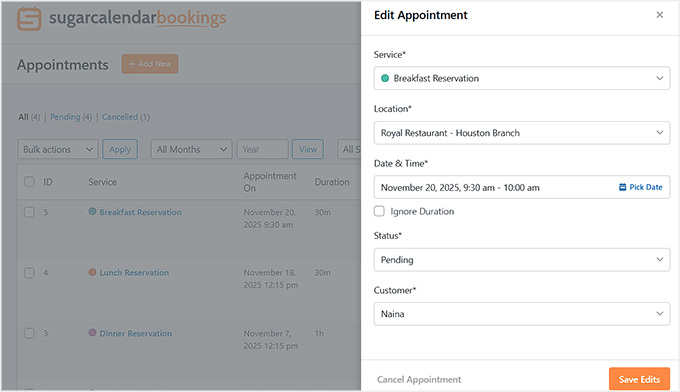
Editing an appointment is also straightforward. Just click ‘Edit’, and make the changes to date, time, service, or location.
You can also change each reservation’s status to ‘Approved’ from here. After that, don’t forget to click the ‘Save Edits’ button.
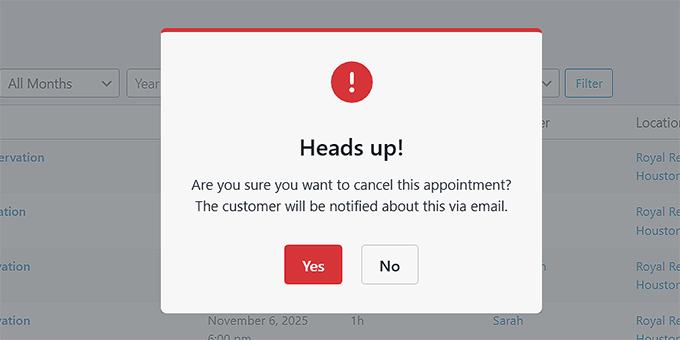
If a customer needs to cancel, you can click ‘Cancel’ either from the appointments list or inside the appointment details.
This will open a confirmation popup, and the customer will automatically get a cancellation email.
You can also view payments, resend confirmations, and manage everything else using your WordPress dashboard.
Bonus: Create an Online Restaurant Menu in WordPress
Once you have added a reservation system, I also recommend adding a restaurant menu on your website. This will allow users to browse through all the food options that you are offering before visiting your business, and can improve the user experience.
Plus, an online menu boosts search visibility and attracts newer customers.
To do this, you can use SeedProd, which is the best WordPress page builder on the market.
Several of our partner brands have designed their entire websites with it and have had an excellent experience. It comes with a drag-and-drop builder, email marketing integration, and a ‘Menu Sales Page’ template to create an attractive menu.
To learn more about its features, you can see our SeedProd review.
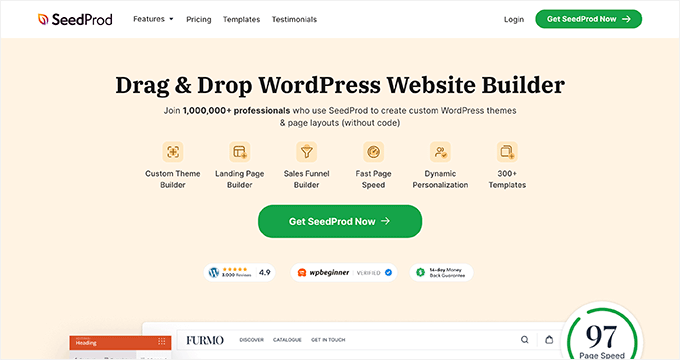
Upon activation, just visit the SeedProd » Landing Pages section and click the ‘Add New Landing Page’ button. This will take you to a new screen where you can select a premade template of your choice.
Now, the plugin’s visual builder will open. Here, you can easily edit the page preview to add your own restaurant menu, or you can use the blocks from the left column for further customization.
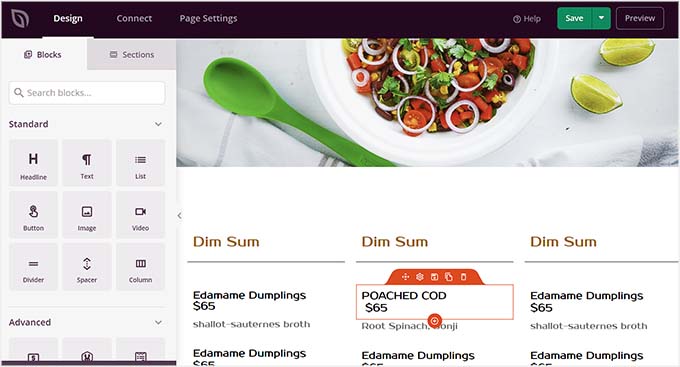
For step-by-step instructions, please check out our tutorial on creating an online restaurant menu in WordPress.
Frequently Asked Questions About Adding a Reservation System in WordPress
Here are some questions that our readers have frequently asked before adding a reservation system to their website:
Can I integrate my booking system with my existing email marketing tools?
Yes. WPForms and Sugar Calendar Bookings support integrations with popular email platforms like Mailchimp and ActiveCampaign. This allows you to follow up with customers, send promotions, or collect feedback.
Can I take deposits for reservations with these methods?
Yes, you can take deposits with two of the methods shown. For a simple request form, WPForms Pro lets you add payment fields for Stripe or PayPal.
For a complete booking system, Sugar Calendar Bookings (Method 3) has built-in Stripe integration, allowing you to collect deposits as part of the reservation process.
How can I prevent double bookings during peak hours?
A full-featured plugin like Five Star Restaurant Reservations or Sugar Calendar Bookings lets you define time slots and table availability, so customers can’t book the same slot twice.
WPForms alone won’t prevent overlapping bookings, so manual confirmation is needed.
Can I offer reservations for multiple restaurant locations?
Yes. Sugar Calendar Bookings lets you add multiple locations and assign services to each one. Five Star Reservations supports multiple booking pages for different locations, while WPForms requires creating separate forms for each branch.
Do I need a special restaurant theme for this to work?
No, all 3 plugins discussed in this tutorial are designed to work with any modern WordPress theme. While a dedicated restaurant theme might offer a more integrated design, it is not required to add a reservation system to your site.
I hope this article helped you learn how to add a restaurant reservation system in WordPress. You may also want to see our beginner’s guide on how to start an online store and our top picks for the best WordPress restaurant themes.
If you liked this article, then please subscribe to our YouTube Channel for WordPress video tutorials. You can also find us on Twitter and Facebook.


fortzuero
Using this plugin already but stuggling to find a way of getting a background image to work.
Anyone managed to do this or do I need to create custom CSS?
Carl Adams
Hi there,
Downloaded the plugin to have a play with what it can do, I too had the same problem earlier till I found a way around it. Using Themify Builder I was able to set it from the page setting in the dashboard area, if you choose same method, I would advise using full width at a depth of 400 px, unless you want full image on screen… Hope this gives a possible resolve….
farhan shah
Hi syed,
Excellent article, it is really helpful and informative. Thanks
Sajid Amanat
Thanks buddy for sharing such a great plugin.
beetzy
I’m doing a restaurant site now! thanks so much for all your posts, they are very helpful to both expert and novice! appreciate you doing all of them.
Iqbal Ahmad
Hello sir,
I want cab and driver booking plug-in.
Please help me
atif
Thanks for sharing information about such a good plugin. I would be like to use this plugin for my own restaurant website.