Long-form content is fantastic for SEO and providing value to your readers, but there’s one small problem: people like to know what they’re getting into.
When someone lands on a 3,000-word tutorial, they want to understand their commitment upfront. Progress bars solve this beautifully by showing readers exactly where they are in your content.
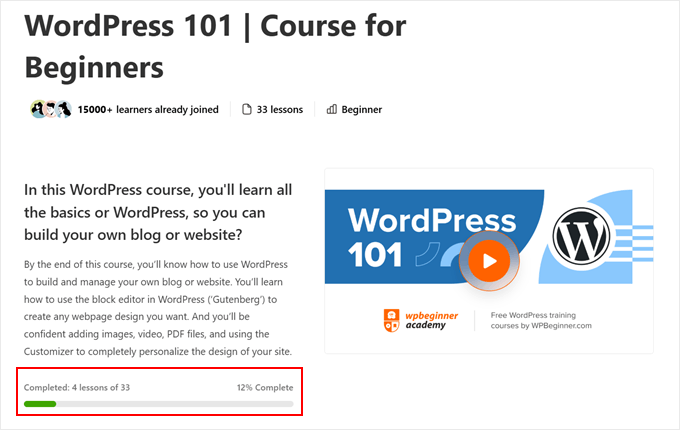
We have been using them on our WPBeginner video membership site to show how much of the course users have completed. This way, students can easily track their learning progress and stay motivated to finish their training.
The best part? You don’t need any coding skills or expensive plugins to add progress bars to your WordPress site. In this guide, we’ll show you exactly how to create them, step by step.
When to Add a Progress Bar to WordPress Posts
There are several scenarios where adding a progress bar can enhance your WordPress blog posts and make them more impactful.
For example, progress bars are excellent for displaying project completion status.
If you’re running a blog that documents long-term projects, then adding progress bars can give readers a quick visual update on how far along you are.
We’ve also used progress bars on our video membership website.
This is to help our users see how far along they have completed the course.
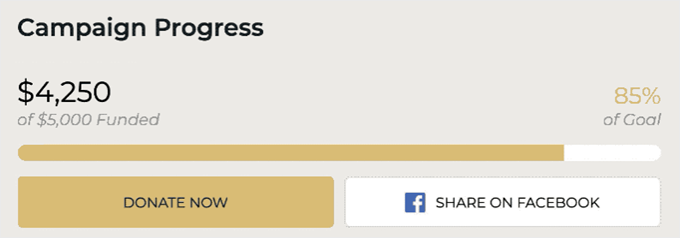
Fundraising campaigns on your WordPress site can also benefit greatly from progress bars. They provide an immediate visual representation of how close you are to reaching your goal, which can encourage more donations.
For educational content, progress bars can illustrate learning milestones or the complexity of different topics. This can help readers see the difficulty level of various subjects you’re covering in your blog posts.
If your website focuses on fitness or health topics, progress bars can be used to show workout intensity levels, skill bar, nutritional information, or progress toward health goals.
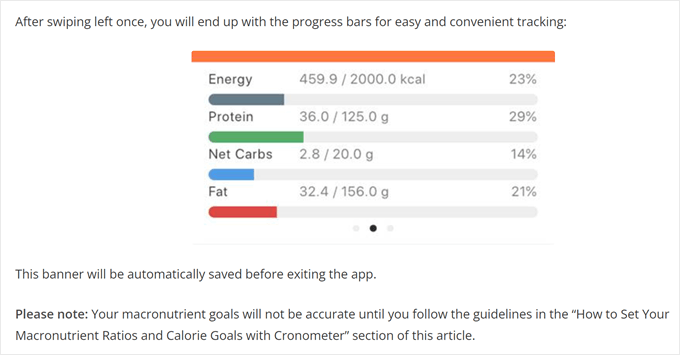
Other than that, adding a progress bar to posts about statistics or survey results can make the data more digestible and engaging. Instead of just listing percentages, you can visually represent the data with colorful progress bars.
With that in mind, we have come up with 2 easy ways to add a progress bar to your WordPress website. You can use the quick links below to skip to your preferred method:
- Method 1: Add a Progress Bar With a Page Builder (More Customizable)
- Method 2: Use a Free Progress Bar Plugin (Quick and Easy)
- Frequently Asked Questions: Adding Progress Bars in WordPress
Note: Are you looking for a reading progress bar tutorial instead? If so, our article on how to add a reading progress bar in WordPress posts is worth the read.
Method 1: Add a Progress Bar With a Page Builder (More Customizable)
One effective way to add a progress bar to your WordPress site is by using a page builder with a built-in progress bar feature. This approach makes sure that your progress bar seamlessly integrates with your overall theme design.
For this method, we will use Thrive Architect, a powerful page builder that offers many different theme templates and a user-friendly drag-and-drop interface. It’s an excellent choice for beginners and experienced users alike who want an easy way to customize their WordPress website design.
However, keep in mind that this method involves changing your theme. If you’re satisfied with your current theme and don’t want to switch, you might prefer our second method instead.
Also, Thrive Architect has no free version. That being said, you can use our Thrive Themes coupon code to get up to 50% off your first purchase.
You can learn more about the platform in our Thrive Architect review.
Step 1: Install the Thrive Theme Builder
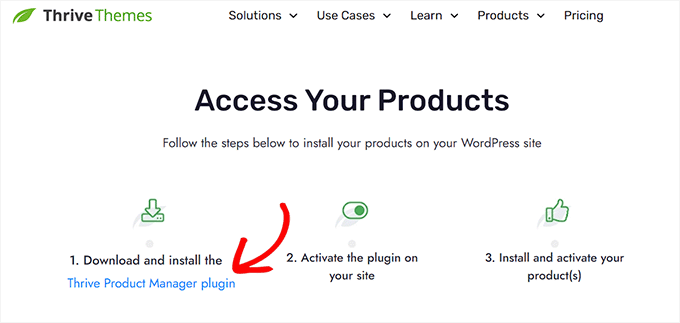
To get started, you’ll need to set up Thrive Architect. Begin by logging in to your Thrive Themes account and downloading the Thrive Product Manager plugin.
After that, download and install the Thrive Product Manager plugin. You can check out our beginner’s guide on how to install a WordPress plugin for step-by-step instructions.
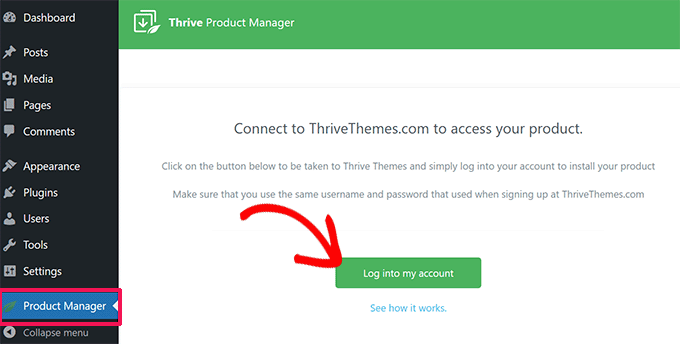
At this stage, go ahead and click Product Manager in your WordPress admin area.
Once you’ve done this, you can click the ‘Log into my account’ button to connect your WordPress site with your Thrive Themes account.
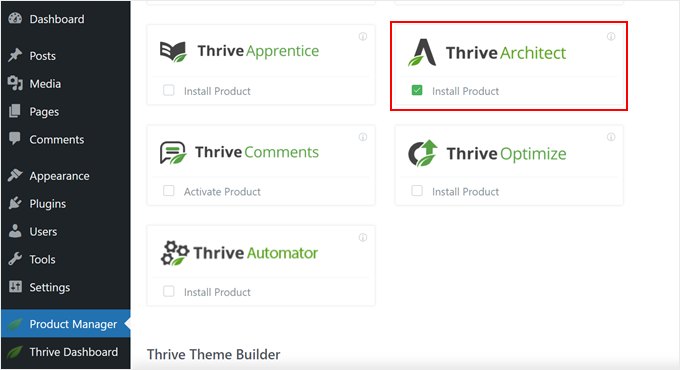
You should now see a list of all the available Thrive Themes products inside your account.
Simply select ‘Thrive Architect ‘and check the ‘Install Product’ box.
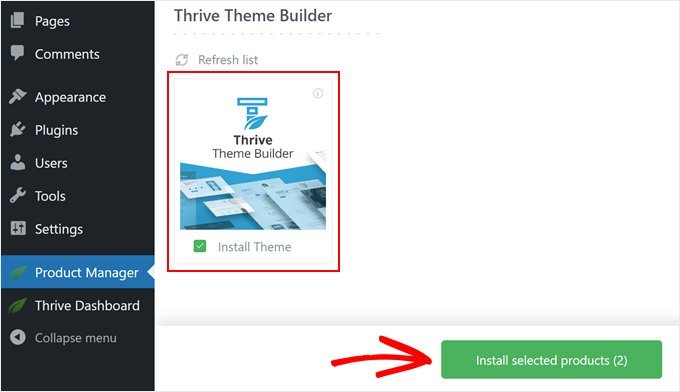
After that, let’s scroll down to the ‘Thrive Theme Builder’ section and check off the ‘Install Theme’ box. We have to do this because Thrive Architect works best with a Thrive Theme.
Next, click the ‘Install selected products’ button.
You should now see that the Thrive Product Manager is setting up the Thrive Architect and Thrive Theme Builder plugins.
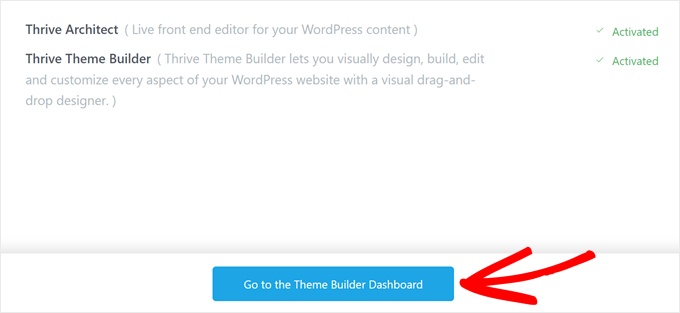
When that’s finished, just click ‘Go to the Theme Builder Dashboard.’
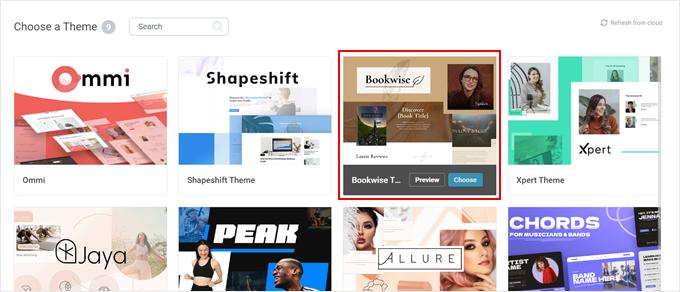
At this point, you can just go ahead and pick a WordPress theme.
You can also click the ‘Preview’ button to see what the theme looks like before you click ‘Choose’ on it.
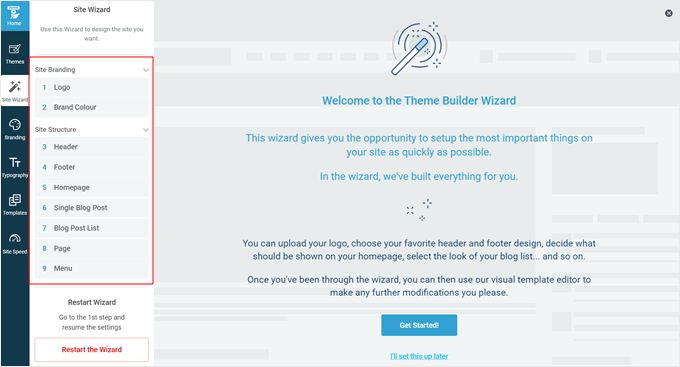
With your theme set up, you should now land on the Theme Builder Wizard.
This onboarding wizard will help you out with uploading your own logo, choosing brand colors to add to your theme, and setting up the different structures and templates of your theme.
Just complete the onboarding so that you can move on to the next step.
Step 2: Add a Progress Bar to Your WordPress Posts
Let’s now add a progress bar to your WordPress posts. To start, open the block editor for a new post or an existing one.
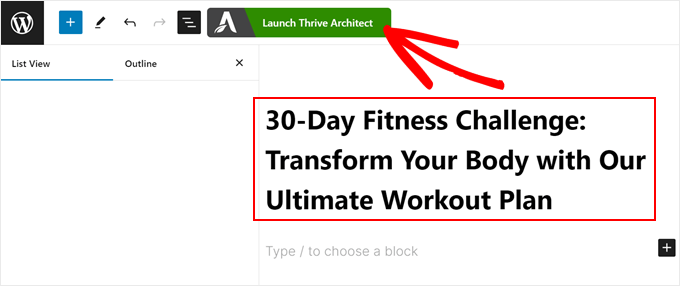
Then, type in the title of your new post there. After that, click the ‘Launch Thrive Architect’ button.
Now, you can use Thrive Architect to create the content for your blog post. It works similarly to the block editor.
That is, you can just click the ‘+’ button and drag and drop any element you want to the section that says ‘Click to add text or drag and drop element from right-hand panel.’
Here is an example of us adding a Text block using the editor:
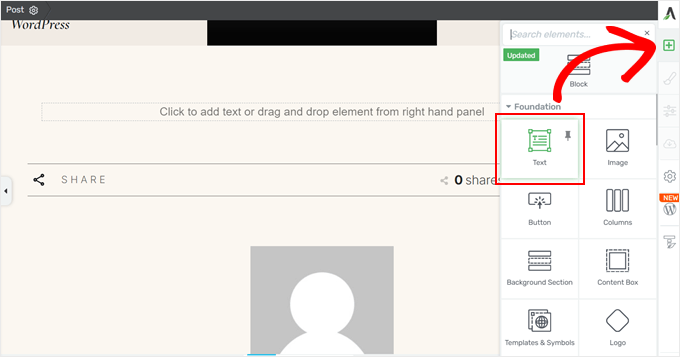
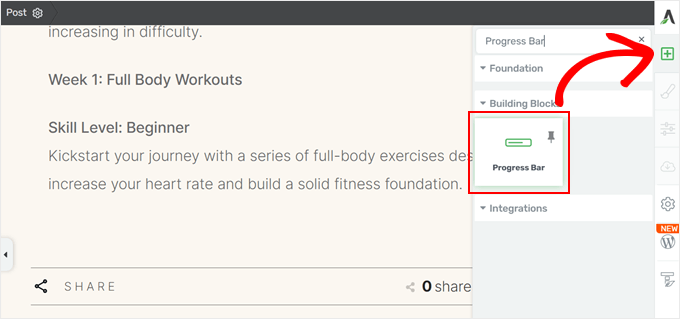
The process for adding a progress bar is pretty much the same. Just click the ‘+’ button again and find the ‘Progress Bar’ block.
After that, just add it to your post.
Next, a popup window will appear, asking you to choose a progress bar design.
There are dozens to choose from, and you can always change it later if needed.
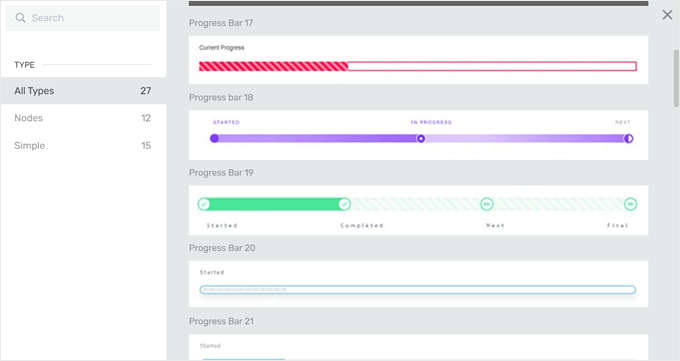
Once you’ve made your choice, you will return to the main editor interface.
Step 3: Customize the Progress Bar
At this stage, you should see a sidebar on the left panel with customization options for the progress bar.
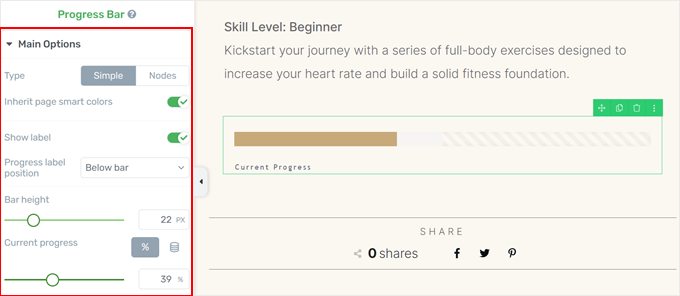
There are many settings to configure, and we will cover the main ones to show how to modify the progress bar.
In the Main Options menu, you can change the progress bar design from a simple one to one with Nodes. Nodes are icons that show where you are in progress. We’ve chosen that type of design for the sake of example.
You can also change where to place the progress bar labels, the bar height, and the current level of the progress bar.
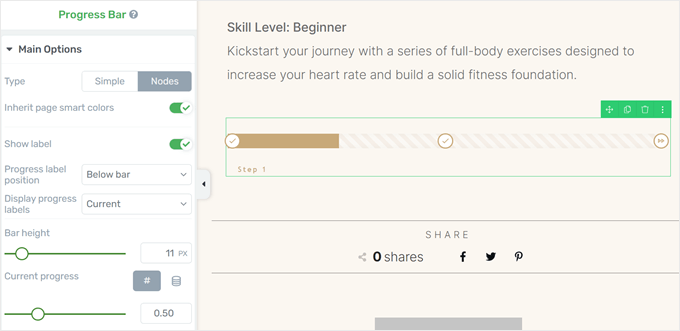
Moving down the panel, you will find options to change the Node labels.
To modify them, click the pencil ‘Edit’ icon next to the label.

Now, just type in your new label.
Once done, click the ‘Save’ icon.

What’s great about Thrive is that it lets you customize every other part of the progress bar so that you can design it the way you like it.
To see those customization options in action, you can hover over one of the elements in the progress bar and click on it.
Here, we’ve selected the part of the progress bar that shows incomplete progress.
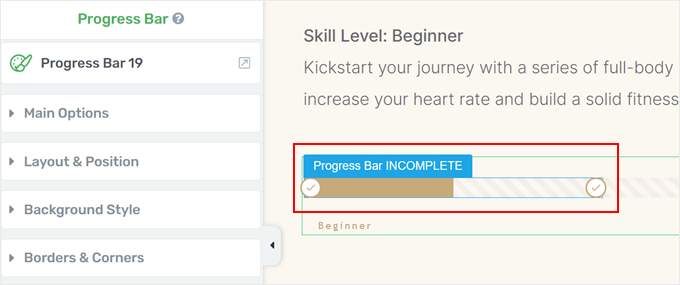
Now, a new set of options has appeared in the left sidebar.
If you click on the ‘Currently styling’ dropdown menu at the top, you can change specific parts of the bar, such as the progress labels, icons, nodes, and more.
Be sure to explore each part to see what you can customize.

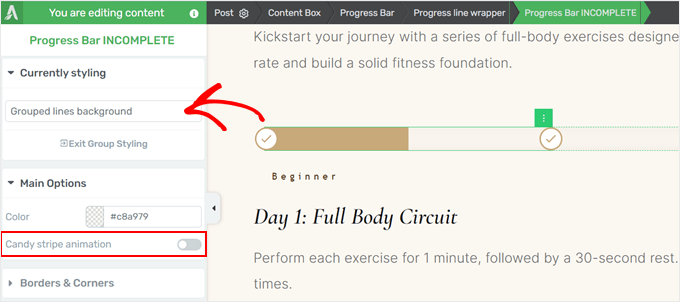
Let’s try some examples. To disable the candy stripe animation in the background bar, select ‘Grouped lines background’ in the Currently styling menu.
Then, toggle off the ‘Candy stripe animation’ button.
If you want to change the icons inside the progress nodes, switch to ‘Progress icons’ in the Currently styling dropdown menu.
After that, in the ‘State’ menu at the top, select ‘Normal.’
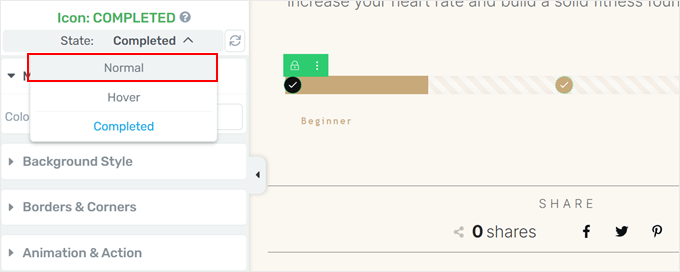
You should now see some settings that are made for changing the progress bar icons.
Here, click ‘Change icon.’
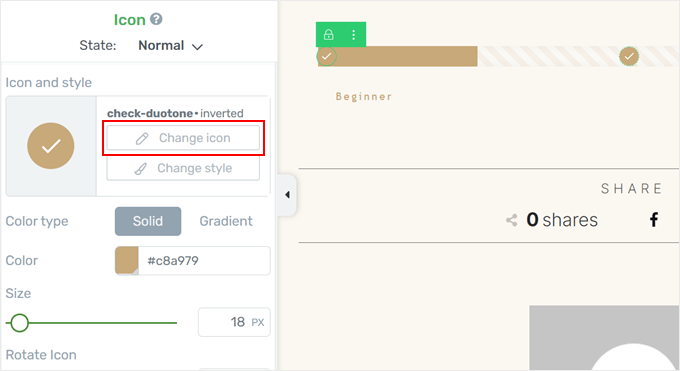
Thrive Architect has many icons in its library for various industries. That being said, make sure the icon you choose is suitable for a progress bar.
Once you’ve made your choice, just click ‘Select.’
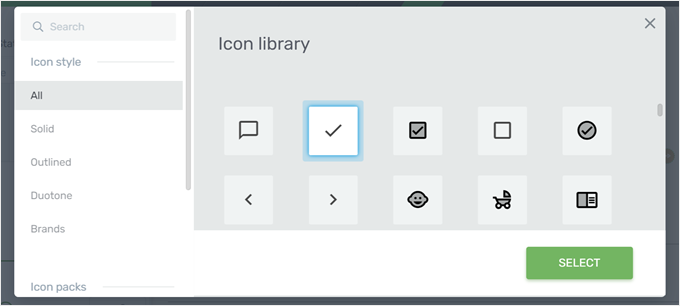
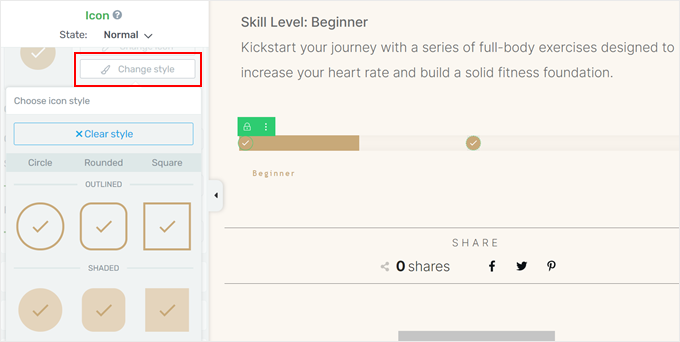
To change the icon style, just click the ‘Change style’ button.
From here, you will see some pre-made icon designs that you can choose.
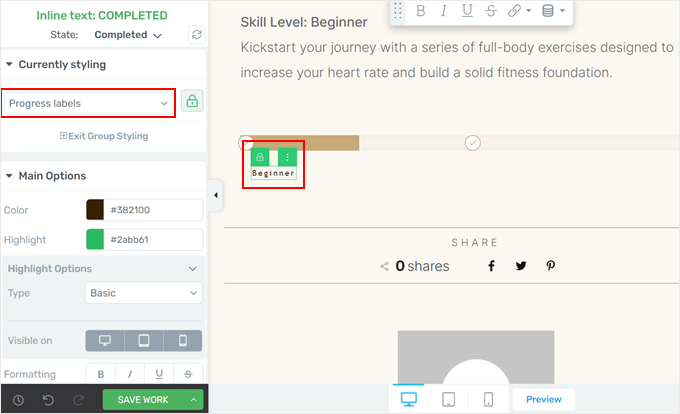
To change the look of the progress label, switch to the ‘Progress label’ option in the Currently styling dropdown menu.
Here, you will see some options to customize the label’s color, highlight, formatting, and so on.
Once you’re happy with how the progress bar looks, click ‘Save Work’ to store your changes.
Make sure to preview your blog post on mobile, desktop, and tablet so that everything looks great.
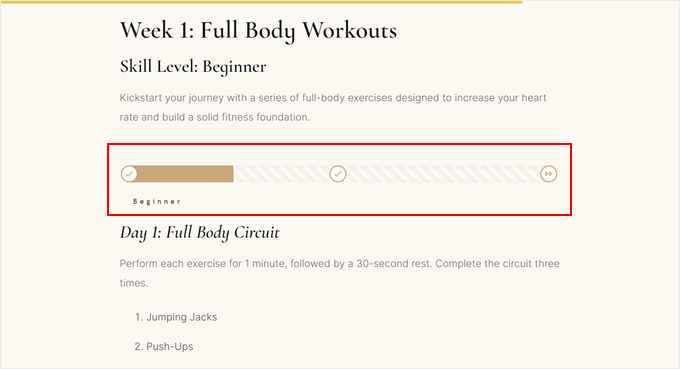
Here’s what ours looks like on our demo site:
Alternative: Add a Circle Progress Bar
Thrive Architect also has a different type of progress bar in their block collection called a fill counter. The Fill Counter block looks like a circle progress bar, which is great for displaying statistics.
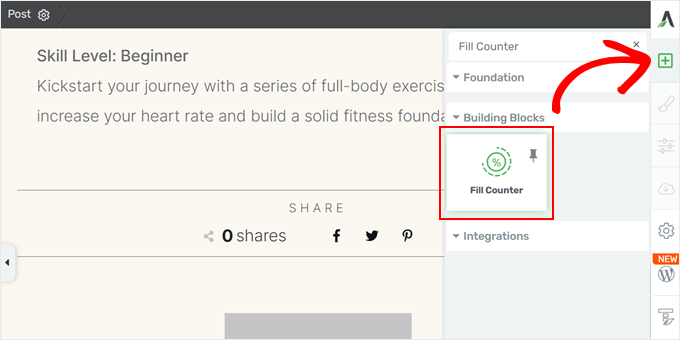
To add it, just click the ‘+’ button on the right sidebar and find the ‘Fill Counter’ element. Then, drag and drop it anywhere on the post.
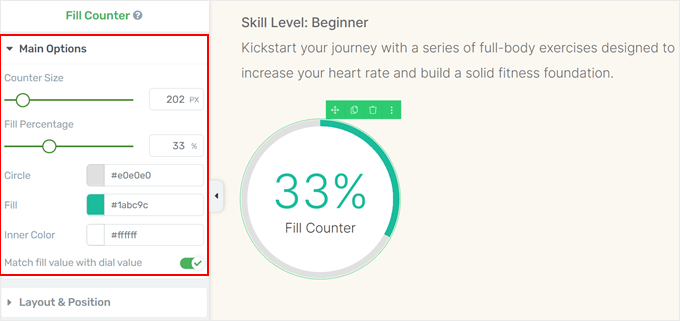
Once you add it, you will see some options to customize the fill counter.
Mainly, you can change the fill counter’s size, fill percentage, colors, and whether the percentage value should match the value visually presented in the counter.
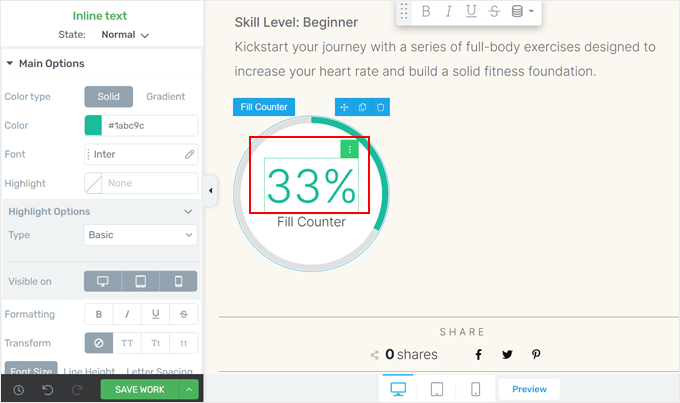
You can also click on the number inside the fill counter to change its appearance.
Feel free to modify its colors, font type, visibility on different devices, and more.
If you want to change the text below the percentage, then just click on the text itself.
After that, you can type in a description for the fill counter.
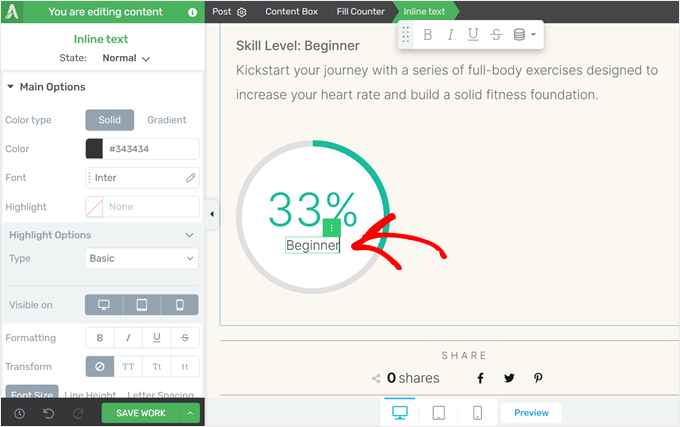
Don’t forget to save your work when you’re done.
Alternative: Not a fan of Thrive Architect? SeedProd page builder also has a progress bar block that you can add to your theme or custom pages.
For more information on how to use SeedProd, just check out our guide on how to create a custom WordPress theme.
Method 2: Use a Free Progress Bar Plugin (Quick and Easy)
This method is best if you don’t want to use a page builder and just need a simple and free WordPress progress bar plugin.
For this, we will use the free Ultimate Blocks plugin, which adds tons of extra Gutenberg blocks to your WordPress editor.
The great thing about this plugin is that the progress bar block is available for free. That said, you can upgrade to the pro version of the plugin to get more Gutenberg blocks and customization options.
You can learn more about the plugin in our Ultimate Blocks review.
First, install and activate the WordPress plugin on your website. Once done, you can open the block editor to create a new post or edit an existing one.
Now, click the ‘+’ button anywhere on the page and select the ‘Progress Bar’ block.
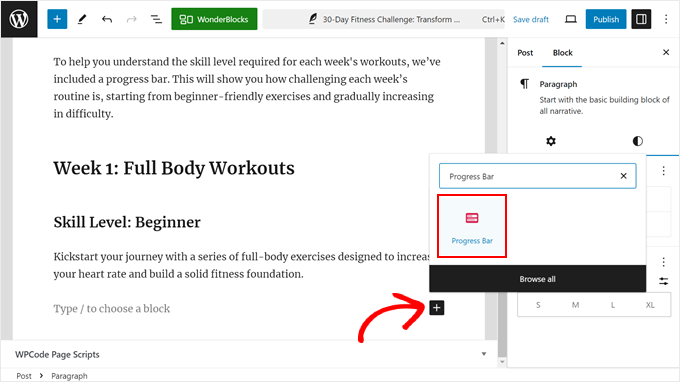
You have now successfully added a progress bar block to your post. Let’s customize this WordPress design element further to suit your needs.
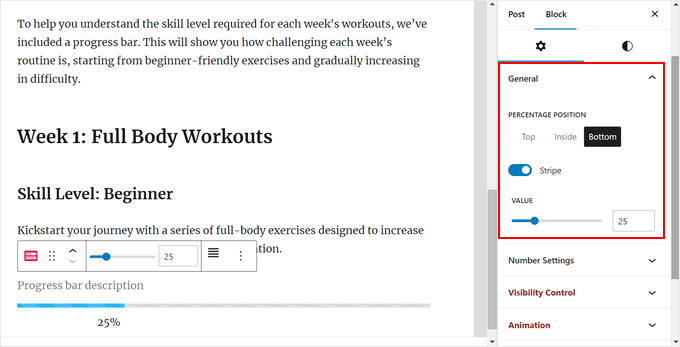
If you look at the block settings sidebar on the right, you will see some customization options. In the ‘General’ tab, you can change the progress bar’s percentage position from the top to the inside or the bottom of the bar.
You can also disable or enable the ‘Stripe’ design and change the value for the current progress.
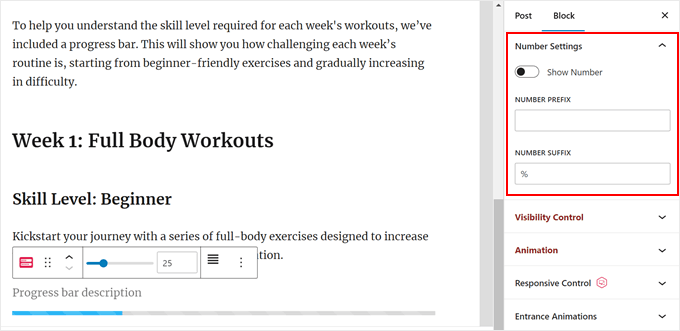
Next, you can customize the Number Settings.
Here, we have chosen to not show the number percentage because we don’t find it useful for our example.
But if you do choose the show it, then you can change the number prefix (a symbol that appears before the number, like a minus sign) and number suffix (a symbol that appears after the number, like a currency sign).
Next up is Responsive Control.
Since progress bars can take up some space in your post, you may want to hide it when the post is being viewed from a smaller screen, like on tablet or mobile devices.

Want to make the progress bar more interactive? Consider adding an entrance animation. When you enable this feature, the progress bar will appear with an animated effect as the viewer scrolls down to it.
You can also choose an animation style and set the delay period so that the progress bar appears at the right moment.

Let’s switch to the ‘Style’ tab, where you can customize the progress bar’s design.
At the top, you can change the design from a line to a circle or a half-circle progress bar. You can also add a border radius to the bar’s design so that it looks more circular rather than rectangular and sharp.
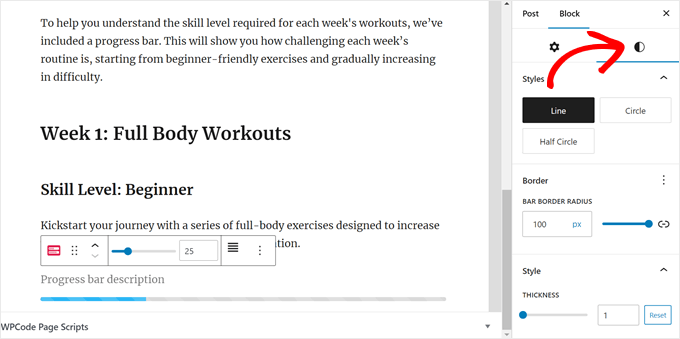
Here, we’ve decided to stick with the line progress bar.
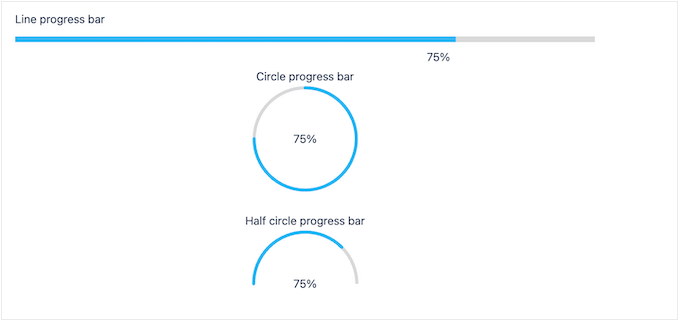
But this is what the circle and half-circle progress bars look like:
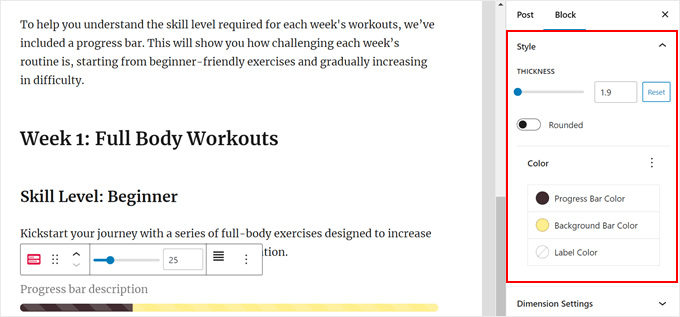
Scrolling down, you can change the thickness of the progress bar so that it stands out even more.
You may also want to change the color of the progress bar, the background bar, and the progress bar’s label to suit your website design.
Another element you can change is the progress bar’s padding and margin.
Both settings essentially control the spacing between the progress bar and the other blocks surrounding it.
You can increase the value for both if you don’t want the progress bar to be too close to the other blocks above or below it.

Next, you may want to add a label or description to the progress bar so that readers get more context from the visual.
On top of the progress bar, just type in some text. You may also want to change the text’s alignment and style using the settings in the block’s toolbar.

Once you’re happy with how the progress bar looks, just click ‘Publish’ or ‘Update’ in the block editor.
You may also want to view the post on mobile, desktop, and tablet to make sure the progress bar looks right across all devices.
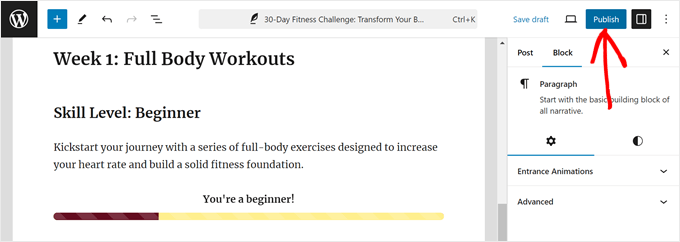
That’s it! You have successfully added a progress bar to your WordPress posts.
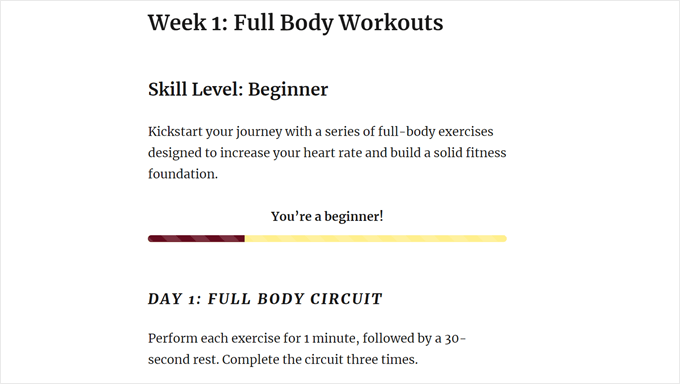
Here’s what our progress bar looks like on our demo website:
Frequently Asked Questions: Adding Progress Bars in WordPress
Here are some questions frequently asked by our readers about progress bars:
1. When should I use a reading progress bar vs. a static progress bar?
We recommend using a reading progress bar when you want to keep readers engaged in long posts. It fills up as they scroll, showing how much of the article they’ve read.
This works well for tutorials, guides, or blog posts where you want to reduce bounce rates.
A static progress bar is better for tracking a fixed goal, like fundraising progress, project completion, or skill levels. These bars don’t move as the user scrolls but instead display a set percentage or value, like “60% complete” or “$300 of $500 raised.”
If your goal is to boost engagement while reading, go with a scroll-based bar. If you want to show off progress or achievements, choose a static one.
2. What are some best practices when using progress bars?
Here are a few tips to make your progress bar more effective:
- Keep it simple – A thin, subtle bar works best and doesn’t distract from your content.
- Match your branding – Customize the color and size to fit your site’s style.
- Choose the right spot – Most readers expect it at the top of the screen.
- Test on mobile – Some bars look clunky on small screens. Disable if needed.
- Optional: Add read time – It helps set expectations for how long the post will take.
A clean and well-placed progress bar can improve user experience without slowing things down.
3. Will adding a progress bar slow down my site?
Most modern progress bar plugins are lightweight and won’t noticeably affect your site’s speed.
However, poorly coded or bloated plugins can impact performance, especially on mobile. To stay safe:
- Use trusted plugins with good reviews.
- Test your site speed after installing.
- Disable the bar on mobile if it affects load time.
As long as you’re careful with your plugin choice, adding a progress bar won’t harm SEO and can even boost engagement.
Bonus Design Elements for Your WordPress Site
Want to add other visual elements to your WordPress website? Just check out these articles below:
- How to Add Drop Caps in WordPress Posts
- How to Add a Countdown Timer Widget in WordPress
- How to Add a Scrolling News Ticker in WordPress
- How to Add an Animated Background in WordPress
- How to Show a Number Count Animation in WordPress
- Ways to Bring Halloween Effects to Your WordPress Site
- How to Add Rotating Testimonials in WordPress
- How to Add Feature Boxes With Icons in WordPress
- How to Add YouTube Video as Fullscreen Background in WordPress
We hope this tutorial has helped you learn how to add a progress bar to your WordPress posts. You may also want to check out our expert picks of the best WordPress theme builders and our guide on how to edit a WordPress website.
If you liked this article, then please subscribe to our YouTube Channel for WordPress video tutorials. You can also find us on Twitter and Facebook.


Sachiko Ishikawa
Hello! I have a question How can I adjust the size (width) of the progress bar? I’m putting it on my sidebar menu, but unfortunately, it’s too wide…
Apologies for the inconveniences.