Sometimes, readers want to print out articles for reference, but WordPress themes aren’t always designed for printing.
By default, most themes include unnecessary elements like graphics, sidebars, and ads – making printed pages look cluttered and, even worse, majorly wasteful when it comes to printer ink.
Luckily, you can fix this by adding a printer-friendly option to your WordPress posts. By doing so, you ensure readers print only the content they need.
In this article, we’ll show you how to set up a printer-friendly option for your WordPress posts. So, your posts look clean and professional when printed! 💡
Why Add a Printer-Friendly Option to Your WordPress Posts?
Printing directly from a WordPress blog often yields unexpected results, such as printing the entire layout instead of just the content of the post. They will probably get every image, sidebar, header, and menu.
This looks unattractive, wastes paper and ink, and is difficult to read.
Fortunately, this doesn’t always happen.
Some WordPress themes do come with a separate CSS stylesheet for printing, which prints only the content the user wants.
You can view the print preview by pressing CTRL+P on Windows or Command+P on Mac to check how your WordPress site looks when printed.
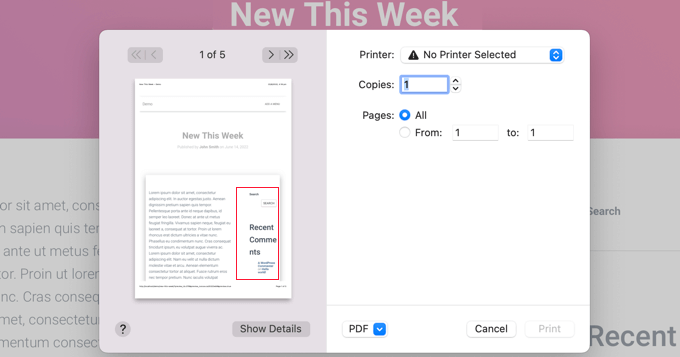
If the print preview shows your website’s header, footer, and sidebar, then you can add a printer-friendly option to your WordPress site.
Doing this will add an on-screen print icon that lets users know they can have an attractive, readable printout of your content.
Let’s see how to add a printer-friendly option to your WordPress posts.
How to Add a Printer Friendly Option to Your WordPress Posts
The first thing you need to do is install and activate the Print, PDF, Email by PrintFriendly plugin. For more details, see our step-by-step guide on how to install a WordPress plugin.
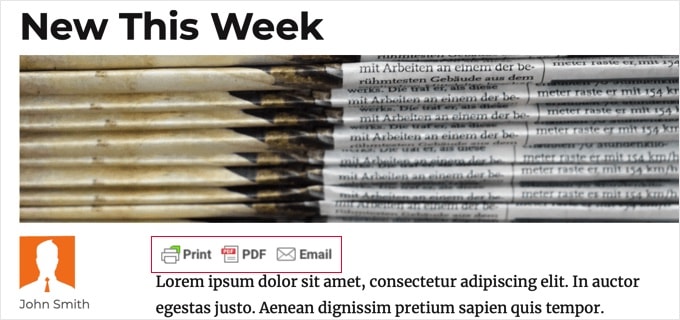
Upon activation, ‘Print’ and ‘PDF’ icons will automatically be added to the bottom of each post and page on your website. These will create an attractive printout or PDF version of the content you are viewing.
You can customize the plugin by navigating to Settings » Print Friendly & PDF from your WordPress dashboard.
At the top of the page, users who are paying for Pro features can activate their accounts. To use the free version, just scroll past this section.
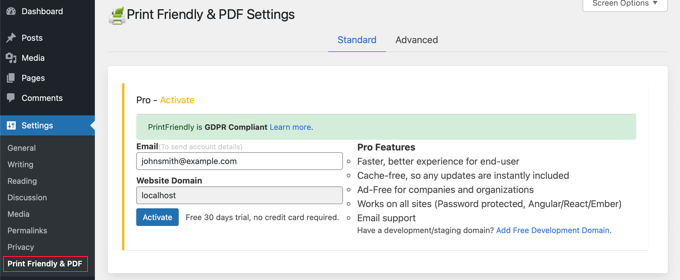
When you come to the ‘Select content using’ section, you should leave the default ‘WP Template’ option selected.
If you find that the ‘Print’ and ‘PDF’ icons are not being displayed on your WordPress website, then you should come back and try one of the other options.

Next, you can choose the button style to display on your website. These are available with different labels and color options. Some styles include buttons for PDF and email, but these options will be offered when previewing the page no matter which style you choose.
You may need to experiment with a few button styles to find one that looks best on your site.
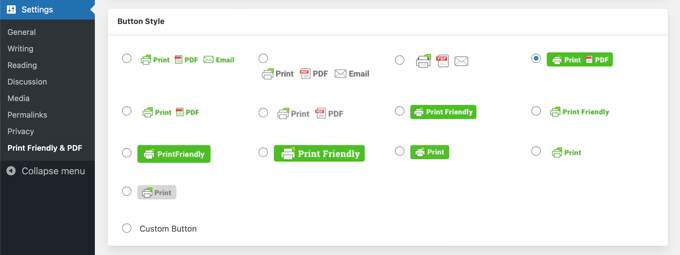
The same applies to where you place the button. You can place the button above or below your content and align it to the left, right, or center, or have no alignment.
You may need to try a few alignment options to find one that looks best.

In the next section, you choose where to display the print button on your website.
By default, it will be displayed on all posts and pages. However, there are also checkboxes for the homepage, category pages, and taxonomy pages.
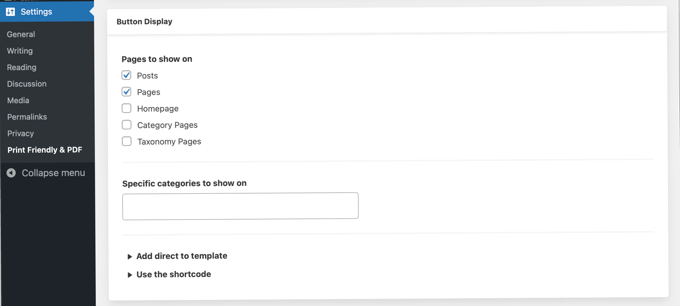
You could show the print button only for specific categories by entering them in the box labeled ‘Specific categories to show on.’ Simply click that box, and then you can select the categories you want from a drop-down menu.
Advanced users can also add the button directly to their theme templates using a code snippet, or add a shortcode anywhere within a post, page, or widget-ready area.
Don’t forget to click ‘Save Options’ at the bottom to save your changes.
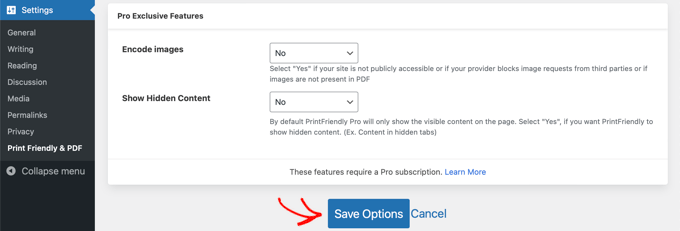
You can now visit your website to see your print icon in action.
Here’s how it looks on our demo website:
When you click the ‘Print’ button, a preview page will appear that shows you exactly how the page will look when it is printed.
However, this isn’t simply a preview page. You can also remove any content you don’t want to print.
For example, when you hover your mouse over the date a trash icon will appear. Clicking it will remove the date from the preview. You can do the same to remove the image and anything else you don’t want to print.
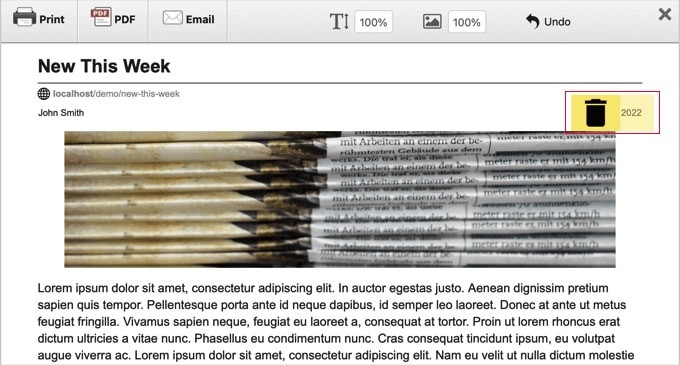
When you’re ready, simply click the ‘Print’ icon to print the page.
Alternatively, you can click the ‘PDF’ button to download a PDF version of the page or the ‘Email’ button to email the PDF.
Bonus Tip: More Blogging Hacks
Adding a print icon to your blog posts is just one way to make things easier for your readers. There are some other cool tricks you can try, too.
For instance, you could add a ‘Load More Posts’ button. This lets visitors keep scrolling through your content without leaving the page, which helps keep them engaged.
You can also show your upcoming scheduled posts. Letting readers know what’s coming next can build excitement for your future content.

Lastly, you can add tooltips to your posts and pages. These give extra details when someone hovers over a word or phrase, keeping things clear without cluttering the page.
For more tutorials, you can check out our ultimate guide on how to start a blog.
We hope this tutorial helped you learn how to add a printer-friendly option to your WordPress posts. Next up, you may also want to learn how to display related posts or how to display most commented posts in WordPress.
If you liked this article, then please subscribe to our YouTube Channel for WordPress video tutorials. You can also find us on Twitter and Facebook.


Jiří Vaněk
I have a fairly graphically heavy website, and yes, printing any guide, including the graphics, was a big problem because an article that could be printed on two pages sometimes ended up on five. The biggest issue was with articles that included comments. This simple solution completely fixed the problem, and the implementation was really easy.
Joe
Thank you for the guidance.
WPBeginner Support
You’re welcome
Admin
facebook
I have one specific page on my site I am trying to get to print without anything around it. I installed the plugin did all of your steps have the print page logo and link. I would like it to just print cleanly the contents of my page with nothing else around it.
WPBeginner Support
You would want to check with the support for the plugin you are using for how they exclude certain content from the printer-friendly page
Admin
Brooke Favorat
This is exactly what I needed and was so excited to see this information… but sadly the plugin recommended has been closed I have no clue about code and all other print plugins are Greek to me. Please help!
WPBeginner Support
The second option is still available but thanks for letting us know, we’ll be sure to look into updating this article
Admin
Brooke
Just wanted to update in case anyone else would like to know…the plugin BWS PDF & Print is great and has been the solution for me
Sam Mooney
Neither plugin is maintained anymore which is a shame. Do you have other suggestions?
Peter
What if I only want this print option on posts and not pages?
MikeM
where is your print function?
Lineisy Kosenkova
Have only just started looking into being able to print WordPress posts. Glad I stumbled onto your site and these useful tips. . This is a great post. Tom, do you have any theme suggestions that play nicely with print stylesheets?
Mark Klinefelter
My favorite is PrintFriendly. Easy to install on any page or post and can be easily removed from any individual page if desired. It also comes with a pdf tool. I use it on my live site and it is a very attractive proposition.