As course creators ourselves, we understand how challenging it can be to set up an online learning platform. When we first started, we had the same questions: How do we organize our lessons? How do we track student progress?
So, yes, adding a Learning Management System (LMS) to WordPress can feel like a big task when you’re just starting out.
But through trial and error, we’ve discovered some great solutions.
While we use MemberPress to power our free video membership website, we went the extra mile to find another option that can cater to different use cases. And after careful research, we found that Thrive Apprentice is an excellent alternative.
In this article, we’ll show you how to add an LMS to WordPress without the hassle.

What Is a Learning Management System in WordPress?
A Learning Management System, or LMS, is like a complete school admin system for your WordPress website.
You can think of it as the backbone of any online school. With an LMS, you can create, manage, and deliver online courses to your audience.
This means you can upload lessons, create quizzes, track progress, and even hand out certificates to your students. It organizes everything for you so you can focus on teaching.
And the best part? It’s all built right into your WordPress site, so there’s no need to send users to a separate platform.
Why Add a Learning Management System in WordPress?
If you’ve ever thought about sharing your skills or knowledge online, an LMS is the way to go.
Whether you’re teaching content marketing, art, or fitness routines, an LMS helps you organize and deliver your content in a way that’s easy for your students to follow – no coding required.
You can set everything up with user-friendly tools designed for non-techies.
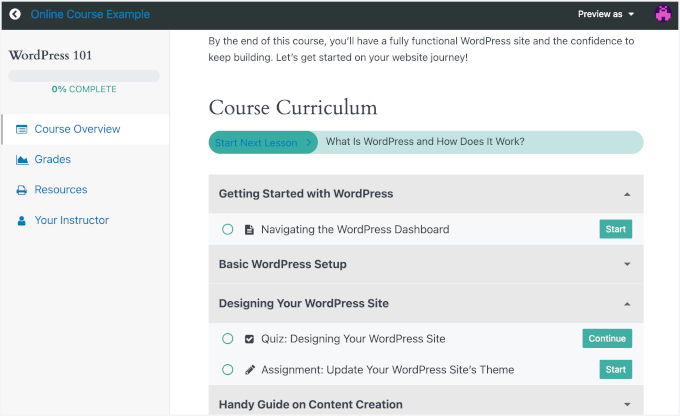
An LMS is also great for keeping students engaged. Features like progress tracking and certificates help learners stay motivated. Plus, it’s all automated; no manual grading or emailing is required.
Not only does it make teaching simple, but it also helps you grow your audience and make money.
With tools like MemberPress and Thrive Apprentice, you can create a membership system so that only paying students get access to your courses. These tools also allow you to design professional-looking courses that are engaging and easy to navigate.
In the following sections, we’ll show you how to add a learning management system in WordPress using MemberPress and Thrive Apprentice. Feel free to go ahead and click on the jump links below to your preferred method:
Let’s walk through how to set up your LMS so you can start teaching without getting bogged down in the technical details!
Method 1: Add a Learning Management System Using MemberPress (Best All-in-One Solution)
If you’re looking for an all-in-one membership and LMS plugin, MemberPress is a fantastic choice. It comes with powerful add-ons: Courses, Quizzes, Assignments, Gradebook, and CoachKit, making it a complete solution for creating and managing online courses.
We personally use MemberPress to manage our video site, and it’s proven to be an excellent solution. You can read our full MemberPress review to see why we recommend it.

To start, let’s install and activate the MemberPress plugin. If you’re not sure how, check out our guide on how to install a WordPress plugin.
Once it’s activated, the MemberPress menu will appear in your dashboard. Click on it to be guided through a simple setup process.
Next, you’ll want to set up your payment methods. Head over to MemberPress » Settings, then click on the ‘Payments’ tab.
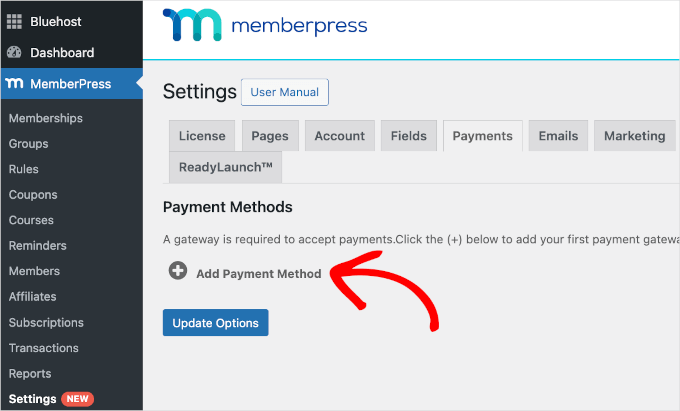
From there, hit the ‘+ Add Payment Method’ button and start adding your payment gateways.
Develop Your Online Courses
Now, it’s time to start creating your courses!
With MemberPress, you’ve got all the tools you need to make your courses shine. You can easily add lessons and quizzes and even give certificates to your students. Everything you need is ready to go, so you can focus on teaching, not getting stuck on setup.
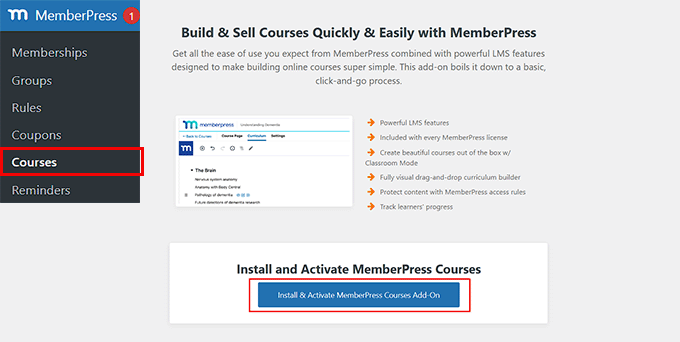
First, you’ll need to get the MemberPress Courses add-on. Just head over to MemberPress » Courses, and you’ll find a button to install and activate the add-on.
Note: MemberPress’ built-in ReadyLaunch feature lets you easily create mobile-friendly pages for courses, certificates, and quizzes.
ReadyLaunch is typically enabled by default when you install the plugin. You can check and adjust the settings by navigating to MemberPress » Settings and then switch to the ‘ReadyLaunch’ tab.
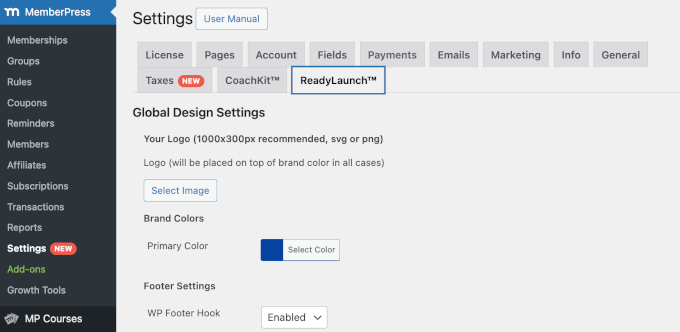
Here, you can upload your logo, choose your brand color, adjust the footer settings, and enable ReadyLauch templates for pre-built pages.
If everything looks good to you, then you’re ready to build your first course.
Once it’s activated, your WordPress dashboard should show a new menu item called ‘MP Courses’.
Click on it and once again on the ‘Add New Course’ button to open the MemberPress course builder.
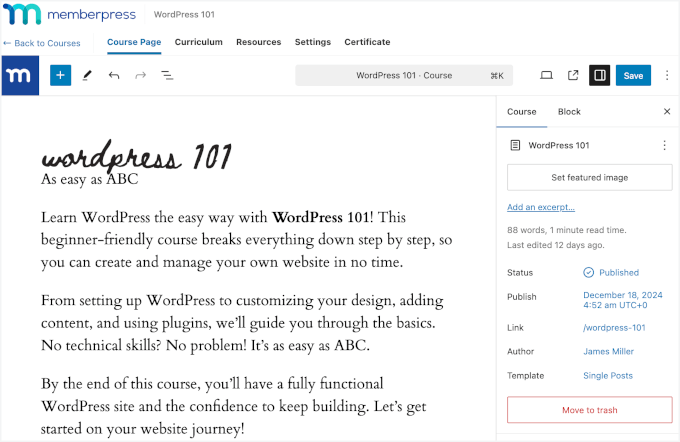
Once inside, you’ll notice the builder uses the WordPress block editor, which is super easy to use. With its drag-and-drop interface, you can add and customize blocks to create a fun, engaging course without the hassle of hard coding from scratch.
From here, you can start by adding a course title and description. For details, see our guide on how to create online courses in WordPress.
Create Modules
Once done, you can switch to ‘Curriculum’ to create your modules. To do this, just click on ‘Add Section’ to create a new course outline.
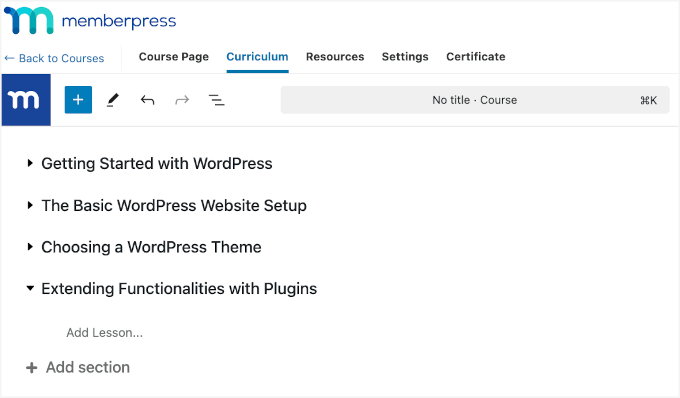
Don’t worry if you are still unsure of how to call your sections. You can always edit them later.
Next, let’s hit ‘Add Lesson’ under that section to add your learning materials. You can add as many lessons as you need. Just keep them relevant to the section.
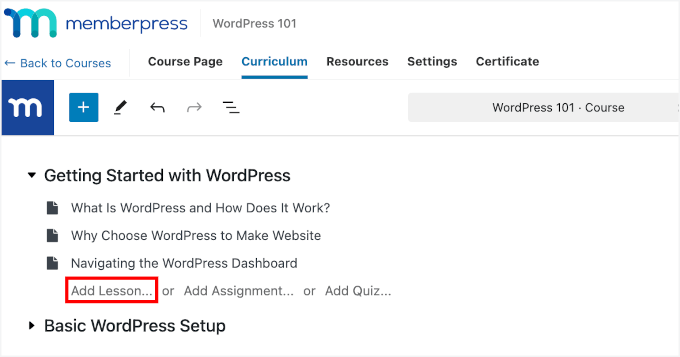
To edit a lesson, hover over it and click ‘Edit.’
This will open up the lesson editor, where you can add your materials.

Add Quizzes, Assignments, and Gradebook
With MemberPress Courses, you can also add quizzes and assignments to each lesson. Do note that you’ll need to activate the Quizzes and Assignments addon, which is pre-included upon the Courses addon installation.
First, let’s install and activate the MemberPress Quizzes addon. To do this, you can navigate to MemberPress » Add-ons.
Next, you can look for the Course Quizzes add-on and click on its ‘Install Add-On’ button. Then, go ahead and toggle the switch to activate it.
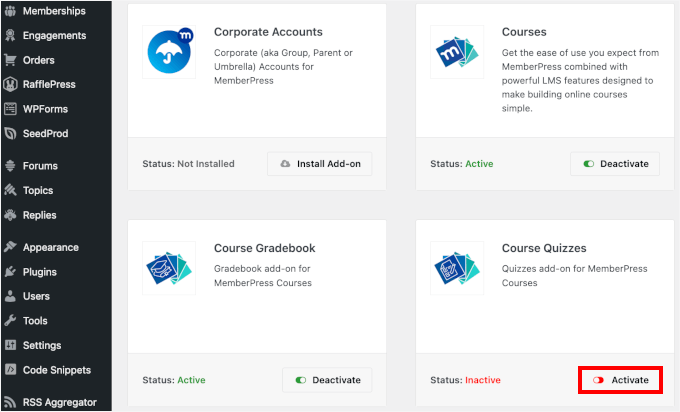
Once done, you can go back to your ‘Curriculum’ tab on the course builder.
Now, you should see the ‘Add Quiz…’ button. Simply click on it to add one.
To create the quizzes, hover over the quiz you just made and click on the ‘Edit’ icon.
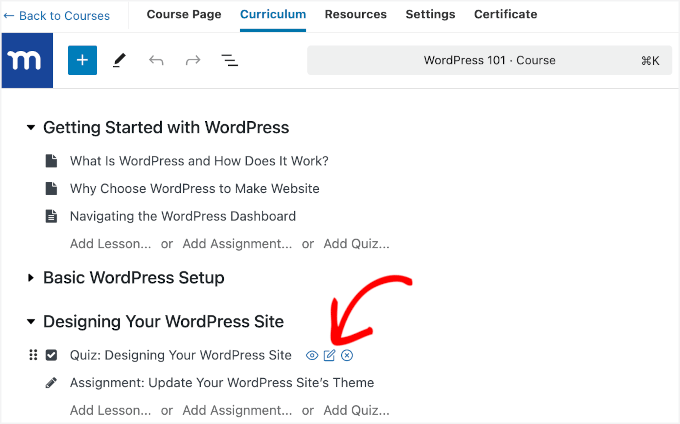
This will take you to the Quiz builder.
From here, you can start adding items one by one. You’ll find various quiz blocks on the left panel, and the quiz preview will be on your right.
To add a quiz block, be it a multiple-choice or an essay question, you can simply drag a block and drop it into the preview area.
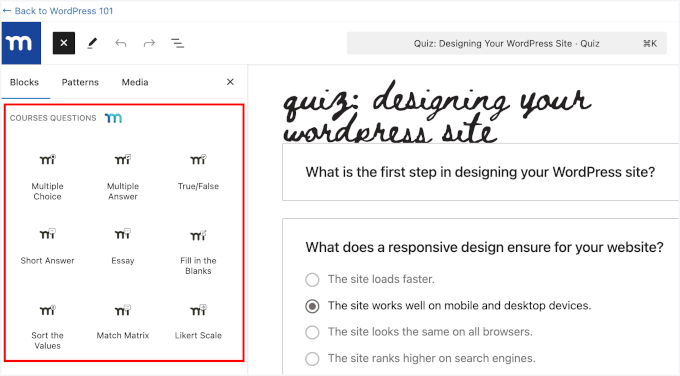
Next, you’ll want to check the ‘Quiz’ panel to see its configurations.
Go ahead and click the ‘Settings’ tab to expand it. From here, you can:
- Enable the ‘Require Passing Score’ feature and add the number in percent or points.
- Add a custom message in the ‘Failed Attempt Message’ field.
- Switch the toggle to allow retakes, define the retake limit, and choose ‘Latest’ to save the most recent quiz attempt.
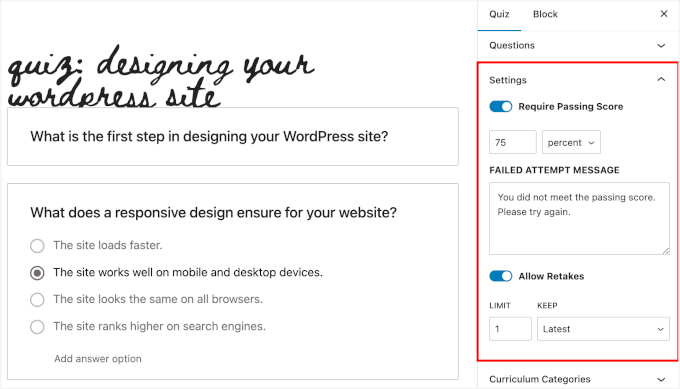
Don’t forget to click ‘Save’ when you’re done.
After that, you might want to add course assignments using the MemberPress Assignments add-on.
So, let’s go to ‘Addon’ under the ‘MemberPress’ menu. After that, simply hit the button to install the ‘Assignments’ add-on and switch the toggle to activate it.
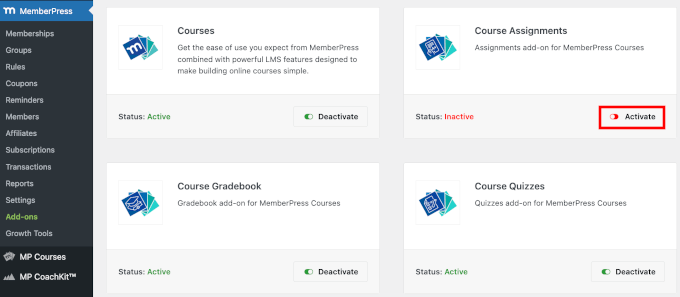
Upon activation, you’ll see the ‘Add Assignments…’ button on your course builder.
Go ahead and click on it to add one. After that, hover over the assignment and click the ‘Edit’ icon.
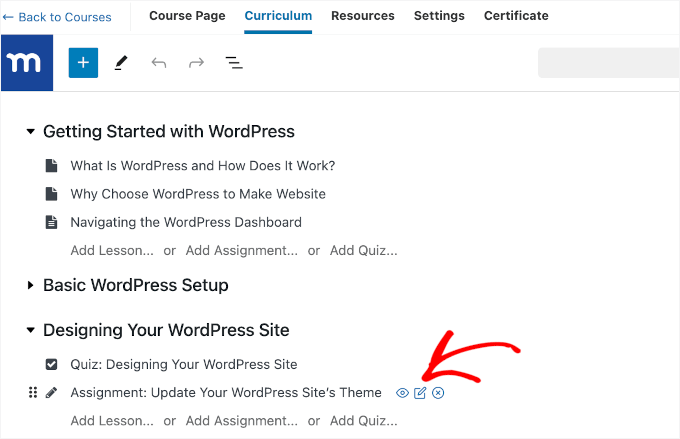
On the next screen, you’ll see the assignment editor.
The MemberPress Assignments add-on allows students to submit assignments by file upload and link sharing.
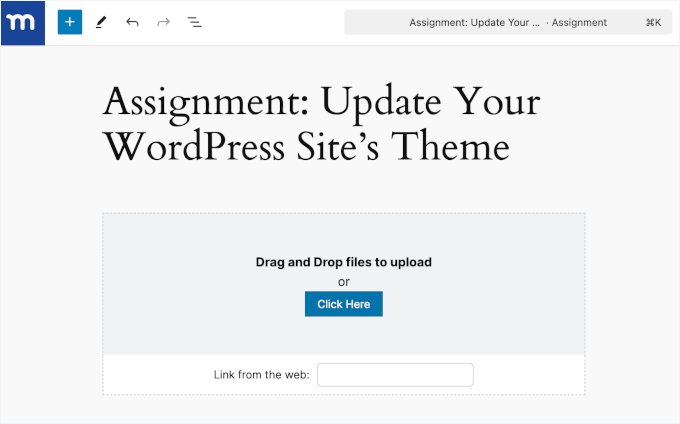
To add more context, try adding a short description of the assignment to explain its purpose and what’s expected. You can also include simple instructions.
Here’s an example:
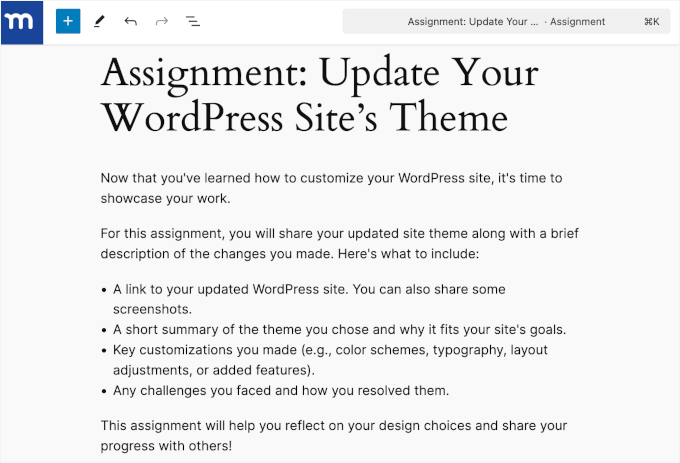
Don’t forget to hit the ‘Save’ button to keep your changes.
Now that you have quizzes and assignments set up, you’ll want to add a grade book functionality.
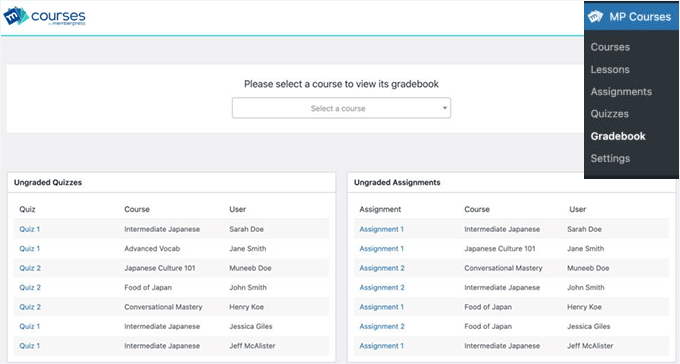
The MemberPress Gradebook add-on makes it super easy to track and assess your students’ progress. Once you install it, each course on your site gets its own gradebook that automatically updates with scores from assignments and quizzes as students complete them.
To install the add-on, you can go to MemberPress » Add-ons, then click the buttons to install and activate the Gradebook Add-on.
This will add the ‘Gradebook’ menu item under the ‘MP Courses.’
Upload Additional Learning Resources
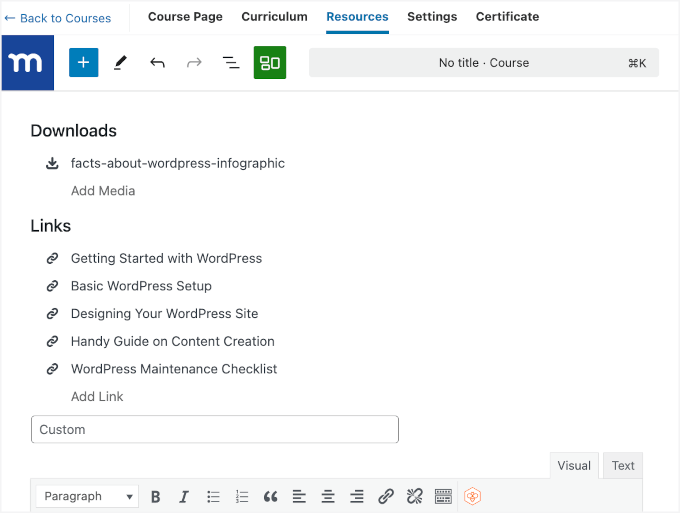
You can switch to the ‘Resources’ tab for the next step.
Here, you can share more learning resources with your students.
For example, you can include media files like images, videos, or audio that students can download. To do this, simply click the ‘Add Media’ button, which will open the uploader for you.
You can also embed external links from reliable sources. Go ahead and click the ‘Add Link’ button to add them.
Configuring the Course Settings
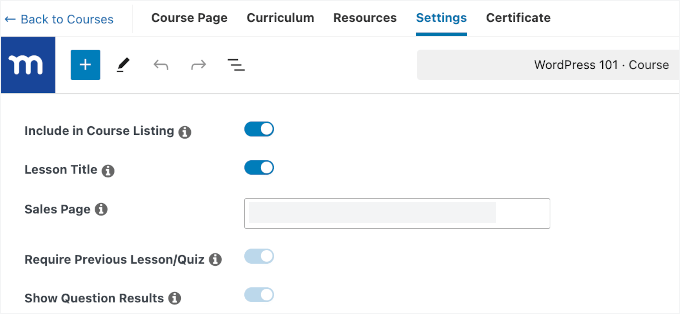
In the ‘Settings’ tab, you’ll find configuration options for a lot of things.
The first thing you’ll see is the ‘Include in Course Listing’ toggle. Since you’ve enabled ReadyLauch, this toggle will be automatically turned on.
You can then go ahead and paste your registration link into the ‘Sales Page’ field. This ensures students are directed to the correct registration form to purchase the course.
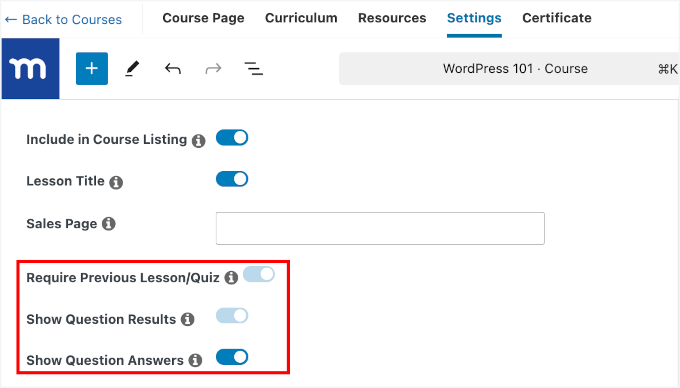
You can also find configuration options for your quizzes.
The ‘Require Previous Lesson/Quiz’ and ‘Show Question Results’ are pre-configured as active. However, you can choose to enable or disable the ‘Show Question Answers’ option.
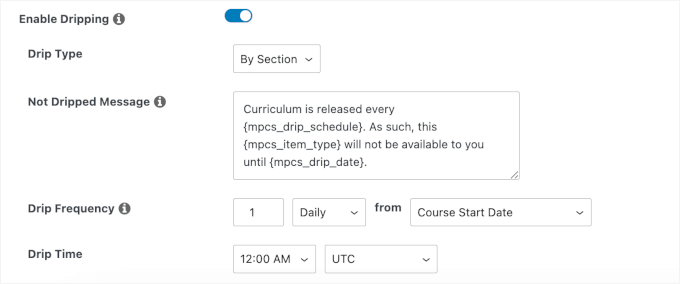
Then, you’ll find the drip content tools at the bottom of the panel.
Here, you can choose how you want the content to drip – either by section or by individual item. You can also set the release frequency (daily, weekly, or monthly) and specify the start date and time zone for each content release.
Customize Certificates Settings
In this stage, you’ll adjust the settings for the course certificates.
First, you’ll need to switch the toggle to enable certificates, which then will open the configuration options.
From here, you can enable force PDF download, choose your paper size, and select the design. You might also want to upload some digital files here, including your course logo and instructor eSignature.
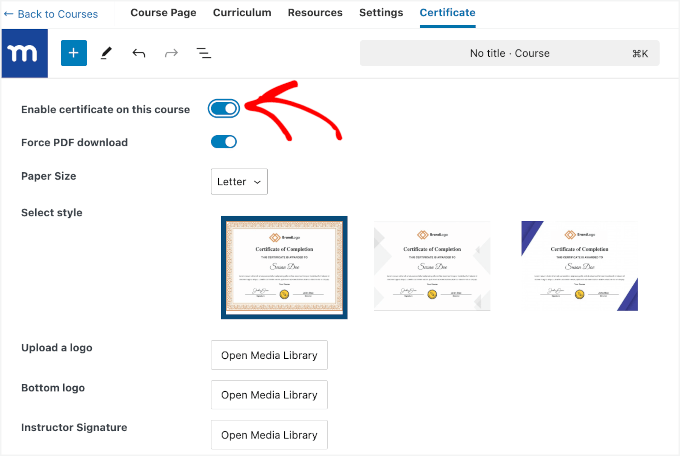
Let’s scroll down the panel to adjust more settings.
You’ll then find options to add a custom certificate title, instructor name and title, and footer message. If needed, you can also change the text color using the color picker.
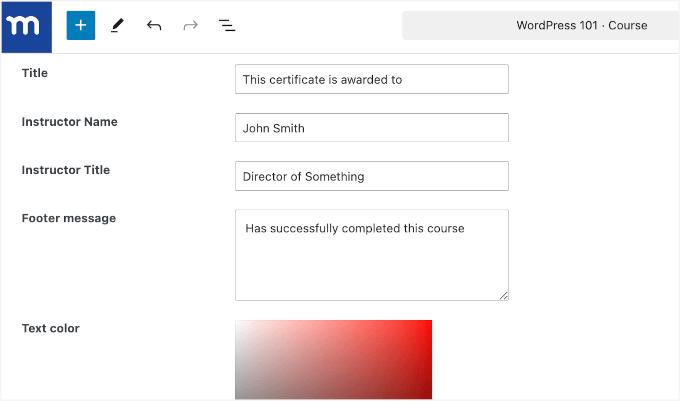
Then, to add the completion date for a student, simply toggle on the ‘Completion Date’ option.
If you want to set the certificate’s expiration date, you can enable the ‘Expiration Date’ option and choose the duration (in days, weeks, months, or years) after which the certificate will expire.
Additionally, if you want students to retake the course once their certificate expires, enable the ‘Reset student’s course progress when certificate expires’ option. This will automatically reset their progress.

That’s it!
When you’re happy with everything, you can finally go ahead and click the ‘Publish’ button.
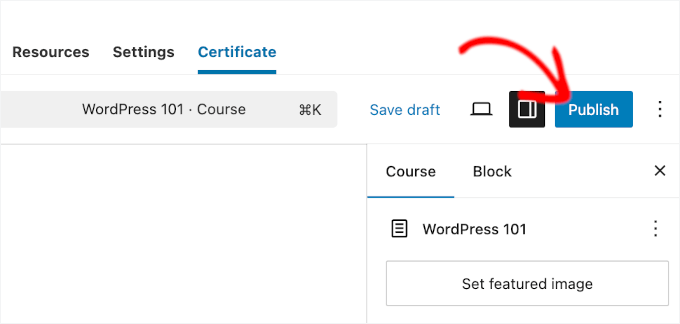
Now, you might want to click on the ‘View’ button when it appears to see it live on your site.
Here’s what our final LMS looks like on the front end:

Control Access and Sell Courses
Now, it’s time to create a membership plan for your course.
Creating a membership plan is a key step in managing your course and making it available to the right audience. It helps you:
- Keep things organized: Group your courses into specific plans for easier management.
- Earn money: Set prices and payment terms so you can make a profit from your course.
- Offer options: Create free or paid plans to fit different learners’ needs.
- Control access: Restrict content to members only so it’s secure and exclusive.
You can start by heading to MemberPress » Memberships and click ‘Add New Membership.’
On the next screen, you can enter a title for your membership plan and add a description.
Then, under the ‘Membership Terms’ box, you can enter your course price. You can also select the access duration (lifetime, recurring, or fixed expiration) and offer free trials.
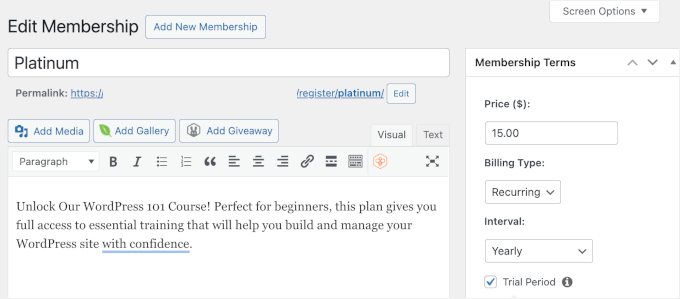
Now, let’s scroll down the page to locate the ‘Membership Options’ section.
Here, MemberPress lets you set up advanced features like the sign-up button, welcome email, and pricing box.
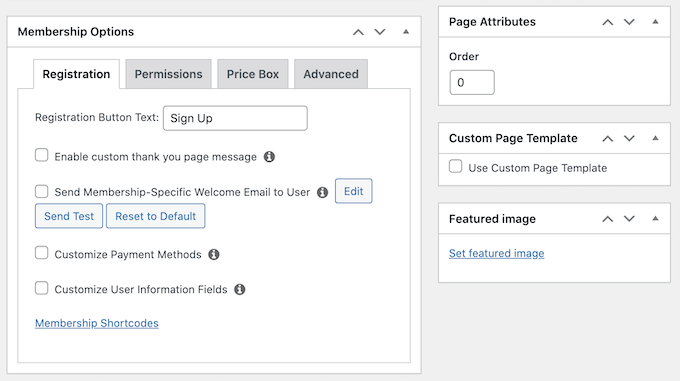
Once you’re done, click on the ‘Publish’ button to save your changes.
The next step is to add the membership rule, lets you choose the content you want to protect (like a specific course).
In your WordPress dashboard, navigate to MemberPress » Rules and click ‘Add New Rule.’
On the next screen, you can name your rule in the available field. Then, you can select the content you want to protect under the ‘Content & Access’ section.
For instance, here, we:
- Chose a single course and selected the course we just made.
- Granted access to the protected content if a logged-in user’s membership plan is Platinum.
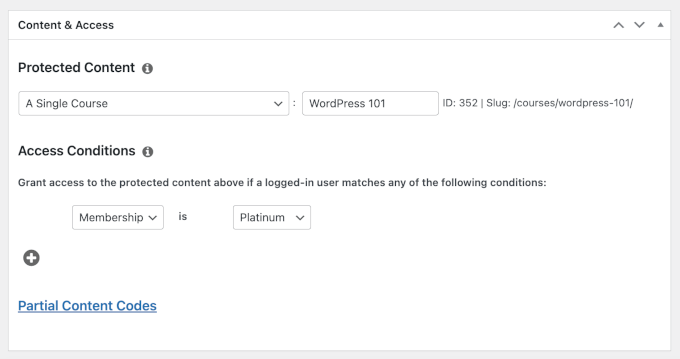
Don’t forget to click the ‘Save Rule’ button to finalize your settings.
That’s all there is to it!
If you want more help, check out our full guide to creating and selling courses in WordPress.
💡 Looking for More LMS Options? If you’re exploring alternatives, AccessAlly is a powerful choice. It offers a range of features like advanced course creation, built-in membership options, and automation tools. Find the right LMS for your needs by checking out our comparison of the best LMS plugins for WordPress.
Method 2: Add a Learning Management System Using Thrive Apprentice (Best for Visual Course Building)
If you’re looking for a dedicated course builder for WordPress, then Thrive Apprentice is an excellent option. It comes with over 55 customizable templates for easy course creation and ready-to-use drip content templates for releasing lessons on a schedule.
While Thrive Apprentice has some built-in membership features, you can use it along with MemberPress to restrict access to your online courses. Alternatively, it’s compatible with other membership plugins like WishList Member or MemberMouse.
We’ve found Thrive Apprentice to be very helpful for creating structured and engaging courses. Check out our complete Thrive Apprentice review for more on this plugin.

Before we get started, just a heads-up: Thrive Apprentice is part of the Thrive Themes Suite, so you’ll need to create an account on their website.
Once you’re on the site, let’s click the ‘Start Now’ button and follow the steps to complete your purchase.

After that, you’ll have access to your ThriveThemes member dashboard.
To use Thrive Apprentice, you’ll need to install the Thrive Product Manager plugin. You’ll need to click on the ‘Thrive Product Manager plugin’ link to download it.
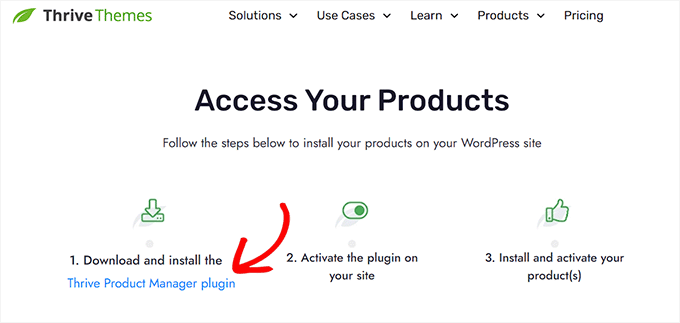
Once the download’s done, you can head to your WordPress dashboard to install and activate the plugin. If you need help with this, check out our guide on how to install a WordPress plugin.
After activation, you’ll need to link your Thrive Themes account to your WordPress site. To do this, go to the ‘Product Manager’ tab in your admin area and click ‘Log into my account.’
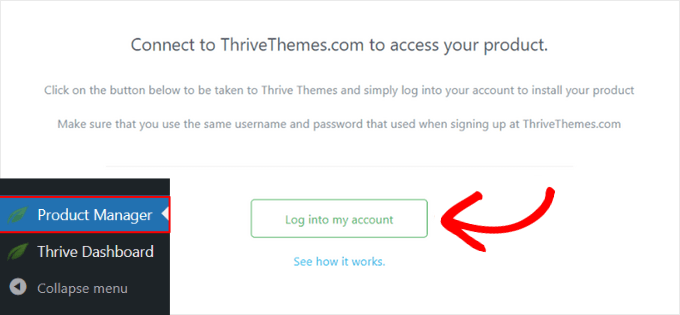
Once logged in, you’ll be able to select the products you want to install and activate on your site.
To install Thrive Apprentice, click ‘Install Product’ and then click the ‘Install Selected Products (1)’ button.
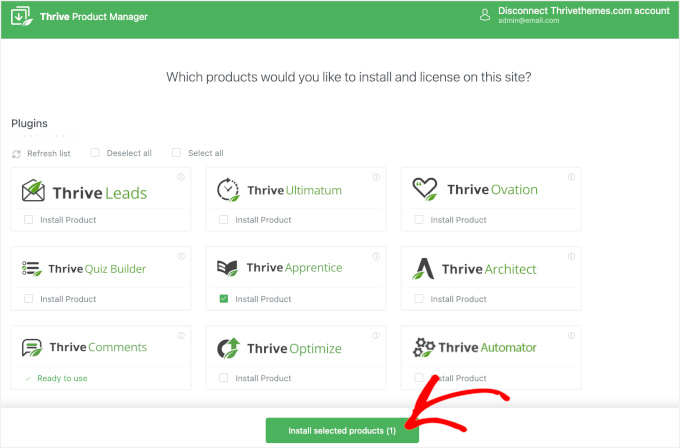
When Thrive Apprentice is installed, you’ll see a success message. Just click the ‘Go to Thrive Themes Dashboard’ button to get started.
Set Up Your Online Course Details
In the Thrive Dashboard, you should now find the section for Thrive Apprentice.
Go ahead and click on ‘Apprentice Dashboard’ to get started.
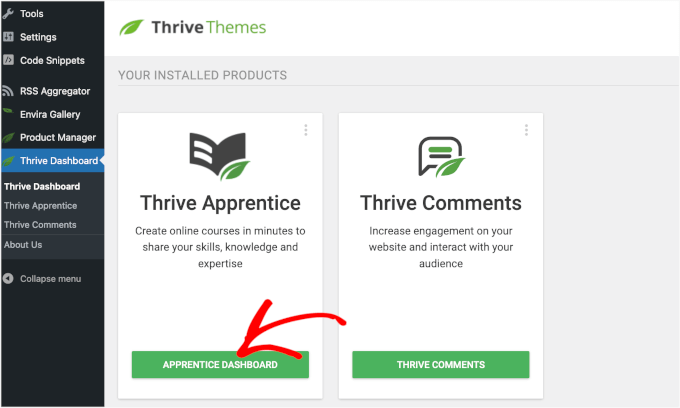
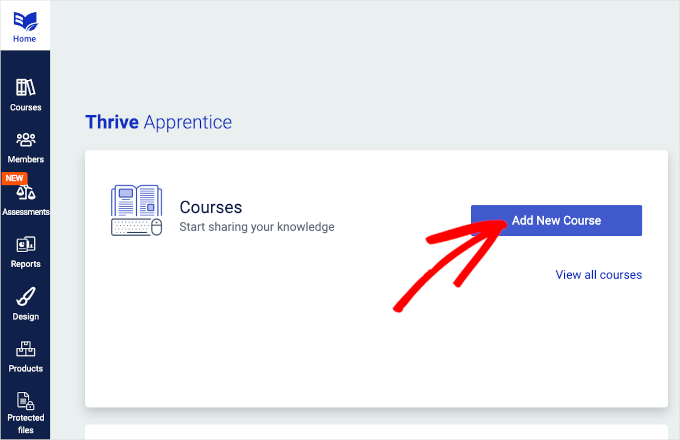
You’ll then be taken to the Thrive Apprentice course builder.
From here, you can go to the ‘Home’ tab and select ‘Add New Course’ to build your course from scratch for more control and fewer distractions.
In the course builder, let’s go to the ‘Course Details’ tab.
After that, you can click the pencil icon at the top to name your course, for example, Website Creation for Beginners.
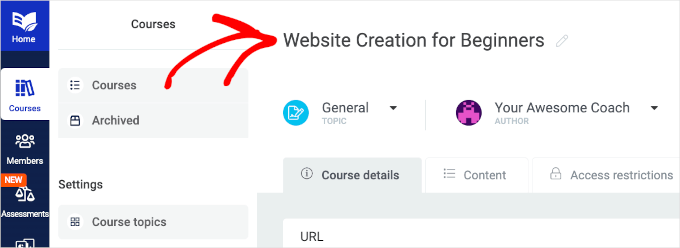
Then, you can also customize the course URL and add a course summary.
There are also settings to add a cover image. Note that Thrive Apprentice recommends a cover image size of 1170 x 400 pixels.
Simply click ‘Upload’ to add an image, or use the ‘Stock Library’ tab to select royalty-free images from Unsplash.
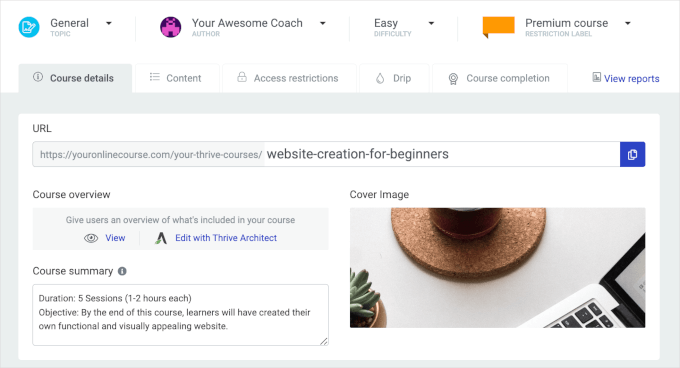
In the ‘Author’ settings, the teacher bio will automatically use the user bio from the associated WordPress user. You can adjust it if necessary.
Then, depending on your course needs, you can toggle the comment and video settings on or off.
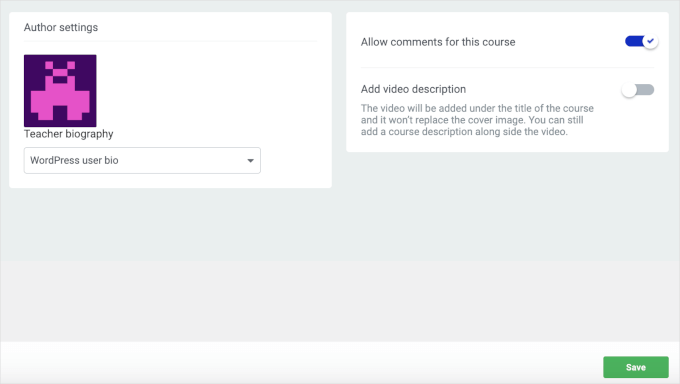
Once everything looks good, just hit the ‘Save’ button to store your changes.
Create Your First Lesson
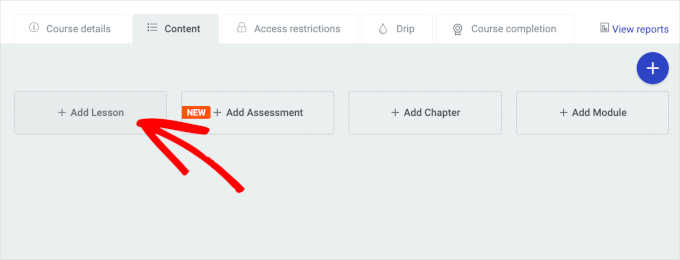
You can now move to the ‘Content’ tab to organize your learning materials using a Kanban-style workspace.
Go ahead and click ‘+ Add Lessons’ to start adding lessons.
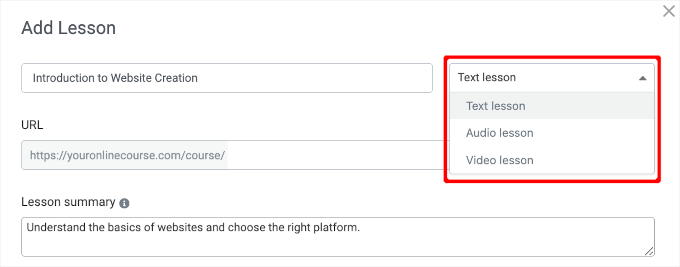
Then, you can enter details like the lesson name, URL, and type (text, audio, or video).
Next up, let’s choose the appropriate lesson type based on your content. For example, you should choose ‘Text’ for written materials or ‘Video’ for video-based lessons.
To encourage engagement, turn on comments by selecting ‘Yes’ in the comments dropdown.
This will allow you to start discussions or ask questions to guide conversations once your course is live.
For the access settings, you can select ‘Inherit access restrictions from product’ to match the course access rules. We’ll talk about this more later in the following steps.
After that, you can add a cover image for your lesson. Or, you can use the same one as your course to maintain a cohesive look.
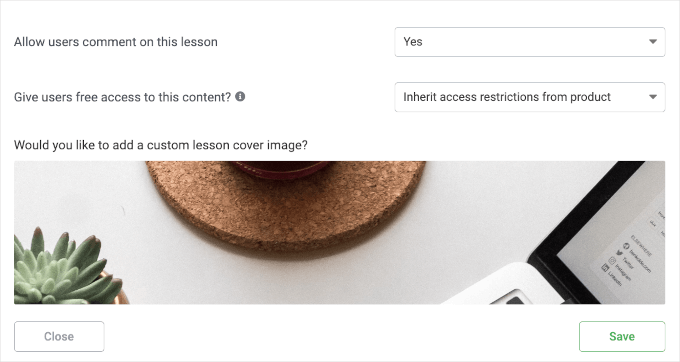
Don’t forget to click ‘Save’ to store your new lesson, and you can repeat the process to add more lessons as needed.
The next step is to add the learning resources to your lessons. Your learning resources can be files, video links, or articles.
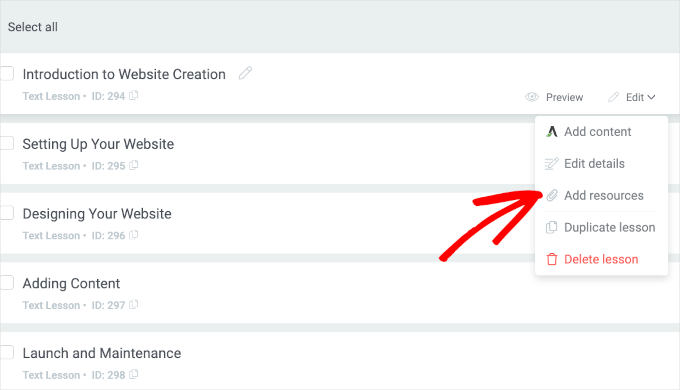
From the course editor, simply click ‘Edit’ on a lesson and then ‘Add Resources.’
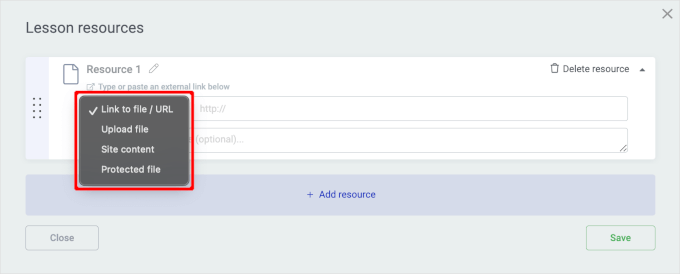
On the next screen, you can choose the resource type ‘Link to file/URL’ or ‘Upload file.’
Once that’s done, click the ‘Save’ button and repeat this step for all the lessons you’ve created.
Combine All Learning Materials into a Chapter
By now, you should have all the lessons and learning resources. The next step is to group these lessons into chapters to organize your course.
You can start by selecting all the lessons you want to group by clicking the checkboxes next to them. Then, click on the ‘Group into a chapter’ button when it appears.
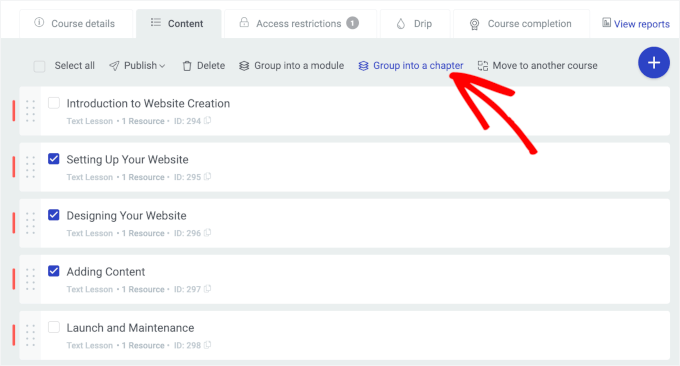
Thrive Apprentice will display a warning that chapter creation cannot be undone. Simply click ‘Continue’ to proceed.
Note: If there are unselected lessons, Thrive Apprentice will prompt you to create a chapter for them.
You’ll then see a popup window where you can enter a name.
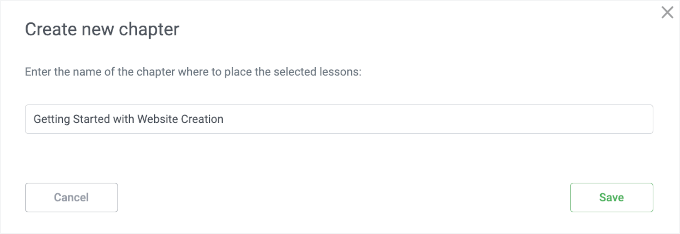
After that, go ahead and click the ‘Save’ button.
This will automatically group your selected chapters and redirect you to the main area. From here, you can create additional chapters to organize your lessons further.
Once done, you can group these chapters into modules.
To do this, select all the chapters you want to group and click the ‘Group into a module’ button.
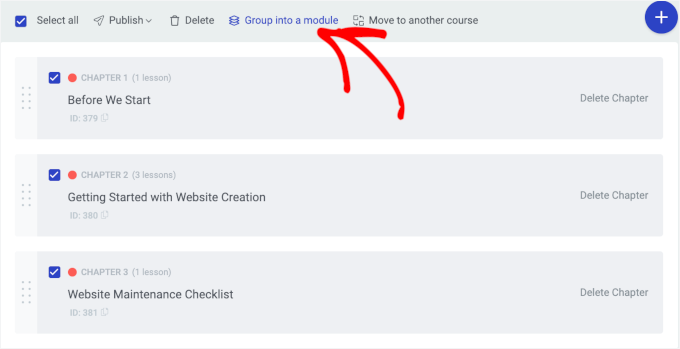
You’ll then see a Thrive Apprentice warning similar to the chapter creation step. Just click ‘Continue’ to proceed.
On the next popup, you can name your module. For better organization, you can use the course name.
Then, you can hit ‘Save’ to complete the process.

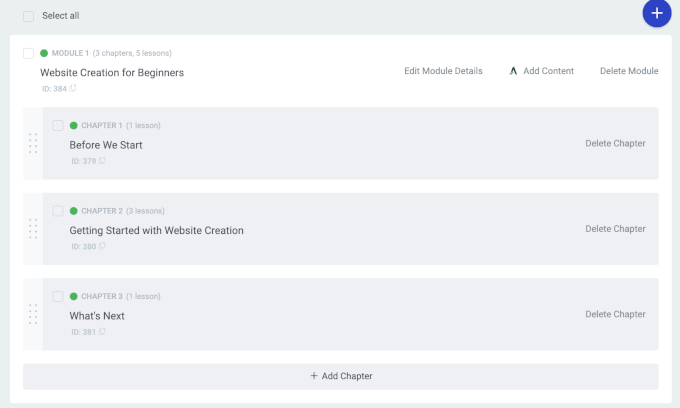
Thrive Apprentice will then group the chapters into the new module.
Here’s what the neatly structured course with chapters and modules looks like in the main course builder:
Add Course Assignments
Like with MemberPress Courses, you can also add assignments to your Thrive Apprentice course.
First, you’ll need to expand the module and select a chapter. Then, click the ‘Add Assignments’ button to get started.
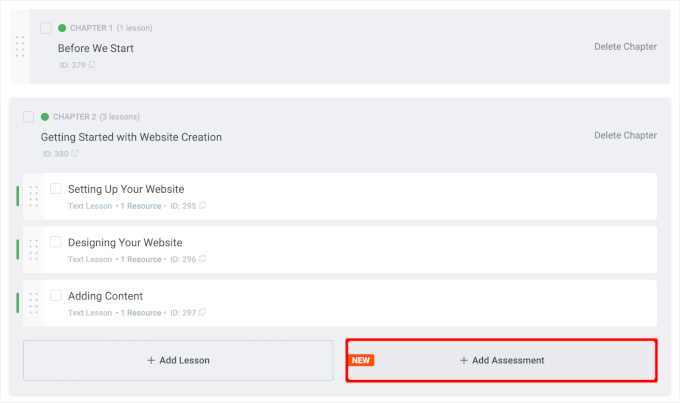
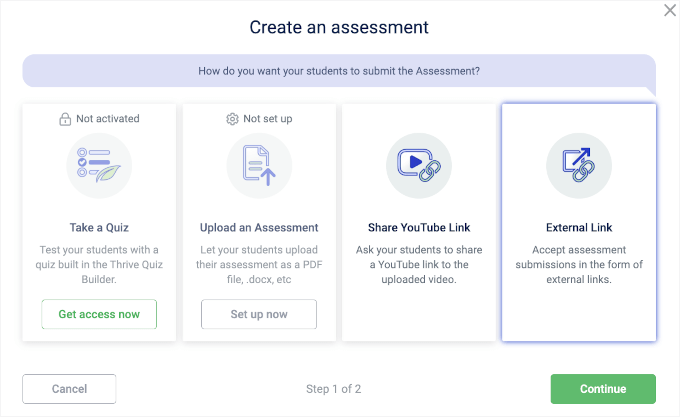
A popup will appear where you’ll need to choose one of four assignment options.
You can use quizzes or ask students to upload files. Alternatively, you can have your students submit assessments as YouTube videos or external links, such as blog posts or Google Docs.
For this example, we will choose ‘External link’ to ask learners to share their new WordPress site.
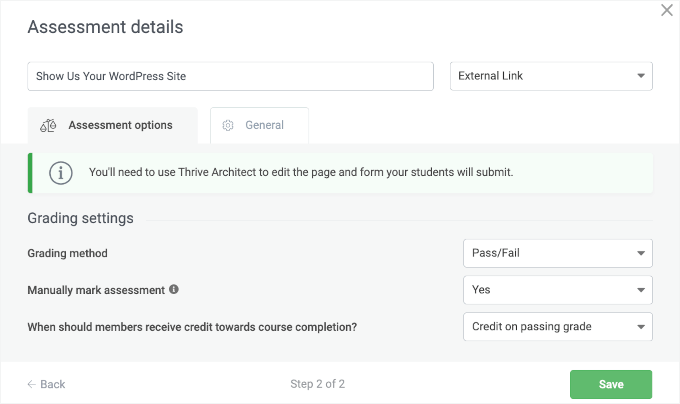
On the next screen, you’ll give your assignment a title.
After that, you’ll need to set up the grading method, assignment marking method, and completion credit or leave them at their default settings.
Once everything looks good, click the ‘Save’ button to store your assignment.
This will then redirect you to the main area, where your assignment will now be part of the selected chapter.
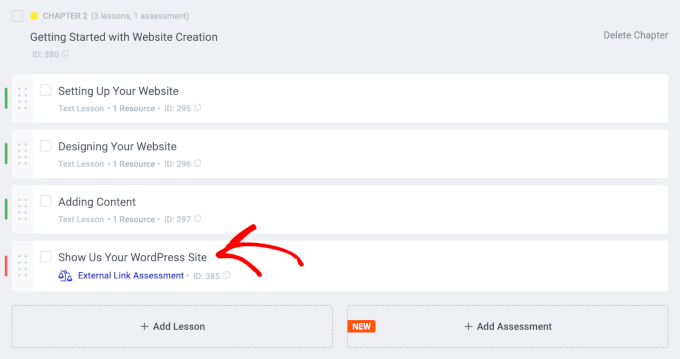
From here, you can further organize your lessons, chapters, and assignments. For comprehensive topics, you can even create additional modules.
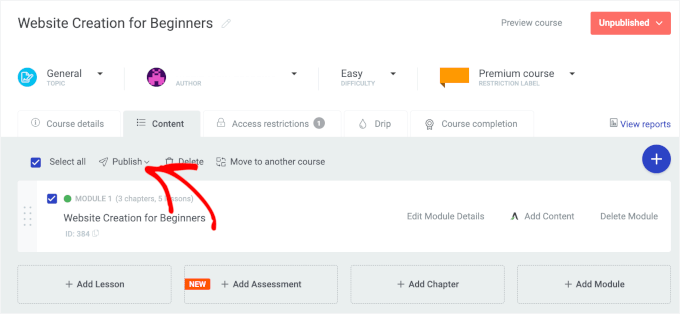
Once you’re done, simply select the ‘Select all’ checkbox and click the ‘Publish’ button to make the course accessible online.
Sell Your Courses as Products
The next step is to configure your ‘Access restrictions.’
This tab allows you to decide whether to make the courses public or private. If you choose private, then you can sell them through a product page or a membership system.
So, let’s click the ‘+ Create a Product based on this course’ button to start selling your courses.
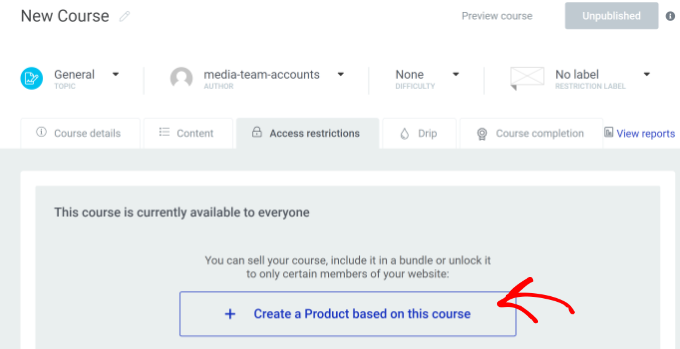
On the next screen, you can click the ‘Done’ button to add the course as a product or edit the product name if needed.
You’ll be redirected to the ‘Product’ page to configure additional settings.
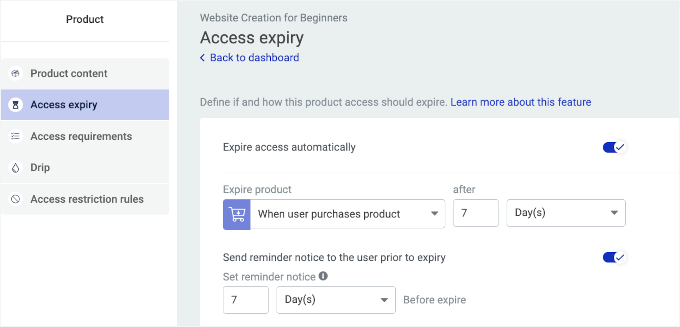
The ‘Access expiry’ section lets you enable the course’s access expiration. To activate it, simply switch on the toggle.
Then, you can set the expiration in 2 ways:
- Specifying a date and time: Set a specific date and time for expiration.
- Calculating days from the purchase: Choose how many days, weeks, months, or years the access will last after purchase.
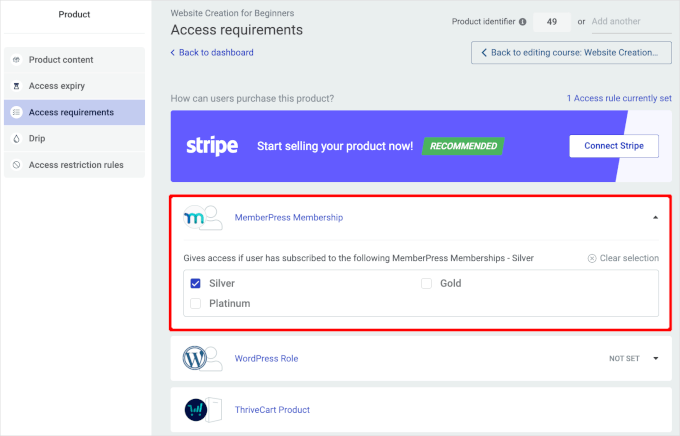
The ‘Access requirements’ tab lets you configure how users can purchase the course product, including through memberships.
Thrive Apprentice integrates seamlessly with MemberPress, so if you’re using the plugin, it’s a good idea to connect them.
In the ‘Access requirements’ tab, simply expand the ‘MemberPress Membership’ dropdown and choose the membership tier or tiers that should have access.
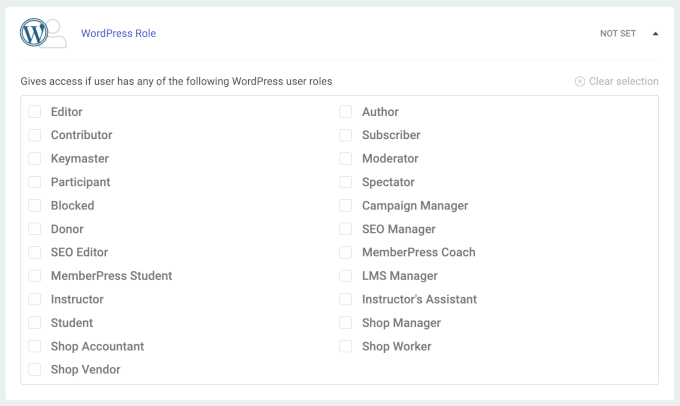
An easier integration option would be WordPress Role.
This lets you grant access to specific user roles, such as ‘Instructor,’ ‘Student,’ ‘Moderator,’ ‘LMS Manager,’ and similar.
Other options include setting up a ThriveCart Product, a WooCommerce Product, and a custom payment link. You can choose the easiest and most relevant option for you.
After that, just remember to click the ‘Save’ button.
Then, go ahead and click the ‘Back to editing course…’ button to return to the main area.
Set Up Drip Content
Note: The drip content tools won’t be available if you don’t sell your course as a product. So, if you want to schedule content dripping, be sure not to skip the previous step.
In this final step, you’ll schedule lessons with the drip content feature.
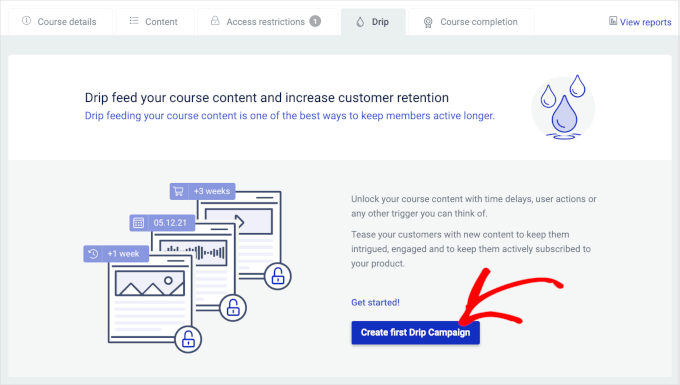
To get started, let’s switch to the ‘Drip’ tab and click the ‘Create First Drip Campaign’ button.
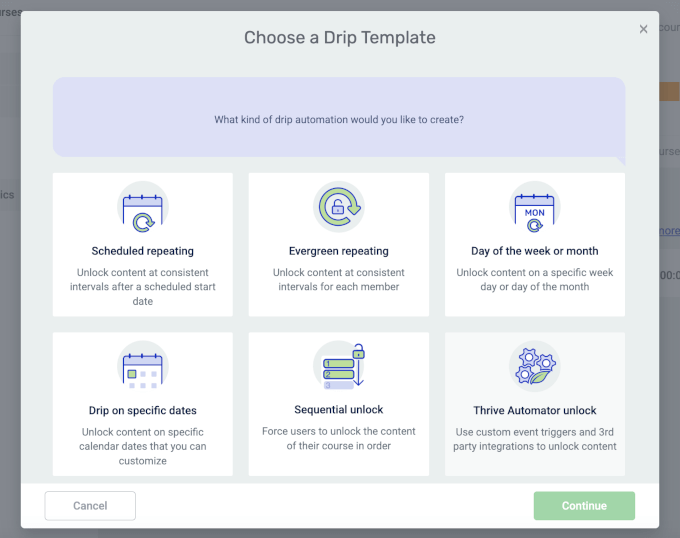
Then, you can choose a template based on when you want to start drip-feeding course content. You can unlock content at regular intervals, on specific days or weeks, and more.
Each template comes with predefined settings that you can use right away.
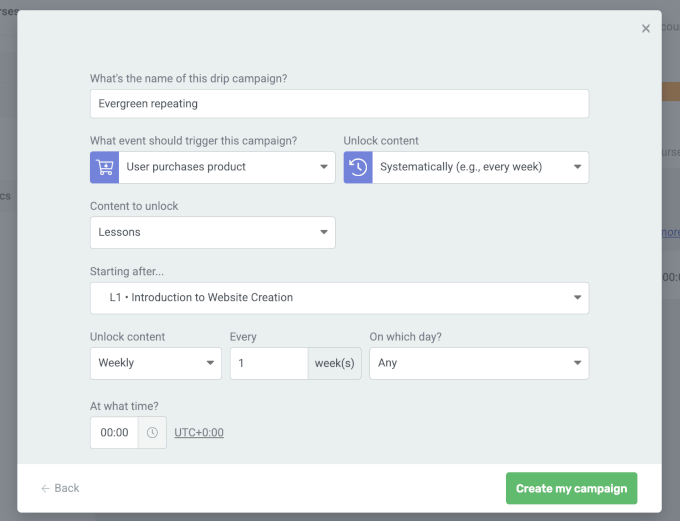
For example, if you choose the ‘Evergreen repeating’ template, each student will have their own timeline for unlocking content.
You can select from 3 different start triggers. If you choose ‘User starts the course’ or ‘User purchases product,’ new content will be unlocked consistently based on when the user starts the course or makes the purchase.
Then, let’s see if you choose the ‘Sequential unlock’ template.
This drip template is great if you want to unlock course content in a specific order.
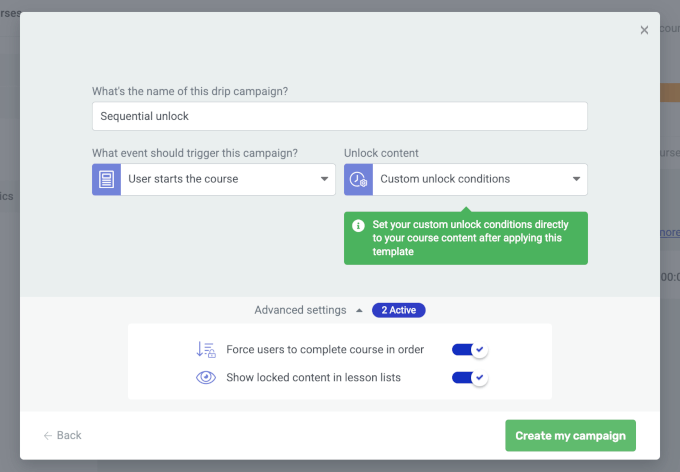
You can adjust these settings manually if needed. However, note that doing so may affect the template structure.
Publish Your Thrive Apprentice Online Courses
Now, here comes the big moment. So before we move on, you might want to check if everything looks good.
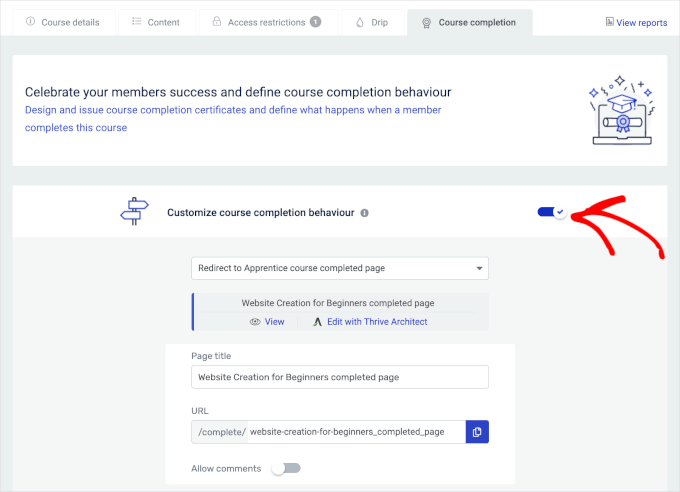
From here, you can first complete the course creation in the ‘Course Completion’ tab.
This tab lets you enable additional features, such as setting up a completion page redirect, grading, and certificates.
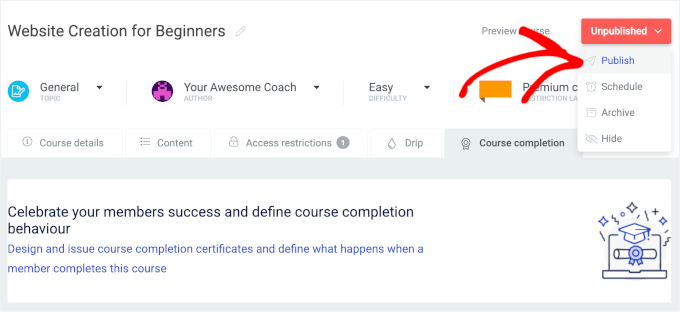
To publish your course, simply open the dropdown ‘Unpublished’ menu in the top right corner.
Then, you can click on ‘Publish.’
And that’s it!
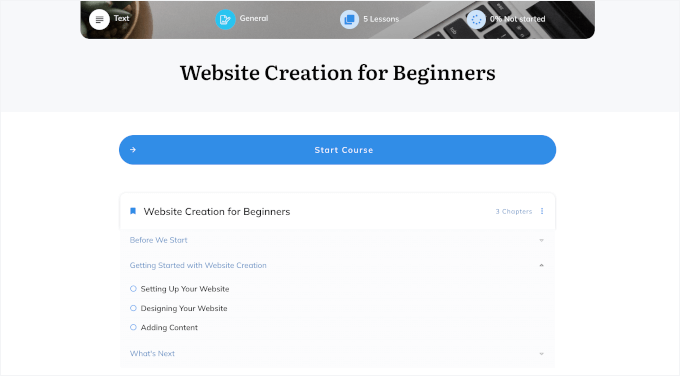
Now, you can open your Thrive Apprentice LMS using the URL in your ‘Course Details’ tab. Here’s what ours looks like:
Bonus Tip: Create a Referral Program to Grow Your Online Course
A referral program is a great way to boost sales by getting others to promote your online courses. In exchange, you offer them a small commission for each sale they generate. It’s like building a sales team without the full-time salary costs.
A referral program for an online course site can help boost sign-ups and sales by attracting new students and reaching potential learners.

Plus, with a plugin like AffiliateWP or Easy Affiliate, setting up a referral program in WordPress is simple, with no coding required.
For details, check out our guide on how to create a referral program in WordPress.
We hope this article helped you add a learning management system in WordPress. Next, you may also want to see our guide on how to protect content in WordPress and our expert picks of the best online course platforms.
If you liked this article, then please subscribe to our YouTube Channel for WordPress video tutorials. You can also find us on Twitter and Facebook.


Samuel
Using Courseware looks better over Sensei in terms of compatibility.
My question is regarding WooCommerce. Do I really have to use Woo Commerce if Paypal is not available in my country? Can I use alternatives like Expresspayment instead of WooCommerce? Is Express Payment a reliable option?
Your help is appreciated, in advance.
Samuel
WPBeginner Support
We have not tested Express Payment at the moment, you can test it if you would prefer that over WooCommerce.
Admin
Mike
Does this LMS plugin allow for uploading SCORM packages, rather then building courses natively? What kind of stats tracking does it have?
Nicky
Thank you so much!!!! I have been going round & round in circles trying to work out how to get my course to show up on the front end of my wp site! Nothing in the WP Courseware info made this clear!
morgan
Hi Syed Balkhi and team,
Thanks so much for writing this post. I couldn’t for the life of me figure out how to get my course to show up on the front end. I’m sure it’s obvious to most, but I needed this article to help me figure it out. Thanks so much for the guidance.
Joanne
I’m building a website for online courses and webinars. I want to be able to record webinars and re-sell the as ever-greens, have on-line programs, memberships and tracking, sell retreats to real locations and sell books/meditations/products.
I bought the Flatsome shop theme with WooCommerce but am I better to switch to WP Courseware (or something else)? (didn’t know it existed)
Desheen
I am confused between courseware and learnpress? wondering if there is someone that can help me set-up my LMS? I tried hiring a freelancer, but they do not seem to understand my needs and functionality is important.
Ifeanyi
i want to comment on those guy HOSTGATOR!!! i try to register with them… uptill now, i unable to have the package i applyed for. they keep on asking me to send my criedit card details to them.
please advise me on what to do
Wiliam
Thanks for the nice walkthrough of WP Courseware. I appreciate the time you guys spend on these step by step articles.
One question, near the end of the article you have a graphic showing the User’s area, and you have a round closeup on the graphic. May I ask how you did that? That’s a very nice feature.
Thanks!
WPBeginner Support
We created this magnifying glass effect using Photoshop.
Admin
Andrew Randazzo
Very interesting. How do you think it compares with Sensei (a WooThemes add-on plugin)? That’s what I currently use and on face value, they appear to do/function the same.
Veronika
Also curious to know if anyone have compared this with Sensei!
Debbie
I’ve used WP Courseware and Sensei.
WP Courseware is likely to be much more compatible with your chosen theme. Sensei often creates layout issues (sidebars shifting to the bottom of the page, for example).
WP Courseware gets the job done and is fairly easy to figure out. Personally, I think the WP Courseware user interface could do with a bit of a facelift (flat images instead of the gradients). Sensei looks clean and follows your theme’s design.
Sensei includes an area for a promo video (YouTube or Vimeo) for your course, which is great for marketing. Although technically you could do the same with Courseware if you use shortcodes.
Currently WooThemes support is disappointing (1 week+), so be prepared if you get stuck. The folks at FlyPlugins do respond eventually, but the answers can be pretty vague at times and may take several rounds of back ‘n forth emails.
Both work easily with WooCommerce.
My choice for now is WP Courseware over Sensei primarily because of theme compatibility and the fact that it works…no matter what. But honestly, because I already own several wootheme extensions, I really would prefer to use Sensei but it would require fooling around with theme coding or switching themes altogether.
Donna Peplinskie
> Sensei often creates layout issues (sidebars shifting to the bottom of the page, for example).
I wanted to drop a quick note to say that, as of version 1.12.2, Sensei has added theme compatibility support and now works with any standard WordPress theme.
Cheers!