If you want to protect your digital content and see how it’s used, managing file downloads on your WordPress site is important.
Luckily, it’s easy with the right tools. 💡
Using a WordPress file download manager can help you handle downloads, see analytics, and control who can access your files. This way, you keep your content safe and manage your storage better.
Plus, if you want to make money, you can even sell file downloads.
Here at WPBeginner, we use Easy Digital Downloads and MonsterInsights to sell our premium plugins. Both tools have proven reliable for helping us track sales, manage downloads, and gain insights into our business performance.
In this guide, we’ll show you simple steps to manage, track, and control your file downloads in WordPress. This will help you get the most out of your content! 🌟
Why Manage, Track, and Control File Downloads in WordPress?
There are many reasons why you would want to manage, track, and control your file downloads in WordPress.
For example, you may want to restrict certain files based on user roles or only give access to paying customers. Or, you might simply want to track how many people are downloading free files on your site.
In this article, we’re going to take you through 4 different methods and provide a tutorial for each. Here’s a quick look at all the methods we’ll cover; you can simply click on the links to jump straight to the one you want to use:
Ready? Let’s make your file management hassle-free!
Method 1. Tracking File Downloads in WordPress Using MonsterInsights
If your WordPress website offers free downloads, you may think you don’t need to manage or control them.
However, it’s still best practice to track file downloads. This lets you discover which of your free downloads are the most popular and where to invest your resources when creating new content.
Now, Google Analytics doesn’t automatically support file download tracking. The good news is that you can track downloads using MonsterInsights, the best Google Analytics plugin for WordPress.
📢 Quick note: We personally use MonsterInsights for a lot of tracking tasks. For example, it helps us keep track of our form, button, and referral link conversions. Check out our full MonsterInsight review to learn more about the software!
First, you’ll need to install and activate the MonsterInsights plugin. If you need help, you can see our step-by-step guide on how to install a WordPress plugin.
You will then need to connect WordPress to your Google Analytics account, which is super easy using MonsterInsights. You can follow the instructions in our guide on installing Google Analytics in WordPress.
Once you have set up the plugin, there is no need to make any further configurations. It will automatically start tracking your file downloads as events.
To see statistics about your downloads, just go to Insights » Reports and switch to the Publishers tab.

Simply scroll down the panel, and you’ll see your top download links.
These will be listed along with their anchor text.
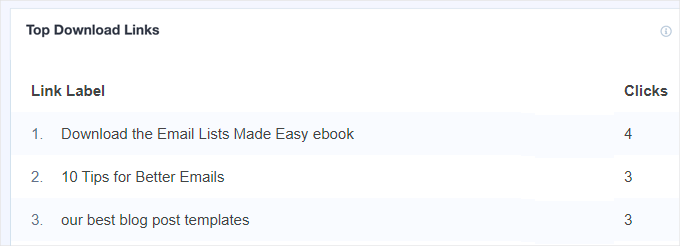
If you have more than one link to a specific file, each link will be listed separately here. This is useful if you want to know exactly how users download files.
What if you want a report of which files are the most popular, regardless of the links used?
Then, you can simply click the ‘View All Download Links Report’ button. This will take you straight into Google Analytics, where you will see a report with the URLs of your downloaded files.
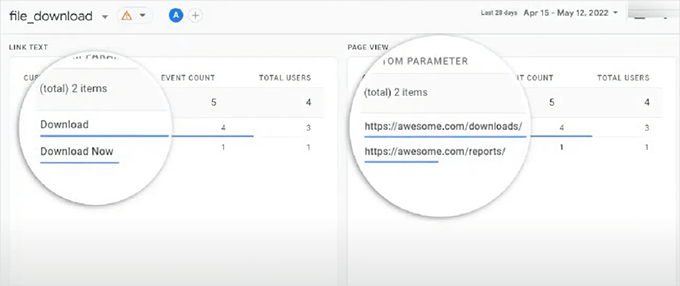
You can also manually navigate to your file download report in Google Analytics GA4.
All you need to do is log in to your Google Analytics account and navigate to Reports » Engagement » Events tab.
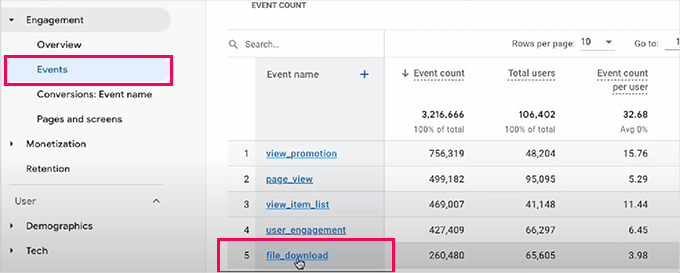
From here, you’ll want to click on the ‘file_download’ link under the ‘Event name’ column to view your file downloads report.
By default, MonsterInsights tracks downloads for all common file types, such as .doc and .docx documents, .xls and .xlsx spreadsheets, .ppt and .pptx presentations, PDFs, and zip files.
If you want to track other file types, then that’s easy to do as well. Simply go to the Insights » Settings page and then switch to the ‘Engagement’ tab.

Now, scroll down to the ‘File Downloads’ section.
Here, you’ll see a list of file extensions currently being tracked.

After that, you can type in any additional file extensions you want to track. Just make sure you put a comma between them.
Once you’re done, don’t forget to click the ‘Save Changes’ button at the top to save your settings.

MonsterInsights will now start tracking all files ending with the file extensions you added in settings.
Even if you choose another solution below for managing and controlling file download access, we recommend always installing MonsterInsights alongside it. Doing so will help you see the right stats which you need to grow your business.
Method 2. Controlling File Downloads in WordPress Using MemberPress
If you want to sell online courses or access downloadable files, then a great way to control and manage file downloads is to use MemberPress.
MemberPress is the best WordPress membership plugin on the market, and it lets you lock premium content on your site so that it’s only available to registered users or paying members.
📢 Quick note: MemberPress powers our video site, providing us with the tools we need to effectively manage memberships and content access. See our complete MemberPress review for more information about the plugin and how it can benefit your site!
This plugin has an add-on called ‘MemberPress Downloads’ for tracking each file that your members download. The add-on also lets you upload multiple files, tag them, categorize them, and list them easily.
Plus, you can protect other content on your site as well. MemberPress is a great plugin option if you are building courses or a premium content library that you only want members to be able to access.
First, you need to install and activate the MemberPress plugin. For more details, see our step-by-step guide on how to install a WordPress plugin.
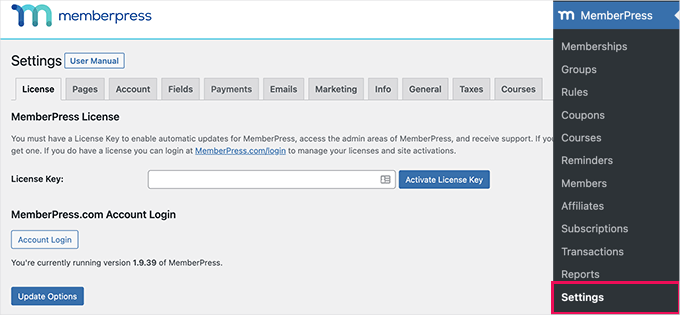
Upon activation, enter your license key into MemberPress » Settings » License in the WordPress admin area. You will find this information under your account on the MemberPress website.
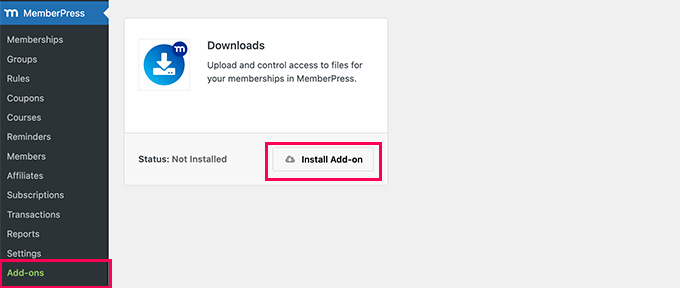
Next, you can go to the MemberPress » Add-ons page.
Here, you simply need to find the ‘Downloads’ add-on. Go ahead and click the ‘Install Add-on’ button to add it to your site.
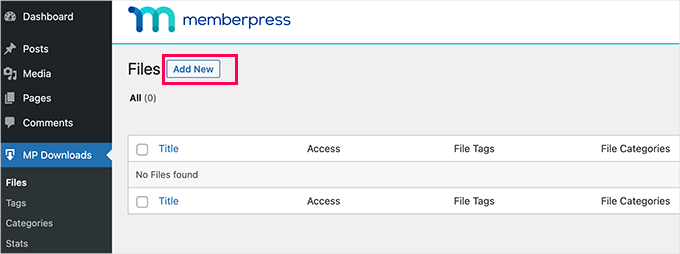
Now, you’ll want to navigate to MP Downloads » Files.
From here, let’s click the ‘Add New’ button to create a new download.
On the next screen, you’ll see a file upload page.
First, you need to enter a title for your download. Once you’ve done that, you can upload the file you want to use.
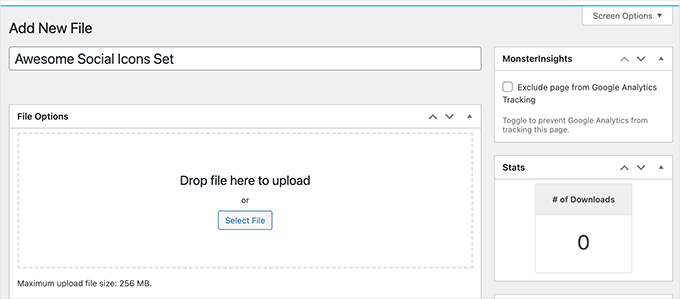
You can also choose additional options on this page, such as adding categories or tags to your download.
We’re going to tag our file ‘paid-members’ so that it and others can be easily protected by a MemberPress rule.
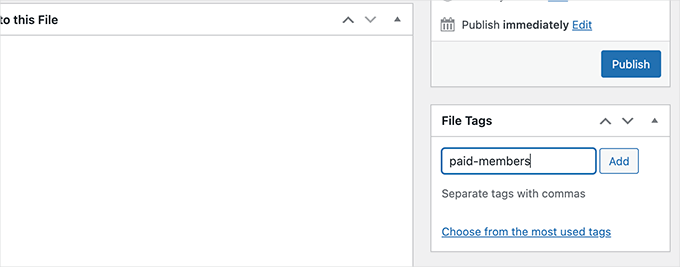
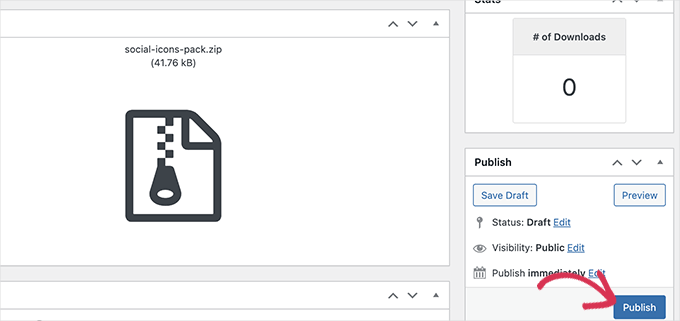
When you’re ready, go ahead and click the ‘Publish’ button.
This will make your downloadable file live.
If you don’t already have a rule defining conditions that must be matched to access files with this tag, simply create one under MemberPress » Rules.
Just click the ‘Add New’ button to create a new rule.
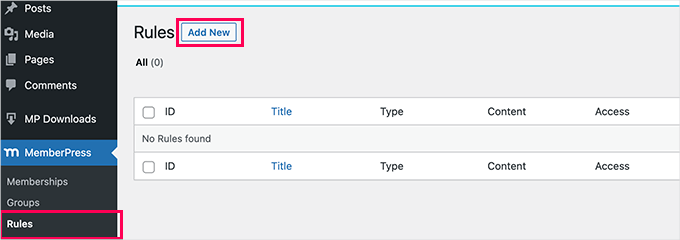
You will then see the page for adding a new rule.
From here, you can customize the new rule for the tag.
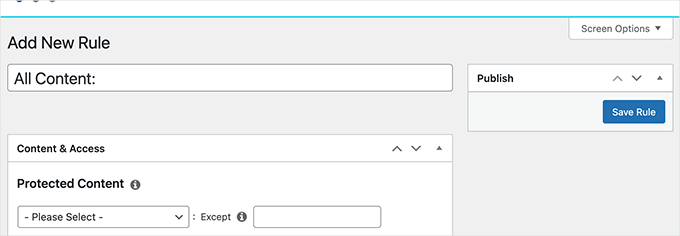
In the ‘Content & Access’ section, you’ll want to click on the dropdown below ‘Protected Content.’
After that, you’ll select ‘Files with File Tag,’ and in the box next to it, type and select the tag you’re using.
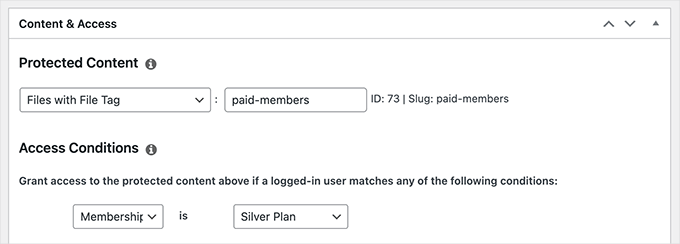
Under ‘Access Conditions,’ let’s open the dropdown. Simply select ‘Membership’ and then the name of the appropriate membership level.
If you haven’t yet set up any memberships, you can do so under MemberPress » Memberships.
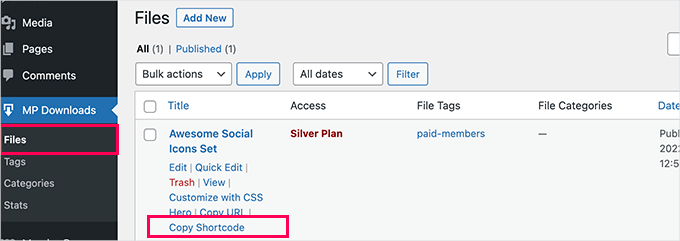
Now, let’s go to MP Downloads » Files again. You will see your file listed here, and it should have the correct access type based on its tag.
Go ahead and click the ‘Copy Shortcode’ link to get the shortcode for this file.
Next, you can paste this shortcode into any post or page on your WordPress site. You can also create a new page just for your file download.
So, let’s go to Pages » Add New from your WordPress admin dashboard, for example.
In the content editor, simply paste your shortcode into your page. WordPress will automatically create a shortcode block for you if you’re using the block editor.
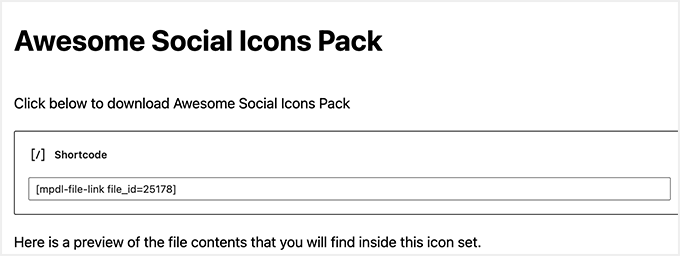
Once you’ve added all the content you want on your page, it’s time to click the ‘Publish’ button to put it live on your site.
Remember to protect your page using MemberPress rules if you want both the page and the file to be accessible only to members.
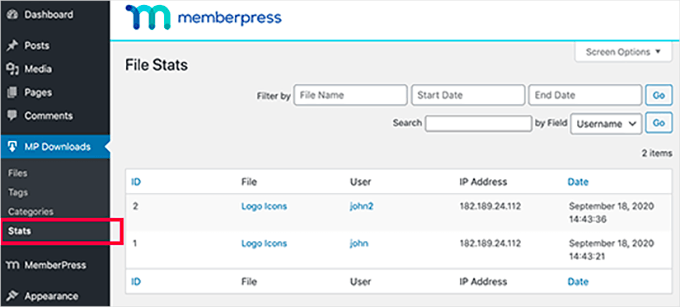
You can view your download stats by visiting MP Downloads » Stats in your WordPress admin area.
You will see the list of users who downloaded the file with a time stamp.
For even more in-depth instructions, you may want to check out our step-by-step guide on how to create a membership site in WordPress.
Method 3. Managing File Downloads in WordPress Using Easy Digital Downloads
To manage all of your file downloads, we recommend Easy Digital Downloads.
It’s the best WordPress eCommerce plugin for selling digital goods, including file downloads, ebooks, software, music, WordPress themes and templates, and more.
📢 Quick Note: At WPbeginner, we use Easy Digital Downloads to sell our premium WordPress plugins. It’s been going really well, and you can find more information about the tool in our complete Easy Digital Downloads review.
What’s more, Easy Digital Downloads comes with advanced features like a shopping cart, activity tracking, multiple payment gateways, discount coupon codes, and more. You can even add password protection or paywalls to ensure only people who’ve paid have access to the digital product.
To get started, you first need to install and activate the Easy Digital Downloads plugin. For more details, see our step-by-step guide on how to install a WordPress plugin.
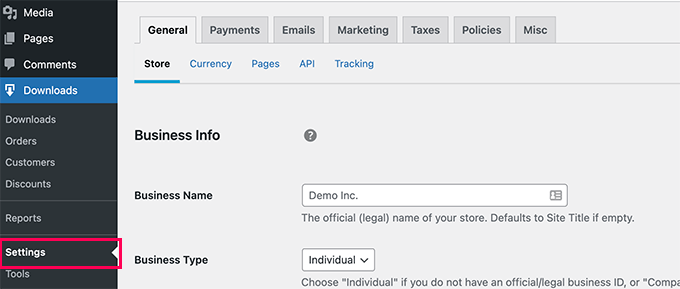
Upon activation, you can navigate to Downloads » Settings to configure the plugin. You’ll start by providing your business details and choosing a currency.
Next, let’s switch to the ‘Payments’ tab to configure a payment gateway.
Easy Digital Downloads supports PayPal and Stripe out of the box. You can download extensions to add support for more payment gateways if needed.
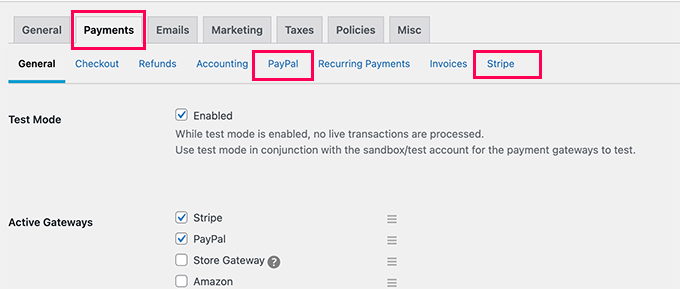
With that done, you can switch to the tab for the gateway you’re using and enter your account details.
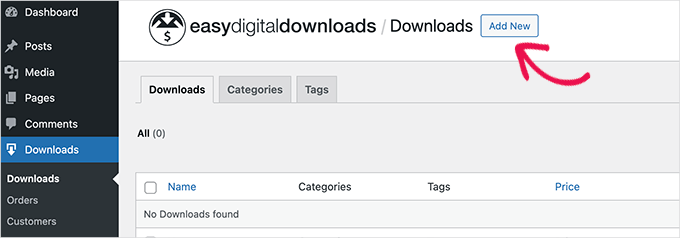
After setting up payments, you can start adding your file downloads. Simply go to the Downloads page and click on the ‘Add New’ button at the top.
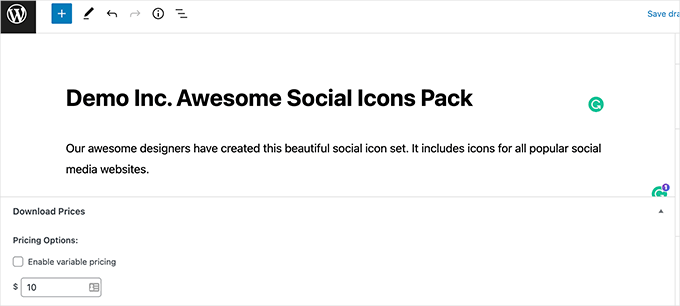
On the next page, go ahead and provide the title and description for your download.
Below that, you can add pricing for your digital download. If you want to offer a download for free, then simply enter $0 under ‘Pricing Options.’
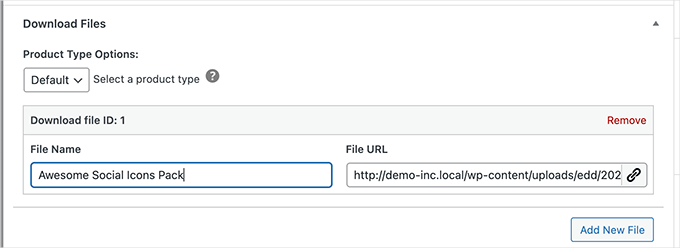
Then, you can scroll down to the ‘Download Files’ section.
From here, you’ll want to add a title for your file download. Then, you can either select the file from your media library or upload the file from your computer.
Next up, go ahead and add categories or tags for your file download, add images, set download limits, and more.
Once everything looks good, you can click the ‘Publish’ button to make your download live on your website.
You can now preview or visit your file download page to see it in action.
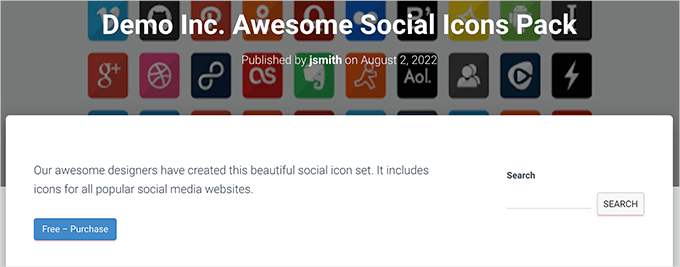
Your users will be able to add the download to their cart and continue shopping or completing their purchase.
And you will be able to track and manage everything using Easy Digital Downloads reporting.
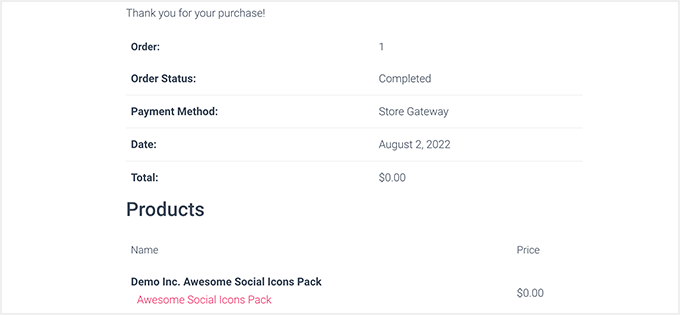
Viewing Advanced Reports for Easy Digital Downloads
Easy Digital Downloads doesn’t come with advanced reporting features in the core software.
However, you can install the EDD Advanced Reports extension to unlock advanced reporting functionality. For more details, see our step-by-step guide on how to install a WordPress plugin.
🚨 Important: You’ll need the ‘All Access Pass’ for Easy Digital Downloads to download this extension, or you can purchase EDD Advanced Reports separately.
Upon activating the extension, you can go to the Downloads » Reports page to view your file download reports.
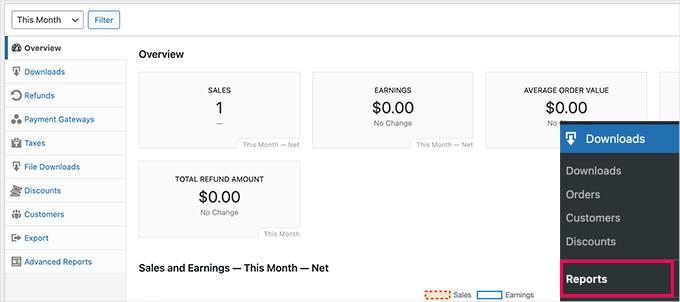
From here, you can switch to different tabs to see detailed reports.
For instance, you can see which files are downloaded more often, popular payment gateways, refunds, taxes, and more.
In addition, the ‘Advanced Reports’ extension allows you to filter by export subscription orders and payment status.
Method 4. Managing File Downloads in WordPress Using WooCommerce
This method is for users who want to sell file downloads alongside physical goods like shirts, swag, etc.
For this method, we will be using WooCommerce, which is the most popular eCommerce plugin for WordPress.
It is perfect for users who want to sell file downloads or make an online store.
WooCommerce can be used to sell both digital downloads and physical goods. You can also use it as your WordPress download manager to offer free downloads. It lets you easily track customers, manage downloads, and view stats.
📢 Quick note: We’ve tested WooCommerce across various types of online stores – read our detailed WooCommerce review for more details!
The first thing you need to do is install and activate the WooCommerce plugin. For more details, see our step-by-step guide on how to install a WordPress plugin.
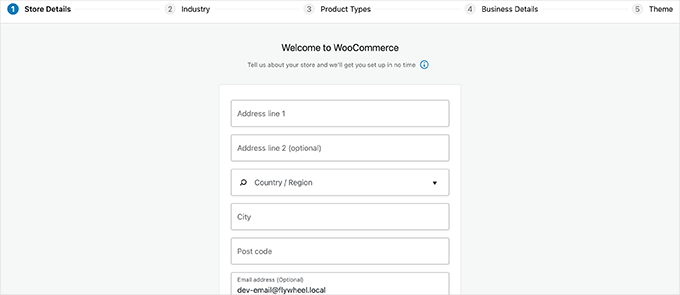
Upon activation, you should see the WooCommerce setup wizard. You can start by providing your store details and then following the on-screen instructions.
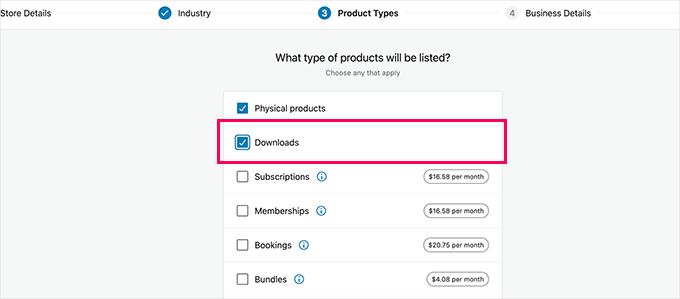
On the ‘Product Types’ screen, you need to select ‘Downloads.’
This will be listed as a product type that you’ll be selling in your store.
Once you finish the setup process, you will see your WooCommerce store’s dashboard.
Go to the Products » Add New section to add your first file download.
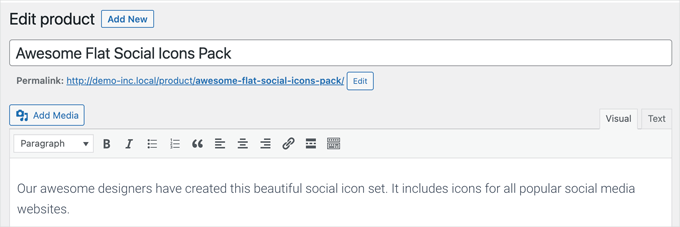
Go ahead and give your new product a title and a description. After that, you’ll want to scroll down to the ‘Product data’ section.
Here, you need to check the ‘Virtual’ and ‘Downloadable’ checkboxes to indicate that the product is a digital download.
- ‘Virtual’ products are products that don’t require shipping and can be delivered online, such as memberships, subscriptions, digital passes, and more.
- ‘Downloadables’ are digital products that users can download on their computers.
You also need to enter the price. If you’re creating a free download, then you’ll need to put 0 here.
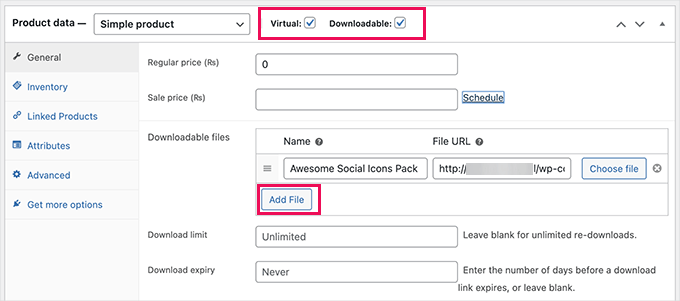
After that, let’s click on the ‘Add File’ button to upload the file for your digital download.
If you want, you can also fill out other options on the page. For example, you can add product images, add a short description, select a product category, and more.
Once satisfied, go ahead and click the ‘Publish’ button near the top of the page to make your product available.
Your users can now go to the product page and add the product to their cart. If it is a free product, then they will be able to check out without adding payment information. Otherwise, they can pay as normal.
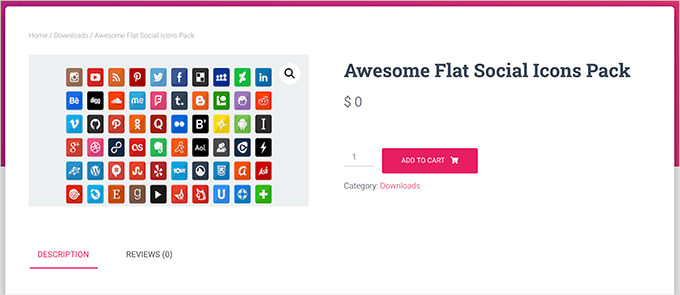
After checkout, the user will be given instructions about how to download the file to their computer.
Tracking File Downloads in WooCommerce
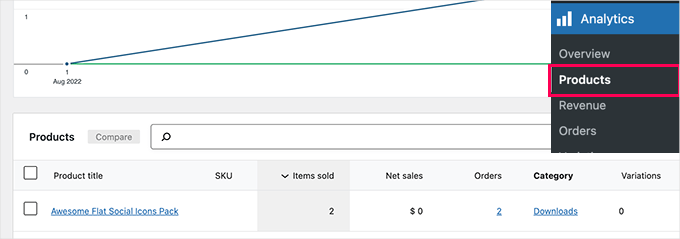
To view how your file downloads are doing, just go to Analytics » Downloads in your WordPress dashboard. From here, you will see an overview of file downloads with a list of popular downloads below.
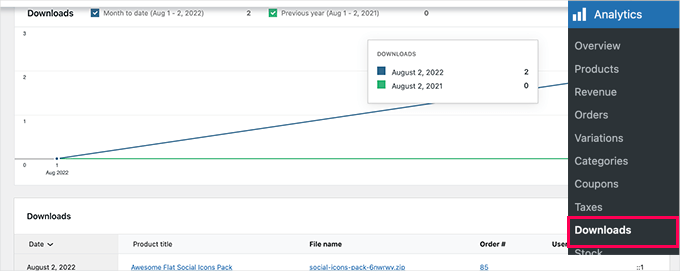
You can also switch to different pages under ‘Analytics’ to see how your store is doing.
For instance, you can see your top products or downloads under the ‘Products’ page.
Note: If you haven’t started with WooCommerce yet, then take a look at our guide on the best WooCommerce hosting providers to get set up, choose from the best WooCommerce themes, and install the best WooCommerce plugins to get started the right way.
Bonus: Tracking Conversions For Your File Downloads in WordPress
You may have noticed that three of the platforms we mentioned come with only basic reporting features.
For instance, they can show you the number of downloads, customers, and the files they bought. However, they will not show you what led a customer to conversion.
This information is significant as it tells you what’s working on your website and helps you make decisions for your business’s growth.
This is where MonsterInsights comes in.
With this Google Analytics plugin for eCommerce websites, you can easily track conversions. As a result, you can optimize the customer journey for your WooCommerce store.
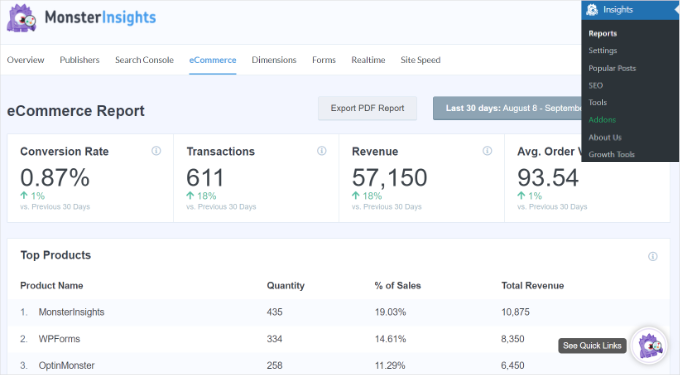
For step-by-step instructions, see our guide on how to easily set up WooCommerce conversion tracking or look at the complete WordPress conversion tracking guide.
We hope this article helped you learn how to manage, track, and control file downloads in WordPress. To sell your digital downloads more effectively, you may also want to check out our guides on how to create a thank you page in WordPress or how to create a digital product marketplace in WordPress.
If you liked this article, then please subscribe to our YouTube Channel for WordPress video tutorials. You can also find us on Twitter and Facebook.


Dennis Muthomi
Here’s a helpful tip I’ve learned: I always recommend to create a standard naming system for downloadable files before uploading them to Easy Digital Downloads. It’s super helpful! This makes tracking and managing files so much easier in the backend, especially when you’re dealing with different versions of the same digital product.
The reporting features in Method 3 work even better when you’ve got this organized system in place. Trust me, it’s worth the initial setup!
Dayo Olobayo
I have a membership site where I offer exclusive content to my subscribers but I was struggling to track who was downloading what. Download Monitor solved this problem for me. Now I can see who is accessing which files and ensure that only authorized users are accessing the content. It’s been a huge help in managing my membership site.
Jiří Vaněk
I’m planning to create PDF files for some tutorials for download. The ability to track the number of downloads and thus potential interest is a great option.
WPBeginner Support
Glad we could share how to track this information
Admin
Glen
It appears that Monster Insights now only offers download reporting as part of their Pro version and is no longer available on their free version. Perhaps you can confirm?
WPBeginner Support
The lite version still has download tracking but the information is in your Google Analytics dashboard.
Admin
khalid
I have woocomerce plugin on my wordpress site ,but I don’t have User name and Login password for my CPanel and can not access backend.
Can you advise a way ?
WPBeginner Support
You would want to reach out to your hosting provider for assistance with that.
Admin
Nas
Would want to know if an eBook can be protected to be open by only the owner.
WPBeginner Support
Depending on what you are specifically wanting, you may want to reach out to MemberPress if what we cover in this article isn’t what you’re wanting.
Admin
Demiket
Please, I want to set a Download counter for my files to tell my visitors how many downloads each has. I used the download monitor and download manager plugins but none gave me that. What should I do?
WPBeginner Support
If you reach out to the plugin’s support they should be able to assist with setting up what you’re wanting
Admin
John
Hi. Good tutorial. i have question about VIP website. How can restrict sub-domain download link. i want setup website for selling my own tutorial and sell file to only vip members, who paid for subscription.
WPBeginner Support
You would want to take a look at membership plugins for what it sounds like you’re wanting and take a look at our guide below:
https://www.wpbeginner.com/plugins/5-best-wordpress-membership-plugins-compared/
Admin
Sugar
Thank for your support sir
Is helpful
WPBeginner Support
You’re welcome, glad we could be helpful
Admin
Angela
This could work – just wanted to check to see if it captures the downloader’s name and email address and version downloaded – ideally I’d like the details to go into MailChimp so we can inform users of updates, etc.
Thanks!
WPBeginner Support
It would depend on the method you use. If you check with the plugin you’re wanting to use’s support they should be able to let you know what is stored and how you can use that with your newsletter service.
Admin
Marcel Tujetsch
Very good article. But I am looking for a plugin with which I can make files available to my visitors for download. Similar to a driver download page from a hardware supplier. Is there such a thing? Thanks for tips.
WPBeginner Support
You would want to take a look at method 2 again for what it sounds like you’re wanting
Admin
Marcel Tujetsch
Thanks a lot, I will try that.
Jennifer
Can you limit the number of times someone can download a file?
WPBeginner Support
Hi Jennifer,
Yes you can.
Admin
arifefa
how to show all category download ?
Thulasi
Thanks for such an informative post. Would like to know the best plugins for limiting downloads per user. Really appreciate your suggestions on this.
Thanks