Niedawno jeden z naszych czytelników zapytał nas, w jaki sposób może używać Mailchimp z WordPressem.
Mailchimp jest jedną z najpopularniejszych usług e-mail marketingu i może być łatwo używany z twoją witryną internetową WordPress. Jednak większość ludzi nie wie, jak to zrobić i jak najlepiej wykorzystać Mailchimp.
W WPBeginner mamy ponad 16 lat doświadczenia w pomaganiu użytkownikom w konfigurowaniu różnych usług e-mail marketingu na ich witrynach internetowych.
W tym przewodniku pokażemy ci, jak łatwo zintegrować Mailchimp z WordPressem i zacząć budować twoją listę mailingową.

Oto krótki przegląd tematów, które omówimy w tym przewodniku:
- Why Build an Email List?
- Why Use Mailchimp With Your WordPress Site?
- Getting Started With Mailchimp
- Adding Mailchimp Email Signup Forms in WordPress
- Adding Beautiful Signup Forms Using OptinMonster
- Creating a Custom Mailchimp Signup Form With WPForms
- Automate Anything in WordPress and Mailchimp
- Bonus Tips to Grow Your Mailchimp Email List Fast
Dlaczego warto budować listę mailingową?
Ponad 70% użytkowników, którzy opuszczą twoją witrynę internetową, prawdopodobnie nigdy na nią nie wróci, chyba że skutecznie zachęcisz ich do zapisania się na listę mailingową.
E-mail to prywatna, osobista i zdecydowanie najbardziej bezpośrednia forma komunikacji w Internecie. Wiele osób sprawdza swoje skrzynki odbiorcze częściej niż kanały w mediach społecznościowych.
Ponadto e-mail pozostanie w skrzynce odbiorczej, chyba że użytkownik podejmie w związku z nim działanie. W mediach społecznościowych twoja wiadomość szybko zostanie pogrzebana na niekończącej się osi czasu.
Aby uzyskać więcej informacji na temat tego, jak marketing e-mailowy może rozwinąć twój biznes, zapoznaj się z naszym przewodnikiem na temat tego, dlaczego powinieneś od razu zacząć budować swoją listę mailingową.
Dlaczego warto używać Mailchimp z twoją witryną WordPress?
Mailchimp to jedna z najpopularniejszych usług e-mail marketingu. Dlaczego? Ponieważ oferuje darmowy plan na zawsze, w ramach którego można wysyłać do 1000 e-maili miesięcznie do nie więcej niż 500 subskrybentów.
Teraz, gdy liczba twoich subskrybentów wzrośnie do ponad 500 lub będziesz musiał wysyłać więcej e-maili, będziesz potrzebował płatnego planu, który może być dość drogi.
Oprócz e-mail marketingu, Mailchimp oferuje również podstawowe narzędzia do automatyzacji, które mogą pomóc w rozwoju twojego biznesu online.
Mailchimp jest jednak daleki od doskonałości. Nie jest to już najłatwiejsza ani najbardziej opłacalna usługa e-mail marketingu na rynku.
Niektóre alternatywy Mailchimp, takie jak Constant Contact, Drip i HubSpot, oferują bardziej zaawansowane narzędzia do automatyzacji marketingu, które są łatwiejsze w użyciu.
Inne firmy, takie jak Brevo (dawniej Sendinblue) i Kit, (dawniej ConvertKit) również oferują na zawsze darmowe plany, które pozwalają wysyłać więcej e-maili do większej liczby subskrybentów.
W związku z tym zobaczmy, jak używać Mailchimp z WordPressem, aby rozwinąć twój biznes i zacząć budować listę mailingową.
Rozpoczęcie pracy z Mailchimp
Aby połączyć Mailchimp z twoją witryną WordPress, pierwszą rzeczą, której będziesz potrzebować, jest konto Mailchimp.
Aby rozpocząć, przejdź na witrynę internetową Mailchimp i kliknij przycisk “Zarejestruj się bezpłatnie” w prawym górnym rogu.
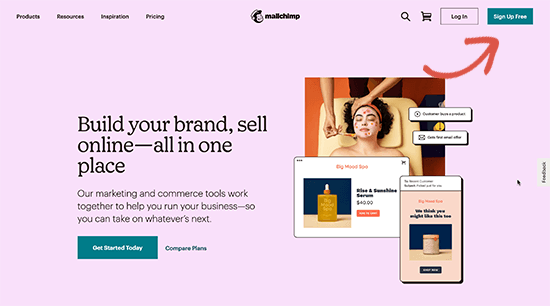
Wystarczy podać swój e-mail, utworzyć nazwę użytkownika i hasło do twojego konta, a następnie postępować zgodnie z instrukcjami wyświetlanymi na ekranie, aby zakończyć konfigurację konta.
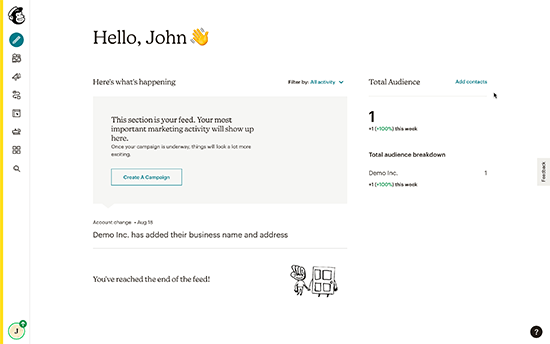
Po utworzeniu konta przejdziesz do kokpitu Mailchimp, który wygląda następująco:
Dodawanie formularzy rejestracji e-mail Mailchimp w WordPress
Mailchimp posiada wbudowane formularze subskrypcji, które możesz osadzać na swojej witrynie internetowej WordPress.
Wystarczy kliknąć przycisk Utwórz na pasku narzędzi po lewej stronie, a następnie wybrać opcję Formularz rejestracji ” Formularz osadzany.
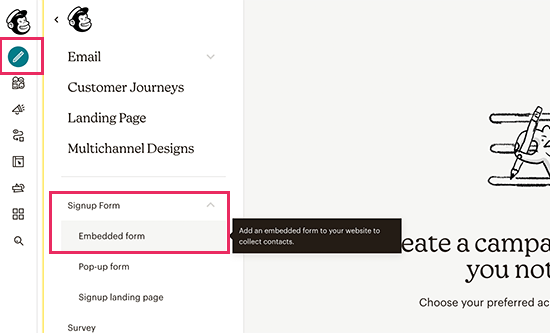
Spowoduje to przejście do strony konfiguracji formularza.
Z tego miejsca możesz wybrać, które pola formularza mają być wyświetlane i wybrać inne opcje dla twojego formularza rejestracji.
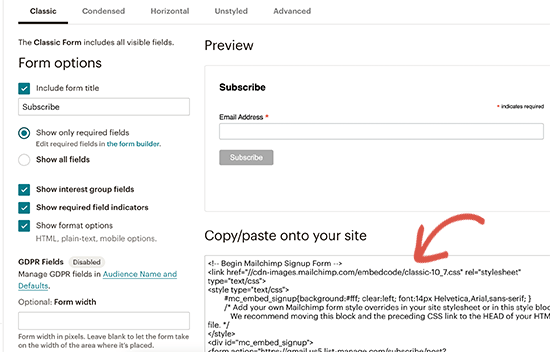
Po wypełnieniu formularza należy skopiować kod osadzania widoczny na ekranie.
Następnie musisz przejść do obszaru administracyjnego twojej witryny internetowej WordPress i przejść do strony Wygląd ” Widżety. W tym miejscu należy dodać blok widżetu Custom HTML do twojego obszaru widżetów.
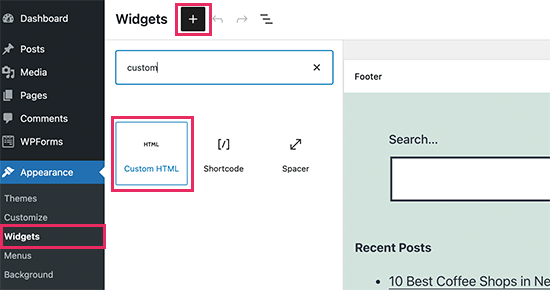
W ustawieniach widżetu należy wkleić kod skopiowany z witryny internetowej Mailchimp.
Nie zapomnij kliknąć przycisku “Aktualizuj”, aby zapisać ustawienia twojego widżetu.
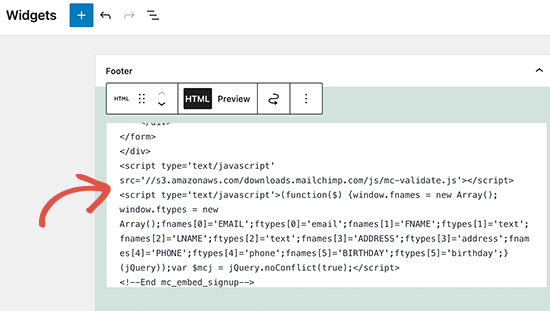
Jeśli korzystasz z motywu blokowego, nie będziesz mieć dostępu do obszaru widżetów. Możesz jednak dodać formularz Mailchimp do twojej witryny internetowej za pomocą pełnego edytora witryny. Aby uzyskać więcej informacji, zapoznaj się z naszym kompletnym przewodnikiem po pełnej edycji witryny.
Możesz teraz przejść na swoją witrynę internetową, aby zobaczyć swój formularz zapisu Mailchimp w działaniu.
Tak to wygląda na naszej demonstracyjnej witrynie internetowej.
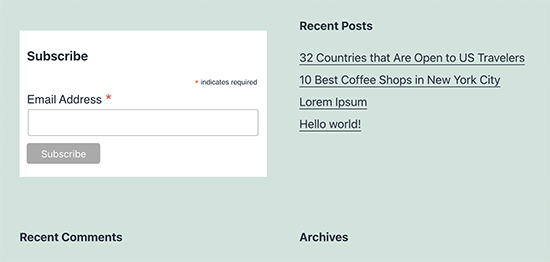
Kod osadzania można również dodać do wpisów lub stron za pomocą bloku HTML. Więcej szczegółów można znaleźć w naszym przewodniku na temat edycji HTML w WordPress.
Dodawanie pięknych formularzy rejestracji za pomocą OptinMonster
Mailchimp umożliwia tworzenie podstawowych formularzy rejestracji e-mail. Formularze te są jednak trudne do dostosowania i nie zawierają wielu opcji kierowania i personalizacji.
Tutaj właśnie wkracza OptinMonster. Jest to najlepsze na rynku oprogramowanie do optymalizacji konwersji i generowania leadów, które pomaga łatwo przekształcić odwiedzających witrynę internetową w subskrybentów.
OptinMonster integruje się z twoim kontem Mailchimp i zawiera dziesiątki 111111 pięknych szablonów i potężny kreator kampanii.
Ponadto ma niesamowite zasady kierowania i wyświetlania, które pozwalają wyświetlać twoje formularze rejestracyjne we właściwym czasie. Możesz na przykład wyświetlać wyskakujące okienko użytkownikom, którzy zamierzają opuścić twoją witrynę, wyświetlać inną kampanię użytkownikom w określonych regionach i nie tylko.
Najpierw należy założyć konto OptinMonster.
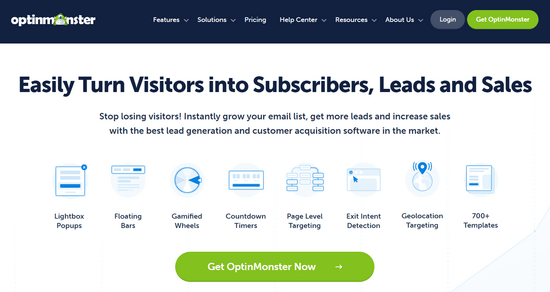
Następnie należy zainstalować i włączyć wtyczkę OptinMonster na twojej witrynie internetowej WordPress. Aby uzyskać więcej informacji, zobacz nasz przewodnik krok po kroku, jak zainstalować wtyczkę WordPress.
Ta wtyczka działa jako łącznik między WordPressem a twoim kontem OptinMonster.
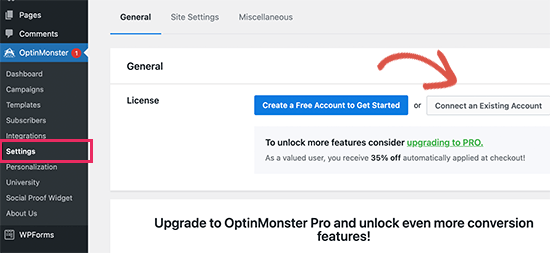
Po włączaniu należy przejść na stronę OptinMonster ” Ustawienia. Stąd wystarczy kliknąć przycisk “Połącz na istniejącym koncie”, aby zintegrować OptinMonster z twoją witryną internetową.
Teraz możesz stworzyć swój pierwszy formularz zapisu do newslettera Mailchimp.
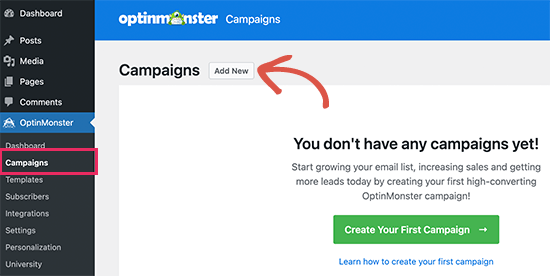
Aby rozpocząć, przejdź do strony OptinMonster ” Kampanie i kliknij przycisk “Utwórz nową” u góry.
Następnie OptinMonster poprosi o wybranie Szablonów lub Playbooków.
Szablony to kampanie, w ramach których projektujesz swoje własne kampanie. Playbooki umożliwiają korzystanie z projektów inspirowanych udanymi kampaniami prowadzonymi przez wiodące organizacje na świecie.
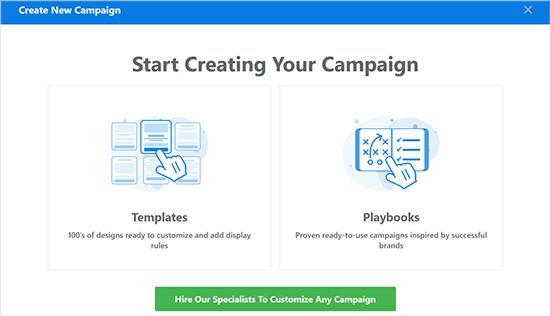
Na potrzeby tego poradnika skorzystamy z szablonów.
OptinMonster umożliwia tworzenie kilku rodzajów kampanii, w tym wyskakujących okienek (okno) lightbox, pływających pasków, kampanii inline, wyskakujących okienek typu slide-in, pełnoekranowych i gamified spin-a-wheel.
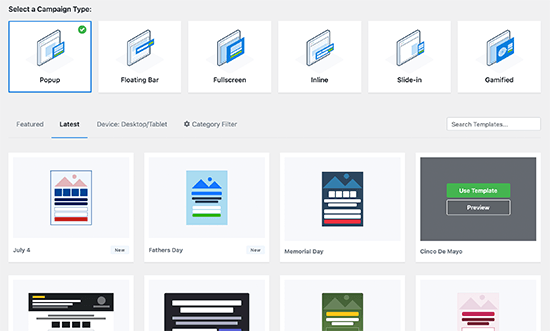
Następnie musisz wybrać szablon dla twojej kampanii. Do wyboru jest kilka 111111 pięknych wzorów, które można dowolnie modyfikować.
Po wybraniu szablonu wpisz nazwę twojej kampanii i uruchom kreator kampanii.
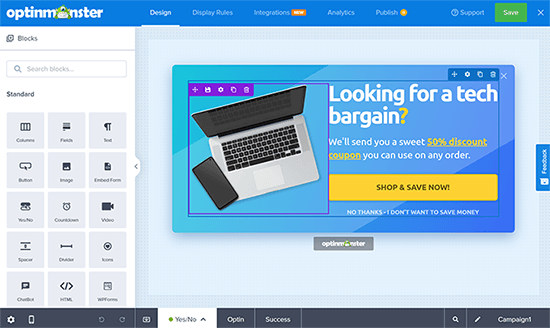
OptinMonster posiada intuicyjny interfejs typu “przeciągnij i upuść”, w którym wystarczy wskazać i kliknąć, aby edytować dowolny element. Możesz także utworzyć nowe elementy projektu zwane blokami, aby dodać swoje obrazki, tekst, przyciski i inne.
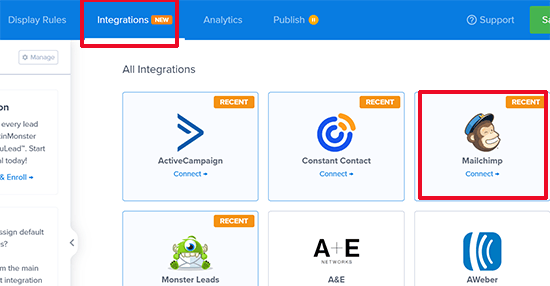
Gdy będziesz zadowolony z projektu kampanii, połącz ją z twoim kontem Mailchimp. Wystarczy przejść do karty Integracje i kliknąć “Połącz” pod integracją Mailchimp.
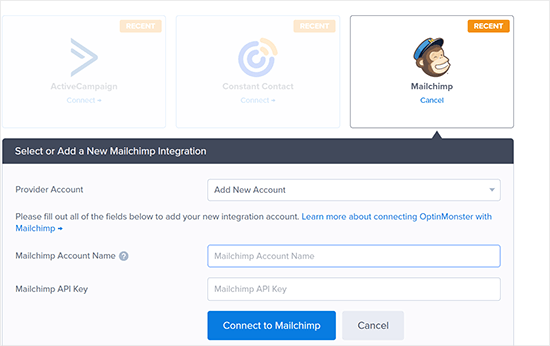
Następnie należy wybrać nazwę dla tego połączenia.
Następnie musisz wpisz swój klucz API Mailchimp.
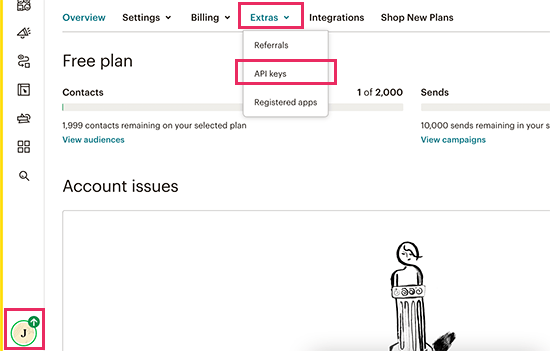
Możesz wygenerować lub zlokalizować swój klucz API Mailchimp na swoim koncie w witrynie internetowej Mailchimp.
Na kokpicie Mailchimp wystarczy kliknąć ikonkę swojego profilu w lewym dolnym rogu ekranu. Następnie kliknij Dodatki ” Klucze API w górnym menu.
Po wpiszeniu twoich kluczy API w kreatorze OptinMonster, kliknij przycisk “Połącz z Mailchimp”.
Następnie musisz wybrać swoje konto Mailchimp i listę mailingową.
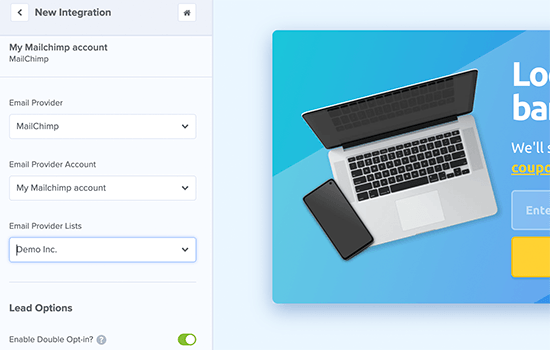
Możesz teraz zapisać i opublikować twoją kampanię OptinMonster.
Następnie zamknij kreator formularzy.
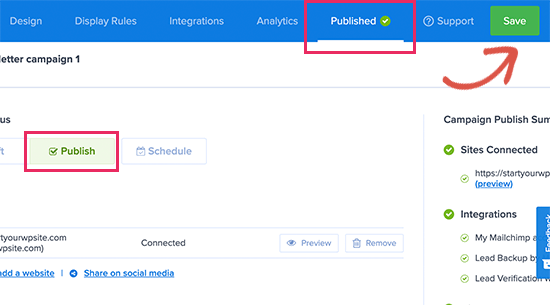
Spowoduje to przejście do strony wyjściowej kampanii w twojej witrynie internetowej WordPress.
Następnie należy wybrać miejsce, w którym kampania ma być wyświetlana i publikowana.
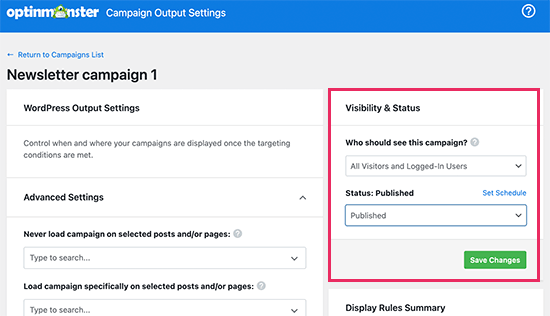
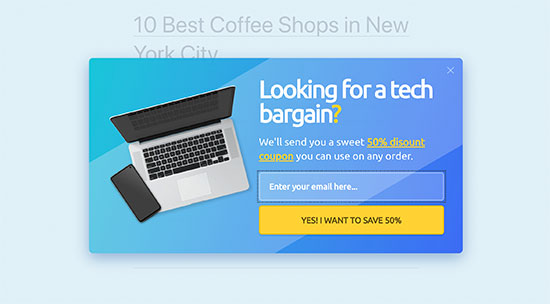
Użytkownik może teraz przejść na twoją witrynę internetową, aby zobaczyć formularz newslettera e-mail w działaniu.
Tak to wygląda na naszej witrynie demonstracyjnej.
Tworzenie własnego formularza zapisu Mailchimp za pomocą WPForms
WPForms to najlepsza na rynku wtyczka do tworzenia formularzy WordPress. Umożliwia ona łatwe tworzenie dowolnego rodzaju formularzy, w tym formularzy zapisu do newslettera.
WPForms jest również jedną z najlepszych wtyczek Mailchimp. Integruje się ona z Twoim kontem Mailchimp, dzięki czemu możesz zapisywać wpisy z formularzy na Twojej liście mailingowej.
Najpierw należy zainstalować i włączyć wtyczkę WPForms. Aby uzyskać więcej informacji, zobacz nasz przewodnik krok po kroku, jak zainstalować wtyczkę WordPress.
Po włączaniu należy przejść na stronę WPForms ” Ustawienia, aby wpisz klucz licencyjny. Możesz go znaleźć na swoim koncie w witrynie internetowej WPForms.
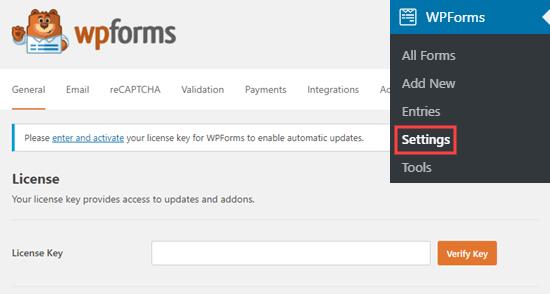
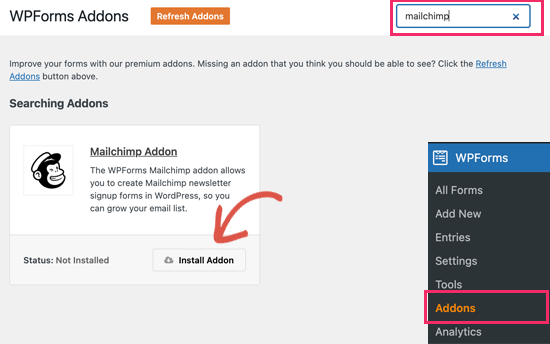
Następnie należy przejść na stronę WPForms ” Addons.
Z tego miejsca można zainstalować dodatek Mailchimp.
Teraz możesz stworzyć swój pierwszy formularz zapisu do newslettera.
Wystarczy przejść do strony WPForms ” Add New, wpisz tytuł twojego formularza, a następnie wybierz szablon Newsletter Signup Form.
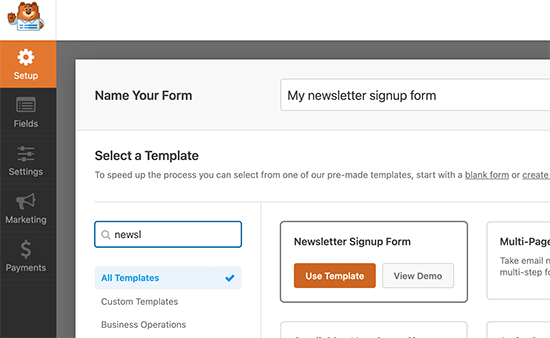
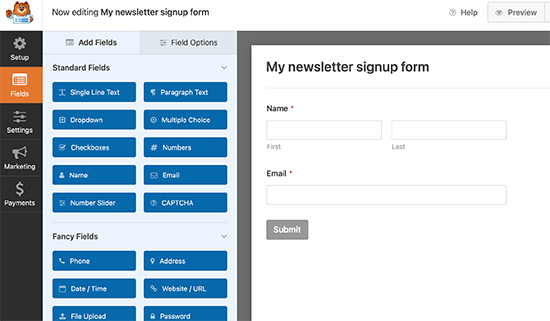
Spowoduje to uruchomienie kreatora formularzy ze wszystkimi wymaganymi polami dla twojego formularza zapisu na listę mailingową.
Możesz edytować lub usuwać pola z formularza, po prostu klikając na nie.
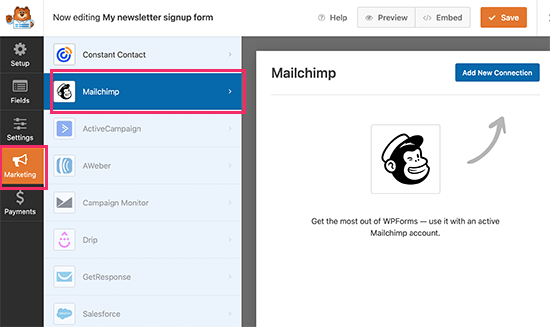
Gdy będziesz zadowolony z formularza, przejdź do karty “Marketing” i kliknij sekcję Mailchimp.
W tym miejscu należy kliknąć przycisk “Utwórz nowe połączenie”.
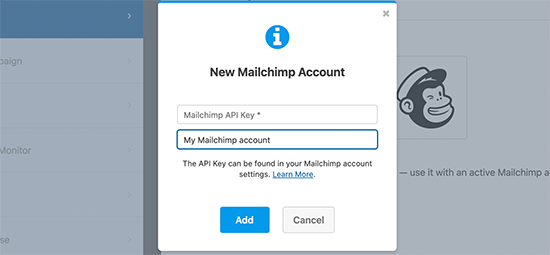
Następnie zostaniesz poproszony o nazwanie połączenia i wpisz klucz API twojego konta Mailchimp.
Klucz API możesz znaleźć na swoim koncie w witrynie internetowej Mailchimp.
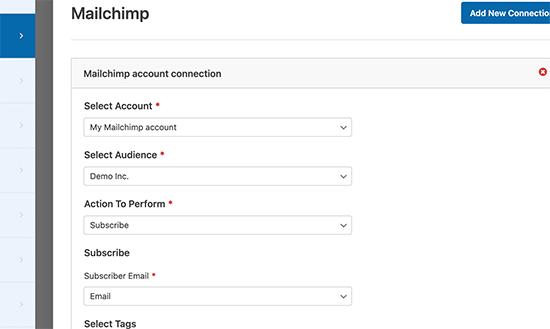
Następnie musisz wybrać twoje konto Mailchimp i odbiorców.
Następnie można wybrać pole formularza odpowiadające polu e-mail.
Możesz teraz zapisać twoje ustawienia formularza i wyjść z kreatora formularzy.
WPForms bardzo ułatwia dodanie twojego formularza w dowolnym miejscu na witrynie internetowej.
Jeśli chcesz wyświetlić formularz na pasku bocznym swojej witryny, możesz przejść do strony Wygląd ” Widżety i dodać blok widżetu WPForms do panelu bocznego lub dowolnego obszaru widżetów.
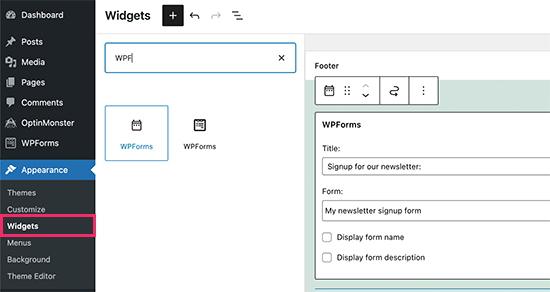
Nie zapomnij kliknąć przycisku “Aktualizuj”, aby zapisać ustawienia twojego widżetu.
Podobnie, jeśli chcesz dodać formularz zapisu do newslettera do wpisu lub strony, możesz edytować wpis lub stronę i dodać blok WPForms.
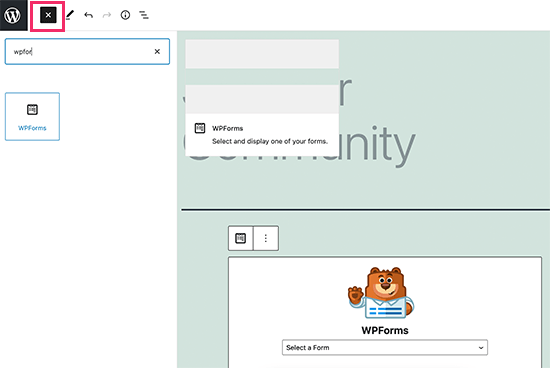
Nie zapomnij opublikować lub zapisać zmian, aby zaktualizować twój wpis lub stronę.
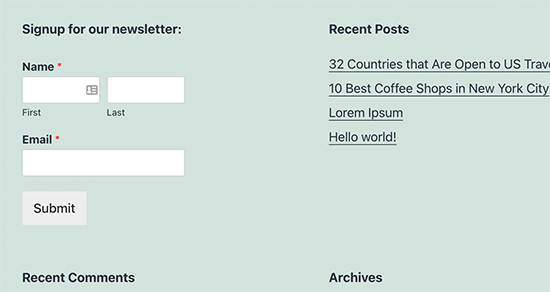
Możesz teraz przejść na swoją witrynę internetową, aby zobaczyć własny formularz zapisu do newslettera Mailchimp w działaniu.
Zautomatyzuj wszystko w WordPress i Mailchimp
E-mail jest niezwykle skuteczny, zwłaszcza gdy jest spersonalizowany i wysyłany na czas. Dzięki odpowiednim narzędziom można łatwo tworzyć automatyzacje e-maili o wysokiej konwersji, które są skierowane do każdego subskrybenta.
Możesz na przykład wysyłać automatyczne wiadomości e-mail, aby prezentować produkty podobne do tych, które klienci już kupili lub automatycznie wysyłać użytkownikom e-mail, gdy opublikujesz nowy artykuł w swojej witrynie internetowej.
W tym miejscu potrzebny jest Uncanny Automator. Jest to najlepsza wtyczka do automatyzacji WordPressa, która pozwala tworzyć zautomatyzowane przepływy pracy dla twojej witryny WordPress.
Uncanny Automator współpracuje ze wszystkimi najlepszymi wtyczkami WordPress, platformami e-handlu, wtyczkami członkowskimi i ponad 3000 aplikacji za pośrednictwem Zapiera. Łączy się również z Mailchimp, co oznacza, że możesz tworzyć inteligentniejsze kampanie e-mail za pomocą zaledwie kilku kliknięć.
Pierwszą rzeczą, którą musisz zrobić, jest zainstalowanie i włączanie wtyczki Uncanny Automator. Aby uzyskać więcej informacji, zapoznaj się z naszym przewodnikiem krok po kroku, jak zainstalować wtyczkę WordPress.
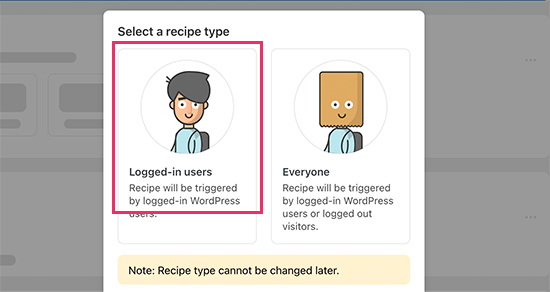
Po włączaniu należy przejść na stronę Automator ” Add New, aby utworzyć twój pierwszy przepis. Zostaniesz poproszony o wybranie rodzaju przepisu, który chcesz utworzyć.
Na potrzeby tego poradnika wyślemy automatyczny e-mail do subskrybentów za każdym razem, gdy opublikujemy nowy wpis. Aby rozpocząć, wybierz opcję “Zalogowani użytkownicy”.
Następnie musisz wybrać WordPress jako twoją integrację, która wywoła działanie.
W przypadku wyzwalacza można wybrać, kiedy użytkownik opublikuje wpis.
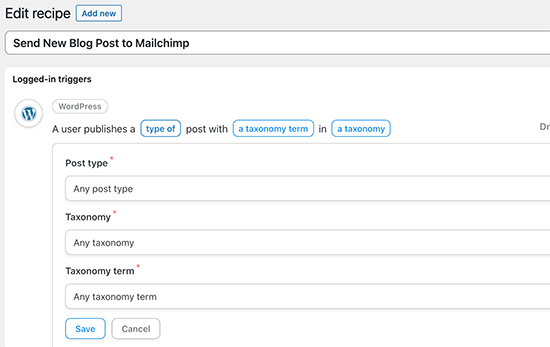
Następnie pojawia się część akcji, w której wybierasz, jakie działanie zostanie uruchomione.
Wystarczy kliknąć ikonkę Mailchimp, aby połączyć ją z twoją witryną internetową.
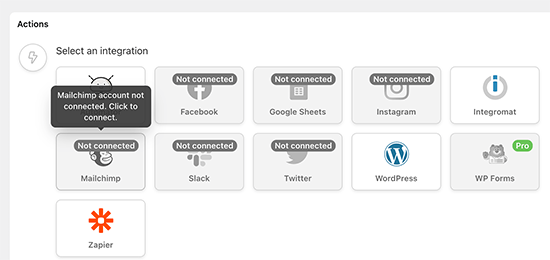
Spowoduje to wyświetlenie wyskakującego okienka, w którym należy postępować zgodnie z instrukcjami wyświetlanymi na ekranie, aby zakończyć połączenie.
Po połączeniu będziesz mógł wybrać działanie, które chcesz wykonać na swoim koncie Mailchimp.
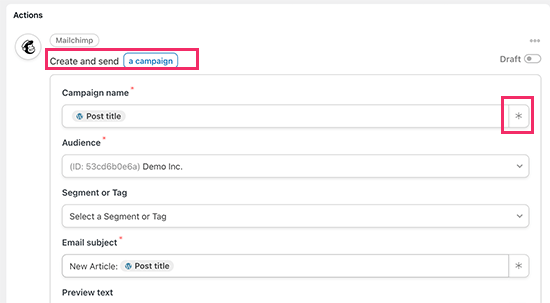
Na przykład tutaj skonfigurowaliśmy go tak, aby wysyłał nowy e-mail do naszych odbiorców z tytułem wpisu na blogu i własną wiadomością.
Po zakończeniu możesz przełączyć przepis z wersji roboczej na wersję aktywną.
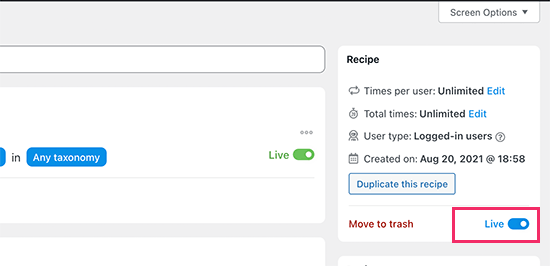
Od teraz, gdy opublikujesz nowy artykuł na twojej witrynie internetowej, Mailchimp automatycznie wyśle e-mail do twoich subskrybentów.
Uncanny Automator to potężne narzędzie łączące Mailchimp i WordPress. Pozwala zautomatyzować Twój marketing i zwiększyć sprzedaż oraz konwersje.
Dodatkowe wskazówki dotyczące szybkiego rozwoju twojej listy mailingowej Mailchimp
Jeśli nie promujesz swojej listy mailingowej wśród odwiedzających twoją witrynę internetową, to tracisz potencjalnych subskrybentów, klientów i sprzedaż.
Poniżej przedstawiamy kilka najlepszych sprawdzonych wskazówek, które pomogą Ci szybciej rozwinąć Twój newsletter Mailchimp.
1. Wiele formularzy rejestracji
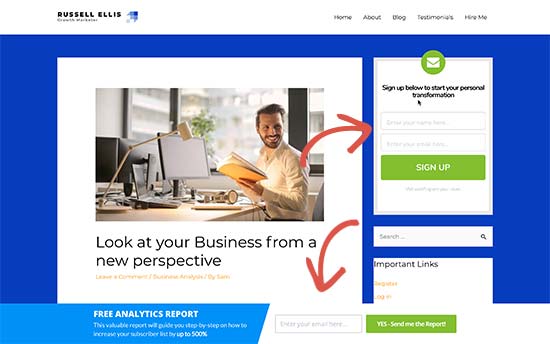
Nie dodawaj tylko jednego formularza rejestracji na panelu bocznym. Zamiast tego daj swoim użytkownikom wiele możliwości rejestracji za pomocą wielu formularzy subskrypcji e-mail.
Zobacz nasz poradnik, jak zrobić formularz zapisu na baner witryny internetowej w WordPress.
2. Wykorzystaj grywalizację do pozyskania subskrybentów
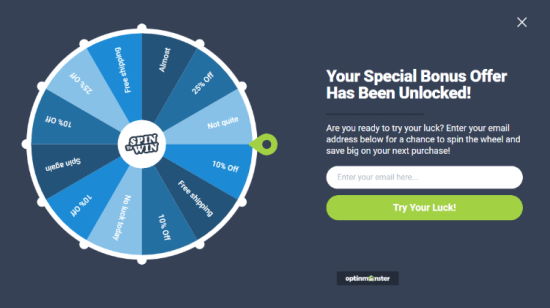
Grywalizacja wprowadza zabawną interakcję do twoich formularzy e-mail. Ludzie chętniej wpiszą swój adres e-mail, jeśli mają szansę wygrać coś w zamian.
Zobacz nasz poradnik na temat dodawania wyskakujących okienek “spin to win ” w WordPress.
3. Tworzenie magnesów przyciągających uwagę
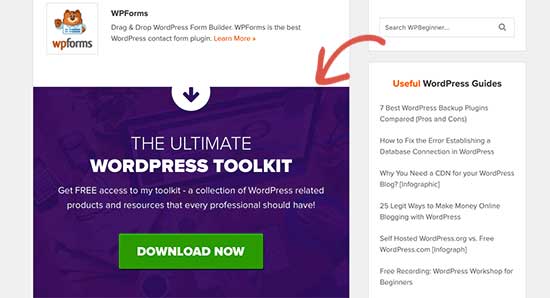
Lead magnets to zachęty, które możesz zaoferować swoim użytkownikom w zamian za zapisanie się na Twoją listę mailingową. Na przykład, możesz wysłać im ebooka, przykładowy rozdział, kod rabatowy i wiele innych.
Dowiedz się więcej z naszego poradnika o tym, jak wymagać adresu e-mail do pobrania pliku w WordPress.
4. Korzystanie z ukierunkowanych kampanii i personalizacji
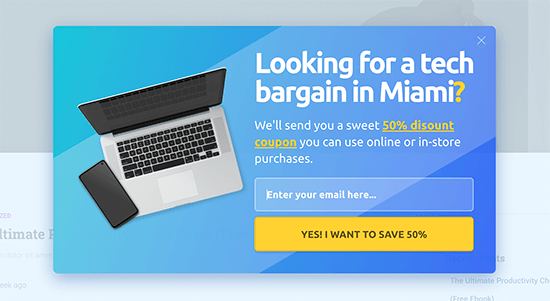
Twoje formularze rejestracji e-mail zdobędą więcej subskrybentów, jeśli będą wyświetlane właściwym użytkownikom we właściwym czasie.
Można na przykład wyświetlić wiadomość powitalną odwiedzającym z mediów społecznościowych lub wyświetlić ofertę rabatową kupującym, którzy zamierzają porzucić swoje koszyki.
Szczegółowe instrukcje można znaleźć w naszym przewodniku na temat wyświetlania spersonalizowanych treści użytkownikom w WordPress.
5. Śledź swoje konwersje
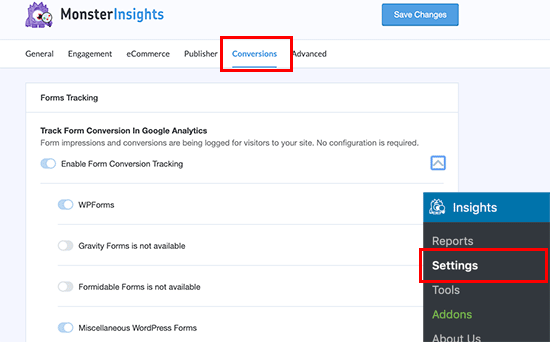
Chcesz wiedzieć, które formularze przynoszą Ci więcej subskrybentów? Do tego będziesz potrzebował MonsterInsights, który jest najlepszą wtyczką Google Analytics na rynku.
MonsterInsights pomaga zrozumieć, które formularze są bardziej skuteczne w rozwijaniu Twojej listy mailingowej. Aby uzyskać więcej informacji, zapoznaj się z naszym kompletnym przewodnikiem na temat śledzenia konwersji w WordPress jak profesjonalista.
Więcej informacji na ten temat można znaleźć w naszym przewodniku na temat tego, jak szybko rozwinąć twoją listę mailingową.
Mamy nadzieję, że ten artykuł pomógł ci dowiedzieć się, jak używać Mailchimp z WordPressem do budowania twojej listy mailingowej. Możesz również zapoznać się z naszym przewodnikiem na temat tworzenia formularza subskrypcji Mailchimp w WordPress lub naszym wyborem najlepszych alternatyw Mailchimp.
If you liked this article, then please subscribe to our YouTube Channel for WordPress video tutorials. You can also find us on Twitter and Facebook.


Li
All of a sudden, only my featured photo shows in my mailchimp email campaign. No other photos in my article. Would that be a WordPress or mailchimp issue? I can’t seem to find help either way
WPBeginner Support
You would want to first go through MailChimp’s troubleshooting recommendations first to ensure it is not an issue from their end.
Admin
Jiří Vaněk
Setting up Mailchimp correctly was quite difficult for me until I understood everything and set up the newsletter. Thanks for the guide.
WPBeginner Support
You’re welcome
Admin
Maria G
Is there a way to use an embedded form to allow users to update their newsletter preferences without them having to type in their email? If they’re logged into WordPress, is there a way for the MailChimp form to already be prefilled with their email address and all they have to do is select the newsletters they wish to subscribe to and submit?
WPBeginner Support
You would want to check with MailChimp for their current integration options.
Admin
Michael
I would like to make accessible the monthly MailChimp newsletters from a non-profit’s website so subscribers can access past newsletters.
Thank you for any help you can provide.
WPBeginner Support
You would need to reach out to MailChimp and they should be able to assist you with what tools they have available
Admin
Poornima M
I’m trying to add an embedded form from Mail Chimp to my WordPress website for blog subscription, but unable to see where to paste the form code inside WordPress. The Text box as mentioned in this article doesn’t seem to be the right place.
WPBeginner Support
You should be able to use a custom HTML widget now but other than that the method has not changed for embedding it on your site.
Admin
Chloé
Hello,
Is it possible to use Mailchimp if I don’t have a domain?
For example : myblog(.)wordpress(.)com
WPBeginner Support
WordPress.com does allow you to use MailChimp currently.
Admin
Tolu
Thanks for your helpful articles. My challenge is how to make a newsletter that automatically updates my subscribers on new posts. How do I place latest blog posts in an automated mail using mailchimp?
WPBeginner Support
It would depend on the newsletter tool you are using but there should be the option to set up an RSS campaign for what you’re wanting
Admin
jan
I’m really struggling with this tutorial. The “Adding MailChimp Email Signup Forms in WordPress” section looks like nothing I can find. There is nothing called, “lists page” anywhere.
WPBeginner Support
MailChimp changed lists to audience as well as a few other updates, we will be sure to look into updating this article when we are able.
Admin
P V Chowdary
I was struggling to integrate email subscription list with my blog.
This guide helped me complete from start till end.
Thank you
Colleen Wildenhaus
Is this information updated? I am on mailchimp right now trying to follow this post and I am not seeing the same information. Thank you.
Shakir
What about, MailChimp forms created in wordpress section of mailchimp, i used that form, but can’t get the email
Eric S Brister
Thanks! I was finally able to hook this up and design a welcome letter! Your information was very easy to understand, and setting it up with a cinch! I’ve been avoiding this because I thought it would be hard but this was simple thank you so much for the help!
Seth
I don’t see a widget option anywhere. Just Customize, Menus, Header, Background, Theme FAQ, and Editor. Any ideas how I can get this to work?
Shelley
There’s a MailChimp Sign-Up Form widget. Why do you recommend using a text widget?
My MailChimp Sign Up Form isn’t working; do you recommend the text widget instead?
edward
hello, my rss feed is sending only one post. How can i send all post of a day in one email?
Greg
Hello,
I am running a blog on wordpress.com with Rowling theme.
I tried to add newsletter signup using Mailchimp following this guide, but once I put the copied Mailchimp’s standard (also superslim or naked) signup form code to WordPress.com Sidebar text widget – half of the code comes up as text. Moreover, the subscribe button does not work and fields that should be filled up do not show up (only their “titles/description”.
I consulted the previous comments, but none of the solutions seem to be working.
HELP!
Vivian
I had the same issue at first. Then I found out I pasted the MailChimp’s standard text in the ‘Visual’ box instead of ‘text’ box. It’s a simple fix for me – just click ‘text’ and past the content in ‘text’ instead of visual.
Amir
Amazing Article. This is probably my favorite site on the internet, right behind Google. I’m doing so much with WordPress and I admire how much hard work you put into it. Thanks a lot brother
Terminally Pretty
Can I only install plugins if I have a wordpress business plan? I have a personal plan and when I paste the code provided by mailchimp into a text widget on my blog sidebar, it just appears like code text on my sidebar instead of an email subscribe form. I don’t know why it’s happening, please help me.
WPBeginner Support
Hello,
If you are talking about WordPress.com, then yes you’ll need a Business Plan to install plugins. For self-hosted WordPress.org website, you just go a head and install any plugin you need. For details see our comparison of WordPress.com vs WordPress.org.
Admin
Nat
So I created my first email campaign for blog updates with mailchimp. I sent out a test update and it looks great. However, I am still receiving the old automated blog updates and I dont know how to delete them, so now everytime theres a new blog, people are getting 2 update emails about the same post. How do I delete the old blog identification? I don’t have anything other then mail chimp installed for this and I don’t see any other campaign for blog updates there that I can delete. please help.
WPBeginner Support
Hi Nat,
Please check your MailChimp settings or contact their support.
Admin
yashwanth
Hi I dont find the Rss button I have the automated button instead . I would like to know how to work on with that option .
Tosin Oluwalowo
How can I make it send emails to subscribers immediately I publish?
Francesco
Thanks for the post!!
Quick question..
Is it possible to create a newsletter that dinamically takes my last 3 post? Or I should put them manually everytime?
This is a features the plugin “Newsletter” has native and it’s really useful.
Every helps is really appreciated
Francesco
Vana
Exactly what I needed!
Thank you so much! You are the best.
Will
Great article. Need help! Installed mailchimp subscriber form on my blog. I am getting notification the confirmation email is sent for double opt. Yet am not receiving the link and no emails are being added to the mailchimp list. Beyond frustrated! Any help appreciated. Seems to be a issue on many help forums.
Shelley
I have two different opt-in forms on my site, both connected to mail chimp. I have some subscribers going to mail chimp email list and some on wordpress. Any idea why this is happening?
Mackenzie Waters
This was exactly what I needed and walked me through the process so easily! Thank you!
Chris
The only reservation I have about switching from FeedBurner is that if someone unsubscribes from the RSS driving posts, but they still want to get the newsletter (or vice versa), then there is no way to accommodate that (that I can tell).
I would like my readers to have control over which content they get but not be completely committed to “all of the above” only.
MartinR
Many Thanks! I just followed these instructions to create a free MailChimp account, create a Subscribe form for posts on my self hosted WordPress site, and start a “campaign” which will email my latest post to subscribers. This is exactly what I was looking for. Again, thanks, great article!
Sunday
I followed all the instruction, but I am asked to register a custom email account with an organisation to be paid before I can continue. Where did I missed it?
James Clewlow
I followed all of the instructions correctly but when I copy and paste the link into the text widget in the sidebar it comes up as a massive link on my website.
Please help!
MartinR
in that above writeup I typed:
…Code button to add a “” at the beginning and a “” at end of the pasted link/block, SAVE, then remove the beginning and ending “” tags, SAVE again…
But the “code” tags I typed in the 1st reply got interpreted as actual HTML – you would actually see the code tags without all the spaces – hope that makes sense…
MartinR
This editor keeps interpreting what I’m trying to type as actual code tags so I’ll just say:
If you follow the first reply – what I did was add a beginning and ending code tag to surround the pasted link – via the Code button, SAVE, then remove them, SAVE again, all was well.
Camille
Hi I followed these instructions and this morning I got the email but my latest blog post isn’t in it. It’s just the template but I though it would pull the latest blog posts into the email. Just curious if you have a resource that could help me on this. Mail chimp doesn’t seem to have anything on their website. Thanks!
John E.
Hi, and thanks for a great article. I’m currently using Mailpoet but thinking of moving to Mailchimp. I want to use the RSS campaign feature, but I also want to include evergreen articles that I occasionally update, but don’t appear as new in the RSS feed. Is there any way to do this with Mailchimp? Or at least drop them manually into a template? Many thanks in advance
Dylan
Thank you so much for this! Exactly what I needed!
WPBeginner Support
Hey Dylan,
Glad you found it useful. You should also check out our YouTube Channel for WordPress video tutorials.
Admin
Stephanie O
After pasting the Mailchimp signup code on WordPress ‘text’ widget, half of the text is showing And the form appears as a text, as in you cannot click anything and the space to enter your email address/name is invisible!..
I have a wordpress.com website with the Textbook theme.
Andrew Gilbert
I have this same problem! Do I have to have a premium account for this to work?
Ella
Hi,
When you paste the signup code, a part of it dictates the style of the form which might clash with the style of your page, is easy just omit/delete this part:
#mc_embed_signup{background:#fff; clear:left; font:14px Helvetica,Arial,sans-serif; }
/* Add your own MailChimp form style overrides in your site stylesheet or in this style block.
We recommend moving this block and the preceding CSS link to the HEAD of your HTML file. */
Hope it help,
Ella
Nik Cree
Do you know of any plugins or methods to send the full post to MailChimp rather than the Excerpt. I have ‘Full Text’ rather than ‘Summary’ selected in Reading Settings, but it is still the excerpt that is going to MailChimp. Any ideas how to get the Full Post instead?
Stef J
Were you able to find an answer or solution to this? I’m struggling with the same issue.
Nik Cree
Yes – it is a setting inside the MailChimp newsletter builder.
portia lambert
I have copied and pasted my form code into the widget side bar etc and its not coming up on my website. help please!
Gerald
i want my susbcriber to pay to my paypal before they subscribe
can i achieve this with mailchimp?
WPBeginner Support
The default MailChimp forms do not have a payment option. You should check out WPForms it comes with payment options like Stripe and PayPal and also supports MailChimp.
Admin
Jim Farthing
I am trying to get mailchimp and wp on the same page, so to speak. I can setup a form to have people sign up for my updates through mailchimp with no problem. I can get people to sign up for my forum with no problem.
Having people sign up for my site and add them to mailchimp at the same time, big problem. I just cannot seem to get that one down.
I really want to use one form so that my visitors do not have to fill out two forms, one to have access to my forums and one to get on my mailing list.
What am I missing? I have tried setting up the mailchimp for wp plugin with no success, I am using ultimate membership pro and have filled out the mailchimp info there with no success.
So at this point I am pulling my hair out so any suggestions will be greatly appreciated.
Jim
Sancheo
I have that exact problem as well! Just so need to get this sorted already :/ May we find our answers soon
MPdev
I am having this issue as well. Have you already checked out the Mailchimp site?
Anu
Thanks a lot for this tutorial. I’m a mailchimp noob and this was very helpful.
Marisa Moon
I’m new to this RSS Feed concept, but upon setting it up I began to wonder if the wordpress site will still be emailing my subscribers when a new post is published. I don’t want my subscribers getting two emails on the same post. Is there a way to disable the wordpress post emails so I can just use Mail Chimp?
Another question I have is about the mail chimp campaign design. After adding the RSS Header and Items, I’m still left with a rather short description and excerpt of the post. Do I have to update the campaign with a photo from the particular blog post each time before it goes out (if I want photos in it)? I use a lot of photos in my blog post, so this RSS campaign will fall flat without the photo content. But what’s the point of this auto-sending feature if I have to go in and add the content again.
Anyways, thank you for the info. I hope to find the answers, especially about the first question.
Jordan White
Marisa,
Did you figure out how to stop WordPress from sending those automatic “new post” emails? I am having the same problem. Now that I have mailchimp, I don’t want my subscribers getting too emails.
LM
Great article and i looooove your site as I set up my new blog. I am planning to sign up for MailChimp. And although i know you recommend OptinMonster, I saw that Mailchimp also has a optin plug-in for WordPress. Do you have any thoughts on it? I’m at the stage where I don’t want to have to pay for anything else and OptimMonster has a monthly fee. I see that as an upgrade opportunity.
Marisa Moon
I don’t remember many of the differences, but I ended up going with PopUp Ally which is a free wordpress plugin. I found it had more features than mail chimp was offering and, even though it had less than optin monster, it was free. Hope this helps! I think for us new bloggers, who don’t have thousands of hits a day, we shouldn’t worry about the “monster” plugins out there just yet unless we’re ready to pay for it.
Andrea
Thank you so much! I’m looking for a free pop-up plugin too, so I’ll try the one you suggested first
Marcel
Good Tutorial. I have one problem though:
I have the double opt-in option enabled but when clicking the opt in link in the email the subscription is not directly confirmed but the user has the prove he is human. How can I disable that?
Many Thanks.
Marisa Moon
I had this same problem. I don’t think you can change it or disable it (according to mail chimp). This is what I wrote two subscribers who complained about not being able to confirm: After trying the subscription myself on several browsers, laptops, and mobile devices, I found out that the trouble is really when using a mobile device. Were you using a mobile device when you had trouble subscribing? In the screen shot attached it shows you that I cannot edit the “robot” test, so i am stuck with it. But the other image I attached is to help explain a few ways you might be able to overcome the issue. When you are asked to select images to prove you’re not a robot, the images can be blurry, they can also reappear once you’ve already clicked them, and you have to continue to click the photos even if new ones appear. Then, once you’ve clicked all of the photos that reappear (as you can see explained at the top and bottom of my photo), you click “verify”. But if you click “verify” before letting the photos run their course, then you will have to try again. If you want to skip the photographs all together, then you can click the little headphone icon that is to the left of “Verify”, and you will be taken to a screen where you can listen to people speak a sequence of numbers that you have to type out and submit. It might be easier!
Tracy
Great tutorial, as always!
I am the process of starting to use Mailchimp but was a little concerned that currently, my new blog posts are automatically sent out by Jetpack. Do I need to disable this to ensure there is no duplication?
Constance Sohodski
This is a great tutorial, but I have a question it doesn’t answer. I am in the process of creating my account. MailChimp warns me against using a gmail account, and I understand why. However, I can’t figure out how to set up an email account associated with my wordpress site. Can anyone help?
April G
Hi. I’m using Mailchimp to write a newsletter and I looked up how to embed a link to a website withtin text. But when I click on the text it doesn’t take me to the website in my code. Do you know what could be the problem?
Angela Dvorak
Hi!
I used this article successfully to set up my RSS email campaign, but then it just stopped working. The feed URL appeared to be bad. I validated it using an RSS validator and it works, but Mail Chimp is still saying its not valid. Any ideas on why that might be? I checked for typos and syntax and just not finding the source of the issue.
WPBeginner Support
We are not sure what could be causing this issue. Try disabling all your plugins and switching to a default theme. After that try to add your RSS in MailChimp. If the issue is revolved then this mean that a plugin or theme on your website is causing the issue. Alternately, you can also rechout to MailChimp support and see what they have to say.
Admin
Saeful
Thanks for the tutorial
very helpful especially for me as a beginner blogger
regards
WPBeginner Support
Hi Saeful, glad you found it helpful. Don’t forget to follow us on Facebook for more WordPress tips and tutorials.
Admin
Melinda
I am following the instructions for setting up the embedded form but I’m not getting any kind of link to paste…I’ve tried several times using the set up as shown in the tutorial. What do I need to do to see this code to use on my WP site?
Pat Mingarelli
Is there way to send an RSS email from MailChimp that shows a partial post and the featured image?
Thanks!
Pat M
Florine
Hey, I have the same problem as Kate Armstrong and the suggested solutions did not work. I tried using a different form (slim/ naked) and also to disable Javaskript, still it only shows plain text or code, no subscribe button. Do you have any idea what the problem might be and how to solve it?
Thanks!
Kamran
Sir i configure it as per your instructions , but post is not showing in the mail box , there are only facebook , twitter i cons are shown but Post is not , plz help what is the problem