Chcesz dostosować swoje formularze Contact Form 7 i zmienić ich styl?
Contact Form 7 jest jedną z najpopularniejszych wtyczek formularzy kontaktowych dla WordPressa, ale jej domyślne formularze są bardzo proste.
Dlatego zalecamy bardziej niezawodne wtyczki do tworzenia formularzy, takie jak WPForms, które oferują większą elastyczność i opcje projektowania. Rozumiemy jednak, że wielu klientów preferuje Contact Form 7, a my jesteśmy tutaj, aby pomóc Ci dostosować gotowe formularze, aby uzyskać pożądany wygląd.
W tym artykule pokażemy, jak stylizować formularze Contact Form 7 w WordPress.
Dlaczego warto stylizować twoje formularze Contact Form 7?
Contact Form 7 to jedna z najpopularniejszych wtyczek formularzy kontaktowych dla WordPressa. Jest darmowa i umożliwia dodanie formularza WordPress za pomocą krótkiego kodu.
Jednak Contact Form 7 ma bardzo ograniczone funkcje. Jednym z problemów Contact Form 7 jest prosty styl formularzy. Ponadto wtyczka nie oferuje żadnych wbudowanych opcji zmiany stylu twoich formularzy.
Utrudnia to dopasowanie wyglądu formularza kontaktowego do twojego motywu witryny internetowej lub jeśli chcesz edytować krój pisma i kolor tła, aby wyróżnić swój formularz.
Jeśli potrzebujesz bardziej konfigurowalnych formularzy z zaawansowanymi funkcjami, polecamy WPForms, która jest najbardziej przyjazną dla początkujących wtyczką do formularzy kontaktowych. Zawiera ona kreator formularzy typu “przeciągnij i upuść”, ponad 2000 gotowych szablonów formularzy i liczne opcje dostosowywania.
Istnieje również darmowa wersja WPForms, która zawiera ponad 60 szablonów, logikę warunkową, płatności Stripe i wiele więcej. Zobacz nasze porównanie Contact Form 7 vs WPForms, aby dowiedzieć się więcej.
To powiedziawszy, przyjrzyjmy się, jak stylizować formularz Contact Form 7 w WordPress.
Pierwsze kroki z formularzem kontaktowym 7
Najpierw musisz zainstalować i włączyć wtyczkę Contact Form 7 na swojej witrynie internetowej. Jeśli potrzebujesz pomocy, zapoznaj się z naszym przewodnikiem na temat instalacji wtyczki WordPress.
Po włączaniu, możesz przejść do Kontakt ” Utwórz nowy z twojego kokpitu WordPress.
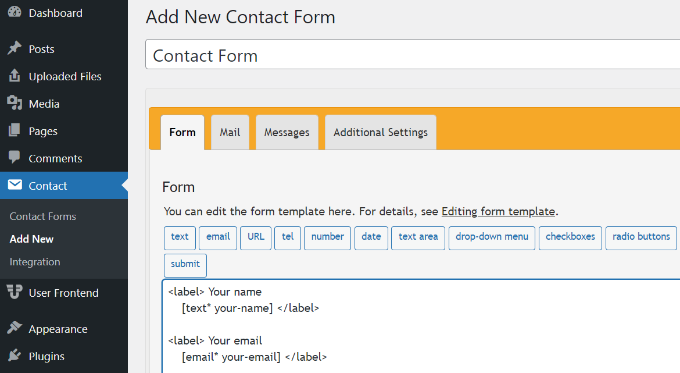
Możesz teraz edytować formularz dla twojej witryny internetowej i zacząć od wpisz tytuł dla twojego formularza.
Wtyczka automatycznie doda domyślną nazwę formularza, e-mail, temat i pola wiadomości. Możesz jednak dodać więcej pól, po prostu przeciągając je i upuszczając w wybranym miejscu.
Po zakończeniu nie zapomnij kliknąć przycisku “Zapisz” i skopiować krótki kod.
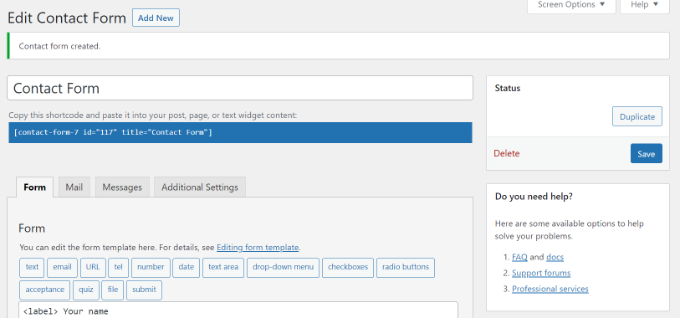
Następną rzeczą do zrobienia jest dodanie go do twojego wpisu lub strony na blogu.
Aby to zrobić, wystarczy edytować wpis lub utworzyć nowy. Gdy znajdziesz się w edytorze WordPress, kliknij znak “+” u góry, a następnie dodaj blok Krótki kod.
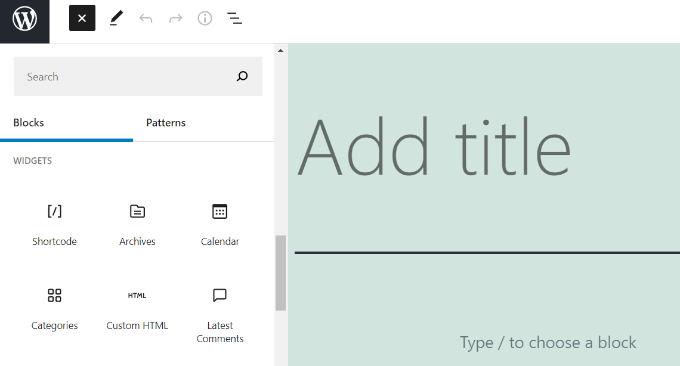
Następnie po prostu wpisz krótki kod dla twojego formularza Contact Form 7 w bloku shortcode. Będzie on wyglądał mniej więcej tak:
1 | [contact-form-7 id="117" title="Contact Form"] |
Teraz opublikuj swój wpis na blogu WordPress, aby zobaczyć formularz kontaktowy w działaniu. Na potrzeby tego artykułu użyliśmy domyślnego formularza kontaktowego i dodaliśmy go do strony WordPress. Tak wyglądał formularz kontaktowy na naszej witrynie testowej.
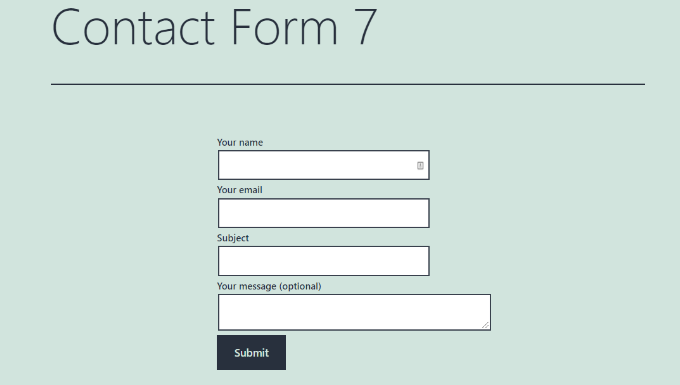
Czy jesteś już gotowy, aby dostosować swój formularz Contact Form 7 w WordPress?
Stylizacja formularzy Contact Form 7 w WordPress przy użyciu własnego CSS
Ponieważ Contact Form 7 nie ma wbudowanych opcji stylów, będziesz musiał użyć CSS do stylizacji twoich formularzy.
Contact Form 7 generuje zgodny ze standardami kod formularzy. Każdy element formularza ma przypisany odpowiedni identyfikator i klasę CSS, dzięki czemu można go łatwo dostosować, jeśli znasz CSS.
Każdy formularz Contact Form 7 używa klasy CSS .wpcf7, której możesz użyć do stylizacji twojego formularza.
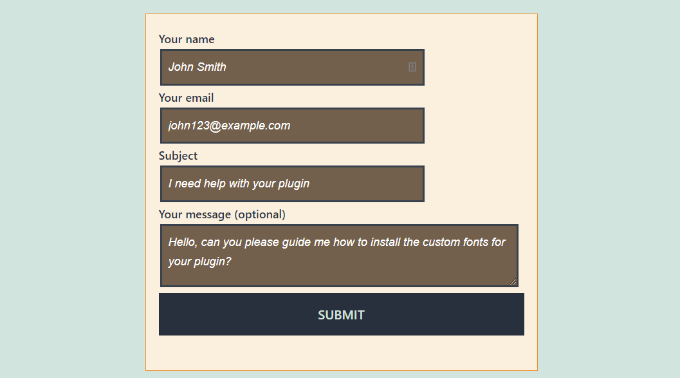
W tym przykładzie użyjemy własnego kro ju pisma o nazwie Lora w naszych polach wejściowych i zmienimy kolor tła formularza.
1 2 3 4 5 6 7 8 9 10 11 12 13 14 15 16 17 18 19 20 | div.wpcf7 { background-color: #fbefde;border: 1px solid #f28f27;padding:20px;}.wpcf7 input[type="text"],.wpcf7 input[type="email"],.wpcf7 textarea {background:#725f4c;color:#FFF;font-family:lora, sans-serif; font-style:italic; }.wpcf7 input[type="submit"],.wpcf7 input[type="button"] { background-color:#725f4c;width:100%;text-align:center;text-transform:uppercase;} |
Jeśli potrzebujesz pomocy w dodaniu własnego CSS, zapoznaj się z naszym przewodnikiem na temat łatwego dodawania własnego CSS do witryny WordPress.
Tak wyglądał nasz formularz kontaktowy po zastosowaniu tego CSS.
Stylizacja wielu formularzy Contact Form 7
Jeśli używasz wielu formularzy kontaktowych i chcesz nadać im inny styl, będziesz musiał użyć identyfikatora wygenerowanego przez formularz kontaktowy 7 dla każdego formularza. Problem z CSS, którego użyliśmy powyżej, polega na tym, że zostanie on zastosowany do wszystkich formularzy Contact Form 7 na twojej witrynie internetowej.
Aby rozpocząć, po prostu otwórz stronę zawierającą formularz, który chcesz zmodyfikować. Następnie najedź swoim kursorem myszy na pierwsze pole formularza, kliknij prawym przyciskiem myszy i wybierz opcję“Inspect“.
Ekran przeglądarki podzieli się i zobaczysz kod źródłowy strony. W kodzie źródłowym należy zlokalizować linię początkową kodu formularza.
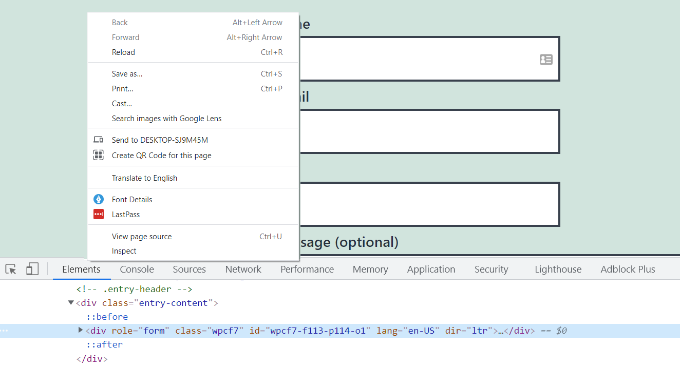
Jak widać na powyższym zrzucie ekranu, nasz kod formularza kontaktowego zaczyna się od linii:
1 | <div role="form" class="wpcf7" id="wpcf7-f113-p114-o1" lang="en-US" dir="ltr"> |
Atrybut ID jest unikalnym identyfikatorem generowanym przez Contact Form 7 dla tego konkretnego formularza. Jest to kombinacja ID formularza i ID posta, w którym ten formularz został dodany.
Użyjemy tego identyfikatora w naszym CSS do stylizacji naszego formularza kontaktowego i zastąpimy .wpcf7 w naszym pierwszym fragmencie kodu CSS #wpcf7-f113-p114-o1.
1 2 3 4 5 6 7 8 9 10 11 12 13 14 15 16 17 18 19 20 | div#wpcf7-f113-p114-o1{background-color: #fbefde;border: 1px solid #f28f27;padding:20px;}#wpcf7-f113-p114-o1 input[type="text"],#wpcf7-f113-p114-o1 input[type="email"],#wpcf7-f113-p114-o1 textarea {background:#725f4c;color:#FFF;font-family:lora, "Open Sans", sans-serif;font-style:italic;}#wpcf7-f113-p114-o1 input[type="submit"],#wpcf7-f113-p114-o1 input[type="button"] {background-color:#725f4c;width:100%;text-align:center;text-transform:uppercase;} |
Możesz teraz powtórzyć ten krok dla wszystkich twoich formularzy i zastąpić identyfikator formularza dla każdego formularza Contact Form 7, który chcesz dostosować.
Stylizacja formularzy Contact Form 7 za pomocą CSS Hero
Łatwiejszym sposobem na zmianę stylu formularzy Contact Form 7 jest użycie CSS Hero. Pozwala on edytować twoje formularze bez konieczności pisania CSS.
Wystarczy zainstalować i włączać wtyczkę CSS Hero na twojej witrynie internetowej. Możesz skorzystać z naszego przewodnika na temat instalacji wtyczki WordPress.
Następnie przejdź do strony zawierającej twój formularz i kliknij opcję “Dostosuj za pomocą CSS Hero” na pasku narzędzi u góry.

CSS Hero zapewnia łatwy interfejs użytkownika do edycji CSS bez pisania jakiegokolwiek kodu.
Korzystając z wtyczki, możesz kliknąć dowolne pole, nagłówek i inne elementy w twoim formularzu i edytować kolor tła, krój pisma, obramowania, odstępy i wiele więcej.
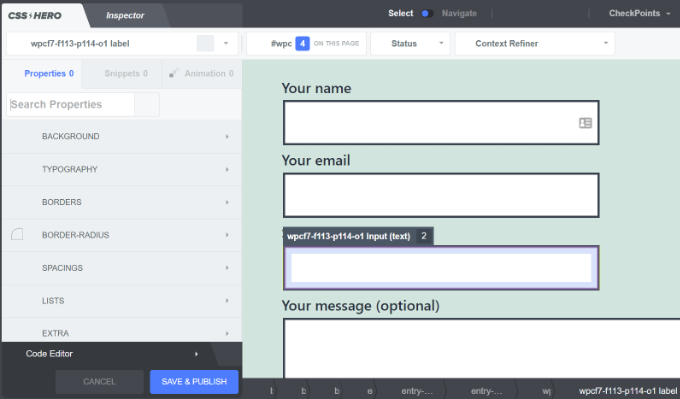
Po dostosowaniu własnego formularza wystarczy kliknąć przycisk “Zapisz i opublikuj” u dołu.
Mamy nadzieję, że ten artykuł pomógł ci dowiedzieć się, jak stylizować formularze Contact Form 7 w WordPress. Możesz również zapoznać się z naszym przewodnikiem na temat tworzenia biuletynu e-mailowego i naszymi ekspertami wybierającymi najlepsze wtyczki kalkulatora dla WordPress.
If you liked this article, then please subscribe to our YouTube Channel for WordPress video tutorials. You can also find us on Twitter and Facebook.


Alejandro
Thanks!
Your instructions were very useful.
Thanks for taking the time to share them!
WPBeginner Support
Glad our guide was helpful
Admin
hmi
Hi sir, where can I find the css code of fields ?
Thank you
WPBeginner Support
For finding the current CSS you would want to use inspect element:
https://www.wpbeginner.com/wp-tutorials/basics-of-inspect-element-with-your-wordpress-site/
Admin
Tony Tran
i can’t change color background css button submit….please help
WPBeginner Support
You may be targeting the wrong object, you may want to take a look at our article here:
https://www.wpbeginner.com/wp-tutorials/basics-of-inspect-element-with-your-wordpress-site/
Admin
Deshave
Submit button in pdf no longer works since uploading form to WordPress website.
WPBeginner Support
The pdf embed we’re recommending is for viewing content. For filling out forms we recommend using a form plugin
Admin
zeeshan alam
Thanks for sharing Sir
WPBeginner Support
You’re welcome
Admin
Steve
Hello is it possible to ad a message if i dont filled out one ore more “Required fields” to get a Message ? Because i Only get the “red arrows” on the “Required fields” that I don’t filled out. In I want additionally a error Message like
“One or more Required fields have an error. Please check and try again.”
But i Only have the red arrows, and the Problem is on mobile Phones the red arrows are not in the window and the Client don’t see it.
WPBeginner Support
You would need to reach out to contact form 7’s support for what they currently have available.
Admin
FRED_VERSATILE
Hello,
Thank you for this tutorial.
I would like to add a custom image at the right of the “send” label, in the button.
I’ve done it with a :before for the other buttons on my website, but i can’t find the element in the send form to put the CSS…
WPBeginner Support
Depending on your form ot would change what to target, if you use inspect element you should be able to see the ID or class of the object:
https://www.wpbeginner.com/wp-tutorials/basics-of-inspect-element-with-your-wordpress-site/
You could also use :after instead of :before as another option
Admin
Muhammad Tahir
How to change response text color of SPECIFIC contact form
waqas
Can we add a time field in contact form 7 without plugin?
Mary Lou Hoffman
I’m a novice, but determined to figure this out! So, please – give me baby steps if you answer.
I have a contact7 form on my website. The font is showing up as white on a white background for the labels (Your name, Your email, etc).
How do I change the color – where do I go to tell it to change color?
I tried copying and pasting some of the codes ya’all had in your answers above, but they just showed up on my page, but didn’t change the font.
Karu Price
You can target the lable area like this-
.wpcf7 form p label {
color: white;
background: black;
font-family: sans-serif;
}
Rita Accarpio
Hi there!
I’m here struggling with modal headings. I changed the form background to a darker color but now I want to change the heading’s color. Doesn’t seem to change at all with all the different options I tried so far.
Do you know anyway to do this? Help me please!
Thanks!
Chris
Thanks!
Abhijeet
I want to reduce gap between name and email boxes…how to do it.
Naveen
Thanks for a great post, was very helpful.
Josh
This helped heaps. Thanks!
Joel Desrosiers
My contact form has a dark image background so I need “your name”, “your email” and “your message” to be white. I can’t find a class or id for those elements, I tried with inspect element but I can’t find anything that works. This is the only contact form on this site. I’m using css on the stylesheet of my childtheme and I tried different options but can’t change the color. Can anyone help me?
Merriann Fu
I’m pretty new to WordPress and Plugins in general but have this Plugin installed and everything is working correctly but instead of seeing the person’s message, it just shows [your-message] in the body of the email. I have everything set up like above and spelled correctly so i’m not sure what the problem is. Any help would be much appreciated! Thanks!
Don Walley
I have the same problem. I’m only new to forms on WP but I’m stuck too. I’m trying to build a Registration page with business name, address, etc along with personal contact information and a drop down to make their choice and of course a comment field. After testing this numerous times I get the same as you; the content of the comment field.
Wish there had been an example or two on the Docs page of Contact 7; something besides only the default Contact Form.
Miguel Ceballos
I don’t think Contact Form 7 is the most popular. It comes pre-installed with many themes and wordpress instalations, that’s the reason they have so many users. It is so frustrating to edit anything in this plugin.
Osama Ali Khan
Hello if some one want contact form with transparent background or want to add contact form 7 on the big banner image with transparent background then add this code to your custom css.
.wpcf7 input[type=”text”],
.wpcf7 input[type=”email”],
.wpcf7 textarea
{
background-color: Transparent;
color: BLUE;
width: 100%;
}
div.wpcf7 {
color: white;
margin: 0;
padding: 0;
}
Deborah
You are an absolute life saver. I’ve been battling with this for hours.
One point I’d make that others might find it useful to know, is that I was trying to style the submit button, which was on a contact form 7 I’d put on my sidebar.
This worked for the first page it was on but then wouldn’t on subsequent pages. However, I then noticed that the f2 code on the second page had a suffix of ‘o2’, and when I added this to my css, the styling on this page worked too.
Thank you again.
WPBeginner Support
Glad you found it helpful.
Admin
Mikko
Thanks for a great post, was very helpful. One thing still bothering me and it’s that i haven’t found a way to customize checkboxes. Have you found a way how it would be possible to change checkbox size for example so that it would work on every browser?
Seems like the input structure isn’t modified so no extra spans could be added to fake the checkboxes an i right?
Glad if you have time to help me out, cheers.
Wendy
Oh my gosh! You have no idea how grateful I am for this post! THANK YOU!
I simply wanted to change the font used in the Submit button. I searched and searched for hours and tried various CSS code variations and nothing worked until I came across your code and then added a font element to it. Problem solved!
pranav shinde
contact-form-7/includes/css/styles.css (inactive) this appears above my css edit file,,by which none of changes are applied to website help me how to make it active
WPBeginner Support
You should not edit the core plugin files. Instead you should add your CSS to your theme’s stylesheet.
Admin
pranav shinde
ya i understood then can you please help me how can i do it..please help me in detail
pranav shinde
thanks a lot sir very much helpfull will suscribe your channel
pranav shinde
means i hould copy this code in my themes css file righht??
Monique
Hello,
I am wondering if any one can help me fix the contact form for mobile. I am able to see the form but it is too wide and gets cut off.
Thank you.
puneet singh
this very helpful realy nice tutorial
Jiniya
I find your website very helpful.just a suggestion it would be great if u could launch an app for your website soon…apps are more convenient than following emails
WPBeginner Support
Sound like a good idea. Meanwhile, you can access WPBeginner using Feedly app on your mobile device.
Admin
Anee
Top most features in WordPress you can own style easily no need deeply knowledge for manage your site in WordPress. In Contact 7 form, you can your own structure that you have already design in HTML or other one.
Neil Murray
If working with CSS is a little beyond your current skill levels you might also consider using https://wordpress.org/plugins/contact-form-7-skins/ .
Contact Form 7 Skins which works right within the normal Contact Form 7 interface, making it easier for regular WordPress users to create professional looking Contact Form 7 forms using a range of compatible Templates and Styles – even if you don’t have HTML and CSS skills.
Sam
thanks Neil
Andrew Wilkerson
Thanks Neil, I think that’s just what I needed. I got excited and installed it then wiped out my existing form, so I had to restore a backup of my site to get it working again, I’ll look into it more when I have time, I guess i’ll have to copy my current form into it or start from scratch with a new one. Off to watch some tutorials. Hopefully this is still the best one to use. I know it’s an old post here but it does say it was recently updated on the plugin page.
Bhongo
Fantastic article. I will use this to style one my website.
Mark
Another good article where you do not end up using yet another plug in.