
Planujesz przenieść swoją witrynę WordPress do nowej firmy hostingowej lub na inny serwer? To poważna decyzja i, co zrozumiałe, prawdopodobnie masz pewne obawy dotyczące potencjalnej utraty danych i przestojów.
Z naszego doświadczenia wynika, że są to zdecydowanie największe zagrożenia podczas zmiany hostingu lub migracji witryny. Można jednak bezpiecznie przenieść się na nowy hosting lub serwer bez uszczerbku dla komfortu użytkowania lub czasu pracy.
W rzeczywistości zmieniliśmy witrynę WPBeginner z HostGator na SiteGround w 2020 roku. Tak więc sami z powodzeniem przeszliśmy przez ten proces bez negatywnego wpływu na naszych czytelników.
W tym poradniku krok po kroku pokażemy, jak bezpiecznie przenieść witrynę WordPress na nowy hosting bez żadnych przestojów. Odpowiemy również na najczęściej zadawane pytania dotyczące przenoszenia witryny WordPress do nowego dostawcy hostingu.

Ważne: Zanim zaczniemy, chcemy, abyś wiedział, że wiele firm hostingowych WordPress oferuje bezpłatną usługę migracji. Może to nie być wymienione na ich witrynie internetowej, więc wszystko, co musisz zrobić, to zapytać. Zwykle jest to bezpłatne, ale niektóre mogą pobierać niewielką opłatę.
Mając to na uwadze, przyjrzyjmy się krokom, które omówimy, aby przenieść WordPressa na nowy serwer hostingowy (bez żadnych przestojów):
Gotowy? Zaczynajmy.
Krok 1: Wybierz twój nowy hosting WordPress
Jeśli utknąłeś na powolnym hoście nawet po zoptymalizowaniu szybkości i wydajności WordPressa, to nadszedł czas, aby przenieść twoją witrynę WordPress na nowego hosta, który poradzi sobie z rosnącym ruchem.
Szukając nowego dostawcy hostingu WordPress, ważne jest, aby wybierać ostrożnie, aby nie musieć ponownie przenosić się w najbliższym czasie.
Oto kogo polecamy:
- W przypadku niezawodnego hostingu współdzielonego zalecamy skorzystanie z Bluehost. Są oni oficjalnie rekomendowani przez WordPress.org. Korzystając z naszego kuponu Bluehost, użytkownicy WPBeginner otrzymują do 75% zniżki i darmową nazwę domeny.
- W przypadku szybszego hostingu współdzielonego polecamy Hostinger. Są to jedne z najlepszych firm hostingowych WordPress i oferują szybsze serwery z doskonałą pomocą techniczną.
- Jeśli szukasz hostingu w chmurze lub dostawców specyficznych dla lokalizacji, zalecamy sprawdzenie SiteGround. Mają centra danych na trzech różnych kontynentach.
- Jeśli szukasz zarządzanego hostingu WordPress, zalecamy sprawdzenie WP Engine. To najlepszy i najbardziej znany dostawca w branży.
Po zakupie twojego nowego hostingu NIE instaluj WordPressa. Zrobimy to w późniejszym kroku.
Na razie twoje nowe konto hostingowe powinno być puste, bez plików i katalogów w katalogu głównym.
Krok 2: Konfiguracja Duplicatora w celu łatwej migracji
Pierwszą rzeczą, którą musisz zrobić, jest zainstalowanie i włączanie wtyczki Duplicator na witrynie internetowej, którą chcesz przenieść. Aby uzyskać więcej informacji, zobacz nasz przewodnik krok po kroku, jak zainstalować wtyczkę WordPress.
Duplicator to najlepsza wtyczka do migracji WordPress na rynku. Wtyczka ta oferuje również zautomatyzowane tworzenie kopii zapasowych, pomoc techniczną w zakresie przechowywania danych w chmurze, przywracanie jednym kliknięciem i inteligentne migracje.
Uwaga: Duplicator ma również darmową wersję o nazwie Duplicator Lite. Może być używana do przenoszenia witryny, ale ma ograniczone funkcje w porównaniu do wersji pro.
Po zainstalowaniu i aktywowaniu Duplicatora przejdź do strony Duplicator ” Kopie zapasowe w obszarze administracyjnym WordPress.
Następnie należy kliknąć przycisk “Dodaj nowy” w lewym górnym rogu.
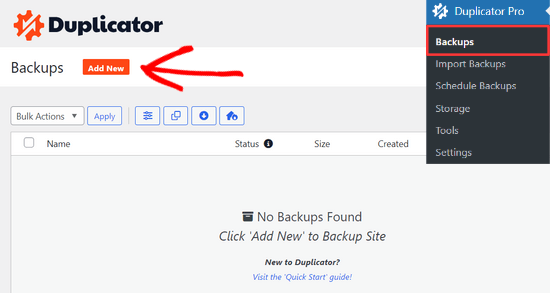
Spowoduje to uruchomienie kreatora kopii zapasowych aplikacji Duplicator.
Na następnym ekranie można wprowadzić nazwę kopii zapasowej lub użyć tagów dynamicznych, aby automatycznie utworzyć format nazwy, taki jak data i tytuł witryny.
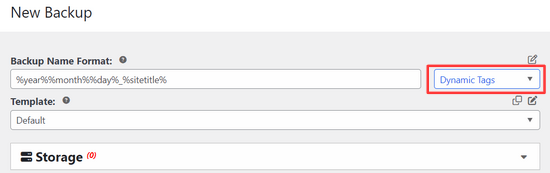
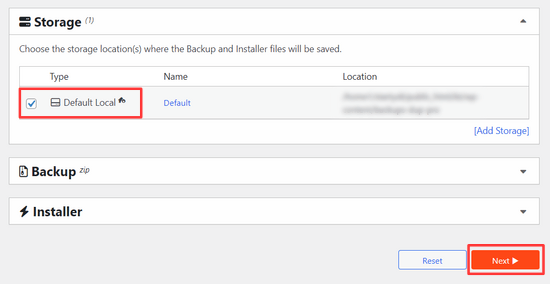
Następnie możesz rozwinąć sekcję “Storage”, aby wybrać lokalizację przechowywania. W tym poradniku użyjemy domyślnej lokalizacji, ale możesz dodać nową lokalizację, taką jak Dropbox lub Google Drive, klikając link “Dodaj pamięć”.
Wystarczy kliknąć przycisk “Dalej”, aby kontynuować.
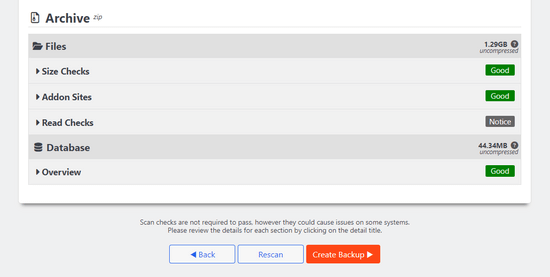
Następnie Duplicator przeskanuje twój system, aby upewnić się, że wszystko jest w porządku, aby przygotować pakiet.
Upewnij się, że wyniki skanowania są prawidłowe (wszystko powinno być “Dobre”), a następnie kliknij przycisk “Utwórz kopię zapasową”.
Proces może potrwać kilka minut, więc pozostaw kartę otwartą, gdy wtyczka wykona swoją pracę.
Po zakończeniu procesu pojawią się opcje pobierania instalatora i pakietu archiwum. Należy kliknąć przycisk “Pobierz”, a następnie wybrać opcję “Oba pliki”.
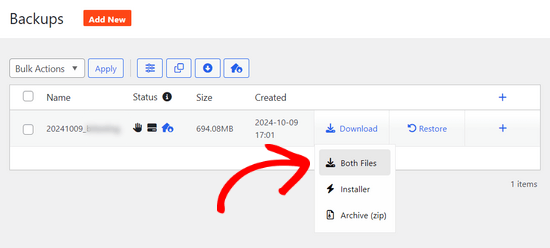
Plik archiwum jest kopią twojej kompletnej witryny internetowej, a plik instalatora zautomatyzuje proces instalacji.
Krok 3: Importowanie twojej witryny WordPress na nowego hosta
Po pobraniu zarówno archiwum, jak i plików instalatora, następnym krokiem jest przesłanie ich na twój nowy hosting.
Możesz to zrobić, łącząc się z twoim nowym hostingiem za pomocą FTP.
Jeśli nigdy wcześniej tego nie robiłeś, zapoznaj się z naszym przewodnikiem dla początkujących na temat przesyłania plików przez FTP do WordPress.
Zwykle podczas łączenia się z klientem FTP jako hosta wpiszesz nazwę domeny twojej witryny internetowej.
Ponieważ jednak nazwa domeny nadal wskazuje na starego hosta, musisz połączyć się, wpisz adres IP lub nazwę hosta twojego serwera.
Informacje te można znaleźć w kokpicie panelu sterowania twojego nowego konta hostingowego.

Jeśli nie jesteś w stanie znaleźć tych informacji, możesz poprosić o pomoc techniczną twoją nową firmę hostingową, a oni ci pomogą.
Korzystając z klienta FTP, należy przesłać zarówno plik installer.php, jak i archiwum .zip do katalogu głównego twojej witryny internetowej.
Zazwyczaj jest to katalog /username/public_html/.
Ponownie, jeśli nie masz pewności, zapytaj swoją firmę hostingową.
Upewnij się, że twój katalog główny jest całkowicie pusty. Niektóre firmy hostingowe automatycznie instalują WordPress podczas rejestracji.
Jeśli masz zainstalowanego WordPressa w twoim katalogu głównym, to musisz go najpierw usunąć.
Gdy to zrobisz, musisz przesłać zarówno plik zip archiwum, jak i plik installer.php do katalogu głównego twojej witryny.
Krok 4: Zmiana pliku Hosts w celu uniknięcia przestojów
Po przesłaniu obu plików na twój nowy hosting, musisz uzyskać dostęp do pliku installer.php w przeglądarce.
Zwykle dostęp do tego pliku można uzyskać za pomocą adresu URL, takiego jak ten:
http://www.example.com/installer.php
Jednak ten adres URL przeniesie Cię do Twojego starego hosta i otrzymasz błąd 404. Wynika to z faktu, że twoja nazwa domeny nadal wskazuje na starego hosta.
Zwykle inne poradniki mogą powiedzieć ci, abyś zmienił serwery nazw domeny i skierował ją do nowej firmy hostingowej, ale to błąd.
Jeśli zrobisz to teraz, Twoi odwiedzający zobaczą uszkodzoną witrynę internetową podczas migracji.
Pokażemy ci, jak możesz tymczasowo uzyskać dostęp do nowej witryny na swoim komputerze, nie mając wpływu na twoją starą witrynę.
Odbywa się to za pomocą pliku hosts na twoim komputerze.
Plik hosts może być używany do mapowania nazw domen na określone adresy IP. Innymi słowy, pozwala oszukać twój komputer, by myślał, że witryna internetowa jest przeniesiona, nawet jeśli tak nie jest.
Przyjrzyjmy się, jak dodać wpis dla twojej domeny w pliku hosts, aby wskazywał na twoją nową firmę hostingową.
Wprowadzenie tych zmian pozwoli ci uzyskać dostęp do plików na nowym hoście przy użyciu własnej nazwy domeny, podczas gdy reszta świata nadal będzie uzyskiwać dostęp do twojej witryny ze starego hosta. Zapewnia to 100% bezawaryjność.
Pierwszą rzeczą, którą należy zrobić, jest znalezienie adresu IP nowego serwera WWW.
Aby to znaleźć, musisz logować się do kokpitu cPanel i kliknąć odnośnik rozwiń statystyki w lewym panelu bocznym. Adres twojego serwera będzie wymieniony jako “Współdzielony adres IP”.
Przykładowo, na Hostingerze adres IP twojego serwera znajdziesz w szczegółach planu hostingowego.

Jeśli korzystasz z komputera z systemem Windows, musisz otworzyć aplikację Notatnik z uprawnieniami administratora.
Wystarczy kliknąć przycisk “Start”, a następnie wyszukać aplikację Notatnik. Kliknij prawym przyciskiem myszy ikonkę aplikacji Notatnik, a następnie wybierz opcję “Uruchom jako administrator”.

Pojawi się monit UAC systemu Windows i należy kliknąć “Tak”, aby uruchomić Notatnik z uprawnieniami administratora.
Na ekranie Notatnika przejdź do Plik ” Otwórz, a następnie przejdź do katalogu C:\Windows\System32\drivers\etc. Z tego katalogu wybierz plik hosts i otwórz go.
Jeśli korzystasz z komputera Mac, musisz otworzyć aplikację Terminal i wpisz to polecenie, aby edytować plik hosts:
sudo nano /private/etc/hosts
Zarówno w przypadku użytkowników systemu Windows, jak i komputerów Mac, w dolnej części pliku hosts należy wpisać skopiowany adres IP, a następnie wpisz nazwę twojej domeny. Na przykład:
192.168.1.22 www.example.com
Upewnij się, że zastąpiłeś adres IP tym, który skopiowałeś z cPanelu, a example.com twoją własną nazwą domeny.
Gdy skończysz, zapisz swoje zmiany.
Możesz teraz uzyskać dostęp do swoich plików na nowym hoście, używając nazwy domeny na twoim komputerze.
Ważne: Nie zapomnij cofnąć zmian wprowadzonych w pliku hosts po zakończeniu migracji (krok 6).
Krok 5: Tworzenie bazy danych MySQL na twoim nowym hoście
Zanim uruchomimy instalator na nowym hoście, należy utworzyć bazę danych MySQL na nowym koncie hostingowym. Jeśli już utworzyłeś bazę danych MySQL, możesz przejść do następnego kroku.
Tworzenie bazy danych w cPanel
Przejdź do kokpitu cPanel twojego nowego konta hostingowego, przewiń w dół do sekcji Bazy danych i kliknij ikonkę “Bazy danych MySQL”.

Pojawi się pole do utworzenia nowej bazy danych.
Wpisz nazwę twojej bazy danych i kliknij przycisk “Utwórz bazę danych”.

Po utworzeniu bazy danych MySQL należy przewinąć w dół do sekcji Użytkownicy MySQL.
Następnie podaj nazwę użytkownika i hasło dla twojego nowego użytkownika i kliknij przycisk “Utwórz użytkownika”.

Następnie musisz dodać tego użytkownika do twojej bazy danych. Dzięki temu utworzona nazwa użytkownika będzie miała wszystkie uprawnienia do pracy w bazie danych.
Można to zrobić, przewijając w dół do sekcji “Dodaj użytkownika do bazy danych”. Wystarczy wybrać utworzonego użytkownika bazy danych z menu rozwijanego obok użytkownika, a następnie wybrać bazę danych i kliknąć przycisk “Dodaj”.

Twoja baza danych jest teraz gotowa do użycia z WordPressem. Pamiętaj, aby zanotować nazwę bazy danych, nazwę użytkownika i hasło. Informacje te będą potrzebne w następnym kroku.
Krok 6: Rozpoczęcie procesu migracji do aplikacji Duplicator
Teraz jesteśmy gotowi do uruchomienia instalatora. Przejdź do następującego adresu w oknie przeglądarki, zastępując example.com nazwą twojej domeny:
http://www.example.com/installer.php

Instalator przeprowadzi kilka testów i wyświetli komunikat “Pass” obok testów archiwizacji i walidacji.
Należy zaznaczyć pole wyboru taksonomii i kontynuować, klikając przycisk “Dalej”.
Teraz zostaniesz poproszony o wpisz swojego hosta MySQL, nazwę bazy danych, nazwę użytkownika i hasło.
Twoim hostem będzie prawdopodobnie localhost. Następnie wpiszesz szczegóły bazy danych, którą utworzyłeś w poprzednim kroku.

Następnie Duplicator musi sprawdzić, czy może połączyć się z bazą danych i czy jest w stanie uruchomić instalację.
Kliknij przycisk “Zatwierdź” na dole, aby kontynuować.

Jeśli Duplicator jest w stanie się połączyć, wyniki testu zostaną wyświetlone jako Pass.
Możesz teraz zaznaczyć pole wyboru warunków i powiadomień i kliknąć przycisk “Dalej”.

Kliknij przycisk “Dalej”, aby kontynuować.
Duplicator będzie teraz importować twoją bazę danych WordPress z archiwum zip do nowej bazy danych.
Następnie zostaniesz poproszony o zaktualizowanie adresu URL witryny lub ścieżki. Ponieważ nie zmieniasz nazwy domeny, NIE musisz niczego tutaj zmieniać.
Wystarczy kliknąć przycisk “Dalej”, aby kontynuować.
Duplicator wykona ostatnie kroki i wyświetli przycisk logowania.

Możesz teraz logować się do twojej witryny WordPress na nowym hoście, aby upewnić się, że wszystko działa zgodnie z oczekiwaniami.
Krok 7: Zaktualizuj swoje serwery nazw domen (DNS)
W tym momencie utworzyłeś pełną kopię bazy danych i plików WordPress na nowym serwerze WWW, ale twoja domena nadal wskazuje na stare konto hostingowe.
Aby zaktualizować twoją domenę, musisz zmienić serwery nazw DNS. Dzięki temu użytkownicy będą przekierowywani do nowej lokalizacji Twojej witryny internetowej po wpisaniu Twojego rodzaju domeny w przeglądarce.
Jeśli zarejestrowałeś swoją domenę u dostawcy hostingu, to najlepiej przenieść ją do nowego hosta.
Z drugiej strony, jeśli korzystasz z rejestratora domen, takiego jak Domain.com, GoDaddy lub Network Solutions, musisz zaktualizować twoje serwery nazw.
Będziesz potrzebował informacji o serwerze nazw DNS od twojego nowego hosta. Zazwyczaj jest to kilka adresów URL, które wyglądają następująco:
ns1.hostname.comns2.hostname.com
Na potrzeby tego przewodnika pokażemy, jak zmienić serwery nazw DNS w GoDaddy.
W przypadku innych dostawców hostingu zapoznaj się z naszym przewodnikiem na temat zmiany serwerów nazw domen.
W zależności od Twojego rejestratora domen lub hosta internetowego, zrzuty ekranu mogą wyglądać inaczej. Jednak podstawowa koncepcja jest taka sama.
Należy poszukać obszaru zarządzania domeną, a następnie serwerów nazw. Jeśli potrzebujesz pomocy w aktualizacji serwerów nazw, możesz zwrócić się do twojej firmy hostingowej.
W przypadku GoDaddy należy logować się na twoje konto GoDaddy, a następnie kliknąć “Domeny”.
Następnie należy kliknąć przycisk “Zarządzaj” obok nazwy domeny, którą chcemy zmienić.

Przejdź do sekcji “Ustawienia dodatkowe”.
Następnie należy kliknąć “Zarządzaj DNS”, aby kontynuować.

Następnie należy przewinąć w dół do sekcji “Serwery nazw”.
Tutaj kliknij przycisk “Zmień”.

Najpierw należy zmienić rodzaj serwera nazw z “Domyślny” na “Własny”.
Następnie możesz wypełnić informacje o nowym dostawcy hostingu w sekcji Serwery nazw.

Nie zapomnij kliknąć przycisku “Zapisz”, aby zapisać twoje zmiany.
Udało Ci się zmienić serwery nazw w Twojej domenie. Propagacja zmian DNS dla wszystkich użytkowników może potrwać od 4 do 48 godzin.
Ponieważ twoja treść jest taka sama na starym i nowym hoście, użytkownicy nie zobaczą żadnej różnicy. Twoja migracja WordPress będzie płynna i nie spowoduje żadnych przestojów.
Aby być bezpiecznym, zalecamy, aby poczekać z anulowaniem starego konta hostingowego do 7 dni po twojej migracji.
Często zadawane pytania
Oto kilka pytań, które wielu naszych użytkowników zadaje podczas przenoszenia WordPressa z jednego hosta na inny.
1. Jak przenieść witrynę internetową WordPress na inny hosting?
Migracja witryny internetowej WordPress polega na przeniesieniu plików WordPress i bazy danych ze starego hostingu do nowego dostawcy hostingu.
Niektóre firmy hostingowe oferują również bezpłatne usługi transferu witryn internetowych, ale trzeba je o to zapytać. Alternatywnie można to zrobić samodzielnie, przenosząc pliki za pomocą klienta FTP i importując bazę danych za pośrednictwem phpMyAdmin.
2. Czy mogę przenieść moją witrynę WordPress do innego dostawcy hostingu?
Tak, możesz przenieść swoją witrynę WordPress do innego dostawcy hostingu.
3. Czy mogę zarejestrować nowe konto hostingowe bez rejestracji nazwy domeny?
Tak, absolutnie można założyć konto hostingowe bez rejestrowania nazwy domeny.
Nazwa domeny i hosting to dwie różne usługi i niekoniecznie trzeba rejestrować nazwę domeny podczas rejestracji nowego hosta. Więcej szczegółów można znaleźć w naszym przewodniku na temat różnicy między nazwą domeny a hostingiem.
Niektórzy dostawcy hostingu proszą o wybranie nazwy domeny jako pierwszego kroku przy zakupie hostingu. Pozwolą ci również wpisz nazwę domeny, jeśli już ją posiadasz.
4. Czy muszę przenieść nazwę domeny do nowego hosta?
Nie, nie musisz przenosić swojej domeny na nowy hosting. Jednak przeniesienie nazwy Twojej domeny na nowy hosting ułatwi jej odnowienie i zarządzanie nią w ramach tego samego kokpitu, co nowe konto hostingowe.
Więcej informacji na ten temat można znaleźć w naszym przewodniku po nazwach domen i ich działaniu.
5. Jak poprawić błąd nawiązywania połączenia z bazą danych w programie Duplicator?
Jeśli widzisz błąd połączenia z bazą danych lub błąd połączenia z bazą danych w Duplicator, to prawdopodobnie wpiszesz nieprawidłowe informacje dla twojego połączenia z bazą danych.
Upewnij się, że twoja nazwa bazy danych, nazwa użytkownika MySQL i hasło są poprawne. Niektóre firmy hostingowe nie używają localhost jako hosta dla swoich serwerów MySQL. W takim przypadku należy poprosić obsługę techniczną dostawcy hostingu o podanie prawidłowych informacji.
6. Jak sprawdzić, czy moja witryna internetowa wczytuje się z nowego hostingu?
Istnieje kilka narzędzi online, które pozwalają sprawdzić, kto hostuje witrynę internetową. Po przeniesieniu twojej witryny internetowej do nowego hosta, możesz użyć dowolnego z tych narzędzi, a pokażą ci one nazwę firmy hostingowej hostującej twoją witrynę.
Jeśli nie minęło dużo czasu od migracji witryny internetowej i wprowadzenia zmian na serwerze nazw domen (DNS), istnieje prawdopodobieństwo, że twoja witryna może nadal wczytywać się ze starego hosta. Pełna propagacja zmian nazwy domeny może zająć do 48 godzin.
7. Czy muszę usunąć jakieś pliki lub dane ze starego hosta?
W przypadku zmiany firmy hostingowej zalecamy zachowanie Twojej starej witryny internetowej przez co najmniej tydzień. Po tym czasie możesz usunąć pliki ze starego hostingu. Jeśli rezygnujesz z konta, dostawca hostingu usunie wszystkie Twoje dane zgodnie ze swoją polityką.
8. Jak długo powinienem włączać konto na starym hoście?
Po migracji twojej witryny internetowej do nowego hosta i jeśli nie masz żadnych innych witryn internetowych hostowanych przez starego hosta, możesz anulować stare konto hostingowe.
Jednak w niektórych przypadkach możesz już zapłacić za roczny hosting. Powinieneś sprawdzić ich politykę zwrotów, aby sprawdzić, czy kwalifikujesz się do zwrotu pieniędzy po anulowaniu.
9. Jak przenieść witrynę WordPress z SSL/HTTPS?
Będziesz musiał zainstalować certyfikat SSL u nowego dostawcy hostingu. Następnie możesz wykonać te same kroki, o których mowa powyżej. Upewnij się tylko, że używasz HTTPS w adresach URL, takich jak https://example.com.
10. Bonus: Bezpłatna migracja witryny przez twojego nowego hosta
Jeśli chcesz zmienić swój hosting, ale powyższe kroki brzmią zbyt skomplikowanie, możesz wybrać następujących dostawców, którzy przeprowadzą migrację Twojej witryny internetowej.
SiteGround, Hostinger i WP Engine oferują darmową migrację witryny internetowej dla użytkowników WPBeginner.
Mamy nadzieję, że ten poradnik pomógł ci przenieść WordPressa na nowy hosting bez żadnych przestojów. Jeśli napotkasz jakiekolwiek problemy podczas migracji WordPressa, możesz również zapoznać się z naszym wyborem najlepszych tanich hostingów WordPress lub naszym przewodnikiem po najczęstszych błędach WordPressa i sposobach ich poprawki.
If you liked this article, then please subscribe to our YouTube Channel for WordPress video tutorials. You can also find us on Twitter and Facebook.
 in 2024")
")


Shane
In the next step, Windows users need to go to Programs » All Programs » Accessories, right click on Notepad and select Run as Administrator. A Windows UAC prompt will appear, and you need to click on Yes to launch Notepad with administrator privileges.
On the Notepad screen, go to File » Open and then go to C:\Windows\System32\drivers\etc. Select hosts file and open it.
I’m having trouble with this step. Can anyone shed any light?
WPBeginner Support
Hi Shane,
You just need to open the Notepad app as an administrator so that you can edit the hosts file.
Admin
Shane
Oh, just microfosft simple wordpad and then “run as administrator”?
Is that all I have to do?
Muhammed Shabeer
Thanks for the wonderfull trick. Exactly the trick was intented to migrate WordPress to new host, but I used for migrating from root to subdomain/subfolder. It done successfully with the plugin. Thank for sharing the trick.
Kenneth Aycox
Thank you for a wonderful product! worked perfect.
James Crow
Briliiant! Thanks so much, I’ve just moved a few sites without any problem at all.
Max
Sadly, this didn’t work for me either. I deleted all the website files as directed , uploaded to the installer.php file and package but when I went to website.com/installer.php I was served a 404 error: Not Found
The requested URL /installer.php was not found on this server.
I think it’s easier to just transfer the website the old fashioned way, as others have mentioned. No need for any scripts that might not work.
Max
Please disregard my comment. I later noticed the root folder was set to httpdocs. So created a folder, named it httpdocs and put the package and installer.php in there. Then the website.com/installer.php worked no problem. All went very smoothly thereafter.
Nandan Jha
Hello Max,
Actually it did work for me in the end. I am guessing that you moved the installer and archive to your new host , correct ?
Please look up the IP address from cpanel or equiv of the new host and try accessing via the IP address
http://IPAddress/installer.phpKB
Seems like a good tutorial, but I had no luck with it. There are also a few steps/screens in the Duplicator sequence that were different from mine. The end result was, I got a 404 error upon clicking Site Login – Login to finalize the setup in Step 4 of 4 of the Test Site screen. This differs substantially from the above. Top right corner there’s a version number of 1.2.30. Fairly certain I have the most up to date version of the plugin. If I use File Manager to view the contents of public_html I don’t see the normal list of wp files that I think I should see aside from a wp-snapshots directory, a few web.config files, some installer files and the archive.zip…oh and database.sql. So something has clearly gone wrong, but I’m at a loss to understand what. So…there it is.
Stephen Duffield
Let me guess, you tried to move from a WordPress.com site? Duplicator & Duplicator Pro wont work for wp.com sites. Nothing works unless you use one of two host sites that they recommend. Duplicator after lots of help, ended up giving me a refund.
Rob
Hey, Just wanted to say thanks for this tutorial. Went perfectly smoothly and would use this duplicator again
Nandan Jha
Great article.
Friends, How do I make it work for an Addon Domain. I took a new plan with GoDaddy and now need to move my sites there. What entry do I make in my hosts file to navigate to install.php ? Thank you,
Nandan Jha
I tried it with my AddOn Domain. It worked for me over a couple of iterations. The thing to take care of is to supply the right ‘domain name’ at Step 3 (or Step 4). The default value which it picks is ‘primarydomain.com/addondomain’. Delete the default value and put addondomain.com
Thanks.
Sean
I recently switched hosts and my original hosting plan has expired. I failed to create a back up before it expired. I do have a local copy of my site on my computer (I use Dreamweaver for FTP). Is there any way to recreate the site with the local files?
Thanks.
Dave Porter
Hi Sean,
Try using WayBack Machine – it takes snapshots of websites over time…
You may be able to grab the source code, images etc… and recreate it from that. I’ve had to do that a few times for clients who have come to me after they have lost contact with their developer…
HTH, Dave
Miki
Hi there,
I have used the Wayback machine and was able to make a copy of my site. Unfortunately I have found myself involved with an unsavory company that had other plans for my business (selling their services on my site) without full disclosure in the beginning. I am now tasked with finding a new programmer to finish the site although it is in wordpress. I do not have wordpress at this time as I was not developing the site; however my understanding from these posts is that if I move the site to another host, I should be able to access wordpress. Is that correct?
WPBeginner Support
Hi Miki,
Yes you can move an existing WordPress website to any other host.
Michael
update…
it works….
be careful with IP address information…. you should read the information carefully…
Thanks
Michael
No luck..
After change the host file, my browser shows message:
This site can’t be reached
example.com took too long to respond.
Search Google for idea inspirations
ERR_CONNECTION_TIMED_OUT
I did flush dns, net stop, dan net start and restart my computer & modem, still not working…
Navajo
I have another question:
In the text it says:
“At this point, you’ve created a complete copy of your WordPress database and files on your new hosting server. But your domain still points to your old web hosting account.
To update your domain, you need to switch your DNS nameservers. This ensures that your users are taken to the new location of your website when they type your domain into their browsers.
If you registered your domain with your hosting provider, then it’s best to transfer the domain to the new host.”
I thought that when i buy a new hosting space, i also and immediatly have to name a doman name. As in: buying a hosting space is always linken to buying a domain. So the new ip addres which i have uploaded my old site to, and which i have to link to my old doman name, already HAS a (newly bought) domain name.
Or can i buy a hosting space, ánd get an IP address which i can use in this tutorial, without it already having a domain name?
Regards, Navajo
WPBeginner Support
Hi Navajo,
It is a common misconception. Hosting and domain name are two different services and you can buy them from two different companies. On the same page where hosting companies offer you to register domain name, they also show another option to indicate that you already have a domain name and you can continue without registering a new one.
For more details please see our detailed guide on What is a domain name and how do domains work?
Admin
Uldis
this is really profound stuff. I was just scratching my head how to migrate client’s site without interruption while changing name servers. Eternally grateful!
Shadat
Hello, I face the database connection failed problem.
can you plz help me? plz
see the screenshots
Dave Porter
Shadat – this is quite an old article now – and you don’t give very much to go on – I would seek help from your hosting company, or get onto a WordPress discussion forum where there are active people who may be able to help you.
But if you are getting a database connection error message, it is generally because the database name/user or password is incorrect
I would try one of the backup tools like Duplicator and see if that works better for you.
Slade
Did you set up a new database and user on your new host?
You must make sure the database name and user and password are all correct for the new host.
Usually a database connection error is a simple oversight like a mispelling or something simple like that.
Michael Goriany
Thanks for this excellent tutorial
If I have well understood, the hosts file (Step 4) is providing for 100% uptime only for the Webmanager but not for the public
How can the DNS switchover time be shortened, or how can the downtime for the public be avoided ?
Slade
Editing the host file allows you to see your site at your new host. Until you update your dns nameservers the public will go to the old host.
The time it takes for dns changes to updare (propagate) is not something that can be controlled. However this guide is correct in providing a no down time solution.
What is happening on the backend that the public does not see is that your website is being hosted at two hosts. The nameservers tell the public which host they are viewing the site on. During the dns update process the users will still view the site at the old host until the propogation is complete.
Once the dns change officially kicks in the public will then be viewing the site at your new host.
Again, to provide the no downtime transfer you would need to change your host file on your local machine (tells your computer you want to view the site at the new host).
This allows you to do the actual install of your website on the new host.
Hope that helps
Lydia
i had to move a client’s site off our subdomain into their own hosting overnight and this REALLY REALLY saved my life! Especially as the domain needed to be repointed seamlessly! I only had trouble with the FTP, i dunno what was wrong with all the logins but i couldn’t get it working. Thankfully my hoster always has an awesome file manager on cpanel.
So yes, very nearly seamless, i’m just testing out the contact forms now which seems to need the DNS switchover time in order to function properly…
And one thing to add, Duplicator has changed the SQL database setup to Step 2 in their latest version, which really made me freak out a bit there.
Thanks very much for the detailed and extremely godsent tutorial!
Kurt
I’m getting ready to follow this tutorial. One question: I am switching servers but also am switching domain names. Should I change my website address in the WP admin settings before running duplicator or after? (Does the order matter?) Thanks!
Johel Fernandez
This tutorial worked out perfectly by April, 2017. ¡Thank you so much!
Ravijit
Hey,
I used this plugin so many times. even, once i used it for too. I really like this plugin but, the problem is it do not extract the big package. We’ve to manually unzip it or need to upload unzipped data to the new hosting.
Any fix for that? Reply as soon as possible.
Archit
Duplicator doesn’t work properly with GoDaddy’s cPanel Linux Hosting service. Script gets terminated even if the settings in php.ini are changed. Please suggest what to do to make Duplicator work there? If not possible, what would be the best alternative?
Hernan
Hi Archit,
I’ve just migrated a site to godaddy and it worked just fine. Which part failed?
best
Hernán
Susan Taunton
This GREAT tutorial successfully guided me through my very first migration of a WordPress site to a different host! Especially life saving was the instruction about changing “sudo nano /private/etc/hosts” in Terminal – worked like a charm. wpbeginner.com has the most succinct, articulate and smart tutorials, which I have come to depend on.
Thank you!!!!
Susan
Prinze
hi, pls have been having issues uploading my site to s new server using FTP client, my hosting company tried to give tutorials on how to transfer with no result.
the tutorials am getting from your site is abt using a duplicate plugin. my site is down, i can’t access my wp-admin to install the plugin.
i use a backup plugin when my site is up so i have a backup file from the plugin i used n also i did a cpanel backup from my old server.
pls, i need a tutorial hoe to upload my backup files to my new server, which one is best to upload?
the plugin backup or the cpanel backup…
pls help!
Greg Draven
What backup plugin did you use?
Ritadrik Chowdhury
Hi Sir,
I am stuck up with 3rd part which is verification part. I have changed the permalinks and I can see the dashboard as usual but the site is not running. Whenever I am clicking on “TEST SITE” it returns error 404: File Not Found. I tried their help documents. Made changes as usual but no luck. Can you please help me out?
saurabh shelar
Hello Sir. I am saurabh from India. I love your website. I have a blog about software review. And I saw your posts and observe that you edited image in microscope effect. This is really fantastic. Can you please tell me how you do this or please make tuts for this please.
Thank you.
WPBeginner Support
Hi Saurabh,
Thanks for the kind words. There are actually tons of tutorials already. Try searching for how to add magnifying glass effect in Photoshop.
Admin
Brad
Hello,
I have a situation where it would be ideal to have the database on separate hosting. Just because the host of the current site does not offer mysql. I cannot move the site (for a company)
Can I install wordpress on current hosting in a sub domain and have the database on another host? I have never used anything except “localhost” in the wp-config file? Thank you!
Sachin
php not supported they are giving reason?? what to do??
Samuel
Does it work on addon domain?
Because there is this step
“Make sure that your root directory is completely empty. If you have WordPress installed in your root directory, then you need to delete WordPress first”
While my primary domain is already up and running
Cory
This is a well put together article, nice job guys!
Just as an FYI for users reading through the comments, any comment pre-dated 12-6-2016 does not pertain to the article above or the Duplicator plugin specifically.
This article was originally written using the Backup Buddy plugin and has since been updated and rewritten using the Duplicator plugin. This should help clear-up any confusion should some of the comments not really make sense or refer to topics not covered in the article.
Mark Rudder
This is an excellent tutorial.
I also believe this is the easiest and fastest way to to migrate a site.
Migrating DB files and tables with phpMyAdmin is the long way around.
Using Duplicator or BackupBuddy is way less work and you are less prone to mistakes that way.
You need to change DNS no matter what method you choose, so that aspect can’t be counted as far as which method is best.
Changing TTL settings to 1 hour (3600 seconds) as Dave Porter pointed out is the only missing piece of the puzzle. (even though that is not essential to success)
Augusto
Nice article, guys!
I feel that the most critical point migrating a site to another host is the email service. If the default email solution provided by host need to be replaced, a lot of work will came.
Anyone want to share your workflow to do this kind of thing?
Thanks!
Frans Kemper
hello,
Would this procedure also work for sub domains?
I have an add on domain to transfer with about 10 related sub domains.
Thank you
Dave Porter
A few days before I move a domain, I go into the DNS settings and change the TTL settings to 1 hour (3600 seconds), so that the site will move quickly (and do it overnight – so the new location will show for everyone in the morning)
(I was expecting this to be mentioned in the article when I saw the title!)
And to answer Dave’s question you can have as many entries in your Hosts file as you want – I have a reseller account with my hosting company and I’m often working on 2 or more sites I am working on that are located on a different server. You can’t specify a sub-directory in the entry – the one entry will point to all locations for that domain – to do what you want to do you are better using sub-domains – so for example example.com is the main location, then you can have play1.example.com as a sub domains that will have it’s own hosts entry.
Harindepreet singh
I think you should make a video or attach screenshots
David in Mississippi
Another article – directly related to this one, but sufficiently different to warrant its own separate article – would be “Replacing A Legacy Website with a Fully-Developed WordPress Website.”
This has happened to me several times already. I have clients with older, legacy-type (non-WordPress) websites, and they ask me to convert their site to WordPress.
I have two methods I use to do this, and one of them involves building the brand new WordPress site on a temporary development URL. When it is done, I then need to transfer it to the existing URL for the client.
In other words, I develop it at DevelopmentSite, and when it is done, I then move it to ExistingLegacySite
I should think it would be easier to do this than the procedure outlined in your article above, but it would still be helpful for you to do an article on this type of migration.
Thanks.
Dave
Correct me if I’m missing something, but this ‘hosts file change’ will only work if you have a just one site on your plan at that new IP address. I have several low-usage sites I’m hosting on one plan. They are in subdirectories under phulic_html.
So doing this:
192.168.1.22 http://www.example.com
in the hosts file will not specify which of your 5 sites to point to. And it seems the only thing you can specify in the hosts file is an IP address and a URL.
You can’t do something like this:
192.168.1.22/sitea http://www.example.com
Am I wrong?
Felipe
I think this is correct, it won’t work for shared domains.
It is better explained here: the voted answer says “If you have shared hosting, this will make your site inaccessible by direct IP. In a shared hosting environment, the host (GoDaddy) will have multiple websites living at the same IP address. When a browser requests a website, the server relies on the domain name to determine which of the many websites to serve. Without a domain name, the server has no way to tell what the browser actually wants so you don’t get your website. To avoid this situation, you will need a host to give you exclusive use of an IP address.”
I think this should be highlighted in the article.
WPBeginner Support
Once you have added your domain name to your new host, your webserver knows that it is hosting domain name example.com and it’s root directory (Doesn’t matter if it is also hosting other domains as well). However, DNS servers take time to propagate so instead of sending your request to your new webserver, they will be sending users to old location for a while. The hosts file allows you to send your request directly to the new server. Hope this clears the confusion.
Admin
Matt Davis
Correct me if I’m wrong, but I believe you can type in (directly in the browser’s address bar) the IP address followed by a slash (/) and then the sub-directory of whichever site you’re trying to access. I would avoid changing the hosts file altogether. Most hosting companies I’ve used will also usually assign temporary URLs to each new website as well, so if that’s the case you could use that instead of the IP or messing with the hosts file.
Niko
That’s correct MATT. Temporary using the IP address instead of altering the hosts file seems like a better approach. However, both work fine.
Vyse
hello. good article but what about wp multisite?
Tanisia
I’ve tried for four hours to make these instructions work. The result? Now I can’t access my site at my old host. I tried following the directions on this 2-year-old article (will there be an update, since BackupBuddy has evolved?) and now everything is messed up.
I used FTP to upload the files, and edited the host file as instructed, but the ImportBuddy PHP script won’t run. It just shows me the code. I tried contacting Bluehost for assistance, and they were no help. So I tried setting all my other settings back to where they were before I started this odyssey, and now I can’t see my site at all. Not the Admin panel, nothing.
WPBeginner Support
Tanisia, please refer to our guide on what to do when you are locked out of WordPress admin area.
Admin
Tanisia
I’m back in at my old host – my servers needed to re-propagage from Bluehost, and it took longer than I had anticipated. I’m still left with BackupBuddy not working the way it’s supposed to. Again, do you have updated instructions from 2014, since there have been several updates to BackupBuddy since this was written? When I did the Notepad update in Windows 10, it looked different from what was described here, so I couldn’t be sure if that trick worked.
Thank you for answering back.
Fahim
If it was a primary domain , can i follow this Process? I need to move and that domain is Main/primary domain, how can i move,will u plz help me?
Mark
Just stuck i step 4, can i just simply addon domain and change dns in new host, ? Following that, C:\Windows\System32\drivers\etc. , there is nothing in my etc, nothing like hosts file, btw great tutorial easy to fallow, thanks
Jacob
I was hoping there would be an easier way to do it with a third party service, but I’m not about to shell out 80 bucks just to do that.
Ash
The backupbuddy steps in the new version have changed quite a bit. Nothing to be afraid of though. I was able successfully migrate from t1.micro on aws to t2.small instance. So far so good.
David
A few questions for you:
1. Isn’t there a SIMPLE way to back up one site (themes, child themes, plugins, and post data), then restore it to another site?
It truly should be as simple as (a) Backup To (dropbox mysite.zip), then (b) Restore From (dropbox mysite.zip).
2. Is it possible, perhaps even EASY, to develop a client’s WP site on your development server, then use Backup Buddy (or some other backup/restore program) to migrate it to the client’s site?
3. Does Backup Buddy, or any other backup/restore program you know of, give you the ability to restore to an existing WP installation? In other words, can you set it to restore everything except the WP core files?
Thanks for this article.
David in Mississippi
WPBeginner Support
Actually, in the article we have shown how BackupBuddy does exactly what you are asking for. You simply backup your site, download an archive file and an importer file. Upload these files to the new location and run the script. Hope this helps.
Admin
Ash
@David, with backupbuddy you can choose which files to leave out while backing up. So you can leave out the core WP files.
Robert
hi guys,
A friend just make me a new wordpress website and uploaded it to my hosting account. Now, I want to change the domain and hosting account and want to upload the website to the new hosting account.
My friend sent me the archive with all files of the website including database. How is possible to upload the website to my new host?
I appreciate your answer.
thank you
Ricardo Clarke
I actually just went through this process yesterday and need to transfer another site today. This is hands down the most thorough walkthrough I’ve seen. The 4 to 48 timeframe really helped ’cause I thought something went wrong, but the transfer just needed time to propagate across the interwebs.
WPBeginner Staff
As soon as you figure out that your new domain has regained the search positions for your old site. We hope that you have setup 301 redireccts on old domain otherwise search engines wouldn’t know that your old content has moved to the new domain permanently.
WPBeginner Staff
What’s the shorter way of doing this?
Sebastien
Hi there, thanks for your tutorial, here’s an other way of doing it… free.
1. Tools > export posts and pages from admin panel. If you also need the DB phpMyAdmin export tables from the db. Import them in the new db. Check for the extension of the tables to be the same (_wp for instance)
2. edit your virtual host config file, add what follows between your server {}
allow your_public_ip;
deny all;
3. Access the site by its ip. (make sure you set the ip of your new server instead of the url in phpmyadmin > wp_options > siteurl and home options)
4. Tools > import posts and pages
5. Change your DNS records at the old host.
6. Done. Use another plugin like UpdraftPlus to backup for free.
Ash
Tried UpdraftPlus. Didn’t do anything at all.
Rachel Charles
Clean and modern and Easy to modify!
Kate_H
Great guide. I can confirm these steps work brilliantly as I recently moved a 5 year old WP site from one domain to another domain and swapped web hosts as well.
The only difference I did was redirect the old site to the new site via the .htaccess as I wasn’t migrating the old domain name over at the time.
Out of curiosity how long would you leave it before deleting all the old content from the old domain and setting up a permanent URL redirect via your registrar?
zimbrul
I really hate Backup Buddy. In 80% of cases I got errors and their support is not that good. I’d rather move a site with Duplicator free WordPress plugin
WPBeginner Staff
Zimbrul, Duplicator is a nice plugin too. However, we have moved many WordPress sites using BackupBuddy and it has always worked flawlessly for us. That’s why we recommend it.
Jim
Fully agree. Duplicator has never let me down and I have backed up and installed to many websites to count. No need for a paid plugin.
Dennis Does Cricket
That’s a ridiculously long winded way of doing it.
Jonathan
I was looking for this. This already assumes knowledge of FTP etc. so why not just:
1. Copy over all files (download locally, upload to new server).
2. Export the DB (you can use Migrate DB free version if you can’t access the old hosts phpmyadmin or such). Also, if you’re moving from a different domain it replaces the urls etc.
3. Create a new DB on your new host, import the DB.
4. Transfer the domain.
Same result, no fiddling with installer scripts and such.
Matt Davis
This is how I would do it.. In addition, you would also need to edit your wp-config.php file with the new DB info (Specifically the database host entry, as I believe importing the old database will create the same database name, user and password on the new one). Also, I would avoid editing your hosts file and instead either use the IP address directly in your browser’s address bar followed by your sub-directory name (if needed) or use the temporary URL most hosters provide when a new account is set up.
The steps in this article are good for someone that doesn’t want to touch configuration files in their WordPress folders, or who want an all-in-one solution that gets them their site and DB in one step.