Wielu użytkowników WordPressa woli pracować nad swoimi witrynami internetowymi przy użyciu lokalnego serwera na swoim komputerze. Pozwala to na prywatną pracę nad twoją witryną internetową przed udostępnieniem zmian online.
Ostatecznie trzeba będzie przenieść ją na serwer rzeczywisty, aby udostępnić ją odwiedzającym online. Przejście to ma kluczowe znaczenie dla zapewnienia prawidłowego funkcjonowania Twojej witryny internetowej na witrynie na żywo.
Pracowaliśmy nad wieloma lokalnymi witrynami internetowymi, więc musieliśmy nauczyć się najłatwiejszego sposobu przenoszenia treści na żywe witryny.
W tym artykule przedstawimy instrukcje krok po kroku, jak przenieść WordPressa z serwera regionalnego na witrynę live.
Dlaczego warto przenieść WordPressa z serwera lokalnego na witrynę Live?
Zbudowanie twojego bloga WordPress na lokalnym serwerze to bezpieczny sposób na testowanie zmian w witrynie internetowej bez posiadania wpływu na odwiedzających.
Po zakończeniu udoskonalania twojej witryny internetowej, następnym krokiem jest przeniesienie jej z lokalnego serwera na witrynę działającą na żywo.
Pokażemy dwa sposoby na przeniesienie twojej witryny z serwera regionalnego do witryny na żywo.
Pierwsza metoda wykorzystuje wtyczkę do migracji WordPress i jest zalecana dla początkujących.
W drugiej metodzie pokażemy, jak ręcznie przenieść WordPressa z lokalnego serwera na witrynę live.
Możesz wybrać metodę, która najbardziej Ci odpowiada:
Przed migracją twojej witryny WordPress
Aby przeprowadzić migrację WordPressa z serwera regionalnego na serwer rzeczywisty, trzeba mieć kilka rzeczy na miejscu.
Po pierwsze, zakładamy, że masz witrynę WordPress działającą na serwerze lokalnym (zwanym również localhost) na twoim komputerze i że masz do niej pełny dostęp.
Następnie musisz mieć nazwę domeny i hosting.
Słyszeliśmy niezliczone relacje od początkujących, którzy zaczynali od kiepskich lub darmowych dostawców hostingu i żałowali tego. Z naszego doświadczenia wynika, że wybór odpowiedniego dostawcy hostingu ma kluczowe znaczenie dla sukcesu każdej witryny internetowej.
Aby ułatwić twoją decyzję, zalecamy skorzystanie z Bluehost. Jest to oficjalnie rekomendowana firma hostingowa WordPress, która daje użytkownikom WPBeginner ekskluzywną zniżkę + darmową domenę i SSL.
Zasadniczo możesz zacząć już za 1,99 USD miesięcznie.
Jeśli szukasz świetnej alternatywy dla Bluehost, możesz spojrzeć na Hostinger. Oferują również ekskluzywną zniżkę dla użytkowników WPBeginner z bezpłatną nazwą domeny.
Jeśli możesz sobie pozwolić na zapłacenie nieco więcej, sprawdź SiteGround. Mają też specjalną ofertę dla czytelników WPBeginner.
Jeśli potrzebujesz pomocy w stworzeniu swojej witryny internetowej, skorzystaj z naszego przewodnika krok po kroku.
Wreszcie, będziesz potrzebował programu FTP i wiedzieć, jak korzystać z FTP, aby przesłać twoją witrynę na serwerze lokalnym do witryny na żywo.
Gotowy? Rozpocznijmy migrację twojej witryny WordPress.
Film instruktażowy
Jeśli wolisz pisemne instrukcje, czytaj dalej.
Metoda 1: Przenieś WordPressa z regionalnego serwera na witrynę Live za pomocą wtyczki migracyjnej (zalecane)
Ta metoda jest łatwiejsza i zalecana dla początkujących. Będziemy używać wtyczki do migracji WordPressa, aby przenieść WordPressa z lokalnego hosta do witryny na żywo.
Krok 1: Instalacja i konfiguracja wtyczki Duplicator
Najpierw musisz zainstalować i włączyć wtyczkę Duplicator na twojej regionalnej witrynie. Aby uzyskać więcej informacji, zobacz nasz przewodnik krok po kroku, jak zainstalować wtyczkę WordPress.
Pro Tip: Istnieje również wersja pro Duplicator, która oferuje zabezpieczenia kopii zapasowych, przechowywanie w chmurze, łatwe przywracanie witryn i wiele więcej.
Po aktywacji należy przejść do strony Duplicator ” Backups i kliknąć przycisk “Create New”.
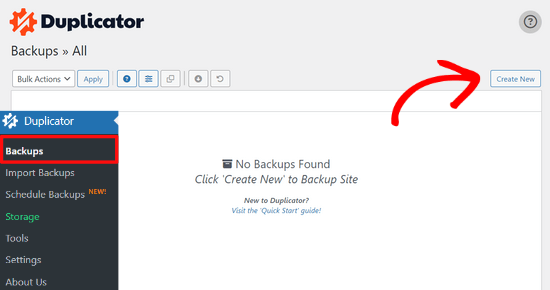
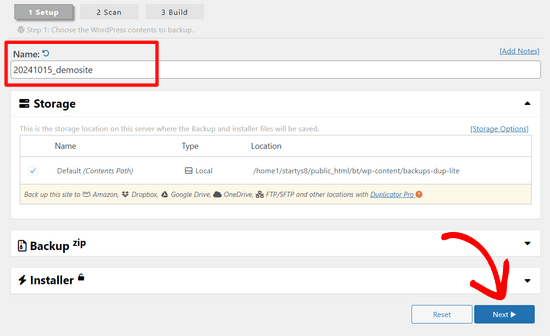
Spowoduje to wyświetlenie ekranu, na którym można nadać nazwę twojej kopii zapasowej.
Następnie kliknij przycisk “Dalej”.
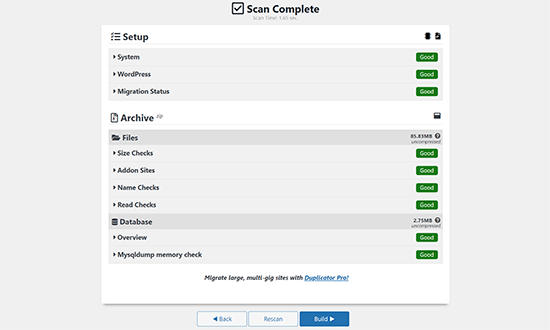
Duplicator przeprowadzi teraz kilka testów, aby sprawdzić, czy wszystko jest w porządku.
Jeśli wszystkie elementy są oznaczone jako “Dobre”, kliknij przycisk “Utwórz”.
Proces ten może potrwać kilka minut, w zależności od rozmiaru twojej witryny internetowej. Należy pozostawić tę kartę otwartą do czasu jego zakończenia.
Po zakończeniu zobaczysz opcje pobierania pakietów “Installer” i “Archive”. Należy kliknąć przycisk “Pobierz oba pliki”, aby pobrać oba pliki na komputer.
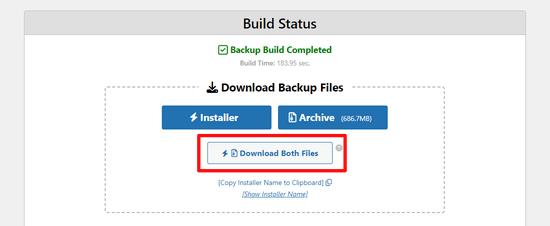
Plik “Archiwum” to kompletna kopia twojej witryny WordPress. Zawiera wszystkie pliki rdzenia WordPressa, a także twoje obrazki, przesłane pliki, motywy, wtyczki i kopię zapasową bazy danych WordPress.
Plik “Installer” to skrypt, który zautomatyzuje cały proces migracji poprzez rozpakowanie pliku archiwum zawierającego twoją witrynę internetową.
Krok 2: Utwórz bazę danych dla twojej witryny internetowej WordPress na żywo
Przed uruchomieniem instalatora lub przesłaniem witryny WordPress z hosta lokalnego na twój serwer hostingowy, musisz utworzyć bazę danych MySQL dla nowej witryny na żywo.
Jeśli utworzyłeś już bazę danych MySQL, możesz pominąć ten krok.
Aby utworzyć bazę danych, należy przejść na kokpit cPanel twojego konta hostingowego. Następnie znajdź sekcję “Bazy danych” i kliknij ikonkę “Kreator baz danych MySQL”.
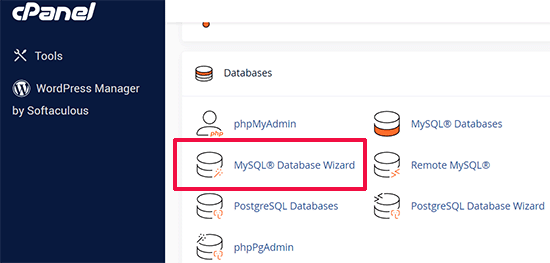
Na kolejnym ekranie znajduje się pole do utworzenia nowej bazy danych.
Wystarczy podać nazwę twojej bazy danych i kliknąć przycisk “Utwórz bazę danych”.

cPanel utworzy teraz nową bazę danych.
Następnie wpisz nazwę użytkownika i hasło dla twojego nowego użytkownika, a następnie kliknij przycisk “Utwórz użytkownika”.
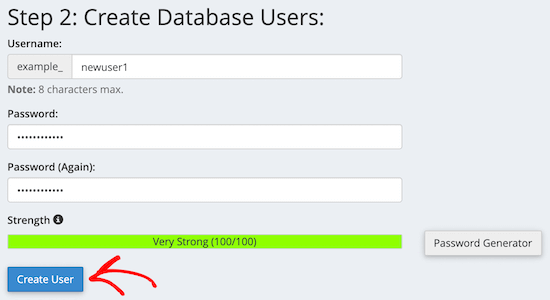
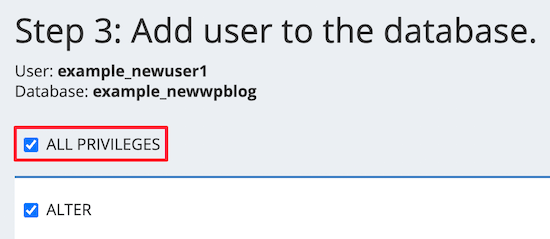
Następnie należy dodać utworzonego użytkownika do bazy danych.
Najpierw kliknij pole wyboru “Wszystkie uprawnienia”.
Następnie przewiń w dół i kliknij przycisk “Wprowadź zmiany”, aby zapisać twoje zmiany.
Twoja baza danych jest teraz gotowa do użycia z witryną WordPress. Pamiętaj, aby zanotować nazwę bazy danych, nazwę użytkownika i hasło. Informacje te będą potrzebne w następnym kroku.
Krok 3: Przesyłanie plików z serwera lokalnego do witryny internetowej WordPress na żywo
Teraz należy przesłać archiwum i pliki instalatora z twojej regionalnej witryny na twoje konto hostingowe.
Najpierw połącz się z twoją witryną na żywo za pomocą klienta FTP. Po połączeniu upewnij się, że katalog główny twojej witryny internetowej jest całkowicie pusty.
Zwykle katalogiem głównym jest katalog /home/public_html/.
Niektóre firmy hostingowe WordPress automatycznie instalują WordPress podczas rejestracji. Jeśli masz tam pliki WordPress, musisz je usunąć.
Następnie możesz przesłać pliki archive.zip i installer.php z Duplicatora do twojego pustego katalogu głównego.

Krok 4: Uruchomienie skryptu migracji
Po przesłaniu plików migracyjnych należy przejść na następujący adres URL w twojej przeglądarce:
http://example.com/installer.php
Nie zapomnij zastąpić “example.com” twoją własną nazwą domeny.
Spowoduje to uruchomienie kreatora migracji Duplicator.
Instalator przeprowadzi kilka testów i zainicjuje skrypt.
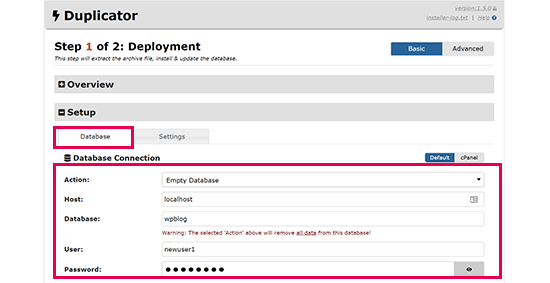
W sekcji Konfiguracja zostaniesz poproszony o wpisz swojego hosta MySQL, nazwę bazy danych, nazwę użytkownika i hasło.
Twój host będzie prawdopodobnie hostem lokalnym. Następnie wpiszesz szczegóły bazy danych, którą utworzyłeś we wcześniejszym kroku.
Następnie kliknij przycisk “Zatwierdź”, aby upewnić się, że wpiszesz prawidłowe dane.
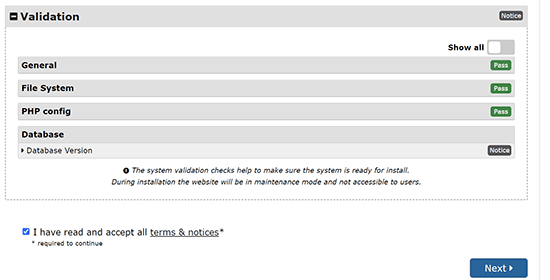
Następnie kliknij przycisk “Dalej”, aby kontynuować.
Duplicator będzie teraz importować twoją kopię zapasową bazy danych WordPress z archiwum do nowej bazy danych.
Zaktualizuje również adresy URL wskazujące na witrynę regionalną i twoją nową witrynę na żywo.
Możesz teraz kliknąć przycisk “Admin Login”, aby wpisz obszar administracyjny WordPress twojej witryny na żywo.

Po zalogowaniu się na twoją witrynę, Duplicator automatycznie wyczyści pliki instalacyjne.
To wszystko. Pomyślnie przeniosłeś WordPressa z lokalnego serwera na twoją witrynę live.
Metoda 2: Ręczne przeniesienie WordPressa z regionalnego serwera na witrynę Live
W tej metodzie pokażemy, jak ręcznie przenieść WordPressa z lokalnego serwera na twoją witrynę na żywo. Będzie to przydatne, jeśli pierwsza metoda nie zadziała lub jeśli wolisz zrobić to ręcznie.
Krok 1: Eksport lokalnej bazy danych WordPress
Pierwszą rzeczą, którą musisz zrobić, to wyeksportować twoją lokalną bazę danych WordPress. W tym celu użyjemy phpMyAdmin.
Jeśli nie jesteś z nim zaznajomiony, to warto zapoznać się z naszym przewodnikiem po zarządzaniu bazą danych WordPress za pomocą phpMyAdmin.
Wystarczy wejść na stronę http://localhost/phpmyadmin/ i kliknąć na twoją bazę danych WordPress. Następnie kliknij przycisk “Eksportuj” na górnym pasku menu.

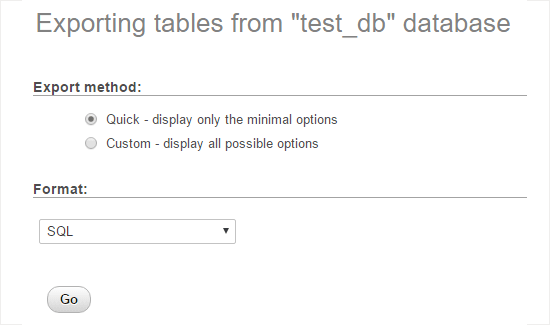
W opcji “Metoda eksportu:” można wybrać “Szybka” lub “Niestandardowa”. Dostosuj zapewni więcej opcji eksportu twojej bazy danych.
Zalecamy jednak wybranie opcji “Szybko”, a następnie kliknięcie przycisku “Dalej”, aby pobrać twoją bazę danych.
Krok 2: Wgranie plików WordPress na witrynę Live
Teraz będziemy musieli przenieść wszystkie pliki twojej witryny internetowej do witryny na żywo.
Aby rozpocząć, otwórz klienta FTP i połącz się z twoim kontem hostingowym.
Po połączeniu się z twoją witryną na żywo, upewnij się, że przesyłasz pliki do właściwego katalogu. Na przykład, jeśli witryna ma być hostowana pod adresem “yoursite.com”, wszystkie pliki należy przesłać do katalogu public_html.
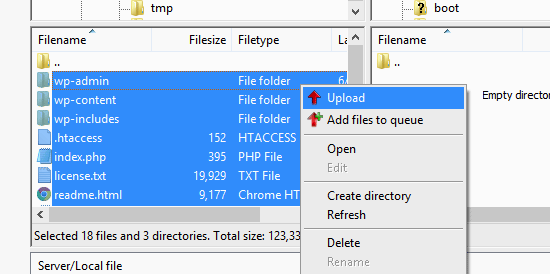
Teraz wybierz twoje lokalne pliki WordPress i prześlij je na swój serwer live.
Krok 3: Utwórz bazę danych MySQL na twojej witrynie Live
Podczas gdy twój klient FTP przesyła pliki WordPress, możesz rozpocząć importowanie bazy danych na serwer live.
Większość dostawców hostingu WordPress oferuje cPanel do zarządzania twoim kontem hostingowym, więc pokażemy ci, jak utworzyć bazę danych za pomocą cPanel.
Najpierw należy zalogować się do twojego kokpitu cPanel i kliknąć ikonkę “Kreator baz danych MySQL”, która znajduje się w sekcji “Bazy danych”.

Na następnym ekranie można utworzyć nową bazę danych.
Musisz podać nazwę twojej bazy danych, a następnie kliknąć “Utwórz bazę danych”.

cPanel automatycznie utworzy teraz nową bazę danych.
Następnie wpisz nazwę użytkownika i hasło dla twojego nowego użytkownika, a następnie kliknij “Utwórz użytkownika”.
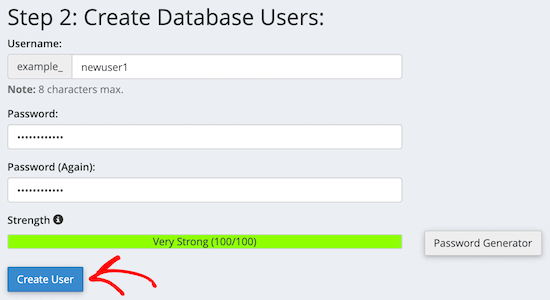
Następnie należy dodać utworzonego użytkownika do bazy danych.
Najpierw zaznacz pole wyboru “Wszystkie uprawnienia”.
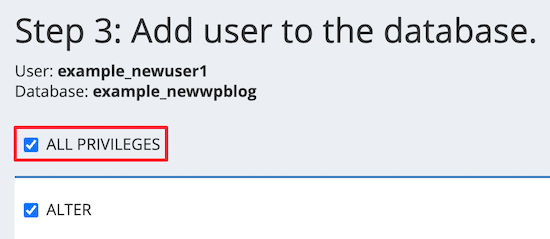
Następnie przewiń w dół i kliknij “Wprowadź zmiany”, aby zapisać twoje zmiany.
Pomyślnie utworzyłeś nową bazę danych dla twojej witryny WordPress na żywo.
Krok 4: Importowanie bazy danych WordPress do witryny Live
Następnym krokiem w procesie jest importowanie twojej bazy danych WordPress.
Przejdź do twojego kokpitu cPanel, przewiń w dół do sekcji “Bazy danych” i kliknij “phpMyAdmin”.
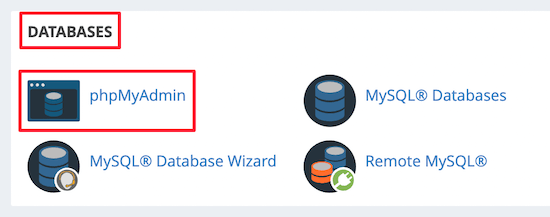
Spowoduje to przejście do phpMyAdmin, gdzie należy kliknąć utworzoną powyżej bazę danych. phpMyAdmin wyświetli twoją nową bazę danych bez tabel.
Następnie kliknij kartę “Importuj” w górnym menu. Na stronie importowania kliknij przycisk “Wybierz plik”, a następnie wybierz plik bazy danych z witryny regionalnej, który zapisałeś w pierwszym kroku.
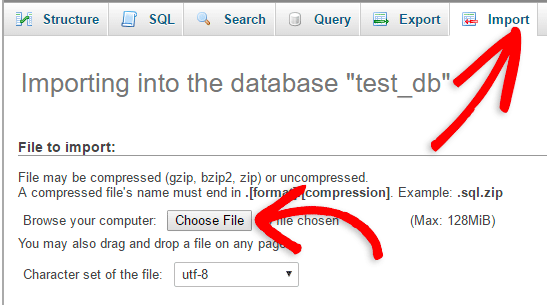
Następnie kliknij przycisk “Go” na dole strony. Twoja baza danych zostanie automatycznie importowana do phpMyadmin.
Krok 5: Zmiana adresu URL witryny
Teraz musisz zmienić adres URL witryny w bazie danych, aby połączyć się z twoją witryną WordPress na żywo.
W phpMyAdmin, poszukaj tabeli wp_options w twojej bazie danych, którą właśnie importowałeś powyżej.
Jeśli zmieniłeś prefiks bazy danych, to zamiast wp_options może być {new_prefix}_options.
Następnie kliknij przycisk “Przeglądaj” obok wp_options. Możesz też kliknąć odnośnik na panelu bocznym, aby otworzyć stronę z listą pól w tabeli wp_options.
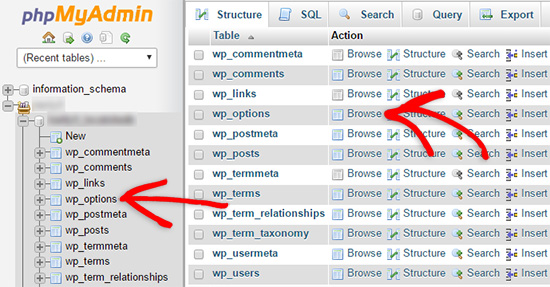
Następnie w kolumnie options_name należy wyszukać opcję siteurl.
Następnie kliknij ikonkę “Edytuj”.

Spowoduje to wyświetlenie okna, w którym można edytować pole.
W polu wejściowym option_value zobaczysz adres URL twojej regionalnej instalacji, który będzie czymś w rodzaju http://localhost/test.
W tym polu należy wstawić adres URL twojej nowej witryny, na przykład: https: //www.wpbeginner.com.
Następnie możesz zapisać pole, klikając przycisk “Dalej”.
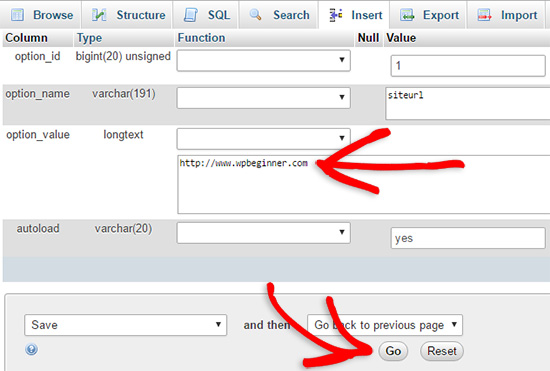
Następnie należy wykonać te same kroki, co powyżej dla nazwy opcji strony głównej. Menu wp_options może mieć kilka stron. Zazwyczaj opcja strony głównej znajduje się na drugiej stronie.
Następnie zaktualizuj adres URL strony głównej, aby był taki sam jak adres URL twojej witryny na żywo.
Krok 6: Skonfiguruj swoją witrynę Live
Teraz, gdy importowałeś bazę danych i przesłałeś swoją treść, nadszedł czas, aby skonfigurować WordPress.
W tym momencie twoja witryna powinna wyświetlać błąd“Błąd nawiązywania połączenia z bazą danych“.
Aby to poprawić, połącz się z twoją witryną internetową za pomocą klienta FTP i otwórz plik wp-config.php.
Poszukiwane będą następujące linie kodu:
1 2 3 4 5 6 7 8 9 | // ** MySQL settings - You can get this info from your web host ** ///** The name of the database for WordPress */define( 'DB_NAME', 'database_name_here' );/** MySQL database username */define( 'DB_USER', 'username_here' );/** MySQL database password */define( 'DB_PASSWORD', 'password_here' );/** MySQL hostname */define( 'DB_HOST', 'localhost' ); |
Będziesz musiał podać nazwę bazy danych, nazwę użytkownika i hasło, które utworzyłeś wcześniej.
Następnie zapisz plik wp-config. php i prześlij go z powrotem na twój serwer hostingowy WordPress.
Teraz, gdy użytkownik przejdzie na twoją witrynę internetową, powinna ona działać na żywo.
Następnie musisz logować się do twojego panelu administracyjnego WordPress i przejść do Ustawienia ” Ogólne. Następnie, nie zmieniając niczego, przewiń do dołu i kliknij przycisk “Zapisz zmiany”.
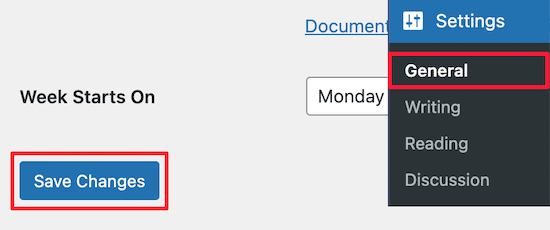
Dzięki temu adres URL twojej witryny zostanie poprawiony wszędzie tam, gdzie powinien.
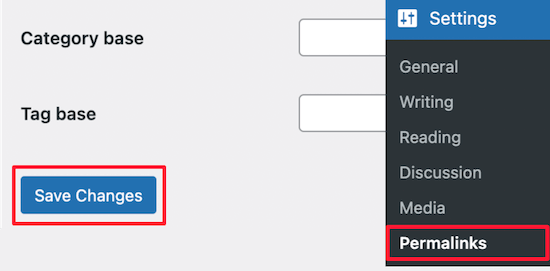
Gdy to zrobisz, przejdź do Ustawienia ” Bezpośrednie odnośniki, a następnie przewiń w dół i kliknij “Zapisz zmiany”, aby upewnić się, że wszystkie odnośniki do wpisów działają poprawnie.
Krok 7: Poprawka obrazków i naprawiono odnośniki poprzez aktualizację ścieżek.
Za każdym razem, gdy przenosisz witrynę WordPress z jednej domeny do drugiej lub z serwera regionalnego do witryny na żywo, napotkasz niedziałające odnośniki i brakujące obrazki.
Pokażemy dwa sposoby aktualizacji adresów URL. Możesz wybrać ten, który najbardziej Ci odpowiada.
1. Aktualizacja adresów URL za pomocą wtyczki Search & Replace Everything (zalecane)
Najbezpieczniejszym sposobem na poprawienie tego jest użycie Search & Replace Everything. Jest to potężna wtyczka WordPress, która pozwala łatwo wykonywać zadania masowej aktualizacji na twojej witrynie internetowej bez pisania skomplikowanych zapytań do bazy danych.
Najpierw należy zainstalować i włączyć wtyczkę Search & Replace Everything.
Po włączaniu przejdź do strony Narzędzia ” WP Wyszukaj i zamień.
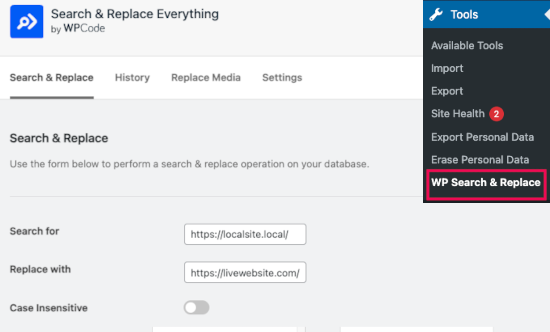
Następnie wpisz adres URL witryny regionalnej w polu “Wyszukaj” i adres URL witryny rzeczywistej w polu “Zamień na”.
Przewiń nieco i kliknij “Wybierz wszystko” pod tabelami. Dzięki temu wtyczka będzie szukać starego adresu URL wszędzie w bazie danych.
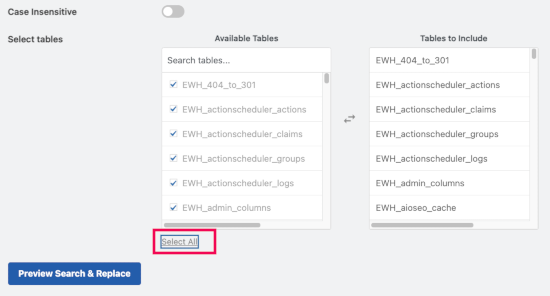
Teraz kliknij przycisk “Podgląd wyszukiwania i zamiany”, aby kontynuować.
Wtyczka przeszuka twoją bazę danych pod kątem wszystkich instancji starego adresu URL, a następnie wyświetli podgląd wyników.
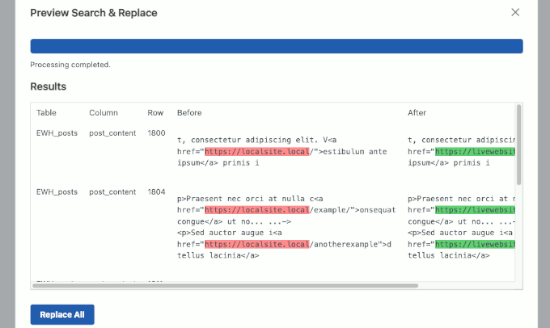
Jeśli wszystko wygląda dobrze, kliknij “Zastąp wszystko”, aby zapisać zmiany.
Zobaczysz ostrzeżenie o wprowadzanych zmianach. Kliknij “Tak”, aby kontynuować.
Wtyczka zaktualizuje teraz bazę danych i zastąpi lokalne adresy URL twoim obecnym, aktualnym adresem URL witryny internetowej.
2. Ręczna aktualizacja adresów URL (zaawansowane)
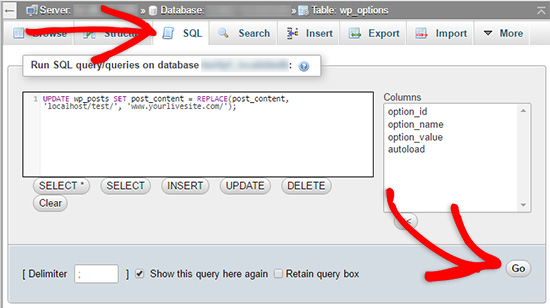
Innym sposobem aktualizacji adresów URL jest użycie następującego zapytania SQL:
1 | UPDATE wp_posts SET post_content = REPLACE(post_content, 'localhost/test/', 'www.yourlivesite.com/'); |
Wystarczy przejść do phpMyAdmin, kliknąć na twoją bazę danych, a następnie kliknąć na “SQL” z górnego menu i dodać powyższe zapytanie.
Upewnij się, że zmieniłeś je na adresy URL twojej witryny regionalnej i witryny na żywo, a następnie kliknij przycisk “Przejdź”.
To wszystko. Pomyślnie przeprowadziłeś migrację WordPressa z twojego regionalnego serwera na witrynę live.
Miejmy nadzieję, że twoja witryna internetowa na żywo działa sprawnie. W przypadku powiadomienia o jakichkolwiek błędach, możesz zapoznać się z naszym przewodnikiem po typowych błędach WordPress, aby uzyskać pomoc w rozwiązywaniu problemów.
Mamy nadzieję, że ten artykuł pomógł ci przenieść WordPressa z serwera lokalnego na witrynę live. Możesz również zapoznać się z naszym przewodnikiem na temat przenoszenia witryny na żywo na serwer lokalny lub zapoznać się z ostateczną listą kontrolną migracji witryny, aby poznać praktyczne kroki migracji WordPress.
If you liked this article, then please subscribe to our YouTube Channel for WordPress video tutorials. You can also find us on Twitter and Facebook.


Thembi
Hi guys tearing my hair out. Original site on local server works well on local server. The live site on the remote server works well on the live server. When I move it to the local host it gives me this php error when installing plugins… i have read all blogs and issue not resolved for me. I tried both the duplicator and manual process but still get this php error
Warning: An unexpected error occurred. Something may be wrong with WordPress.org or this server’s configuration. If you continue to have problems, please try the support forums. (WordPress could not establish a secure connection to WordPress.org. Please contact your server administrator.) in C:\wamp\www\missflairword\wp-includes\update.php on line 457
WPBeginner Support
Seems like your localhost install is unable to connect to the internet. This could happen if Apache is blocked by your network’s firewall. You need to allow apache access to the internet from your windows firewall settings.
Admin
Checo
Wow guys, this Tutorial was excellent, precise and very well detailed!!! Thank you very much, you helped me publish my first locally developed wordpress site right on the deadline without any mistakes. Best regards!
Sam
someone should tell me when you see a better word for Genius, because that is what you guys are. your tutorials has made me a lil’genius.
Thanks guys
Silvia
Your tut is the best! I tried several times before and never was able to do it until now! genius! thanks!
Angela
What a LIFESAVER! I tried several other peoples suggestions and different plug-ins that are supposed to make it easy… Nothing worked until this! Thank you!
gaurav Royal
thankx a lot .. its working
Ken
I’ve followed all the steps given. When I access the live site I get everything I can without changing the media URLs.
I can’t do that yet because I can’t login to the admin area. i get the following errors on the screen above the login box and valid logins are not accepted (checked with myPHP):
Warning: session_start(): Cannot send session cookie – headers already sent by (output started at /home/cgbookss/public_html/wp-includes/functions.php:1) in /home/cgbookss/public_html/wp-content/plugins/event-commerce-wp-event-calendar/evntgen-scbooking.php on line 519
Warning: session_start(): Cannot send session cache limiter – headers already sent (output started at /home/cgbookss/public_html/wp-includes/functions.php:1) in /home/cgbookss/public_html/wp-content/plugins/event-commerce-wp-event-calendar/evntgen-scbooking.php on line 519
Warning: Cannot modify header information – headers already sent by (output started at /home/cgbookss/public_html/wp-includes/functions.php:1) in /home/cgbookss/public_html/wp-login.php on line 424
Warning: Cannot modify header information – headers already sent by (output started at /home/cgbookss/public_html/wp-includes/functions.php:1) in /home/cgbookss/public_html/wp-login.php on line 437
Have you any suggestions?
WPBeginner Support
Try deactivating all your plugins.
Admin
geoff
can’t seem to get the phpmyadmin to work locally. you seem to haven’t put that in, and the link you have provided to “explain” how to use the phpmyadmin, refers to that running on c panel not locally.
it would be good if you could explain, running phpmyadmin locally, through webmatrix for explain.
rodrigo
Was a great help, this tutorial. I had some 500 server errors fixed after editing the htaccess.php file. But I still have no access to the wp-admin dashboard? Anyone got the same emptiness on the backend link? what could be the fix?
Charlie
I have the same exact issue. Trying to find a solution for this but it seems like one isn’t mentioned here on this page, or in the comments.
hokka
I have troubles with my new site address. Everything else seems to work just fine.
In phpmyadmin if I change the siteurl to direct the site to the correct subfolder, the website content disappears when the “home” option value is correct. Then again if I also change my home-value into the same address as the files are in, meaning the same address as siteurl, then I see the content but the address is not what I wanted it to be. I’ve also tried to use Velvet Blues -plugin but nothing happened.
In my case the WordPress url is different from website url, so basically the changes won’t affect in admin panel Settings.
Thanks for this great tutorial.
JulioC
Not sure if was very lucky but in my case I followed all steps and everything worked perfect!!!
Thanks a lot!
WPBeginner Staff
The other part of making backups is restoring your sites from backups. cPanel does not make that part easy. Configurations may differ from one site to another. Sometimes user may even want to move to a web host that does not offer cPanel. For more advanced users who can troubleshoot these issues, cPanel backups can be a good option. But for most beginners it can be difficult. There are other backup options as well, take a look at our pick of 7 Best WordPress Backup plugins.
Joey
BackupBuddy seems to be a bit of an overpriced option when you can simply back up a WP site via Cpanel … are there any other benefits for using BackupBuddy when backing up via Cpanel is easy and free?
jeroen
Hi, I’m still struggling withe the migration of my local hosted WP multisite to a webserver. Replaced all the urls’s as far as I can tell but still the navigation doens’t work. Ik can enter the root which shows the homepage correctle but clicking a navigation link I get this error.
“Not Found
The requested URL /index.php was not found on this server.”
Although the paths of the menu links(shown on hover) look fine. Any Idea where to go look to solve this? Thanks in advance.
Tim
After importing the database, I tried to do step 5. However, when I click on wp_options, i do not have an edit spot. It says “current selection does not contain a unique column. Grid edit, checkbox, edit, copy and delete features are not available.”
Why is this happening?
Thank you
nirali
hello can anyone help me.. there is a image path error in hosting.. how to solve it?
WPBeginner Staff
You can find out your live site’s database information by vising phpMyAdmin through cpanel. Notice the database name, mysql host, mysql username, and password and then fill in that information in your live site’s wp-config.php file.
On your local site go to localhost/phpmyadmin/ to find out the correct database name.
allison ranieri
I completed all the steps and now my live site just says Error Establishing database connection and I cannot access my localhost at all – it is just a white screen. When in Step 6 it said to change your config.php file I accidentally changed the info in my local config file instead of the one updated through MySql but I figured that one out and changed the info back in my local file to what I thought it was before, but now when I go to localhost/wordpress (where I had previously gone before) it just shows a white screen. And my live site says Error Establishing Database Connection. So confused. Any help would be lovely.
WPBeginner Staff
Yes, you will be able to see the edit link after signing into your live site.
Prabhjot kaur
I want to ask something as if i upload my site as a live site then edit link will appear or not ?that are already shown in localserver.
Enoch Ramal
Almost there but I get this…
Parse error: syntax error, unexpected ‘define’ (T_STRING) in /home/klbensonsk/public_html/wp-config.php on line 31
vanyoattila
Hi, I have uploaded my first page with the help of this post and it has been working perfect since than. Now I have a problem with an other site. I went through all the critical points again and again but I have always the same issue. The site is working (with broken links) but I can’t log in to the admin site. I changed the database at phpmyadmin and the wp-config.php file also. They have the same username and same password so they have the same datas and yet I have the problem. How does it possible?
Sybrin
Hi there, my WordPress website has just moved to a new ip address, and I followed the steps at the bottom to fix broken links. It said that it fixed them but my website is still not displaying properly. Some images are displaying as broken images and some image sliders are not showing up at all. The website also seems a hell of a lot slower. How do I fix this all?
vinamr
Do i have to install WordPress through my cpanel? or do i straight away upload the files through ftp?
WPBeginner Staff
Contents of WordPress folder.
up
I have had a hard time finding an answer to a simple question: Do you upload the wordpress folder or the contents of the wordpress folder to public_html
Krizia Bianca
Thank you so much, this tutorial works fine for me! I uploaded my wordpress to a live site. And it run smoothly!
GSR
Hi. I’ve followed all the steps (I think so) and now I no longer have the error message about not having a database connection – instead I now just have a blank white screen. Can you tell me where I’ve gone wrong?
Malik Talib Hussain
Thanks a lot for such a descriptive guide,I have uploaded my site successfully using this guide.
John
Thanks for sharing this. It worked for me at a go.
Daniel
Is it normal that in the step 6, after I updated the wp-config.php file, instead of appearing the homepage of the site (as I viewed in localhost) it appears the installation process?
PD: I have completed all the previous steps.
duke
Very easy, some tips to remember, i have to wait a while to transfer local wordpress site to public_html because of the number of themes i am using.
I forget to grant access to the db user, so i did it and it worked.
All steps is important, the sql command works great.
I rename .htaccess to .htaccess_old and it works
then just update and save permalinks.
Very easy fix for everything.
BJH
Thanks for the tutorial.
Unfortunately it doesn’t work for me. I think that there are so many variables with something like this. Your steps work for you, with your scenario, but for someone else it can be very easy to end up with something else which stops the process working. Migrating wordpress is a real chore in my experience.
Lloyd
I have 30+ years of IT experience including design of large 1000+ user infrastructure, plus extensive hands on program coding.
I have used WordPress to create one site and I am really happy with the result.
However, I would have to say that for anything other than simply creating a single production site, WordPress is unbelievably complicated to use for anyone contemplating creating multiple sites, or creating a dev to prod environment. Absolute unmitigated nightmare.
Is there is anything that the WordPress developers could do to make the actual architecture easier to understand and use that would be great.
Matthew
Hi,
Great tutorial, thanks a bunch. I’m doing my first wp redesign for a client who already has a well established blog with posts images etc. I’ve exported all of her data into the local site, designed a new theme with new pages etc. While importing her posts locally and selecting the option to download attachments, the posts have appeared but none of the images and I’m about ready to upload everything to her server.
Do I just upload the theme files and in doing so will my modifications be present? Or do I need to upload everything as this tutorial suggests. She has over 2000 posts, an image for each, and I’ve got new images, pages, and layout.
If you can either make a tutorial for moving/importing a redesigned or newly designed blog into an existing blog with posts pages etc. Or point me in the right direction, That would be great.
The client won’t give me access to the server itself and insists on doing the ftp himself because he saw on the news that he could get his identity stolen or some such nonsense. I explained that he could set access restrictions on a separate login but he insists he do it.
And the don’t want me working directly on the site because they’re worried about downtime while I update and build it.
You can’t always be picky when it come to clients and I don’t really have a choice I’m just about done.
Emilio
Thank you for the tutorial!
But now that I’ve imported all my site, the logo isn’t showing and my Dashboard doesn’t show the theme functions, I run Divi from Elegant Themes.
Martin
I’ve imported my database and wordpress install, but none of my pages are showing when I login to the admin panel? I’ve activated the theme, but no pages? Please help!
WPBeginner Staff
Please go to the admin area -> Settings and make sure that you are using the correct Site Address and WordPress Address.
Christine
Good day.
Thanks for this easy to follow tutorial.
I managed all the steps and my site seems to be connected, except that my theme is missing. All the files are in place with their stylesheets, but the site seems to be displaying plain html.Has anyone else experienced this?
Not sure how to go about fixing it.
tawanda masvanhise
thanks for the great tutorial! l have a problem after doing all the steps; my website is displaying
Error establishing a database connection
how can i solve this problem?
Claudio Henrique Amorim
Thank you so much.
I’m definitely a wp beginner and this post was just of an wonderful help. Everything went on flawless.
I’m really enjoying working as a web designer and wp developer. And I hope I’ll get more and more of these kind of jobs, and more challenging ones. I learned so much while doing this very first one.
Thank you again.
WPBeginner Staff
Seems like your domain is not yet ready or you have uploaded WordPress in the wrong directory on your web server. Please contact your web hosting provider for support.
Elliot Lee
HELP!!
I have completed step 1 to step 6, but my site still displays:
Future home of something quite cool.
If you’re the site owner, log in to launch this site
If you are a visitor, check back soon.
Why is this happening???
Elliot Lee
I have completed step 1 to step 6, but my website still displays:
Future home of something quite cool.
If you’re the site owner, log in to launch this site
If you are a visitor, check back soon.
What could be the problem???
Elliot Lee
HELP!!! Why am I receiving this error in step 4?
SQL query:
—
— Database: `wordpress`
—
— ——————————————————–
—
— Table structure for table `wp_commentmeta`
—
CREATE TABLE `wp_commentmeta` (
`meta_id` bigint( 20 ) unsigned NOT NULL AUTO_INCREMENT ,
`comment_id` bigint( 20 ) unsigned NOT NULL DEFAULT ‘0’,
`meta_key` varchar( 255 ) DEFAULT NULL ,
`meta_value` longtext,
PRIMARY KEY ( `meta_id` ) ,
KEY `comment_id` ( `comment_id` ) ,
KEY `meta_key` ( `meta_key` ) ) ENGINE = InnoDB DEFAULT CHARSET = utf8 AUTO_INCREMENT =1;
MySQL said:
#1046 – No database selected
WPBeginner Staff
Before you can run this query you need to select the database you want to run it on. If you are using phpMyAdmin then select the database and then click on the SQL to run the query.
Elliot Lee
ok thanks
Thinh
Hi, thanks for a easy guide.
But I wonder how I can export to live when WordPress is already installed live? I redesigned the website from scratch, only thing is that I used the same theme. What would be the best way to get this live?
Thanks, keep up the good work!
PixelstoLife
Great tutorial, thanks for the help.
Like some others, the up_user updates don’t work and the links on my site are still calling the localhost. I’ve also been booted out as the admin user and cannot login to update permalinks etc.
I’ve found a tutorial to re-instate an admin user via phpmyadmin so I’ll give that a go and see if I can get back in!
Cheers
Ben
Great guide, but having a little bit of trouble and wondering if you can help.
I’ve done everything above, but when I try to go on to the …/wp-admin page I get this: ‘Warning: require(/home/username/public_html/wp-includes/pomo/mo.php): failed to open stream: No such file or directory in /home/username/public_html/wp-settings.php on line 76’
Any ideas?
lokesh
I m facing a prlessphp fatal error: load error: failed to find /home1/eminenta/public_html/server/Suman_Creations/wp-content/themes/theme49413/bootstrap/less/bootstrap.lesslessphp fatal error: load error: failed to find /home1/eminenta/public_html/server/Suman_Creations/wp-content/themes/theme49413/style.less oblem when i move my website from local server to live server