Wielu użytkowników WordPressa woli pracować nad swoimi witrynami internetowymi przy użyciu lokalnego serwera na swoim komputerze. Pozwala to na prywatną pracę nad twoją witryną internetową przed udostępnieniem zmian online.
Ostatecznie trzeba będzie przenieść ją na serwer rzeczywisty, aby udostępnić ją odwiedzającym online. Przejście to ma kluczowe znaczenie dla zapewnienia prawidłowego funkcjonowania Twojej witryny internetowej na witrynie na żywo.
Pracowaliśmy nad wieloma lokalnymi witrynami internetowymi, więc musieliśmy nauczyć się najłatwiejszego sposobu przenoszenia treści na żywe witryny.
W tym artykule przedstawimy instrukcje krok po kroku, jak przenieść WordPressa z serwera regionalnego na witrynę live.
Dlaczego warto przenieść WordPressa z serwera lokalnego na witrynę Live?
Zbudowanie twojego bloga WordPress na lokalnym serwerze to bezpieczny sposób na testowanie zmian w witrynie internetowej bez posiadania wpływu na odwiedzających.
Po zakończeniu udoskonalania twojej witryny internetowej, następnym krokiem jest przeniesienie jej z lokalnego serwera na witrynę działającą na żywo.
Pokażemy dwa sposoby na przeniesienie twojej witryny z serwera regionalnego do witryny na żywo.
Pierwsza metoda wykorzystuje wtyczkę do migracji WordPress i jest zalecana dla początkujących.
W drugiej metodzie pokażemy, jak ręcznie przenieść WordPressa z lokalnego serwera na witrynę live.
Możesz wybrać metodę, która najbardziej Ci odpowiada:
Przed migracją twojej witryny WordPress
Aby przeprowadzić migrację WordPressa z serwera regionalnego na serwer rzeczywisty, trzeba mieć kilka rzeczy na miejscu.
Po pierwsze, zakładamy, że masz witrynę WordPress działającą na serwerze lokalnym (zwanym również localhost) na twoim komputerze i że masz do niej pełny dostęp.
Następnie musisz mieć nazwę domeny i hosting.
Słyszeliśmy niezliczone relacje od początkujących, którzy zaczynali od kiepskich lub darmowych dostawców hostingu i żałowali tego. Z naszego doświadczenia wynika, że wybór odpowiedniego dostawcy hostingu ma kluczowe znaczenie dla sukcesu każdej witryny internetowej.
Aby ułatwić twoją decyzję, zalecamy skorzystanie z Bluehost. Jest to oficjalnie rekomendowana firma hostingowa WordPress, która daje użytkownikom WPBeginner ekskluzywną zniżkę + darmową domenę i SSL.
Zasadniczo możesz zacząć już za 1,99 USD miesięcznie.
Jeśli szukasz świetnej alternatywy dla Bluehost, możesz spojrzeć na Hostinger. Oferują również ekskluzywną zniżkę dla użytkowników WPBeginner z bezpłatną nazwą domeny.
Jeśli możesz sobie pozwolić na zapłacenie nieco więcej, sprawdź SiteGround. Mają też specjalną ofertę dla czytelników WPBeginner.
Jeśli potrzebujesz pomocy w stworzeniu swojej witryny internetowej, skorzystaj z naszego przewodnika krok po kroku.
Wreszcie, będziesz potrzebował programu FTP i wiedzieć, jak korzystać z FTP, aby przesłać twoją witrynę na serwerze lokalnym do witryny na żywo.
Gotowy? Rozpocznijmy migrację twojej witryny WordPress.
Film instruktażowy
Jeśli wolisz pisemne instrukcje, czytaj dalej.
Metoda 1: Przenieś WordPressa z regionalnego serwera na witrynę Live za pomocą wtyczki migracyjnej (zalecane)
Ta metoda jest łatwiejsza i zalecana dla początkujących. Będziemy używać wtyczki do migracji WordPressa, aby przenieść WordPressa z lokalnego hosta do witryny na żywo.
Krok 1: Instalacja i konfiguracja wtyczki Duplicator
Najpierw musisz zainstalować i włączyć wtyczkę Duplicator na twojej regionalnej witrynie. Aby uzyskać więcej informacji, zobacz nasz przewodnik krok po kroku, jak zainstalować wtyczkę WordPress.
Pro Tip: Istnieje również wersja pro Duplicator, która oferuje zabezpieczenia kopii zapasowych, przechowywanie w chmurze, łatwe przywracanie witryn i wiele więcej.
Po aktywacji należy przejść do strony Duplicator ” Backups i kliknąć przycisk “Create New”.
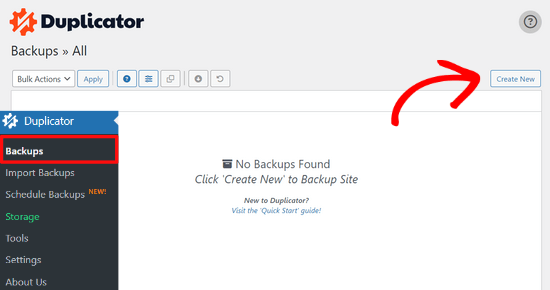
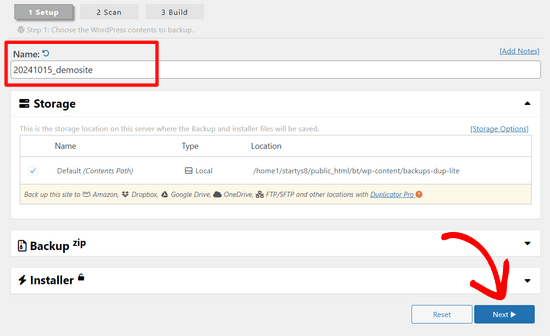
Spowoduje to wyświetlenie ekranu, na którym można nadać nazwę twojej kopii zapasowej.
Następnie kliknij przycisk “Dalej”.
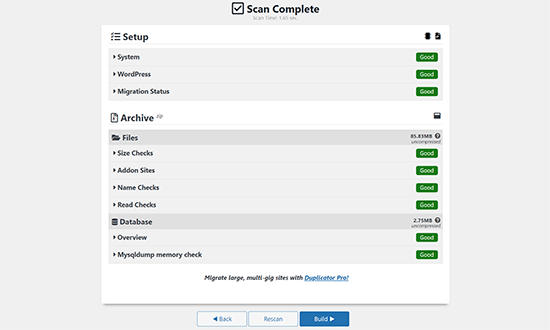
Duplicator przeprowadzi teraz kilka testów, aby sprawdzić, czy wszystko jest w porządku.
Jeśli wszystkie elementy są oznaczone jako “Dobre”, kliknij przycisk “Utwórz”.
Proces ten może potrwać kilka minut, w zależności od rozmiaru twojej witryny internetowej. Należy pozostawić tę kartę otwartą do czasu jego zakończenia.
Po zakończeniu zobaczysz opcje pobierania pakietów “Installer” i “Archive”. Należy kliknąć przycisk “Pobierz oba pliki”, aby pobrać oba pliki na komputer.
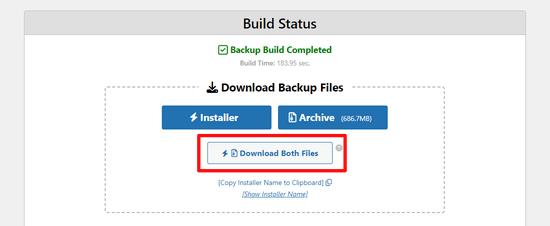
Plik “Archiwum” to kompletna kopia twojej witryny WordPress. Zawiera wszystkie pliki rdzenia WordPressa, a także twoje obrazki, przesłane pliki, motywy, wtyczki i kopię zapasową bazy danych WordPress.
Plik “Installer” to skrypt, który zautomatyzuje cały proces migracji poprzez rozpakowanie pliku archiwum zawierającego twoją witrynę internetową.
Krok 2: Utwórz bazę danych dla twojej witryny internetowej WordPress na żywo
Przed uruchomieniem instalatora lub przesłaniem witryny WordPress z hosta lokalnego na twój serwer hostingowy, musisz utworzyć bazę danych MySQL dla nowej witryny na żywo.
Jeśli utworzyłeś już bazę danych MySQL, możesz pominąć ten krok.
Aby utworzyć bazę danych, należy przejść na kokpit cPanel twojego konta hostingowego. Następnie znajdź sekcję “Bazy danych” i kliknij ikonkę “Kreator baz danych MySQL”.
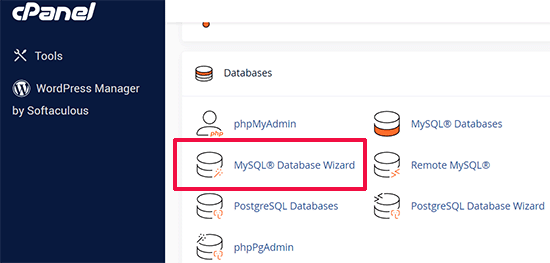
Na kolejnym ekranie znajduje się pole do utworzenia nowej bazy danych.
Wystarczy podać nazwę twojej bazy danych i kliknąć przycisk “Utwórz bazę danych”.

cPanel utworzy teraz nową bazę danych.
Następnie wpisz nazwę użytkownika i hasło dla twojego nowego użytkownika, a następnie kliknij przycisk “Utwórz użytkownika”.
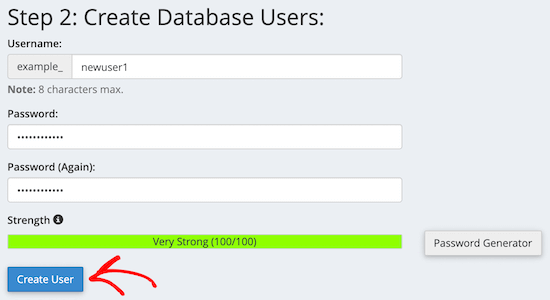
Następnie należy dodać utworzonego użytkownika do bazy danych.
Najpierw kliknij pole wyboru “Wszystkie uprawnienia”.
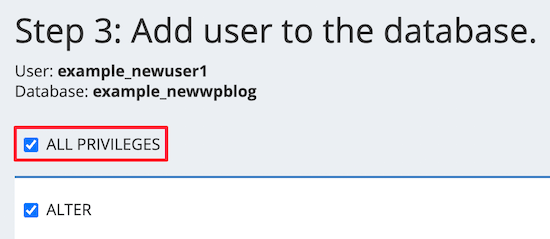
Następnie przewiń w dół i kliknij przycisk “Wprowadź zmiany”, aby zapisać twoje zmiany.
Twoja baza danych jest teraz gotowa do użycia z witryną WordPress. Pamiętaj, aby zanotować nazwę bazy danych, nazwę użytkownika i hasło. Informacje te będą potrzebne w następnym kroku.
Krok 3: Przesyłanie plików z serwera lokalnego do witryny internetowej WordPress na żywo
Teraz należy przesłać archiwum i pliki instalatora z twojej regionalnej witryny na twoje konto hostingowe.
Najpierw połącz się z twoją witryną na żywo za pomocą klienta FTP. Po połączeniu upewnij się, że katalog główny twojej witryny internetowej jest całkowicie pusty.
Zwykle katalogiem głównym jest katalog /home/public_html/.
Niektóre firmy hostingowe WordPress automatycznie instalują WordPress podczas rejestracji. Jeśli masz tam pliki WordPress, musisz je usunąć.
Następnie możesz przesłać pliki archive.zip i installer.php z Duplicatora do twojego pustego katalogu głównego.

Krok 4: Uruchomienie skryptu migracji
Po przesłaniu plików migracyjnych należy przejść na następujący adres URL w twojej przeglądarce:
http://example.com/installer.php
Nie zapomnij zastąpić “example.com” twoją własną nazwą domeny.
Spowoduje to uruchomienie kreatora migracji Duplicator.
Instalator przeprowadzi kilka testów i zainicjuje skrypt.
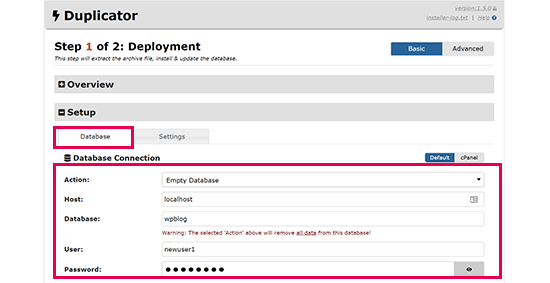
W sekcji Konfiguracja zostaniesz poproszony o wpisz swojego hosta MySQL, nazwę bazy danych, nazwę użytkownika i hasło.
Twój host będzie prawdopodobnie hostem lokalnym. Następnie wpiszesz szczegóły bazy danych, którą utworzyłeś we wcześniejszym kroku.
Następnie kliknij przycisk “Zatwierdź”, aby upewnić się, że wpiszesz prawidłowe dane.
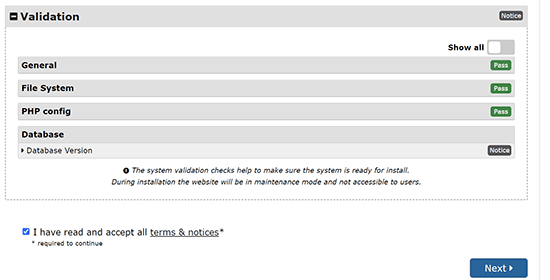
Następnie kliknij przycisk “Dalej”, aby kontynuować.
Duplicator będzie teraz importować twoją kopię zapasową bazy danych WordPress z archiwum do nowej bazy danych.
Zaktualizuje również adresy URL wskazujące na witrynę regionalną i twoją nową witrynę na żywo.
Możesz teraz kliknąć przycisk “Admin Login”, aby wpisz obszar administracyjny WordPress twojej witryny na żywo.

Po zalogowaniu się na twoją witrynę, Duplicator automatycznie wyczyści pliki instalacyjne.
To wszystko. Pomyślnie przeniosłeś WordPressa z lokalnego serwera na twoją witrynę live.
Metoda 2: Ręczne przeniesienie WordPressa z regionalnego serwera na witrynę Live
W tej metodzie pokażemy, jak ręcznie przenieść WordPressa z lokalnego serwera na twoją witrynę na żywo. Będzie to przydatne, jeśli pierwsza metoda nie zadziała lub jeśli wolisz zrobić to ręcznie.
Krok 1: Eksport lokalnej bazy danych WordPress
Pierwszą rzeczą, którą musisz zrobić, to wyeksportować twoją lokalną bazę danych WordPress. W tym celu użyjemy phpMyAdmin.
Jeśli nie jesteś z nim zaznajomiony, to warto zapoznać się z naszym przewodnikiem po zarządzaniu bazą danych WordPress za pomocą phpMyAdmin.
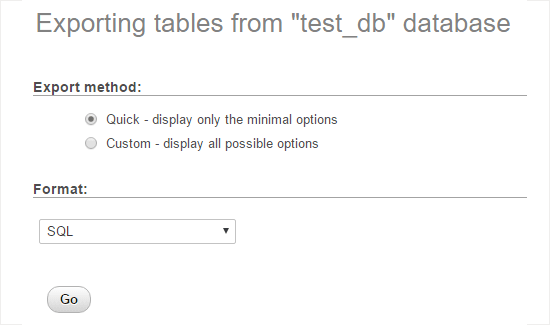
Wystarczy wejść na stronę http://localhost/phpmyadmin/ i kliknąć na twoją bazę danych WordPress. Następnie kliknij przycisk “Eksportuj” na górnym pasku menu.

W opcji “Metoda eksportu:” można wybrać “Szybka” lub “Niestandardowa”. Dostosuj zapewni więcej opcji eksportu twojej bazy danych.
Zalecamy jednak wybranie opcji “Szybko”, a następnie kliknięcie przycisku “Dalej”, aby pobrać twoją bazę danych.
Krok 2: Wgranie plików WordPress na witrynę Live
Teraz będziemy musieli przenieść wszystkie pliki twojej witryny internetowej do witryny na żywo.
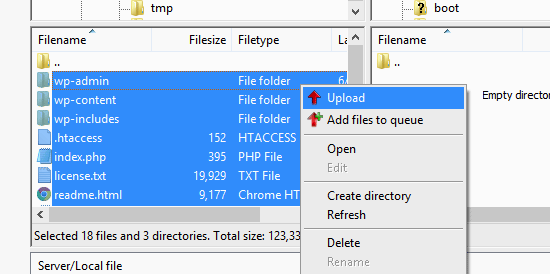
Aby rozpocząć, otwórz klienta FTP i połącz się z twoim kontem hostingowym.
Po połączeniu się z twoją witryną na żywo, upewnij się, że przesyłasz pliki do właściwego katalogu. Na przykład, jeśli witryna ma być hostowana pod adresem “yoursite.com”, wszystkie pliki należy przesłać do katalogu public_html.
Teraz wybierz twoje lokalne pliki WordPress i prześlij je na swój serwer live.
Krok 3: Utwórz bazę danych MySQL na twojej witrynie Live
Podczas gdy twój klient FTP przesyła pliki WordPress, możesz rozpocząć importowanie bazy danych na serwer live.
Większość dostawców hostingu WordPress oferuje cPanel do zarządzania twoim kontem hostingowym, więc pokażemy ci, jak utworzyć bazę danych za pomocą cPanel.
Najpierw należy zalogować się do twojego kokpitu cPanel i kliknąć ikonkę “Kreator baz danych MySQL”, która znajduje się w sekcji “Bazy danych”.

Na następnym ekranie można utworzyć nową bazę danych.
Musisz podać nazwę twojej bazy danych, a następnie kliknąć “Utwórz bazę danych”.

cPanel automatycznie utworzy teraz nową bazę danych.
Następnie wpisz nazwę użytkownika i hasło dla twojego nowego użytkownika, a następnie kliknij “Utwórz użytkownika”.
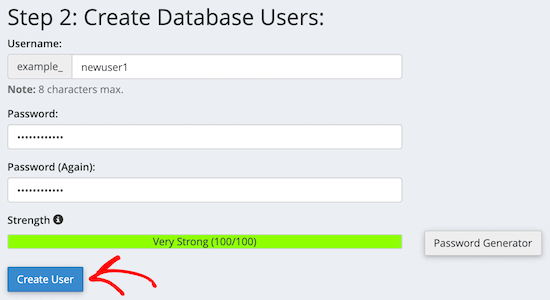
Następnie należy dodać utworzonego użytkownika do bazy danych.
Najpierw zaznacz pole wyboru “Wszystkie uprawnienia”.
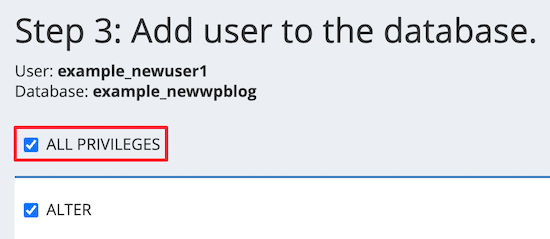
Następnie przewiń w dół i kliknij “Wprowadź zmiany”, aby zapisać twoje zmiany.
Pomyślnie utworzyłeś nową bazę danych dla twojej witryny WordPress na żywo.
Krok 4: Importowanie bazy danych WordPress do witryny Live
Następnym krokiem w procesie jest importowanie twojej bazy danych WordPress.
Przejdź do twojego kokpitu cPanel, przewiń w dół do sekcji “Bazy danych” i kliknij “phpMyAdmin”.
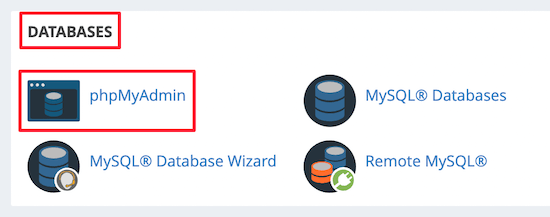
Spowoduje to przejście do phpMyAdmin, gdzie należy kliknąć utworzoną powyżej bazę danych. phpMyAdmin wyświetli twoją nową bazę danych bez tabel.
Następnie kliknij kartę “Importuj” w górnym menu. Na stronie importowania kliknij przycisk “Wybierz plik”, a następnie wybierz plik bazy danych z witryny regionalnej, który zapisałeś w pierwszym kroku.
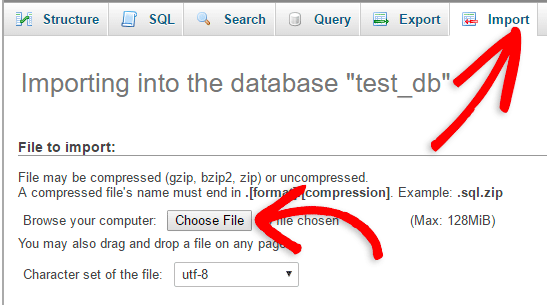
Następnie kliknij przycisk “Go” na dole strony. Twoja baza danych zostanie automatycznie importowana do phpMyadmin.
Krok 5: Zmiana adresu URL witryny
Teraz musisz zmienić adres URL witryny w bazie danych, aby połączyć się z twoją witryną WordPress na żywo.
W phpMyAdmin, poszukaj tabeli wp_options w twojej bazie danych, którą właśnie importowałeś powyżej.
Jeśli zmieniłeś prefiks bazy danych, to zamiast wp_options może być {new_prefix}_options.
Następnie kliknij przycisk “Przeglądaj” obok wp_options. Możesz też kliknąć odnośnik na panelu bocznym, aby otworzyć stronę z listą pól w tabeli wp_options.
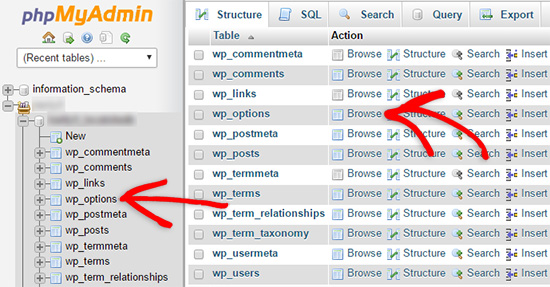
Następnie w kolumnie options_name należy wyszukać opcję siteurl.
Następnie kliknij ikonkę “Edytuj”.

Spowoduje to wyświetlenie okna, w którym można edytować pole.
W polu wejściowym option_value zobaczysz adres URL twojej regionalnej instalacji, który będzie czymś w rodzaju http://localhost/test.
W tym polu należy wstawić adres URL twojej nowej witryny, na przykład: https: //www.wpbeginner.com.
Następnie możesz zapisać pole, klikając przycisk “Dalej”.
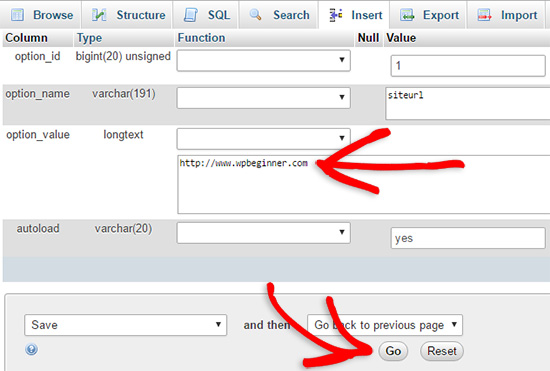
Następnie należy wykonać te same kroki, co powyżej dla nazwy opcji strony głównej. Menu wp_options może mieć kilka stron. Zazwyczaj opcja strony głównej znajduje się na drugiej stronie.
Następnie zaktualizuj adres URL strony głównej, aby był taki sam jak adres URL twojej witryny na żywo.
Krok 6: Skonfiguruj swoją witrynę Live
Teraz, gdy importowałeś bazę danych i przesłałeś swoją treść, nadszedł czas, aby skonfigurować WordPress.
W tym momencie twoja witryna powinna wyświetlać błąd“Błąd nawiązywania połączenia z bazą danych“.
Aby to poprawić, połącz się z twoją witryną internetową za pomocą klienta FTP i otwórz plik wp-config.php.
Poszukiwane będą następujące linie kodu:
1 2 3 4 5 6 7 8 9 | // ** MySQL settings - You can get this info from your web host ** ///** The name of the database for WordPress */define( 'DB_NAME', 'database_name_here' );/** MySQL database username */define( 'DB_USER', 'username_here' );/** MySQL database password */define( 'DB_PASSWORD', 'password_here' );/** MySQL hostname */define( 'DB_HOST', 'localhost' ); |
Będziesz musiał podać nazwę bazy danych, nazwę użytkownika i hasło, które utworzyłeś wcześniej.
Następnie zapisz plik wp-config. php i prześlij go z powrotem na twój serwer hostingowy WordPress.
Teraz, gdy użytkownik przejdzie na twoją witrynę internetową, powinna ona działać na żywo.
Następnie musisz logować się do twojego panelu administracyjnego WordPress i przejść do Ustawienia ” Ogólne. Następnie, nie zmieniając niczego, przewiń do dołu i kliknij przycisk “Zapisz zmiany”.
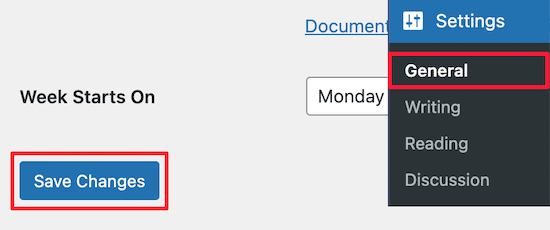
Dzięki temu adres URL twojej witryny zostanie poprawiony wszędzie tam, gdzie powinien.
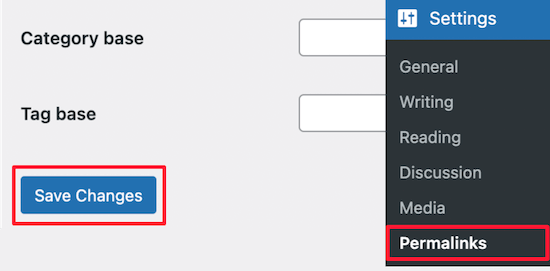
Gdy to zrobisz, przejdź do Ustawienia ” Bezpośrednie odnośniki, a następnie przewiń w dół i kliknij “Zapisz zmiany”, aby upewnić się, że wszystkie odnośniki do wpisów działają poprawnie.
Krok 7: Poprawka obrazków i naprawiono odnośniki poprzez aktualizację ścieżek.
Za każdym razem, gdy przenosisz witrynę WordPress z jednej domeny do drugiej lub z serwera regionalnego do witryny na żywo, napotkasz niedziałające odnośniki i brakujące obrazki.
Pokażemy dwa sposoby aktualizacji adresów URL. Możesz wybrać ten, który najbardziej Ci odpowiada.
1. Aktualizacja adresów URL za pomocą wtyczki Search & Replace Everything (zalecane)
Najbezpieczniejszym sposobem na poprawienie tego jest użycie Search & Replace Everything. Jest to potężna wtyczka WordPress, która pozwala łatwo wykonywać zadania masowej aktualizacji na twojej witrynie internetowej bez pisania skomplikowanych zapytań do bazy danych.
Najpierw należy zainstalować i włączyć wtyczkę Search & Replace Everything.
Po włączaniu przejdź do strony Narzędzia ” WP Wyszukaj i zamień.
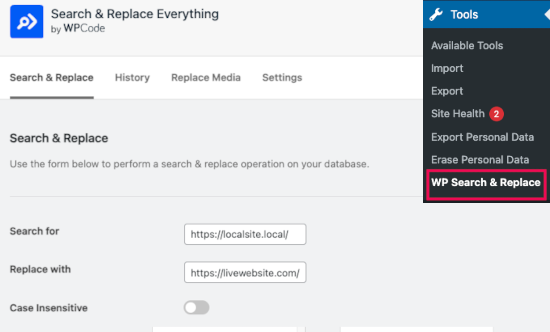
Następnie wpisz adres URL witryny regionalnej w polu “Wyszukaj” i adres URL witryny rzeczywistej w polu “Zamień na”.
Przewiń nieco i kliknij “Wybierz wszystko” pod tabelami. Dzięki temu wtyczka będzie szukać starego adresu URL wszędzie w bazie danych.
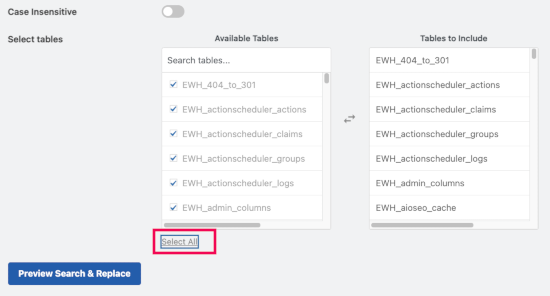
Teraz kliknij przycisk “Podgląd wyszukiwania i zamiany”, aby kontynuować.
Wtyczka przeszuka twoją bazę danych pod kątem wszystkich instancji starego adresu URL, a następnie wyświetli podgląd wyników.
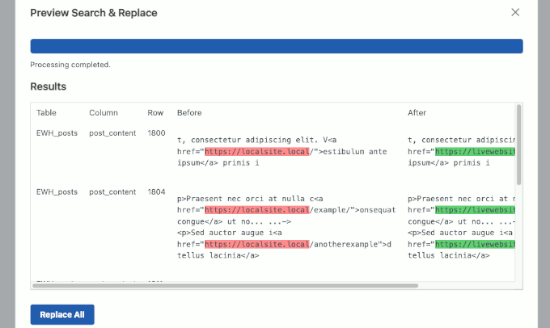
Jeśli wszystko wygląda dobrze, kliknij “Zastąp wszystko”, aby zapisać zmiany.
Zobaczysz ostrzeżenie o wprowadzanych zmianach. Kliknij “Tak”, aby kontynuować.
Wtyczka zaktualizuje teraz bazę danych i zastąpi lokalne adresy URL twoim obecnym, aktualnym adresem URL witryny internetowej.
2. Ręczna aktualizacja adresów URL (zaawansowane)
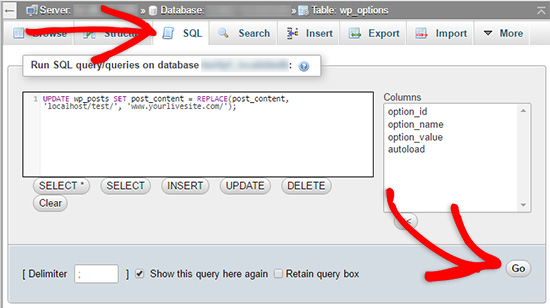
Innym sposobem aktualizacji adresów URL jest użycie następującego zapytania SQL:
1 | UPDATE wp_posts SET post_content = REPLACE(post_content, 'localhost/test/', 'www.yourlivesite.com/'); |
Wystarczy przejść do phpMyAdmin, kliknąć na twoją bazę danych, a następnie kliknąć na “SQL” z górnego menu i dodać powyższe zapytanie.
Upewnij się, że zmieniłeś je na adresy URL twojej witryny regionalnej i witryny na żywo, a następnie kliknij przycisk “Przejdź”.
To wszystko. Pomyślnie przeprowadziłeś migrację WordPressa z twojego regionalnego serwera na witrynę live.
Miejmy nadzieję, że twoja witryna internetowa na żywo działa sprawnie. W przypadku powiadomienia o jakichkolwiek błędach, możesz zapoznać się z naszym przewodnikiem po typowych błędach WordPress, aby uzyskać pomoc w rozwiązywaniu problemów.
Mamy nadzieję, że ten artykuł pomógł ci przenieść WordPressa z serwera lokalnego na witrynę live. Możesz również zapoznać się z naszym przewodnikiem na temat przenoszenia witryny na żywo na serwer lokalny lub zapoznać się z ostateczną listą kontrolną migracji witryny, aby poznać praktyczne kroki migracji WordPress.
If you liked this article, then please subscribe to our YouTube Channel for WordPress video tutorials. You can also find us on Twitter and Facebook.


ANTONIO
Some days ago I posted I had used method #1 successfully. I am now trying again, from scratch, with no success.
I have two webs in one host (two subdomains: www and blog). one seats in /public/ and the other seats in /public_blog/.
(so, not a subfolder but a sibling, in my host provider). Both (www and blog subdomains) have a SSL.
I got to enter the WP admin area, clean the remaining files; posts and pages are listed, but clicking preview shows a blank page. No errors on the log
I don’t know how to trace and find out the steps (although I have the dup-installer-log.txt
thanks
WPBeginner Support
You would likely want to reach out to your hosting provider to ensure that the subdomain is set to the correct folder location for the most common reason for that issue.
Admin
Rob H
Brilliant tutorial.
I went with option 1. Got write through to point 4, but then on trying to launch WordPress, I received a “too many redirects”. Spent ages trying to figure out what I had done wrong, trying all the suggested for the error type and turned out not to be my fault. It wasn’t working because the database version I was using on Wamp was newer than the version on my hosting company 1and1 ionos.
I called up 1and 1 CS’s to ask if they could update the database version and it appears they must have had other complaints. 2 days later, database version updated and my local website transferred to the live site within minutes.
So…… database versions is another thing to consider if you get problems.
Thanks for such an excellent tutorial, I will use this method again in the future.
WPBeginner Support
Thanks for sharing your solution should anyone else run into this issue
Admin
Antonio
Perfect. I used method #1. Now the site (in server) is up and running.
But, then, when I add some posts, pages, menus in localhost,… how can I update the real site, without starting from scratch again?
thanks
WPBeginner Support
You could use the duplicator method to move the updated content over to your current site
Admin
Antonio
Thanks. I will try.
I didn’t notice my post was published yesterday, so I just wrote a new one asking the same question.
Sorry for the inconvenience.
WPBeginner Support
No worries
Bahadur
My website working fine on localhost but when i upload it to my live domain some of the Social button images are not showing can you help please ?
WPBeginner Support
We would first recommend reaching out to the support for the plugin you are using to ensure there isn’t a hiccup that is specific to transferring the content.
Admin
Luisa
Hi! I followed every step but once I get to step 4 and click on Admin Login I get an error saying “Too many redirects occurred trying to open […]. This might occur if you open a page that is redirected to open another page which then is redirected to open the original page”.
How can I fix that?
WPBeginner Support
For that error you would want to try the troubleshooting steps in our article here: https://www.wpbeginner.com/wp-tutorials/how-to-fix-error-too-many-redirects-issue-in-wordpress/
Admin
Anita Steen-van Meerveld
Hi, I’ve followed the instructions so far, and everything seems to go as it has, but the problem begins on step 4.
I’ve uploaded the migration files, after check the file is 1.2 gig.
After launching the installer.php the message is : file is 4k, please upload the complete file.
I am sure that the uploaded file is completely uploaded.
The process stops here, what can I do?
WPBeginner Support
You would want to reach out to duplicator’s support and let them know the error and they will be able to assist.
Admin
Jessica
Thankyou for this fantastic tutorial! I am building a new website locally but I already have a live site running that I will want to completely overwrite with the new one. Do I need to delete my whole live website before migrating? Both are running WordPress but are completely different themes… thanks!
WPBeginner Support
It would normally be best to remove the site you are replacing so you do not have unnecessary additional files on your server.
Admin
nurudeen
In my opinion I recommend you guys to please organize a complete video tutorial, it gonna be a great practical guide and more helpful and much easier, for it may allow to view in real doing until results achieve.. Thanks you guys for good job you are offering.
WPBeginner Support
Thank you for your recommendation
Admin
Reggie
Hi, I did this and now my slider/carousel does not work live but it shows and works on localhost. What can I do to fix this? Thank you.
WPBeginner Support
It would depend on what error you are running into at the moment. If you reach out to the slider plugin’s support they should be able to assist.
Admin
Gage
Hi I really appreciate the in depth explanation. I am completely finished with step 5, changed my URL and Home to my actual URL i am using, but now when I type in my URL it still gives me the “if you are the owner login to launch site”. Not sure what I’m missing but i dont get an error message.
WPBeginner Support
Hi Gage,
Please recheck if you uploaded WordPress files to the correct directory. If you are unsure, then ask your hosting provider and they will let you know which directory you should upload it to.
Admin
Vladimir
Thank. Very useful tutorial.
WPBeginner Support
Thank you
Admin
Tarun Bisht
Thanks for sharing the post, i will surely try.
WPBeginner Support
Glad our post can help you
Admin
Hazel beaver
I normally love your tutorials and have built my two personal websites with your help and guidance… But this is too complicated for me!
When I run Duplicator If doesn’t list all the entries as ‘good’. The size check and add on checks come back as having a warning. so I can’t get any further. My site isn’t that big.. but I think it’s trying to package everything ( including back-up and plugins that I assume I don’t need to migrate. Is there a way round this ( I’m trying to down load my live site to WAMP so I can work on using a new theme )
WPBeginner Support
As long as they are only warnings you should be able to continue, if you click on the section with the warning it should let you know different options on how to change from warning to good. You can also enable filters to ignore certain files/folders
Admin
Fahim
Good post.
WPBeginner Support
Thank you
Admin
Ravi gupta
Great! Thanks for sharing this information I am so very happy to read this information
WPBeginner Support
Glad you like our article
Admin
Rosa
Hi there! I’ve followed your instructions so far, and everything seems to go as it has, but I’ve stuck on Step 6.
I read: “To fix this, connect to your website using an FTP client and edit wp-config.php file. Provide the database name, user and password you created earlier in Step 3. Save the wp-config.php file and upload it back to your server. Visit your website, and it should be live now.”
Can you please be more specific? Where exactly do I find wp-config.php file and how do I edit it?
WPBeginner Support
You would find the wp-config file where your WordPress folders are which is normally in the public_html or www folder of your hosting. You would use a text editor such as notepad or similar to edit the content of the file
Admin
Hirr
Could be more helpful if you uploaded a video..
WPBeginner Support
Thank you for your recommendation, we’ll certainly take a look for a possible video
Admin
Mike
“Click on the Import tab in the top menu. On the import page, click on Choose File button and then select the database file you saved in Step 1.” I cannot locate this file – no idea where to even look.
WPBeginner Support
Hi Mike,
In the first step you would have saved a file to your computer. This is the file you need to import here.
Admin
Samad
Thank you very much for the information,
I have been doing these wrong in the past.
Jim Thorne
Fantastic how-to article. I followed it and easily migrated my site from localhost to the live server. Thanks for posting! I’m a newbie at moving a site, so I had to figure out some of the simplest things. One thing I had to discover was how to move the file folders from my computer to the host server using cPanel. After researching this, I discovered to ZIP the entire folder with all of its subfolders into a ZIP file and then upload that one file.
Christian
Fix Images and Broken Links by Updating Paths: How to update background images? The method mention in step 7, only work normal image not background images. So how to update images?
WPBeginner Support
Hi Christian,
You’ll have to manually update those.
Admin
Alex
Hi guys, great tutorial.
But when i try to access my site through the url, it asks me to re-install WordPress (i mean is shows me the wizard of the WordPress when it starts)
Plus, when you say go to the database and create a new user, mySQL doesn’t have an option.
Olaniyan
Hello please i followed all the steps but at the end of it all am getting an error message stating Erro In Establishing a database connection message
Steph
Hi, how do I proceed if there is no cPanel? Thank you in advance!
Jasonas
Hello! Great article. Just two things that I think would be cool to read on this subject.
1.Are there any tips of workflow in order to avoid the broken links, images etc. that you mention?
2.Also, I’ve read plugin reviews where users claim that some bad plugins will leave “trash code” (unusable code and files) after the uninstall/deletion of the plugin, which eventually makes their website slower. Is that true? If yes how could we, as beginners, detect that “trash code” (essentially the leftovers of plugins that we deleted) and remove it?
In my local website I try many plugins that I don’t intend to use and will end up deleting (like many others do), so I am interested in this.
Thank you in advance.
WPBeginner Support
Hi Jasonas,
1. You can follow the steps above in order they appear to avoid broken links.
2. You can view leftover data in your WordPress database by using phpMyAdmin. However, we don’t recommend beginners to do that unless they are certain that this data is slowing down their website.
Admin
Sally
Hi,
I have been building my site on the local server, I now want to move it over to a temporary Url on my WordPress which is installed on my hosting package to finish and then once ready it will be pointed to the domain name which currently hosts the old site, I have attempted the above steps but I get as far as step 1 and have no idea where the export file goes?
Sorry if this is a silly question but can’t seem to find it anywhere!
Any help would be much appreciated.
Thanks,
Sally
WPBeginner Support
Hi Sally,
Export file is automatically downloaded to your computer. Check your computer’s Downloads folder or any other folder where your browser usually stores downloaded files.
Admin
Sally
Hello,
Thanks, sorry can’t find it there at all. I emptied the folder and did it again but nothing appeared in there at all, hence asking the question.
All Safari downloads go into the normal download folder, so don’t know where it could be going. Going to give it a go with Duplicator and see if I get any further!
Thanks,
Sally
Sheuen
I think maybe you can try choose download custom instead of download quick, and then in output field, choose “Save output to a file” > Compression: > gzipped
JD Simpkins
Depending on your setup, it may not automatically download. It may open up in a new screen and you can then copy/paste it into a file and save yourself. Not sure if this is just a MAMP thing or what but when I migrated over to working on a Mac, this part of the steps changed.
Sally
Hi,
Your tutorials are great, thank you!
I have just been following this thread and not sure if what I am doing is wrong but I do Step 1 (Export) but no idea where the file that I am exporting goes?
I am running a local server on my Mac and have got stuck here, am I missing something?
I am trying to get my website from the local server to WordPress running on my hosting package with 123 Reg. This is going onto a temporary URL until I am ready to move onto the domain which has currently got the old website on it.
Any help will be much appreciated.
Many thanks
Sally
Ahmad Lone
Thank you so much.
Ismail
I have a wordpress website on live server, i want to replace it by another wordpress server that i created on localhost, i want to keep the same host and same domaine name. what should i do please ?
Sandy
This is very helpful. I want to ask about the next step. What if I continue to develop locally and want to sync changes from time to time ? Do you have a tutorial for that ?
DEAN O
I have an issue where my laptop died with localhost MAMP server. I have been able to extract the all the files from the hard disc but I can’t run a database export.
I have an laptop set up with XAMP.
Any thoughts?
Mauricio
Sunday evening.
The client wants the website.
I have tried Duplicator all day long, no way.
Problems with PHP and DB, just doesn’t work… until I get to your post.
Back to basics man, manually put the live on air.
Thanks for sharing.
Its the simpler idea yet we try to automate things and get less work done sometimes.
Had to share with you my truly akcnowledgment.
Nicely done
Stefan
Thank you! This guide is perfect. I use it every time I forget how I move wordpress from local to live!
Chell
I have recieved a complete WP “filesystem” through an FTP server from a supplier of mine, and I want to creat a new webpage with these files, but with my own domain.
Can I use this “walk-through” for this?
Sorry silly questions, but I have only worked on WP through a cloud solution
WPBeginner Support
Hi Chell,
You will also need the WordPress database not just the files. Once you have both database and WordPress files, then you will be able to upload them to your own domain name and import the database.
Admin
Scott
Hello. I have finished building my site on a local server and ready to move it to my live server. I am assuming that before I follow your steps, that I would need to install WordPress on my hosting account first. Is that correct? And if so, should I click the box that says “Automatically create a new database for this installation” ? If I do that, I will need to replace that database with the one from my local server, right? Or should I leave that box unchecked since I’m about to migrate a new database to it? Thanks.
WPBeginner Support
Hi Scott,
No, instead of installing WordPress you will be moving one from your local server to the live site. Similarly, you will export your local database and then import it on your live server’s hosting account using phpmyadmin via cpanel.
Admin
Bryn Why
Hi, after updating my wp-config.php file to reflect the database information, I am now presented with the below when accessing the live site:
Fatal error: Class ‘WP_Widget_Media’ not found in /home/…/wp-includes/widgets/class-wp-widget-media-audio.php on line 17
Manos Liakos
Dude, you are a life saver. That thing with the SQL query to change the links just saved me. I’ve been trying for 2 days straight to fix the site not displaying properly when accessing it from public ip through my domain name, even if “siteurl” and “home” were correctly configured. Thanks!
WPBeginner Support
Hi Manos,
Glad you found the solution. Don’t forget to join us on Twitter for more WordPress tips and tutorials.
Admin
Shreshta
Thank you in advance.
I have to upload the word press website from my local machine to the web server my company owns which sits in the same building as I work. My problem is I am not using any hosting services so I am not sure what to do when it comes to the file manager step for the database transfer. Just to be clear, how would I go if I were to upload the website from my local machine to the private company server without using a web hosting service.
Dimitris
Hello I am going to do this migration, but I have a question. What happened if i have to upload a website to a server but in my localhost this website is a part of multisite? How can I isolate this website from the local WordPress Network and finally upload it to a real web server?
Olumide
phpMyAdmin – Error
Error during session start; please check your PHP and/or webserver log file and configure your PHP installation properly. Also ensure that cookies are enabled in your browser.
session_start(): open(SESSION_FILE, O_RDWR) failed: No such file or directory (2)
The above is what i get and my site is not working please help.
WPBeginner Support
Hi Olumide,
If the error occurs on your live site, then please contact your hosting provider. If this happens on your local server, then this means your local server set up is not properly configured.
Admin
Angela
I just followed these steps to move a local site to active and none of my local site transferred over.
Olakorede O
Please i am having issues with step 7. i imputed the life site but what will i put for the local site? thanks
Dimitri
Thanks god for this article !
The Step 6 saved my life, it could not be found anywhere on the internet !!!
Kisses from France
Marlon
Hi WPBEGINNER SUPPORT et al,
Thanks I have found your article helping people out there. I hope I can find your favor to my problem. After having modifies by adding codes in functions.php (live site) i can’t view or access the website anymore, it always shows the message saying:
Notice: ob_end_clean(): failed to delete buffer. No buffer to delete in /home/dh_awey63/website/wp-content/plugins/nextgen-gallery/nggallery.php on line 92
ParseError thrown
syntax error, unexpected ‘ang’ (T_STRING)
I used to searched in google the message error and got some advices to access it thru FTP FileZilla client, but I can’t login successfully I always got an error in: “Response: 530 Login incorrect”. “Error: Critical error: Could not connect to server”. Is there a way i can edit the functions.php file to delete my comments there and put back the site in normal, I just don’t know if the web developer have configured ftp account, that freelance developer left his messy and lousy stuff in his web design and has gone out after he receives the payment. I am really new to this area and don’t know what to do. Please help. Thank you very much.
WPBeginner Support
Hi Marlon,
You can also access your WordPress files using the File Manager in cPanel under your web hosting account dashboard. Once you are connected to your site using file manager, you need to locate your functions.php file and undo the changes you made earlier.
Admin
Marlon
Hi WPBEGINNER SUPPORT,
Thank you for your prompt reply. I sad I really have no idea if the guy who build the site created a cpanel account, I really don’t know the login details if there’s any. That bad guy never replies my messages after he receives the money from us. Please help me what to do if there’s any available options. Please visit the website at rheumacares.ph. Thank you very much.
Victor
Hi, I’m with a problem in step 4. After importing my database I get an error message. I don’t now what I did wrong in the process and I don’t know how to fix it. Could you give me some advice? I’m posting the error message below
Thanks
Error
SQL query:
—
— Database: `meusite`
—
— ——————————————————–
—
— Table structure for table `wp_commentmeta`
—
CREATE TABLE `wp_commentmeta` (
`meta_id` bigint(20) UNSIGNED NOT NULL,
`comment_id` bigint(20) UNSIGNED NOT NULL DEFAULT ‘0’,
`meta_key` varchar(255) COLLATE utf8mb4_unicode_520_ci DEFAULT NULL,
`meta_value` longtext COLLATE utf8mb4_unicode_520_ci
) ENGINE=InnoDB DEFAULT CHARSET=utf8mb4 COLLATE=utf8mb4_unicode_520_ci
MySQL said: Documentation
#1050 – Table ‘wp_commentmeta’ already exists
WPBeginner Support
Hi Victor,
The table in your database already exists. If you do not have any content on your live site, then you can simply DROP all tables in your WordPress database and then try to import again.
Admin
Jonathan
Thank you for a fantastic article!
I have locally built a wordpress site which I would like to replace a site currently live online.
If I want to upload the local site to a test environment online, am I able to do this without the need to setup a new database? i.e. am i able to share the same database being used by the live site? If so how can I do this?
Cheers, Jon
Jon
Fantastically helpful article thankyou! I have been building a wordpress site locally to replace one that is hosted online.
I would like to move the locally hosted one to online in a test environment so that it does not replace the existing site.
You instructions suggest that I need to setup a new SQL database for which I will incur charges. Is there a way that I can upload the test site to the existing database without disturbing the live site? If so how?
Thanks,
Jon
WPBeginner Support
Hi Jon,
It is not recommended, but you can change the table prefix in the wp-config.php file of your test site to something unique. Use the same MySQL database as your live site. Doing so your live website’s database will have tables for different WordPress installs.
Admin
Jojo Esposa Jr
Can I use the Cpanel Softaculous installation of WordPress, then simply upload the sql database and the current theme I used? Uploading the entire wordPress files from my laptop to the live site using ftp takes very long since my internet connection is extremely slow, (2 mbps).
WPBeginner Support
Hello Jojo Esposa Jr,
Yes, you can do that.
Admin
Lyada Emmanuel
Hello i followed all the steps ,however when i open login page to wordpress i get this
Internal Server Error
WPBeginner Support
Hi Lyada,
Please see our guide on how to fix internal server error in WordPress.
Admin
Madison Duncan
Hello,
I am confused by step two. When I click on my FTP client account it prompts me to use Cyberduck, but then I am not sure which files to upload or where (how to I make sure it is on public html?). I completed step one, so are those the files that I am supposed to upload? I just don’t see all of those anywhere. Thanks!
WPBeginner Support
Hi Madison,
This tutorial is about moving a WordPress website built on local server (Your computer) to a live website. If you have a local server installed on your computer (programs like Wamp, MAMP, XAMP), then you will find local files on your computer. These are the files you need to upload.
The first step only exports your database. You will need it in Step 4.
Admin