Chcesz bezpiecznego miejsca do eksperymentowania z witryną WordPress bez obawy o zepsucie czegoś na swojej aktywnej stronie?
Przeniesienie Twojej witryny WordPress na lokalny serwer na Twoim komputerze jest, naszym zdaniem, idealnym rozwiązaniem, szczególnie dla programistów, projektantów lub początkujących użytkowników WordPress.
Instalacja WordPressa na komputerze (serwer lokalny) pozwala na łatwe nauczenie się WordPressa i testowanie różnych rzeczy. Kiedy przenosisz działającą stronę WordPress na serwer lokalny, umożliwia Ci to eksperymentowanie z tymi samymi danymi, co na Twojej działającej stronie.
W tym artykule pokażemy Ci, jak łatwo przenieść działającą witrynę WordPress na serwer lokalny.
Dlaczego i kto chciałby przenieść działającą stronę WordPress na lokalny serwer?
Jeśli od jakiegoś czasu prowadzisz stronę WordPress, możesz chcieć wypróbować nowe motywy lub wtyczkę. Jednak robienie tego na aktywnej stronie internetowej może skutkować słabym doświadczeniem użytkownika dla Twoich odbiorców.
Aby tego uniknąć, wielu użytkowników tworzy kopię swojej witryny WordPress na serwerze lokalnym, aby testować nowe motywy, wtyczki lub przeprowadzać testy rozwojowe.
Pozwala to na skonfigurowanie motywu wraz z całą zawartością i przetestowanie wszystkich funkcji bez obawy o zepsucie witryny. Wielu użytkowników kopiuje swoją witrynę na lokalny serwer, aby ćwiczyć swoje umiejętności WordPress i kodowania na rzeczywistych danych witryny.
Chociaż możesz przeprowadzić wszystkie testy za pomocą przykładowej treści w WordPressie, rzeczywiste dane strony zapewnią lepszą wizualną reprezentację tego, jak te zmiany będą wyglądać na Twojej aktywnej stronie.
Przygotowanie do przeniesienia lokalnej witryny na lokalny serwer
Po pierwsze, musisz upewnić się, że zawsze tworzysz kopie zapasowe swojej witryny WordPress. Istnieje kilka świetnych wtyczek do tworzenia kopii zapasowych WordPressa, których możesz użyć.
Po drugie, musisz zainstalować lokalne środowisko serwerowe na swoim komputerze. Możesz użyć WAMP dla systemu Windows i MAMP dla Maca. Po skonfigurowaniu środowiska musisz utworzyć nową bazę danych za pomocą phpMyAdmin.
Po prostu odwiedź następujący adres URL w swojej przeglądarce, aby uruchomić phpMyAdmin.
http://localhost/phpmyadmin/
http://localhost:8080/phpmyadmin/
Stąd musisz kliknąć zakładkę „Bazy danych” i utworzyć nową bazę danych. Będziesz potrzebować tej bazy danych, aby później rozpakować dane swojej aktywnej witryny.

Jesteś teraz gotowy do przeniesienia swojej aktywnej strony WordPress na lokalny serwer.
Metoda 1. Przenoszenie aktywnej strony WordPress na lokalny serwer za pomocą wtyczki
Ta metoda jest łatwiejsza i zalecana dla wszystkich użytkowników.
Pierwszą rzeczą, którą musisz zrobić, to zainstalować i aktywować wtyczkę Duplicator. Więcej szczegółów znajdziesz w naszym przewodniku krok po kroku na temat jak zainstalować wtyczkę WordPress.
Duplicator pozwala łatwo tworzyć zduplikowany pakiet całej Twojej witryny. Może być używany do przenoszenia witryny WordPress w nowe miejsce, a także może być używany jako wtyczka do tworzenia kopii zapasowych.
Uwaga: Istnieje darmowa wersja Duplicator, od której możesz zacząć. Jednak Duplicator Pro oferuje nieograniczone kopie zapasowe i bardziej zaawansowane funkcje.
Po aktywacji przejdź do Duplicator Pro » Backups z paska bocznego administracji WordPress. Aby utworzyć nowy pakiet, musisz kliknąć przycisk „Add New”.
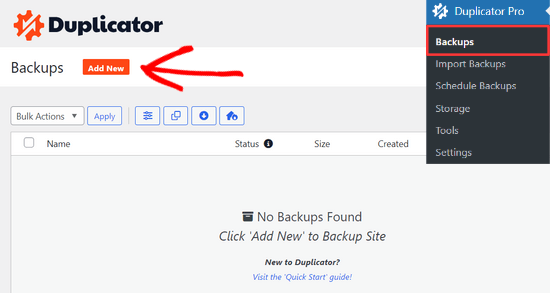
Duplicator uruchomi następnie kreatora kopii zapasowych.
Najpierw musisz podać nazwę dla swojego pakietu kopii zapasowej. Możesz również użyć dynamicznych tagów, aby automatycznie utworzyć format nazwy, taki jak data i tytuł Twojej witryny.

Następnie rozwiń sekcję „Storage” i wybierz lokalizację przechowywania.
W tym samouczku użyjemy domyślnej lokalizacji. Możesz kliknąć link „Dodaj magazyn”, aby dodać nową lokalizację, taką jak Dropbox lub Google Drive, jeśli chcesz.
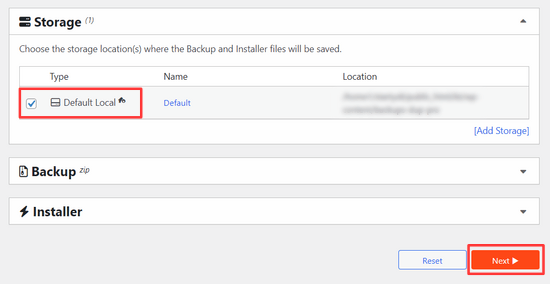
Kliknij przycisk „Dalej”, aby kontynuować.
Wtyczka przeskanuje następnie Twoją witrynę i przeprowadzi kilka kontroli w tle. Następnie wyświetli podsumowanie tych kontroli.
Jeśli wszystko wygląda dobrze, kliknij przycisk „Utwórz kopię zapasową”, aby kontynuować.
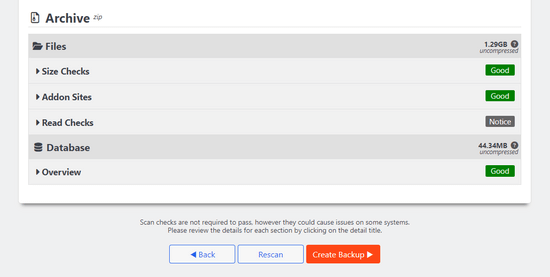
Duplicator utworzy teraz pakiet Twojej witryny.
Po zakończeniu zobaczysz plik archiwum zip zawierający wszystkie dane Twojej strony internetowej oraz plik instalacyjny. Musisz pobrać oba pliki na swój komputer.
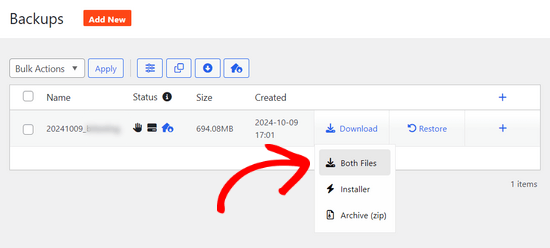
Jesteś teraz gotowy do rozpakowania i zainstalowania tych plików na swoim lokalnym serwerze.
Najpierw musisz utworzyć nowy folder w głównym folderze serwera lokalnego. Jest to folder, w którym serwer lokalny przechowuje wszystkie witryny.
Na przykład, jeśli używasz MAMP, będzie to folder /Applications/MAMP/htdocs/. Alternatywnie, jeśli używasz WAMP, będzie to folder C:\wamp\www\.
Wewnątrz tego folderu możesz tworzyć nowe foldery dla każdej nowej strony internetowej, którą chcesz zaimportować lub utworzyć na swoim serwerze lokalnym.
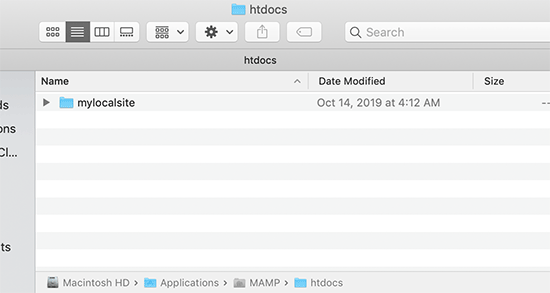
Następnie musisz otworzyć folder, który utworzyłeś dla swojej lokalnej strony, a następnie skopiować i wkleić zarówno plik archiwum zip, jak i skrypt instalacyjny, które pobrałeś wcześniej.
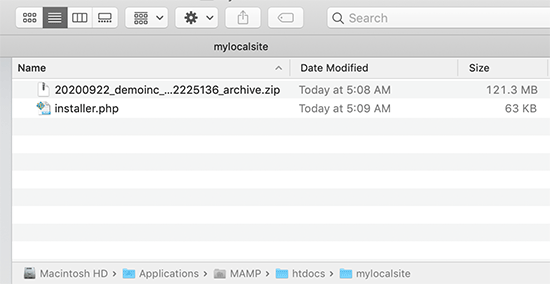
Aby uruchomić instalację, musisz otworzyć skrypt installer.php w przeglądarce internetowej.
Na przykład, jeśli wkleiłeś oba pliki do folderu /mylocalsite/, będziesz mógł uzyskać do nich dostęp w przeglądarce, odwiedzając http://localhost/mylocalsite/installer.php.
Teraz zobaczysz skrypt instalacyjny Duplicator w następujący sposób:
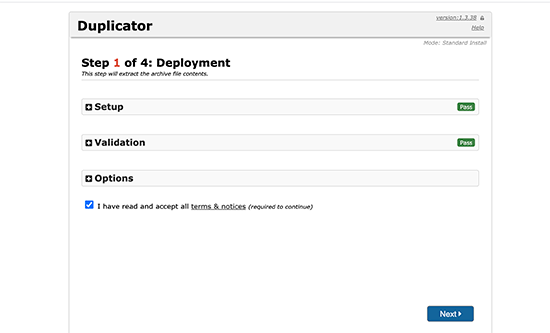
Kliknij przycisk „Dalej”, aby kontynuować.
Duplicator rozpakuje teraz plik archiwum zip i poprosi o podanie informacji o bazie danych Twojej lokalnej witryny. Jest to baza danych, którą utworzyłeś wcześniej.
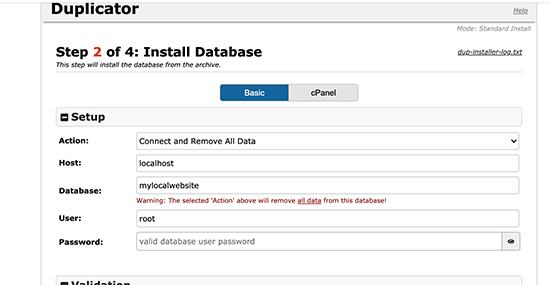
Nazwa serwera to prawie zawsze localhost, a nazwa użytkownika to root. W większości przypadków instalacja serwera lokalnego nie ma ustawionego hasła dla roota, więc możesz je pozostawić puste.
Na dole strony zobaczysz przycisk „Testuj bazę danych”, którego możesz użyć, aby upewnić się, że informacje o bazie danych są poprawne.
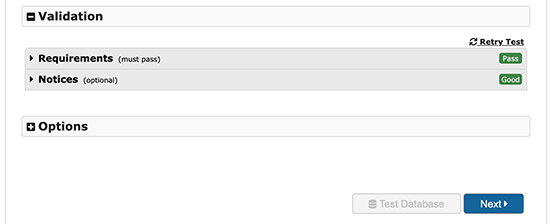
Jeśli wszystko wygląda dobrze, kliknij przycisk „Dalej”, aby kontynuować.
Duplicator zaimportuje teraz Twoją bazę danych WordPress. Następnie poprosi o ponowne sprawdzenie informacji o nowej stronie, które zostały automatycznie wykryte.
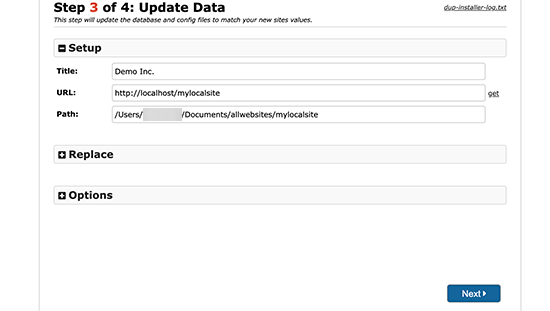
Kliknij przycisk „Dalej”, aby kontynuować.
Duplicator zakończy teraz konfigurację i wyświetli przycisk do zalogowania się na Twojej lokalnej stronie. Użyjesz tej samej nazwy użytkownika WordPress i hasła, których używasz na swojej działającej stronie.
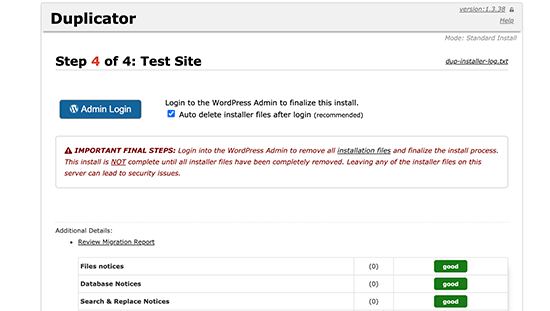
To wszystko, pomyślnie przeniosłeś swoją działającą stronę na serwer lokalny.
Metoda 2. Ręczne przeniesienie aktywnej strony WordPress na serwer lokalny
W przypadku, gdy wtyczka nie działa, zawsze możesz ręcznie przenieść swoją aktywną witrynę na serwer lokalny. Pierwszą rzeczą, której będziesz potrzebować, jest ręczne wykonanie kopii zapasowej witryny z Twojego konta hostingowego WordPress.
Krok 1. Wyeksportuj bazę danych WordPress Twojej aktywnej strony
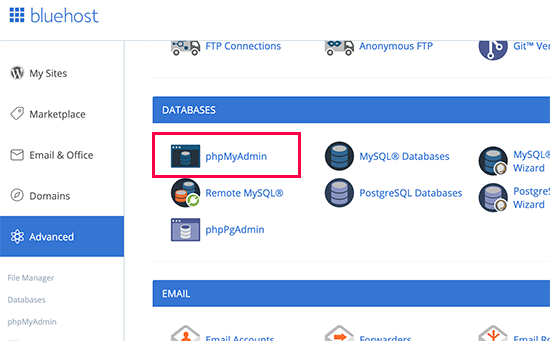
Aby wyeksportować bazę danych WordPress Twojej aktywnej witryny, musisz zalogować się do panelu cPanel i kliknąć phpMyAdmin.
Uwaga: Pokazujemy zrzuty ekranu z panelu Bluehost.
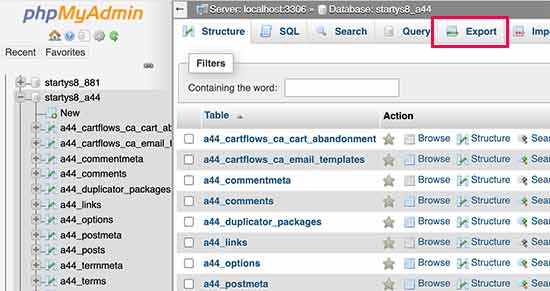
W phpMyAdmin musisz wybrać bazę danych, którą chcesz wyeksportować, a następnie kliknąć zakładkę eksportu na górze.
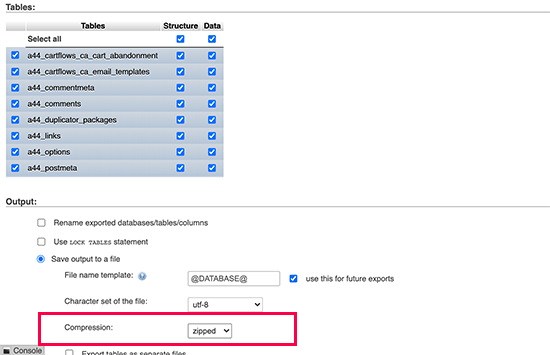
phpMyAdmin poprosi Cię teraz o wybór szybkiej lub niestandardowej metody eksportu. Zalecamy użycie niestandardowej metody i wybranie formatu zip jako metody kompresji.
Czasami pluginy WordPress mogą tworzyć własne tabele w bazie danych WordPress. Jeśli już nie używasz tego wtyczki, niestandardowa metoda pozwala na wykluczenie tych tabel.
Pozostaw pozostałe opcje bez zmian i kliknij przycisk „Go”, aby pobrać kopię zapasową bazy danych w formacie zip.
phpMyAdmin pobierze teraz plik Twojej bazy danych. Więcej szczegółów znajdziesz w naszym poradniku na temat ręcznego tworzenia kopii zapasowej bazy danych WordPress.
Krok 2. Pobierz wszystkie pliki WordPress
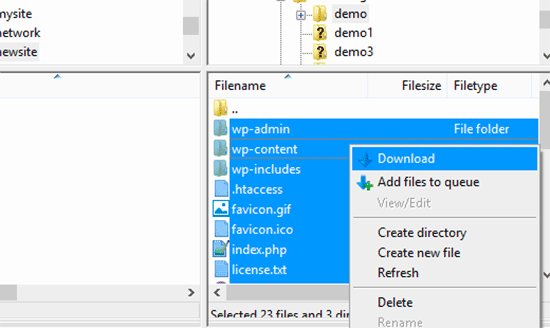
Następnym krokiem jest pobranie plików WordPress. Aby to zrobić, musisz połączyć się ze swoją stroną WordPress za pomocą klienta FTP.
Po połączeniu wybierz wszystkie pliki WordPress i pobierz je na swój komputer.
Krok 3. Zaimportuj pliki WordPress i bazę danych na lokalny serwer
Po pobraniu plików WordPress musisz utworzyć folder na swoim lokalnym serwerze, do którego chcesz zaimportować lokalną witrynę.
Jeśli używasz WAMP, utwórz folder w folderze C:\wamp\www\ dla swojej lokalnej witryny. Użytkownicy MAMP będą musieli utworzyć folder w folderze /Applications/MAMP/htdocs/.
Następnie po prostu skopiuj i wklej swoje pliki WordPress do nowego folderu.
Następnie musisz zaimportować swoją bazę danych WordPress. Po prostu otwórz phpMyAdmin na swoim lokalnym serwerze, odwiedzając następujący adres URL:
http://localhost/phpmyadmin/
Ponieważ baza danych została już wcześniej utworzona, należy ją teraz wybrać, a następnie kliknąć kartę „Importuj” u góry.
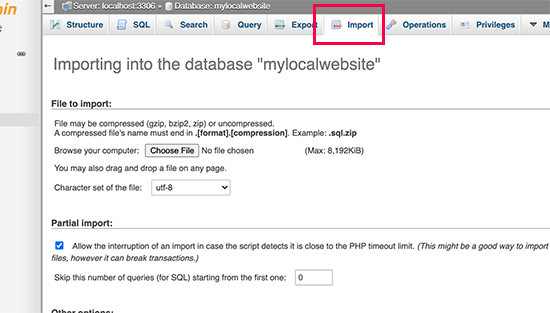
Kliknij przycisk „Wybierz plik”, aby wybrać i przesłać plik eksportu bazy danych, który pobrałeś w pierwszym kroku. Następnie kliknij przycisk „Przejdź” u dołu strony.
phpMyAdmin rozpakuje i zaimportuje Twoją bazę danych WordPress.
Teraz, gdy Twoja baza danych jest skonfigurowana, musisz zaktualizować adresy URL w swojej bazie danych WordPress, które odwołują się do Twojej aktywnej strony.
Możesz to zrobić, uruchamiając zapytanie SQL w phpMyAdmin. Upewnij się, że wybrałeś bazę danych swojej lokalnej witryny, a następnie kliknij SQL.
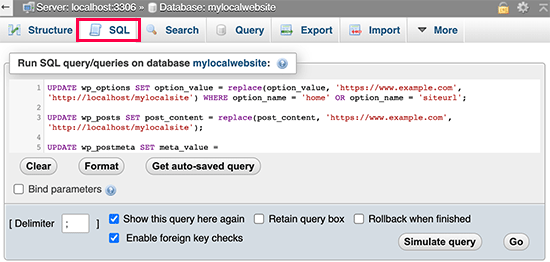
Na ekranie SQL w phpMyAdmin skopiuj i wklej ten kod, upewnij się, że zastąpiłeś example.com adresem URL swojej aktywnej strony i http://localhost/mylocalsite adresem URL lokalnego serwera swojej strony.
UPDATE wp_options SET option_value = replace(option_value, 'https://www.example.com', 'http://localhost/mylocalsite') WHERE option_name = 'home' OR option_name = 'siteurl'; UPDATE wp_posts SET post_content = replace(post_content, 'https://www.example.com', 'http://localhost/mylocalsite'); UPDATE wp_postmeta SET meta_value = replace(meta_value,'https://www.example.com','http://localhost/mylocalsite');
To zapytanie zastąpi odniesienia do adresu URL Twojej witryny na żywo w bazie danych i zastąpi je adresem URL localhost.
Krok 4. Zaktualizuj plik wp-config.php
Ostatnim krokiem jest zaktualizowanie pliku wp-config.php Twojej lokalnej witryny. Ten plik zawiera ustawienia WordPress, w tym sposób połączenia z bazą danych WordPress.
Po prostu przejdź do folderu, w którym zainstalowałeś WordPress na swoim lokalnym serwerze, a następnie otwórz plik wp-config.php w edytorze tekstu, takim jak Notatnik.
Zastąp nazwę bazy danych tą, którą utworzyłeś w phpMyAdmin na swoim localhost.
Następnie zastąp nazwę użytkownika bazy danych swoją lokalną nazwą użytkownika MySQL, zazwyczaj jest to root. Jeśli ustawiłeś hasło dla użytkownika MySQL root na swoim lokalnym hoście, wpisz to hasło. W przeciwnym razie pozostaw je puste i zapisz zmiany.
/** The name of the database for WordPress */
define('DB_NAME', 'database_name_here');
/** MySQL database username */
define('DB_USER', 'username_here');
/** MySQL database password */
define('DB_PASSWORD', 'password_here');
Możesz teraz odwiedzić swoją lokalną stronę w oknie przeglądarki, wpisując adres URL w ten sposób:
http://localhost/mylocalsite/
Zastąp „mylocalsite” nazwą folderu, do którego skopiowałeś pliki WordPress.
To wszystko, Twoja działająca strona WordPress została teraz skopiowana na Twój lokalny serwer.
Mamy nadzieję, że ten artykuł pomógł Ci dowiedzieć się, jak łatwo przenieść działającą witrynę WordPress na serwer lokalny. Możesz również zapoznać się z naszym przewodnikiem, jak łatwo utworzyć witrynę stagingową dla WordPress do testowania, lub jak przenieść witrynę WordPress z serwera lokalnego na serwer produkcyjny.
Jeśli podobał Ci się ten artykuł, zasubskrybuj nasz kanał YouTube po samouczki wideo WordPress. Możesz nas również znaleźć na Twitterze i Facebooku.


Reese
Witam,
Otrzymuję błąd podczas dochodzenia do tego kroku:
„Teraz, gdy Twoja baza danych jest skonfigurowana, musisz zaktualizować adresy URL w swojej bazie danych WordPress, które odwołują się do Twojej aktywnej strony. Możesz to zrobić, uruchamiając zapytanie SQL w phpMyAdmin. Upewnij się, że wybrałeś bazę danych swojej lokalnej strony, a następnie kliknij SQL. Na ekranie SQL w phpMyAdmin skopiuj i wklej ten kod, upewnij się, że zastąpiłeś example.com adresem URL swojej aktywnej strony, a localhost/test-site adresem URL lokalnego serwera Twojej strony.”
Błąd brzmi:
#1146 – Tabela „rpd.wp_options” nie istnieje
Proszę o poradę, dziękuję!
Martin
Dziękuję za całą twoją ciężką pracę. Jestem początkującym programistą stron internetowych, a twoja strona jest niezwykle pomocna.
Przejrzałem oba Państwa artykuły dotyczące migracji z lokalnego środowiska na produkcyjne i odwrotnie. Zbudowałem stronę WordPress lokalnie i użyłem jej do zastąpienia istniejącej strony HTML. Następnie wprowadziłem zmiany na stronie produkcyjnej i nie jestem pewien, jak ponownie „zsynchronizować” obie wersje. Co by Państwo sugerowali?
Wsparcie WPBeginner
Cześć Martin,
Zapoznaj się z naszym przewodnikiem na temat konfiguracji środowiska stagingowego.
Admin
James
Dziękuję za artykuł, jednak nadal mam problemy.
Jedna rzecz, której nie rozumiem, to to, że zaczynasz od polecenia użycia backupbuddy (którego używam do tworzenia kopii zapasowych moich stron), ale potem nagle mówisz, aby użyć tego wtyczki duplicator.
Mam pełną kopię zapasową (z bazą danych) w archiwum zip mojej strony WordPress, którą utworzyłem za pomocą BackupBuddy i rozpakowałem ją do własnego folderu w folderze „www” w WAMP.
Pomyślnie utworzyłem nową bazę danych w PhpMyAdmin, a następnie pomyślnie zaimportowałem do niej bazę danych mojej strony internetowej. Zmieniłem również nazwę bazy danych i hasło w pliku config.php.
Jednak na następnym kroku, próbując zmienić adresy URL, pojawia się komunikat:
#1146 – Tabela „zexico.wp_options” nie istnieje
#1146 – Tabela „zexico.wp_posts” nie istnieje
#1146 – Tabela „zexico.wp_postmeta” nie istnieje
Co zrobiłem źle?
dziękuję
Ozi Diptongo
Cześć. Mam ten sam błąd. Czy udało Ci się go naprawić? Dziękuję!
Nina Chang
Nawiązując do mojego wcześniejszego komentarza – rozwiązałem problem! Z jakiegoś powodu wtyczka duplikująca nie kopiowała wszystkich moich tabel bazy danych, co powodowało pierwszą serię problemów – rozwiązałem to, przechodząc na metodę ręczną. Następnie, podczas uruchamiania zapytań w mysql, początkowo nie zdawałem sobie sprawy, że musiałem również zmienić nazwy tabel bazy danych (tj. po prostu wklejałem wp_options, gdy musiałem to dostosować) – nie jestem pewien, czy jest to normalne, ponieważ twoje linie kodu podkreślają tylko adresy URL jako wymagające poprawy? POTEM musiałem poradzić sobie z moim dziwnym plikiem wp-config.php, który miał już wypełnione wszystkie pola „database”, „host”, „username” – po wypróbowaniu obu opcji zadziałało dopiero wtedy, gdy usunąłem dane, które WordPress już wypełnił, i zastąpiłem je danymi localhost zgodnie z instrukcjami. Nie rozumiem, dlaczego mój plik wp-config miał już wypełnione pola, ale jestem w tym zupełnym nowicjuszem, więc na pewno wiele przeoczyłem/źle zrozumiałem. Tak czy inaczej – dziękuję jeszcze raz za samouczek, ponieważ w końcu doprowadził mnie do celu!
Nina Chang
Cześć,
Dzięki za tutorial. Próbowałem migrować moją witrynę za pomocą duplicatora i wydaje się, że działa, z wyjątkiem tego, że potem nie mogę zalogować się na moją lokalnie hostowaną witrynę – w ogóle nie rozpoznaje mojego użytkownika. Po zainstalowaniu moich plików przez duplicator miałem dwa pliki config.php – jeden config-sample.php i jeden config.php, a także dwa pliki htaccess – jeden .htaccess i jeden ORIG – czy te podwojone pliki mogą mieć coś wspólnego z moimi problemami z logowaniem? Próbowałem każdej wariacji usuwania po jednym z każdej pary, a także próbowałem zastąpić mój plik wp-login i usuwać wtyczki, jak czytałem gdzieś indziej, że może to pomóc, ale nic nie zadziałało. Ponownie wykonałem cały proces od pakowania i nadal bez powodzenia! Próbowałem również ręcznie, ale utknąłem na aktualizacjach zapytań mysql. Czy masz jakieś pomysły, gdzie popełniłem błąd??
Dziękuję bardzo!
Nina
Susan Taunton
Nie mogę wyrazić, jak bardzo jestem wdzięczny za te informacje. Poświęciłem niewiarygodną ilość czasu na próbę przeniesienia działającej strony na mój lokalny serwer na próżno — a potem dziś znalazłem Twój post. Użyłem Duplicator i DZIAŁAŁO!
DZIĘKUJĘ!!!!!!!!! :-))
Personel redakcyjny
You’re very welcome Susan
Admin
Dilip Pradhan
Skopiowałem stronę internetową z domeny hostingowej na lokalny serwer. wszystko jest w porządku, ale wszystkie linki menu i inne są przekierowywane do
jak to rozwiązać
Byron Allen
cześć,
Miałem ten sam problem i właśnie znalazłem rozwiązanie. Jestem pewien, że już go rozwiązałeś, ale to może pomóc innym w przyszłości.
w obszarze administracyjnym WordPressa przejdź do ustawienia-> linki stałe. Wybierz Nazwa wpisu.
Twoje problemy powinny zostać rozwiązane.
John Payne
Dziękuję za wszystkie doskonałe rady, które udzielasz - to wspaniała usługa dla społeczności WordPress.
Zacząłem używać wtyczki All-in-1 WP Migration, aby łatwo tworzyć kopie zapasowe mojej witryny, a następnie w razie potrzeby ją migrować.
Dobrze byłoby również móc wprowadzać zmiany na stronach na moim własnym komputerze, sprawdzając je przed przesłaniem zaktualizowanych plików.
Instaluję XAMPP na moim komputerze. Czy jest łatwy sposób, abym mógł użyć moich plików kopii zapasowej All-in-1 WP Migration z tym?
Wszelkie rady będą bardzo mile widziane.
Wsparcie WPBeginner
Cześć John,
Przepraszamy, ale nie testowaliśmy tego wtyczki. Proszę spróbować skontaktować się z twórcami wtyczki.
Admin
Andres
Świetny poradnik. Ważne jest, aby wspomnieć, że należy usunąć plik HTACCESS, aby to zadziałało.
Dzięki
James orr
Z lokalnej strony?
Siddhartha
Tak, z lokalnego folderu witryny. Zrobiłem to i moja witryna zaczęła działać. Jednak nadal mam wiele innych problemów. Na przykład moje linki do kategorii w ogóle nie działają.
lohith
świetny czysty samouczek, udało mi się go uruchomić bez żadnych problemów.
Gokiko
Witaj WPbeginner,
Postępowałem zgodnie ze wszystkimi instrukcjami dotyczącymi ręcznego przenoszenia. Ale otrzymuję błąd „Oops! That page can’t be found.” na stronie głównej, żadna zawartość nie może być wyświetlona. A wszystkie linki na mojej stronie localhost kierują do mojej strony internetowej online.
Wydaje się, że przeniesiono tylko główną strukturę mojej witryny (motyw, menu itp.), ale reszta została utracona.
Wsparcie WPBeginner
Czy ten błąd jest wyświetlany z Twoim motywem WordPress, czy na pustej białej stronie? Jeśli jest wyświetlany na pustej białej stronie, prawdopodobnie oznacza to, że Twoja witryna WordPress nie jest zainstalowana pod adresem URL, który próbujesz użyć.
Admin
Gokiko
Pokazuje się w moim motywie WordPress. Pokazuje się również wszystkie moje menu i kategorie treści. Ale wszystkie linki prowadzą do oryginalnego adresu strony internetowej. Oto zrzut ekranu, jeśli to pomoże:
Wsparcie WPBeginner
Spróbuj odświeżyć strukturę permalinków swojej witryny. Przejdź do strony Ustawienia » Permalink i kliknij przycisk zapisz zmiany bez wprowadzania żadnych zmian.
Juan
Mam dokładnie ten sam problem, ale nie mogę zalogować się na moje localhost za pomocą wp-admin lub wp-login, ponieważ przekierowuje mnie na domenę live-site.
Czy jest inny sposób, aby zalogować się do mojego obszaru localhost/dev-site, aby dokonać tej zmiany? Z góry dziękuję!
Jason Hess
Drogi WPBeginner,
Przede wszystkim dziękuję za wszystko, co robicie dla społeczności WP. Moje pytanie jest mam nadzieję dość proste. (Słynne ostatnie słowa, co nie?) Obecnie używam CLEF do logowania się na moją „Live Site”. Kiedy przeniosę moją Live site na mój lokalny serwer, czy spowoduje to jakieś problemy z logowaniem się na lokalną stronę po zakończeniu przeniesienia? Czy też muszę utworzyć nowe hasło do logowania dla mojej strony za pośrednictwem Panelu w mojej Live site przed przeniesieniem do środowiska lokalnego, czy też CLEF nadal będzie działać na moim „lokalnym serwerze”?
Czy macie jakieś przemyślenia na temat używania CLEF do logowania? Używam WP od czasu do czasu od około 2 lat i po prostu chcę poznać Waszą opinię na temat CLEF.
Dziękuję bardzo z góry! Jesteście super! Kiedy już uruchomię moją stronę, możecie być pewni, że będę ją promować wszystkim, których znam. Nauczyłem się już tak wiele z Waszej strony, a jestem członkiem dopiero od 2, prawie 3 miesięcy.
Miłego dnia,
Jason Hess
Wsparcie WPBeginner
Możesz wyłączyć Clef w dowolnym momencie po przeniesieniu swojej witryny na serwer lokalny.
Admin
Mohd Amir
Zapomniałem hasła do Filezilla, więc nie mogłem pobrać wszystkich plików z działającej witryny. Mam kopię zapasową tylko folderu wp_content z działającej witryny. Co mogę teraz zrobić dla lokalnego serwera.
maarja
Cześć,
Dziękuję za pomocne wskazówki. Po długim czasie udało mi się w końcu uzyskać działającą stronę na moim localhost z wtyczką, ALE z jakiegoś powodu strony z treścią nie są odnajdywane na serwerze - cała informacja, teksty itp. są w zapleczu, ale nie są wyświetlane w panelu użytkownika, z wyjątkiem strony głównej.
Czy masz jakiś pomysł, gdzie/dlaczego problem może występować?
Z góry dziękuję,
Maarja
Wsparcie WPBeginner
Spróbuj postępować zgodnie z krokami opisanymi w naszym przewodniku dla początkujących dotyczącym rozwiązywania błędów WordPress.
Admin
Żółty Kanarek
Thank you very much I have done it manually… from a live server to localhost. With your instructions I have managed this for the first time. And I even know now how to do a SQL query in phpMyAdmin. I feel like a real pro!
amna
Cześć,
wykonałem wszystkie kroki, ale otrzymuję błąd wewnętrznego serwera.
Jestem zdezorientowany w jednym kroku, po pobraniu na żywo witryny przez filezilla z hosta godaddy. zastępuję folder wordpress moim folderem na żywo, tj.
C:/users/amna/wamp/www/wordpress/old folders
z folderami C:/users/amna/wamp/www/wordpress/mywebsite nowe
proszę o pomoc, jestem początkujący
Debenkumar Naorem
Witaj WEBBIGINNER SUPPORT, Postępowałem zgodnie z instrukcjami dla opcji ręcznej, działa bardzo dobrze. Dziękuję za takie instrukcje, szukałem tego. Jeszcze raz dziękuję.
Wsparcie WPBeginner
Hej Debenkumar, proszę bardzo. Nie zapomnij dołączyć do nas na Facebooku, aby uzyskać więcej wskazówek i samouczków dotyczących WordPressa.
Admin
Manish
Hej! Dzięki za post.
Postępowałem zgodnie z instrukcjami w podręczniku i zamieniłem adres URL mojej witryny na localhost/nazwa_bloga. Problem, z którym się borykam, polega na tym, że żadne obrazy nie są ładowane na moim blogu. Wszystkie przesłane obrazy znajdują się w folderze upload. Tekst jest absolutnie w porządku. Adresy URL obrazów zmieniły się na localhost, ale nie są wyświetlane.
Czy możesz mi w tym pomóc?
deepthi
cześć, postępowałem zgodnie z procedurą z instrukcji, aby sprawdzić moją stronę WordPress na localhost przy użyciu xampp, zmieniłem adres URL strony, domyślny adres i tabele wp-posts oraz wp-postmeta. problem polega na tym, że moja strona główna ładuje się poprawnie na localhost. ale kiedy przechodzę do stron w menu, pojawia się następujący błąd.
Nie znaleziono obiektu!
Żądany adres URL nie został znaleziony na tym serwerze. Link na stronie odsyłającej wydaje się być błędny lub nieaktualny. Proszę poinformować autora tej strony o błędzie.
Jeśli uważasz, że jest to błąd serwera, skontaktuj się z webmasterem.
Błąd 404
localhost
Apache/2.4.10 (Win32) OpenSSL/1.0.1i PHP/5.5.15
Zalogowałem się do panelu administracyjnego i widzę całą zawartość strony w sekcji edycji, ale stamtąd również, gdy próbuję wyświetlić stronę, pojawia się ten sam błąd.
ścieżka adresu URL, którą przyjmuje, to tylko mój zaktualizowanyURL,
proszę o odpowiedź z rozwiązaniem
Wsparcie WPBeginner
Przejdź do strony Ustawienia » Permalinki i kliknij przycisk „Zapisz zmiany”, aby zaktualizować swoje permalinki.
Admin
Joshua S.
Mogę cię przytulić? Mogę kochać cię wiecznie?
Miałem ten sam problem. Zrobiłem wszystko poprawnie, z wyjątkiem tego, że strona główna się ładowała, ale wszystkie inne linki do stron wydawały się zepsute (wyświetlał się tylko nieustylizowany układ informacji z mojego localhost).
Ale przejście do Ustawienia>Stałe linki>Zapisz zmiany zresetowało moje linki i teraz mogę uzyskać dostęp do moich różnych stron, nawet do nowych stron, które tworzę od czasu przeniesienia mojej witryny na lokalny serwer.
POLUBIŁEM!
Wsparcie WPBeginner
Dzięki Joshua, cieszymy się, że artykuł okazał się pomocny. Możesz również zasubskrybować nasz Kanał YouTube po samouczki wideo WordPress.
Peter
Po wykonaniu instrukcji ręcznego przeniesienia witryny, strona główna wyświetlała się poprawnie na localhost, ale żadne linki nie działały. Poniższa strona mówiła, aby „Przejść do ustawień/linków stałych w panelu administracyjnym WordPress i zaktualizować linki stałe, klikając dwukrotnie przycisk Zapisz zmiany”. To rozwiązało problem.
Mohd Hasan
Postępowałem zgodnie z Twoimi krokami, ale działa tylko strona główna, a żadne linki nie działają. Podany adres URL /akhdir3/category/health/ nie został znaleziony na tym serwerze.
Anes P A
Drogi Autorze,
Próbowałem Twojego kroku. Ale problem polega na tym, że podczas ładowania strony localhost odnosi się do strony online, a linki do menu wskazują na stronę internetową online. Jak można to rozwiązać?
Proszę o poradę.
Dzięki
Anes
Bhavana
Wykonałem ręcznie wszystkie wymienione powyżej kroki. Ale nie otrzymuję właściwej witryny, której chcę. Pojawiają się wszystkie odinstalowane wtyczki w panelu administracyjnym, a motyw jest również nieprzystosowany. Gdzie popełniam błąd?
Justin
Próbuję postępować zgodnie z Twoimi instrukcjami dotyczącymi ręcznego przeniesienia.
Podczas próby wyszukania/zamiany adresu strony produkcyjnej na mój lokalny host, SQL zgłasza błąd składni.
#1064 – Wystąpił błąd składni SQL; sprawdź podręcznik odpowiadający wersji serwera MariaDB, aby uzyskać prawidłową składnię w pobliżu „)” w wierszu 1
Czy jesteś pewien, że kod jest poprawny?
Justin
Rozwiązałem własny problem... w pewnym sensie.
Z jakiegoś powodu wszystkie moje tabele zaczynają się od wplm zamiast od wp (np. wp_options = wplm_options). Zaktualizowanie kodu, aby szukał poprawnej nazwy tabeli, pozwoliło skryptowi działać bez błędów.
Ale… SQL raportuje „# MySQL zwrócił pusty zestaw wyników (tj. zero wierszy)”, a wartości w tabeli nie zostały zaktualizowane. Musiałem wejść i ręcznie zaktualizować linki. W moim przypadku były to tylko 2 wartości w wplm_options, ale wyobrażam sobie, że niektórzy ludzie będą mieli znacznie więcej linków do sprawdzenia.
Niemniej jednak, mam teraz zaimportowaną moją stronę, a praca z lokalnym hostingiem jest notorycznie mylącym procesem.
Dziękuję za jasne i proste instrukcje!
Lloyd
Instrukcje dla instalatora Duplicator zaczynają się od tej linii:
„Twoja lokalna witryna serwera będzie potrzebować nowej bazy danych, więc musisz utworzyć bazę danych na swoim lokalnym serwerze za pomocą phpMyAdmin.”
Czy utworzenie nowej bazy danych jest czymś prostym, jak kliknięcie opcji w menu, czy jest tak skomplikowane, że wymagałoby obszernego samouczka do wyjaśnienia?
Kiedy przeglądam phpMyAdmin na Xampp, jedyne, co wygląda na możliwość, znajduje się w zakładce Bazy danych, gdzie jest napisane:
„Utwórz bazę danych:
(X) Brak uprawnień”
Czy jest problem z autoryzacją i jeśli tak, gdzie mam zmienić ten parametr?
Mam dwie strony internetowe na tym lokalnym hoście, które wydają się działać poprawnie, więc założyłem, że lokalny host jest poprawnie skonfigurowany.
Dzięki za pomoc lub sugestie,
Lloyd
Ashvani Kumar
Postępuję zgodnie z opcją ręczną, ale kiedy przechodzę do strony Importuj bazę danych w phpMyAdmin, maksymalny rozmiar przesyłania bazy danych to (Max: 2,048KiB), ale mój rozmiar kopii zapasowej bazy danych to 710MB. Jak mogę zwiększyć ten limit, abym mógł przesłać bazę danych?
Dzięki
Wsparcie WPBeginner
Musisz zwiększyć limit przesyłania plików w PHP. Zobacz nasz przewodnik na temat jak zwiększyć maksymalny rozmiar przesyłanego pliku. i postępuj zgodnie z metodą php.ini
Admin
Abdul Aleem Mohammed
Cześć Ashvani,
możesz zmienić max_upload_size w pliku php.ini w apaczu.
domyślnie będzie to 2 MB, możesz zmienić to zgodnie z własnymi potrzebami.
Dzięki
Judy Williams
Próbuję to zrobić za pomocą Duplicator. Pobrałem moją stronę i instalator. Utworzyłem bazę danych za pomocą phpMyAdmin i dotarłem do fragmentu „musisz skopiować i wkleić pakiet i plik instalacyjny do pustego folderu w katalogu sieciowym lokalnego serwera”. Nie mam pojęcia, jak to zrobić! Mam zainstalowane Filezilla i XAMPP na moim laptopie. Czy istnieje samouczek, jak utworzyć pusty folder w katalogu sieciowym mojego lokalnego serwera? Utknąłem teraz. Dzięki
Wsparcie WPBeginner
Możesz po prostu przejść do folderu htdocs na swoim komputerze.
Admin
niemiecki
Skopiowałem pliki i bazę danych, kiedy próbuję uzyskać dostęp do mojego localhost/test-site, jestem przekierowywany do panelu. Czy masz jakieś pomysły, dlaczego tak się dzieje?
miguel
dziękuję za jasny tutorial.
chociaż zrobiłem odwrotnie (z lokalnego hosta na publiczny serwer), myślałem, że odwrotność będzie równie prosta.
jednak jeśli chodzi o połączenie bazy danych, jestem w kropce. wielokrotnie przeglądałem ustawienia, ale nie mogę się połączyć.
wszedłem nawet w pewne kłopoty i zostałem zablokowany z bazy danych, ale na szczęście udało mi się to rozwiązać.
w moim pliku config.php zmieniłem użytkownika na "root", potem ustawiłem go na pusty, użyłem nazwy użytkownika z publicznego serwera i tak samo z hasłem. poprawnie ustawiłem nazwę bazy danych na nazwę lokalnego hosta.
nie mogę zgadnąć, co muszę zrobić.
jeśli mógłbyś mi wskazać, gdzie dalej szukać, będę bardzo wdzięczny.
dziękuję za twoją pracę z miłości. wspaniale widzieć tak wielu ludzi z wiedzą, którzy pomagają nam, tym, którzy szukają odpowiedzi.
Daniel
Cześć
Ja też chcę to zrobić. Czy ten post został napisany kilka lat temu, czy nadal warto stosować to podejście, czy są inne wtyczki lub posty, na które powinienem zwrócić uwagę?
Daniel
Beatrix K.
Witajcie wszyscy,
Just wondering (please bare with me as I am new at this) – if I need to have have my local site to work with on two different devices, say my desktop and my laptop, is there a way for the changes I make on one device to be updated on the other device? I just want to know if it is possible to work from two different devices on the same project and not have to redo all of my changes. Thanks in advance for any insight
B
Muniba
Jestem zdezorientowany w kroku dotyczącym Filezilli,,, jak pobrać moją stronę WordPress za pomocą Filezilli..??
niemiecki
pobierz filezilla, nawiąż połączenie ze swoim obecnym hostem, witryną produkcyjną za pomocą filezilla. Po nawiązaniu połączenia będziesz mógł pobrać pliki do lokalnego katalogu na swoim komputerze
Dee
Czyli za pomocą CPanelu, na przykład, użylibyśmy powiązanego adresu IP, naszego użytkownika i hasła CPanel, wraz z „21” jako wartością portu? Po nawiązaniu połączenia z hostem Cpanel, jak mogę przenieść pliki na mój localhost, jednocześnie zachowując działającą stronę? W zasadzie, jak stworzyć duplikat, mając tę samą stronę na obu hostach (jedną do eksperymentowania, a drugą, która pozostaje aktywna)?
Dee
Po pomyślnym przeniesieniu plików z serwera zdalnego na lokalny, czy istnieje łatwy sposób na masowe kopiowanie i wklejanie (zamiast ręcznie po jednym) plików na lokalny serwer, na którym chcemy zainstalować WordPress? Próbowałem zaznaczyć wszystkie pliki do skopiowania, ale nie ma dostępnej funkcji kopiowania. Proszę o pomoc.
assal0le
Chcę skopiować moją aktywną stronę WordPress na mój lokalny serwer WAMP, zaznaczam, że nie przenoszę jej. Czy wykonanie tego samouczka za pomocą wtyczki Duplicator usunie moją aktywną stronę WordPress?
Dzięki
Diane Laidlaw
Nie, tylko to kopiuje.
Ognatius Chironga
Bardzo dziękuję!
Ten artykuł okazał się pomocny.
Prawie zacząłem od nowa tworzyć moją witrynę.
Quy P
Testowałem i próbowałem wielokrotnie. Nie działa, dopóki nie usunę pliku .htaccess lokalnie. Dziękuję.
Andres
Dziękuję bardzo.
Tobias
Jeśli zarządzasz siecią witryn, powinieneś również zaktualizować adresy URL domen w tabeli wp_blogs.
lorenzo
Dziękuję za ten przydatny tutorial. Muszę ręcznie przenieść moją stronę wp, ale jeśli wpiszę w przeglądarce „http://localhost/phpmyadmin/”, nie pojawia się mój phpmyadmin. Czy muszę go zainstalować? Jak?
Dziękuję bardzo…
Dave
W pliku wp-config.php muszę również zmienić /**hostname MySQL */
/** Nazwa hosta MySQL */
define(‘DB_HOST’, ‘localhost’);
ustaw na localhost
nicola
Cześć,
postępuję zgodnie z Twoimi krokami, ale logowanie administratora nie jest widoczne…. błąd 404 nie znaleziono. cała strona jest dobra w mojej lokalnej instalacji. jak mogę rozwiązać mój problem?
abdelouahad
zrobiłem wszystkie kroki, ale zawsze mam stronę z błędem, nie wiem dlaczego, czy ktoś może mi pomóc, proszę
Paul Denver Sy
Dziękuję Ci bardzo za to. Oszczędziłeś mi prawie tydzień męki z uruchomieniem tego na moim lokalnym komputerze.
Shilling
Dwukrotnie sprawdziłem wszystkie kroki i wszystko wydaje się w porządku, ale otrzymuję ten komunikat o błędzie, gdy wchodzę na stronę pod moim lokalnym adresem URL:
Próba połączenia Google Chrome z localhost została odrzucona. Witryna może być niedostępna lub Twoja sieć może nie być prawidłowo skonfigurowana.
Nie sądzę, że strona jest niedostępna. Mój lokalny adres URL automatycznie przełącza się na http://localhost/wordpress-folder-name
chociaż myślę, że powinien przejść na http://localhost:888/wordpress-folder-name
Mam nadzieję, że to oczywista wskazówka. Jestem w tym nowy i po prostu nie mam pojęcia.
Będę bardzo wdzięczny za wszelkie wskazówki.
Ebert
This was the clearest tutorial I found which helped me to copy a site I started with iPage to my laptop under localhost. The database was not imported but created a new local copy of the server database. I copied the data tables into my new database and modified the sql commands to match the table names and everything ran smoothly.
I had to reuse the password I used on the live site with the local wordpress copy and I can now access and modify what I need to.
Thanks and you just got another new subscriber to this great site.
Also the post about BackWPup was very helpful as well. I tried to use Duplicator and it kept giving me error messages about permissions to create a backup folder on my machine. I used BackWPup and everything ran without a hitch. Thanks again!!
Eduardo Weidman Barijan
Proces ręczny zadziałał jak marzenie. Dziękuję.
Alessio
Cześć wszystkim,
Próbuję skonfigurować localhost na moim komputerze z systemem Linux Mint.
Już ustawiłem nową bazę danych, przeniosłem pliki przez FTP do mojego lokalnego folderu WordPress.
Teraz zaimportowałem bazę danych, ale kiedy wprowadzam zapytanie, aby zmienić adres internetowy na lokalny, otrzymuję komunikat „# MySQL zwrócił pusty zestaw wyników (tj. zero wierszy)”.
Teraz, jeśli wpiszę w przeglądarce „localhost”, przekieruje mnie na stronę internetową online…
Co mam zrobić?
Dziękuję!
idriss
Cześć Allesio,
Czy udało Ci się to rozwiązać?
Mam ten sam problem. Jak udało Ci się go rozwiązać?
Dzięki
Justin
Ten sam problem.
SQL ma problem z zastąpieniem adresu URL strony na żywo adresem lokalnego hosta.
Bez aktualizacji bazy danych WP próbuje połączyć się z witryną na żywo zamiast z witryną lokalną.
Czy któremuś z was udało się to naprawić?
Sam
Przejdź do swojego lokalnego phpmyadmin i bazy danych, której używasz dla witryny. Kliknij wp_options i edytuj siteurl i home. Zastąp adres URL na żywo adresem: localhost/ nazwa-twojego-folderu-tutaj
To powinno pomóc.
Sam
Mike
Pierwszy krok zadziałał u mnie.
Ale jak mogę wejść na localhost/test-site/wp-admin? Pojawia się komunikat o błędzie:
Błąd wewnętrzny serwera
Wenke Adam
Aktualizacja pliku wp-config.php lokalnej witryny może nie być ostatnim krokiem w tej procedurze. Postępowałem zgodnie z Twoimi instrukcjami i po kilku próbach publiczna witryna działała (najpierw miałem literówkę w zapytaniach SQL i nic się nie działo), ale nadal nie mogłem uzyskać dostępu do wp-admin.
Rozwiązaniem było edytowanie tabeli wp_options w bazie danych. Pierwszy wiersz zawierał nieprawidłowy adres URL. Naprawiłem to i w końcu wszystko działało poprawnie, nawet permalinki.
Dziękuję za wszystkie te bardzo ładne i jasne samouczki!
Tim
Ponownie publikuję to, ponieważ wydaje się, że zniknęło (przynajmniej z mojej strony). Przepraszam więc, jeśli to podwójny post.
Otrzymuję komunikat o błędzie podczas przesyłania bazy danych. Czy ktoś ma jakieś pomysły?
Dzięki
Tim
Kiedy próbuję przesłać bazę danych, pojawia się czerwony ekran błędu. Jeśli chcesz, mogę wysłać zrzut ekranu z błędem.
Dzięki
Wsparcie WPBeginner
Jasne, możesz przesłać zrzut ekranu do usługi hostingu w chmurze, takiej jak Dropbox, i wkleić link jako odpowiedź na ten komentarz. Przyjrzymy się temu i postaramy się pomóc.
Admin
Ian Hyndman
Przez cały dzień próbowałem dokonać tej zmiany bez żadnego efektu!
Musiałem nawet ponownie zainstalować WordPressa na moim serwerze testowym. Już miałem się poddać, kiedy natknąłem się na to. Moją inną opcją było ręczne skopiowanie i wklejenie oraz zainstalowanie wszystkich tych samych wtyczek aktywnych na moim serwerze hostingowym na moim serwerze testowym.
Kiedy przeczytałem twój post, skończyłem w 5 minut :):)
Thank you for your tutorial, its just what I needed. !
Well Done
Alexandros
Od dwóch dni próbuję sam dokonać tej zmiany bez efektu!
Kiedy przeczytałem Twój post, skończyłem w 5 minut :):)
Thank you for everything !
Keep up the great work