
Chcesz mieć bezpieczną przestrzeń do eksperymentowania ze swoją witryną WordPress bez obawy, że coś zepsujesz w swojej witrynie na żywo?
Przeniesienie witryny WordPress na lokalny serwer na komputerze jest naszym zdaniem idealnym rozwiązaniem, szczególnie dla programistów, projektantów lub początkujących użytkowników WordPress.
Instalacja WordPressa na komputerze (serwerze lokalnym) pozwala na łatwą naukę WordPressa i testowanie różnych rzeczy. Przeniesienie działającej witryny WordPress na serwer lokalny umożliwia eksperymentowanie z tymi samymi danymi, co w przypadku działającej witryny.
W tym artykule pokażemy, jak łatwo przenieść działającą witrynę WordPress na serwer lokalny.

Dlaczego i kto chciałby przenieść działającą witrynę WordPress na serwer lokalny?
Jeśli prowadzisz witrynę WordPress od jakiegoś czasu, możesz chcieć wypróbować nowe motywy lub wtyczki. Jednak robienie tego w witrynie na żywo może skutkować niskim komfortem użytkowania dla użytkowników.
Aby tego uniknąć, wielu użytkowników tworzy kopię swojej witryny WordPress na serwerze lokalnym, aby testować nowe motywy, wtyczki lub przeprowadzać testy programistyczne.
Pozwala to na skonfigurowanie motywu z całą zawartością i przetestowanie wszystkich funkcji bez obawy o uszkodzenie witryny. Wielu użytkowników kopiuje swoją witrynę na lokalny serwer, aby ćwiczyć swoje umiejętności WordPress i kodowania z rzeczywistymi danymi witryny.
Nawet jeśli możesz przeprowadzić wszystkie testy z fikcyjną zawartością w WordPress, rzeczywiste dane witryny zapewniają lepszą wizualną reprezentację tego, jak te zmiany pojawią się w Twojej witrynie na żywo.
Przygotowanie do przeniesienia witryny lokalnej na serwer lokalny
Po pierwsze, musisz upewnić się, że zawsze tworzysz kopię zapasową swojej witryny WordPress. Istnieje kilka świetnych wtyczek do tworzenia kopii zapasowych WordPress, z których możesz skorzystać.
Po drugie, musisz zainstalować lokalne środowisko serwerowe na swoim komputerze. Możesz użyć WAMP dla Windows i MAMP dla Mac. Po skonfigurowaniu środowiska należy utworzyć nową bazę danych za pomocą phpMyAdmin.
Wystarczy odwiedzić poniższy adres URL w przeglądarce, aby uruchomić phpMyAdmin.
http://localhost/phpmyadmin/
http://localhost:8080/phpmyadmin/
W tym miejscu należy kliknąć kartę “Bazy danych” i utworzyć nową bazę danych. Ta baza danych będzie potrzebna do późniejszego rozpakowania danych witryny na żywo.

Teraz możesz przenieść swoją witrynę WordPress na żywo na serwer lokalny.
Metoda 1. Przenoszenie witryny WordPress na żywo na serwer lokalny za pomocą wtyczki
Ta metoda jest łatwiejsza i zalecana dla wszystkich użytkowników.
Pierwszą rzeczą, którą musisz zrobić, to zainstalować i aktywować wtyczkę Duplicator. Aby uzyskać więcej informacji, zobacz nasz przewodnik krok po kroku, jak zainstalować wtyczkę WordPress.
Duplicator umożliwia łatwe tworzenie duplikatów całej witryny. Może być używany do przenoszenia witryny WordPress do nowej lokalizacji, a także może być używany jako wtyczka do tworzenia kopii zapasowych.
Uwaga: Istnieje darmowa wersja programu Duplicator, od której można zacząć. Jednak Duplicator Pro oferuje nieograniczoną liczbę kopii zapasowych i bardziej zaawansowane funkcje.
Po aktywacji przejdź do Duplicator Pro ” Backups z paska bocznego administratora WordPress. Aby utworzyć nowy pakiet, należy kliknąć przycisk “Dodaj nowy”.

Następnie Duplicator uruchomi kreator kopii zapasowej.
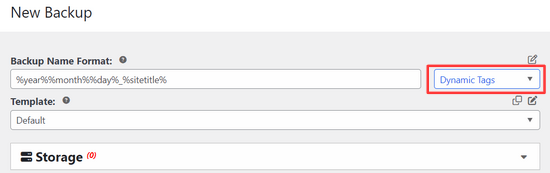
Najpierw należy wprowadzić nazwę pakietu kopii zapasowej. Możesz także użyć tagów dynamicznych, aby automatycznie utworzyć format nazwy, taki jak data i tytuł witryny.
Następnie rozwiń sekcję “Pamięć” i wybierz lokalizację przechowywania.
W tym poradniku użyjemy domyślnej lokalizacji. Jeśli chcesz, możesz kliknąć link “Dodaj pamięć”, aby dodać nową lokalizację, taką jak Dropbox lub Dysk Google.
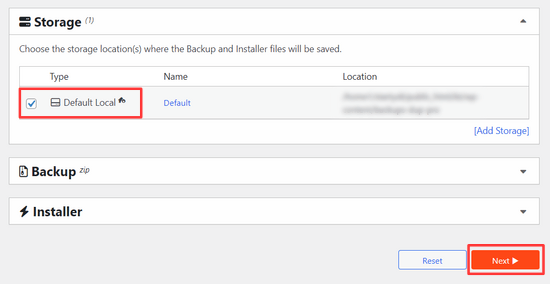
Kliknij przycisk “Dalej”, aby kontynuować.
Następnie wtyczka przeskanuje witrynę i przeprowadzi kilka kontroli w tle. Następnie wyświetli podsumowanie tych kontroli.
Jeśli wszystko wygląda dobrze, kliknij przycisk“Utwórz kopię zapasową“, aby kontynuować.

Duplicator utworzy teraz pakiet witryny.
Po zakończeniu zostanie wyświetlony plik archiwum zip zawierający wszystkie dane witryny oraz plik instalatora. Oba pliki należy pobrać na swój komputer.

Teraz możesz rozpakować i zainstalować te pliki na lokalnym serwerze.
Najpierw należy utworzyć nowy folder w folderze głównym serwera lokalnego. Jest to folder, w którym lokalny serwer przechowuje wszystkie strony internetowe.
Na przykład, jeśli używasz MAMP, będzie to folder /Applications/MAMP/htdocs/. Alternatywnie, jeśli używasz WAMP, będzie to folder C:\wamp\www\.
Wewnątrz tego folderu możesz utworzyć nowe foldery dla każdej nowej strony internetowej, którą chcesz importować lub utworzyć na serwerze lokalnym.

Następnie należy otworzyć folder utworzony dla lokalnej witryny internetowej, a następnie skopiować i wkleić zarówno plik zip archiwum, jak i pobrany wcześniej skrypt instalacyjny.

Aby uruchomić instalację, należy otworzyć skrypt installer.php w przeglądarce internetowej.
Na przykład, jeśli wkleiłeś oba pliki do folderu /mylocalsite/, uzyskasz do nich dostęp w przeglądarce, odwiedzając stronę http://localhost/mylocalsite/installer.php.
Skrypt instalacyjny programu Duplicator będzie wyglądał następująco:

Kliknij przycisk “Dalej”, aby kontynuować.
Duplicator rozpakuje teraz plik zip archiwum i poprosi o wprowadzenie informacji o bazie danych lokalnej witryny. Jest to baza danych utworzona wcześniej.

Nazwa serwera to prawie zawsze localhost, a nazwa użytkownika to root. W większości przypadków lokalna instalacja serwera nie ma ustawionego hasła dla roota, więc można pozostawić to pole puste.
W dolnej części strony znajduje się przycisk “Testuj bazę danych”, którego można użyć, aby upewnić się, że informacje o bazie danych są prawidłowe.

Jeśli wszystko wygląda dobrze, kliknij przycisk “Dalej”, aby kontynuować.
Duplicator będzie teraz importować bazę danych WordPress. Następnie zostaniesz poproszony o podwójne sprawdzenie informacji o nowej witrynie, które zostały automatycznie wykryte.

Kliknij przycisk “Dalej”, aby kontynuować.
Duplicator zakończy teraz konfigurację i wyświetli przycisk umożliwiający zalogowanie się do lokalnej witryny. Będziesz używać tej samej nazwy użytkownika i hasła WordPress, których używasz w swojej aktywnej witrynie.

To wszystko, pomyślnie przeniosłeś swoją witrynę na żywo na serwer lokalny.
Metoda 2. Ręczne przeniesienie aktywnej witryny WordPress na serwer lokalny
W przypadku, gdy wtyczka nie działa, zawsze można ręcznie przenieść witrynę na żywo na serwer lokalny. Pierwszą rzeczą, której potrzebujesz, jest ręczne wykonanie kopii zapasowej witryny z konta hostingowego WordPress.
Krok 1. Eksport bazy danych WordPress witryny na żywo
Aby wyeksportować bazę danych WordPress witryny na żywo, należy zalogować się do kokpitu cPanel i kliknąć phpMyAdmin.
Uwaga: Pokazujemy zrzuty ekranu z kokpitu Bluehost.

W phpMyAdmin musisz wybrać bazę danych, którą chcesz wyeksportować, a następnie kliknąć kartę eksportu u góry.

phpMyAdmin poprosi teraz o wybranie szybkiej lub niestandardowej metody eksportu. Zalecamy użycie metody niestandardowej i wybranie zip jako metody kompresji.
Czasami wtyczki WordPress mogą tworzyć własne tabele w bazie danych WordPress. Jeśli nie używasz już tej wtyczki, metoda niestandardowa pozwala wykluczyć te tabele.
Pozostaw pozostałe opcje bez zmian i kliknij przycisk “Dalej”, aby pobrać kopię zapasową bazy danych w formacie zip.

phpMyAdmin pobierze teraz plik bazy danych. Aby uzyskać więcej informacji, zobacz nasz poradnik na temat ręcznego tworzenia kopii zapasowej bazy danych WordPress.
Krok 2. Pobierz wszystkie pliki WordPress
Następnym krokiem jest pobranie plików WordPress. Aby to zrobić, musisz połączyć się z witryną WordPress za pomocą klienta FTP.
Po nawiązaniu połączenia wybierz wszystkie pliki WordPress i pobierz je na swój komputer.

Krok 3. Importowanie plików WordPress i bazy danych na serwer lokalny
Po pobraniu plików WordPress należy utworzyć folder na serwerze lokalnym, do którego będzie importowana lokalna witryna.
Jeśli korzystasz z WAMP, powinieneś utworzyć folder w folderze C:\wamp\www\ dla swojej lokalnej witryny. Użytkownicy MAMP będą musieli utworzyć folder w folderze /Applications/MAMP/htdocs/.
Następnie wystarczy skopiować i wkleić pliki WordPress do nowego folderu.
Następnie należy importować bazę danych WordPress. Wystarczy otworzyć phpMyAdmin na lokalnym serwerze, odwiedzając następujący adres URL:
http://localhost/phpmyadmin/
Ponieważ baza danych została już utworzona wcześniej, należy ją teraz wybrać, a następnie kliknąć kartę “Importuj” u góry.

Kliknij przycisk “Wybierz plik”, aby wybrać i przesłać plik eksportu bazy danych pobrany w pierwszym kroku. Następnie kliknij przycisk “Przejdź” u dołu strony.
phpMyAdmin rozpakuje i zaimportuje bazę danych WordPress.
Teraz, gdy baza danych jest już skonfigurowana, należy zaktualizować adresy URL w bazie danych WordPress odwołujące się do witryny na żywo.
Można to zrobić, uruchamiając zapytanie SQL w phpMyAdmin. Upewnij się, że wybrałeś lokalną bazę danych witryny, a następnie kliknij SQL.

Na ekranie SQL phpMyAdmin skopiuj i wklej ten kod, upewniając się, że zastąpiłeś example.com adresem URL witryny na żywo, a http://localhost/mylocalsite adresem URL lokalnego serwera witryny.
UPDATE wp_options SET option_value = replace(option_value,'https://www.example.com','http://localhost/mylocalsite') WHERE option_name ='home'OR option_name ='siteurl';UPDATE wp_posts SET post_content = replace(post_content,'https://www.example.com','http://localhost/mylocalsite');UPDATE wp_postmeta SET meta_value = replace(meta_value,'https://www.example.com','http://localhost/mylocalsite');
To zapytanie zastąpi odwołania do adresu URL witryny na żywo z bazy danych i zastąpi je adresem URL lokalnego hosta.
Krok 4. Aktualizacja pliku wp-config.php
Ostatnim krokiem jest aktualizacja lokalnego pliku wp-config.php witryny. Plik ten zawiera ustawienia WordPress, w tym sposób łączenia się z bazą danych WordPress.
Po prostu przejdź do folderu, w którym zainstalowałeś WordPress na swoim lokalnym serwerze, a następnie otwórz plik wp-config.php w edytorze tekstu, takim jak Notatnik.
Zastąp nazwę bazy danych tą, którą utworzyłeś w phpMyAdmin na swoim hoście lokalnym.
Następnie zastąp nazwę użytkownika bazy danych lokalną nazwą użytkownika MySQL, zwykle jest to root. Jeśli ustawiłeś hasło dla użytkownika root MySQL na swoim hoście lokalnym, wprowadź to hasło. W przeciwnym razie pozostaw to pole puste i zapisz zmiany.
/** The name of the database for WordPress */define('DB_NAME','database_name_here');/** MySQL database username */define('DB_USER','username_here');/** MySQL database password */define('DB_PASSWORD','password_here');
Możesz teraz odwiedzić lokalną witrynę w oknie przeglądarki, wprowadzając adres URL w następujący sposób:
http://localhost/mylocalsite/
Zastąp “mylocalsite” nazwą folderu, do którego skopiowałeś pliki WordPress.
To wszystko, witryna WordPress na żywo została skopiowana na serwer lokalny.
Mamy nadzieję, że ten artykuł pomógł ci dowiedzieć się, jak łatwo przenieść działającą witrynę WordPress na serwer lokalny. Możesz również zapoznać się z naszym przewodnikiem na temat tego, jak łatwo utworzyć witrynę przejściową dla WordPress do testowania lub jak przenieść witrynę WordPress z serwera lokalnego do witryny rzeczywistej.
If you liked this article, then please subscribe to our YouTube Channel for WordPress video tutorials. You can also find us on Twitter and Facebook.


")
Joseph
Hi, just came across this tutorial today, I found out about some of the steps from other tutorials, but my problem is with the SQL Query. I get the error # MySQL returned an empty result set (i.e. zero rows). I followed all your steps about changing site names etc but cant work this one out and so obviously i cant then connect to the local site. I used the Duplicator before on another site but it wont work so good on this one because of all the images on my photo site, ie timeout issues. Kinda going around in circles here, so help would be good.
Thanks,
Joseph
Yarina
Joseph, check that the table prefix on the SQL tables you are working with are the same. I had this issue before when I didn’t realize that the theme I was copying from had a non typical prefix (wp_extra-text instead of just wp_). When you create the new db on phpMyAdmin, make sure that the prefix matches that of the old db. Hope this helps!
Alan OldStudent
I tried using Duplicator, and that worked with one minor glitch. So then I dropped the database and tried the manual method. All steps proceeded well until it came time to import. I recreated the database and went to import. Afterwards, I got this error message: “#1064 – You have an error in your SQL syntax; check the manual that corresponds to your MySQL server version for the right syntax to use near ‘default’, ‘This is the default profile, used when no profile is specified.’, ‘a:’ at line 7”
To me that looks like gobbledygook. Do you have any idea what went wrong and how I can do the import manually?
Regards,
Alan
WPBeginner Support
This could be a syntax error or conflict caused by using different versions of MySQL. To solve this, when exporting your database choose the same MySQL version as your local install. Also make sure that you are using the same character set for both database tables.
Admin
Em Cloney
Just a quick thing I noticed: the Duplicator file is called “installer.php” rather than “install.php”.
Ben
I noticed the same thing. Great article, though. So glad I heard about this plugin from you guys.
wpva
Hi I decided to do it manually
I created a database for my WordPress site on my local server and tried to import the database that I downloaded before to my computer but im getting this error message:
SQL query:
—
— Database: `aguilar_jmln1`
—
— ——————————————————–
—
— Table structure for table `gm_AnythingPopup`
—
CREATE TABLE IF NOT EXISTS `gm_AnythingPopup` (
`pop_id` int(11) NOT NULL,
`pop_width` int(11) NOT NULL DEFAULT ‘380’,
`pop_height` int(11) NOT NULL DEFAULT ‘260’,
`pop_headercolor` varchar(10) NOT NULL DEFAULT ‘#4D4D4D’,
`pop_bordercolor` varchar(10) NOT NULL DEFAULT ‘#4D4D4D’,
`pop_header_fontcolor` varchar(10) NOT NULL DEFAULT ‘#FFFFFF’,
`pop_title` varchar(1024) NOT NULL DEFAULT ‘Anything Popup’,
`pop_content` text CHARACTER SET utf8 COLLATE utf8_bin NOT NULL,
`pop_caption` varchar(2024) NOT NULL DEFAULT ‘Click to open popup’
) ENGINE=MyISAM AUTO_INCREMENT=2 DEFAULT CHARSET=utf8;
MySQL said:
#1046 – Aucune base n’a été sélectionnée
Kin
It is saying that no database was selected.
Yeah I got that as well.
You need to make sure that you clicked on a database before hitting the ‘import”, if not the admin tool will try to import the .sql file on nothing!!
TMo
Wonderful tutorial on how to manually go through this process. Thank you for the clear directions and photos!
Shane Levine
Hi, is Duplicator an acceptable method for keeping a backup website? I have been using BackWPup but it looks like Duplicator also allows you to create a backup…
Dennis Crayon
Hi I am not sure if I just got lucky but I was able to download and setup the local version quickly. The only problem I am having is that I have to set permalinks to default which is fine locally will I be able to set them back to post name later when I push the whole thing live? Thanks just getting this far is great
WPBeginner Staff
Yes, you can change permalinks after putting your site live.
Felix
Dennis, I am new to wordpress but I have so far learnt key configuration issues. Could you lease hel on changing permalinks from default to post name?
Iftikhar Raja
Just an observation to share.
If you choose custom structure as permalink, it might not work. The work around is to chose default permalink and save the changes. It worked for me after several hours of head scratching
Hope it helps
Mario
If you’re using WAMP you need to turn on mod_rewrite to enable custom permalinks.
Click Wamp -> Apache -> Apache Modules -> rewrite_module
WPBeginner Staff
It is usually enabled by default.
isboleas
Perfect! I did it manually just in wp-config.php must change and the line
/** MySQL hostname */
define(‘DB_HOST’, ‘127.0.0.1 ‘);
With ip appear in phpmyadmin in left up corner.
Anindyo Yudhistiro
I’ve followed all the steps, but I still can’t see my database in my local wp. I still only have Hello World post.
I’ve imported it, change all the url’s, and many row has already affected.
Keith Davis
I used the manual method but the SQL query wouldn’t work for me.
I had to go into the wp-options and change url in siteurl and home table and then all was fine.
Keith Davis
Hi guys
The Duplicator method looks good.
Do you know how much free disc space you need to create the packages?
Nana
Any ideas why it gives me a “Welcome to the famous five-minute install” screen?
WPBeginner Staff
It is possible that your WordPress URL and Site URL are set to localhost/xammp. If you can access the admin area go to settings and set it to your WordPress install directory.
Je
I checked and it’s definitely not set to that. It is so strange!
Je
I figured it out. It was the W3 cache in the htaccess file causing problems. Thanks for you help and for this awesome tutorial!
Jen
Great tutorial, I did everything exactly like you said….I thought it was working until I tried to change the theme and it wouldn’t change. Then I started trying to navigate to other pages and it took me to localhost/xammp. Everytime. Any ideas?
dion
Hi. I did all of this(using the manual option, but when I click on any option, ie login or one of the menu options, I get “the requested URL … was not found on this server”
wagster
If you copy the SQL query straight off the screen above, you will get the line numbers as well, which will throw an error like the above. Click ‘View source’ and copy the clean code from there.
MrDev
Thanks for this article. I tried the manual route of moving a WordPress site to localhost, however my stylesheets are not loading. For some reason the ‘href’ is not being set on all my stylesheets. Any idea what might be going on?
WPBeginner Staff
We would feel more confident recommending BackupBuddy for backups.
NikkiC4lyf
Would you recommend using the Duplicator plugin for doing backups as well as moving sites?
Kin Tatsu
Great tutorial! The problem I’m having is when I login to to wp-admin with the same login and password I used for my live site I get “ERROR: Invalid username. Lost your password?” The username and password are correct for the live site but incorrect for the localhost site. I tried to retrieve password with my email address but it says that my email address is not registered. Any ideas?
pbr
I have only one word about this steps…AAWWEESSOOMMEE!!!!
StefsterNYC
Did you check your Prefixes?
pels
got same error
StefsterNYC
You may have missed a table or something. Do a search for the old prefix. Also make sure you’re using a fresh new WP-CONFIG. I find that sometimes that messes things up.
StefsterNYC
Sorry for the delay Mark. Not sure I understand your question. Hopefully I can answer something here.
If you started with a config file and it originally started with the wp_ and you didn’t use a custom one you’ll be fine. Just remember the config has to match the DB. If you worked locally and are migrating everything to a live site and you use the same DB and same Config that you worked locally with everything should be fine. Just remember to change Username, Password and Hostname.
The key here to remember here is Prefixes. So many people teach you how to do this and that but they miss the one thing that can mess it all up for you. And that is the Prefix.
And User Roles, if missed can cause a major headache when adding Admins manually. So be careful when changing and working with prefixes. They are absolutely a great way to tighten up WP sites. I highly recommend using a custom prefix always. dbh_234_ something like that is a great way to protect your site(s).
WPBeginner Staff
If your live site’s mysql host is not localhost, then you need to change it to localhost. You may also need to change the database name to the database on your local computer. Same goes for DB username which is usually root on local servers, and db password which is usually blank.
Mark
Hi just to be clear the password in the config.php file should be the same as the one you use for myphpadmin? because that seems to work for me?
StefsterNYC
Great tutorial. I believe one thing was missed. Prefix. For those of you that use a prefix in the config, make sure when you query the db you change the wp for the query to your prefix. Otherwise your query won’t reset the urls correctly.
Mark
If I have a local install and I move the database live, the prefix will remain the same correct? Do I need to do anything?
Cypherinfo
Error 404: Object not found: The requested URL was not found on this server. The link on the referring page seems to be wrong or outdated. Please inform the author of that page about the error.
If you think this is a server error, please contact the webmaster.
” I followed all of the steps you wrote.
Sophie
These instructions are exactly what I needed. Thank you!!!
However, I seem to have encountered a problem…
When updating the URLs in my database for those of the local server, it returns a #1064 – error in your SQL syntax near line 3. Could you possibly suggest a solution?
Would I need to include the port number when updating the http://localhost/ part of the code?
Please Help!!
Vtin
One more newbie trouble here! Sorry for the inconvenience.
Of course, I think I’ve done everything correctly (probably not). When I try to access the site via localhost, in the screen appears the index.php file line by line, instead of loading it.
Any ideas?
W
This was fantastic. Super quick and worked exactly as intended.
Paul Sahota
Can you please show how to move a live wordpress site to local using backup buddy on mac using MAMP. I have tried multiple times but it does not work for me. I can easily do the opposite.
thanks
Jeremy
After transferring the live site to my local server (wamp), I navigate to the destination in browser and get a “Not Found” wordpress error. The site’s navigation loads though and when clicked it takes me to the live site. Am I missing something rudimentary?
Kin
I am getting the same thing. I followed all the steps. Then came back to check again, but the error remains. I am seeing that a couple of people above had the same problem as well. Any idea guys of why this is happening?
Sinuhe
Thank you!!! I just finished moving my site and a subdomain to a new hosting service and it worked like a charm. I am no techie, actually I am philosopher I really appreciate you taking the time to explain this info in detail.
Sam
Hey, I did everything the same way you said in manual method.
after setup,
I can see homepage of my website on local server.
But when I try to navigate to other page, I get following error:
“Not Found: the requested URL /test/logistics was not found on this server.”
Please help
Bill
I just ran into the same issue. I went into site/wp-admin. Then went to Setting > Permalinks and just clicked Save Changes. It updated something and all of my links work.
Look at that! My first contribution to the community.
Isabela Santos
thank you! But I had to disable it for it to work…
Mark
Brilliant!
John
Awesome. Worked great! Thanks for posting this.
Natalia
Hi,
I followed your tutorial on doing it manually to the T, but I still get an error message. I am pulling my hair, here…
I’m pretty new to WP and I still have to figure out how to actually enter the new content and modify the files… but I can’t even get it to work locally
This is the message I get:
“Error establishing a database connection”
Which I don’t understand, because I did everything as you said in your tutorial.
Help, please!!
Natalia
Tried it all over again a second time and still same error message… I’m going crazy
Natalia
I even tried in a remote server and I got the same error message. I don’t know what I’m doing wrong… there must be a path somewhere that I’m forgetting about and it’s just not reading the right db…
Someone, please, help!!
WPBeginner Support
Natalia, the most common cause for this error is incorrect database information. On your live site, you need to edit your wp-config.php file. Make sure that the database information in this file matches the database you have created for your live site.
Admin
Kathi Kostiuk
Thank you, your site is super helpful. New to WP, inherited a site, got it localhost so I can learn/test. When trying to ‘upload’ a pic, get this: C:/wamp/www/testsite/wp-content/uploads. Is its parent directory writable by the server? No errors shown in phpMyAdmin, permissions on folders, users look right. Could you possibly direct me to a solution? Have looked everywhere I can think of. Thanks.
WPBeginner Support
When you moved the site to localhost, did you change the siteurl and homeurl options? If you didn’t then you need to add these two lines to your
wp-config.phpfiledefine('WP_HOME','http://localhost/yoursite');define('WP_SITEURL','http://localhost/yoursite');1-click Use in WordPress
Admin
Kathi Kostiuk
Thank you, will do that.
Julie Rondeau
Hi,
Great tutorials! Thank you, however i keep getting an “Unknown” Error code 0 from the Duplicator Plugin when trying to create the packages. Is there any other way you could recommend? Any help would be really appreciated.
Thank you so much,
Best from Paris.
J.
WPBeginner Support
You can also manually backup your localhost site and restore it on live server.
Admin
Rehan
Best tutorial ever!!
Ashley
Hi! Thank you so much for your great tutorials! Everything worked out great, but I when I was supposed to “resave permalinks” it wouldn’t let me login. I got that fixed and I am logged in now, but where do I go to resave them now that I don’t have that pop up? I’m assuming this is why when I try to click on posts it gives me a “not found page” ? Thanks in advance!
WPBeginner Support
You can save permalinks from Settings » Permalinks.
Admin
Jesse
Can I ask how you fixed the login problem? I’m getting the same issue.
Yarina
Hi! This all worked great until I had to login to the wp dashboard, my login didn’t work and even after changing it manually in the users table, I couldn’t log in, any ideas…?
Angela
Thank You! I’ve been trying to do this for some time now. I’ve watch several YouTube videos but could not get it to work correctly. This was so easy….the best thing ever. Again thanks!
Ivan
Hi,
I followed your instructions to the letter (and sing lol), but was not successful. I think it has something to do with WP installation. I have not installed it, just copied it.
Brett Golding
Didn’t work for me just ended up with a blank white home page after I ran the program. Re tried 3 times.
WPBeginner Support
Checkout how to resolve white screen of death issue.
Admin
Jason Moore
Thank you! This is was too easy!
ron
Hi, I’m trying to do exactly this, but I get a 500 Internal Server Error right after I put the database details and hit the Run Deployment button, I get the progress animation and after about 10 or 15 seconds I get the error.
I was looking at the error logs located at C:\wamp\logs and I could only find this line that seemed somewhat relevant: “Invalid command ‘RewriteOptions’, perhaps misspelled or defined by a module not included in the server configuration”.
I’ve successfully used duplicator in the past, but going from webserver to another webserver.
Any ideas?
WPBeginner Support
Please take a look at our guide on how to fix 500 internal server error in WordPress.
Admin
Usama Noman
Thanks, seems like this is a tutorial posted upon my request Thanks guys you are doing good.
WPBeginner Support
Yes it is Usama. Thank you for suggesting it to us.
Admin
Jamie Mannion
Good guide, but I think you missed the part where you update wp-config.php with the new database details – name is the new name, username is ‘root’ and password is empty.
I tried it manually and it all looks good but the links take me to the WAMP server configuration page, even though the URLs are updated – can’t figure it out. I can get the home page and admin, but that’s it. Cheers!
WPBeginner Support
Thanks for pointing out updating wp-config.php thing. We have updated the article.
As for your redirection issue. Try deleting .htaccess file from wordpress installation on your localserver.
Admin
Jamie Mannion
Awesome, thanks! I removed the .htaccess, then visited the permalinks option page and saved and now we’re good! I should admit, the only reason I knew about the wp-config.php settings is because I’ve read your previous articles. Keep up the great work!
Kin
I put a question earlier today, but this worked out for me great.
Thank you.
Shahraar Khan
I do this manually. Just zip the files from the server and download it… export the database and replace all the links in my text editor. just a 5 min work.. But anyhow your tutorial is also a very good alternative.