
Chcesz mieć bezpieczną przestrzeń do eksperymentowania ze swoją witryną WordPress bez obawy, że coś zepsujesz w swojej witrynie na żywo?
Przeniesienie witryny WordPress na lokalny serwer na komputerze jest naszym zdaniem idealnym rozwiązaniem, szczególnie dla programistów, projektantów lub początkujących użytkowników WordPress.
Instalacja WordPressa na komputerze (serwerze lokalnym) pozwala na łatwą naukę WordPressa i testowanie różnych rzeczy. Przeniesienie działającej witryny WordPress na serwer lokalny umożliwia eksperymentowanie z tymi samymi danymi, co w przypadku działającej witryny.
W tym artykule pokażemy, jak łatwo przenieść działającą witrynę WordPress na serwer lokalny.

Dlaczego i kto chciałby przenieść działającą witrynę WordPress na serwer lokalny?
Jeśli prowadzisz witrynę WordPress od jakiegoś czasu, możesz chcieć wypróbować nowe motywy lub wtyczki. Jednak robienie tego w witrynie na żywo może skutkować niskim komfortem użytkowania dla użytkowników.
Aby tego uniknąć, wielu użytkowników tworzy kopię swojej witryny WordPress na serwerze lokalnym, aby testować nowe motywy, wtyczki lub przeprowadzać testy programistyczne.
Pozwala to na skonfigurowanie motywu z całą zawartością i przetestowanie wszystkich funkcji bez obawy o uszkodzenie witryny. Wielu użytkowników kopiuje swoją witrynę na lokalny serwer, aby ćwiczyć swoje umiejętności WordPress i kodowania z rzeczywistymi danymi witryny.
Nawet jeśli możesz przeprowadzić wszystkie testy z fikcyjną zawartością w WordPress, rzeczywiste dane witryny zapewniają lepszą wizualną reprezentację tego, jak te zmiany pojawią się w Twojej witrynie na żywo.
Przygotowanie do przeniesienia witryny lokalnej na serwer lokalny
Po pierwsze, musisz upewnić się, że zawsze tworzysz kopię zapasową swojej witryny WordPress. Istnieje kilka świetnych wtyczek do tworzenia kopii zapasowych WordPress, z których możesz skorzystać.
Po drugie, musisz zainstalować lokalne środowisko serwerowe na swoim komputerze. Możesz użyć WAMP dla Windows i MAMP dla Mac. Po skonfigurowaniu środowiska należy utworzyć nową bazę danych za pomocą phpMyAdmin.
Wystarczy odwiedzić poniższy adres URL w przeglądarce, aby uruchomić phpMyAdmin.
http://localhost/phpmyadmin/
http://localhost:8080/phpmyadmin/
W tym miejscu należy kliknąć kartę “Bazy danych” i utworzyć nową bazę danych. Ta baza danych będzie potrzebna do późniejszego rozpakowania danych witryny na żywo.

Teraz możesz przenieść swoją witrynę WordPress na żywo na serwer lokalny.
Metoda 1. Przenoszenie witryny WordPress na żywo na serwer lokalny za pomocą wtyczki
Ta metoda jest łatwiejsza i zalecana dla wszystkich użytkowników.
Pierwszą rzeczą, którą musisz zrobić, to zainstalować i aktywować wtyczkę Duplicator. Aby uzyskać więcej informacji, zobacz nasz przewodnik krok po kroku, jak zainstalować wtyczkę WordPress.
Duplicator umożliwia łatwe tworzenie duplikatów całej witryny. Może być używany do przenoszenia witryny WordPress do nowej lokalizacji, a także może być używany jako wtyczka do tworzenia kopii zapasowych.
Uwaga: Istnieje darmowa wersja programu Duplicator, od której można zacząć. Jednak Duplicator Pro oferuje nieograniczoną liczbę kopii zapasowych i bardziej zaawansowane funkcje.
Po aktywacji przejdź do Duplicator Pro ” Backups z paska bocznego administratora WordPress. Aby utworzyć nowy pakiet, należy kliknąć przycisk “Dodaj nowy”.

Następnie Duplicator uruchomi kreator kopii zapasowej.
Najpierw należy wprowadzić nazwę pakietu kopii zapasowej. Możesz także użyć tagów dynamicznych, aby automatycznie utworzyć format nazwy, taki jak data i tytuł witryny.
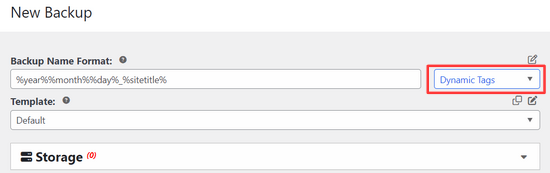
Następnie rozwiń sekcję “Pamięć” i wybierz lokalizację przechowywania.
W tym poradniku użyjemy domyślnej lokalizacji. Jeśli chcesz, możesz kliknąć link “Dodaj pamięć”, aby dodać nową lokalizację, taką jak Dropbox lub Dysk Google.
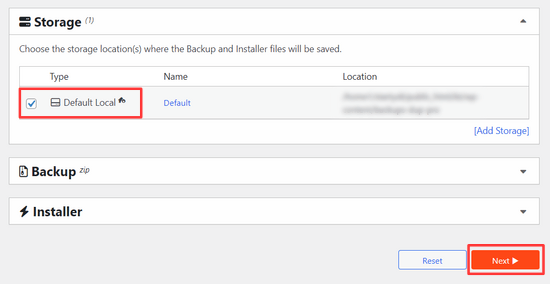
Kliknij przycisk “Dalej”, aby kontynuować.
Następnie wtyczka przeskanuje witrynę i przeprowadzi kilka kontroli w tle. Następnie wyświetli podsumowanie tych kontroli.
Jeśli wszystko wygląda dobrze, kliknij przycisk“Utwórz kopię zapasową“, aby kontynuować.

Duplicator utworzy teraz pakiet witryny.
Po zakończeniu zostanie wyświetlony plik archiwum zip zawierający wszystkie dane witryny oraz plik instalatora. Oba pliki należy pobrać na swój komputer.

Teraz możesz rozpakować i zainstalować te pliki na lokalnym serwerze.
Najpierw należy utworzyć nowy folder w folderze głównym serwera lokalnego. Jest to folder, w którym lokalny serwer przechowuje wszystkie strony internetowe.
Na przykład, jeśli używasz MAMP, będzie to folder /Applications/MAMP/htdocs/. Alternatywnie, jeśli używasz WAMP, będzie to folder C:\wamp\www\.
Wewnątrz tego folderu możesz utworzyć nowe foldery dla każdej nowej strony internetowej, którą chcesz importować lub utworzyć na serwerze lokalnym.

Następnie należy otworzyć folder utworzony dla lokalnej witryny internetowej, a następnie skopiować i wkleić zarówno plik zip archiwum, jak i pobrany wcześniej skrypt instalacyjny.

Aby uruchomić instalację, należy otworzyć skrypt installer.php w przeglądarce internetowej.
Na przykład, jeśli wkleiłeś oba pliki do folderu /mylocalsite/, uzyskasz do nich dostęp w przeglądarce, odwiedzając stronę http://localhost/mylocalsite/installer.php.
Skrypt instalacyjny programu Duplicator będzie wyglądał następująco:

Kliknij przycisk “Dalej”, aby kontynuować.
Duplicator rozpakuje teraz plik zip archiwum i poprosi o wprowadzenie informacji o bazie danych lokalnej witryny. Jest to baza danych utworzona wcześniej.

Nazwa serwera to prawie zawsze localhost, a nazwa użytkownika to root. W większości przypadków lokalna instalacja serwera nie ma ustawionego hasła dla roota, więc można pozostawić to pole puste.
W dolnej części strony znajduje się przycisk “Testuj bazę danych”, którego można użyć, aby upewnić się, że informacje o bazie danych są prawidłowe.

Jeśli wszystko wygląda dobrze, kliknij przycisk “Dalej”, aby kontynuować.
Duplicator będzie teraz importować bazę danych WordPress. Następnie zostaniesz poproszony o podwójne sprawdzenie informacji o nowej witrynie, które zostały automatycznie wykryte.

Kliknij przycisk “Dalej”, aby kontynuować.
Duplicator zakończy teraz konfigurację i wyświetli przycisk umożliwiający zalogowanie się do lokalnej witryny. Będziesz używać tej samej nazwy użytkownika i hasła WordPress, których używasz w swojej aktywnej witrynie.

To wszystko, pomyślnie przeniosłeś swoją witrynę na żywo na serwer lokalny.
Metoda 2. Ręczne przeniesienie aktywnej witryny WordPress na serwer lokalny
W przypadku, gdy wtyczka nie działa, zawsze można ręcznie przenieść witrynę na żywo na serwer lokalny. Pierwszą rzeczą, której potrzebujesz, jest ręczne wykonanie kopii zapasowej witryny z konta hostingowego WordPress.
Krok 1. Eksport bazy danych WordPress witryny na żywo
Aby wyeksportować bazę danych WordPress witryny na żywo, należy zalogować się do kokpitu cPanel i kliknąć phpMyAdmin.
Uwaga: Pokazujemy zrzuty ekranu z kokpitu Bluehost.

W phpMyAdmin musisz wybrać bazę danych, którą chcesz wyeksportować, a następnie kliknąć kartę eksportu u góry.

phpMyAdmin poprosi teraz o wybranie szybkiej lub niestandardowej metody eksportu. Zalecamy użycie metody niestandardowej i wybranie zip jako metody kompresji.
Czasami wtyczki WordPress mogą tworzyć własne tabele w bazie danych WordPress. Jeśli nie używasz już tej wtyczki, metoda niestandardowa pozwala wykluczyć te tabele.
Pozostaw pozostałe opcje bez zmian i kliknij przycisk “Dalej”, aby pobrać kopię zapasową bazy danych w formacie zip.

phpMyAdmin pobierze teraz plik bazy danych. Aby uzyskać więcej informacji, zobacz nasz poradnik na temat ręcznego tworzenia kopii zapasowej bazy danych WordPress.
Krok 2. Pobierz wszystkie pliki WordPress
Następnym krokiem jest pobranie plików WordPress. Aby to zrobić, musisz połączyć się z witryną WordPress za pomocą klienta FTP.
Po nawiązaniu połączenia wybierz wszystkie pliki WordPress i pobierz je na swój komputer.

Krok 3. Importowanie plików WordPress i bazy danych na serwer lokalny
Po pobraniu plików WordPress należy utworzyć folder na serwerze lokalnym, do którego będzie importowana lokalna witryna.
Jeśli korzystasz z WAMP, powinieneś utworzyć folder w folderze C:\wamp\www\ dla swojej lokalnej witryny. Użytkownicy MAMP będą musieli utworzyć folder w folderze /Applications/MAMP/htdocs/.
Następnie wystarczy skopiować i wkleić pliki WordPress do nowego folderu.
Następnie należy importować bazę danych WordPress. Wystarczy otworzyć phpMyAdmin na lokalnym serwerze, odwiedzając następujący adres URL:
http://localhost/phpmyadmin/
Ponieważ baza danych została już utworzona wcześniej, należy ją teraz wybrać, a następnie kliknąć kartę “Importuj” u góry.

Kliknij przycisk “Wybierz plik”, aby wybrać i przesłać plik eksportu bazy danych pobrany w pierwszym kroku. Następnie kliknij przycisk “Przejdź” u dołu strony.
phpMyAdmin rozpakuje i zaimportuje bazę danych WordPress.
Teraz, gdy baza danych jest już skonfigurowana, należy zaktualizować adresy URL w bazie danych WordPress odwołujące się do witryny na żywo.
Można to zrobić, uruchamiając zapytanie SQL w phpMyAdmin. Upewnij się, że wybrałeś lokalną bazę danych witryny, a następnie kliknij SQL.

Na ekranie SQL phpMyAdmin skopiuj i wklej ten kod, upewniając się, że zastąpiłeś example.com adresem URL witryny na żywo, a http://localhost/mylocalsite adresem URL lokalnego serwera witryny.
UPDATE wp_options SET option_value = replace(option_value,'https://www.example.com','http://localhost/mylocalsite') WHERE option_name ='home'OR option_name ='siteurl';UPDATE wp_posts SET post_content = replace(post_content,'https://www.example.com','http://localhost/mylocalsite');UPDATE wp_postmeta SET meta_value = replace(meta_value,'https://www.example.com','http://localhost/mylocalsite');
To zapytanie zastąpi odwołania do adresu URL witryny na żywo z bazy danych i zastąpi je adresem URL lokalnego hosta.
Krok 4. Aktualizacja pliku wp-config.php
Ostatnim krokiem jest aktualizacja lokalnego pliku wp-config.php witryny. Plik ten zawiera ustawienia WordPress, w tym sposób łączenia się z bazą danych WordPress.
Po prostu przejdź do folderu, w którym zainstalowałeś WordPress na swoim lokalnym serwerze, a następnie otwórz plik wp-config.php w edytorze tekstu, takim jak Notatnik.
Zastąp nazwę bazy danych tą, którą utworzyłeś w phpMyAdmin na swoim hoście lokalnym.
Następnie zastąp nazwę użytkownika bazy danych lokalną nazwą użytkownika MySQL, zwykle jest to root. Jeśli ustawiłeś hasło dla użytkownika root MySQL na swoim hoście lokalnym, wprowadź to hasło. W przeciwnym razie pozostaw to pole puste i zapisz zmiany.
/** The name of the database for WordPress */define('DB_NAME','database_name_here');/** MySQL database username */define('DB_USER','username_here');/** MySQL database password */define('DB_PASSWORD','password_here');
Możesz teraz odwiedzić lokalną witrynę w oknie przeglądarki, wprowadzając adres URL w następujący sposób:
http://localhost/mylocalsite/
Zastąp “mylocalsite” nazwą folderu, do którego skopiowałeś pliki WordPress.
To wszystko, witryna WordPress na żywo została skopiowana na serwer lokalny.
Mamy nadzieję, że ten artykuł pomógł ci dowiedzieć się, jak łatwo przenieść działającą witrynę WordPress na serwer lokalny. Możesz również zapoznać się z naszym przewodnikiem na temat tego, jak łatwo utworzyć witrynę przejściową dla WordPress do testowania lub jak przenieść witrynę WordPress z serwera lokalnego do witryny rzeczywistej.
If you liked this article, then please subscribe to our YouTube Channel for WordPress video tutorials. You can also find us on Twitter and Facebook.


")
Jakob Uzioa
So i followed the instructions to manually move the site to the letter using wampserver but when i navigate to the file path localhost/mysite and hit enter, the site does not open but instead only a file downloads which is called. ” download” which is a php file:
/**
* Front to the WordPress application. This file doesn’t do anything, but loads
* wp-blog-header.php which does and tells WordPress to load the theme.
*
* @package WordPress
*/
/**
* Tells WordPress to load the WordPress theme and output it.
what could be the problem ?
WPBeginner Support
Please ensure you go through the installer.php when first installing the site and ensure WAMP is running as common possible reasons for that issue.
Admin
Tye
Thanks for the tutorial, its more clear than a lot of the ones I found online, I have a problem though, migration all fine, the site is running but I cannot login with the usernames I had on the live site, cannot access the admin dashboard to create new usernames either. Help please?
WPBeginner Support
If your users are not working then you could manually add a user following the steps in our article below. You would be able to use your file manager instead of FTP for a local installation.
https://www.wpbeginner.com/wp-tutorials/how-to-add-an-admin-user-in-wordpress-using-ftp/
Admin
Mark
Thank you for this tutorial, you run a very helpful website. It took me a long time to run through this, as there are alot of steps and I find a lot of ways to go wrong! I ended up using the file names that you used in your examples, to reduce complication. And success! Much appreciated.
WPBeginner Support
Glad our guide could help!
Admin
Lina
Thanks for the great tutorial! However, it only works for my home page. When I try to open a subpage, I see this error message: “The requested URL was not found on this server.” Can you help me here?
Best regards,
Lina
WPBeginner Support
It would depend on the method you used but we would recommend ensuring you used the SQL update as that should fix your URLs in your database. You may also want to ensure the links you are using in your menu are not custom URLs as that can be a common reason for that issue as well.
Admin
Awais
is the above code is right ?
I copy and paste in SQL but every time this massage comes,
0 rows affected. (Query took 0.0046 seconds.)
WPBeginner Support
The code should work but especially if you’ve already run it once, there will be no change in your site and it will come back with 0 affected.
Admin
Deb
Hi, thanks for your fab instructions. I used the Duplicator method and everything works…except when viewing the site my images/thumbnails don’t show up (broken image), until I click on them. Then they show in their own window, as expected.
They do show properly in the wp dashboard editor.
Cheers, Deb
WPBeginner Support
There are a few possible reasons but for a starting point you could try regenerating the thumbnails following our guide below as the most common solution for that error:
https://www.wpbeginner.com/plugins/regenerate-thumbnails-new-image-sizes-wordpress/
Admin
Aamir Khan
I have created a backup of my website manually and setup on local machine and run the above quires, but my website is redirecting to online version.
WPBeginner Support
It seems like you may have not updated the URL, you can do so using step 3 of the manual method of this article.
Admin
George
Thank you so much for this clear and useful article. I was able to follow it and migrate my WP site in less than 20 minutes – and I’m no expert. You’ve saved me a lot of pain – thank you.
WPBeginner Support
Glad our guide was helpful
Admin
Barry
Doesn’t work for me. I create the package, but it installs the basic WordPress files. So when I navigate to the folder it asks me to setup wordpress
WPBeginner Support
For the most common reason, you would want to ensure you are properly connected to the database, if you are not then it would show the option for creating a new site instead of showing the correct site.
Admin
Daniel
Nooo, its not working for me. pefrectly written tutorial and easy to follow (apart from it says hhttpps in the 3rd query)
i get this in my browser:
This site can’t be reachedlocalhost refused to connect.
Try:
Checking the connection
Checking the proxy and the firewall
ERR_CONNECTION_REFUSED
WPBeginner Support
Thanks for pointing out that typo, it should be fixed. For that error, you would want to ensure you updated your URL in step 3 correctly for the most common reason for that issue.
Admin
McKenzie
Thanks for your tutorial.
The front page is partially working but every other page is not working at all. Furthermore, it seems that front page is loading All the pages. What could be wrong?
WPBeginner Support
We would recommend starting by going through our troubleshooting guide below:
https://www.wpbeginner.com/beginners-guide/beginners-guide-to-troubleshooting-wordpress-errors-step-by-step/
Admin
Collins
Hi, Thank you for this super useful article.
I don’t know why mine doesn’t just work, I have done the exact same thing and gotten all the correct feedback. Whenever I try to open the home page localhost/site/ I get a page that doesn’t exist with the headers and footers and the rest of the pages still point to the live site.
WPBeginner Support
It sounds like you may have not set the URLs correctly. You would likely want to go to method 2 and try the SQL changes to update your URLs.
Admin
Murat
For those who are getting “wp_options doesn’t exist” error, you may have changed your table_prefix before. Just open the wp_config.php file and check $table_prefix = ‘wp_’
if the value isn’t “wp_” you get that error so when pasting the code edit it accordingly, for instance:
UPDATE xx_options SET option_value………..
WPBeginner Support
Thanks for sharing this should someone be running into that error
Admin
Chinwe
Thank you so much for this. It worked.
WPBeginner Support
Glad our guide was helpful
Admin
Ivana Spasic
When I copy and paste the code you provided to phpMyAdmin’s SQL screen, I am getting message: #1146 – Table ‘xyz.wp_options’ doesn’t exist.
How can this be fixed?
WPBeginner Support
You would want to ensure you have the correct database selected for the most common reason for that issue.
Admin
Jill
I used the Duplicator plugin to set up a copy of a website for a non-profit that I inherited. After reloading it so that all plugins are disabled I finally came to the conclusion that my site is attempting to use https:// to log in to the dashboard. To further confuse me, an empty site that I created on localhost does NOT use https:// for log in to the dashboard. I understand the value of https:// on the live site, but it appears there may be a way to disable it on localhost?
WPBeginner Support
For changing your local site’s URL you can follow our guide below and remove the s:
https://www.wpbeginner.com/wp-tutorials/how-to-change-your-wordpress-site-urls-step-by-step
Admin
Hazel beaver
Is there a plugin that allows you to download a zip file from the live site then upload into a fresh install of wordpress on the local host in a simpler way?
WPBeginner Support
For what it sounds like you’re wanting, the closest would be method 2 of this guide that you would want to take a look at.
Admin
Daniel
I successfully uploaded to localhost but when i try to use localhost/mysite_location/wp-admin, it redirects to the live site. Not the one on the localhost.
Need help
WPBeginner Support
You would want to go into your site’s database, go to the options table, and change your site url and address to localhost there. For how to modify your database you would want to take a look at our article here: https://www.wpbeginner.com/beginners-guide/beginners-guide-to-wordpress-database-management-with-phpmyadmin/
Admin
Bine
Great tutorial. It’s straight forward. Unfortunately I still get redirected to the dashboard as soon as I try to enter my URL. I followed all the steps but something must be missing. Does anyone has an idea what the problem might be? Cheers
WPBeginner Support
You may want to check your options table in your database to be sure that you didn’t set the site’s url to your wp-admin area
Admin
Niaz Muhammad
Great tutorial thanks for sharing your knowledge
WPBeginner Support
Glad you liked our article
Admin
alvaro hernandez
it works great!!! i love you!
WPBeginner Support
Glad our guide was helpful
Admin
T_WA
Hi, thanks for the tutorial, it’s was super helpful!!
However, after following all your steps, I have problems “establishing secure connection” (I guess because of the SSL) and thus it doesn’t work . I even tried and changed a line ‘DB_HOST’ to ‘localhost/localhost:8888’ in the wp-config.php that wasn’t mentioned in the video but didn’t help.
Also, when changing links I tried many variations nothing worked. Has someone faced a similar issue and found a solutions to it?
WPBeginner Support
Did you attempt to clear all of your caching after updating the URLs and is there the option to continue anyway under advanced on that error page?
Admin
Said
First of all thank you for theses clear explanations that I followed to the letter. The result is that i can access to to my site homepage locally, but links in this homepage do not seem to work because when I click on a link, for example :
localhost.mysite.com/subject.html
it is the following page that is displayed fir all links :
localhost/dashboard
Can you help me to resolve this problem
Thanks in advance
WPBeginner Support
It is likely due to your localhost not accepting pretty permalinks: https://www.wpbeginner.com/wp-tutorials/how-to-enable-custom-permalinks-in-wordpress-wamp-installation/
Admin
Ifthikar Hussain
Great Working, am facing a new problem which is i can access the only home page of my word press side. how can i able to access other pages??
WPBeginner Support
It would depend on what error you are running into. To get started you could take a look at the troubleshooting steps in: https://www.wpbeginner.com/beginners-guide/beginners-guide-to-troubleshooting-wordpress-errors-step-by-step/
Admin
Hannah
Hi there,
this is really easy to follow and helpful so thank you for that.
I do have a very straightforward question though.
When updating the URLs, you say to replace http:// example.com with your live site, but what if my live site uses https?
WPBeginner Support
If you’re moving your site to a local server we recommend http to avoid local installation issues with not having an SSL, you would change to https if you’re moving the content back to a live site that is using SSL.
Admin
Philip
Thanks. You wrote this article over 5 years ago, and it’s still good. I managed to set everything up nicely without too much trouble by following your manual instructions. Thanks in particular for the SQL queries.
Philip
WPBeginner Support
Glad our guide could be helpful and still works
Admin
Basem
After finishing the installation I click Admin Login button. the browser open new window to the installation of wordpress again? and the login page is not there
I checked the folders. all files are copied.
Patrick
Somebody find a fix for the localhost site copy (from live https) administration wanting to use https ?
dowlass
I found your instructions for the manual move of my site (from live server to localhost) worked pretty well. I had to do the permalinks thing – just click on ‘save’ without changing anything – to make links work properly. But otherwise it’s mostly good.
However, I’ve encountered a problem when trying to use new themes. If I add a new theme, then sure the theme installs ok and shows up on the theme page. However, if I try to preview or activate the new theme I just get a totally blank page – even the admin goes blank. The only recourse is to use the browser back button to get back to the admin view where I can delete the theme.
Adding new themes and trying to use them just makes the whole thing fall over!
Any ideas?
(p.s. I’m using a very old version of WordPress – 2.9.2…!! Which is the reason for wanting to play with it on localhost and work out the best way to upgrade.)
Michael
Tutorial worked pretty good but I had “internal Server Error”. I was downloading an entire network installation. I recopied the wp-config.php file because it had become compressed, all spacing removed. Then replaced the .htaccess with a fresh network version and that “RewriteBase /sitename/” was to the folder of the installation, instead of “RewriteBase /”
Emma
The instructions are clear and straightfoward but unfortunately I am having a total nightmare getting my site to work on the local server. After much trial and I’ve managed to get connect to the database and get some of the site content displayed but links aren’t working (they’re not found, apparently). I’m using MAMP Pro for Windows. Maybe I’ll try XAMMP – or using a Mac – instead. I think alot of the problem is to do with permissions but don’t really know where to start there seem to be so many fixes needed!
WPBeginner Support
Hi Emma,
If you can access the WordPress admin area, then try visiting Settings » Permalinks and then click on the save changes button without changing anything.
Admin
andy
I solve my problem. If you manually moved wordpress to localhost, and you install w3 total cache in your wordpress, you have to clear the browser cache after change database and wp-config. Or just open your localhost site with different browser.
andy
I have changed wp-config and all database url to localhost, but localhost still redirect me to live site. Why? I cannot install any plugin like duplicator anymore because the site already deleted
Suhana
Hi Andy
Have u tried changing the settings from wp dashboard?
Settings-> General->WordPress Address (URL),Site Address (URL)
Even if it shows the localhost address just save it and check. Hope it helps.
Patrick Pogi
Hi wpbeginner,
Thank you for the tutorial, it helps me a lot. I tried the manual install and but in the end it keeps redirecting me into wordpress installation page. Pls help me, i think i’m almost done. Im using xampp.
Thank you
Jason
Hi,
Im having issues while moving my site, it says LOCALHOST REFUSED TO CONNECT.
But my other local sites are okay.
Im moving it to local because something gone terribly wrong and my page woun’t load on the server’s.
Please any suggestion or advise is appriciated
John
In MAMP Preferences set your Ports to – Apache 80, Nginx 443 and MySQL 3306 and see if that fixes it
Steve
Thanks for this article, I found it very useful but would like to add to it if I may.
I used the manual method successfully with one exception, I could not navigate to any of the pages or posts from my sites menu. I would get a page not found error. I tried everything here, saving the premalinks, but nothing worked. I finally found a post elsewhere that gave me the solution. I had to modify a line in Apache’s httpd.conf file. Open the file and search for ‘AllowOverride’. If it looks like this: ‘AllowOverride None’, change it to ‘AllowOverride All’. I could not get to every page and post and see all the content!. FYI, there are several ‘AllowOverride’ options but the one you are looking for resides on a line by itself. I know this is a WordPress and not an Apache config forum but others may be experiencing the same issue. Hope this helps.
Braun Philippe
Hello Guys,
I’m running into a serious problem. When I click on my local site forler with servers ON on MAMP, it redirects to live site I’ve done everything this tutorial says, do you know where is the problem ?
Thanks for your help
Sara
Hi
I am also having blank screen like IDRIS D…any suggestion
Idris D
Unfortuntely when I follow this guide, all the links in my local site redirect to the live site.
Any suggestions?
Adrian Stangell
Hi,
after following the instructions for the manual migration I end up with a blank screen when I try to access my website on the localhost. Any ideas?
Joel M
After running the SQL Query to replace links I receive a 1064 error – it seems there is a problem with the code syntax. I’m guessing it’s the (:) in my localhost url : ‘http://localhost:888/localwebsite’ – any ideas how I can work around this? I am using MAMP to run the local server.
Aaron L
try four ‘8’s instead of 3…. localhost:8888/localwebsite
Natalie Bell
Hi there!
I’ve had a successful migration to local site except for my Media Library, every picture is there (lots of files), url’s are correct, but when they don’t show up in the actual blog. When I go to media library it just shows the grid of the pics – all blank, but in description, url etc everything is correct.
Any idea what to do next?
Grant
Try going to your wordpress dashboard, click on the settings menu near the bottom of the sidebar on the left. Then click on the reading menu in the settings submenu, scroll down to the site visibility options and select the ‘allow search engines to index’ option and click save changes at the bottom of the page. See if that works, if not you may have to go to your terminal and manually pull media files from your old site recursively – I had to go this route and can walk you through it if you have any questions. Hope this helps
Carolina
Hi there, Thanks for the post, it’s a huge success for me.
So far, I’ve been able to get to the wp-login page.
and I’m sorry if this is a very silly question. but I’m really newbie with wp
my problem is I can’t login :$
I’ve tried the same logins as the live details = don’t work
as I haven’t set up the dashboard and it’s a local. no email will work.
what should I do?
btw, it’s on a mac.
Many thanks in advanced. Help is appreciated!!
WPBeginner Support
Hi Carolina,
You can change password using PHPMyAdmin.
Admin
DavidA
Hi again,
My sincere apologies! Posted a comment yesterday (July 24) re difficulty running the Duplicator program from my browser. Went back to check today and realised that I had made a mistake with the placement of the “test-site” folder which contained the installer.php and the zip archive database.
Once I truly placed this folder in the htdocs folder then everything worked fine and I was able to install the website data locally as per your instructions.
Thank you again for all your help!
DavidA
Hi — thank you again for another great article! All very helpful!
I am at the step of opening the Duplicator installer on my local computer. However when I put “http://localhost/test-site/installer.php” into my browser I get a “404 error message” saying “object not found”.
Interestingly if I use “localhost” alone or “localhost/phpmyadmin” they both work. I have moved the “test-site” folder to the “htdocs” folder but still does not work.
Any suggestions??
Thank you
Shun
Thanks for this guide, but what if you’re migrating from a live site with an SSL cert down to a dev site without SSL (https to http?)
I got the front-end working fine, however, HTTPS is still added to my wp-login URL, preventing me from accessing the login page into the admin.
Any additional steps required to eliminating https on a local/dev site’s WP login page?
simone
I am having a similar issue. I migrated a live site to MAMP using WP Migrate DB plug in and FTP. I get the following error – due to the live sites SSL Certificate. It has something to do with the database prefixes not matching. But – I cannot change the prefix on the live site, I called Go Daddy to see if I edited the live site prefix to match my local install database prefix if it would break the site, they said no guarantees, I tried it and it broke the site.
error message I get when entering localhost:8888 url.
An error occurred during a connection to localhost:8888. The client has encountered bad data from the server. Error code: SSL_ERROR_BAD_SERVER
The page you are trying to view cannot be shown because the authenticity of the received data could not be verified.
Please contact the website owners to inform them of this problem.
Thank you in advance for any help!
xasmatic
Well, i used SSL certificate and that is what I did:
At the step where you have to update the URLs inside your WordPress database referencing to your live site, you write the SQL query 4 times to change every URL that may exist.
First time write code like above “http://www.example.com”, then “http://example.com”, after that “https://www.example.com” and finally “https://example.com”.
Make sure: 1) that you write all four times the URL
http://localhost/test-sitewhich will replace those URLs2) change wp_options, wp_posts and wp_postmeta to your right ones (mine for example were cagwp_options etc.)
And a last reminder: Finally (if you’re moving on localhost), on the last step you have also to change the host name to localhost (wp_config.php file)
/** MySQL hostname */
define(‘DB_HOST’, ‘localhost’);
Veer Abheek Singh Manhas
I am tried using this article but I am not sure at which point of time i am supposed to install wordpress. Can anyone help me here?
Thanks
AIAI
you don’t have to reinstall wordpress again. all files from the source wp installation is already backed up.
Alex
I have used these instruction before and they worked fine, however i now have an updated version of mamp and wordpress and i continually get errors. betwen playing around i get the white blank screen or the index.php file. as text.
Both similar problems to users below.
it might be time to update this.
I gave up on moving my site to local and decided to just have a dev url too however, when i run the sql query above i always end up with a token missmatch, despite making all the necessary changes.
Andi
Thank’S a lot for your work.
But it doesn’t work. If I run local installer.php I see blank screen.
Best regards
Andi
mc
hey
I did everything as it is described and when I get to the last phase and put the url: localhost/mysite it automatically downloads a file that has this information:
<?php
/**
* Front to the WordPress application. This file doesn't do anything, but loads
* wp-blog-header.php which does and tells WordPress to load the theme.
*
* @package WordPress
*/
/**
* Tells WordPress to load the WordPress theme and output it.
*
* @var bool
*/
define('WP_USE_THEMES', true);
/** Loads the WordPress Environment and Template */
require( dirname( __FILE__ ) . '/wp-blog-header.php' );
is it something wrong that i did in the process?