Po latach budowania witryn WordPress nauczyliśmy się, jak ważne jest posiadanie lokalnej konfiguracji WordPress na komputerze.
Posiadanie WordPressa na osobistym komputerze pozwala eksperymentować z nowymi funkcjami bez narażania witryny na żywo, zagłębiać się w rozwój WordPressa, a nawet tworzyć całe witryny internetowe przed ich uruchomieniem. To jak prywatna piaskownica dla wszystkich projektów WordPress.
Jeśli jesteś użytkownikiem systemu Windows, istnieje wiele sposobów na skonfigurowanie WordPressa lokalnie. Zawęziliśmy je jednak do dwóch najłatwiejszych metod. W tym przewodniku pokażemy, jak łatwo zainstalować WordPress na komputerze z systemem Windows, niezależnie od używanej wersji.
Dlaczego warto zainstalować WordPress na Windows?
Jeśli jesteś użytkownikiem systemu Windows, instalacja WordPressa lokalnie na komputerze oferuje kilka korzyści.
Lokalna instalacja WordPress tworzy środowisko testowe, które nie ma wpływu na działającą witrynę. Ta konfiguracja, często nazywana serwerem lokalnym lub hostem lokalnym, jest osobistym placem zabaw dla WordPressa.
Programiści WordPress regularnie używają lokalnych instalacji do swojej pracy. Mogą na przykład używać ich do eksperymentowania z nowymi wtyczkami lub motywami lub testowania witryny przed aktualizacją do edytora bloków Gutenberg.
Ale nie jest to rozwiązanie tylko dla profesjonalistów. Jeśli dopiero zaczynasz przygodę z WordPressem, lokalna konfiguracja jest idealna do nauki. Możesz odkrywać funkcje, testować motywy i wtyczki oraz swobodnie eksperymentować bez obawy o uszkodzenie działającej witryny.
Ważne jest, aby pamiętać, że po zainstalowaniu WordPressa lokalnie w systemie Windows, tylko ty możesz zobaczyć witrynę. Jeśli chcesz utworzyć publiczną witrynę internetową, będziesz potrzebować nazwy domeny i hostingu.
Technicznie rzecz biorąc, można zainstalować WordPressa na Windowsie za pomocą XAMPP, a my napisaliśmy już o tym poradnik.
Biorąc to pod uwagę, znaleźliśmy 2 jeszcze prostsze sposoby niż XAMPP na skonfigurowanie lokalnego środowiska WordPress, dzięki czemu są one idealne dla początkujących lub użytkowników, którzy muszą szybko utworzyć lokalną witrynę. Możesz kliknąć poniższy link, aby przejść do dowolnej metody, która Cię interesuje:
Metoda 1: Zainstaluj WordPress na Windows przy użyciu Studio (szybko i prosto)
W przypadku pierwszej metody użyjemy Studio. Jest to lokalne oprogramowanie WordPress stworzone przez Automattic, firmę, która zarządza i prowadzi WordPress.com, który jest narzędziem do tworzenia stron internetowych opartym na oprogramowaniu WordPress.
Omówimy tę metodę jako pierwszą, ponieważ jest ona znacznie szybsza i prostsza do naśladowania, dzięki czemu jest idealna dla zupełnie początkujących.
Najpierw należy otworzyć stronę Studio by WordPress.com. Następnie kliknij przycisk “Pobierz dla Windows”.
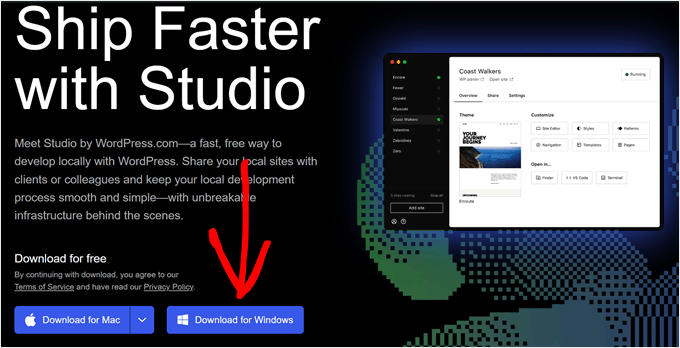
Gdy to zrobisz, po prostu otwórz pobrany plik, aby rozpocząć instalację.
Pojawi się wyskakujące okienko z informacją, że aplikacja jest instalowana.
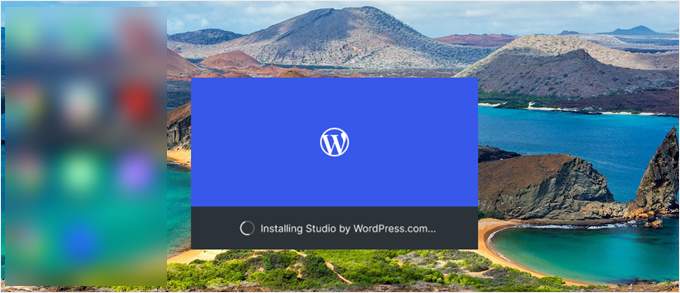
Po wykonaniu tej czynności można dodać pierwszą witrynę.
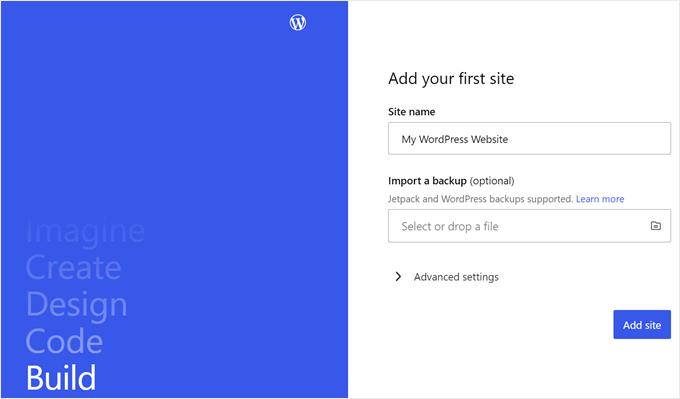
Aby to zrobić, wystarczy wpisać nazwę nowej lokalnej witryny WordPress i kliknąć “Dodaj witrynę”. Możesz nazwać witrynę w dowolny sposób, o ile pomoże ci to łatwo ją zidentyfikować.
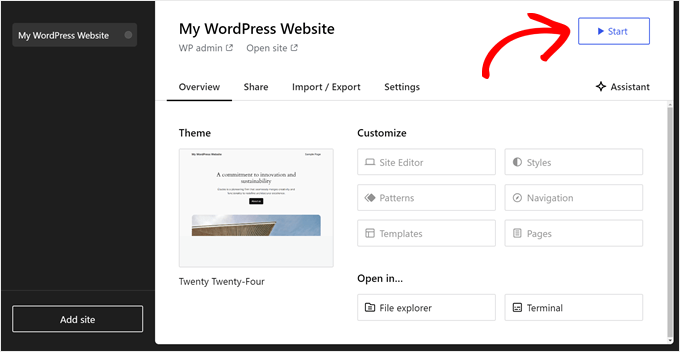
Powinieneś teraz zobaczyć lokalny kokpit witryny WordPress.
Aby uzyskać dostęp do kokpitu WordPress i edytować swoją witrynę, wystarczy kliknąć przycisk “Start” w prawym górnym rogu. Spowoduje to udostępnienie lokalnej witryny na komputerze.
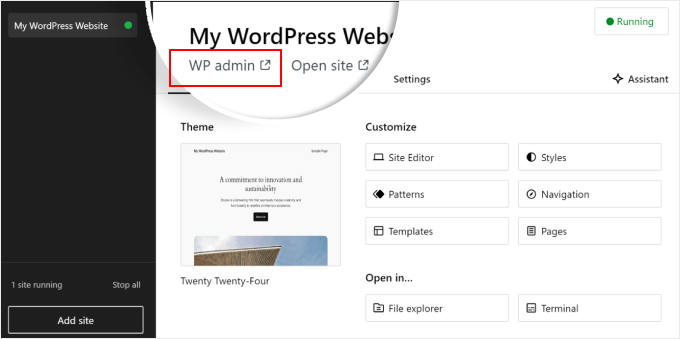
Gdy przycisk “Start” zmieni się na “Running”, możesz kliknąć link “WP Admin” w lewym górnym rogu strony.
Spowoduje to przejście do lokalnej strony administracyjnej WordPress.
I to prawie wszystko, jeśli chodzi o konfigurację. Przyjrzyjmy się innym ustawieniom, które mogą być niezbędne podczas tworzenia lokalnej witryny.
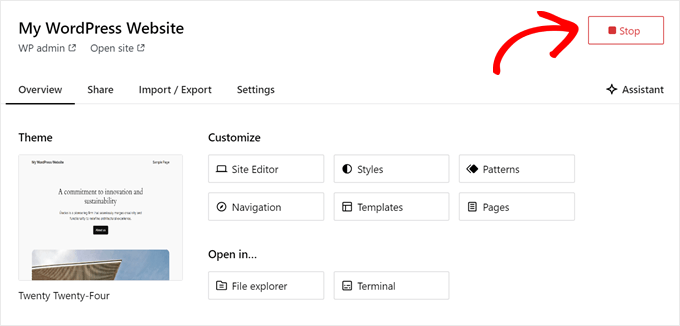
Jak widać na karcie “Przegląd”, można natychmiast uzyskać dostęp do menu edytora pełnej witryny WordPress bezpośrednio z kokpitu Studio. Możesz także kliknąć “Eksplorator plików”, aby otworzyć foldery i pliki witryny WordPress oraz kliknąć “Terminal”, aby zarządzać witryną za pomocą WP-CLI.
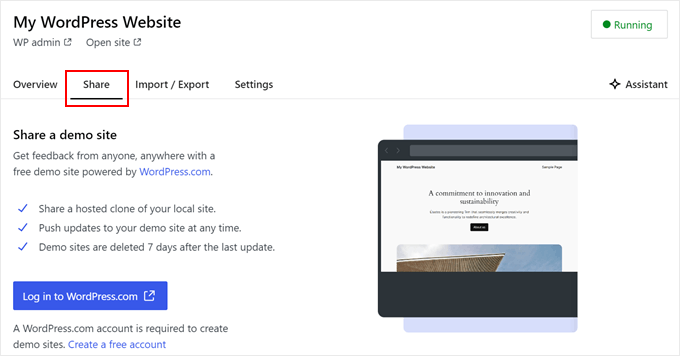
Jeśli przejdziesz do karty “Udostępnij”, możesz zalogować się na swoje konto WordPress.com, sklonować lokalną witrynę i przesłać ją na serwery WordPress.com. Spowoduje to tymczasowe udostępnienie sklonowanej witryny online, co jest przydatne do udostępniania witryn demonstracyjnych klientom lub członkom zespołu.
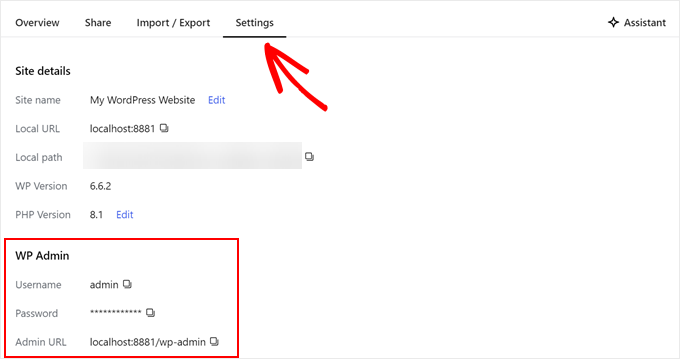
Czasami możesz chcieć zalogować się do swojej lokalnej witryny bezpośrednio przez przeglądarkę zamiast używać Studio. W takim przypadku musisz znać swoje dane uwierzytelniające wp-admin.
Aby je znaleźć, możesz przejść do karty “Ustawienia” i znaleźć tam swoją nazwę użytkownika administratora WordPress, hasło i adres URL logowania.
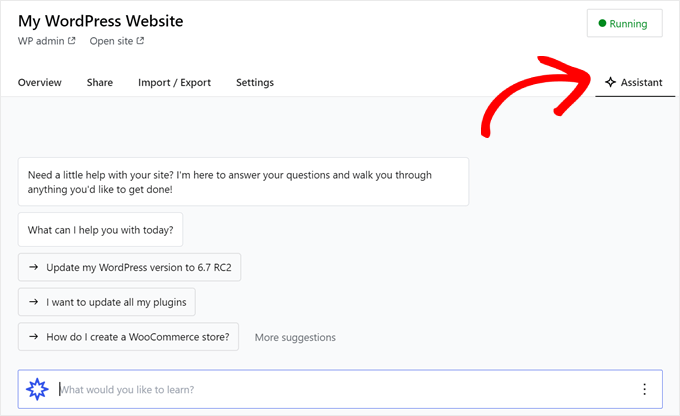
Kolejną ciekawą funkcją Studio jest wbudowany chatbot AI, z którym można się komunikować, klikając przycisk “Asystent”.
Tutaj możesz poprosić Studio o pomoc w takich zadaniach, jak aktualizacja wszystkich wtyczek jednocześnie, aktualizacja rdzeni wersji WordPress lub utworzenie kodu dla niestandardowego bloku.
Po zakończeniu pracy nad lokalną witryną wystarczy najechać kursorem na przycisk “Running” w prawym górnym rogu, aż pojawi się napis “Stop”.
Następnie kliknij przycisk, aby zatrzymać witrynę.
Jedną z wad Studio jest to, że nie można skonfigurować środowiska WordPress według własnych upodobań. Oznacza to, że musisz korzystać z wersji PHP, serwera WWW i bazy danych, które zostały dla Ciebie wstępnie wybrane.
Może to być wadą, jeśli chcesz przetestować swoją witrynę lub wtyczkę w określonych konfiguracjach serwera.
Jeśli potrzebujesz większej kontroli nad lokalnym środowiskiem WordPress lub musisz dopasować lokalną konfigurację do określonej konfiguracji serwera na żywo, możesz sprawdzić następną metodę za pomocą Local WP.
Metoda 2: Zainstaluj WordPress w systemie Windows przy użyciu lokalnego WP (bardziej konfigurowalny)
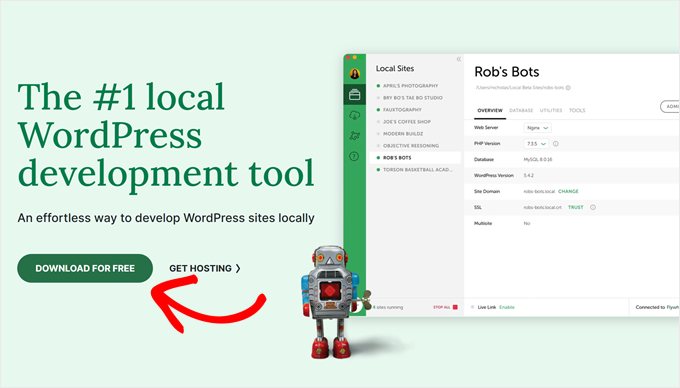
Najpierw należy pobrać i zainstalować oprogramowanie Local WP na twoim komputerze z systemem Windows. Wystarczy przejść do witryny internetowej Local WP i kliknąć przycisk “Pobierz za darmo”.
Następnie pojawi się wyskakujące okienko, w którym należy wybrać platformę. Wybierz “Windows” z rozwijanego menu.
Następnie możesz wprowadzić swoje dane, takie jak imię i nazwisko, służbowy adres e-mail i numer telefonu, aby pobrać oprogramowanie.
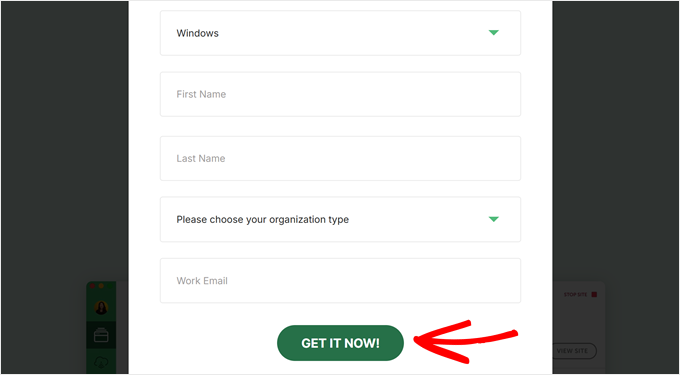
Po wpiszeniu danych wystarczy kliknąć przycisk “Pobierz teraz”.
Następnie oprogramowanie zostanie automatycznie pobrane na komputer. W przeciwnym razie możesz kliknąć łącze “kliknij tutaj”, aby rozpocząć pobieranie.
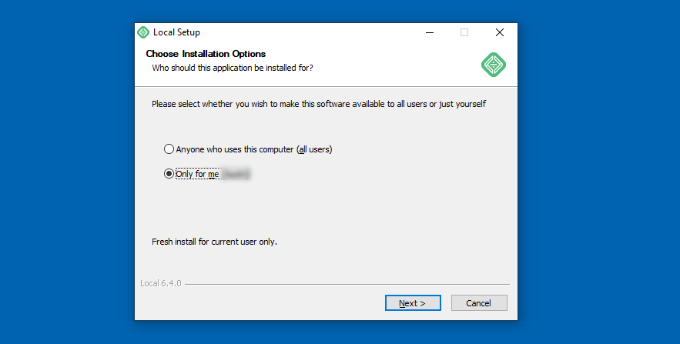
Po pobraniu pliku należy uruchomić kreator konfiguracji.
Teraz musisz wybrać, czy chcesz zainstalować oprogramowanie dla wszystkich użytkowników, czy tylko dla siebie.
Po wybraniu opcji kliknij przycisk “Dalej”.
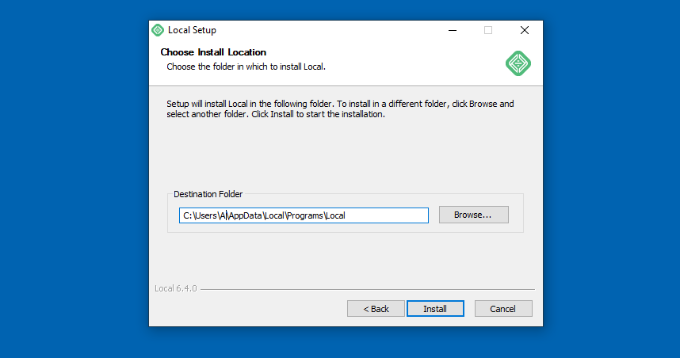
W następnym kroku można wybrać “Katalog docelowy”, w którym zostanie zainstalowane oprogramowanie.
Wystarczy kliknąć przycisk “Przeglądaj”, aby ustawić ścieżkę, a następnie kliknąć przycisk “Zainstaluj”.
Oprogramowanie WP zostanie teraz zainstalowane na twoim komputerze z systemem Windows.
Po zakończeniu można zaznaczyć pole wyboru “Uruchom lokalnie” i kliknąć przycisk “Zakończ” w kreatorze konfiguracji.
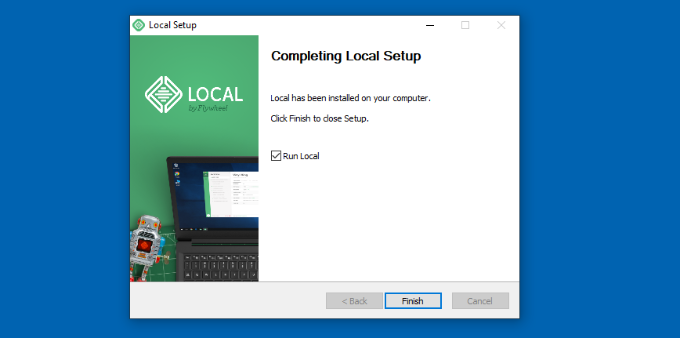
Oprogramowanie uruchomi się teraz na twoim urządzeniu z systemem Windows.
Następnym krokiem jest dodanie nowej lokalnej strony internetowej. Aby to zrobić, wystarczy kliknąć przycisk plusa “+” u dołu.
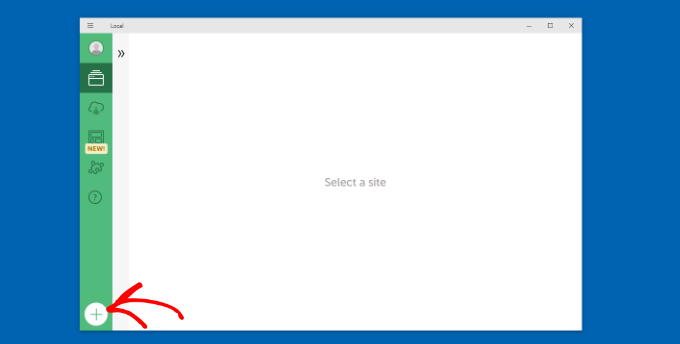
Następnie można utworzyć witrynę w oprogramowaniu Local.
Wybierz opcję “Utwórz nową witrynę” i kliknij przycisk “Kontynuuj”. Istnieją również opcje tworzenia witryny z planu lub istniejącego pliku witryny, ale dla celów demonstracyjnych wybierzemy pierwszą opcję.
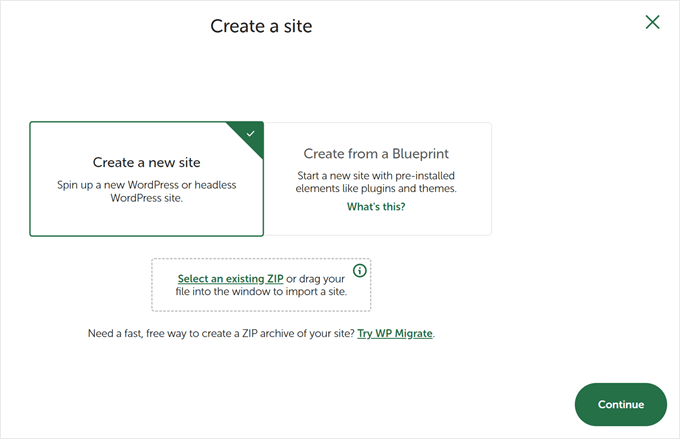
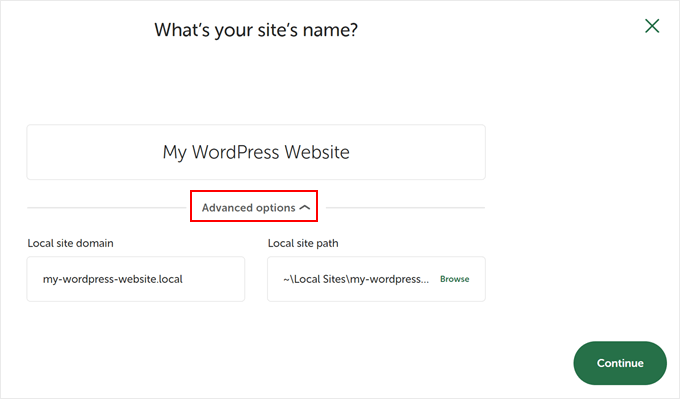
Następnie możesz wprowadzić nazwę swojej lokalnej witryny, na przykład “Moja witryna WordPress”.
Istnieją również opcje zaawansowane, w których można wprowadzić lokalną domenę witryny i lokalną ścieżkę witryny. Domyślnie domena będzie używać tytułu witryny, ale oddzielonego myślnikami.
Po zakończeniu kliknij przycisk “Kontynuuj”.
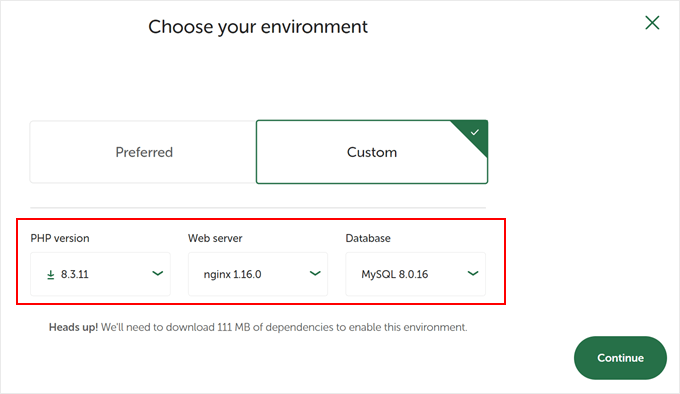
Następnie należy wybrać środowisko dla twojej lokalnej witryny internetowej.
Możesz użyć środowiska “Preferowane”, w którym oprogramowanie automatycznie wybierze wersję PHP, serwer WWW i wersję MySQL. Z drugiej strony można również wybrać opcję “Niestandardowe” i wprowadzić szczegóły środowiska.
Local WP oferuje najnowsze wersje PHP. Jeśli chodzi o serwer WWW, można wybrać między Nginx lub Apache. Możesz także wybrać MySQL lub MariaDB dla baz danych.
Należy pamiętać, że niektóre wersje PHP, serwera WWW i bazy danych wymagają pobrania pewnych zależności, aby działały poprawnie.
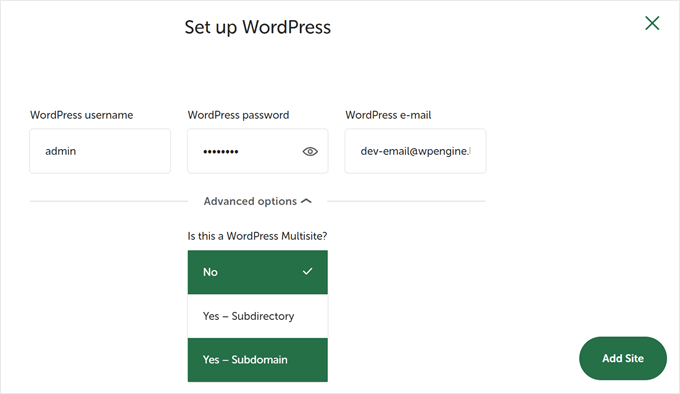
Następnie możesz wprowadzić nazwę użytkownika WordPress i hasło do swojej lokalnej witryny. Ponadto istnieje również opcja wyboru adresu e-mail WordPress, na który będziesz otrzymywać wszystkie powiadomienia e-mail.
Poza tym istnieje opcja zaawansowana, w której oprogramowanie zapyta, czy masz sieć WordPress multisite. Jeśli nie, wystarczy kliknąć “Nie”.
Po wpiszeniu tych danych wystarczy kliknąć przycisk “Dodaj witrynę”.
Oprogramowanie zainstaluje teraz WordPress i skonfiguruje twoją witrynę internetową.
Aby uruchomić lokalną witrynę, kliknij przycisk “Uruchom witrynę” w prawym górnym rogu.
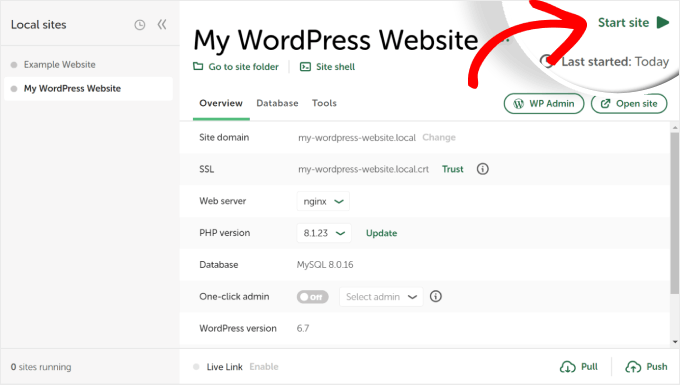
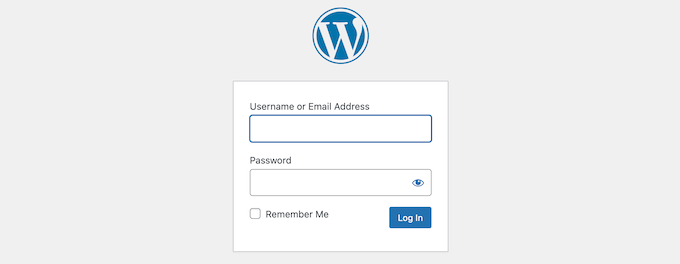
Następnie kliknij przycisk “WP Admin”, a zobaczysz stronę logowania administratora WordPress.
Wystarczy wprowadzić nazwę użytkownika i hasło wprowadzone wcześniej podczas konfigurowania lokalnej strony internetowej, a następnie kliknąć przycisk “Zaloguj się”.
Teraz możesz edytować swoją regionalną witrynę internetową na komputerze z systemem Windows.
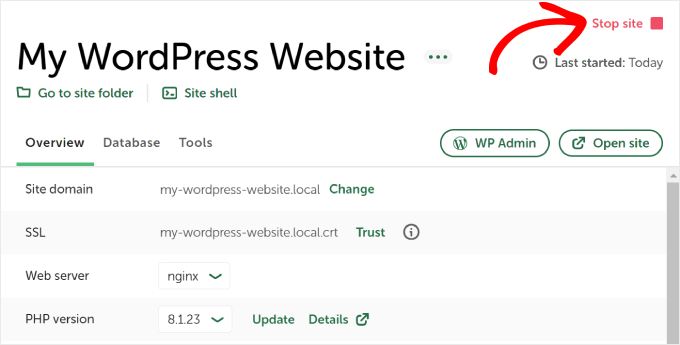
Po zakończeniu nie zapomnij zatrzymać witryny internetowej z poziomu oprogramowania WP, klikając przycisk “Zatrzymaj witrynę”.
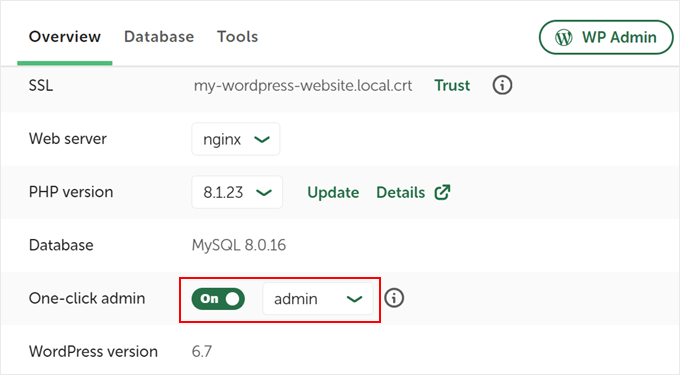
Pro Tip: Jeśli chcesz pominąć proces logowania, możesz włączyć logowanie administratora jednym kliknięciem w Local WP.
Aby to zrobić, wystarczy wrócić do lokalnego kokpitu WP i przełączyć przycisk “One-click admin”, aż pojawi się napis “On”. Następnie w rozwijanym menu wybierz użytkownika administratora, który może korzystać z tej funkcji logowania jednym kliknięciem.
Alternatywa: Użyj WordPress Playground do testowania motywów, wtyczek i nie tylko
WordPress Playground to innowacyjne narzędzie, które pozwala eksperymentować z WordPressem bezpośrednio w przeglądarce internetowej. Jest to wirtualna piaskownica, w której można wypróbować nowe motywy, wtyczki i funkcje WordPress bez wpływu na rzeczywistą witrynę.
WordPress Playground różni się od lokalnego środowiska WordPress na kilka kluczowych sposobów.
Po pierwsze, nie wymaga instalacji na komputerze i resetuje się po każdym użyciu, w przeciwieństwie do trwałych konfiguracji lokalnych. Dostęp do niej można uzyskać z dowolnego urządzenia z przeglądarką, podczas gdy instalacje lokalne są powiązane z jednym komputerem.
Podczas gdy WordPress Playground jest idealny do szybkich testów i nauki, lokalne środowisko WordPress na komputerze z systemem Windows oferuje większą elastyczność w przypadku długoterminowych projektów rozwojowych.
Aby uzyskać szczegółową instrukcję, zapoznaj się z naszym przewodnikiem na temat korzystania z WordPress Playground w przeglądarce.
Zainstalowałem WordPress na moim komputerze z systemem Windows, co teraz?
Teraz, gdy masz już WordPressa na swoim komputerze, oto kilka rzeczy, które możesz zrobić:
- Poznaj podstawowe wskazówki i triki WordPress, aby lepiej korzystać ze swojej witryny.
- Wypróbujróżne motywy WordPress, aby zobaczyć, jak może wyglądać Twoja witryna.
- Zainstaluj i przetestuj niezbędne wtyczki WordPress, aby dodać nowe funkcje do swojej witryny.
- Dowiedz się, jak samodzielnie poprawiać typowe błędy WordPressa.
- Wypróbuj różne kreatory stron typu “przeciągnij i upuść “, aby Twoja witryna wyglądała ładnie.
- Dowiedz się, jak zresetować hasło administratora WordPress na localhost, aby odzyskać dostęp do swojej witryny.
- Skonfigurujzautomatyzowane przepływy pracy, aby ułatwić zarządzanie witryną.
- Dowiedz się więcej o bezpieczeństwie WordPress, aby chronić swoją witrynę przed hakerami.
- Przenieśswoją lokalną witrynę WordPress na serwer live, gdy będziesz gotowy, aby udostępnić ją wszystkim.
Mamy nadzieję, że ten artykuł pomógł ci dowiedzieć się, jak zainstalować WordPress lokalnie na komputerze z systemem Windows. Możesz również zapoznać się z naszym artykułem o tym, jak zainstalować WordPress lokalnie na komputerze Mac i naszym przewodnikiem po tworzeniu witryny przejściowej WordPress.
If you liked this article, then please subscribe to our YouTube Channel for WordPress video tutorials. You can also find us on Twitter and Facebook.


Leone Agoya
Thank you for this article. Very helpful and it works.
Vivek Sharma
Best tuts awesome explanation , best website
WPBeginner Support
Hey Vivek, glad you like our website. Don’t forget to join us on Twitter for more WordPress tips and tutorials.
Admin
Stephen Rea
Thank you… It feels great to be learning new powers.. WP and WAMP now on desktop… Now to learn WP !
Dave
Great walk through!!! Thanks for the assist!!!
Elaine
Wow, thanks sooo much. It helped me a lot.
Manuel
Absolutely outstanding! Had an issue with C++ 13 & 14 but it was so well explained and pointed me in the right direction that I was able to solve it and now I have a development WordPress environment on my Window 10 laptop. THANK YOU VERY MUCH
Jonathan
Do I need have basic in knowledge coreldraw and or photoshop to become a professional web designer.
Thanks for your sincere answer.
WPBeginner Support
It will help greatly. Specially Photoshop.
Admin
Karthik
Really useful and thanks very much..:)
Michael Gyori
Greaet tutorial, thanks!
One suggestion. Mention the Skype Port 80 issue right at the point when it would be encountered in your tutorial. Having it mentioned at the end was not helpful because I already spent considerable time trying to figure out what was going wrong. A simple note saying: “If your browser screen is blank when selecting phpMyAdmin, then you may have a conflict with Skype (see below).”
mark k
Thx for the tutorial – ran in to problems starting WAMP (blank page on localhost/phpmyadmin), on wins 10 www service was running stopping apache, so ran services.msc and stopped that.
Only other problem happened when wp tried to create config – by default it self completes txtBox with “password” so just remember to delete it. simple fix but had me stumped for 2 mins.
once again thx
Frank George
please i need urgent help as i would love to move my site live….i am running wordpress through my local host using Microsoft web matrix through IIS7…how do i do it please…i need help urgently!
ahmed
Hi
I have plant to installed WordPress on wamp windows based server.who is right person to contact if I find any problem. Please let me know.
Thanks in advance.
Ahmed
vijay
i installed wordpress using bitnami software.
i also tried using wamp both are awesome.
Johari
Thank you for simplifying the manual. The steps you provided are easy to follow. Keep posting great articles!
cornel
great job , thank you
Vikash Gupta
Thank you for providing nice guidance.
It worked for me excellently.
Ahmed
When i tried to start wamp, its giving me an error that vcruntime.dll is missing… Please any solution?
Mayur
After clicking on phpmyadmin showing error.
The webpage cannot be found
Plz help me..
Ruben Tahir
Trying to run phpMyAdmin for the first time, I am prompt to enter user name and password. I suppose there must be a default user name a password. What are they or how to setup my own?
Ruben Tahir
Just found out by simply googling. the username is root and no password.
You should mention that in your tutorial.
J Robinson
My WAMP-64 was installed some time ago on my D: drive. I just added WP. When I point the browser to http://localhost/wp-admin/ (changed the WP folder name back), I get:
Warning: require_once(D:\wamp64\www/wp-load.php): failed to open stream: No such file or directory in D:\wamp64\www\wp-admin\admin.php on line 31
and
Fatal error: require_once(): Failed opening required ‘D:\wamp64\www/wp-load.php’ (include_path=’.;C:\php\pear’) in D:\wamp64\www\wp-admin\admin.php on line 31
Should I just delete everything and start over, or is there a configuration to fix this?
manjeet kaur
hi sir I want to learn word press .can I learnt it online ? my future depend on it
Dipankar Ray
Thanks for the step by step info. However, I am not sure how to create a Database as very time I click on the Wamp icon and then phpMyAdmin, I am getting a blank new browser window with ‘http://localhost/phpmyadmin as the URL..
Therefore,I can’t proceed to the next step which is to click on Databases and thereafter create a database for WordPress.
Please help and point out if I am not on the right path.
Thanks.
WPBeginner Support
Try adding a slash at the end of URL like this:
http://localhost/phpMyAdmin/
Admin
Dipankar Ray
Thanks for your suggestion of using the URL above. I had overcome my previous issue and was able to proceed. However, after that I came across other issues like MySQL errors and decided to uninstall WAMP server from my computer.
By the way, my OS is Windows XP.
Now on trying to re-install after downloading this software I am receiving the following error message. ‘ Aestan Tray Menu has encountered a problem and needs to close.We are sorry for the inconvenience.’. This has happened over three times. Thanks.
Please help as I am not sure where I am erring.
WP Complete Beginner
Pretty sure that you have Microsoft IIS running which is causing this mess. Happened to me. Go to the WAMP > Apache > Test Port 80 option.
It will blurt out something like Port 80 wrong service is running. The real service that’s running is MS IIS X.0
Launch cmd as admin and type iisrest / stop in the command line.
Then go to WAMP > Apache > Service Administration > Install Service
Finally, Then go to WAMP > Apache > Service Administration > Start Service.
It should work! Let me know if my comment helped you.
Jun Allan
Thank you!
Fawaz
Thanks a lot. Had to fix some errors and finally it worked. Very nice guide through. Already bookmarked.
Vassilis
How do I establish 2 or more sites on the same server (if possible)?
Thanks in advance
Krishna
Really useful and worked perfectly. Thank you so much..
ART
I’m an advanced beginner using Vista SP2. I think I am running both 32 and 64 bit. I had a big problem with VCRunTime140.dll missing error. First I tried Wamp 64bit, then Wamp newest 32bit, then confirmed VCRunTime140.dll was installed in my Windows\System32 folder and confirmed my updated Firefox was in the Programs(86) folder. Still had the *.dll missing error. Then tried the older Wamp 32bit. Problem solved.
2 more errors I made were to copy the WordPress folder without extracting it. Then deleted where I copied it and properly extracted it before copying. But I copied it to Wamp instead of Wamp\www
After I deleted it from the second wrong location, I copied it to Wamp\www and things worked great after that.
Hopefully a little helpful to call out some beginner errors to prevent others’ headaches.
Visata requires Wamp Version 2.5
Recently Wamp and Google Maps versions or settings have changed. Vista SP2 cannot run the latest Wamp, Stay with Version 2.5, specifically MYSQL 5.6.XX (I found xx=17 but some places say xx=26 is available.)
Thank you so much for these instructions!! Other lists of instructions are very difficult and not very useful.
Vianney kirumira
Thank u so much guyz. really you have made my day!. At least
Iris India
Excellent ! Thanks for your step by step instructions
Sid
Probably being dumb, but how do i see my web site project again and work on my site? To open it again I selected the ‘wamp’ icon, it opened a dashboard where I could see my project folder, I double clicked to open it, but instead of my site I got a page that said error my page cannot be found. I could not see the wordpress dashboard when I selected the wamp icon or any option to open wordpress. Can you please advise? Thanks.
Michael
Type localhost/site-name in your browser. To view your admin type localhost/sitename/wp-admin
Nicko Johnson
After clicking on phpMyAdmin its saying the site can’t be reached. What could be wrong?
Sid
Just want to say thank you! I have never done anything like this before and your steps were very useful and easy to follow
NOURI
when I try to install WAMP, it gives me error msg
JP
I followed instructions, yet when I attempt to open the browser with:
http://localhost/mysite/
I get a 404 file not found. Any hints as to what is going on? Thanks.
WPBeginner Support
The mysite directory is not found in the WAMP web folder.
Admin
kittyket
and what do you have to do then?
WPBeginner Support
It depends. May be a user has installed WordPress in their htdocs or www directory. Or may be they created the mysite folder elsewhere and WAMP can’t find it in the www directory.
Maya
Struggled a bit with Wampserver installation but finally everything went smooth. Thanks for the step-by-step explanation.
WPBeginner Support
Glad you found it helpful.
Admin
puri shanker dhobi
how to open a php template in wordpess using wamp server
Gold
Thank you so much!!!! You’re all shades of amazing.. This tutorial was super super helpful. Everything worked perfectly. Thanks again!
veena
after wp_config file it is sudenly showing following error.
Error establishing a database connection
I have created a database , mysql , apache , php are all working, how find out solution for this?
Suzi
I was getting the same error because I was not using a password, and I forgot to remove the word “password” where it asks for MySQL password on the previous page!
Erling Bergan
I have followed the instructions, and everything has looked fine. I have clicked on the Wampserver icon, and then clicked on phpmyadmin. A browser window opens, but there is no phpMyAdmin in it. The web page is blank. Could you give me a hint of what may be wrong?
Suzi
I was having the same issues .. there are so many reasons that this could be happening. did you follow ALL of the instructions, including the VISUAL downloads and skype and port 80 issues? I got to the point where my icon was green and still would not work, so I uninstalled it and used the 32 bit version even though I have 64 bit on my pc. Then it worked!
Jimmy Karago
Thanks so much was lost but, this helped me a lot
soheib
thank youuuuu really helped!!!!!!!!
Mxolisi Maphosa
Thank you very much, this helped me so much.
ana
Great tutorial! It really helped me. I’ll be following you.
Jeremy
Hi, what if I have an instance of Acquia Dev Desktop (Drupal) on my local machine? Installing this wont be an issue?
Thanks
Paul Gomez
Hello, right now I am trying to set the WAMPserver, but in i see 4 versions 2 for 32 Bits and 2 for 64 Bits. Which of the two versions should I pick? I am a bit confused what the difference is from the 2 versions. I see the Apache, PHP and MySQL versions are different but I am not sure.
WPBeginner Support
They are basically the same. Most modern computers have 64bit architecture. If you are using an older machine then try 32bit version, other wise try 64bit version.
Admin
Paul Gomez
I understand, but that was not my question. Please read my original message.
Jason
This has to do with the size of the data types the processor can handle and the size of the memory addresses it can hold in it’s register. 64 bit applications can utilize more RAM because they can utilize exponentially more of those addresses, but unless you are writing your own ‘big data’ type of applications or using plugins that need the extra memory then it’s almost completely irrelevant to you. You won’t notice the difference either way, so just pick one.
Phil
Any answer on this? I have the same question. I know I want 64 bit, but what PHP version should I choose?
HV
The two 64bit installs have different software versions.
Apache : 2.4.17 MySQL : 5.7.9 PHP : 5.6.16 on one
and Apache : 2.4.9 MySQL : 5.6.17 PHP : 5.5.12 on the other.
The two 32 bit versions are similar
They are giving you options in case your development environment
needs a particular version of Apache, PHP or MySQL
Prasad Sagare
After clicking on phpmyadmin show error.
IIS 8.5 detailed error-404 not found.
Plz help me..
David
I get the same error 404 page when clicking phpmyadmin. Any resolution here? I do not have skype on this computer.
Luc
After numerous failures, this instruction worked just fine! Thanks.
dicegeorge
Thanks,
that worked without a hitch,
i’ve been wanting to do this for ages!
Michael
It is not clear to me whether I must set up a database first, or can I simply import my current live back up of the blog, and then work on it locally.
I sort of expected to import the existing word press blog to my local hard disk, and the import process will then create all the tables and the databases.
Thanks
Ron
Thank you. This great page of info REALLY helped !!!
Prashant Menase
Thank you for easy steps!!! Helped me lot! keep adding………….