Po latach budowania witryn WordPress nauczyliśmy się, jak ważne jest posiadanie lokalnej konfiguracji WordPress na komputerze.
Posiadanie WordPressa na osobistym komputerze pozwala eksperymentować z nowymi funkcjami bez narażania witryny na żywo, zagłębiać się w rozwój WordPressa, a nawet tworzyć całe witryny internetowe przed ich uruchomieniem. To jak prywatna piaskownica dla wszystkich projektów WordPress.
Jeśli jesteś użytkownikiem systemu Windows, istnieje wiele sposobów na skonfigurowanie WordPressa lokalnie. Zawęziliśmy je jednak do dwóch najłatwiejszych metod. W tym przewodniku pokażemy, jak łatwo zainstalować WordPress na komputerze z systemem Windows, niezależnie od używanej wersji.
Dlaczego warto zainstalować WordPress na Windows?
Jeśli jesteś użytkownikiem systemu Windows, instalacja WordPressa lokalnie na komputerze oferuje kilka korzyści.
Lokalna instalacja WordPress tworzy środowisko testowe, które nie ma wpływu na działającą witrynę. Ta konfiguracja, często nazywana serwerem lokalnym lub hostem lokalnym, jest osobistym placem zabaw dla WordPressa.
Programiści WordPress regularnie używają lokalnych instalacji do swojej pracy. Mogą na przykład używać ich do eksperymentowania z nowymi wtyczkami lub motywami lub testowania witryny przed aktualizacją do edytora bloków Gutenberg.
Ale nie jest to rozwiązanie tylko dla profesjonalistów. Jeśli dopiero zaczynasz przygodę z WordPressem, lokalna konfiguracja jest idealna do nauki. Możesz odkrywać funkcje, testować motywy i wtyczki oraz swobodnie eksperymentować bez obawy o uszkodzenie działającej witryny.
Ważne jest, aby pamiętać, że po zainstalowaniu WordPressa lokalnie w systemie Windows, tylko ty możesz zobaczyć witrynę. Jeśli chcesz utworzyć publiczną witrynę internetową, będziesz potrzebować nazwy domeny i hostingu.
Technicznie rzecz biorąc, można zainstalować WordPressa na Windowsie za pomocą XAMPP, a my napisaliśmy już o tym poradnik.
Biorąc to pod uwagę, znaleźliśmy 2 jeszcze prostsze sposoby niż XAMPP na skonfigurowanie lokalnego środowiska WordPress, dzięki czemu są one idealne dla początkujących lub użytkowników, którzy muszą szybko utworzyć lokalną witrynę. Możesz kliknąć poniższy link, aby przejść do dowolnej metody, która Cię interesuje:
Metoda 1: Zainstaluj WordPress na Windows przy użyciu Studio (szybko i prosto)
W przypadku pierwszej metody użyjemy Studio. Jest to lokalne oprogramowanie WordPress stworzone przez Automattic, firmę, która zarządza i prowadzi WordPress.com, który jest narzędziem do tworzenia stron internetowych opartym na oprogramowaniu WordPress.
Omówimy tę metodę jako pierwszą, ponieważ jest ona znacznie szybsza i prostsza do naśladowania, dzięki czemu jest idealna dla zupełnie początkujących.
Najpierw należy otworzyć stronę Studio by WordPress.com. Następnie kliknij przycisk “Pobierz dla Windows”.
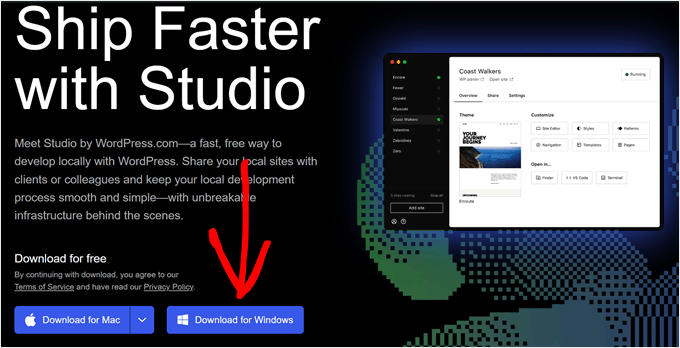
Gdy to zrobisz, po prostu otwórz pobrany plik, aby rozpocząć instalację.
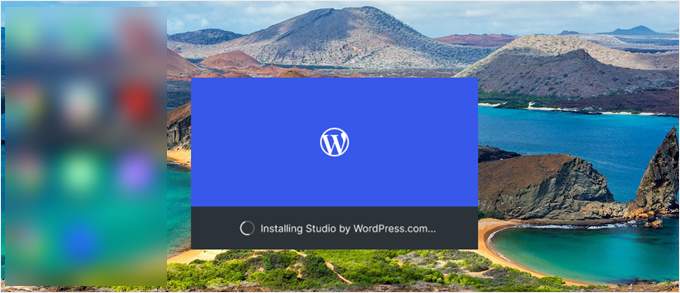
Pojawi się wyskakujące okienko z informacją, że aplikacja jest instalowana.
Po wykonaniu tej czynności można dodać pierwszą witrynę.
Aby to zrobić, wystarczy wpisać nazwę nowej lokalnej witryny WordPress i kliknąć “Dodaj witrynę”. Możesz nazwać witrynę w dowolny sposób, o ile pomoże ci to łatwo ją zidentyfikować.
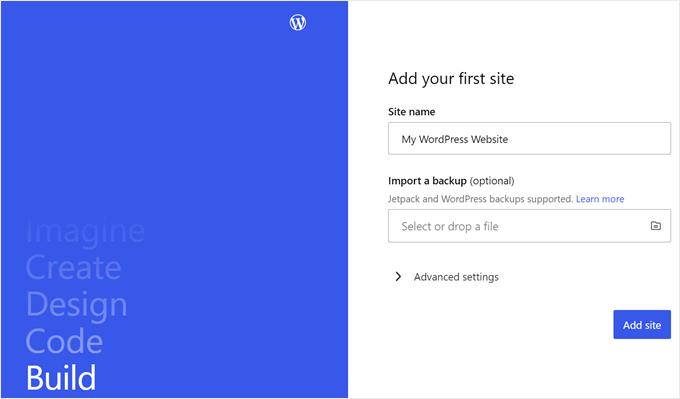
Powinieneś teraz zobaczyć lokalny kokpit witryny WordPress.
Aby uzyskać dostęp do kokpitu WordPress i edytować swoją witrynę, wystarczy kliknąć przycisk “Start” w prawym górnym rogu. Spowoduje to udostępnienie lokalnej witryny na komputerze.
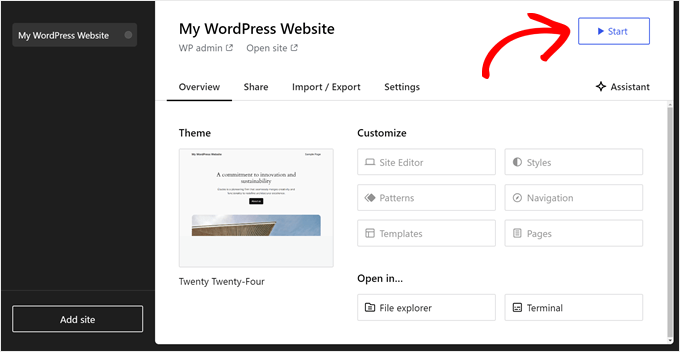
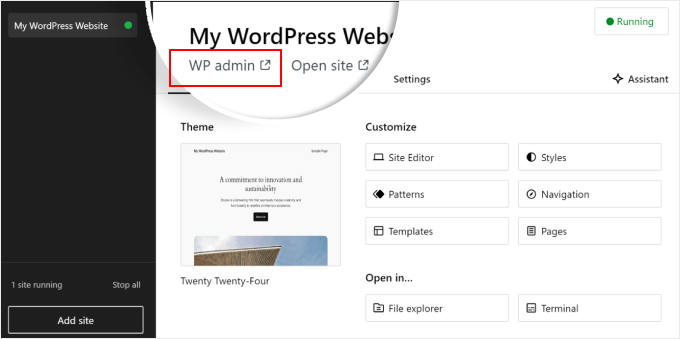
Gdy przycisk “Start” zmieni się na “Running”, możesz kliknąć link “WP Admin” w lewym górnym rogu strony.
Spowoduje to przejście do lokalnej strony administracyjnej WordPress.
I to prawie wszystko, jeśli chodzi o konfigurację. Przyjrzyjmy się innym ustawieniom, które mogą być niezbędne podczas tworzenia lokalnej witryny.
Jak widać na karcie “Przegląd”, można natychmiast uzyskać dostęp do menu edytora pełnej witryny WordPress bezpośrednio z kokpitu Studio. Możesz także kliknąć “Eksplorator plików”, aby otworzyć foldery i pliki witryny WordPress oraz kliknąć “Terminal”, aby zarządzać witryną za pomocą WP-CLI.
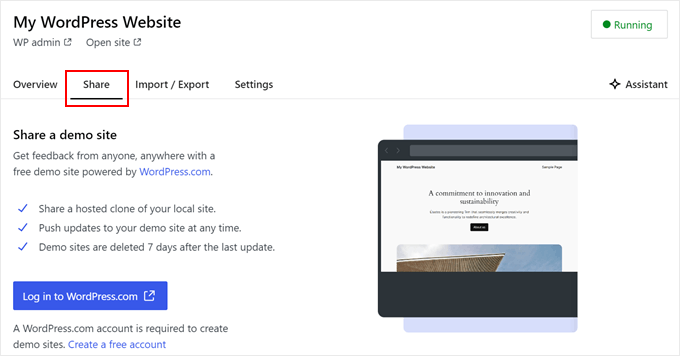
Jeśli przejdziesz do karty “Udostępnij”, możesz zalogować się na swoje konto WordPress.com, sklonować lokalną witrynę i przesłać ją na serwery WordPress.com. Spowoduje to tymczasowe udostępnienie sklonowanej witryny online, co jest przydatne do udostępniania witryn demonstracyjnych klientom lub członkom zespołu.
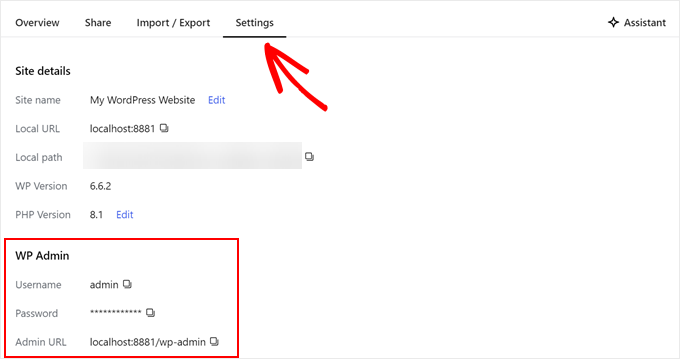
Czasami możesz chcieć zalogować się do swojej lokalnej witryny bezpośrednio przez przeglądarkę zamiast używać Studio. W takim przypadku musisz znać swoje dane uwierzytelniające wp-admin.
Aby je znaleźć, możesz przejść do karty “Ustawienia” i znaleźć tam swoją nazwę użytkownika administratora WordPress, hasło i adres URL logowania.
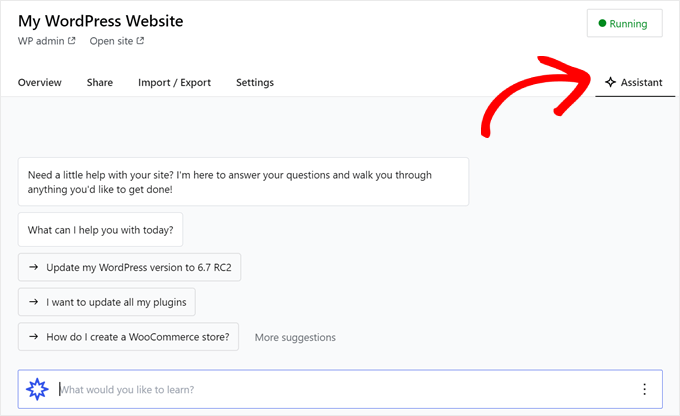
Kolejną ciekawą funkcją Studio jest wbudowany chatbot AI, z którym można się komunikować, klikając przycisk “Asystent”.
Tutaj możesz poprosić Studio o pomoc w takich zadaniach, jak aktualizacja wszystkich wtyczek jednocześnie, aktualizacja rdzeni wersji WordPress lub utworzenie kodu dla niestandardowego bloku.
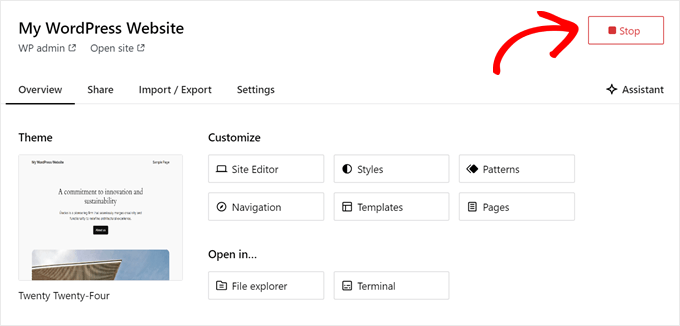
Po zakończeniu pracy nad lokalną witryną wystarczy najechać kursorem na przycisk “Running” w prawym górnym rogu, aż pojawi się napis “Stop”.
Następnie kliknij przycisk, aby zatrzymać witrynę.
Jedną z wad Studio jest to, że nie można skonfigurować środowiska WordPress według własnych upodobań. Oznacza to, że musisz korzystać z wersji PHP, serwera WWW i bazy danych, które zostały dla Ciebie wstępnie wybrane.
Może to być wadą, jeśli chcesz przetestować swoją witrynę lub wtyczkę w określonych konfiguracjach serwera.
Jeśli potrzebujesz większej kontroli nad lokalnym środowiskiem WordPress lub musisz dopasować lokalną konfigurację do określonej konfiguracji serwera na żywo, możesz sprawdzić następną metodę za pomocą Local WP.
Metoda 2: Zainstaluj WordPress w systemie Windows przy użyciu lokalnego WP (bardziej konfigurowalny)
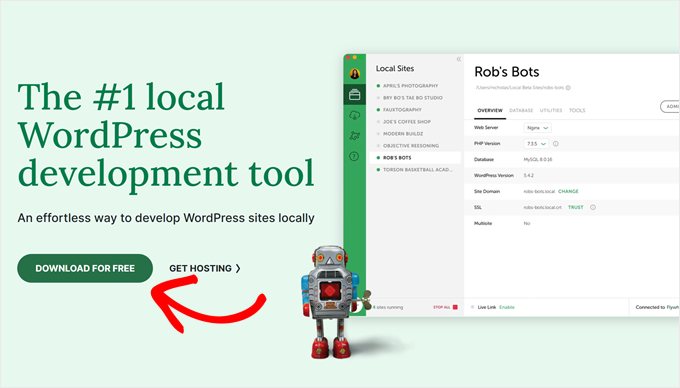
Najpierw należy pobrać i zainstalować oprogramowanie Local WP na twoim komputerze z systemem Windows. Wystarczy przejść do witryny internetowej Local WP i kliknąć przycisk “Pobierz za darmo”.
Następnie pojawi się wyskakujące okienko, w którym należy wybrać platformę. Wybierz “Windows” z rozwijanego menu.
Następnie możesz wprowadzić swoje dane, takie jak imię i nazwisko, służbowy adres e-mail i numer telefonu, aby pobrać oprogramowanie.
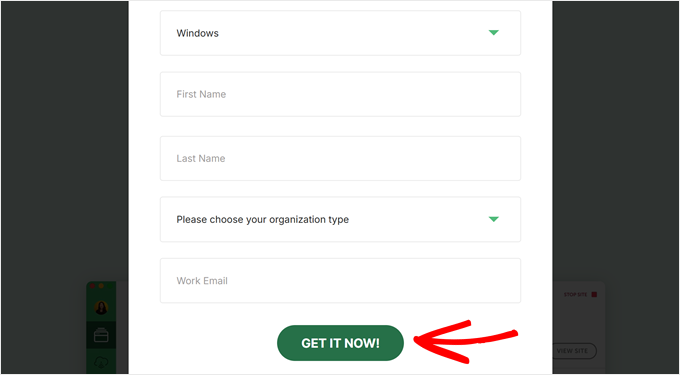
Po wpiszeniu danych wystarczy kliknąć przycisk “Pobierz teraz”.
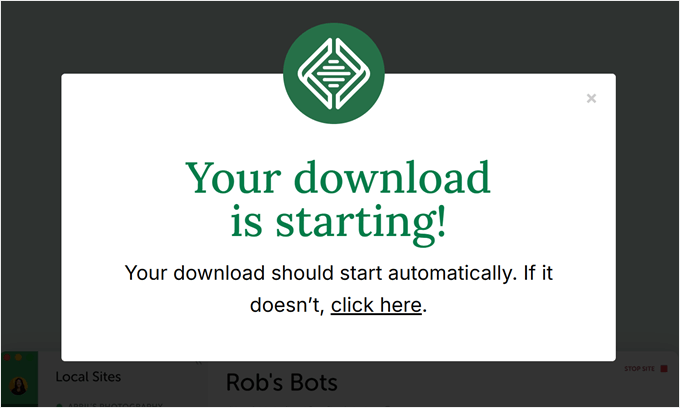
Następnie oprogramowanie zostanie automatycznie pobrane na komputer. W przeciwnym razie możesz kliknąć łącze “kliknij tutaj”, aby rozpocząć pobieranie.
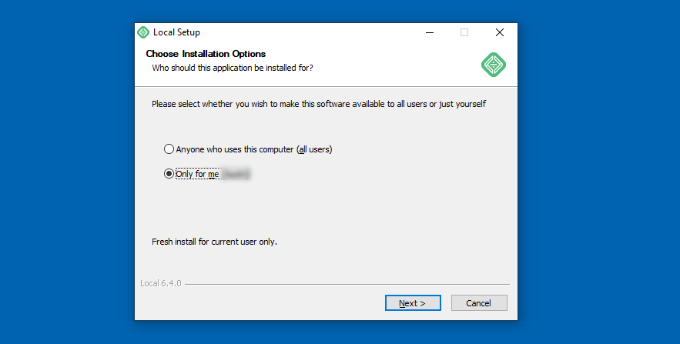
Po pobraniu pliku należy uruchomić kreator konfiguracji.
Teraz musisz wybrać, czy chcesz zainstalować oprogramowanie dla wszystkich użytkowników, czy tylko dla siebie.
Po wybraniu opcji kliknij przycisk “Dalej”.
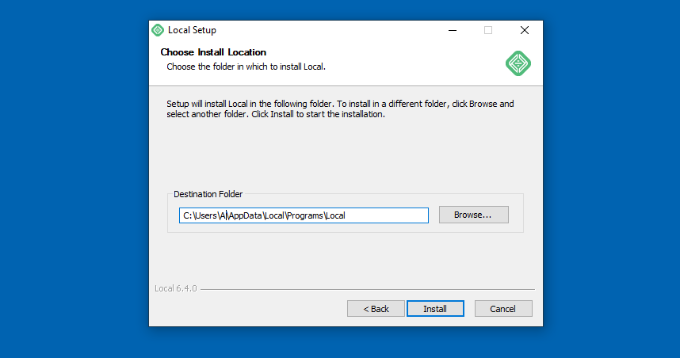
W następnym kroku można wybrać “Katalog docelowy”, w którym zostanie zainstalowane oprogramowanie.
Wystarczy kliknąć przycisk “Przeglądaj”, aby ustawić ścieżkę, a następnie kliknąć przycisk “Zainstaluj”.
Oprogramowanie WP zostanie teraz zainstalowane na twoim komputerze z systemem Windows.
Po zakończeniu można zaznaczyć pole wyboru “Uruchom lokalnie” i kliknąć przycisk “Zakończ” w kreatorze konfiguracji.
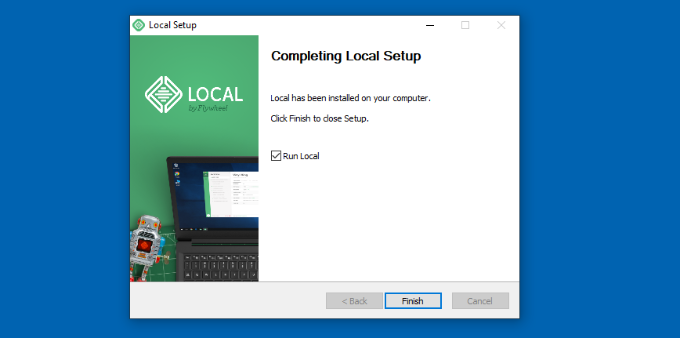
Oprogramowanie uruchomi się teraz na twoim urządzeniu z systemem Windows.
Następnym krokiem jest dodanie nowej lokalnej strony internetowej. Aby to zrobić, wystarczy kliknąć przycisk plusa “+” u dołu.
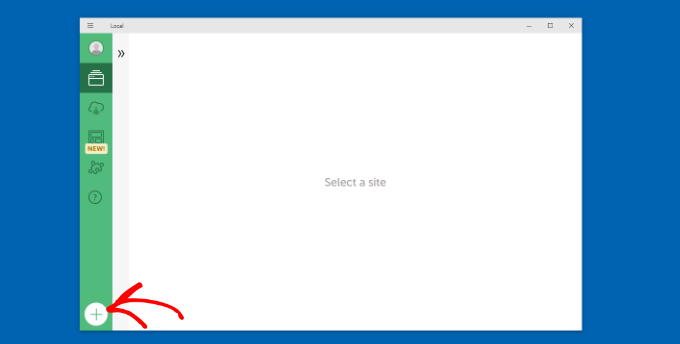
Następnie można utworzyć witrynę w oprogramowaniu Local.
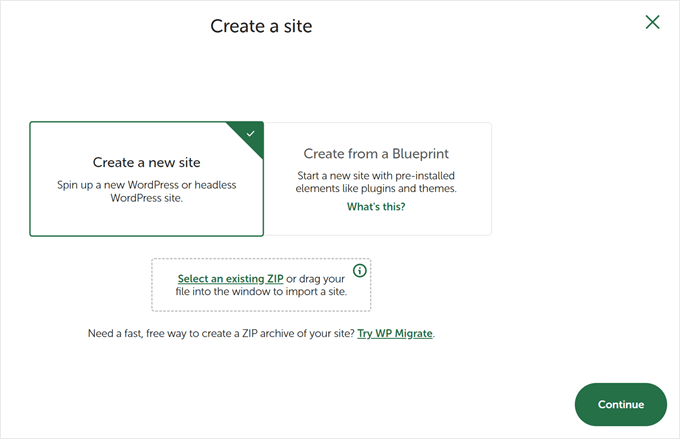
Wybierz opcję “Utwórz nową witrynę” i kliknij przycisk “Kontynuuj”. Istnieją również opcje tworzenia witryny z planu lub istniejącego pliku witryny, ale dla celów demonstracyjnych wybierzemy pierwszą opcję.
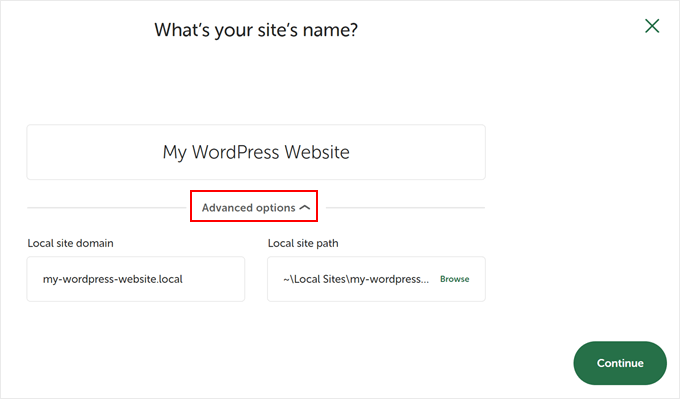
Następnie możesz wprowadzić nazwę swojej lokalnej witryny, na przykład “Moja witryna WordPress”.
Istnieją również opcje zaawansowane, w których można wprowadzić lokalną domenę witryny i lokalną ścieżkę witryny. Domyślnie domena będzie używać tytułu witryny, ale oddzielonego myślnikami.
Po zakończeniu kliknij przycisk “Kontynuuj”.
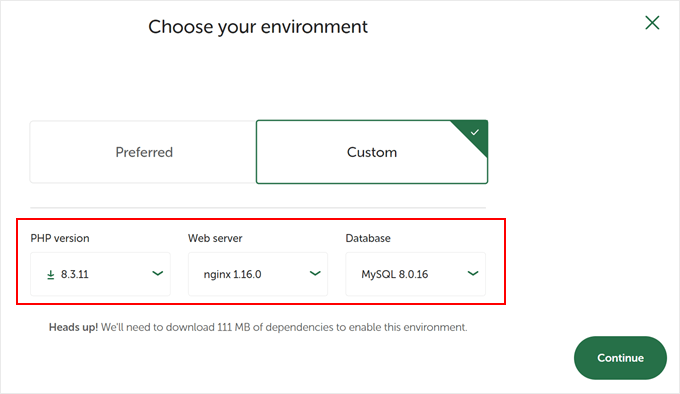
Następnie należy wybrać środowisko dla twojej lokalnej witryny internetowej.
Możesz użyć środowiska “Preferowane”, w którym oprogramowanie automatycznie wybierze wersję PHP, serwer WWW i wersję MySQL. Z drugiej strony można również wybrać opcję “Niestandardowe” i wprowadzić szczegóły środowiska.
Local WP oferuje najnowsze wersje PHP. Jeśli chodzi o serwer WWW, można wybrać między Nginx lub Apache. Możesz także wybrać MySQL lub MariaDB dla baz danych.
Należy pamiętać, że niektóre wersje PHP, serwera WWW i bazy danych wymagają pobrania pewnych zależności, aby działały poprawnie.
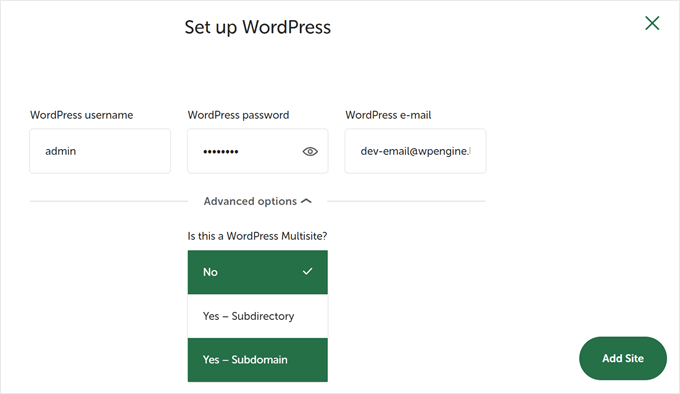
Następnie możesz wprowadzić nazwę użytkownika WordPress i hasło do swojej lokalnej witryny. Ponadto istnieje również opcja wyboru adresu e-mail WordPress, na który będziesz otrzymywać wszystkie powiadomienia e-mail.
Poza tym istnieje opcja zaawansowana, w której oprogramowanie zapyta, czy masz sieć WordPress multisite. Jeśli nie, wystarczy kliknąć “Nie”.
Po wpiszeniu tych danych wystarczy kliknąć przycisk “Dodaj witrynę”.
Oprogramowanie zainstaluje teraz WordPress i skonfiguruje twoją witrynę internetową.
Aby uruchomić lokalną witrynę, kliknij przycisk “Uruchom witrynę” w prawym górnym rogu.
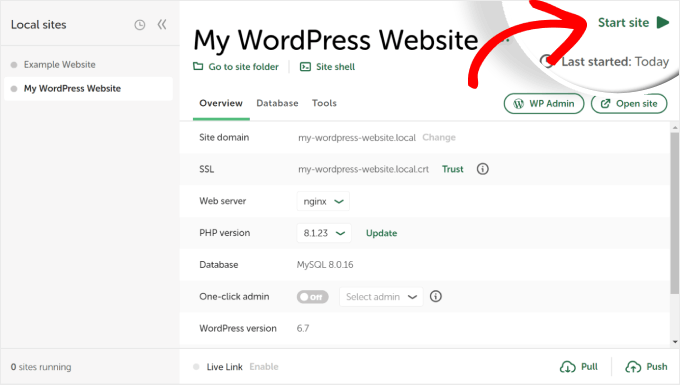
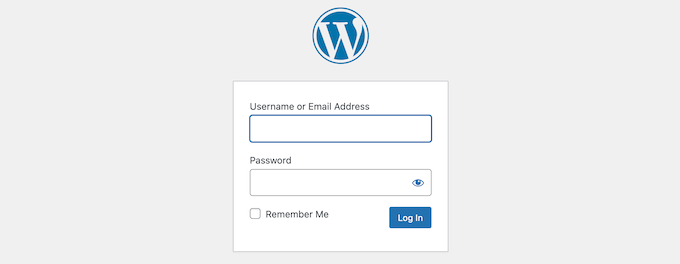
Następnie kliknij przycisk “WP Admin”, a zobaczysz stronę logowania administratora WordPress.
Wystarczy wprowadzić nazwę użytkownika i hasło wprowadzone wcześniej podczas konfigurowania lokalnej strony internetowej, a następnie kliknąć przycisk “Zaloguj się”.
Teraz możesz edytować swoją regionalną witrynę internetową na komputerze z systemem Windows.
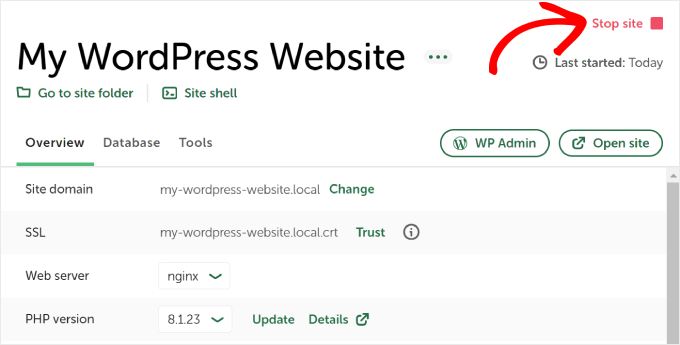
Po zakończeniu nie zapomnij zatrzymać witryny internetowej z poziomu oprogramowania WP, klikając przycisk “Zatrzymaj witrynę”.
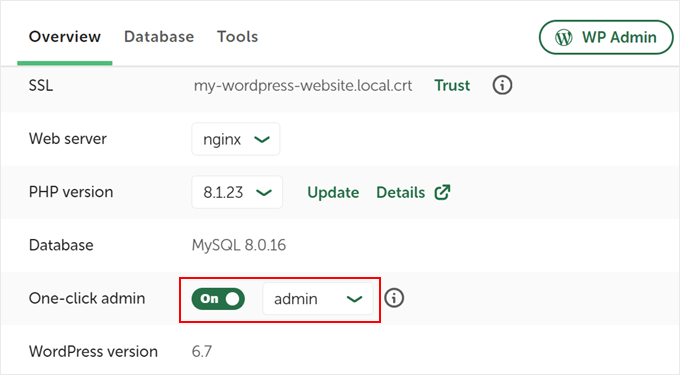
Pro Tip: Jeśli chcesz pominąć proces logowania, możesz włączyć logowanie administratora jednym kliknięciem w Local WP.
Aby to zrobić, wystarczy wrócić do lokalnego kokpitu WP i przełączyć przycisk “One-click admin”, aż pojawi się napis “On”. Następnie w rozwijanym menu wybierz użytkownika administratora, który może korzystać z tej funkcji logowania jednym kliknięciem.
Alternatywa: Użyj WordPress Playground do testowania motywów, wtyczek i nie tylko
WordPress Playground to innowacyjne narzędzie, które pozwala eksperymentować z WordPressem bezpośrednio w przeglądarce internetowej. Jest to wirtualna piaskownica, w której można wypróbować nowe motywy, wtyczki i funkcje WordPress bez wpływu na rzeczywistą witrynę.
WordPress Playground różni się od lokalnego środowiska WordPress na kilka kluczowych sposobów.
Po pierwsze, nie wymaga instalacji na komputerze i resetuje się po każdym użyciu, w przeciwieństwie do trwałych konfiguracji lokalnych. Dostęp do niej można uzyskać z dowolnego urządzenia z przeglądarką, podczas gdy instalacje lokalne są powiązane z jednym komputerem.
Podczas gdy WordPress Playground jest idealny do szybkich testów i nauki, lokalne środowisko WordPress na komputerze z systemem Windows oferuje większą elastyczność w przypadku długoterminowych projektów rozwojowych.
Aby uzyskać szczegółową instrukcję, zapoznaj się z naszym przewodnikiem na temat korzystania z WordPress Playground w przeglądarce.
Zainstalowałem WordPress na moim komputerze z systemem Windows, co teraz?
Teraz, gdy masz już WordPressa na swoim komputerze, oto kilka rzeczy, które możesz zrobić:
- Poznaj podstawowe wskazówki i triki WordPress, aby lepiej korzystać ze swojej witryny.
- Wypróbujróżne motywy WordPress, aby zobaczyć, jak może wyglądać Twoja witryna.
- Zainstaluj i przetestuj niezbędne wtyczki WordPress, aby dodać nowe funkcje do swojej witryny.
- Dowiedz się, jak samodzielnie poprawiać typowe błędy WordPressa.
- Wypróbuj różne kreatory stron typu “przeciągnij i upuść “, aby Twoja witryna wyglądała ładnie.
- Dowiedz się, jak zresetować hasło administratora WordPress na localhost, aby odzyskać dostęp do swojej witryny.
- Skonfigurujzautomatyzowane przepływy pracy, aby ułatwić zarządzanie witryną.
- Dowiedz się więcej o bezpieczeństwie WordPress, aby chronić swoją witrynę przed hakerami.
- Przenieśswoją lokalną witrynę WordPress na serwer live, gdy będziesz gotowy, aby udostępnić ją wszystkim.
Mamy nadzieję, że ten artykuł pomógł ci dowiedzieć się, jak zainstalować WordPress lokalnie na komputerze z systemem Windows. Możesz również zapoznać się z naszym artykułem o tym, jak zainstalować WordPress lokalnie na komputerze Mac i naszym przewodnikiem po tworzeniu witryny przejściowej WordPress.
If you liked this article, then please subscribe to our YouTube Channel for WordPress video tutorials. You can also find us on Twitter and Facebook.


Thomas
Great tutorial! I’m trying to download a wordpress site to a local copy. I’ve based my self on this tutorial. So far this is what I’ve done right (I think…):
1- I’ve downloaded all the files from the live website using FileZilla to wamp/www/mysite/.
2 – I’ve exported, downloaded and zipped the live site database.
3 – Using WAMP>phpmyadmin I’ve created a new database and imported the zip file (from 2)
4- Changed the wp-config.php and updated the database name, user and password.
Now at this point, I’m able to see the homepage when I type http::/localhost/mysite. The them has been rest however. Also, the admin side as far as I can tell works perfectly.
The main problem I’m getting is that apart from the homepage I get 404 errors for all the other pages on the local site.
I’m not sure what I’m doing wrong! Thanks in advance!
George
Thanks so much. I have everything up and running. Very helpful. I would not have been able to do this on my own.
maggie
xampp is good for wordpress .It supports max range of url and all
maggie
thanks… It was helpfull and easy
karis
Been postponing this with the misconception that the process is tedious and takes time. Wow, thanks to you, I am now done. So easy. Thanks again for the good work. May it never go unrewarded.
Dmitry M
Thanks for the tut, very easy to follow.
Naaz
great..!! was as simple as 1+1 :p
Marty
Excellent, worked 110%. Thanks dude!
Bob S
This was an awesome tutorial! Thanks for the help
Faisal Masood
Thanks for sharing the nice WordPress resources.
Sabine Blackburn
Have it all installed but can not create a database in MyphpAdmin, it shows ‘No Privileges’ where the create button should be
Any suggestions?
David
After following your instructions, I got everything right except when I wanted to log in with the “root” username. When I log in, I get this message ” #1045 Cannot log in to the MySQL server”. Please what should I do?
WPBeginner Staff
Try to log in with blank password if that does not work you would need to reset root password for your MySQL server.
pran
how to change the root password
Gabriel Popov
Thanks, this article was really useful.
Omar
Amazing!! thanks a ton!!
Aaron
Downloaded everything. I can access wordpress but need to create a database for wordpress. When i click on phpmyadmin it takes me to a 403 forbidden error saying You don’t have permission to access /phpmyadmin/ on this server. I cant figure it out.
Annie L
Hello – your tutorial rocks. I’m able to get pass the 5 min setup and land on the WordPress login page.
One issue, after entering the same credentials provided in the 5-min setup (/wordpress/wp-login.php), I get “SSL connection error.”. Looking at the wp-login.php file, it forces a redirect to SSL.
How do I get around it without installing a SSL locally?
Running Wamp 2.4, Windows 7, Chrome browser.
lubna
really help tutorial bro.I just cant log in to word after the successful installation Help.
Miriam
I think your tutorials are clearer than anything else I find for a newbie like me. Thanks!
Can you offer any suggestions for my problem creating a database? I already have a WP site under Bitnami. I decided to download WAMP to have multiple WP sites using WAMP. After installing WAMP, when I open phpMyAdmin I get a log in window. If I log in using the username/pswd originally set up (with Bitnami installation) it says I don’t have priveliges to create a database. I can log into phpMyAdmin using the usename/pswd from the Bitnami WordPress site and I have priveliges but it gives me a 1044 Error when I try to create a new database. I am not sure what to try next. Thanks in advance for any suggestion you may have.
Miriam
I figured out that problem and am on to a different problem. After installing WAMP and putting WordPress in c:WAMP/WWW… I open a browser and try http://localhost/mysite/ but get a 404 Not Found. Could this be related to the fact that I already have Bitnami/localhost? Thanks!
Win
You didn’t paste it in the www folder. You can’t post it in the main wordpress file — you have to navigate to the www folder and paste it next to the index.html file. This should fix your 404 error problem
Merom
Hi,
I am facing the same problem. what exactly should I paste to www?
thanks
IBAS
I really found this tutorial so helpful to me, thanks for the efforts
Kriss
Wamp Server is an outdate program died on 2013. Probably it is not the best for wordpress
Laurent Lafont
You are not saying what the username and password are when launching phpmyadmin! And all web searches are giving dummy information as well….. So now stuck…. very useful instructions indeed…….
Win
Username: Root
Password: Blank
Helen Magner
Thanks for the instruction. It worked well. I have had a wordpress site up and running for a year now. but now but I would like to be able to import it to to local site so that I can write and save wile I cannot connect to the internet and publish when I can get back on line. Thanks for your help.
ludovic
Simply perfect. Merci !!!
Robert
When i follow the steps wampserver to myphpadmin I get the login page, not the page which allows me to click on the database tab as shown in your very well written tutorial. Suggestions to get the wp-config.php file set up?
Dave
I had the same problem, just leave the password blank & you’ll get in.
Psdfreak.com
On that login page fill Username: “root” and press login (no password required)
Maryam Jamil
thanks alot
your article really helps
Dharmesh Joshi
Thanks you bro…(Y)
Vivi
Hey! Really helpfull article, But… I can’t log in in wordpress..Firstly , in the step of installing wordpress i was directed in a blank page( logo only) , then i reloaded and said it has allready been istalled, so i procceded with the log in, but it seems that my account is not valid..nothing workd..not even the e-mail for getting a new pswrd .
What should i do? I allready copied the steps twice from the beggining with different databases and data.
nel
your tutorial worked PERFECTLY
ty
Andy
Please help . Thanks
installed WAMServer, as according to your instructions, I chose phpMyadmin, and I encountered this error msg, “HTTP Error 404.0 – Not Found
The resource you are looking for has been removed, had its name changed, or is temporarily unavailable.
Detailed Error Information
Module IIS Web Core
Notification MapRequestHandler
Handler StaticFile
Error Code 0×80070002
Requested URL http://localhost:80/phpmyadmin/
Physical Path C:\inetpub\wwwroot\phpmyadmin\
Logon Method Anonymous
Logon User Anonymous”
I installed and re-installed WAMServer, but encounter the same error, how do I proceed from here?
farah
Hi, Thank you for great tutorial, I am facing an issue please help me to solve the issue. After successful installation of WAMP, when I have clicked on PhpMyAdmin , It is asking me to login , but i dont know what is my username and password that can be used here?
Regards
Farah
WPBeginner Support
Try username root and leave password field blank
Admin
Barbara
I had the same error and other sites had very complicated and, frankly, unsuccessful suggestions on how to fix it. Thank you for this clear and simple solution – it worked!
KarSho
Simple, Clear and Helped.
Thanks Dude…
zubekk
thanks dude………..!
Sara
Hey there! I installed WampServer like you said but when i press phpmyadmin it opens a blank chrome webpage. No database menu or anything like the printscreen you showed. it’s just blank. I’ve tried unistalling and installing again but it remains the same. help!
WPBeginner Support
Where do you press phpMyAdmin? Try accessing it using the url http://localhost/phpmyadmin/
Admin
Sara
I pick the WampServer icon out of the taskbar and pick the phpmyadmin just like in your printscreen. No, that didn’t work either. I don’t know what can be wrong!
Sara
Ok, reboot the system and It opened something on the phpmyadmin but it’s asking me login and password!
Omer
Hi. Although this article is helpful, however I would like to give some suggestions in improving it. There are some fill in the blanks in this article which makes it difficult to install wordpress.
1. After instructing on installing Wamp Server 2, you immediately jump to phpmyadmin where as you should have told that we need to install mySQL -service- install service and start it. Then we have to install apache – service – install service and start it. Then after making sure that the wamp icon is green head over to the phpmyadmin.
2. After opening the localhost site, you didn’t mention that the username was “root” and password was blank for the database site and jumped immediately on creating database through database tag.
Apart from that it was great effort.
hujat ul islam
can you help me in installing word press on xampp
sumit
while installing wamp server it wll shows error again and again.. . error is about MSVC3100.dll file error.. . kindly fix this error
LIsa
I installed wamp successfully, renamed database, installed wordpress, entered all fields and then once I hit the final “install wordpress”, got a weird blank screen with the wordpress logo at the top. When I hit the “back button” it said wordpress was already installed so I tried entering the username and password and it says it is not found. I tried entering the email I had entered to reset the password and says it isn’t found. I tried using the instructions above for changing the password within the phpmyadmin found the Wp-users file in my database and clicked on pencil icon to edit users and it says “my sql returned an empy result” … help!
Lisa Tomsio
Never mind … I just deleted wordpress installation, created a new database and started over and it worked. I had unchecked the “allow search engines …” on the wordpress page the first time so I left it checked the second time and it worked fine. Thanks for this information!
Campbell
I installed WAMServer, as according to your instructions, I chose phpMyadmin, and I encountered this error msg, “HTTP Error 404.0 – Not Found
The resource you are looking for has been removed, had its name changed, or is temporarily unavailable.
Detailed Error Information
Module IIS Web Core
Notification MapRequestHandler
Handler StaticFile
Error Code 0x80070002
Requested URL http://localhost:80/phpmyadmin/
Physical Path C:\inetpub\wwwroot\phpmyadmin\
Logon Method Anonymous
Logon User Anonymous”
I installed and re-installed WAMServer, but encounter the same error, how do I proceed from here?
yousef mayeli
hi there
i installed many times with different options but same problem,it’s icon appears and when i click it to proceed it doesn’t appear anything. i don’t know what should i do.just disappointed
yousef mayeli
i installed wamp and its icon came on desk but when i click on it doesn’t open i even went to my skype and changed but didn’t affect anything , thanks
. guide me
WPBeginner Support
Try installing WAMP again.
Admin
sumit
while installing wamp server it wll shows error again and again.. . error is about MSVC3100.dll file error.. . kindly fix this error
please help meee….
Kevin Salt
Good article … Thanks.
I don’t want to nit-pick but I think you’re missing a semi-colon in the Skype section …
“and go to Tools » Options. Click on Advanced and then Connections.”
——————-> »
al b
I seem to be hung up on the http://localhost/mysite/ I get a 404 Not found error.
Al B
Disregard. I overlooked renaming the WP directory when moving to www. Thank you for this tutorial!
WPBeginner Support
make sure you have WordPress installed there. Make sure your WAMServer is running.
Admin
Kenia
I had just installed WAMP and then had no idea how to proceed from there as there is no manual for WAMP. This and the next article on making the wordpress site live are both lifesavers. Seriously. THANK YOU for writing this for beginners, and not assuming we know things we don’t (I see that a lot with experts: they take their knowledge for granted and forget what it’s like to start out and not know things).
THANK YOU, THANK YOU, THANK YOU!!!
Martin
Hello Guys, all done.. no matter what I am doing.. still last step freezes. I see only WP white-blue logo and white unloaded text box. After typing my website I get: “Error establishing a database connection” error. Any ideas? Cheers.
Chris
Thanks so much for this! Successfully installed. Only problem I ran into was with the wp-config.php file. I needed to open the copy of wp-config-sample.php, make changes on my own and then save. Other than that, easy install.
Amelia
When I went to click on “create database” in phpmMyAdmin, it said “X No privileges”. What did I do wrong?
Amelia
No matter, I got that fixed. Now I’m just stuck on the configuration page, info filled out and hit submit but the install wordpress page never comes up!
om gupta
in my laptop wamp server is not working in the local user account .it work only in administrator account but i want to run wamp server in local user account because i do not have administrator access right pls help me how can i run wamp server in my local user account.
WPBeginner Support
Without administrator rights it would be difficult for you to run wamp.
Admin
Ratan
Hi ,
I followed the complete step and dowloaded the WP and started uploading theme . With my first theme only , I got the below message after tryin to install the same :
The uploaded file exceeds the upload_max_filesize directive in php.ini.
Please guide .
Regards ,
WPBeginner Support
Please check out this guide: How to increase the maximum upload size in WordPress
Admin
utpal
after install Wampserver i go to phpmyadmin, inthin a login option is here
where i get pass and id
WPBeginner Support
Try root for username and leave password blank.
Admin
Tony Leary
Same problem – that works. Thanks.
Alan
Hello again,
Per my last comment, I think I figured it out. Sorry for the bother.
Alan
Thanks for the write-up! Wondering if you might have any ideas as to why I cannot create a db from phpmyadmin? After clicking “databases” to create a db, I get a “loading” message for quite some time, then that disappears & nothing…
The same occurs no matter which tab I select in the phpmyadmin dash. Been Googling for over an hour & I haven’t been able to find a solution. Thanks again!
WPBeginner Support
Try uninstalling and then reinstalling WAMP server. If that does not help you can also install XAMPP.
Admin
Maureen
Hi Guys! Step by Step Wonderful! Installed WAMP successfully, set up database, downloaded wp with no problem Sucess! now log in… user name or password invalid… press here to have password sent via email… i receive this message “The e-mail could not be sent.
Possible reason: your host may have disabled the mail() function.” any help is appreciated!
WPBeginner Support
Check out our guide on how to reset a WordPress password from phpMyAdmin
Admin