Zainstalowanie WordPressa na twoim Macu pozwoli ci poznać jego funkcje bez konieczności posiadania hosta.
Poznasz działanie WordPressa i przekonasz się, czy jest on odpowiedni dla twojego projektu. Jest to również idealne rozwiązanie do testowania motywów i wtyczek przed uruchomieniem twojej witryny. Ponadto eksperymentowanie na miejscu daje swobodę popełniania błędów i uczenia się.
Wiele razy bawiliśmy się witrynami regionalnymi, zarówno na komputerach Mac, jak i Windows. W tym poradniku przedstawimy 2 proste metody konfiguracji WordPressa na twoim komputerze Mac.
Uwaga: Nie używasz komputera Mac? Mamy również poradnik, jak zainstalować WordPress lokalnie w systemie Windows.
Dlaczego warto zainstalować WordPressa lokalnie na Macu?
Zazwyczaj do stworzenia witryny internetowej WordPress potrzebne jest konto hostingowe i nazwa domeny.
Jednak rdzeń oprogramowania WordPress można pobrać bezpłatnie i uruchomić lokalnie na twoim komputerze. Ta lokalna witryna WordPress nie będzie ogólnie dostępna w Internecie i można ją zobaczyć tylko na twoim komputerze.
Zaletą tego podejścia jest to, że można prywatnie ćwiczyć korzystanie z WordPressa, wypróbować go i zobaczyć, jakiego rodzaju witryny internetowe można tworzyć.
Możesz także użyć tej lokalnej instalacji do przetestowania różnych motywów WordPress i wtyczek przed zainstalowaniem ich na twojej witrynie internetowej.
Czego potrzebujesz, aby zainstalować WordPress lokalnie na Macu?
WordPress jest napisany głównie w PHP, języku programowania po stronie serwera. Do uruchomienia PHP potrzebne jest oprogramowanie serwera WWW i zainstalowany system zarządzania bazą danych MySQL.
Teraz, instalowanie wszystkich tych programów niezależnie i sprawienie, by ze sobą współpracowały, brzmi jak zniechęcające zadanie.
Na szczęście istnieją darmowe narzędzia programistyczne, które sprawiają, że bardzo łatwo jest zainstalować je jako jeden pakiet, nawet dla mniej zaawansowanych technicznie użytkowników. Mając to na uwadze, oto 2 metody na łatwą instalację WordPressa lokalnie na komputerze Mac bez specjalnych umiejętności administrowania serwerem:
Gotowy? Uruchommy WordPressa na twoim komputerze.
1. Zainstaluj WordPress lokalnie na Macu za pomocą Local WP (zalecane)
Local WP to narzędzie programistyczne WordPress, które pozwala łatwo skonfigurować lokalny serwer na twoim komputerze Mac. Możesz również użyć Local na Windows i Linux, aby skonfigurować WordPress.
Najpierw należy przejść na witrynę internetową Local i kliknąć przycisk “Pobierz” w prawym górnym rogu ekranu.
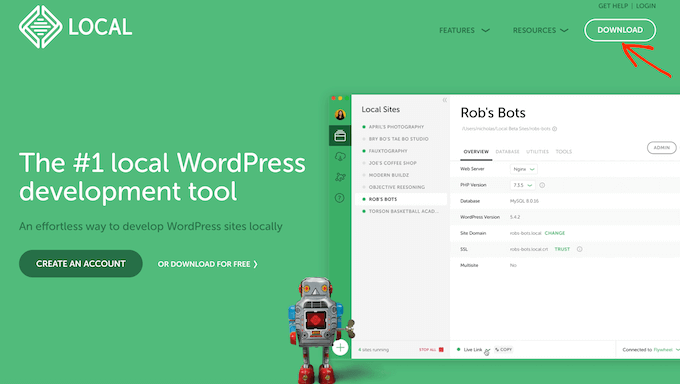
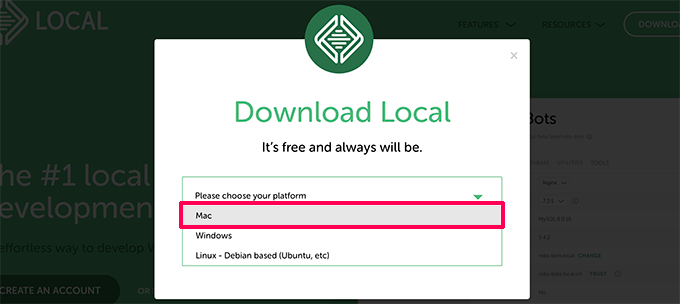
Spowoduje to otwarcie wyskakującego okna Pobierz lokalnie.
Wybierzmy Mac jako twoją platformę.
W ustawieniach regionalnych zostaniesz poproszony o wypełnienie krótkiego formularza.
Po wpisaniu twojego imienia i nazwiska, adresu e-mail i numeru telefonu, możesz kliknąć przycisk “Pobierz teraz”.
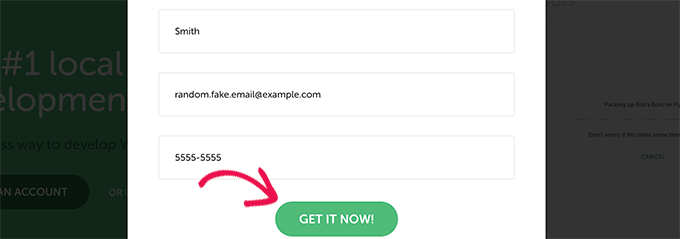
Spowoduje to pobranie regionalnego pliku instalacyjnego na twój komputer. Możesz kliknąć dwukrotnie, aby otworzyć pobrany plik zaraz po zakończeniu pobierania.
Wyświetli się kreator konfiguracji, który poprowadzi cię przez proces instalacji aplikacji Local na twoim komputerze.
Użytkownicy komputerów Mac muszą po prostu przeciągnąć aplikację Local do katalogu “Aplikacje”.
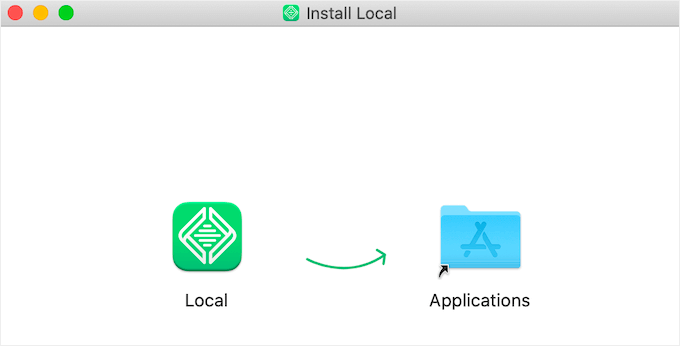
Po zakończeniu instalacji będzie można uruchomić aplikację Regionalne z katalogu Aplikacje.
Przy pierwszym uruchomieniu możesz zostać poproszony o udzielenie odpowiedzi na kilka pytań i utworzenie bezpłatnego konta lokalnego. Kroki te są opcjonalne i możesz je pominąć, jeśli chcesz.
Tworzenie witryny internetowej WordPress w ustawieniach regionalnych
Local sprawia, że bardzo łatwo jest stworzyć lokalną witrynę internetową i szybko zainstalować WordPress.
Aby rozpocząć, wystarczy kliknąć przycisk “Utwórz nową witrynę”.

Na następnym ekranie musisz wpisz nazwę twojej witryny.
Następnie kliknij przycisk “Kontynuuj”.

Następnie zostaniesz poproszony o wybranie twojej platformy.
Ustawienia regionalne pozwalają wybrać wersję PHP, Apache i MySQL.
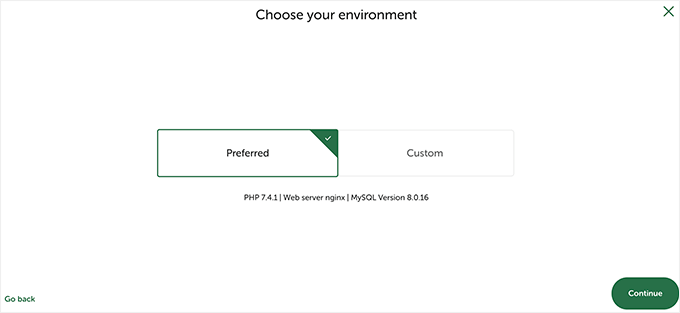
Jeśli nie masz pewności, wybierz ustawienia “Preferowane” i kliknij przycisk “Kontynuuj”.
Na koniec należy wpisz nazwę użytkownika WordPress i hasło. Następnie można kliknąć przycisk “Dodaj witrynę”.
Aplikacja Local pobierze i zainstaluje WordPress, aby utworzyć twoją witrynę internetową. Możesz zostać poproszony o wpisz swojej nazwy użytkownika Mac i hasła, aby wprowadzić zmiany.
Po zakończeniu zobaczysz informacje o Twojej nowo utworzonej witrynie internetowej wraz z przyciskami umożliwiającymi przejście na obszar administracyjny WordPress lub zobaczenie Twojej witryny regionalnej.
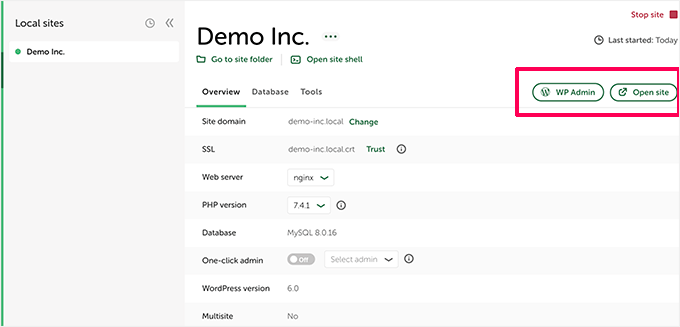
Możesz teraz przejść na swoją witrynę internetową lub logować się do obszaru administracyjnego WordPress.
Z tego miejsca możesz korzystać z Twojej hostowanej lokalnie witryny WordPress tak, jak zarządzałbyś witryną na żywo.
Możesz zainstalować wtyczki i motywy oraz zaprojektować swoją witrynę internetową według własnego uznania.
2. Instalacja WordPressa lokalnie na Macu przy użyciu MAMP
MAMP to popularny program, który umożliwia uruchomienie WordPressa na twoim komputerze Mac.
Najpierw przejdźmy na witrynę internetową MAMP. Tutaj powinieneś zobaczyć najnowszą wersję MAMP i MAMP Pro.
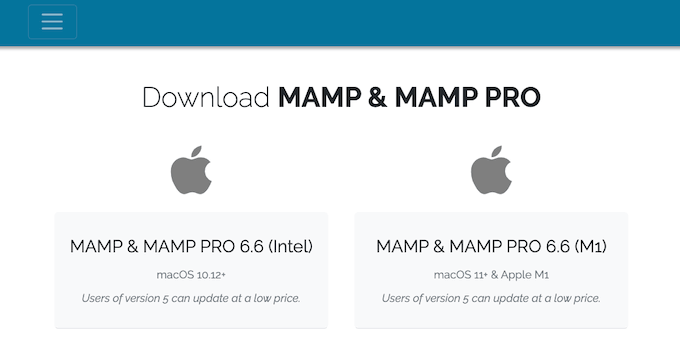
MAMP ma oddzielne pliki do pobrania dla różnych wersji systemu operacyjnego macOS.
Nie masz pewności, która wersja systemu macOS jest zainstalowana na twoim komputerze? Aby się tego dowiedzieć, wystarczy kliknąć ikonkę Apple na pasku narzędzi twojego komputera.
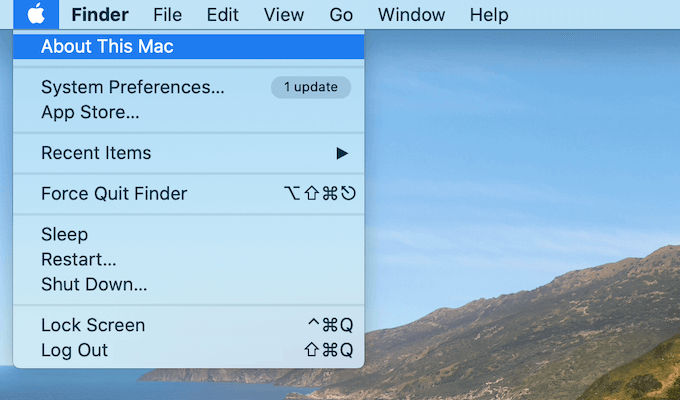
Następnie możesz kliknąć opcję “About This Mac”.
Spowoduje to wyświetlenie wyskakującego okienka z wieloma informacjami o twoim komputerze, w tym o wersji systemu macOS.
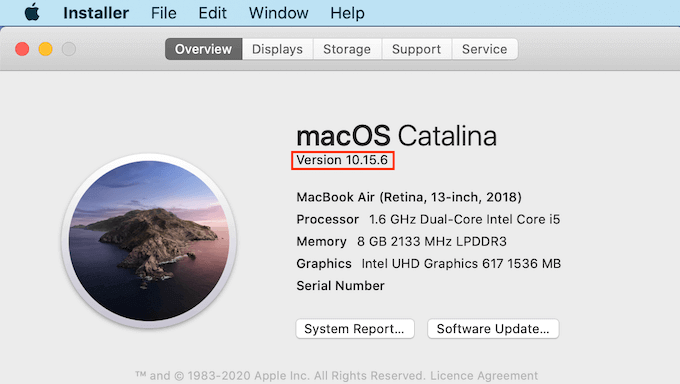
Możesz teraz pobrać odpowiednią wersję MAMP dla twojego systemu operacyjnego.
Po zakończeniu twojego pobierania, kliknij dwukrotnie na plik MAMP .pkg. Spowoduje to uruchomienie instalatora MAMP.

Teraz wystarczy postępować zgodnie z instrukcjami wyświetlanymi na ekranie, aby zainstalować MAMP.
Po zainstalowaniu tego programu, uruchom MAMP, otwierając katalog “Aplikacje” na twoim komputerze.
Tutaj znajdziesz 2 wersje MAMP. MAMP Pro jest wersją płatną, więc upewnij się, że wybrałeś wersję darmową.
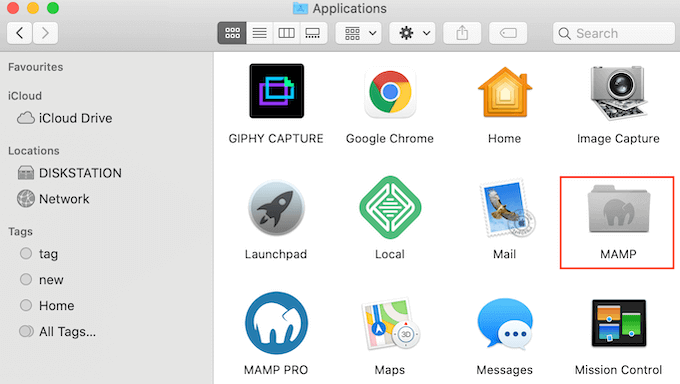
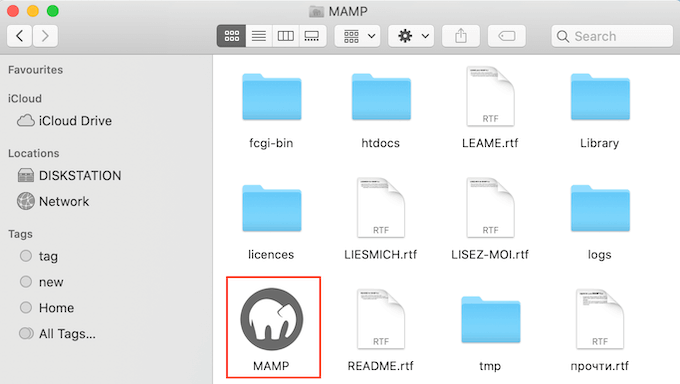
Wewnątrz tego katalogu MAMP znajdują się różne pliki oraz aplikacja MAMP.
Wystarczy kliknąć dwukrotnie, aby uruchomić aplikację MAMP.
Zanim zaczniesz, zalecamy skonfigurowanie kilku ustawień, aby poprawić twoje wrażenia z korzystania z MAMP.
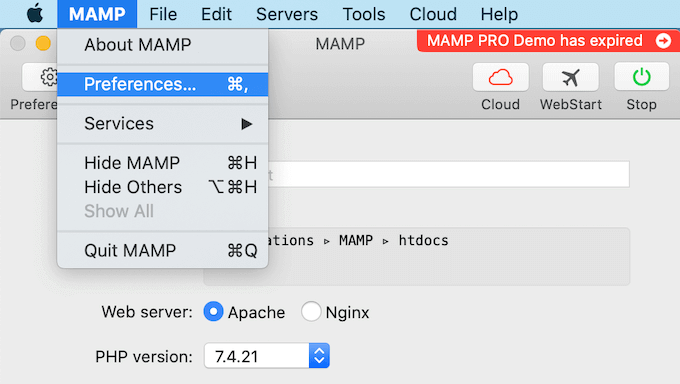
Aby wprowadzić te zmiany, kliknij “MAMP” na twoim pasku narzędzi, a następnie wybierz “Preferencje….”.
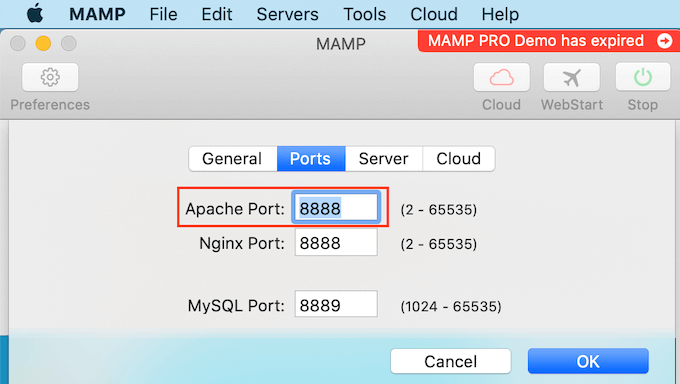
W wyskakującym okienku będziesz chciał przełączyć się na kartę “Porty”.
Możesz teraz sprawdzić, którego portu Apache używa MAMP. Zalecamy przełączenie na port Apache 8888, jeśli MAMP jeszcze go nie używa.
Następnym krokiem jest skonfigurowanie twojego katalogu głównego dokumentów. To tutaj będziesz tworzyć i przechowywać wszystkie swoje lokalne witryny internetowe WordPress.
Domyślnie MAMP używa katalogu /Applications/MAMP/htdocs/, ale można to zmienić na dowolną inną lokalizację.
W oknie dialogowym “Preferencje…” kliknijmy kartę “Serwer”. Twój główny dokument powinien być teraz widoczny.
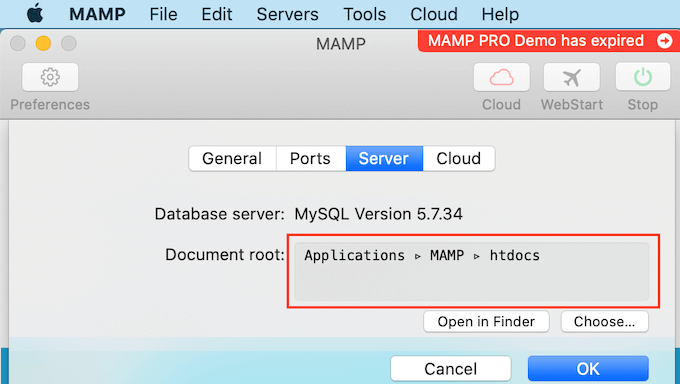
Aby przechowywać twoje witryny w dowolnym innym katalogu, kliknij przycisk “Wybierz…”.
Spowoduje to otwarcie wyskakującego okienka, w którym można wybrać nową lokalizację. Możesz również utworzyć nowy katalog do przechowywania wszystkich twoich witryn internetowych WordPress.
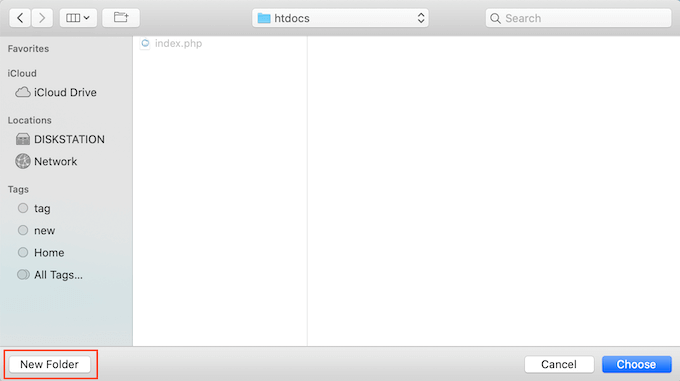
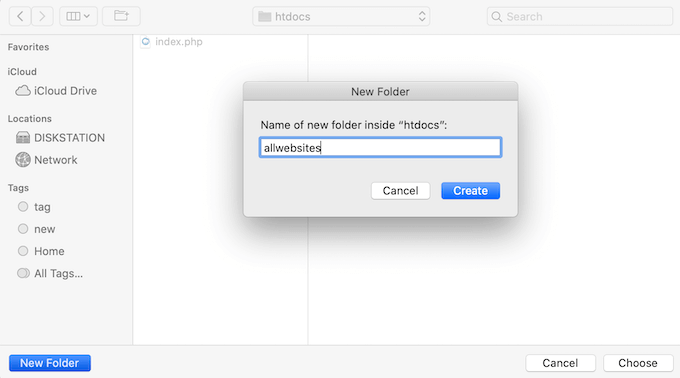
Możesz nadać temu katalogowi dowolną nazwę.
W tym artykule będziemy przechowywać nasze witryny internetowe w katalogu o nazwie “allwebsites”.
Instalacja WordPressa na MAMP
Teraz, gdy już skonfigurowałeś MAMP, nadszedł czas, aby zainstalować WordPress na twoim komputerze Mac.
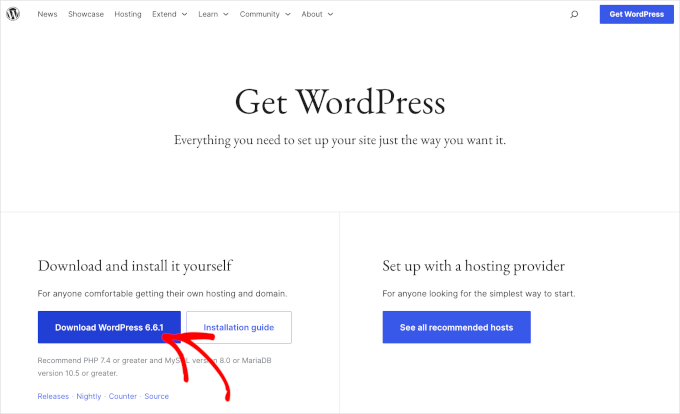
Najpierw należy przejść na witrynę internetową WordPress. org i pobrać najnowszą wersję WordPress Core.
UWAGA: Istnieją dwie wersje WordPress. Aby uzyskać więcej informacji, zobacz nasz artykuł porównawczy na temat WordPress.com vs WordPress.org.
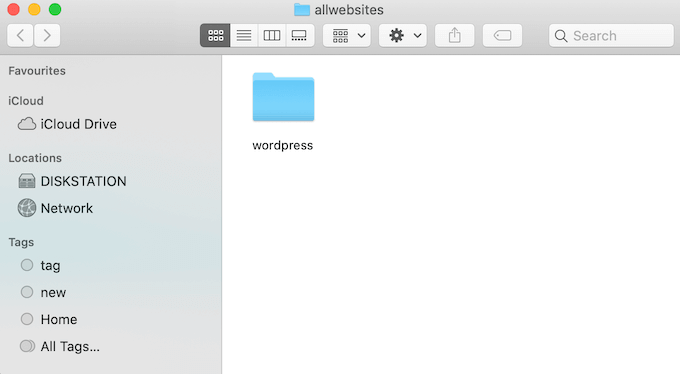
Po pobraniu pliku ze strony WordPress.org wystarczy go rozpakować. Spowoduje to utworzenie rozpakowanego katalogu “wordpress”.
Teraz po prostu skopiuj ten katalog do twojego katalogu głównego dokumentów MAMP.
Ponieważ zmieniliśmy katalog główny dokumentów, musimy skopiować “wordpress” do applications/MAMP/htdocs/allwebsites.
WordPress potrzebuje bazy danych do przechowywania wszystkich swoich treści i danych. Musisz utworzyć tę bazę danych przed utworzeniem regionalnej witryny internetowej.
Nie martw się – nie jest to tak trudne, jak się wydaje.
W oknie MAMP “Preferencje…” wystarczy kliknąć przycisk “OK”. Powinno to uruchomić aplikację MAMP w nowej karcie przeglądarki.
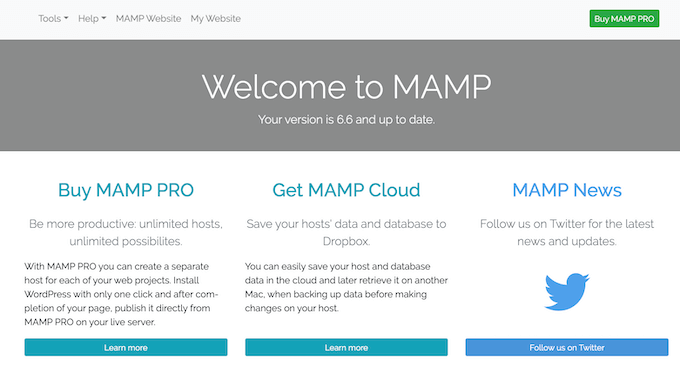
Twoim kolejnym zadaniem jest uruchomienie phpMyAdmin. Jest to aplikacja internetowa służąca do zarządzania bazą danych MySQL twojej witryny.
Na pasku narzędzi przejdźmy do Narzędzia ” phpMyAdmin.
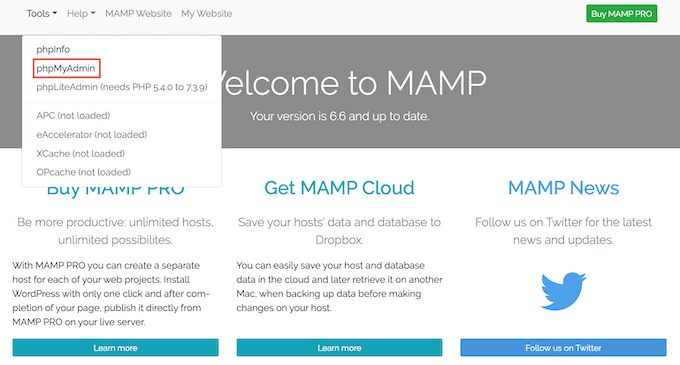
Spowoduje to otwarcie phpMyAdmin w nowej karcie.
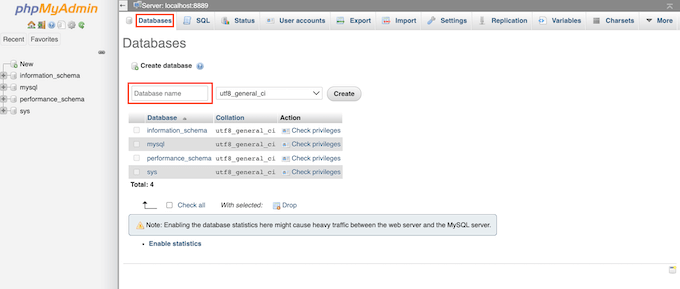
W kokpicie phpMyAdmin należy przejść do karty “Bazy danych”.
Możesz teraz wpisać dowolny rodzaj nazwy twojej bazy danych w polu “Nazwa bazy danych”. Pamiętaj tylko, aby zapamiętać nazwę, ponieważ będziemy jej używać w następnym kroku.
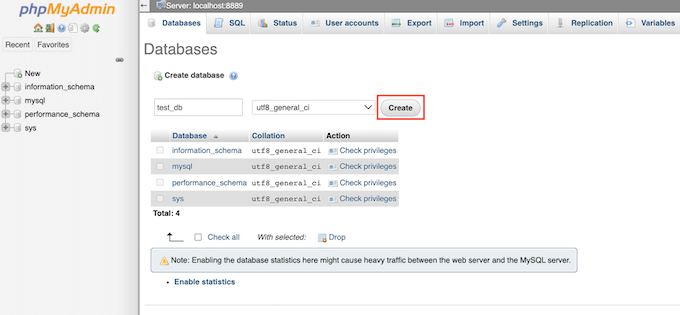
Na potrzeby tego poradnika nazwiemy naszą bazę danych “test_db”.
Po wpisaniu nazwy twojej bazy danych możesz kliknąć przycisk “Utwórz”.
PhpMyAdmin utworzy wtedy twoją bazę danych.
Teraz nadszedł czas na zainstalowanie WordPressa.
W nowej karcie przeglądarki wystarczy przejść na stronę http://localhost:8888/. Jeśli używasz innego portu niż 8888, po prostu zmień adres URL, aby wspomnieć o twoim porcie.
Powinieneś teraz zobaczyć odnośnik do folderu “wordpress”, który skopiowałeś do głównego katalogu dokumentów. Kliknij ten odnośnik. Spowoduje to otwarcie kreatora instalacji WordPress.
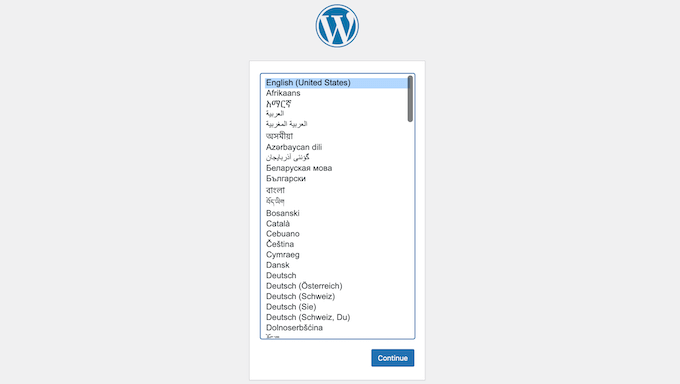
Kreator instalacji WordPress rozpoczyna się od prośby o wybranie języka. Po dokonaniu twojego wyboru możesz kliknąć przycisk “Kontynuuj”.
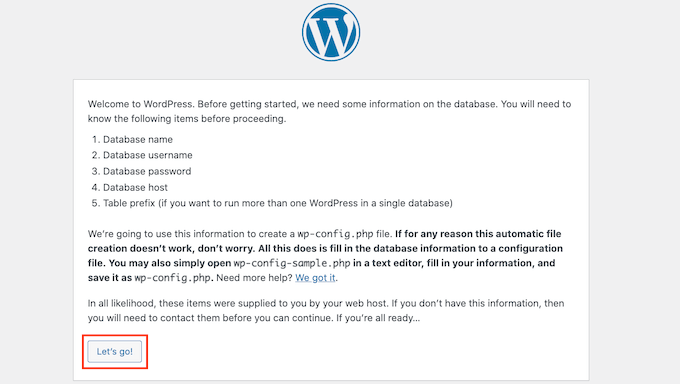
Na następnym ekranie WordPress wyświetli listę wszystkich informacji potrzebnych do ukończenia instalacji.
Po zapoznaniu się z tym ekranem, kliknij przycisk “Przejdźmy dalej”, aby przejść dalej.
Kreator konfiguracji poprosi teraz o podanie informacji o twojej bazie danych WordPress. Jako nazwę bazy danych wystarczy wpisać nazwę utworzoną w poprzednim kroku.
W polu “Nazwa użytkownika” i “Hasło” wystarczy wpisać rodzaj “root”.
Następnie możesz wpisać “localhost” w polu “Host bazy danych”. Localhost oznacza, że baza danych i witryna internetowa są hostowane na tym samym serwerze, którym w tym przypadku jest twój komputer Mac.
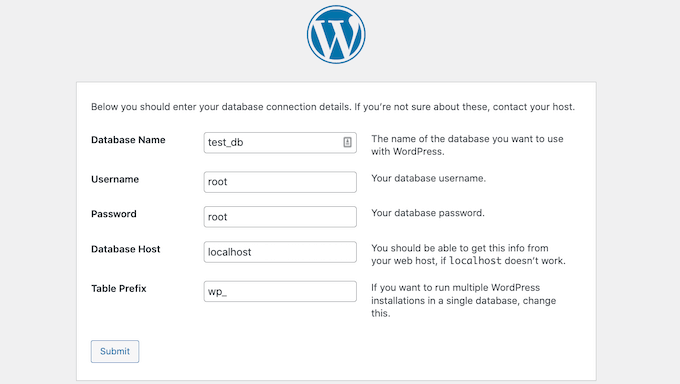
Po wpisaniu wszystkich tych informacji wystarczy kliknąć przycisk “Wyślij”.
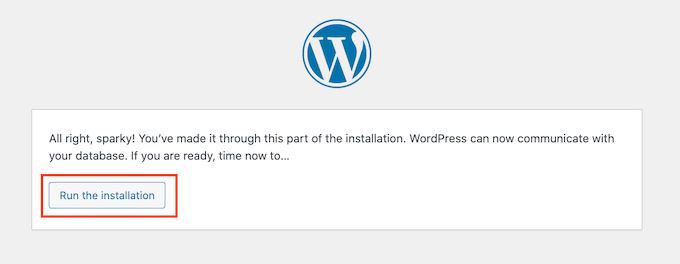
WordPress połączy się teraz z twoją bazą danych i utworzy dla ciebie plik konfiguracyjny. Po zakończeniu zobaczysz komunikat o powodzeniu.
Aby przejść do następnego kroku, możesz kliknąć przycisk “Uruchom instalację”.
Na następnym ekranie WordPress poprosi o dodanie tytułu witryny. Możesz na przykład użyć nazwy Twojej firmy. Większość motywów WordPress wyświetla ten tytuł na samej górze twojej witryny internetowej.
Jeśli nie masz pewności co do tytułu twojej witryny, nie ma powodu do paniki. Możesz zmienić tytuł w twoim kokpicie WordPress w dowolnym momencie.
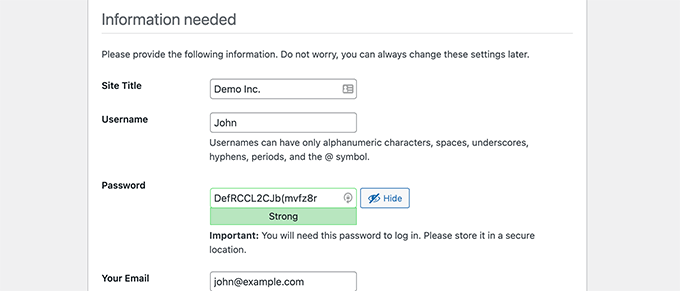
Następnie należy utworzyć nazwę użytkownika i hasło. Są to dane logowania, których będziesz używać, aby uzyskać dostęp do twojego kokpitu WordPress.
Możesz również wpisać swój adres e-mail w polu “Twój e-mail”. Jest to adres, na który WordPress będzie wysyłać wszystkie e-maile od administratorów.
Po wypełnieniu formularza kliknij przycisk “Zainstaluj WordPress”.

WordPress uruchomi teraz instalację.
Po kilku chwilach powinieneś zobaczyć komunikat “Sukces!”.

Aby przejść bezpośrednio do twojego ekranu logowania WordPress, kliknij przycisk “Loguj się”.
Możesz również logować się do swojej regionalnej witryny internetowej WordPress, korzystając z następującego adresu URL: http: //localhost:8888/wordpress/wp-login.php.
Uwaga: Jeśli używasz innego portu Apache, musisz zmienić część “8888” tego adresu URL.
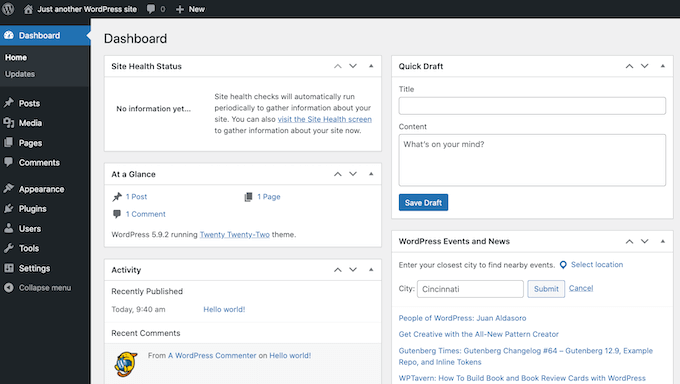
Możesz teraz zalogować się do swojej witryny WordPress, wpisz nazwę użytkownika i hasło utworzone w poprzednim kroku.
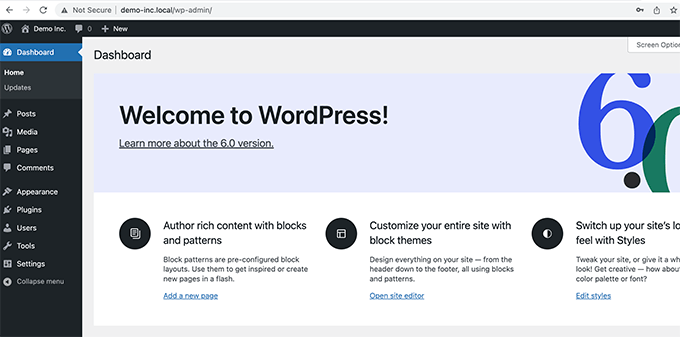
Spowoduje to przejście do kokpitu WordPress.
Wypróbowanie WordPressa lokalnie na Macu
Instalacja lokalna jest idealna do testowania WordPressa lub tworzenia witryn internetowych na twoim komputerze. Teraz, gdy WordPress działa lokalnie na twoim Macu, oto kilka rzeczy, które możesz chcieć wypróbować:
- Eksperymentuj z najlepszymi motywami WordPress.
- Spróbuj znaleźć swój idealny motyw WordPress.
- Przetestuj niezbędne wtyczki WordPress lokalnie.
- Naucz się programowania WordPress, tworząc własne wtyczki i dostosowane motywy.
Przeniesienie twojej regionalnej instalacji WordPress do witryny internetowej na żywo
Gdy już pobawisz się WordPressem lokalnie, możesz chcieć przenieść twoją instalację WordPressa do witryny internetowej na żywo. Tylko w ten sposób inni będą mogli zobaczyć twoją witrynę internetową.
Aby to zrobić, musisz kupić nazwę domeny i hosting.
Nazwa domeny to adres Twojej witryny internetowej w Internecie, a hosting to miejsce przechowywania plików witryny. Możesz myśleć o hostingu internetowym jako o domu Twojej witryny internetowej w Internecie.
Jeśli chodzi o hosting, polecamy Bluehost. Jest to jedna z największych firm hostingowych na świecie, która jest również oficjalnie rekomendowana przez WordPress.org.
Na szczęście Bluehost oferuje użytkownikom WPBeginner zniżkę na hosting, darmowy certyfikat SSL i darmową nazwę domeny. Zasadniczo możesz przekształcić swoją lokalną instalację WordPress w witrynę internetową za 1,99 USD miesięcznie.
Po zakupie hostingu warto zapoznać się z naszym artykułem na temat przenoszenia WordPressa z serwera lokalnego na witrynę internetową.
Mamy nadzieję, że ten artykuł pomógł ci dowiedzieć się, jak zainstalować WordPressa lokalnie na Macu. Następnie możesz również zapoznać się z naszym przewodnikiem na stronie , jak stworzyć witrynę internetową z WordPressem lub zobaczyć nasze porównanie najlepszych zarządzanych firm hostingowych WordPress.
If you liked this article, then please subscribe to our YouTube Channel for WordPress video tutorials. You can also find us on Twitter and Facebook.


WPBeginner Staff
Since we don’t know what went wrong when you deleted the site earlier. We would recommend you to create a new site. Basically repeat the whole process all over again. Except this time create a new directory in your document root folder. Do the same with MySQL DB. Then install WordPress in the new directory using your new MySQL DB.
Steve
Great instructions! I was able to set up a site, but I needed to delete it and start over. I trashed the SQL database and the previous site folder. But when WordPress goes to install itself now, I get a huge error log in the browser saying that a ton of files, info “already exist.” Do I need to get rid of some other previously installed files and, if so, which ones?
Minyan
When I type in http://localhost/wordpress (I name the wordpress folder under the root folder of MAMP wordpress), it shows “404 not found. The requested URL /wordpress was not found on this server”. Can anyone tell me what I did wrong?
Schalk
Minyan,
Any luck with your “404 not found’ issue ??
ej
having the same problem. please help!
Ish
Instead of typing in ‘http://localhost/wordpress’,
just type in ‘localhost’ instead and it should bring you to the wordpress page.
Worked for me, hope it does for you!
ThankQ
Michelle Hamilton
These instructions are the best and easiest to follow out there. I actually used them to help my instructor set up WordPress on her new mac and I used them to set it up on the mac I use in my internship. Thanks so much!!!
Michelle Hamilton
These are the best and easiest to follow instructions out there. I actually used them to help my instructor install MAMP on her mac. I had already used them to do it for my internship that I am participating in. Great Job!!!
Julie Valin
Thank you very much for this great step-by-step tutorial! Very helpful for this first-time MAMP user, when at first I felt overwhelmed. Now I’m feeling informed and happy, and I always like to comment on those posts/tutorials that have really helped me. Kudos!
WPBeginner Staff
You can set up a staging environment for on a live server. Take a look at our guide on how to create staging environment for a WordPress site
Haley
Thanks for this tutorial – quick question for you: I’m designing a site for a client that I will have to build offline using MAMP, however I see the note about only being able to view it on my computer. Is there a way that my client (located in another state) can review the progress without making it live on their site?
Hannah
Oh god, thank you wpbeginner team so much. First time I’ve ever used MAMP and nothing seemed to say ‘Hey, for all you dummys, here’s how you install WordPress’- it just assumed we would know. *forever grateful*
Frank
Too easy guys, thanks a lot!
Alex Koch
Really appreciate your help. MAMP 3.0.3 comes with a slightly different interface and a different setup – you have to redirect Apache to /bin/phpMyAdmin/ in oder to setup your mysql database for wordpress and THEN redirect Apache to you actual root directory localhost/mysitewahtever/ where you put wordpress.
WordPress can access the db nevertheless.
Rich
Thank you for this easy to follow guide! I finally got the motivation up to move forward with a project I’ve almost completed and this guide really helped. Thanks again!
megan Dickson
This was AWESOME. SO EASY.
Thank you!
Tim Aldiss
Really useful, thanks
Tom Nguyen
Is it possible to receive emails from WordPress installed on a local server? I’m only asking because I had installed WordPress and forgot my administrator password. I click the Lost Your Password link to start the password reset process, but I never received an email.
I just ended up going to the local phpMyAdmin interface and reset the password that way.
Kate
I made an assumption when installing mamp/wordpress with my website name. The “website name” I used to set it up using your tutorial is not my website name my business currently owns and I am redoing. I thought if I used that one it would mess up the current site. So…..do I have to go back and put my “real” website name in the install files or can I just switch it over to my current domain name when I am done with the new wordpress site? Thanks!
Leigh
hey
followed steps ….up to setting up to part of .. new database – used test_db as per example
opening http://localhost/mysite in browser and getting 404 kicking out.
should be saying …
WordPress will notify you that it was unable to find wp-config.php file. !!!
…directory set cool , to mysite
///using default mamp ports
thanx for help in advance man !
smiles
Kate
I guess the issue was that I named my wp folder that contains all my wp files in hpdocs folder within MAMP using 2 words. Therefore I put a space in between and when I went to put the local host/mydomainname/wp-admin/ address to find my dashboard I apparently had to add a %20 due to the space. It seems to work now so I think I did it right! Thanks again for your sites guidance and prompt help. I really appreciate it and have added your site to my bookmarks and subscribed!
Kate
Well apparently it was so simple I was missing the part that I needed to put the _db after my new database I created Solved!
Kate
I am switching to wordpress from drupal and I appreciate and value your great resources and thorough steps coming from a newbie with no tech experience and knowledge!! I am having the same problem that Jen did above (12/12/2013). I’m using a Macbook Pro and got as far as trying to figure out whether the database that I set up in my wp-config file exists. I did the steps you recommended (it says all privileges are granted in my root user) , but maybe I’m doing it wrong cause I’m still getting the same error message as she did? Maybe I need another way of explaining the steps? I closed Skype and ensured websharing wasn’t on, but that didn’t change anything. Totally stumped!!
WPBeginner Support
Kate once you start MAMP, you need to go to http://localhost/phpmyadmin create a new database. Open your wp-config.php file and enter the database name on the line:
define('DB_NAME', 'YourDBNameHere');Let us know if this solved your problem.
Admin
Daniel
Thanks for the guide.
Now i have installed wordpress onto my mac, and have created a website. How do I go about starting a new website?
Thanks Dan
WPBeginner Support
Repeat the process by installing WordPress in a new directory (folder) and by creating a new database.
Admin
Syed
I am going through a nightmare. Thanks to your instructions, everything was running fine until today when I clicked on upgrade to the new MAMP version and went for an install, thinking that it will happen in the background.
It appears that the upgrade has either erased my data or has put it away. Incidentally, I had a full copy of the main drive on a different drive (the whole MAMP folder). I can see the folders and files in both places but when I try to start MAMP from the different drive where the old MAMP folders are placed, it still boots up with the new version and I can’t start my site.
I have no way to really know what to do next. Kindly help. Thanks
netyx
Thanks for the guide!
I have a problem though. I created a database and then MySQL server crashed. It’s not working anymore. Could you help me please anyone?
arzu
very helpful, thank you
Art
Yeah dude, this was very helpfull, thanks a lot!
Derek
Great tutorial. Thanks. It all worked fine for me until the very end. After I successfully installed wordpress I clicked on “View Site” and got a white splash screen that says “Your Website” followed by instructions on how to make it “live.” I don’t want to go live. I just want to work on building a theme locally. But for whatever reason, I’m just not able to view the site.
Help!
Thanks.
Ian
Perfect guide, much appreciated
Brandon
A breeze. Many thanks!
GH
Thank you so much. Very helpful explanation.
Jen
I just installed MAMP and my servers won’t start. Have you ever had this problem before? I tried restarting and re-reading the steps, thanks!
WPBeginner Support
check error logs in the directory where you installed MAMP
Admin
Jen
PLEASE HELP! I CANNOT FIND AN ANSWER AND IM ON A DEADLINE!
So everything was working until I clicked the ‘open start page’ button. Originally it just populated a web browser that only said:
It Works
Then, after refreshing it send me straight to the create config screen for wordpress and skipped the database start section. When I submitted the information your tutorial included it says :
“We were able to connect to the database server (which means your username and password is okay) but not able to select the (my database name) database.”
What do I do to fix this?? I was reading online and it says that there are some issues with Mac Mountain Lion, so I turned off the web sharing, which was the solution for this problem on all other sites. Please please please help!!
– Jen
WPBeginner Support
Jen, open your wp-config.php file which is located in your WordPress installation’s root directory. Look at the Database, database username and password sections. Go to phpmyadmin by typing
http://localhost/phpmyadminin the browser. Make sure that the database name in your wp-config file exists. Also check that the username used in wp-config file has all privileges by clicking on the Users tab in phpmyadmin.Admin
brad
i rescind my prior victory, when i finished working on my site, I stopped the servers and quit MAMP. When I restarted MAMP to work on a new project a few hours later I am unable to access any files in htdocs without a 404 error. MAMAP support forums have almost no responses to this issue, any one here have this issue? Any possible help? I’m not a tech person, just a designer so this is mostly greek to me.
Brad
Thanks for a simple and well explained tutorial! I got this up and running in under 15 mins!
Daniele
Thank you guys! Really helpful for a young Mac user like me!
jeroen faber
Great guide!
One thing: the following line in the guide:
“Open a new browser window and type http://localhost/mysite.”
didn’t take me to the WordPress installation screen, just typing “localhost” in the browser did.
Did i make some mistake in the configuration or….?
WPBeginner Support
seems like you have installed wordpress in your main www or htdocs or web directory under your Apache installation.
Admin
Dee
Thanks for this, it was really easy to follow and I had no problems at all!
Ton in 't Veld
I’ve made many sites already with Dreamweaver. Now I want to set up a WordPress blog for my wife. I installed MAMP. So far so good. In the preference I tried to start the servers. MySQL Server worked immediately, but the Apache server doesn’t go to green. I alreadyI switched off Skype (as advised before.
Many thanks for looking atmy problem.
WPBeginner Support
Sometimes skype is running in the background check in the activity monitor to make sure that skype is not running in the background.
Admin
George
Everything was going well until I got to, http://localhost:8888/wordpress. For some reason the Apache Server wouldn’t start with a port of 80. Please tell me what I’m not doing or doing wrong.
Thank you,
George
Editorial Staff
This is happening if you have Skype running. You need to change the port in Skype or quit skype while using Mamp.
Admin
Justin
That was exactly what I needed. One hang up I had was that “Web Sharing” was turned on in my Mac OSX “System Preferences.” It was causing a duplicate Apache server to run, which prevented phpmyadmin or the “Start Page” from running.
Editorial Staff
Thanks for sharing that with us Justin. Hopefully it will help others who read the comments
Admin
Jonas
Hi,
Followed your instructions an successfully installed WP. Many thanks
JaY Srivastava
Thanks for saving me real time, i knew how to do that on windows, but since i use my mac as my main work laptop it was getting difficult for me to test websites.
I have been always fan of wpbeginner but now i guess it has grown more.
Thanks Again !
RW
Been using my first install of mamp ever since I read this tutorial. The only thin that I’m struggling with is, porting it over to a live production site. I’m assuming I have to export my DB and then import it using phpmyadmin, but obviously, some things will have to change. Also have to manually upload all upload folders as well.
Does anyone have recommended workflow ideas?
Thanks,
Bob
Editorial Staff
If you have BackupBuddy, then you can easily create a full backup file and import that. To do it manually:
1. Install WordPress on new site and copy/paste the /wp-content/ directory from the old site.
2. Import all content using phpMyAdmin
3. Change the site_url and home_url options in wp_options to reflect the new site.
4. Login to the new site and go to Settings > General and click on the save button.
5. Go to Settings > Permalinks and click on the save button.
Admin
RW
perfect! thanks! never loved backupbuddy as it didn’t reliably work for me. the manual approach looks simple! thanks so much!
Bob
RW
I’ve been using MAMP for a week now and absolutely love it. Makes testing so much faster!
Thanks,
Bob
Gautam Doddamani
i have been using XAMPP from a long time and its serving me well…it has the same functionality as MAMP and perfectly runs on a mac
Raihan
this post is very useful to me. for this i saved this page
Gunstra
Great Tut, thank you.
Debbie
Finally, concise, step-by-step instructions on how to set-up WordPress. I have followed other instructions and still get lost on what to do. Thank you so much!!
Christopher Anderton
I’m using MAMP myself, however, there is a even simpler way to get up and running in notime using MAMP Stack (http://bitnami.com/stack/mamp) and the WordPress module (see the modules section at the page).
Luke
Definitely a useful process! I wish I had this article the first time I tried to set this up. It would have been a huge help!
What’s your opinion on modifying the hosts file to allow using a DNS name for the local site ( example.com instead of localhost )? Good practice? Bad practice?
I’ve personally found it helpful when transferring a site I’ve developed locally to a live server.
RW
That’s so helpful. I’ve read about doing this and I think it will save so much time working locally on sites. I guess it has to be configured (or reconfigured) for different sites?
Thanks,
Bob