Zastanawiasz się nad reklamami retargetingowymi na Facebooku? Czy chcesz zainstalować piksel Facebooka w WordPress?
Konfigurowanie kampanii reklamowych na Facebooku, które są skierowane do osób, które wcześniej zobaczyły twoją treść, to świetny sposób na przyciągnięcie większego ruchu z powrotem na twoją witrynę.
W tym artykule pokażemy, jak krok po kroku dodać piksel Facebooka w WordPressie, aby skonfigurować reklamy retargetingowe.
Dlaczego warto używać piksela retargetingowego Facebooka, aby zwiększyć twój zasięg w mediach społecznościowych?
Syed Balkhi, nasz założyciel i CEO, opublikował studium przypadku na temat tego, jak zwiększyliśmy ruch na Facebooku WPBeginner o 332% w 2015 roku. Wywołało to ogromne zainteresowanie naszych czytelników, którzy chcieli wiedzieć, jak mogą zrobić to samo dla swoich witryn internetowych.
Zwiększając liczbę wpisów na stronie Facebooka za pomocą reklam na Facebooku, możesz wybrać szeroką grupę docelową. Retargeting pozwala zawęzić twoją grupę odbiorców i uzyskać lepsze wyniki przy mniejszych wydatkach.
Możesz wyświetlać swoje reklamy osobom, które są już zainteresowane Twoją witryną internetową. Osoby te są znacznie bardziej skłonne do reagowania na twoje wpisy i reklamy na Facebooku.
Czym jest piksel retargetingowy Facebooka?
Czy zauważyłeś, że po przejściu na witrynę internetową zaczynasz widzieć jej reklamy na Facebooku? Nazywa się to retargetingiem lub remarketingiem.
Witryny te wykorzystują technologię retargetingu Facebooka, powszechnie znaną jako Facebook Pixel lub Meta Pixel.
Piksel retargetingowy nie dodaje niczego widocznego do twojej witryny internetowej. Po prostu wysyła plik ciasteczka do przeglądarki odwiedzających Twoją stronę.
Dzięki temu Facebook może retargetować użytkowników, którzy przejdą na Twoją witrynę internetową na Facebooku.
Przyjrzyjmy się, jak dodać piksel retargetingowy Facebooka do twojej witryny WordPress.
Krok 1. Tworzenie piksela retargetingowego Facebooka (Meta Pixel)
Aby to ułatwić, stworzyliśmy film instruktażowy, jak zainstalować wtyczkę WordPress, który możesz obejrzeć poniżej.
Jeśli jednak chcesz po prostu postępować zgodnie z instrukcjami tekstowymi, możesz skorzystać z naszego samouczka krok po kroku, jak zainstalować piksel retargetingowy Facebooka w WordPress.
Najpierw należy logować się na twoje konto na Facebooku i przejść na stronę Meta Business Suite. Następnie kliknij Wszystkie narzędzia ” Menedżer wydarzeń.
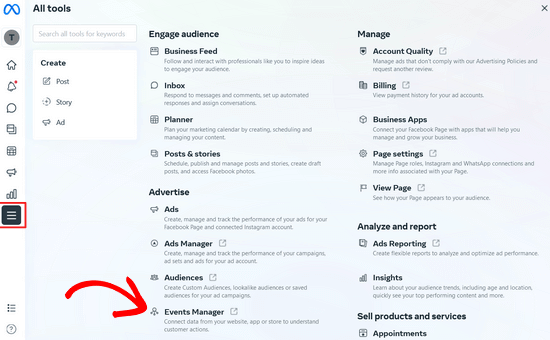
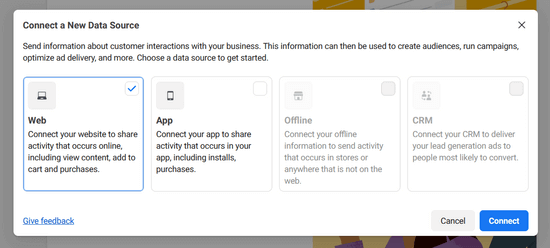
Następnie kliknij przycisk “+ Connect to Data Sources” w menu po lewej stronie i wybierz opcję “Web”.
Następnie kliknij przycisk “Połącz”.
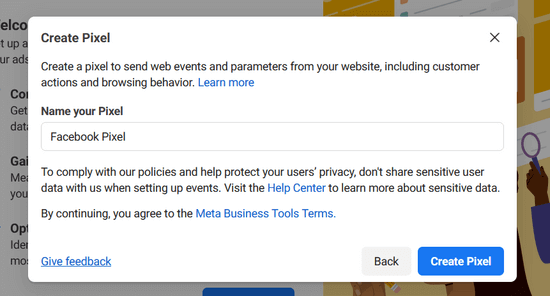
W następnym wyskakującym oknie musisz wpisz nazwę twojego piksela, która może być nazwą twojej firmy lub produktu.
Następnie kliknij przycisk “Utwórz piksel”, aby kontynuować.
Następnie wpisz adres URL swojej witryny internetowej i kliknij przycisk “Sprawdź”, aby sprawdzić, czy Twoja witryna kwalifikuje się do integracji z pomoc techniczną partnerów, takich jak WordPress i Shopify.
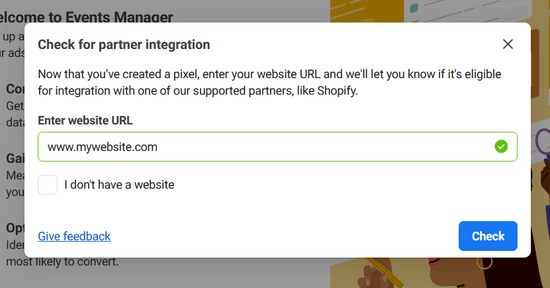
Jeśli twoja witryna kwalifikuje się do integracji, zobaczysz zielony znacznik wyboru i możesz kliknąć przycisk “Dalej”, aby kontynuować.
Następnie należy wybrać sposób połączenia Twojej witryny internetowej i przesyłania aktywności do Facebooka.
W tym poradniku wybierzemy opcję “Tylko Meta Pixel”. Zawsze możesz skonfigurować Conversion API oprócz twojego piksela później.
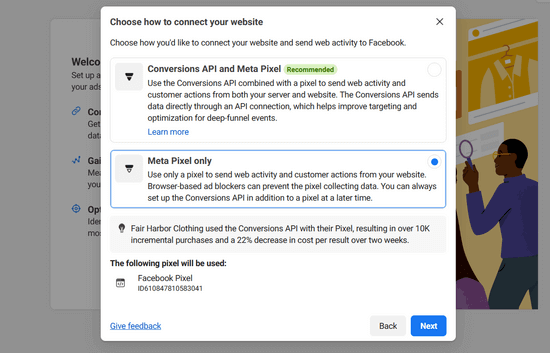
Kliknij “Dalej”, aby kontynuować.
Teraz należy wybrać metodę dodawania kodu piksela do twojej witryny internetowej.
Jeśli ktoś inny zarządza sprawami technicznymi na twojej witrynie internetowej, możesz wysłać mu kod piksela e-mailem. W przeciwnym razie kliknij przycisk “Zainstaluj kod ręcznie”, aby zainstalować go samodzielnie.

Facebook wyświetli teraz kod piksela, który należy zainstalować na twojej witrynie WordPress.
Wystarczy kliknąć przycisk “Kopiuj kod”, aby skopiować kod piksela, a my pokażemy, jak zainstalować go w WordPress.

Krok 2. Instalacja piksela Facebooka w WordPress (+ śledzenie e-handlu)
Musisz dodać kod piksela Facebooka tuż przed </head> w twoim motywie WordPress.
Najprostszym sposobem jest skorzystanie z darmowej wtyczki WPCode.
WPCode to najlepsza wtyczka do fragmentów kodu dla WordPressa. Ułatwia wstawienie kodu do nagłówków i stopek witryny WordPress bez konieczności edytowania plików twojego motywu.
Aby rozpocząć, należy zainstalować i włączyć wtyczkę WPCode. Aby uzyskać instrukcje krok po kroku, zapoznaj się z naszym przewodnikiem na temat instalacji wtyczki WordPress.
Po zainstalowaniu i włączaniu wtyczki należy przejść do strony Fragmenty kodu ” Nagłówek i stopka.
Następnie wystarczy wkleić kod piksela Facebooka w polu nagłówka.

Po zakończeniu nie zapomnij nacisnąć przycisku “Zapisz zmiany”.
Zobacz nasz przewodnik na temat dodawania kodu nagłówka i stopki w WordPress, aby uzyskać szczegółowe instrukcje.
W ten sposób pomyślnie zainstalowałeś piksel Facebooka na swojej witrynie internetowej WordPress.
Alternatywa: Dodanie Piksela Facebooka dla WooCommerce z funkcją śledzenia e-handlu
Jeśli masz sklep internetowy, możesz uaktualnić do wersji premium WPCode, aby dodać piksele śledzenia e-handlu i poprawić skuteczność reklam.
Dodatek Conversion Pixels firmy WPCode umożliwia łatwe dodawanie pikseli śledzących e-handel dla popularnych platform, takich jak Facebook, Google Ads, Snapchat, Pinterest i TikTok za pomocą jednego kliknięcia.
Bezproblemowo integruje się z WooCommerce i Easy Digital Downloads, więc nie jest wymagana dodatkowa konfiguracja.
Możesz szybko wybrać zdarzenia e-handlu do śledzenia, takie jak zobaczenie strony produktu, dodanie do koszyka, płatność i zakup, aby lepiej zrozumieć skuteczność twoich reklam i poprawić zwrot z reklam (ROAS).
Najpierw należy zainstalować i włączyć wtyczkę premium WPCode. Aby uzyskać dostęp do dodatku Conversion Pixels, wymagany jest plan Plus lub wyższy. Aby uzyskać instrukcje krok po kroku, zobacz nasz przewodnik na temat instalacji wtyczki WordPress.
Następnie wykonaj te same instrukcje, co w kroku #1, aby utworzyć piksel Facebooka dla WooCommerce.
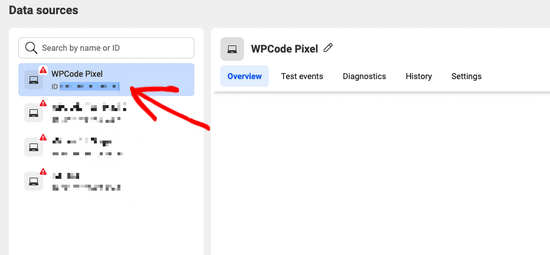
Następnie skopiuj identyfikator piksela, który można znaleźć w sekcji “Źródła danych” w Menedżerze zdarzeń Facebooka na twoim koncie Facebook Business.
Następnie przejdź do Fragmenty kodu “ Piksele konwersji z kokpitu WordPress i wklej twój identyfikator piksela w polu “Identyfikator piksela Facebooka”.

Następnie musisz dodać swój token API konwersji Facebooka, aby skonfigurować śledzenie e-handlu.
Aby to zrobić, wróć do ekranu “Źródła danych” w Menedżerze zdarzeń Facebooka i kliknij twój piksel. Po wybraniu twojego piksela kliknij kartę “Ustawienia”, a następnie kliknij odnośnik “Wygeneruj token dostępu”.
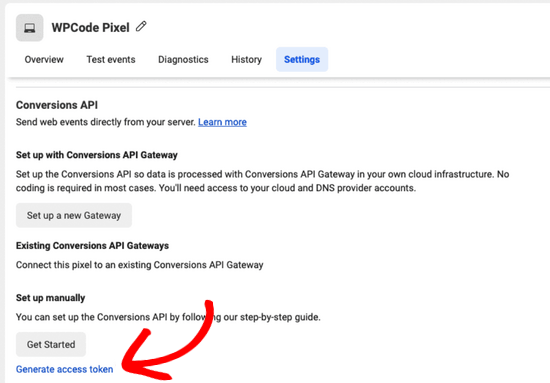
Po kliknięciu odnośnika twój token dostępu zostanie wygenerowany automatycznie. Wystarczy skopiować token dostępu i wkleić go w polu “Conversions API Token” w WPCode.
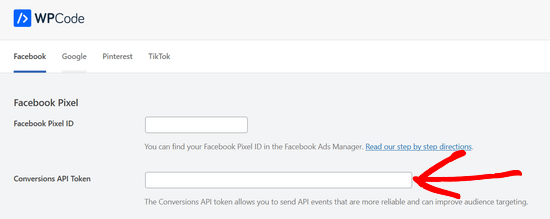
Teraz możesz przewinąć stronę w dół, aby wybrać rodzaj zdarzeń e-handlu do śledzenia.
Domyślnie włączone jest śledzenie wszystkich zdarzeń. Jeśli jednak chcesz wyłączyć śledzenie zdarzeń dla którejkolwiek z opcji, po prostu przełącz przełącznik na “Wył.”.
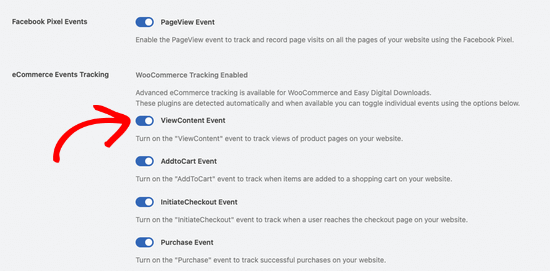
Nie zapomnij nacisnąć przycisku Zapisz zmiany u dołu strony.
To wszystko, pomyślnie dodałeś piksel Facebooka dla WooCommerce i jesteś gotowy do śledzenia wydarzeń e-handlu.
Krok 3. Tworzenie własnych odbiorców za pomocą Facebook Pixel
Teraz, gdy pomyślnie zainstalowałeś Facebook Pixel na swojej witrynie WordPress, następnym krokiem jest utworzenie własnych odbiorców dla kampanii retargetingowych na Facebooku.
Konfigurator odbiorców umożliwia kierowanie reklam na Facebooku do klientów, których już znasz. Tymi użytkownikami mogą być odwiedzający twoją witrynę internetową, użytkownicy, którzy polubili twoją stronę lub użytkownicy, którzy zapisali się na twoją listę mailingową.
Oto jak tworzyć własnych odbiorców na Facebooku.
Wystarczy przejść na kokpit Meta Business Suite i przejść do sekcji Wszystkie narzędzia ” Odbiorcy.
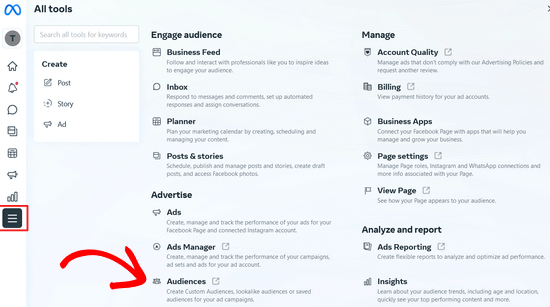
Na następnej stronie kliknij przycisk “Utwórz własnego odbiorcę”.
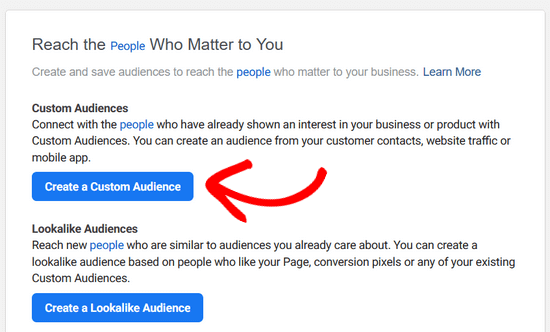
Spowoduje to wyświetlenie wyskakującego okienka, w którym należy wybrać źródło odbiorców, na które chcesz kierować reklamy na Facebooku.
Możesz wybrać witrynę internetową, listę klientów, włączanie aplikacji i wiele innych. W tym poradniku wybierzemy opcję “Witryna internetowa”.
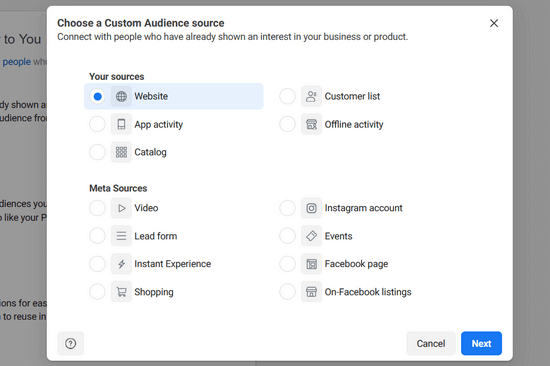
Następnie kliknij przycisk “Dalej”.
Teraz Facebook zapyta Cię, na jakich odbiorców witryny internetowej chcesz kierować reklamy. Możesz wybrać wszystkich odwiedzających witrynę internetową, osoby, które przechodzą na określone strony lub odwiedzających według spędzonego czasu.
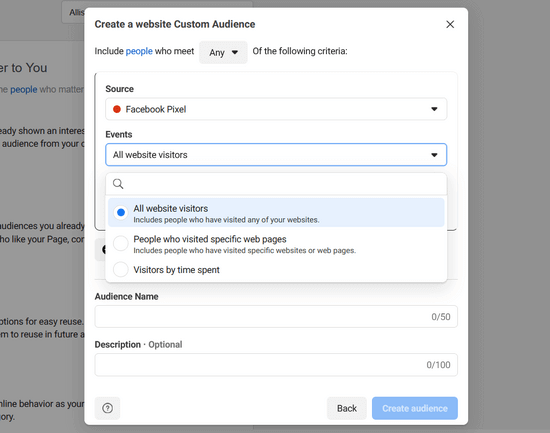
Następnie należy wybrać czas trwania wynoszący kilka dni. Na koniec należy podać nazwę grupy odbiorców. Użyj czegoś, co pomoże Ci łatwo zidentyfikować tę grupę odbiorców w Twoich spostrzeżeniach.
Gdy skończysz, kliknij przycisk “Utwórz odbiorców”, aby zakończyć tworzenie pierwszej własnej grupy odbiorców.
Powtórz ten proces, aby utworzyć więcej własnych odbiorców za pomocą retargetingu na Facebooku.
Krok 4. Wyświetlanie twoich reklam dostosowanym klientom za pomocą piksela retargetingowego Facebooka
Prawdziwa zabawa zaczyna się od angażowania twoich własnych klientów za pomocą reklam na Facebooku.
Zacznij od utworzenia nowej reklamy na Facebooku. Możesz uruchamiać różne rodzaje reklam dla różnych celów. Takich jak zwiększanie wpisów na twojej stronie, wysyłanie ruchu na twoją witrynę internetową, zwiększanie konwersji i tak dalej.
W zależności od wybranego celu, na pewnym etapie tworzenia reklamy będzie można wybrać grupę docelową.
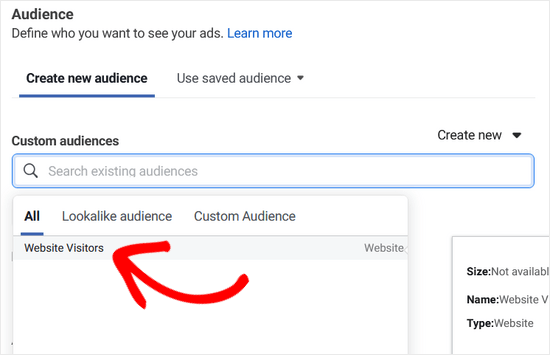
W tym samym wyborze odbiorców, Facebook pokaże ci własną grupę odbiorców, którą możesz wybrać, aby kierować na nią swoją kampanię reklamową.
Mamy nadzieję, że ten artykuł pomógł Ci zainstalować piksel remarketingowy/retargetingowy Facebooka w WordPress. Możesz również zapoznać się z naszym przewodnikiem na temat instalowania i konfigurowania komentarzy na Facebooku w WordPressie oraz naszymi eksperckimi typami najlepszych wtyczek WordPress do Facebooka, które pomogą Ci rozwinąć Twojego bloga.
If you liked this article, then please subscribe to our YouTube Channel for WordPress video tutorials. You can also find us on Twitter and Facebook.


crystal
Can you make an updated version of this? Now FB has a partners integration option. I have tried this version of doing (downloading a plugin) and I’ve tried their partners way of doing it and neither way is working for me.
WPBeginner Support
We will be sure to take a look
Admin
Jeff Cope
Thank you for the post and even though it does need updating since Facebook has changed the links and process, I finally added the pixel to my website. Note with the improvement in the WordPress Customizer, a plugin is no longer needed to add the pixel code above the /head.
WPBeginner Support
Thank you for your feedback and we still recommend the plugin to ensure it is included on every page on the site
Admin
Joseph Abokhai
I was using the Facebook for woocommerce plugin that automatically sets up a Facebook pixel on a particular website.
I started a new hosting account and redirected my domain name servers to point to the new hosting account.
My question is, since I changed my hosting account and started building the site from scratch, will the pixel still be attatched to my domain?
WPBeginner Support
Sadly, for that plugin, you would need to check with the plugin’s support for how they handle a change like that
Admin
Andrew Wilkerson
Well I think it’s done right, thanks WpBeginner! Still not sure what I should be doing with the second bit of code from Facebook in order to track people who have gone to one particular page. I clicked around for over 2 hours on FB then my wp site, then gave up as usual.
I’m not even sure how this works, where does the headers and footers plugin put the code, in to every page? Do I just add the second bit of FB code beneath this? it needs to go after the . Does it go in the page template? Posts template? I’m lost as usual, until FB make this easier I’m not going to bother. Selecting your audiences, demographics, countries, Events? and all that, it’s just too overwhelming for most business owners. Those who have money will survive online, they can pay someone else to do it, one-man businesses like mine will eventually disappear. I can’t make any money wasting time on things like this so it just gets worse. Already slipped off the first page of Google after 14 years on there, all down hill from here I’m afraid, time to do something else.
Angie Sherbondy
Thank you! I followed the instructions. I already had headers and footers installed and there was already code in the header section so I put this above it. Is that OK?
Thanks,
Angie
Shivam Bhateja
Yes, it is okay. I used the analytics code and pixel code both in the headers section.
Shodkk
Ya, there is no Problem in doing So. It is Completely Fine this only a Code.
This Code load each time when your site page run. there is no problem in that OK. Both Code run and send the Respected data back to FB and Google by their Respective code.
Andre
Hi there. There is one question that I have on the FB pixel I just can’t seem to find an answer for anywhere. Shopify has an app called Trackify that allows you to segment the events, per product for example, and in doing so allows you to super target people who have purchased a particular product without setting up custom events. Is there a similar plugin for WordPress. Please if you could help that would be great! I am at my wits end with searching for a solution.
Maryann
I am so glad I came across your site. Very helpful and informative.
Thank you
vinton samms
Thank you most kindly for this tutorial. I really did not how how to use the FB pixel. Thanks again.
Vinton
Nathan
I’ve installed the pixel using the plugin.
Will the pixel automatically be place on every page?
Thanks
Claudio
It seems like Facebook has changed some of the details for doing this since this post was written. They now have a new pixel which also includes having to copy event code. How/where do we do this within the context of this article and plugin?
Matthew
How do you install the pixel to fire on page load given the plugin constraint?
I’ll clarify- Facebook states that if you want an event to fire on page load the code for that specific event has to be pasted BELOW the head tag.
The plugin in you recommend, as well as all the others I’ve seen available for WP, don’t address this issue.
Recommendations?
John Henry Gaspay
Is it also possible to add the code on the footer instead in the header portion? usually if it’s for tracking purposes better implementation would be on the footer part, your know for SEO purposes.
Pat
I went ahead and installed the pixel because i wanted more visits to my music site. I started filling in the remarketing stuff in FB, then I came to the part about paying! I didn’t realise I had to pay so I’ve uninstalled the remarketing pixel in WP and delete everything in FB that I’d filled out. I hope I don’t start getting demands for money. Maybe you could add a note to your article that there will be payment involved in FB marketing. I guess I should have realised.
Jim
You didn’t think you had to pay for marketing or advertising? Where have you been for the past one thousand years?
Michael
Is there any way to use a Facebook pixel if I am at wordpress.com?
WPBeginner Support
Please see our guide on the difference between self hosted WordPress.org vs free WordPress.com blog.
Admin
Alex
Great article! Thanks
I use wordpress on mys ite – I’ve managed to install the facebook pixel using the “insert headers and footers app” and facebook says it is successfully installed
in wordpress, what’s the best way to install a standard event code? I have a “thank you” page that I would like to use as my conversion referecence – the thank you page appears after the viewer has submitted a form
Thanks!
Karl
I have also successfully installed the facebook pixel code through insert headers and footers by wpbeginner, now I want to know how to add standard event codes. Can anyone teach us how to? Big thanks to WPBeginner for this
Terry Green
I added the FB retargeting pixel about a month or so ago to my WP site, and the Facebook Pixel Helper showed it was installed and working. Now I “hear” there is a new Facebook Pixel, AND my Facebook Pixel Helper shows “there are no Facebook pixels” on my site.
The article I read goes all over the world and back about everything I don’t want to know about. All I want to know is how to replace the pixel. You are a trusted source so I thought I would ask … is there a new pixel out? And can I add it (or replace the old one) as easily as it was to add it the first time (with a plugin), or will it require manually adding code to each page?
Nina
How do we add other rules, like these Search fbq(‘track’, ‘Search’);
Add to cart fbq(‘track’, ‘AddToCart’);
Add to wishlist fbq(‘track’, ‘AddToWishlist’);
do we simply add it to the code?
Yev
I need to re-copy the Facebook pixel if I add standard/custom events for Conversion Tracking, to paste the new one into the website.
Does that mean I only have PageView data up until I update the code on the website, or does any type of data backtrack and becomes available as long as I had the original/basic Pixel installed?
Darren
Hi,
I have done this and the Facebook pixel is tracking. However I am using the sign up form as well with the mailchimp API and I added the Lead and Complete registration aspects to the pixel in the header. They are firing as the chrome addon shows that however the sign up form isnt triggering as a sign up or registration complete. I am not sure if I am explain my problem well. So in business manage and the pixel I can see people visiting my site. But when they sign up the value for lead or complete registration is still 0. Any ideas why this occurs? I used the old FB conversion pixel and that was fine just this new one is so annoying!
Cheers
Ron Hudson
Wow! Thank you very much for writing this post and recording a video to help your audience implement this important tool.
WPBeginner Support
Glad you found it helpful.
Admin
Prakash Thakur
hi wp beginner
Great job by making this article..
one question only…
can i uninstall that plugin after uploading script in the header section???
Brendon Osborne
Great video, super simple and helpful!!
moon
Hi,
I need to add ” Facebook Pixel Code ” in my wordpress site.
May I know if this plugin suitable for it.
Thanks
Elle Van Buren
Dear author, I have a question on the “Add conversion tracking” feature. Like you instructed, if we place the Facebook pixel into the header section of the plugin, that piece of code will be on every page. But if I have a conversion page, how do I single out that particular page and add in a custom event such as fbq(‘track’, ‘Lead’); to the middle of the Facebook pixel?
Usually with WordPress or other CMS, once something is in the header, it is on every page. How do we then put up something different for a particular page?
Thanks!
I Have The Same Exact Question!
I have the same question! How do you I single out a particular page (Thank You Page) and add in a custom event?
Marvin
I too have this question.
Stephen
Has anyone gotten a solution for this?
Adrien
Still have this question remaining… any solution ?
Cheers
Luke
THANK YOU!
So much easier to understand than the official FB instructions.
Hammad Afzal
Great article, Can I use this feature right away or first I have to buy facebook ad campaign. I means paid Facebook advertising.
Thanks alot syed balkhi for a cool post.
WPBeginner Support
You can see information about your visitors right away. You can run a paid campaign later on.
Admin
Hammad Afzal
Thank you so much
fajar siagian
hello
i want to ask about this
is this using facebook ads first. become subscriber user facebook ads
thank you,
Kingsley
Great, thanks for this tutorial
Angelica Costa
This is perfect. I am starting to experiment on Facebook Ads.
On other note, is there a way to tell where are facebook visitors coming from? Sometimes I get a load of new user and have no idea who shared a link to my website.