
Czy kiedykolwiek próbowałeś wgrać plik na twoją witrynę WordPress i natrafiłeś na mur? To bardzo frustrujące, gdy nie możesz przesłać potrzebnego obrazka, wtyczki lub motywu. Nasi czytelnicy często proszą nas o pomoc w rozwiązywaniu problemów z przesyłaniem plików, ponieważ mogą one spowolnić twój przepływ pracy.
Czasami te limity przesyłania plików mogą nieoczekiwanie uniemożliwić dodawanie treści do biblioteki multimediów lub instalowanie większych wtyczek i motywów, których potrzebujesz. To tak, jakbyś miał związane ręce. A jest to jeszcze bardziej irytujące, gdy nie wiadomo, jak to naprawić!
Ale nie martw się, jesteśmy tutaj, aby pomóc. Uwielbiamy to, że WordPress jest tak konfigurowalną platformą i często istnieje wiele sposobów na rozwiązanie tego samego problemu.
W tym przewodniku pokażemy najprostsze sposoby na zwiększenie maksymalnego rozmiaru przesyłanych plików w WordPress. Dzięki temu będziesz mógł wrócić do tego, co kochasz – prowadzenia swojej witryny internetowej!

Dlaczego warto zwiększyć maksymalny rozmiar przesyłanego pliku w WordPress?
Twój dostawca hostingu WordPress ustawi domyślny maksymalny rozmiar przesyłanych plików podczas rejestracji i instalacji WordPressa. Twój dostawca hostingu definiuje ten limit i zwykle wynosi on od 2 MB do 500 MB.
Dla większości właścicieli witryn internetowych WordPress limit ten będzie więcej niż wystarczający.
Zdarzają się jednak sytuacje, w których konieczne będzie zwiększenie tego limitu, aby uniknąć błędów przesyłania.
Na przykład:
- Prowadzisz witrynę internetową poświęconą fotografii i musisz przesyłać duże obrazki.
- Twoje portfolio projektowe lub fotograficzne zawiera duże obrazki.
- Chcesz zainstalować większy motyw WordPress lub wtyczkę.
- Chcesz sprzedawać produkty cyfrowe, takie jak eBooki, zdjęcia, filmy i inne.
- Regularnie aktualizujesz treść i dodajesz pliki audio, zdjęcia i inne, które wykraczają poza obecny, aktualny limit.
Biorąc to pod uwagę, pokażemy ci, jak możesz zwiększyć maksymalny rozmiar przesyłanych plików na twojej witrynie WordPress.
Uwaga: Należy pamiętać, że wyświetlanie wielu dużych plików na twojej witrynie internetowej może poważnie spowolnić jej szybkość i wydajność. Dlatego też zazwyczaj zalecamy, aby nigdy nie przesyłać filmów do WordPressa.
Ponieważ większość użytkowników ma różne konfiguracje hostingu WordPress, omówimy następujące kwestie:
- How to Check Your Maximum File Upload Size Limit in WordPress
- Method 1: Contact Your WordPress Hosting Provider
- Method 2: Create or Edit an Existing php.ini file
- Method 3: Add Code to Your WordPress Theme functions.php File
- Method 4: Add Code to Your .htaccess File
- Method 5: Use a WordPress Plugin to Increase File Upload Size
Jak sprawdzić twój maksymalny limit rozmiaru przesyłanego pliku w WordPress?
WordPress automatycznie wyświetli maksymalny limit rozmiaru przesyłanego pliku podczas przesyłania obrazków lub innych multimediów.
Aby to sprawdzić, po prostu przejdź do Media ” Utwórz nowy w panelu administracyjnym WordPress, a zobaczysz maksymalny limit rozmiaru przesyłanego pliku dla twojej witryny WordPress.

Teraz, gdy już wiesz, jak znaleźć limit rozmiaru, pokażemy Ci, jak zwiększyć maksymalny rozmiar przesyłania w WordPress.
Metoda 1: Skontaktuj się z dostawcą hostingu WordPress
Jednym z najprostszych sposobów na zwiększenie maksymalnego rozmiaru przesyłanych plików w WordPress jest skontaktowanie się z dostawcą hostingu WordPress.
Jest to stosunkowo proste zadanie dla ich zespołu obsługi klienta i można je wykonać w ciągu kilku minut.
Dla początkujących może to być znacznie łatwiejsze niż dodawanie kodu do WordPressa i edytowanie plików serwera.
Wystarczy przejść do witryny internetowej dostawcy hostingu, takiego jak Bluehost, i logować się.
Następnie kliknij ikonkę “Czat” u dołu ekranu. Następnie możesz poprosić pracowników pomocy technicznej o zwiększenie rozmiaru przesyłania plików na twojej witrynie WordPress.

Możesz również skontaktować się z pomocą techniczną z poziomu kokpitu Twojego konta hostingowego.
Metoda 2: Utwórz lub edytuj istniejący plik php.ini
Innym sposobem na zwiększenie maksymalnego rozmiaru przesyłanego pliku jest utworzenie lub edycja pliku o nazwie php.ini. Plik ten kontroluje wiele ustawień dla twojego środowiska hostingowego WordPress.
Większość dostawców hostingu WordPress, takich jak Bluehost, ma przyjazny dla początkujących cPanel, który pomaga zarządzać twoją witryną internetową.
Jeśli twój hosting ma kokpit cPanel, możesz zwiększyć rozmiar przesyłanych plików za pomocą wbudowanych narzędzi.
Uwaga: Poniższe informacje pochodzą z cPanelu Bluehost. Jednak większość dostawców hostingu współdzielonego będzie miała podobne kroki.
Przycisk cPanel znajduje się w dolnej części karty Hosting w Bluehost.

Kliknięcie tego przycisku otworzy twój kokpit cPanel.
Teraz należy przewinąć w dół do sekcji Oprogramowanie i kliknąć “MultiPHP INI Editor”.

Następnie przewiń w dół do sekcji oznaczonej “upload_max_filesize” i wpisz nowy maksymalny rozmiar pliku w polu.
Następnie kliknij przycisk “Zastosuj”.

Alternatywnie można kliknąć kartę menu “Tryb edytora”, a następnie zmienić maksymalny rozmiar przesyłanego pliku bezpośrednio w edytorze.
Musisz edytować sekcję “upload_max_filesize”, aby zwiększyć twój rozmiar przesyłanego pliku.
Po zakończeniu kliknij przycisk “Zapisz”.

Edycja php.ini poprzez dodanie kodu
Jeśli twój obecny, aktualny dostawca hostingu nie oferuje opcji cPanel, będziesz musiał edytować ten plik ręcznie.
Aby to zrobić, możesz użyć klienta FTP lub opcji menedżera plików w twoim panelu sterowania hostingu WordPress.
Jeśli korzystasz z hostingu współdzielonego, możesz nie widzieć pliku php.ini w twoim katalogu hostingowym. Jeśli go nie widzisz, po prostu utwórz plik o nazwie php.ini i prześlij go do twojego katalogu głównego.
Następnie dodaj następujący fragment kodu do pliku:
1 2 3 | upload_max_filesize = 256Mpost_max_size = 256Mmax_execution_time = 300 |
Możesz zmodyfikować limit “256M” do rozmiaru pliku, którego potrzebujesz dla twojego bloga WordPress.
Metoda 3: Dodanie kodu do pliku functions.php twojego motywu WordPress
Metoda ta bierze udział w dodaniu kodu do pliku functions.php w twoim motywie WordPress.
Zamiast edytować plik bezpośrednio, zalecamy użycie WPCode. Jest to najlepsza wtyczka do fragmentów kodu, która umożliwia dodawanie kodu do twojej witryny internetowej bez jej niszczenia.
Jeśli nie robiłeś tego wcześniej, zapoznaj się z naszym przewodnikiem dla początkujących, jak dodać własny kod w WordPress.
Najpierw należy zainstalować darmową wtyczkę WPCode. Aby uzyskać więcej informacji, zobacz nasz przewodnik krok po kroku, jak zainstalować wtyczkę WordPress.
Po włączaniu należy przejść do sekcji Fragmenty kodu ” + Dodaj fragment kodu.
Będziesz musiał najechać kursorem myszy na opcję “Add Your Custom Code (New Snippet)”, a następnie kliknąć przycisk “+ Add Custom Snippet”.
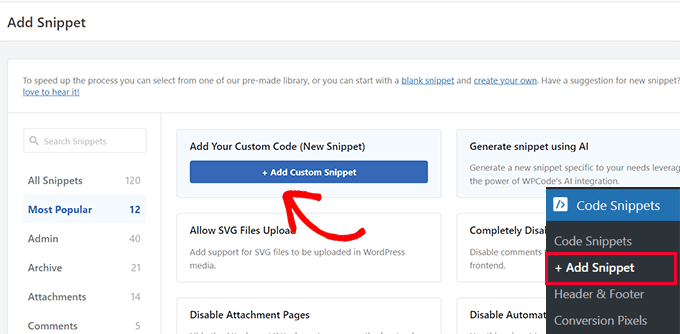
Następnie należy wybrać “Fragment kodu PHP” jako rodzaj kodu z wyświetlonej listy opcji.
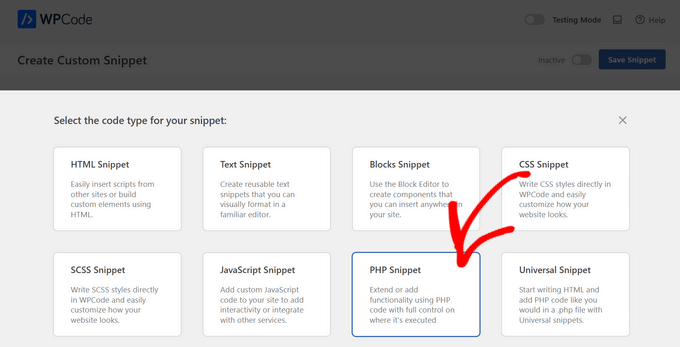
Na następnym ekranie wpisz nazwę twojego nowego fragmentu kodu, która może być dowolna, aby pomóc ci zapamiętać, do czego służy kod.
Następnie możesz skopiować i wkleić poniższy fragment kodu w sekcji “Podgląd kodu”. Upewnij się, że zmieniłeś “256M” na maksymalny wymagany rozmiar pliku:
1 2 3 | @ini_set( 'upload_max_size' , '256M' );@ini_set( 'post_max_size', '256M');@ini_set( 'max_execution_time', '300' ); |

Na koniec przełącz przełącznik u góry na “Włączony”, a następnie kliknij przycisk “Zapisz fragment kodu”. Kod zostanie teraz wykonany na twojej witrynie internetowej.
Metoda 4: Dodaj kod do twojego pliku .htaccess
Innym sposobem na zwiększenie maksymalnego rozmiaru pliku jest modyfikacja pliku .htaccess. Plik ten kontroluje wysokopoziomowe ustawienia konfiguracyjne twojej witryny internetowej.
Aby to zrobić, musisz logować się na twój serwer witryny internetowej przez FTP. Jeśli nie robiłeś tego wcześniej, zapoznaj się z naszym przewodnikiem na temat korzystania z FTP do przesyłania plików do WordPressa dla początkujących.
Następnie należy zlokalizować plik .htaccess w katalogu głównym witryny internetowej.

Jeśli nie możesz znaleźć twojego pliku .htaccess, może on być ukryty przez menedżera plików lub klienta FTP. Aby dowiedzieć się więcej, zobacz nasz przewodnik na temat tego, dlaczego nie możesz znaleźć pliku .htaccess na twojej witrynie WordPress.
Następnie musisz dodać następujący fragment kodu do twojego pliku .htaccess:
1 2 3 4 | php_value upload_max_filesize 256Mphp_value post_max_size 256Mphp_value max_execution_time 300php_value max_input_time 300 |
Aby jeszcze bardziej zwiększyć twój maksymalny rozmiar przesyłanego pliku, po prostu zmień “64M” na wymagany rozmiar.
Metoda 5: Użyj wtyczki WordPress, aby zwiększyć rozmiar przesyłanego pliku
Innym sposobem na zwiększenie maksymalnego limitu przesyłania plików jest użycie wtyczki WP Increase Upload Filesize. Jeśli nie czujesz się komfortowo dodając kod do WordPressa, może to być dobra opcja dla Ciebie.
Pierwszą rzeczą, którą musisz zrobić, jest zainstalowanie i włączanie wtyczki. Więcej szczegółów można znaleźć w naszym przewodniku na temat instalacji wtyczki WordPress.
Po włączaniu, przejdź do Media ” Increase Upload Limit w twoim panelu administracyjnym WordPress.
Spowoduje to wyświetlenie ekranu, na którym można wybrać nowy rozmiar przesyłanego pliku z listy rozwijanej “Wybierz maksymalny rozmiar przesyłanego pliku”.
Następnie kliknij przycisk “Zapisz zmiany”.

Uwaga: Maksymalny rozmiar przesyłanego pliku zostanie ustawiony przez twojego dostawcę hostingu. Jeśli potrzebujesz limitu rozmiaru pliku, który jest większy niż ten wymieniony w rozwijanym menu, musisz skontaktować się z dostawcą hostingu i poprosić o zwiększenie limitu.
Film instruktażowy
Jeśli nie lubisz postępować zgodnie z pisemnymi instrukcjami, możesz zapoznać się z naszym filmem instruktażowym:
Mamy nadzieję, że ten artykuł pomógł ci zwiększyć maksymalny rozmiar przesyłanego pliku w WordPress. Możesz również zapoznać się z naszym przewodnikiem na temat dodawania dodatkowych rodzajów plików do przesłania w WordPressie oraz naszymi eksperckimi wtyczkami i wskazówkami, aby ulepszyć obszar administracyjny WordPressa.
If you liked this article, then please subscribe to our YouTube Channel for WordPress video tutorials. You can also find us on Twitter and Facebook.

 in 2024")

")
Abduaziz
Thanks a lot!!! Method 3 worked for me
WPBeginner Support
Glad our recommendation could help
Admin
Alexander Gartley
Thanks, this helped me troubleshoot an upload limit. I’m on a WordPress multisite network install, so it ended up being a setting in the Network Admin Settings.
I was confused at first, because my php settings were allowing larger uploads, but it was restricted in the Network Settings.
WPBeginner Support
Thanks for sharing what solved the problem for you
Admin
Ernesto
Would have been great if you have included the .user.ini method.
.user.ini uploaded in the root folder with the same value/text in your edited php.ini
Most of the time, only this method works for shared hosting.
ErnestPH
WPBeginner Support
The php.ini file should work the same as the user.ini file unless your specific host ignores the php.ini but thank you for sharing your recommendation
Admin
Mark
This is the only solution that works on my shared hosting server. Thanks Ernesto!
Tamir Davidoff
Not working for me.
I have followed this guide and double checked the php.ini file to make sure that the changed are in fact saved. changed htaccess file to increase limits. and also tried modifying the phpMyAdmin httpd-app.conf and php-settings.conf file. All of these files reflect max upload higher than 40m and my WP site does not reflect Any of these changes. Really frustrated here.
Please help me, thanks !
WPBeginner Support
If you haven’t already, you would want to reach out to your hosting provider to ensure there is not a setting on their end that is overriding what you are setting
Admin
rajesh
i have tried all 3 method none of them worked. i am trying to upload newspaper theme in my in my wordpress site. but every time it show that php.ini file upload max file size.
plz help me
WPBeginner Support
You would want to reach out to your hosting provider to ensure they don’t have a setting that is overriding the changes you made.
Admin
Adam Walsworth
Watchout for hidden php.ini files. In my setup I found 2 of them. The one which I found actually resolved the issue was found under
./etc/php/7.0/apache2/php.ini
modifying this file fixed my issue.
WPBeginner Support
Thanks for sharing your solution, with where that file is located we would recommend most users reach out to their hosting provider before looking in locations like that.
Admin
Rafiq khan
Thanks buddy i have solved my problem by adopting method 2 by editing my php.ini file
Thanks alot you are working great
WPBeginner Support
Glad our article could help
Admin
Carla
None of the above worked for me. A matter of fact, editing the htaccess file broke my site even after deleting the above code. Overwriting with a new file fixed the problem though.
I have a dedicated server on Bluehost. What worked for me was going in the WHM root, not cpanel nor FTP access. Search for MultiPHP INI Editor. Give it at least 5 minutes to load if you only see the title and icon. You can set you upload time, post size, etc. there. Works instantly, even if your site is using Cloudflare, without placing it in development mode or clearing the cache. I hope this helps someone.
WPBeginner Support
Thank you for sharing what worked for you, should other users be on a dedicated server, if they reach out and let BlueHost know the need to increase the upload size then BlueHost can normally edit that for them
Admin
Pezza
Great Stuff! .htaccess worked for me!
WPBeginner Support
Thank you, glad our guide could help
Admin
ReineR
htaccess metod worked for me, thanks!
WPBeginner Support
Glad our article could help
Admin
Ahmed
Work for me
3. htaccess Method
you need to click (show hidden files to view and edit this file).
WPBeginner Support
Glad our article could help
Admin
rahul
when i tried this
Unable to communicate back with site to check for fatal errors, so the PHP change was reverted. You will need to upload your PHP file change by some other means, such as by using SFTP.
this happened to me
whats the solution of this
WPBeginner Support
You would need to use FTP rather than WordPress itself to add the code: https://www.wpbeginner.com/beginners-guide/how-to-use-ftp-to-upload-files-to-wordpress-for-beginners/
Admin
Ephraim
I had been trying php.ini method but it never works please how will I set it..
Or you should please tell me the were to paste at function.php
WPBeginner Support
You would normally use a text editor to set the content in the php.ini file. For your functions.php it should go at the end normally so it can be removed later as needed. You may also want to check with your hosting provider if you are having trouble with these methods for if they can assist in increasing the file size for you.
Admin
Ivos G.
None worked for me. But this one fixed it – add to your .htaccess this line:
LimitRequestBody 104857600
WPBeginner Support
Thanks for sharing your solution for this issue
Admin
Achilleas
I am using Nginx and i had already setup properly the values for php in the php.ini but what fixed it was puting the same value in the server block with the variable client_max_body_size xxxM;
I am writing this hoping it will help someone.
Editorial Staff
Thank you for sharing this with us
Admin
RAHUL
That worked for me thanx
WPBeginner Support
Glad our tutorial could help
Admin
Adriana Sabo
None of the options worked for me. Nothing happened when I tried the first two, and the last one prompted an error 500. Any way you can help?
Carl
Very helpful, thank you!
Md. Rana
The third option is worked for me.
WPBeginner Support
Hey Rana,
Glad it worked out for you. Don’t forget to follow us on Facebook for more WordPress tips and tutorials.
Admin
Tom Allen
The above explanation is fine for hosted sites, bit what about us guys that locahost? I still can figure out the “upload_max_filesize” error when downloading Updfaftplus from WP Plugins or from a download zip file. I am a beginner and need hand-holding through this process. Help is appreciated.
crystal
hta access worked.
you guys must put the code before #END WordPress
if you put after #end wordpress then site goes to 500 internal server error in my experience with godaddy hosting
Luis Felipe Lino
Thanks.
Jaime Lopes
On most of the shared cPanel sites I’ve setup:
-changing .htaccess brings the whole site down (500 internal error)
-adding php.ini or php5.ini files does nothing
-there is no option to choose ‘Site Software’ in cPanel…
Joseph
Thanks so much. The .htaccess file worked for me
John S
Thanks so much. The .htaccess file worked for me!
Karina
Thanks you so much!!! The .htaccess version worked for me
Megan
Thank you! This was a huge help! I couldn’t even upload plugins because my limit was pre-set at 2MB…Now I’ve got it to 64MB and am able to work.
Thanks!
Okimi Solomon
Thanks a lot. The second option worked for me. God bless you
Benj
Modifying .htaccess file worked for me. Thanks a lot..
Martin Croker
On vidahost (now TSOhost).
Adding the following php.ini worked for me… however (and I’m still a bit confused why), just putting it at http root didn’t work – I had to duplicate the php.ini file inside wp-admin and wp-include directories within wordpress.
Kabelo
Very helpful. Thanks very much.
Dwayne S
I’m on HostGator and currently having issue with max execution time. It occurred a few weeks ago and HostGator support fixed the issue. It now reappeared and support is telling me that they can’t fix it because I’m on shared server. The agent even crashed my site by manually editing the htaccess file and didn’t verify if it was working or not. He did however recommend a plugin that would edit the htaccess file with code to increase the limit but it doesn’t work. I guess HostGator blocks it
Jessany
I added the code into the .php functions folder, and now WordPress will not load. How do I fix this problem??
WPBeginner Support
Hi Jessany,
You can delete the code you added by accessing your website via FTP or File Manager in cPanel.
Admin
bala
upload the above given code to .htaccess file it is working
Caleb
I have GoDaddy hosting and contacted them to help me increase my file upload size. It was a piece of cake — I didn’t have to create any files, add code to my theme, or anything like that. So for those of you who have GoDaddy or cPanel type controls, forget hacks and just use your admin settings.
Here’s what support had me do:
1. Go to your cPanel Admin (a similar hosting panel ‘might’ work somewhat the same)
2. Scroll down to the ‘Software’ and click on ‘Select PHP Version’
3. Click on ‘Switch to PHP Options’ in the top right And TADA! There’s all your PHP Options!
4. Just go down and change the ‘post_max_filesize’ and ‘upload_max_filesize’ to whatever you want, apply and save your changes, and you’re now a safe and happy non-coding website owner.
Good luck!
ZafB
Thanks that worked perfect
Alissa
Thank you for posting this! It worked great!
Alejandra
Thanks a lot! That worked indeed!!
Paul Palmer
Brilliant solution – worked perfectly and easily! Many thanks.
Rich Perozich
This worked for me but in order to even find these files, I had to call godaddy where I was walked through these steps or I never would have been able to navigate to the cpanel Admin without their help.
1. Sign on to godaddy
2. Click on my products upper left
3. Under web hosting click manage all
4. Click web hosting with C panel
5. Click C panel Admin icon
6. Scroll down to Software and click Select php version
7. Click on switch to php options
8. At bottom of page click on the number upload_max_filesize and select # you wish as the max filesize
9. Click apply. It works. Now file sizes can be uploaded to the selected max.
Chris Sandford
Multisite Users:
If your a dumb dumb like me, you may have tried everything to no avail.
Don’t forget if you’re using WordPress Multi-site, to change the upload settings for individual sites.
Network Admin > Settings > Max upload file size
You may still need to use the tips in this article, but without changing the upload settings for multi-site, you won’t know if it’s working.
Stef Thoen
You’re my hero. I’ve been researching this issue for way to long until I finally saw your post. Thanks so much.
Ron
Thank you for this! This should be in the body of this article!
Hitesh L.
WORKED! kudos to you!!!!!!!
Emanuel Pietri
Method 3 – with .htaccess – works fine for me with theme
Stefanos Kargas
Thanks!! I changed .htaccess file and it worked.
haadi
hi. thanks a lot. the 3rd one worked for me
Jim R
Option 2 worked good. Thanks for the info.
Tor Helge
It worked when I did the last one with .htaccess
mara
Anyone on here get this to work with Godaddy? There are very unhelpful. I know I need to create the php.ini file, (and I did), but none of the solutions you posted worked. Any help is appreciated.
WangTuanJie
after 3 method, i couldn’t see success.
Mahadi
Thanks man!! .htacces worked for me!
Lynn
Wish you wouldn’t assume everyone looking for this solution knows what you mean by our “Theme Functions File” – do you mean functions.php? I’m not an expert, and I’m really good at following precise directions, and don’t want to even put a toe in the water of editing files if I don’t know EXACTLY what file you’re talking about! No clues were provided, like what other code I might look for in the file to know I’m in the right place, etc. So…this didn’t help me at all
WPBeginner Support
Hi Lynn,
Yes you need to add it to your theme’s functions.php file.
Admin
Justin
Yea, but where does it go in the functions.php. At the top, bottom, in the middle? Inside the “”
WPBeginner Support
Hi Justin,
At the end.
jack
thank you all those steps helped me
Alex
Thank you, method 3 really worked for me
php_value upload_max_filesize 64M
php_value post_max_size 64M
php_value max_execution_time 300
php_value max_input_time 300
vikram
HI
Do you use shared hosting
shahrin
great! htaccess method work for me. I’m so relieve,guys! Thanks in advance
Samba Siva
.htaccess method worked for me
nelson
htaccess worked for me ,thank you
Sagar
php.ini is worked for me.
cheers.
thnks man !!
Mituka
This worked for me.
Open your .htacess file with notepad.
Skip everything you see and at the bottom.
Paste the following and save.
php_value upload_max_filesize 64M
php_value post_max_size 64M
php_value max_execution_time 300
php_value max_input_time 300
Thomas
Where exactly did you paste it?
# BEGIN WordPress
RewriteEngine On
RewriteBase /
RewriteRule ^index\.php$ – [L]
RewriteCond %{REQUEST_FILENAME} !-f
RewriteCond %{REQUEST_FILENAME} !-d
RewriteRule . /index.php [L]
# END WordPress
php_value upload_max_filesize 64M
php_value post_max_size 64M
php_value max_execution_time 300
php_value max_input_time 300
Is it before the #END WordPress statement? ( I get error when I do that)
Or should it be after the #END WordPress statement?
WPBeginner Support
Hi Thomas,
You need to paste it at the end of your .htaccess file after the #END WordPress line.
Admin