Czy kiedykolwiek próbowałeś przesłać plik na swoją stronę WordPress i napotkałeś mur? To bardzo frustrujące, gdy nie możesz przesłać potrzebnego obrazu, wtyczki lub motywu. Nasi czytelnicy często proszą nas o pomoc w problemach z przesyłaniem plików, ponieważ mogą one spowolnić Twój przepływ pracy.
Czasami te limity przesyłania plików mogą niespodziewanie uniemożliwić dodawanie treści do biblioteki multimediów lub instalowanie większych wtyczek i motywów, których potrzebujesz. To jakby być związanym rękami. A jest to jeszcze bardziej irytujące, gdy nie wiesz, jak to naprawić!
Ale nie martw się, jesteśmy tutaj, aby pomóc. Uwielbiamy to, że WordPress jest tak konfigurowalną platformą, i często istnieje wiele sposobów rozwiązania tego samego problemu.
W tym przewodniku pokażemy najprostsze sposoby na zwiększenie maksymalnego rozmiaru przesyłanych plików w WordPress. Pomożemy Ci pokonać te ograniczenia, abyś mógł wrócić do tego, co kochasz – prowadzenia swojej witryny!
Dlaczego zwiększyć maksymalny rozmiar przesyłanych plików w WordPressie?
Twój dostawca hostingu WordPress ustawi domyślny maksymalny rozmiar przesyłanych plików podczas rejestracji i instalacji WordPress. Twój dostawca hostingu określa ten limit, który zazwyczaj wynosi od 2 MB do 500 MB.
Dla większości właścicieli stron WordPress ten limit będzie więcej niż wystarczający.
Istnieją jednak sytuacje, w których będziesz musiał podnieść ten limit, aby uniknąć błędów przesyłania.
Na przykład:
- Prowadzisz stronę fotograficzną i musisz przesyłać duże obrazy.
- Twoje portfolio projektowe lub fotograficzne zawiera duże obrazy.
- Chcesz zainstalować większy motyw lub wtyczkę WordPress.
- Chcesz sprzedawać produkty cyfrowe, takie jak e-booki, zdjęcia, filmy i inne.
- Regularnie aktualizujesz treści i dodajesz audio, zdjęcia i inne elementy, które wykraczają poza obecny limit.
Mając to na uwadze, pokażemy Ci, jak zwiększyć maksymalny rozmiar przesyłanych plików na Twojej stronie WordPress.
Uwaga: Pamiętaj, że wyświetlanie wielu dużych plików na Twojej stronie może poważnie spowolnić jej szybkość i wydajność. Dlatego zazwyczaj zalecamy nigdy nie przesyłać filmów do WordPressa.
Ponieważ większość użytkowników ma różne konfiguracje hostingu WordPress, omówimy następujące kwestie:
- Jak sprawdzić limit maksymalnego rozmiaru przesyłanych plików w WordPress
- Metoda 1: Skontaktuj się ze swoim dostawcą hostingu WordPress
- Metoda 2: Utwórz lub edytuj istniejący plik php.ini
- Metoda 3: Dodaj kod do pliku functions.php motywu WordPress
- Metoda 4: Dodaj kod do pliku .htaccess
- Method 5: Use a WordPress Plugin to Increase File Upload Size
Jak sprawdzić limit maksymalnego rozmiaru przesyłanych plików w WordPress
WordPress automatycznie wyświetli maksymalny limit rozmiaru przesyłanych plików podczas przesyłania obrazów lub innych multimediów.
Aby to sprawdzić, przejdź do Media » Dodaj nowe w panelu administracyjnym WordPress, a zobaczysz maksymalny limit rozmiaru przesyłanych plików dla swojej witryny WordPress.
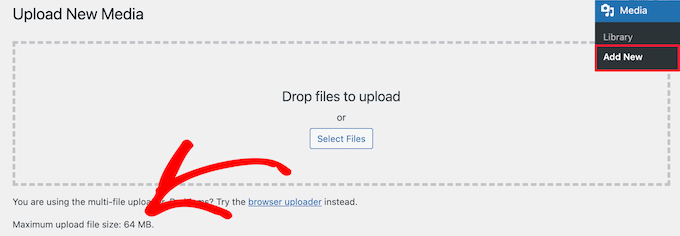
Teraz, gdy wiesz, jak znaleźć limit rozmiaru, pokażemy Ci, jak zwiększyć maksymalny rozmiar przesyłania w WordPress.
Metoda 1: Skontaktuj się ze swoim dostawcą hostingu WordPress
Jednym z najprostszych sposobów na zwiększenie maksymalnego rozmiaru przesyłanych plików w WordPressie jest skontaktowanie się z dostawcą hostingu WordPress.
Jest to stosunkowo proste zadanie dla ich zespołu ds. obsługi klienta i można je wykonać w ciągu kilku minut.
Dla początkujących może to być znacznie łatwiejsze niż dodawanie kodu do WordPressa i edycja plików serwerowych.
Po prostu przejdź na stronę swojego dostawcy hostingu, na przykład Bluehost, i zaloguj się.
Następnie kliknij ikonę „Czat” u dołu ekranu. Możesz wtedy poprosić personel wsparcia o zwiększenie rozmiaru przesyłanych plików na Twojej stronie WordPress.
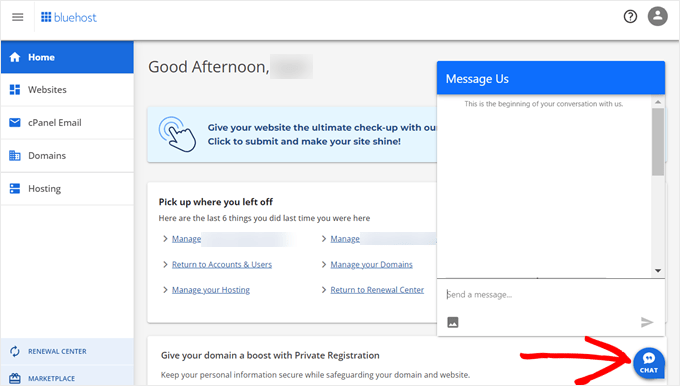
Możesz również skontaktować się z pomocą techniczną z poziomu panelu swojego konta hostingowego.
Metoda 2: Utwórz lub edytuj istniejący plik php.ini
Innym sposobem na zwiększenie maksymalnego rozmiaru przesyłanych plików jest utworzenie lub edycja pliku o nazwie php.ini. Ten plik kontroluje wiele ustawień Twojego środowiska hostingowego WordPress.
Większość dostawców hostingu WordPress, takich jak Bluehost, ma przyjazny dla początkujących cPanel do zarządzania Twoją stroną internetową.
Jeśli Twój hosting internetowy ma panel administracyjny cPanel, możesz zwiększyć rozmiar przesyłanych plików za pomocą wbudowanych narzędzi.
Uwaga: Poniższe informacje pochodzą z panelu cPanel Bluehost. Jednak większość dostawców hostingu współdzielonego będzie miała podobne kroki.
Przycisk cPanel znajdziesz na dole zakładki Hosting w Bluehost.
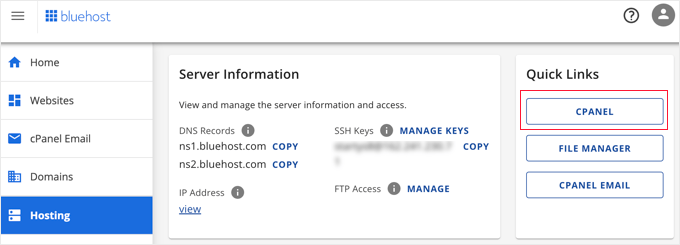
Kliknięcie tego przycisku otworzy pulpit cPanel.
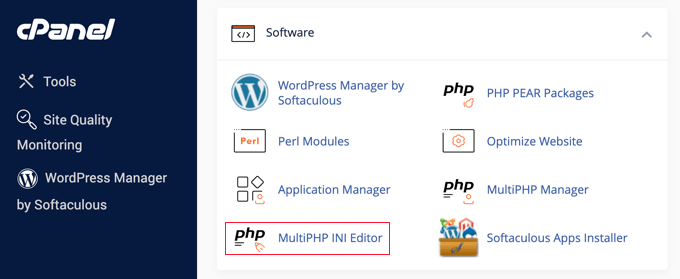
Teraz musisz przewinąć w dół do sekcji Oprogramowanie i kliknąć „Edytor MultiPHP INI”.
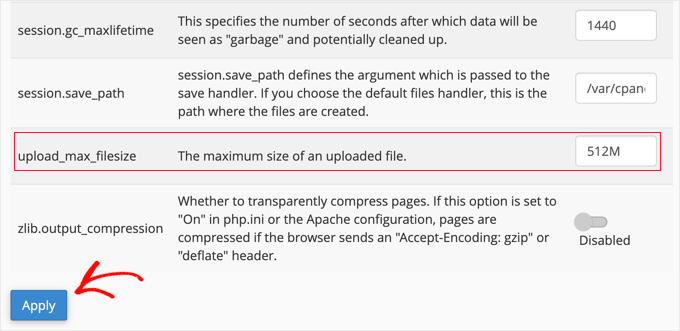
Następnie przewiń w dół do sekcji zatytułowanej „upload_max_filesize” i wprowadź nowy maksymalny rozmiar pliku w polu.
Następnie kliknij przycisk „Zastosuj”.
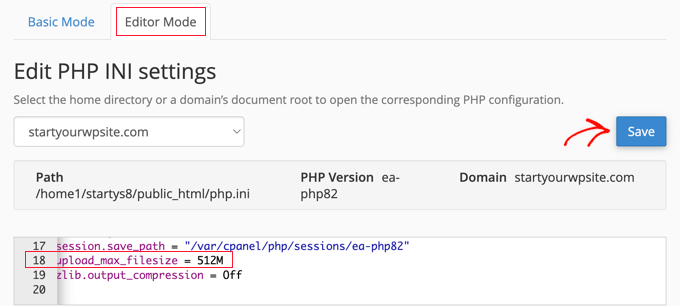
Alternatywnie, możesz kliknąć zakładkę menu „Tryb edytora”, a następnie możesz bezpośrednio zmienić maksymalny rozmiar przesyłanego pliku w edytorze.
Musisz edytować sekcję „upload_max_filesize”, aby zwiększyć rozmiar przesyłanych plików.
Po zakończeniu kliknij przycisk „Zapisz”.
Edytuj plik php.ini, dodając kod
Jeśli Twój obecny dostawca hostingu nie oferuje opcji cPanel, będziesz musiał edytować ten plik ręcznie.
Aby to zrobić, możesz użyć klienta FTP lub opcji menedżera plików w panelu kontrolnym hostingu WordPress.
Jeśli korzystasz z hostingu współdzielonego, możesz nie widzieć pliku php.ini w swoim katalogu hostingowym. Jeśli go nie widzisz, po prostu utwórz plik o nazwie php.ini i prześlij go do swojego głównego folderu.
Następnie dodaj następnią fragment kodu do pliku:
upload_max_filesize = 256M
post_max_size = 256M
max_execution_time = 300
Możesz zmodyfikować limit „256M” do rozmiaru pliku, którego potrzebujesz dla swojego bloga WordPress.
Metoda 3: Dodaj kod do pliku functions.php motywu WordPress
Ta metoda polega na dodaniu kodu do pliku functions.php w Twoim motywie WordPress.
Zamiast edytować plik bezpośrednio, zalecamy użycie WPCode. Jest to najlepsza wtyczka fragmentów kodu, która pozwala dodawać kod do Twojej witryny bez jej psucia.
Jeśli jeszcze tego nie robiłeś, zapoznaj się z naszym przewodnikiem dla początkujących na temat jak dodawać niestandardowy kod w WordPress.
Najpierw musisz zainstalować bezpłatny wtyczkę WPCode. Więcej szczegółów znajdziesz w naszym przewodniku krok po kroku na temat jak zainstalować wtyczkę WordPress.
Po aktywacji przejdź do Code Snippets » + Add Snippet.
Musisz najechać kursorem myszy na opcję „Dodaj swój niestandardowy kod (nowy fragment)” i kliknąć przycisk „+ Dodaj niestandardowy fragment”.

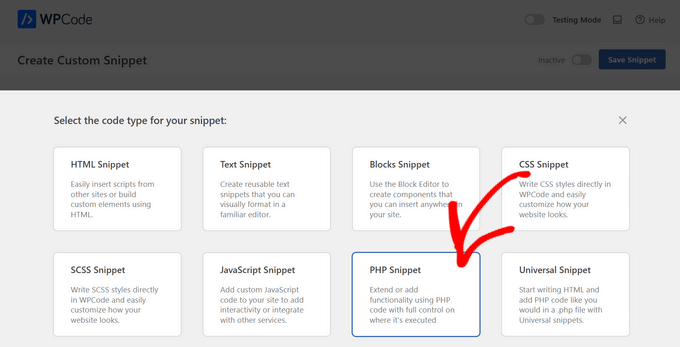
Następnie musisz wybrać „Fragment PHP” jako typ kodu z wyświetlonej listy opcji.
Na następnym ekranie wprowadź nazwę dla swojego nowego fragmentu kodu, która może być dowolna, aby pomóc Ci zapamiętać, do czego służy kod.
Następnie możesz skopiować i wkleić poniższy fragment kodu pod sekcją „Podgląd kodu”. Upewnij się, że zmienisz „256M” na maksymalny rozmiar pliku, którego potrzebujesz:
@ini_set( 'upload_max_size' , '256M' );
@ini_set( 'post_max_size', '256M');
@ini_set( 'max_execution_time', '300' );
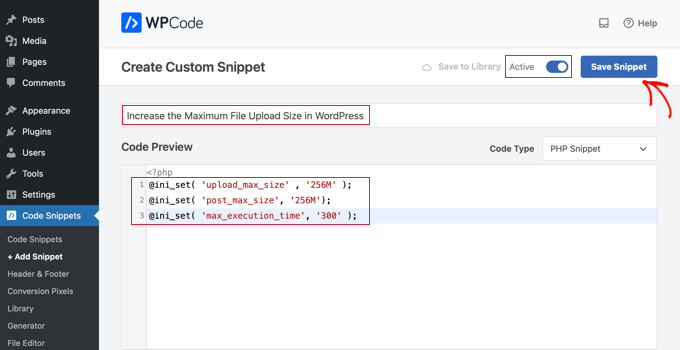
Na koniec przełącz przełącznik u góry na „Aktywny”, a następnie kliknij przycisk „Zapisz fragment”. Kod zostanie teraz wykonany na Twojej stronie internetowej.
Metoda 4: Dodaj kod do pliku .htaccess
Innym sposobem na zwiększenie maksymalnego rozmiaru plików jest modyfikacja pliku .htaccess. Ten plik kontroluje ustawienia konfiguracji wysokiego poziomu Twojej witryny.
Aby to zrobić, musisz zalogować się na serwer swojej witryny przez FTP. Jeśli nigdy tego nie robiłeś, zapoznaj się z naszym przewodnikiem jak używać FTP do przesyłania plików do WordPressa dla początkujących.
Następnie musisz zlokalizować plik .htaccess w głównym folderze swojej witryny.

Jeśli nie możesz znaleźć pliku .htaccess, może on być ukryty przez menedżera plików lub klienta FTP. Aby dowiedzieć się więcej, zapoznaj się z naszym przewodnikiem dlaczego nie możesz znaleźć pliku .htaccess na swojej stronie WordPress.
Następnie musisz dodać następujący fragment kodu do swojego pliku .htaccess:
php_value upload_max_filesize 256M
php_value post_max_size 256M
php_value max_execution_time 300
php_value max_input_time 300
Aby jeszcze bardziej zwiększyć maksymalny rozmiar przesyłanych plików, po prostu zmień „64M” na wymagany rozmiar.
Metoda 5: Użyj wtyczki WordPress do zwiększenia rozmiaru przesyłanych plików
Innym sposobem na zwiększenie maksymalnego limitu przesyłania plików jest użycie wtyczki WP Increase Upload Filesize. Jeśli nie czujesz się komfortowo z dodawaniem kodu do WordPress, może to być dla Ciebie dobra opcja.
Pierwszą rzeczą, którą musisz zrobić, to zainstalować i aktywować wtyczkę. Więcej szczegółów znajdziesz w naszym przewodniku jak zainstalować wtyczkę WordPress.
Po aktywacji przejdź do Media » Zwiększ limit przesyłania w swoim panelu administracyjnym WordPress.
Spowoduje to przejście do ekranu, na którym można wybrać nowy rozmiar przesyłanego pliku z listy rozwijanej „Wybierz maksymalny rozmiar przesyłanego pliku”.
Następnie kliknij przycisk „Zapisz zmiany”.

Uwaga: Maksymalny rozmiar przesyłanego pliku zostanie ustawiony przez Twojego dostawcę hostingu. Jeśli potrzebujesz limitu rozmiaru pliku większego niż ten wymieniony na liście rozwijanej, musisz skontaktować się ze swoim dostawcą hostingu i poprosić o zwiększenie limitu.
Samouczek wideo
Jeśli nie lubisz postępować zgodnie z pisemnymi instrukcjami, możesz zamiast tego obejrzeć nasz samouczek wideo:
Mamy nadzieję, że ten artykuł pomógł Ci zwiększyć maksymalny rozmiar przesyłanych plików w WordPress. Możesz również zapoznać się z naszym przewodnikiem na temat jak dodawać dodatkowe typy plików do przesyłania w WordPress oraz naszymi ekskluzywnymi wyborami wtyczek i wskazówek dotyczących ulepszenia obszaru administracyjnego WordPress.
Jeśli podobał Ci się ten artykuł, zasubskrybuj nasz kanał YouTube po samouczki wideo WordPress. Możesz nas również znaleźć na Twitterze i Facebooku.


Being Stealth
Dodanie pliku php.ini w folderze wp-admin zadziałało u mnie. Yahoooo dzięki.
Mouad Chafai
Metoda z php.ini zadziałała idealnie. Dzięki.
i’ve created the php.ini
wp-adminphp.ini
add lines:
upload_max_filesize = 64M
post_max_size = 64M
max_execution_time = 300
dzięki za artykuł.
Saleh Shaukat
Dzięki .htaccess zadziałało dla mnie idealnie!!.
Dan Rosenberg
Metoda PHP.INI zadziałała idealnie. Dzięki!
Ben Peacock
Przepraszam, proszę znaleźć to zamiast tego Zaloguj się do głównej maszyny wpisz następujące polecenie nano /usr/lib/php.ini
znajdź ; Maximum size of POST data that PHP will accept.
post_max_size = 2M zmień to na 64
Save and exit and then you should be able to upload what you need hope this helps
QuangPham
Dzięki za instrukcje, jak to naprawić.
Voicu Ioan Virgil
Dzięki, świetny tutorial!
Maria McCarthy
Dodanie pliku php.ini do mojego folderu wp-admin KONKRETNIE zadziałało również u mnie! Dzięki wszystkim! Zajęło mi to prawie 4 godziny, aby znaleźć stronę z informacjami, które by mi pomogły – ratujecie życie!
pete
znaleziono php.ini działało w sieci wp-admin php.ini
Tabassum Javaid
Metoda htaccess działa u mnie bez problemu. dzięki
Mike
z niektórymi hostami (np. GoDaddy) mogą być wymagane dodatkowe kroki.
I do jakiej wersji PHP działasz. W przypadku GoDaddy z PHP5, zmień nazwę php.ini na php5.ini i pamiętaj, że jeśli masz uruchomione procesy, będziesz musiał je tymczasowo zakończyć, zanim plik zostanie przejęty, lub poczekać chwilę.
Procesy systemowe / Zakończ wszystkie
jaymz
Wielkie dzięki za artykuł. W przypadku samodzielnego hostingu istnieje inna metoda, ponieważ metody 2 i 3 nie zadziałały u mnie, ponieważ zmiana .htaccess nie miała żadnego efektu, podobnie jak dodanie pliku php.ini w /wp-admin. Chodziło po prostu o znalezienie istniejącego pliku php.ini dla Apache. Na Ubuntu uruchomiłem;
sudo find / -name php.ini
Ten plik ini został znaleziony w /etc/php5/apache2/
Wszystko, co było potrzebne, to zlokalizowanie parametrów i zaktualizowanie wartości dla;
upload_max_filesize
post_max_size
max_execution_time
Dzięki, że mnie tam doprowadziłeś!
D Winzell
Dziękuję za napisanie tego. Plik php.ini musi znajdować się w katalogu wp-admin, aby działał poprawnie. Sprawdziłem mojego hosta (Vaurent) i pozwalają na przesyłanie plików do 105M, więc znajdę coś o tym rozmiarze i zobaczę, czy uda mi się przesłać na mojego bloga.
Matt
Chciałbym tylko dodać, że używając godaddy nie można użyć metody htaccess, spowoduje to błąd wewnętrzny serwisu 500.
Musisz użyć metody php.ini. Jedyna różnica będzie taka, że będziesz musiał mieć php.ini i php5.ini, a linie muszą być dodane do obu. Pliki muszą znajdować się w katalogu głównym instalacji WordPressa, a nie w folderze wp-admin, poza nim.
Również jeśli masz wiele instalacji WordPressa, trzeba to zrobić i umieścić w każdym katalogu, w którym znajduje się każda instalacja WordPressa.
GSJha
Bardzo dobry post.
sandeep
php_value upload_max_filesize 64M
php_value post_max_size 64M
php_value max_execution_time 1500
php_value max_input_time 1500
używam tych wartości w .htaccess i działa!
dzięki
Thyme
Zrobiłem wszystko, co napisałeś i zmieniłem php.ini w folderze /etc (moja strona jest na usłudze grid-service firmy mediatemple) i nic nie działało, ale potem mgliście przypomniałem sobie, że musiałem coś zmienić w ustawieniach sieciowych, jeśli moja instalacja była multisite i tam to było. Ugh.
Więc tak, jeśli masz sieć WordPress, przejdź do ustawień sieciowych i zmień maksymalny rozmiar przesyłanych plików w pobliżu dołu strony.
Alex
To jedyna rzecz, która mi zadziałała, próbowałem wszystkich opcji, jestem na 1&1
memory_limit = 32M
upload_max_filesize = 32M
post_max_size = 32M
file_uploads = On
** Rozmiar może być dowolny
Kluczowa była linia „file_uploads”
Umieść to w folderze /wp-admin/.
Kristina
Zadziałało u mnie! Jestem na Bluehost.
Thanks for your post
Brandon
to zadziałało u mnie po tym, jak nic innego nie działało. Jestem taka ulżona!
Ja też mam 1&1. Po dodaniu linii „file_uploads = On” do mojego pliku php.ini zadziałało jak marzenie!!
dzięki!
Hafeez Ansari
Thank you Alex, This works for me in /wp-admin/ folder. Problem solved.
Jordan Miller
Dziękuję bardzo
Mike
Niesamowite! dzięki Alex. Byłem ograniczony do 2 MB... bardzo przydatne.
Sam
Alex, jesteś wspaniały! Twoje rozwiązanie zadziałało u mnie! Wielkie dzięki!
Johnny T
Genius! This worked for me! Just to clarify. Create a php.ini file in the wp-admin folder and only add the lines of code in Alex’s post. FTP this to your server and you’re good to go. Thanks Alex. You are a genius!
Luan
Dziękuję Johnny i Alex! To było bardzo pomocne.
vanniee
jaka jest nazwa pliku?
Togi Tan
Ale to nie działa na darmowym hostingu. Wszystkie metody, które wypróbowałem. Myślę, że to może zależeć od serwera.
Duncan
Wow wow wow wow! Dziękuję za ten jasny komentarz, który pomógł mi to uruchomić. Jesteś gwiazdą.
Nomo
Alex – Twój post nadal jest pomocny. Bardzo doceniam!
Noor
Zadziałało metodą .htaccess. Szacunek człowieku.
Bogdan
Świetna rada. Mój limit przesyłania wynosił 8 MB i wypróbowałem tylko sztuczkę z htaccess i zadziałało, zwiększył się do 64 MB. Przetestowałem i działa pięknie! Dziękuję bardzo za Twoją świetną radę!
VoidnessMD
Ważna uwaga: Użycie metody php.ini wymaga, aby plik znajdował się w folderze wp-admin, a nie w głównym katalogu instalacji WP.
DJ
THANKS!! This sorted it out for me on my end
David Connolly
Doskonale… jasne i ostateczne rozwiązanie zadziałało.
Wielkie dzięki
Bongo
Ta strona jest najfajniejsza do nauki WP! Dobra robota chłopaki… więcej proszę… więcej! lol
Personel redakcyjny
Thanks for the kind words
Admin
Ido Schacham
Wreszcie post, który jasno wyjaśnia, jak zmienić limit pamięci w WP. Dzięki!
mostafa
Cześć.
Udało mi się to zrobić trzecią metodą. Mój rozmiar wysyłania wynosił 8 MB, ale teraz wynosi 64 MB. Dla mnie to więcej niż wystarczająco.
Dzięki wielkie.
Nawiasem mówiąc, jestem z Iranu.
Rowan Evenstar
Utworzenie pliku php.ini i umieszczenie go w katalogu głównym od razu rozwiązało problem!
Dzięki, bardzo doceniam!
assassinateur
dzięki, ale jestem na hostingu współdzielonym, więc nic nie działa, umieściłem php.ini w wp-admin, w folderze bloga i w folderze głównym i też nie działa. .htaccess nie działał, zmieniłem motyw i nie działał
Arvind Kukreti
Dodanie kodu w pliku .htaccess może spowodować błąd 500 Internal Error… najlepszym sposobem jest utworzenie pliku php.ini i przesłanie go do folderu wp-admin
Stephen Afije
Waooo, to było genialne, wszystko, co zrobiłem, to utworzenie pliku php.ini i przesłanie go do folderu wp-admin, zadziałało jak nic innego, dzięki
leo
Metoda htaccess działa u mnie bez problemu. dzięki
Andrew Lilly
Cześć,
Zrobiłem wszystko powyższe i nadal nie pozwala mi zaimportować pliku xml o rozmiarze 11 MB. Potrzebuję go, ponieważ zawiera 1500 produktów do zaimportowania.
Rozmawiałem z moim dostawcą serwera wirtualnego 1and1 i powiedzieli, że wszystko, co muszę zrobić, to dodać kod do pliku .htaccess, ale to nie działa
Proszę, niech ktoś pomoże
Personel redakcyjny
Jeśli żadna z powyższych metod nie działa, jedyną osobą, która może Ci pomóc, jest Twój hostingodawca.
Admin
Ali Amer
Może to być związane z typem MIME. W takim przypadku rozwiąż to z cPanelu
Dominique
Nic z tego mi nie pomogło. Próbowałem wszystkiego. Używam WPEngine do hostingu.
Jakieś sugestie?
Personel redakcyjny
Poproś WPEngine o zwiększenie limitu.
Admin
Thad
Metoda htaccess zadziałała u mnie. Dzięki za post. Dobra informacja, dobrze przedstawiona.
Richard
Opcja php.ini zadziałała u mnie, ale w pliku php.ini w katalogu /wp-admin
Mike
idealnie – zadziałało świetnie – ustawione na 200MB i działa bez problemu.
Matheus M.
Na localhost działa .htaccess. Ale na hostingu tylko php.ini. Dzięki za pomoc.
dan
Tak, php.in działa w /wp-admin. dzięki
marin
Dzięki, htaccess zadziałał, doceniam to.
Makarand Mane
Mam hosting na mediatemple. Pierwsze dwie metody mi nie zadziałały. Tylko metoda htaccess zadziałała dla mnie.
Dzięki.
Gavin
Odkryłem, że plik php.ini był ukryty w folderze cgi-bin, który niektóre serwery współdzielone mają w swoich głównych katalogach. Zmodyfikowałem go jak powyżej (I dodałem php5.ini na wszelki wypadek), ale dopóki tego nie zrobiłem, nic innego nie działało. Dzięki za BARDZO pomocny wątek!
Cath
Dzięki Gavin, żadna z innych metod mi nie działała, a potem zobaczyłem Twój komentarz. W folderze cgi-bin znajdowały się pliki php.ini i php4.ini. Znalazłem odpowiedni kod w obu plikach – post_max_size = i upload_max_filesize = , poprawiłem je i teraz wszystko działa dobrze.
Jarod Billingslea
Bardzo dziękuję za ten artykuł!
Void lon iXaarii
Bardzo dziękuję! Próbowałem wielu rozwiązań i Twoje .htaccess w końcu zadziałało
Anthony
Jedyną rzeczą, która zadziałała dla mnie, było utworzenie/edycja pliku php.ini i dodanie następujących wierszy:
memory_limit = 100M upload_max_filesize = 100M post_max_size = 100M file_uploads = On
i przesłanie go do folderu wp-admin.
Alan
Opcja 2 działała doskonale, chociaż musiałem umieścić plik php.ini w folderze wp-admin zamiast w katalogu głównym.
phpinfo wykrywał plik php.ini w głównym katalogu, ale nie WordPress.
Obecnie mam zainstalowane WP 3.2...
RPaterson
Dzięki za tę dodatkową wskazówkę, to właśnie to w końcu zadziałało u mnie
arun
dzięki anthony, twoja metoda uratowała mi życie.
Quest The Wordsmith
To jest dokładnie to, co zadziałało również u mnie.
RamiAlloush
Thx
Snowboard
dzięki za ten post, ale jaki jest domyślny limit?
almb1111
64 MB
kat1111
Było 8 MB, ale udało mi się osiągnąć 192 MB @almb1111
kat1111
Dzięki za odpowiedź, w końcu dostałem pomoc, musiałem zmienić PHP na PHP-5.
kat1111
Jestem ewidentnie nowszy od większości tutaj, nie rozumiem, który jest „głównym” katalogiem, czy to Edytor w zakładce Wygląd? Nie rozumiem też, jak dostać się do hcaccess. Będę wdzięczny za pomoc.
jameserie
Metoda htaccess działa u mnie. – dzięki!
nycxs
Jeśli używasz PHP5, plik powinien nazywać się php5.ini i znajdować się w głównym katalogu współdzielonych folderów.
MyDreamDinZ
Jaki jest najwyższy limit przesyłu
czy mogę ustawić na 1024M ?
alexlee.cs
Metoda .htaccess działa u mnie. Dzięki.
rajkanuri
Dzięki za kod.. jest dla mnie naprawdę pomocny..
pranjalgupta2009
Tak! Umieszczenie php.ini również w wp-admin działa u mnie. dzięki
Snipsley
Dzięki, ale żadna z tych metod mi nie pomogła.
Ale znalazłem rozwiązanie!
Musiałem umieścić ten plik php.ini w /public_html ORAZ w /public_html/wp-admin i działa!
Biju Subhash
tak..ta sama rzecz działa u mnie też..
Dzięki Snisley
Trond
Great! This worked for me as well I run Wordpress on an MS Server 2008 with IIS 7.5 from my host provider, btw
kenseneff
U mnie też zadziałało. Dzięki!
Kiran
Dzięki, stary. Działa u mnie.
Rollie Osayan
Tak. Tutaj też działa. dzięki
Kaushik Biswas
Na końcu wpisu chcę wyświetlić ostatnie wpisy z tej konkretnej kategorii pod tym wpisem – jak mogę to zrobić?