
Czy ciągle przełączasz się między WordPressem a edytorem zdjęć tylko po to, aby przeskalować obrazki przed ich przesłaniem? Wcześniejsze edytowanie każdego zdjęcia z osobna jest żmudnym i nieefektywnym procesem.
Na szczęście, dzięki wieloletnim eksperymentom z WordPressem, odkryliśmy prosty sposób na automatyczne skalowanie szarości obrazków podczas ich przesyłania, co pozwala zaoszczędzić cenny czas.
W tym artykule pokażemy ci, jak krok po kroku skalować obrazy w skali szarości w WordPress podczas przesyłania ich na twoją witrynę.

Kiedy należy używać obrazków w skali szarości w WordPress?
Obrazki w skali szarości zawierają tylko informacje o ilości światła w obrazku. Kolory obrazków przedstawiają różne odcienie szarości, wahające się między czernią a bielą.
W pewnych sytuacjach używanie obrazków w skali szarości może być korzystne dla twojej witryny internetowej WordPress. Na przykład, można go użyć do poprawy czytelności obiektów przedstawionych na obrazku.
Z drugiej strony, obrazy w skali szarości są powszechnie używane do przetwarzania obrazków ze względu na ich niewielki rozmiar. Pozwala to programistom na wykonywanie złożonych operacji w krótszym czasie.
To powiedziawszy, zobaczmy, jak możesz zmienić twoje obrazki na skalę szarości w WordPressie podczas ich przesyłania.
Skalowanie szarości obrazków podczas przesyłania w WordPressie
Jeśli chodzi o dodawanie obrazków w WordPressie, przed ich załadowaniem należałoby je edytować za pomocą oprogramowania do edycji zdjęć, takiego jak Photoshop, i przekonwertować kolorowe obrazki na skalę szarości.
Jeśli masz setki lub tysiące obrazków do przesłania, ręczna edycja każdego z nich może zająć dużo czasu.
Można jednak automatycznie przekształcić je w obrazki w skali szarości podczas przesyłania. Aby rozpocząć, wystarczy dodać następujący kod do pliku functions.php twojego motywu:
1 2 3 4 5 6 7 8 9 10 11 12 13 14 15 16 17 18 19 20 21 22 23 24 25 26 27 28 29 30 31 32 33 34 | add_filter('wp_generate_attachment_metadata','rb_bw_filter'); function rb_bw_filter($meta) { $path = wp_upload_dir(); // get upload directory $file = $path['basedir'].'/'.$meta['file']; // Get full size image $files[] = $file; // Set up an array of image size urls foreach ($meta['sizes'] as $size) { $files[] = $path['path'].'/'.$size['file']; } foreach ($files as $file) { // iterate through each image size // Convert image to grayscale credit to http://ottopress.com/2011/customizing-wordpress-images/ list($orig_w, $orig_h, $orig_type) = @getimagesize($file); $image = wp_load_image($file); imagefilter($image, IMG_FILTER_GRAYSCALE); switch ($orig_type) { case IMAGETYPE_GIF: imagegif( $image, $file ); break; case IMAGETYPE_PNG: imagepng( $image, $file ); break; case IMAGETYPE_JPEG: imagejpeg( $image, $file ); break; } } return $meta;} |
Prostym sposobem na dodanie kodu do plików motywu jest użycie wtyczki WPCode dla WordPressa.
Jest to najlepsza wtyczka do fragmentów kodu, która pomaga uruchamiać fragmenty kodu bez konieczności ręcznej edycji pliku function.php twojego motywu. Dzięki temu nie musisz się martwić, że zepsujesz swoją witrynę.

Najpierw musisz pobrać i zainstalować darmową wtyczkę WPCode na twojej witrynie. Jeśli potrzebujesz pomocy, skorzystaj z naszego przewodnika na temat instalacji wtyczki WordPress.
Uwaga: Darmowa wersja WPCode oferuje wszystko, czego potrzebujesz, aby łatwo dodać własny kod w WordPress. Aby uzyskać bardziej zaawansowane funkcje, takie jak prywatna biblioteka fragmentów kodu w chmurze, zaplanowane fragmenty kodu, piksele konwersji i inne, możesz uaktualnić do WPCode Pro.
Po włączaniu, możesz udać się do Code Snippets ” + Add New z twojego kokpitu WordPress.
Następnie przejdź do opcji “Add Your Custom Code (New Snippet)” i kliknij przycisk “Use snippet”.

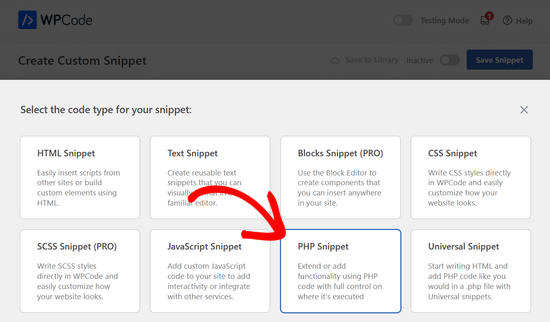
Następnie należy wybrać “Fragment kodu PHP” jako rodzaj kodu z wyświetlonych opcji.
Teraz, na stronie Create Custom Snippet, wpisz nazwę dla twojego fragmentu kodu. Może to być cokolwiek, co pomoże ci zapamiętać, do czego służy kod.
Następnie wklej powyższy kod w obszarze “Podgląd kodu”.

Po wpiszeniu kodu można przewinąć w dół do sekcji “Wybierak”.
Tutaj możesz pozostawić zaznaczoną opcję “Automatyczne wstawienie”. Spowoduje to automatyczne wstawienie i wykonanie kodu.

Na koniec wróć do górnej części ekranu i przełącz przełącznik z “Nieaktywny” na “Aktywny” i kliknij przycisk “Zapisz fragment kodu”.

Następnie możesz przetestować kod, edytując lub dodając nową stronę. Będąc w edytorze WordPress, kliknij przycisk “+” i dodaj blok z obrazkiem.
Możesz teraz przesłać dowolny obrazek na swojego bloga WordPress, a zostanie on automatycznie przekonwertowany na obraz w skali szarości.

Mamy nadzieję, że ten artykuł pomógł ci nauczyć się skalowania szarości obrazków w WordPress. Możesz również zapoznać się z naszym przewodnikiem na temat dodawania trybu ciemnego do twojej witryny WordPress oraz z naszymi eksperckimi wyborami najlepszego oprogramowania do projektowania stron internetowych.
If you liked this article, then please subscribe to our YouTube Channel for WordPress video tutorials. You can also find us on Twitter and Facebook.
")
 in 2024")


Tomas Kapler
Great tip, i would just like to mention, that for many usages it might be better to simply do this via CSS filter, e.g.
img.bw {
filter: grayscale(1);
}
you can even e.g. show b/w by default and color on hover, or you can do animation from greyscale to full color and back, e.g.
img.bw {
filter: grayscale(0);
}
img.bw.grey {
filter: grayscale(1);
transition-property: filter;
transition-duration: 1s;
}
i also do not think, that wp_generate_attachment_metadata filter is the proper one, that should be used because of its calling in meta creation not only image creation and making second image manipulation, but the proper solution would be much longer, so i understand why it is done this way
rok
It works nice but when uploading, WP 4.3 throws error in media library.
i think have applied all fixes written in comments, but still error.
my code looks like this:
add_filter(‘wp_generate_attachment_metadata’,’themename_bw_filter’);
function themename_bw_filter($meta) {
$time = substr( $meta[‘file’], 0, 7); // <- get the correct time of the upload
$file = wp_upload_dir( $time ); // <- locates the correct upload directory
$file = trailingslashit($file[‘path’]).$meta['sizes']['slide-pic']['file'];
if( $file ) {
list($orig_w, $orig_h, $orig_type) = @getimagesize($file);
}
$image = wp_load_image($file);
imagefilter($image, IMG_FILTER_GRAYSCALE);
switch ($orig_type) {
case IMAGETYPE_GIF:
imagegif( $image, $file );
break;
case IMAGETYPE_PNG:
imagepng( $image, $file );
break;
case IMAGETYPE_JPEG:
imagejpeg( $image, $file );
break;
}
return $meta;
}
Kim
Will this change all pictures in word press to grayscale or only newly updates ones?
Tomaž Zaman
I know I’m a bit late to the discussion, but I just had the same problem with an error (that others report):
imagefilter() expects parameter 1 to be resource, string givenThis happens when you try to upload image through media modal while editing a post, older than the current month which apparently confuses WordPress which directory the original image is in and which directory it should save the grayscaled image in.
This is the solution:
<?php

add_filter('wp_generate_attachment_metadata','themename_bw_filter');

function themename_bw_filter($meta) {

  $time = substr( $meta['file'], 0, 7); // <- get the correct time of the upload

  $file = wp_upload_dir( $time ); // <- locates the correct upload directory

  $file = trailingslashit($file['path']).$meta['sizes']['themename-bw-image']['file'];

  list($orig_w, $orig_h, $orig_type) = @getimagesize($file);

  $image = wp_load_image($file);

  imagefilter($image, IMG_FILTER_GRAYSCALE);

  switch ($orig_type) {

    case IMAGETYPE_GIF:

      imagegif( $image, $file );

      break;

    case IMAGETYPE_PNG:

      imagepng( $image, $file );

      break;

    case IMAGETYPE_JPEG:

      imagejpeg( $image, $file );

      break;

  }

  return $meta;

}
endul
how to change, result filter image to specific folder/directory
geertvdheide
One addition: I’ve added a few lines to get around the issue of having two images with the same file name, caused by having two add_image_size calls with the same size. The additional code was found here:
http://bavotasan.com/2011/create-black-white-thumbnail-wordpress/
mklemme
@geertvdheide
If you wanted to add multiple size support, try what I use:
if ( function_exists( ‘add_theme_support’ ) ){
add_theme_support( ‘post-thumbnails’ );
set_post_thumbnail_size( 50, 50, true );
add_image_size( ‘medium-thumb’, 660, ”, true );
add_image_size( ‘large-thumb’, 960, ”, true );
add_image_size( ‘small-thumb’, 100, ”, true );
}
(The height is not defined, only the width.)
you would have to add the different names to make the function apply to them all:
[‘medium-thumb’ , ‘large-thumb’ , ‘small-thumb’] in the filter code.
Calling the thumbnail in your theme is the same listed in the article:
Mike Logan
Excellent idea, almost 10 years later this is still handy.
geertvdheide
Thanks for sharing this code! Except I’m running into a weird issue when trying to implement it. It’s related to the uploaded image’s size (pixel size, meaning its dimensions). Copied the code literally to my theme’s functions.php, and it works a charm with images larger than the size specified in the add_image_size call. But when using an image smaller than or equal to the size specified, the uploader in WordPress gives me errors and doesn’t process the image size (either from the media section of the admin environment, or from a specific post or page). The error:
Warning: imagefilter() expects parameter 1 to be resource, string given.
Ssome other stuff in the error as well, but this seems to be the main cause. The image data given to the imagefilter function must not be valid or doesn’t exist?
Any idea what’s causing this? The only real difference between my situation and a clean install is that I’ve also added a few other add_image_size calls for other purposes in my site. I’m also adding the same size twice (one black/white, one regular), but that doesn’t seem to be a problem with the larger images.
Ed Nailor
@GEERTVDHEIDE
and for others that need this:
When the script is converting the image to greyscale and the file uploaded does not fit the file size, this causes the script to break. To prevent this, simply add a quick if() conditional to make sure you have the $file.
$file = trailingslashit($file[‘path’]).$meta[‘sizes’][‘themename-bw-image’][‘file’];
if( $file ) {
list($orig_w, $orig_h, $orig_type) = @getimagesize($file);
——– remainder of code until ——–
return $meta;
}
This will check to make sure the file size you have requested exists before it tries to convert it.
Hope that helps!
frankiegershwin
@Otto42 Thanks for offering. I will.
Otto42
@frankiegershwin bummer! Feel free to email me directly for code help. otto@wordpress.org
frankiegershwin
@Otto42 thank you! I had a bit of a hard time, actually and had to undoe it will pick it up tomorrow. It’s a good way to mix it up onsite
Otto42
@frankiegershwin Lemme know if you need help. I added a way to do sepia tones too in my comments on the original post: http://t.co/avDNNEX
rodhk
@rodriguezhernan vaya idiotez de truco…. madremua tocar el codigo para eso
wpbeginner
@Otto Thanks for the comment Otto. Updated the post as well
Otto
Note that people should change “themename” to be the name of their theme instead.