Twoja witryna WordPress nie wysyła e-maili. Przesyłane formularze kontaktowe znikają, a ważne powiadomienia nigdy nie są importowane. Brzmi znajomo?
Nie jesteś sam, a problem nie leży w samym WordPressie. Jest nim sposób, w jaki witryny internetowe zazwyczaj obsługują dostarczanie wiadomości e-mail.
Dokładnie z tym problemem mieliśmy do czynienia na WPBeginner. Dlatego używamy i ufamy WP Mail SMTP do obsługi wszystkich naszych e-maili WordPress. Wykorzystuje on SMTP (standard branżowy dla niezawodnego dostarczania e-maili), aby upewnić się, że twój e-mail faktycznie dotrze do miejsca przeznaczenia.
W tym przewodniku pokażemy dokładnie, co powoduje twoje problemy z e-mailem i jak je naprawić za pomocą SMTP, abyś nigdy nie przegapił kolejnego ważnego powiadomienia.
Dlaczego twoja witryna WordPress nie otrzymuje e-maili?
Najczęstszą przyczyną braku e-maili jest to, że twój serwer hostingowy WordPress nie jest poprawnie skonfigurowany do korzystania z funkcji PHP mail().
Nawet jeśli twój hosting jest skonfigurowany do korzystania z niego, wielu dostawców usług e-mail, takich jak Gmail i inni, korzysta z różnych narzędzi w celu ograniczenia spamu e-mail. Narzędzia te próbują wykryć, czy e-mail pochodzi z lokalizacji, za którą się podaje.
E-maile wysyłane przez witryny internetowe WordPress często nie przechodzą tego testu.
Oznacza to, że gdy e-mail jest wysyłany z twojej witryny WordPress (z wtyczki formularza kontaktowego, powiadomienia administratora itp.), może nawet nie trafić do katalogu spamu odbiorcy, nie mówiąc już o skrzynce odbiorczej.
Dlatego zalecamy, aby nie używać WordPressa do wysyłania twojego newslettera e-mail.
Jest to również powód, dla którego zalecamy wszystkim korzystanie z SMTP do wysyłania e-maili w WordPress.
Co to jest SMTP?
SMTP (Simple Mail Transfer Protocol) to branżowy standard wysyłania wiadomości e-mail.
W przeciwieństwie do funkcji PHP mail(), SMTP używa odpowiedniego uwierzytelniania, co prowadzi do wysokiej dostarczalności e-maili.
WordPress posiada wtyczkę WP Mail SMTP, która konfiguruje twoją witrynę WordPress do wysyłania e-maili za pomocą SMTP zamiast funkcji PHP mail().
Można go używać do łączenia się z dowolnymi popularnymi usługami SMTP, takimi jak SendLayer, Brevo (dawniej Sendinblue), Gmail (Google Workspace), Amazon SES i inne.
Możesz przeczytać naszą recenzję WP Mail SMTP, jeśli potrzebujesz więcej szczegółów na temat wtyczki.
Mając to na uwadze, przyjrzyjmy się, jak poprawić problem niewysyłania e-maili przez WordPress. Możesz skorzystać z poniższych odnośników, aby poruszać się po tym artykule:
Alternatywa: Jeśli korzystasz z WooCommerce i twoje e-maile z zamówieniami nie są dostarczane, to zamiast tego przeczytaj nasz przewodnik o tym, jak poprawić WooCommerce nie wysyła e-maili z zamówieniami.
Krok 1: Zainstalowanie wtyczki WP Mail SMTP
Niezależnie od wybranej usługi SMTP, musisz mieć zainstalowaną wtyczkę WP Mail SMTP na twojej witrynie. Umożliwia ona przełączenie WordPressa z korzystania z wbudowanej funkcji PHP mail() na korzystanie z twojej usługi SMTP.
Najpierw zainstaluj i włącz wtyczkę WP Mail SMTP. Jeśli nie wiesz jak to zrobić, zapoznaj się z naszym przewodnikiem krok po kroku, jak zainstalować wtyczkę WordPress.
Następnie kliknij “WP Mail SMTP” w twoim kokpicie WordPress, aby skonfigurować ustawienia wtyczki.
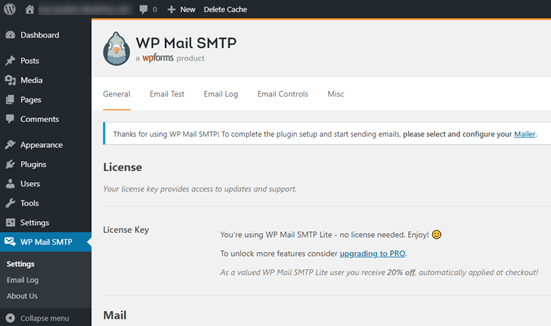
Będziesz musiał zacząć od wpisz nazwę i biznesowy adres e-mail, z którego mają pochodzić wiadomości e-mail z Twojej witryny.
Upewnij się, że używasz tutaj tego samego adresu e-mail, który będzie używany dla twojej usługi mailingowej SMTP.
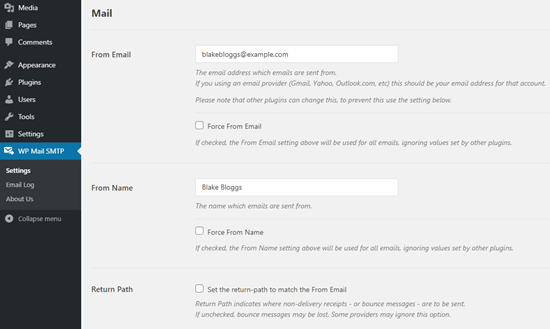
Możesz wymusić, aby e-maile używały tej nazwy i adresu e-mail, nawet jeśli inne wtyczki, takie jak WPForms, mają inne ustawienia. WP Mail SMTP zastąpi ustawienia innych wtyczek.
Następnie należy wybrać usługę pocztową SMTP dla twojej witryny. W tym poradniku skonfigurujemy SMTP za pomocą SendLayer.
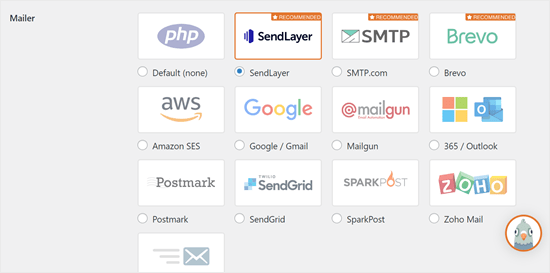
Aby zakończyć konfigurację WP Mail SMTP, musisz utworzyć konto w SendLayer. Przejdziemy do tego w następnej kolejności, a następnie wrócimy do finalizowania konfiguracji WP Mail SMTP, więc pamiętaj, aby pozostawić tę kartę otwartą.
Krok 2: Skonfiguruj twoją usługę pocztową SMTP
SendLayer to niezawodny dostawca usług e-mail. Pozwala na wysyłanie dużej liczby e-maili z wysoką dostarczalnością.
Możesz użyć SendLayer do wysłania do 200 e-maili za darmo, co jest więcej niż wystarczające dla większości małych witryn internetowych, aby rozpocząć.
Mogą to być e-maile z formularza kontaktowego, dane nowego konta użytkownika, e-maile dotyczące odzyskiwania hasła lub inne wiadomości e-mail wysyłane za pośrednictwem Twojej witryny WordPress.
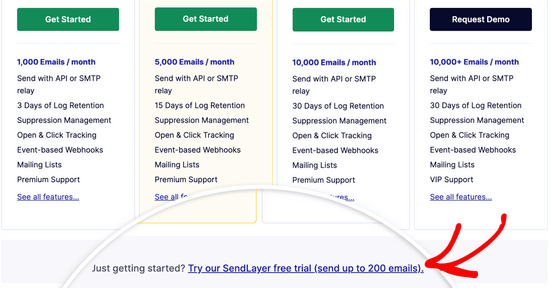
Najpierw musisz przejść do witryny internetowej SendLayer, aby utworzyć konto. Na stronie z cennikiem kliknij odnośnik “Wypróbuj bezpłatną wersję próbną SendLayer (wyślij do 200 e-maili)”, aby skonfigurować twoje konto.
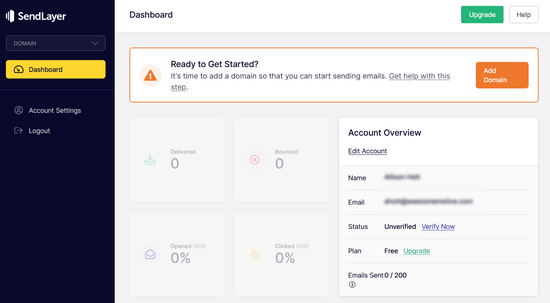
Po utworzeniu konta zobaczysz swój kokpit SendLayer.
Teraz, gdy masz już konto SendLayer, skonfigurujmy twojego dostawcę e-mail z WordPress.
Krok 3: Połącz twoją witrynę internetową WordPress z SendLayer
Zanim będziesz mógł wysyłać e-maile za pomocą SendLayer, musisz autoryzować swoją domenę.
Dowodzi to serwerom e-mail, że jesteś potwierdzonym właścicielem domeny wysyłającej i że twoje wiadomości e-mail są wysyłane z legalnego źródła.
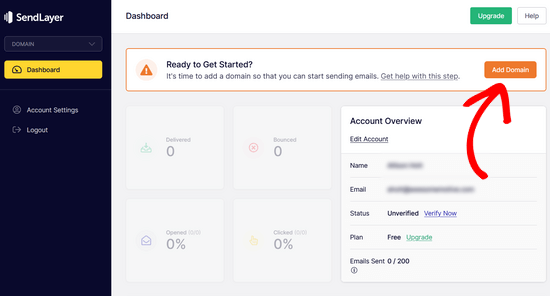
Aby autoryzować twoją domenę, kliknij pomarańczowy przycisk “Dodaj domenę” na kokpicie SendLayer.
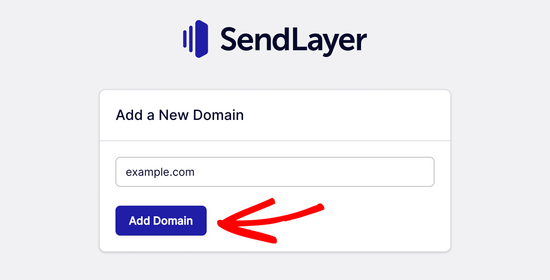
Na następnej stronie wystarczy wpisać nazwę twojej domeny w odpowiednie pole.
Następnie kliknij przycisk “Dodaj domenę”.
Uwaga: W przypadku innych usług mailingowych, takich jak Brevo (dawniej Sendinblue), musisz najpierw skonfigurować subdomenę dla twojej witryny internetowej. SendLayer automatycznie doda subdomenę do rekordów DNS domeny nadawcy.
Nie trzeba więc dodawać dodatkowej subdomeny podczas rejestracji domeny.
Po dodaniu Twojej domeny, SendLayer pokaże Ci 5 rekordów DNS, które musisz dodać do ustawień rekordów DNS Twojej domeny.
Te linie kodu pozwalają SendLayer autoryzować twoją nazwę domeny.
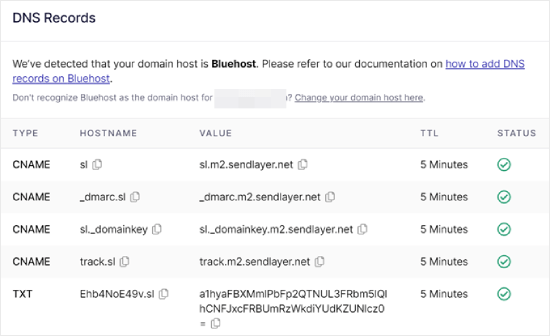
Będziesz musiał dodać te rekordy DNS do swojej witryny WordPress. Może się to wydawać skomplikowane, ale wystarczy je skopiować i wkleić w odpowiednie miejsce.
Na potrzeby tego poradnika zademonstrujemy nasz przykład na przykładzie konta hostingowego w Bluehost.
Jeśli korzystasz z usług innych firm hostingowych lub Twój DNS jest zarządzany przez rejestratora domen, takiego jak Domain.com, Network Solutions lub GoDaddy, postępuj zgodnie z ich instrukcjami.
Możesz również przeczytać nasz przewodnik, jak skonfigurować WP Mail SMTP z dowolnym hostem.
Najpierw otwórz nową kartę przeglądarki i loguj się na swoje konto hostingowe WordPress. Następnie znajdź rekordy DNS twojej domeny.
W Bluehost można to zrobić, przechodząc do sekcji “Domeny”. Następnie kliknij “Ustawienia” obok domeny, którą chcesz połączyć z SendLayer.
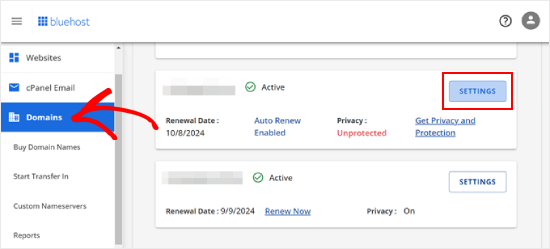
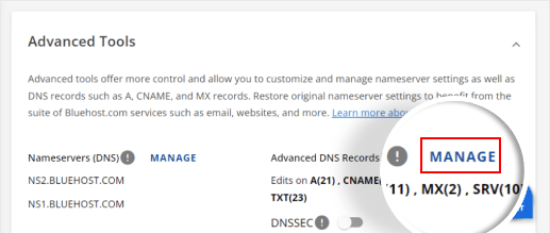
Na następnej stronie przewiń w dół do sekcji “Narzędzia zaawansowane”.
Następnie kliknij przycisk “Zarządzaj” obok pozycji Zaawansowane rekordy DNS.
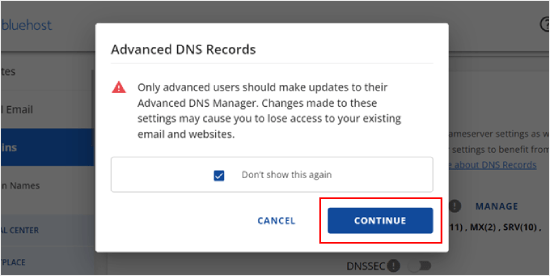
Pojawi się komunikat ostrzegawczy z informacją, że rekordy DNS powinny być edytowane przez zaawansowanego użytkownika. Nie przejmuj się tym komunikatem, ponieważ proces ten jest dość prosty.
Przejdź dalej i kliknij “Kontynuuj”, aby kontynuować.
Zostanie wyświetlona strona Manage Advanced DNS Records (Zarządzaj zaawansowanymi rekordami DNS).
Aby rozpocząć, kliknij przycisk “+ Dodaj rekord”.
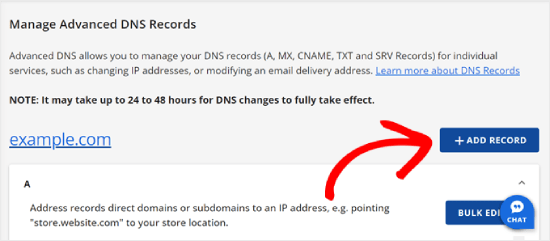
Teraz zacznijmy dodawać rekordy DNS, które dostarczył SendLayer.
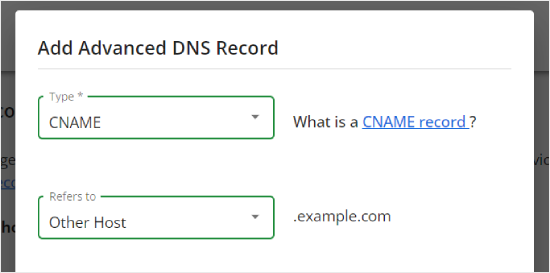
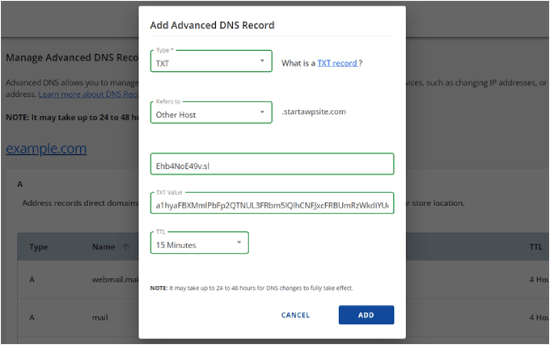
Najpierw należy wybrać rodzaj rekordu DNS. W tym przypadku użyjemy CNAME dla pierwszego rekordu.
W sekcji “Odnosi się do” kliknij “Inny host”. Tę samą opcję wybierzesz później dla wszystkich twoich rekordów DNS.
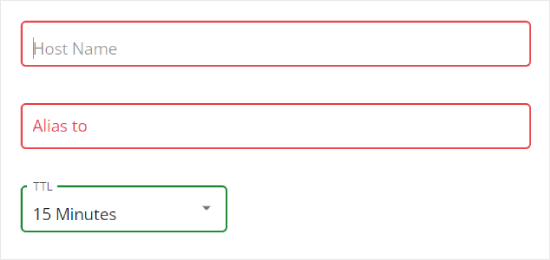
Przewijając w dół, zobaczysz trzy pola: Nazwa hosta, Alias i TTL.
Nazwa hosta powinna być wypełniona wartością w ‘Hostname’ dostarczoną przez SendLayer. Alias powinien być wypełniony wartością w “Value”. Jeśli chodzi o TTL, możesz pozostawić go na 15 minut.
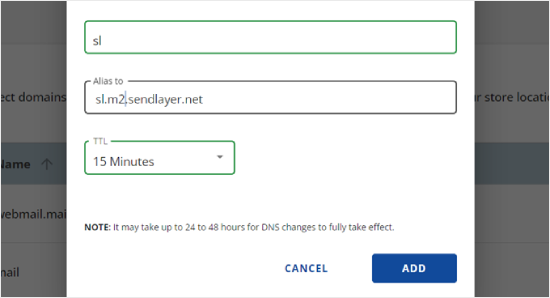
Poniższy zrzut ekranu pokazuje, jak wyglądał nasz ekran po dodaniu pierwszego rekordu CNAME.
Po zakończeniu kliknij “Dodaj”.
Kroki te można powtórzyć dla wszystkich rekordów DNS (zarówno CNAME, jak i TXT).
Podczas dodawania rekordu TXT należy wkleić wartość “Hostname” z SendLayer do pola “Host Name”, a wartość z “Value” do pola “TXT Value”.
Oto jak to wygląda:
Po dodaniu twoich rekordów, wróć do SendLayer i zaznacz pole obok “Dodałem te rekordy DNS i jestem gotowy do kontynuowania”.
Następnie kliknij przycisk “Zweryfikuj rekordy DNS”.
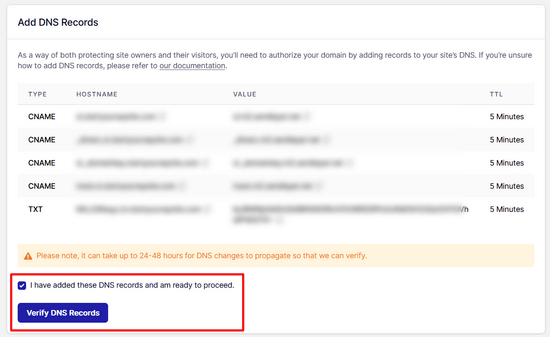
Może minąć 24-48 godzin, zanim SendLayer będzie w stanie zweryfikować twoje dane. Z naszego doświadczenia wynika, że zajęło to kilka godzin.
Jeśli po kliknięciu tego przycisku nic się nie dzieje, rekordy nie mogą być jeszcze zweryfikowane. Możesz sprawdzić ponownie później, aby zobaczyć, czy zostały zweryfikowane, przechodząc do “Ustawień” i przechodząc do karty “Rekordy i ustawienia DNS” z kokpitu SendLayer.
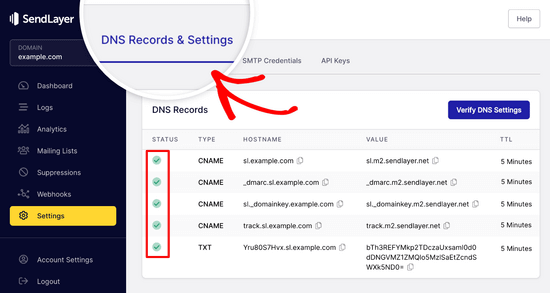
Tutaj znajdziesz listę wszystkich twoich rekordów DNS w jednym miejscu. Gdy twoja domena zostanie pomyślnie autoryzowana, zobaczysz zielone znaczniki wyboru obok każdego rekordu DNS w kolumnie “Status”.
Możesz kontynuować korzystanie z tego poradnika, czekając na autoryzację.
Krok 4: Zakończenie konfiguracji WP Mail SMTP do korzystania z SendLayer
Zakończmy konfigurację. Najpierw przejdź do twojego konta SendLayer, aby znaleźć klucz API.
Z kokpitu SendLayer wystarczy przejść do strony Ustawienia “ Klucze API. Tutaj zobaczysz domyślny klucz API, który został wygenerowany podczas autoryzacji Twojej domeny w SendLayer.
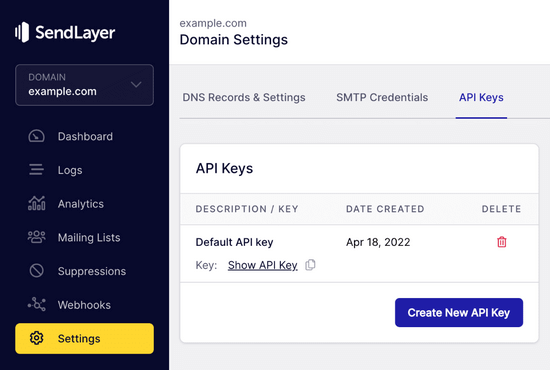
Klucz API można skopiować z tej strony, klikając ikonkę kopiowania.
Na przykład:
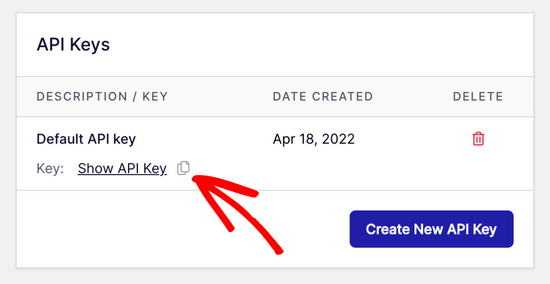
Po wykonaniu tej czynności możesz wrócić do karty kreatora konfiguracji WP Mail SMTP.
Następnie wklej klucz API w odpowiednim miejscu.

Gratulacje. Wszystko zostało już skonfigurowane. Ostatnim krokiem jest wysłanie testowego e-maila, aby upewnić się, że wszystko działa.
Przejdź do WP Mail SMTP “ Narzędzia. W karcie “Test e-mail” wpisz adres e-mail, na który chcesz wysłać wiadomość e-mail. Domyślnie będzie to e-mail administratora witryny. Kliknij “Wyślij e-mail”.
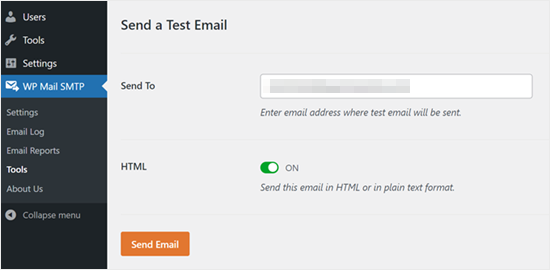
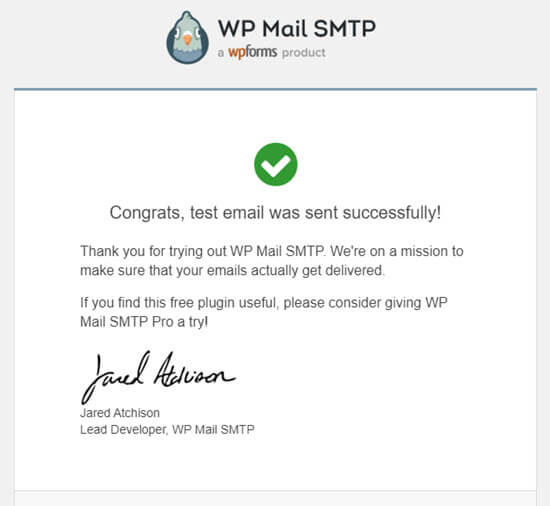
Powinieneś zobaczyć komunikat “Testowy e-mail HTML został wysłany pomyślnie!”.
Sprawdź swoją skrzynkę odbiorczą, aby sprawdzić, czy wiadomość dotarła. Będzie wyglądać następująco:
Uwaga: Jeśli twoje konto SendLayer nie jest jeszcze włączane, otrzymasz komunikat: [permission_denied]: Nie można wysłać e-maila. Twoje konto SMTP nie jest jeszcze włączane.
Alternatywne sposoby na naprawienie problemu z niewysyłaniem e-maili przez WordPressa
Jak widać z listy opcji usług pocztowych wtyczki WP Mail SMTP, nie trzeba korzystać z SendLayer. Chociaż jest to nasza najlepsza darmowa rekomendacja, istnieją inne opcje, z których można skorzystać, w tym Microsoft 365, GoogleWorkspace, Amazon SES itp.
Używanie Gmaila lub Google Workspace z WP Mail SMTP do poprawki e-maili z WordPressa
Jeśli masz Gmaila, możesz go używać do wysyłania twoich e-maili. Nie będziesz musiał wpisz swoje dane logowania e-mail w WordPress, gdy używasz wtyczki WP Mail SMTP.
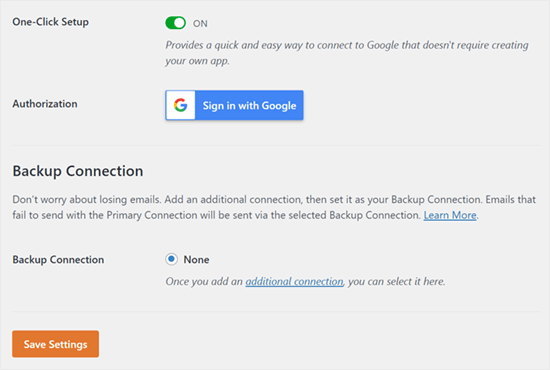
Aby korzystać z Gmaila lub Google Workspace, skonfiguruj WP Mail SMTP, jak pokazano powyżej, a następnie kliknij opcję “Google / Gmail” dla twojej usługi pocztowej.
Następnie można skonfigurować ustawienia usługi pocztowej za pomocą konfiguracji WP Mail SMTP jednym kliknięciem.
Ta metoda nie wymaga tworzenia twojej własnej aplikacji, co jest znacznie łatwiejsze. Wystarczy zalogować się na twoje konto Gmail i kliknąć “Zapisz ustawienia”.
Korzystanie z Twojego profesjonalnego Gmaila lub Google Workspace ma jednak kilka kluczowych wad.
Jednym z nich jest konieczność skontaktowania się z twoim hostingiem w celu zainstalowania odpowiedniego certyfikatu.
Innym jest to, że jeśli zmienisz adres e-mail w przyszłości, będziesz musiał ponownie przejść przez cały proces. Obejmuje to utworzenie nowej aplikacji internetowej.
Używanie Microsoft 365 z WP Mail SMTP do poprawki e-maili WordPressa
Jeśli korzystasz z Microsoft Office 365 lub Outlook dla twojego zwykłego konta e-mail, możesz również użyć go do wysyłania e-maili za pośrednictwem WordPress. Nie jest to jednak zalecana opcja, ponieważ jest mniej bezpieczna.
Będziesz musiał skonfigurować WP Mail SMTP jak powyżej, a następnie kliknąć opcję “365 / Outlook” przy wyborze twojej usługi pocztowej SMTP. Następnie należy zarejestrować aplikację na Microsoft Azure, aby móc wypełnić poniższe pola.
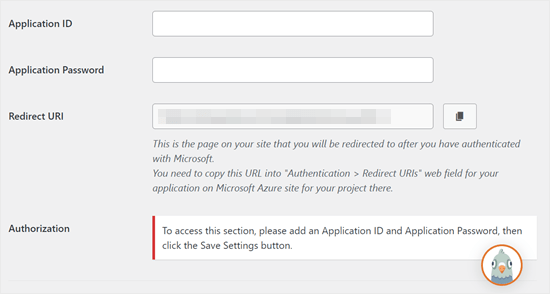
Więcej szczegółów można znaleźć w szczegółowym przewodniku na temat konfiguracji Outlooka z WP Mail SMTP.
Używanie Amazon SES z WP Mail SMTP do poprawki e-maili WordPressa
Platforma Amazon AWS posiada usługę Simple Email Service (SES), której można użyć do poprawienia problemu z e-mailem WordPress.
Najlepszą częścią Amazon jest to, że pozwala wysyłać do 62 000 e-maili miesięcznie za darmo. Wadą jest to, że konfiguracja jest nieco trudniejsza dla początkujących, dlatego nie polecamy jej jako preferowanej opcji.
Ale jak można sobie wyobrazić, wielu profesjonalistów i ekspertów korzysta z Amazon SES dla swojej usługi SMTP e-mail WordPress, więc nie mogliśmy napisać artykułu bez wspomnienia o nim.
Jeśli jesteś zainteresowany konfiguracją Amazon SES z WordPress, zapoznaj się z pełną instrukcją konfiguracji Amazon SES z WordPress.
Bez względu na to, z jakiej usługi pocztowej zdecydujesz się skorzystać, zawsze pamiętaj o użyciu funkcji “Testuj e-mail”, aby upewnić się, że wiadomości e-mail są pomyślnie wysyłane.
Musisz również sprawdzić swoją skrzynkę odbiorczą i potwierdzić, że otrzymałeś testowego e-maila.
Film instruktażowy
Jeśli wolisz instrukcje wizualne, obejrzyj ten film:
Doświadczasz innych błędów WordPress? Sprawdź te przewodniki
WordPress nie jest doskonały i od czasu do czasu możesz napotkać pewne typowe błędy. Oto kilka poradników, które możesz sprawdzić, aby je rozwiązać:
- Jak naprawiono niedziałający przycisk dodawania multimediów w WordPress?
- Jak naprawić problem z przesyłaniem obrazków w WordPress (krok po kroku)
- Jak naprawiono błąd mieszania treści w WordPress (krok po kroku)
- Jak naprawić wpisy WordPress zwracające błąd 404 (krok po kroku)
- Jak naprawić błąd “WordPress Database Error Disk Full”?
- Jak naprawiono błąd nawiązywania połączenia z bazą danych w WordPress?
- Jak poprawić błąd “Przepraszamy, ten rodzaj pliku nie jest dozwolony ze względów bezpieczeństwa” w WordPress?
- Jak naprawiono błąd 502 Bad Gateway w WordPress?
- Jak naprawiono niedziałającą wyszukiwarkę WordPress?
- Formularz WordPress nie działa: 7 wskazówek dotyczących rozwiązywania problemów
Mamy nadzieję, że ten artykuł pomógł ci dowiedzieć się, jak poprawić problem z niewysyłaniem e-maili przez WordPress. Możesz również zapoznać się z naszą listą najczęstszych problemów z edytorem bloków WordPress lub naszymi najlepszymi wtyczkami do konfiguratora e-mail WooCommerce.
If you liked this article, then please subscribe to our YouTube Channel for WordPress video tutorials. You can also find us on Twitter and Facebook.


John Little
Found out why mine wasn’t working. My provider blocks (well prevents pass though traffic) if coming from VPN. All my testing was done with the VPN on.
WPBeginner Support
Thanks for sharing that should anyone else be running a VPN and have the same issue
Admin
Jiří Vaněk
Im using WP Forms paid version with WP Mail SMTP in free version and this combination work pretty well together.
Jiří Vaněk
Currently, the most problems that I have solved in the last year with sending emails on WordPress was the missing DNS record for SPF and DKIM. Specifically, it is most evident on the side of Google and Gmail, which rejects such emails. It is therefore a good idea to also focus on SPF and DKIM records for the domain.
WPBeginner Support
If the method in this guide does not work then that could certainly be something to check
Admin
Moinuddin Waheed
Sending emails and being hundred percent assured that it has got delivered is a must for any kind of online businesses.
This is where comes the role of this excellent plugin called wp SMTP mail which ensures that the email that has been sent has also been delivered to the recipient.
I have implemented wp mail SMTP to my websites and planning to use on all my wordpress websites.
Carol
The best answer so far! I have been looking for this answer for 1 year!
WPBeginner Support
Glad to hear our guide was helpful!
Admin
Abubakar Bala
Wow! WP Beginner is my number 1 go to destination for WordPress bugs. I have been facing serious issues with the issues discussed in this article. Thank you so much for these detailed solutions.
WPBeginner Support
Glad to hear our guide was helpful!
Admin
Joe
What is the purpose of setting up the mail1 subdomain?
Bren
Is there a code-only alternative? I’d like to avoid using plugins where possible.
WPBeginner Support
We do not have any beginner-friendly methods for adding SMTP without a plugin, for not using a plugin, we would recommend taking a look at our site below that covers common concerns for using multiple plugins and why they aren’t as prevalent as they seem:
https://www.wpbeginner.com/opinion/how-many-wordpress-plugins-should-you-install-on-your-site
Admin
Tim
I understand having to set up the WP Mail SMTP Plugin. That’s fabulous.
I suppose what I don’t understand is if I have SMTP with my hosting account and I can send through that, why use a third-party SMTP provider? Did I miss something? What benefit does the third-party provide? Thanks.
WPBeginner Support
It would be a personal preference if you use a third party as we recommend or some hosting providers do not have the option to use SMTP through them.
Admin
Qudus
Thank you for this great article.
I followed every step successfully until I got to AUTHENTICATE THIS DORMAIN.
when I clicked on manage domains, I couldn’t find any DNS record or TXT for me to add the codes from Sendinblue.
Please what do I do?
WPBeginner Support
If you do not see where you can add the records, you would want to reach out to your hosting provider and they should be able to assist.
Admin
Brittany Pelegrino
Thank you so much for this awesome article! I was wondering if you could advise on where you need to point your subdomain to when creating the DNS record?
WPBeginner Support
Unless your hosting provider requires it, you shouldn’t need to point the subdomain to a specific location on your site or anywhere at all other than the records from our guide.
Admin
Oscar
hey i have the setup correct the test email went through however the email from the contact form was sent to promotions. what can i do to fix this?
WPBeginner Support
That would be determined by the email provider being used and not something the plugin would change sadly.
Admin
Michael
Tnx a lot for your guide. After not less than 10 different attempts to make my emails functionable, this did it. THANKS!
WPBeginner Support
Glad our guide was helpful
Admin
Paul
What if email domain and web site domain are different? In your instructions and also the instructions of sendinblue it was confusing under which of the two domains am I putting the records, getting authorization, etc.
WPBeginner Support
You would want to set up Sendinblue for the domain that is in the email address
Admin
Paul
Excuse my SMTP ignorance but can I use Sendinblue for sending email from that email address from my wordpress account if I already have that email account functioning elsewhere (in my case outlook)?
WPBeginner Support
Yes, you can customize the address you send the email from in Sendinblue.
Admin
Marlene Elizabeth
It worked with the WP Mail SMTP Configuration perfectly. Literally just had to changed the E-Mail. Thanks.
WPBeginner Support
Glad our guide was helpful
Admin
Lisa
Two days trying to resolve wordpress not sending attachment bigger than 1mb; nothing works.
Resolved in 1 minute thanks to you.
WPBeginner Support
Glad our guide was helpful
Admin
Martin N
Is there any way to do this but without a plugin?
WPBeginner Support
We do not have a recommended method to set this up without a plugin.
Admin
eva
Hi,i follow your steps. but my WordPress still don’t send an email now. I think i set up WP Mail SMTP successfully and test my private email, but when my clients subscribed, placed an order, canceled, and order, i didn’t receive a notification, either my clients. i have checked with my host server several times, they don’t know how to help me, and only clients’ reset passwords email was sent successfully after their help. Now they think there are must be something wrong with my woo commerce plugin or my theme.
I don’t know how to deal with this problem now, can you give me your suggestion?
WPBeginner Support
You may want to check with the support for the plugin to ensure they don’t override the sending method for emails.
Admin
Harold
I was able to use sindInBlue and get it to work. Whenever a customer fills out my form, I get an email with all the customers information. They only problem I have is that I would like to send a “confirmation” email to my customers email address, stating that we received their email and will respond within 24 hours.
WPBeginner Support
You would want to check with the options in your contact form for that.
Admin
Scott
In the tutorial, there is the line “Open up a new browser tab and log back into your web hosting account. You need to find your domain and open up the DNS records. ”
Do I open up the DNS of my domain, or the newly created subdomain?
WPBeginner Support
You would open your primary domain’s DNS and add the records that Sendinblue has given you to that.
Admin
Victoria
I was really struggling with this issue and your article really helped – thank you!
WPBeginner Support
You’re welcome, glad our guide helped
Admin
Tulay Girard
Great tutorial. Thank you!
WPBeginner Support
You’re welcome
Admin
Tolu
I thought this guide would help as my issue seemed similar but after going through this guide, im still not sure how to fix my issue. I’ve been trying to change the Admin email so I can receive order details. when I try to change it says the new email will not be recognized until the confirmation email (sent to old) is accepted. But that confirmation email is nowhere to be found. How to I change the admin email?
WPBeginner Support
If the message is not caught in your spam folder when you resent it, we would recommend taking a look at our guide below:
https://www.wpbeginner.com/beginners-guide/how-to-change-the-wordpress-admin-email
Admin
Rudy Ramkissoon
I’m receiving emails from non gmail accounts and getting error. Like the following below.
Address not foundYour message wasn’t delivered to example@example.com because the domain example.com couldn’t be found. Check for typos or unnecessary spaces and try again.
What can cause this?
WPBeginner Support
If the user did not type in their email address correctly would be the most common reason.
Admin
J H
I followed this guide and got “test email sent successfully” but I didn’t receive an email on my email account, how come?
WPBeginner Support
There are multiple possible reasons, you may want to ensure that the email did not get caught in your spam folder for a starting point
Admin
Joel
Thank You so very much for the step by step guidance… Was using the same plugin earlier and it stopped working… Following your instructions, have signed up for Sendinblue & now it works like a charm.
I have always followed most of the instructions from your blog… Thank You
WPBeginner Support
Glad our guide was able to help
Admin
lori
Hello, I’m a little confused. When I set up our site I contacted the web host (BlueHost) and they set up our email accounts using G-Suite so that we could use @ourdomain for our emails. They said it would be complicated to do, so they set it up without explaining the details. We pay for each email account set up this way. After reading this post, I’m wondering if I’m also supposed to set up the WP Mail SMTP plugin. Do I need to go back and set up this plugin also for the best email performance, or would that not apply in our situation? Thank you.
WPBeginner Support
We would recommend using SMTP to send your emails still as having a custom email address does not change how WordPress sends emails.
Admin
John
Thanks for this but why do we need to create a subdomain?
WPBeginner Support
To ensure that connections going there are for email and not possible site visitors
Admin
Jack
This was super helpful, super easy to follow and fixed my issue Thanks!
WPBeginner Support
You’re welcome, glad our guide was helpful
Admin
Daniel
You guys really help me out . I really need this information.
WPBeginner Support
Glad we could help you with our guide
Admin
Bob
Thank you for the guidance..
WPBeginner Support
You’re welcome
Admin
Julie
Thank you for the guidance..
WPBeginner Support
You’re welcome
Admin
Peter
Thank you for the guidance.
WPBeginner Support
You’re welcome
Admin
Corinne
Followed along on how to fix the issue of WordPress not sending emails. Worked great until about half way through. What was on the website to what was actually happening totally off from each other. Did not successfully complete the task and not sure what to do next. Please update the help on the website. Thanks!!
WPBeginner Support
We will certainly take a look at what needs to be updated in this article.
Admin
Kate
Thanks for the tutorial, it has changed a bit in google dev since you wrote it but I got there in the end. And emails are being sent and received!
WPBeginner Support
You’re welcome, it’s difficult to keep up with Google’s changes but glad our article could still be helpful
Admin
Shahbaaz
I am not receiving WordPress password recovery emails or WordPress confirm emails. What should I do ? I am using Google cloud hosting trial. I am a beginner. Please help!
WPBeginner Support
It may be the method that WordPress is sending emails, you can change the method your site sends emails using our article here: https://www.wpbeginner.com/plugins/how-to-send-email-in-wordpress-using-the-gmail-smtp-server/
Admin
Carla
Hi there, thanks for this amazing tutorial and so well explained – However I’m still unable to overcome the problem on the main settings. I’m using contactform7 and forms aren’t working duo to this issue. I’m not receiving any email at all to be able to confirm the address change.
WPBeginner Support
If you set up SMTP properly and the emails are not sending correctly then you would want to reach out to your form’s support to ensure there isn’t an issue with the form itself.
Admin
Emmanuel
I am currently using Google Gmail setup and was able to follow the steps to create the Gmail api to connect the Client ID and Secret ID. I can test the redirection URL and login to Google all right. However, I’m unable to send a Test Email. All of sudden the “Force From Email” check box is also grayed out and uncheck. I can’t check that box. Please help
WPBeginner Support
For issues with the plugin, please reach out to the plugin’s support through the support forum and they should be able to assist.
Admin
Adi Hermanto
Thanks for brilliant tutorial mate, really did help solve an issue which wasted hours of my time.
WPBeginner Support
Glad our article could help solve the problem
Admin
Ankit
Thanks !!!
Which theme are you using?
WPBeginner Support
Hi Ankit,
We are using a custom theme made on top of Genesis framework.
Admin
Penina
Thank you for the tutorial. It works so well!
mudasir abbas turi
Hello dear thank you very much i got success
Pugazhendhi
I got an error message 403 forbidden at the last stage of setting up the gmail smtp.Can you suggest me something so that I can resolve it to send an email of the enquiry form that i have created using contact form 7.
Joel
I installed the WP Mail SMTP plugin and although you made a great effort to demonstrate connectivity with mailgun, your info was not necessarily dated with Godaddy’s cpanel. I decided to go with Sendgrid which was a much easier set process than mailgun.
brad
i successfully installed WP Mail SMTP and got the confirmation test email. However, I don’t know how to attach it to my website. The current contact form in zerif lite gives me an error message. Please advise. Thanks.
WPBeginner Support
Hi Brad,
Please contact your theme support. Alternately you can use WPForms Lite to add a contact form to your website.
Admin
Jason
I was able to set up WP Mail SMTP to work with Contact Form 7, but in all emails we receive they always show my gmail as the sender but not the real senders email. Is there anyway to fix this problem?
Josin
I get the following error when I try to authorize the plugin to send mails using Gmail.
“The Web server is configured to not list the contents of this directory or you do not have enough permissions to access the resource”
How can I tackle this error?
Alicia
I tried twice to follow these directions and everything was going according to plan… But then at the end… and error message! Anyone know what this means?
The OAuth client was not found.