Własne typy treści pozwalają wyjść poza standardowe wpisy i strony. Pozwalają tworzyć różnorodne rodzaje treści dostosowane do konkretnych potrzeb twojej witryny.
Na przykład, własne typy treści pozwalają przekształcić twoją witrynę WordPress z prostej platformy blogowej w solidny system zarządzania treścią(CMS).
Właśnie dlatego używamy niestandardowych typów treści na naszych własnych witrynach internetowych. W tym przewodniku pokażemy, jak łatwo tworzyć własne typy treści w WordPress.

Czym jest własny typ treści w WordPressie?
Na twojej witrynie internetowej WordPress typy treści są używane do rozróżniania różnych rodzajów treści w WordPress. Wpisy i strony są typami treści, ale służą do różnych celów.
Domyślnie WordPress zawiera kilka różnych typów treści:
- Wpis
- Strona
- Załącznik
- Wersja
- Menu nawigacji
Możesz jednak tworzyć własne typy treści, znane jako niestandardowe typy wpisów. Są one przydatne podczas tworzenia treści o innym formacie niż standardowy wpis lub strona.
Załóżmy, że prowadzisz witrynę internetową z recenzjami filmów. W takim przypadku prawdopodobnie będziesz chciał utworzyć typ treści “recenzje filmów”. Możesz także utworzyć własne typy treści dla portfolio, referencji, produktów i innych.
Co więcej, niestandardowe typy treści mogą mieć różne niestandardowe pola i własną strukturę kategorii.
Na przykład na WPBeginner używamy własnych typów treści dla naszych sekcji Oferty i Słowniczek, aby oddzielić je od naszych codziennych artykułów na blogu. Pomaga nam to lepiej zorganizować treść naszej witryny internetowej.
Wiele popularnych wtyczek WordPress wykorzystuje niestandardowe typy treści do przechowywania danych na twojej witrynie internetowej WordPress. Poniżej znajduje się kilka najlepszych wtyczek, które wykorzystują własne typy treści:
- WooCommerce dodaje typ treści “produkt” do twojego sklepu internetowego.
- WPForms tworzy typ treści “wpforms” do przechowywania wszystkich twoich formularzy
- MemberPress dodaje własny typ treści “memberpressproduct”.
Film instruktażowy
Jeśli wolisz pisemne instrukcje, czytaj dalej.
Czy muszę tworzyć własne typy treści?
Zanim zaczniesz tworzyć własne typy treści na swojej witrynie WordPress, ważne jest, aby ocenić twoje potrzeby. Często można osiągnąć te same wyniki za pomocą zwykłego wpisu lub strony.
Jeśli nie jesteś pewien, czy twoja witryna potrzebuje niestandardowych typów treści, zapoznaj się z naszym przewodnikiem na temat tego, kiedy potrzebujesz niestandardowego typu treści lub taksonomii w WordPress.
Mając to na uwadze, przyjrzyjmy się, jak łatwo tworzyć niestandardowe typy treści w WordPressie na twój własny użytek. Pokażemy ci dwie metody, a także omówimy kilka sposobów wyświetlania własnych typów treści na twojej witrynie internetowej WordPress:
Gotowy? Zaczynajmy.
Ręczne tworzenie własnego typu treści za pomocą WPCode
Utworzenie własnego typu treści wymaga dodania kodu do pliku functions. php twojego motywu. Jednak nie zalecamy tego nikomu poza zaawansowanymi użytkownikami, ponieważ nawet niewielki błąd może zepsuć twoją witrynę. Ponadto, jeśli zaktualizujesz swój motyw, kod zostanie usunięty.
Zamiast tego będziemy używać WPCode, najłatwiejszego i najbezpieczniejszego sposobu dla każdego, aby dodać własny kod do twojej witryny internetowej WordPress.
WPCode umożliwia dodawanie własnych fragmentów kodu i włączanie wielu funkcji z wbudowanej, wstępnie skonfigurowanej biblioteki kodu. Innymi słowy, może zastąpić wiele dedykowanych lub jednorazowych wtyczek, które możesz mieć zainstalowane.
Najpierw należy zainstalować i włączyć darmową wtyczkę WPCode. Aby uzyskać szczegółowe instrukcje, zapoznaj się z naszym przewodnikiem krok po kroku, jak zainstalować wtyczkę WordPress.
Po włączaniu, przejdź do Code Snippets “ Add Snippet z twojego kokpitu WordPress. Następnie najedź kursorem myszy na “Add Your Custom Code (New Snippet)”, a następnie kliknij “Use Snippet”.
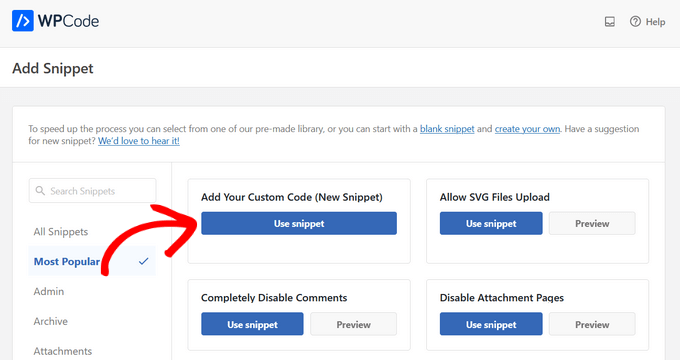
Spowoduje to otwarcie ekranu “Utwórz fragment kodu własnego”.
Teraz możesz utworzyć tytuł fragmentu kodu i przełączyć przełącznik na “Aktywny”.
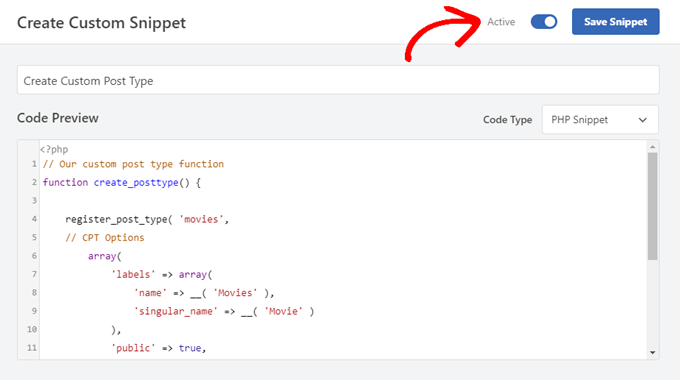
Następnie wystarczy wkleić poniższy kod w obszarze “Podgląd kodu”. Ten kod tworzy podstawowy własny typ treści o nazwie “Filmy”, który pojawi się na panelu bocznym administratora i będzie działał z dowolnym motywem.
1 2 3 4 5 6 7 8 9 10 11 12 13 14 15 16 17 18 19 20 | // Our custom post type functionfunction create_posttype() { register_post_type( 'movies', // CPT Options array( 'labels' => array( 'name' => __( 'Movies' ), 'singular_name' => __( 'Movie' ) ), 'public' => true, 'has_archive' => true, 'rewrite' => array('slug' => 'movies'), 'show_in_rest' => true, ) );}// Hooking up our function to theme setupadd_action( 'init', 'create_posttype' ); |
Jeśli chcesz mieć tylko podstawowy niestandardowy typ treści, po prostu zastąp filmy i Filmy własną nazwą i slugiem CPT i kliknij przycisk “Aktualizuj”.
Jeśli jednak chcesz mieć jeszcze więcej opcji dla twojego własnego typu treści, powinieneś użyć poniższego kodu zamiast powyższego.
Poniższy kod dodaje wiele innych opcji do niestandardowego typu treści “Filmy”, takich jak obsługa wersji, wyróżniających się obrazków i pól własnych, a także powiązanie niestandardowego typu treści z niestandardową taksonomią o nazwie “gatunki”.
Uwaga: Nie należy łączyć tych dwóch fragmentów kodu, w przeciwnym razie WordPress wyświetli błąd, ponieważ oba fragmenty kodu rejestrują ten sam własny typ treści. Zalecamy utworzenie zupełnie nowego fragmentu kodu za pomocą WPCode dla każdego dodatkowego typu treści, który chcesz zarejestrować.
1 2 3 4 5 6 7 8 9 10 11 12 13 14 15 16 17 18 19 20 21 22 23 24 25 26 27 28 29 30 31 32 33 34 35 36 37 38 39 40 41 42 43 44 45 46 47 48 49 50 51 52 53 54 55 56 57 58 59 60 61 62 63 64 | /** Creating a function to create our CPT*/ function custom_post_type() { // Set UI labels for Custom Post Type $labels = array( 'name' => _x( 'Movies', 'Post Type General Name', 'twentytwentyone' ), 'singular_name' => _x( 'Movie', 'Post Type Singular Name', 'twentytwentyone' ), 'menu_name' => __( 'Movies', 'twentytwentyone' ), 'parent_item_colon' => __( 'Parent Movie', 'twentytwentyone' ), 'all_items' => __( 'All Movies', 'twentytwentyone' ), 'view_item' => __( 'View Movie', 'twentytwentyone' ), 'add_new_item' => __( 'Add New Movie', 'twentytwentyone' ), 'add_new' => __( 'Add New', 'twentytwentyone' ), 'edit_item' => __( 'Edit Movie', 'twentytwentyone' ), 'update_item' => __( 'Update Movie', 'twentytwentyone' ), 'search_items' => __( 'Search Movie', 'twentytwentyone' ), 'not_found' => __( 'Not Found', 'twentytwentyone' ), 'not_found_in_trash' => __( 'Not found in Trash', 'twentytwentyone' ), ); // Set other options for Custom Post Type $args = array( 'label' => __( 'movies', 'twentytwentyone' ), 'description' => __( 'Movie news and reviews', 'twentytwentyone' ), 'labels' => $labels, // Features this CPT supports in Post Editor 'supports' => array( 'title', 'editor', 'excerpt', 'author', 'thumbnail', 'comments', 'revisions', 'custom-fields', ), // You can associate this CPT with a taxonomy or custom taxonomy. 'taxonomies' => array( 'genres' ), /* A hierarchical CPT is like Pages and can have * Parent and child items. A non-hierarchical CPT * is like Posts. */ 'hierarchical' => false, 'public' => true, 'show_ui' => true, 'show_in_menu' => true, 'show_in_nav_menus' => true, 'show_in_admin_bar' => true, 'menu_position' => 5, 'can_export' => true, 'has_archive' => true, 'exclude_from_search' => false, 'publicly_queryable' => true, 'capability_type' => 'post', 'show_in_rest' => true, ); // Registering your Custom Post Type register_post_type( 'movies', $args ); } /* Hook into the 'init' action so that the function* Containing our post type registration is not * unnecessarily executed. */ add_action( 'init', 'custom_post_type', 0 ); |
Możesz powiadomić o części, w której ustawiliśmy wartość hierarchiczną na false. Jeśli chcesz, aby twój własny typ treści zachowywał się jak strony, a nie wpisy, możesz ustawić tę wartość na true.
Kolejną rzeczą, na którą należy zwrócić uwagę, jest wielokrotne użycie ciągu twentytwentyone , zwanego “domeną tekstową”. Jeśli twój motyw jest gotowy do tłumaczenia i chcesz, aby własne typy treści zostały przetłumaczone, musisz wspomnieć o domenie tekstowej używanej przez twój motyw.
Możesz znaleźć domenę tekstową twojego motywu w pliku style.css w katalogu motywu lub przechodząc do Wygląd “ Edytor plików motywu w panelu administracyjnym. Domena tekstowa będzie wymieniona w nagłówku pliku.
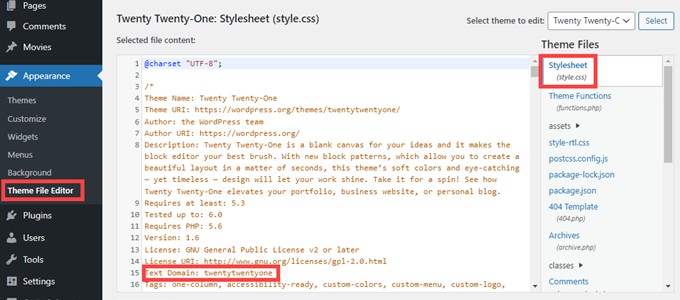
Wystarczy zastąpić twentytwentyone “domeną tekstową” twojego motywu.
Po wprowadzeniu zmian wystarczy kliknąć przycisk “Aktualizuj”, a WPCode zajmie się resztą.
Tworzenie własnego typu treści za pomocą wtyczki
Innym łatwym sposobem na utworzenie własnego typu treści w WordPress jest użycie wtyczki. Ta metoda jest zalecana dla początkujących, ponieważ jest bezpieczna i bardzo łatwa.
Pierwszą rzeczą, którą musisz zrobić, to zainstalować i włączyć wtyczkę Custom Post Type UI. Aby uzyskać więcej informacji, zobacz nasz przewodnik krok po kroku, jak zainstalować wtyczkę WordPress.
Po włączaniu należy przejść do CPT UI ” Add / Edit Post Types, aby utworzyć nowy konfigurator typu treści. Powinieneś znaleźć się na karcie “Dodaj nowy typ treści”.
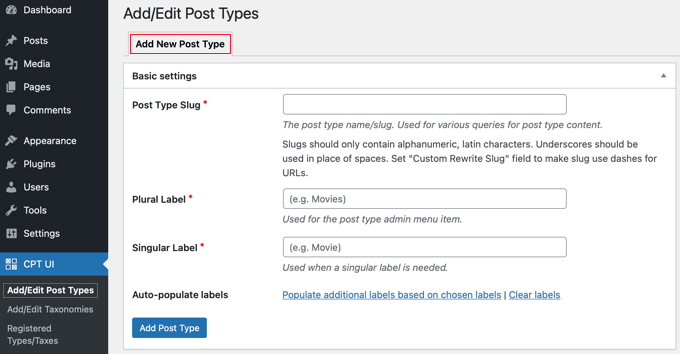
W tym obszarze musisz podać slug dla własnego typu treści, na przykład “filmy”. Ta uproszczona nazwa będzie używana w adresie URL i w zapytaniach WordPress, więc może zawierać tylko litery i cyfry.
Poniżej pola slug należy podać nazwę w liczbie mnogiej i pojedynczej dla twojego własnego typu treści.
Jeśli chcesz, możesz kliknąć odnośnik “Wypełnij dodatkowe etykiety na podstawie wybranych etykiet”. Spowoduje to automatyczne wypełnienie dodatkowych pól etykiet poniżej i zwykle pozwoli zaoszczędzić czas.
Możesz teraz przewinąć w dół do sekcji “Dodatkowe etykiety”. Jeśli nie kliknąłeś odnośnika, o którym wspomnieliśmy, będziesz musiał podać opis dla twojego typu treści i zmienić etykiety.
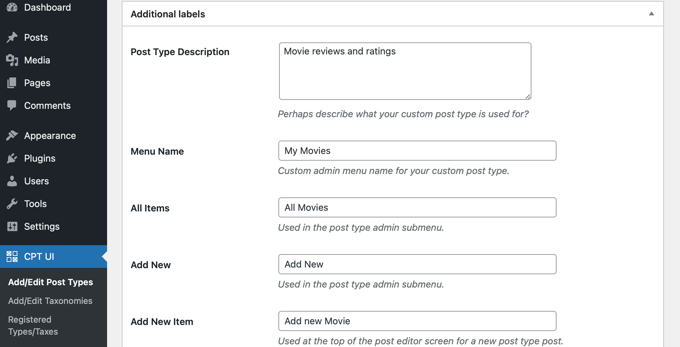
Etykiety te będą używane w całym interfejsie użytkownika WordPress podczas zarządzania treścią w danym typie treści.
Następnie dostępne są ustawienia typu treści. W tym miejscu możesz skonfigurować różne atrybuty dla twojego typu treści. Każda opcja posiada krótki opis wyjaśniający jej działanie.
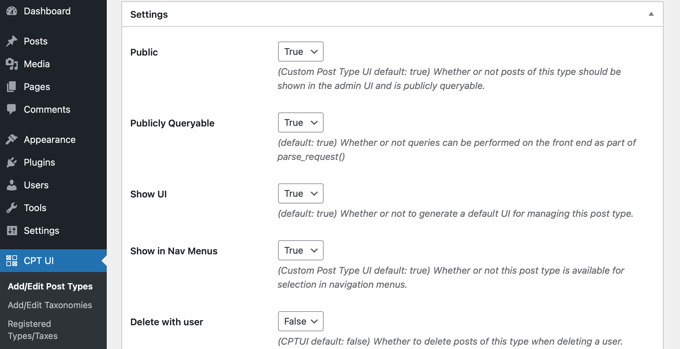
Można na przykład wybrać, aby typ treści nie był hierarchiczny jak strony lub sortować chronologicznie wpisy w odwrotnej kolejności.
Poniżej ustawień ogólnych znajduje się opcja wyboru funkcji edycji obsługiwanych przez ten typ treści. Po prostu zaznacz opcje, które chcesz uwzględnić.
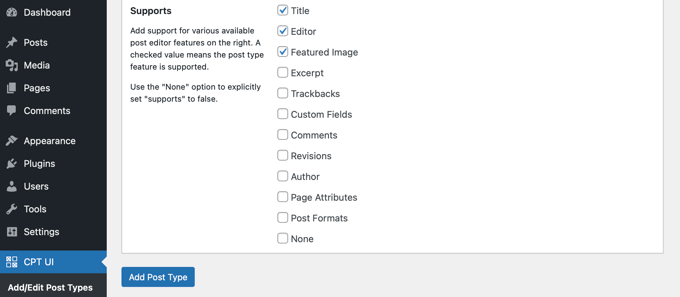
Na koniec kliknij przycisk “Dodaj typ treści”, aby zapisać i utworzyć własny typ treści.
To wszystko, pomyślnie utworzyłeś swój własny typ treści! Możesz teraz rozpocząć dodawanie treści.
Wyświetlanie własnych typów treści na twojej witrynie
WordPress posiada wbudowaną obsługę wyświetlania twoich własnych typów treści. Po dodaniu kilku elementów do nowego niestandardowego typu treści, nadszedł czas, aby wyświetlić je na twojej witrynie internetowej.
Istnieje kilka metod, z których można skorzystać, a każda z nich ma swoje zalety.
Wyświetlanie własnych typów treści przy użyciu domyślnego szablonu archiwum
Po pierwsze, możesz po prostu przejść do Wygląd ” Menu i dodać własny odnośnik do twojego menu. Ten niestandardowy link jest odnośnikiem do twojego własnego typu treści.
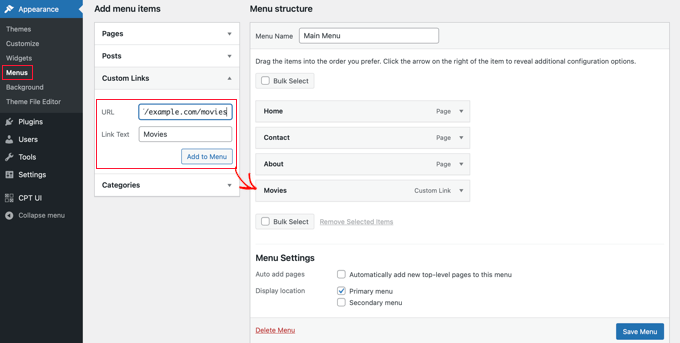
Jeśli korzystasz z przyjaznych dla SEO bezpośrednich odnośników, to adres URL twojego własnego typu treści będzie najprawdopodobniej wyglądał mniej więcej tak:
http://example.com/movies |
Jeśli nie korzystasz z bezpośrednich odnośników przyjaznych dla SEO, Twój adres URL typu treści będzie wyglądał mniej więcej tak:
http://example.com/?post_type=movies |
Nie zapomnij zastąpić “example.com” własną nazwą domeny, a “movies” nazwą twojego niestandardowego typu treści.
Następnie możesz zapisać menu i przejść na stronę frontową twojej witryny internetowej. Zobaczysz dodany nowy utwórz menu, a po jego kliknięciu zostanie wyświetlona strona archiwum twojego konfiguratora typu treści przy użyciu pliku szablonu archive.php w twoim motywie.

Tworzenie szablonów własnych typów treści
Jeśli nie podoba ci się wygląd strony archiwum dla twojego niestandardowego typu treści, możesz użyć dedykowanego szablonu dla archiwów niestandardowych typów treści.
Wszystko, co musisz zrobić, to utworzyć nowy plik w katalogu twojego motywu i nazwać go archive-movies.php. Upewnij się, że zastąpiłeś “movies” nazwą twojego własnego typu treści.
Aby rozpocząć, możesz skopiować treść pliku archive.php twojego motywu do szablonu archive-movies. php, a następnie zmodyfikować go do swoich potrzeb.
Teraz za każdym razem, gdy dostępna jest strona archiwum dla twojego niestandardowego typu treści, ten szablon zostanie użyty do jej wyświetlenia.
Podobnie, możesz utworzyć własny szablon dla wyświetlania pojedynczego wpisu twojego typu treści. Aby to zrobić, musisz utworzyć plik single-movies.php w katalogu twojego motywu. Nie zapomnij zastąpić “movies” nazwą twojego własnego typu treści.
Możesz zacząć od skopiowania treści szablonu single.php twojego motywu do szablonu single-movies. php, a następnie zmodyfikowania go do swoich potrzeb.
Aby dowiedzieć się więcej, zapoznaj się z naszym przewodnikiem na temat tworzenia własnych szablonów pojedynczych wpisów w WordPress.
Wyświetlanie własnych typów treści na stronie głównej
Jedną z zalet korzystania z niestandardowych typów treści jest to, że oddzielają one twoje niestandardowe typy treści od zwykłych wpisów. Jeśli jednak chcesz, możesz wyświetlać niestandardowe typy treści na głównej stronie twojej witryny internetowej.
Wystarczy dodać ten kod jako nowy fragment kodu za pomocą darmowej wtyczki WPCode. Szczegółowe instrukcje znajdują się w sekcji tego artykułu dotyczącej ręcznego dodawania kodu.
1 2 3 4 5 6 7 | add_action( 'pre_get_posts', 'add_my_post_types_to_query' ); function add_my_post_types_to_query( $query ) { if ( is_home() && $query->is_main_query() ) $query->set( 'post_type', array( 'post', 'movies' ) ); return $query;} |
Nie zapomnij zastąpić “movies” twoim własnym typem treści.
Zapytania do własnych typów treści
Jeśli jesteś zaznajomiony z kodowaniem i chciałbyś uruchamiać zapytania w pętli w twoim szablonie, oto jak to zrobić. Poprzez zapytanie do bazy danych można pobrać elementy z własnego typu treści.
Będziesz musiał skopiować poniższy fragment kodu do szablonu, w którym chcesz wyświetlić niestandardowy typ treści.
1 2 3 4 5 6 7 8 9 10 11 12 13 14 15 | <?php $args = array( 'post_type' => 'movies', 'posts_per_page' => 10 );$the_query = new WP_Query( $args ); ?><?php if ( $the_query->have_posts() ) : ?><?php while ( $the_query->have_posts() ) : $the_query->the_post(); ?><h2><?php the_title(); ?></h2><div class="entry-content"><?php the_content(); ?> </div><?php endwhile;wp_reset_postdata(); ?><?php else: ?><p><?php _e( 'Sorry, no posts matched your criteria.' ); ?></p><?php endif; ?> |
Ten kod definiuje typ treści wpisu i liczbę wpisów na stronę w argumentach dla naszej nowej klasy WP_Query. Następnie uruchamia zapytanie, pobiera wpisy i wyświetla je wewnątrz pętli.
Wyświetlanie własnych typów treści w widżetach
Zauważysz, że WordPress ma domyślny widżet do wyświetlania ostatnich wpisów, ale nie pozwala na wybranie własnego typu treści.
Co jeśli chciałbyś wyświetlać najnowsze wpisy z twojego nowo utworzonego typu treści w widżecie? Na szczęście jest na to prosty sposób.
Pierwszą rzeczą, którą musisz zrobić, to zainstalować i włączyć wtyczkę Custom Post Type Widgets. Aby uzyskać więcej informacji, zobacz nasz przewodnik krok po kroku, jak zainstalować wtyczkę WordPress.
Po włączaniu wystarczy przejść do Wygląd ” Widżety i przeciągnąć widżet “Ostatnie wpisy (własny typ treści)” na panel boczny.
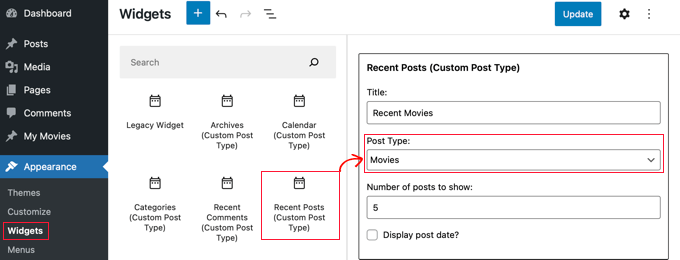
Ten widżet umożliwia wyświetlanie ostatnich wpisów z dowolnego typu treści. Musisz wybrać swój własny typ treści z listy rozwijanej “Typ wpisu” i wybrać żądane opcje.
Następnie kliknij przycisk “Aktualizuj” u góry ekranu i przejdź na twoją witrynę internetową, aby zobaczyć widżet w działaniu.

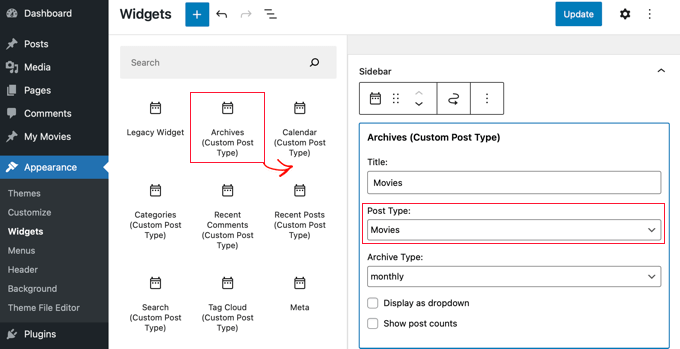
Wtyczka udostępnia również konfigurowalne widżety typu treści, które wyświetlają archiwa, kalendarz, kategorie, ostatnie komentarze, wyszukiwanie i chmurę tagów.
Nie krępuj się więc i wybierz tę, której potrzebujesz.
Mamy nadzieję, że ten poradnik pomógł ci nauczyć się tworzyć własne typy treści w WordPress. Następnie możesz również dowiedzieć się, jak utworzyć własną stronę archiwum w WordPress lub zapoznać się z naszą listą ważnych stron, które powinien posiadać każdy blog WordPress.
If you liked this article, then please subscribe to our YouTube Channel for WordPress video tutorials. You can also find us on Twitter and Facebook.


R Davies
You have a syntax error in your second (more detailed) example, code does not work in latest WordPress 7.4.3
) Warning: call_user_func_array() expects parameter 1 to be a valid callback, function ‘custom_post_type’ not found or invalid function name
Any chance of an update / correction?
WPBeginner Support
Hi R Davies,
We checked and it worked perfectly.
Admin
Archit
Is the comma at the end if the supports array (in the options for the custom post type) deliberate?
Robert Stuart
On line 31? Yes, that’s normal PHP code.
“The comma after the last array element is optional and can be omitted. This is usually done for single-line arrays, i.e. array(1, 2) is preferred over array(1, 2, ). For multi-line arrays on the other hand the trailing comma is commonly used, as it allows easier addition of new elements at the end.”
saurabh
How to enable ‘Post Settings’ in Custom_Post_type (using Custom Post Type UI Plugin)?
Arias
Hello, I have been having problems with this plugin.
It has disabled the option to create categories and tags,
I have been looking for an example to place them manually but I still have not found anything.
I am trying to undo if with this method I can fix the problem but I would greatly appreciate your help.
stormonster
In your $args array, on the ‘taxonomies’ index, add ‘category’ and ‘post_tag’.
That should do the trick.
John D
Way too much coding. WordPress need to keep things more simple.
Ilija
This is why I use my own CMS where I can create new post types in a fraction of a second directly through cms itself. Without any coding, unfortunately big agencies want WordPress developers and have to learn it, seems so complicated..
Sarah A
Hi, i’ve succeded to display group of CPT with a specific design in a pop-up when you click on a image like the first one But it opens a new page and when you click out of the pop-up to quit you don’t return to the homepage, and i don’t want that. I want all on the homepage.
I’ve put the code of the CPT to display as the pop-up on “single-chg_projet.php” and open and close the pop-up with javascript. I’ve already tried to put all the code of single-chg_projet.php on the index, but it display nothing. Or i may be failed somewhere. Please help me. Thanks
Ghulam Mustafa
Hi,
Thanks for the great code. Just a minor correction to the code. The endwhile; statement is missing before else: statement in the Querying Custom Post Types section =)
Tony Peterson
THIS! Please update your code to reflect this syntax error as it caused me a bit of heartache until I found Ghulam’s comment. It’s working now.
Arkanum
Yes! True. It’s miss befire wp_reset_postdate();
The cycle while does not end
Azamat
Typo: “When doi I need a custom post type?”
WPBeginner Support
Thanks for notifying us We have updated the article.
Admin
Jhon
hey, can you guide me in the process of making a custom glossary like you have on your site?
WPBeginner Support
We use a custom fields and a custom template to display Glossary terms.
Admin
Anil Reddy
I want to create list type for posts in the category page for my website
david ben oren
how do i clone a post type which has a speicifc table in it, i need to create a seperate post type for other tables.
betty
How do I add a custom field to a Post Type?
WPBeginner Support
Please see our guide WordPress Custom Fields 101.
Admin
Megan
I’ve downloaded the plugin and want to add two custom post types. 1. Fanfiction for all of my writings and 2. Fanart for all of my art.
For Fanfiction – I want the ability to link chapters together into a story and be able to upload chapters to a story as I write them.
For Fanart – I’d like to have the focus be on an image (obviously) with a description underneath it
Is this article what I need or this something completely different?
Thanks,
Megan
Zubair Abbas
Hi,
I simply copied the code to my site’s functions.php. The new post type is visible in the dashboard but when I try to see a post after publishing it, a blank page appears. Later I realised that even the default posts are not opening.
When I remove the code from functions.php everything works fine again.
Please help
Thanks,
Zubair Abbas
Jouke Nienhuis
If you see a blank page, it often means that you forgot a character. The fact that you see the posts if you delete your custom code, confirms that you have a typo. Check for semi-colons ” ; ” and the opening and closing brackets.
To see exactly where you made a mistake, you could edit the wp-config file. Look for ERROR REPORTING and set this value to true. After that test again and there you get an error and a line with the omission.
Alex
I have created the CPT and is working beautifully, but Google cannot find it even after updating sitemaps, using SEO plugins or fetching on Google Webmaster Tools. Any thoughts on why is that happening?
WPBeginner Support
It takes Google sometime to start showing new content in search results. Just to be on safe side, check your SEO plugin settings to make sure you are not blocking indexing of your CPTs or CPT archive pages.
Admin
Amunet
Creating Custom Post Type can be easy especially with a plugin. The real trick is to show them on the page. Usually you need quite advanced custom development or theme specific plugins like that for Avada.
Unfortunately there is no universal way to display CPT in WordPress.
WPBeginner Support
Actually, there are straight forward and standard ways to display CPTs in WordPress. We have mentioned one in the article above.
Admin
Jouke Nienhuis
Like the author said, but I will repeat the answer.
In a nutshell create a link in your navigation menu
Advanced answer in a nutshell: create an archive page and a single page
Chuck
Great article. How can you modify single post CPT post info based on the custom taxonomy? For instance:
Date | Author | Series | Book | Topic
This is easy to write but I want to figure out how to display a modified post info if one the missing taxonomy of Series, like:
Date | Author | Book | Topic
Otherwise the default post info displays as:
Date | Author | | Book | Topic
borahan
I want to diplay specific category posts for current user in page. How can i do it?
Moazam Ali
Dear,
Thanks for the post. I want to make a library of ebooks and want to use custom post type and portfolio to show the thumbnails of books in front end. Can you please guide how i can do that?
Sharon Wallace
Hello All,
This is a great plugin. I’m trying to get the taxonomy to show on the page. I created one called Presenters. You can see it here.
How can I make that happen?
Thank you
WPBeginner Support
Please take a look at how to create custom taxonomies in WordPress. Hope this answers your question.
Admin
Sharon Wallace
Hello,
Thank you for your response. It still isn’t working but you’ve pointed me in the right direction. I will continue to play with it.
Have a wonderful day.
Dave S.
Hi,
I have created a form (using ArForms plugin) which I need it to be turned into a Post-Type. Do you have any suggestions as to how to accomplish this please?
Thank you.
Mark Greenway
Thanks for this, exactly what I needed to know to help me get to grips with custom post types.
Mark.
shashik
Thanks dear..it’s very useful..
Graham
Thank you! Just what I was looking for. It’s amazing how many times I find wordpress work-arounds and then forget how I do them and keep having to come back.
Much appreciated!
Ram
Very useful! Thank you….
MELAS
Dear,
I don’t have a lot of knowledge about coding. How can I see on the specific page theses Custom post types and taxonomies?
Thanks in advance!
MELAS
Mike Ritter
Is there an error? Shouldn’t the function be `create_post_type`?
WPBeginner Support
No mike, it is not a core function. You can define this function anyway you want.
Admin
Vera
Hello,
Thank yo for this beautiful tutorial.
I have gone and done everything as you said.
Two things I do not understand:
1.
You have specified taxonomy “genre”. Where is that set up? What if I want to make the actual genres underneath that? How do I make them? Where do I see them?
2.
I would like to make the menu links to the “Movies” and underneath – sublinks to “Genres”. I can see the “Movies” in the Menu section, each post, like pages. Don’t really need that, but I won’t mind. How to see the “Genres” in there?
Thank you,
Vera
WPBeginner Support
Seems like you have successfully created your custom post type, i.e. Movies. The next step is to create custom taxonomy, Genres. A taxonomy is a way to sort content in WordPress. Categories and tags are two default taxonomies that come built in with WordPress and are by default associated with ‘Posts’. Please see our tutorial on how to create custom taxonomies in WordPress. Follow the instructions in that tutorial to create your custom taxonomy Genres and associate it with the post type movies. Your custom taxonomy will appear below the Movies menu in WordPress admin area.
Admin
Hamed 3daJoo
I do All Of This but when i want to public a post by this post type my post types redirects to main page (i Just coppied your code without any changes)
for example i write this post with Movies post type
please help me ilove post type but i can’t use it correctly
Ciprian
Have you tried re-saving the permalinks structure?
Cheers!
Aaron
Excellent post! Thanks for the content.. helped a lot.
antonio
hi i’m trying to add the snippet of code fort the post type movie… i copied it into functions.php but when i refresh the page nothing is shown. i’m using the twenty fourteen theme… what can be wrong?
ashish shestha
How to display Csutom post type in front End??
Fahd
Hi, Custom post types on my wordpress website were working fine from last 2 years. But what happend is when I change the title of post and click update it save other changes too. But if I keep the post title same and make changes in the post, it doesn’t save it. Any recommendations please?
WPBeginner Staff
Please check out this tutorial on how to show/hide text in WordPress posts with toggle effect.
Arup Ghosh
Thanks for the info.
Arup Ghosh
I want to create a custom post type coupons with reveal coupon option and the code will link to the store url, can you tell me how can I do that. I don’t have much knowledge about coding.
Isaías Subero
Great articule. How can I add icons to custom post types on the wordpress back-end just like it is shown on the picture?
Jouke Nienhuis
it is one of the arguments ($args) when defining the custom post type.
Add ‘menu-icon’ => ‘dashicons-cart’ to the $args list.
WordPress uses built-in dashicons, but you can also use your own icons.
More information on this link:
Johan
Hi, the excerpt and the custom fields data is not displaying in the front end… any idea of why this is happening?
Bill Querry
I forgot to mention, prreferably via code for my functions.php file since that’s where the curernet CPT are defined.
Bill Querry
I am looking at a way to add categories to some existing custom post types. Anyone able to point me in the right direction?
Jouke Nienhuis
You can add new taxonomies to an existing Post Type (custom or not) just by filling in the right post-type when you write the function to create it. Category is just a taxonomy name which includes all posts with a category.
If you want to make a new category, just click on category on the menu and create a new one.
Examples of categories are Boats if your post is about boats or planes if your post is about planes. More categories is also possible, just select or add them in the right sidecolumn when you are writing your new post or editing one.
A post type is not attached or linked to a specific category, a post is.
Robey Lawrence
I just tried to use the snippet under
Querying Custom Post Types,
and figured out it needs a before the reset.
YassinZ
Thanks for the clean handy article
I just want to use the text editor in the custom post
so that I can use html tags,
Yassin
thanks for such an awesome clear tutorial
but I’m faceing a problem in displaying the CPT I’m using SEO friendly permalinks when I direct to may website/movies the CPT are duplicated
Aris Giavris
Very useful! Thank you.
I would like to add to every tag of my posts one of the following signs: +, -, +/-. May I?
If so, then I would like to have the choice to represent the signed tags as follow: all the +tags, all the -tags, all the +/-tags.
I think I am questioning a lot of things.
Placid
Hi,
I am having a hard time implementing a custom post type correctly. I have searched for a solution for a long time but couldn’t find any. Here’s what I did:
1. Freshly installed WordPress in my local wamp server (enabled apache rewrite_module first).
2. Using default theme (twenty fourteen). No plugins installed.
3. Changed permalinks to “Post name”
4. In the plugins folder, created a folder named pr_custom_posts and inside that, created a file named pr_custom_posts.php. In the file I created a custom post type. The code is as follows:
register_post_type();
//flush_rewrite_rules();
}
public function register_post_type () {
$args = array(
‘labels’ => array (
‘name’ => ‘Movies’,
‘singular_name’ => ‘Movie’,
‘add_new’ => ‘Add New Movie’,
‘add_new_item’ => ‘Add New Movie’,
‘edit_item’ => ‘Edit Movie’,
‘new_item’ => ‘Add New Movie’,
‘view_item’ => ‘View Movie’,
‘search_items’ => ‘Search Movies’,
‘not_found’ => ‘No Movies Found’,
‘not_found_in_trash’ => ‘No Movies Found in Trash’
),
‘query_var’ => ‘movies’,
‘rewrite’ => array (
‘slug’ => ‘movies/’,
‘with_front’=> false
),
‘public’ => true,
‘publicly_queryable’ => true,
‘has_archive’ => true,
‘menu_position’ => 10,
‘menu_icon’ => admin_url().’/images/media-button-video.gif’,
‘supports’ => array (
‘title’,
‘thumbnail’,
‘editor’
)
);
register_post_type(‘jw_movie’, $args);
//flush_rewrite_rules();
}
}
add_action(‘init’, function() {
new PR_Movies_Custom_Post();
//flush_rewrite_rules();
});
?>
The Good Thing: The CPT is showing in my admin panel and I can add and view movies there.
THE PROBLEM: I cannot preview the movies in the front end (By clicking the “view” in the CPT in admin panel). It shows in the front end only when I set permalink to default (http://localhost/wp02/?p=123).
What I have tried:
1. Go to permalink, keep permalink settings to “Post name” and Save changes.
2. Use flush_rewrite_rules() in several places (one by one) in my code. Please see the commented out parts in the code above.
3. Created a menu item as:
URL: http://localhost/wp02/movies
Navigation Label: Movies
This creates a menu item in the front end but shows “Not Found” when “Movies” link is clicked.
This is driving me crazy. Can anyone please help on this? I would really appreciate.
kikilin
I was going crazy too with the same “Not Found” issue, until I tried this: go to Settings > Permalinks and then re-save your settings. I had switched my setting to Default, and then changed it to Post Name (for my project’s needs). After that, links were working as expected.
WPBeginner Staff
Yes sure we will try to make a video tutorial soon. Please subscribe to our YouTube Channel to stay updated.
rehan
Helpfull tutorials and posts thanks
ceslava
Another easy way is just duplicate the archive.php and rename it to archive-movies.php and the same for single.php -> single-movies.php
Then you can make tweaks to the php files for your theme.
Best regards
Mladen Gradev
lol the plugin looks super useful, thanks.
Achilles Khalil
Very hard to display. please can you make a video tutorial ?
Mik
Hi, I’ve been reading and following your posts for so long now, you are amazing, and targeting those missing stuff of beginners… Thank you.
Davide De Maestri
This plugin should be okay, but after every upgrade they’ve got some bug. Due to exporting field, or while migrating from local to remote etc… So It’s better to hand-write the code and put into functions.php