Przypięty pływający pasek stopki pozostaje widoczny na twojej witrynie internetowej, nawet gdy użytkownicy przewijają ją w dół.
Może pomóc w importowaniu ofert rabatowych, ważnych ogłoszeń lub uchwytów mediów społecznościowych, co może zmniejszyć współczynnik odrzuceń i uzyskać więcej konwersji.
Wykorzystaliśmy pływające paski stopki w naszych sklepach e-handlu i witrynach internetowych do promowania rabatów i prezentowania newsletterów. Pomogło nam to wygenerować więcej potencjalnych klientów i zwiększyć sprzedaż.
W tym artykule pokażemy, jak krok po kroku łatwo stworzyć przypięty pływający pasek stopki w WordPress. W tym poradniku wykorzystaliśmy metody przyjazne dla początkujących, które nie wymagają żadnego kodowania.
Czym jest pływający pasek stopki w WordPress?
Przypięty pływający pasek stopki pozwala na wyraźne wyświetlanie ważnych treści i wiadomości dla importerów.
Ten pasek pozostaje widoczny dla odwiedzających przez cały czas, więc jest bardziej prawdopodobne, że klikną go i odkryją więcej przydatnych treści.
Możesz użyć pływającego paska stopki, aby:
- Zwiększ liczbę kliknięć do innych wpisów na blogu.
- Generuj leady i buduj swoją listę mailingową.
- Zwróć uwagę na specjalne kupony lub oferty rabatowe/wyprzedaże.
- Promuj swoje konta w mediach społecznościowych.
- Budowanie rozpoznawalności marki.
- Zapewnij dostęp do ważnych zasobów na twojej witrynie internetowej WordPress.
Powiedziawszy to, zobaczmy, jak łatwo stworzyć przypięty pływający pasek stopki w WordPress. W tym poradniku pokażemy ci dwie metody, a ty możesz skorzystać z odnośników poniżej, aby przejść do wybranej przez ciebie metody:
Metoda 1: Utwórz przypięty pływający pasek stopki za pomocą OptinMonster (zalecane)
Możesz łatwo stworzyć przypięty pływający pasek stopki za pomocą OptinMonster. Jest to najlepsze narzędzie do generowania leadów i optymalizacji konwersji na rynku, które sprawia, że konwersja odwiedzających twoją witrynę internetową w subskrybentów jest niezwykle łatwa.
W WPBeginner używaliśmy go do tworzenia banerów i wyskakujących okienek promujących nasze usługi pro lub newsletter. Aby dowiedzieć się więcej, zobacz naszą pełną recenzję OptinMonster.
Wtyczka zawiera kreator typu “przeciągnij i upuść” oraz gotowe szablony, które umożliwiają tworzenie pływającego paska stopki, wyskakujących okienek i banerów bez użycia jakiegokolwiek kodu.
Zalecamy tę metodę, ponieważ OptinMonster jest bardzo łatwy w użyciu i oferuje więcej opcji konfiguratora niż metoda darmowej wtyczki.
Krok 1: Zainstaluj OptinMonster na twojej witrynie internetowej
Najpierw należy zarejestrować się na witrynie internetowej OptinMonster, klikając przycisk “Pobierz OptinMonster teraz”.

Następnie musisz zainstalować i włączyć darmową wtyczkę OptinMonster na twojej witrynie internetowej. Aby uzyskać więcej instrukcji, zapoznaj się z naszym przewodnikiem dla początkujących, jak zainstalować wtyczkę WordPress.
Po włączaniu na ekranie otworzy się kreator konfiguracji OptinMonster, w którym należy kliknąć przycisk “Połącz istniejące konto”. Spowoduje to połączenie twojej witryny WordPress z kontem OptinMonster.
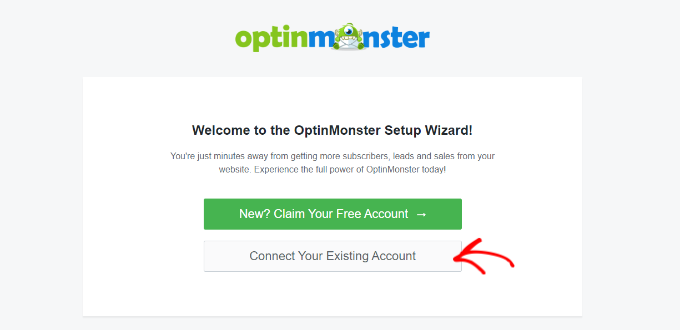
Gdy to zrobisz, na twoim ekranie otworzy się nowe okno.
Tutaj kliknij przycisk “Połącz z WordPress”, aby przejść dalej.

Krok 2: Utwórz i dostosuj pływający przypięty pasek stopki
Teraz, gdy połączyłeś OptinMonster z twoją witryną internetową, nadszedł czas, aby utworzyć przypięty pływający pasek stopki.
Aby to zrobić, należy przejść na stronę OptinMonster ” Szablony z panelu bocznego administratora WordPress i wybrać “Floating Bar” jako rodzaj kampanii.
Gdy to zrobisz, wszystkie gotowe szablony dla pływającego paska będą wczytywane na ekranie. W tym miejscu możesz kliknąć przycisk “Użyj szablonu” na tym, którego chcesz użyć.
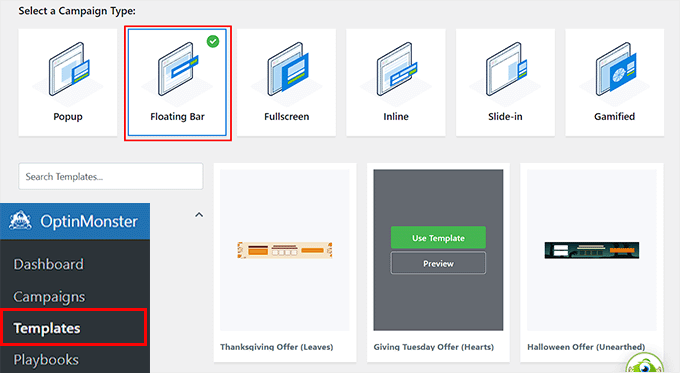
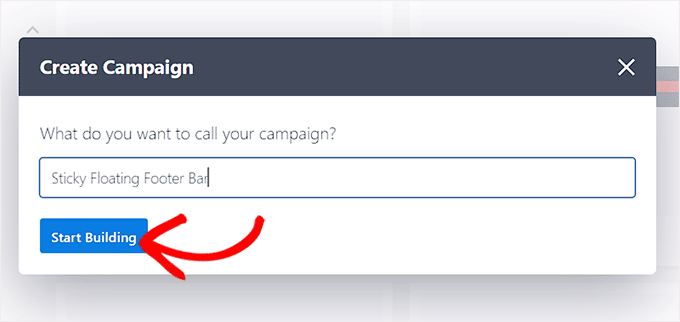
Spowoduje to wyświetlenie monitu “Utwórz kampanię” na ekranie, w którym możesz dodać nazwę dla pływającego paska stopki, który zamierzasz utworzyć. Może to być dowolna nazwa, ponieważ nie będzie ona wyświetlana odwiedzającym Twoją stronę.
Następnie wystarczy kliknąć przycisk “Rozpocznij tworzenie”.
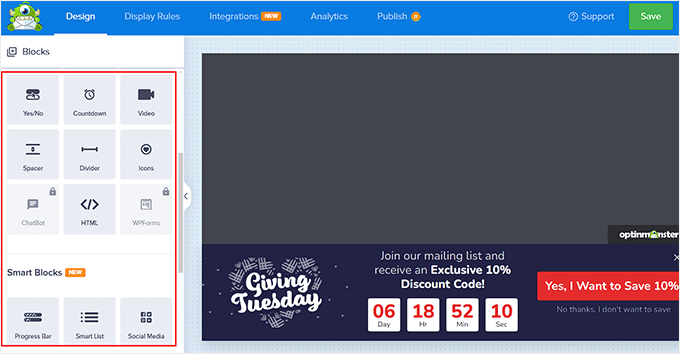
Kreator przeciągnij i upuść OptinMonster zostanie teraz uruchomiony na ekranie, gdzie możesz rozpocząć konfigurowanie twojego pływającego paska stopki. Powiadomienie wyświetli podgląd pływającego paska po prawej stronie z blokami w lewej kolumnie.
Na przykład, możesz użyć bloku odliczającego czas, jeśli twój pływający pasek stopki promuje ofertę rabatową. Pomoże to stworzyć poczucie pilności wśród użytkowników i zachęci ich do podjęcia działań.
Do paska stopki można również dodać wezwanie do działania, film lub blok mediów społecznościowych. Szczegółowe instrukcje można znaleźć w naszym poradniku na temat tworzenia paska powiadomień w WordPress.
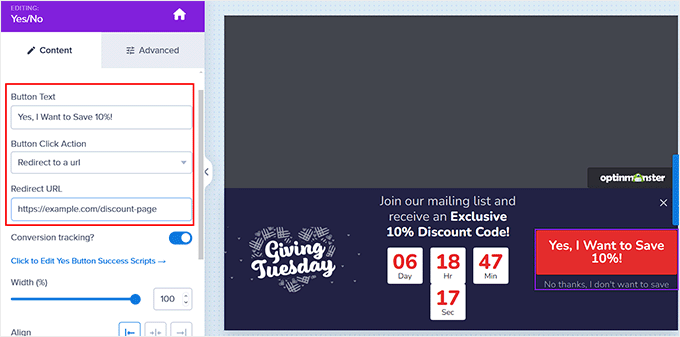
Możesz także edytować tekst na pasku stopki, klikając go. Spowoduje to otwarcie ustawień bloku w lewej kolumnie, gdzie możesz dostosować je zgodnie z twoimi upodobaniami.
Na przykład, jeśli chcesz zmienić ofertę rabatową w szablonie, możesz zmienić tekst przycisku. Następnie można wybrać opcję “Przekieruj na adres URL” i dodać odnośnik do strony, na którą użytkownicy mają zostać przekierowani po kliknięciu przycisku.
Krok 3: Skonfiguruj reguły wyświetlania dla twojego pływającego paska stopki
Gdy już będziesz zadowolony z konfiguratora Twojej stopki, po prostu przejdź do karty “Reguły wyświetlania” u góry.
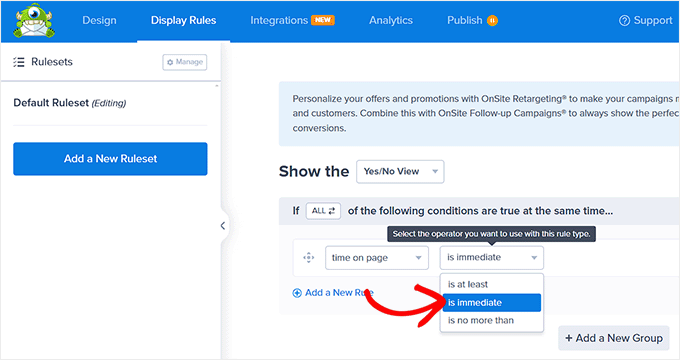
Tutaj możesz skonfigurować, kiedy pasek ma być wyświetlany na twojej stronie. Jeśli chcesz wyświetlać pływający pasek stopki przez cały czas, musisz wybrać opcję “czas na stronie” z menu rozwijanego po lewej stronie.
Następnie wybierz opcję “jest natychmiastowa” z menu rozwijanego po prawej stronie.
Aby jednak wyświetlić pływający pasek stopki na określonej stronie, należy wybrać opcję “Kierowanie na stronę” z prawego menu rozwijanego.
Następnie wybierz opcję “dokładnie pasuje” z rozwijanego menu pośrodku, a następnie dodaj adres URL strony. Gdy to zrobisz, pływający pasek stopki będzie wyświetlany tylko na wybranej stronie.
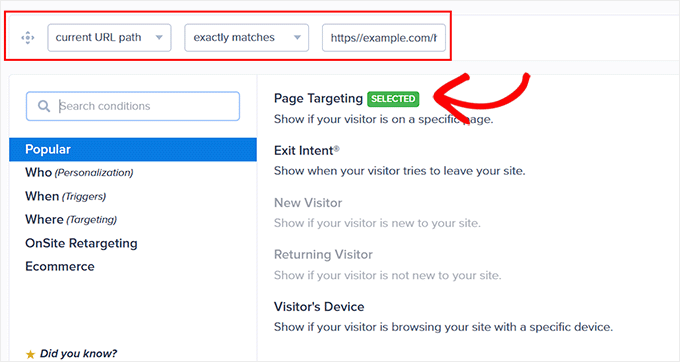
Dodatkowo możesz wybrać opcję “Exit Intent”, aby wyświetlić przypięty pływający pasek stopki, gdy użytkownik ma zamiar opuścić twoją witrynę. Następnie można skonfigurować czułość zamiaru wyjścia i wybrać urządzenia, na których będzie wyświetlany pasek stopki. Może to być przydatne, jeśli chcesz zmniejszyć współczynnik odrzuceń.
Możesz nawet wybrać opcję “Urządzenie odwiedzającego”, jeśli chcesz wyświetlać pływający pasek stopki tylko odwiedzającym komputery stacjonarne.
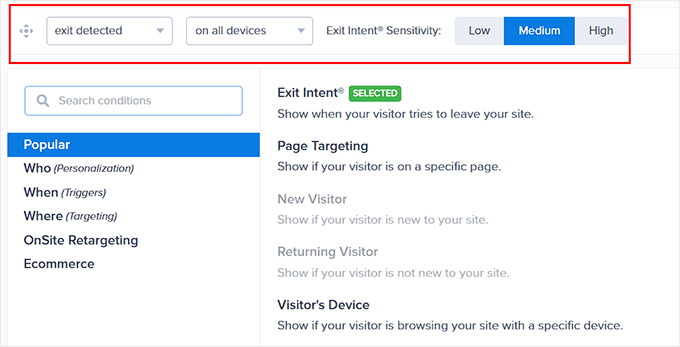
Można również skonfigurować reguły wyświetlania zgodnie z datą, godziną lub odległością przewijania, wybierając opcję “Kiedy” z lewej kolumny.
Więcej informacji na temat reguł wyświetlania można znaleźć w naszej pełnej recenzji OptinMonster.
Krok 4: Opublikuj twój pływający pasek stopki
Po zdefiniowaniu warunków wyświetlania twojego paska stopki, przejdź do karty “Opublikuj” u góry.
Tutaj wystarczy kliknąć przycisk “Opublikuj”.
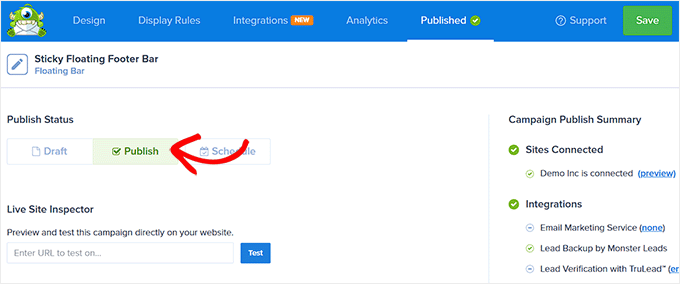
Następnie nie zapomnij kliknąć “Zapisz”, aby wprowadzić twoje zmiany.
Teraz możesz przejść na twój blog WordPress, aby zobaczyć przypięty pływający pasek stopki w działaniu.
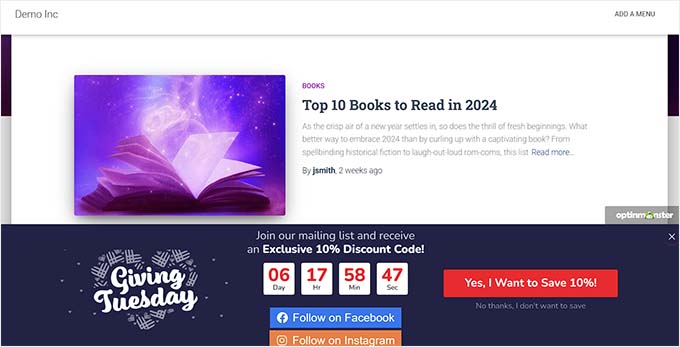
Alternatywa: Możesz również użyć Thrive Ultimatum, aby wyświetlić pływający pasek stopki z licznikiem czasu na twojej witrynie internetowej. Aby uzyskać więcej motywów, zobacz naszą pełną recenzję Thrive Themes Suite.
Metoda 2: Utwórz przypięty pływający pasek stopki za pomocą darmowej wtyczki
Jeśli szukasz darmowego sposobu na stworzenie przypiętego pływającego paska stopki, to ta metoda jest dla Ciebie. Pamiętaj jednak, że będziesz mieć ograniczone opcje konfiguratora w porównaniu do korzystania z OptinMonster.
Najpierw należy zainstalować i włączyć wtyczkę Firebox Popup Builder. Szczegółowe instrukcje można znaleźć w naszym poradniku na temat instalacji wtyczki WordPress.
Po włączaniu przejdź na stronę Firebox ” Kampanie z kokpitu WordPress i kliknij przycisk “+ Nowa kampania”.
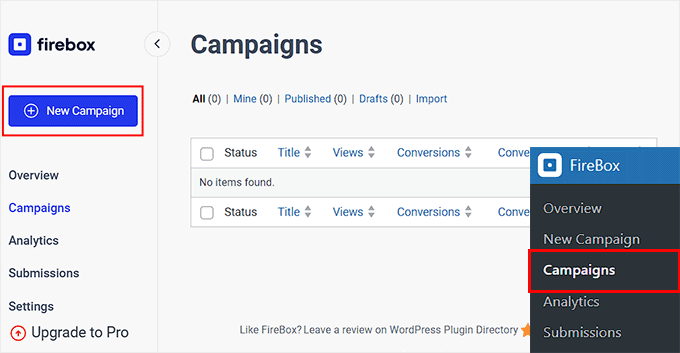
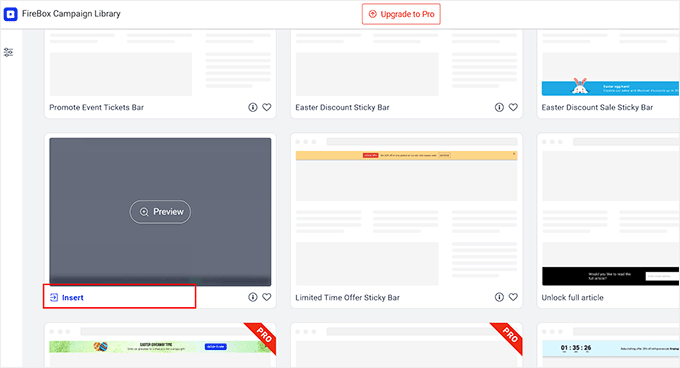
Spowoduje to otwarcie biblioteki kampanii Firebox, w której można wyszukać przypięte szablony pływających pasków.
Następnie wystarczy kliknąć odnośnik “Wstaw” pod wybranym pływającym paskiem stopki. Pamiętaj, że jeśli wybierzesz pasek nagłówka, nie będziesz mógł zmienić jego pozycji. Musisz upewnić się, że wybrany szablon jest przeznaczony dla paska stopki.
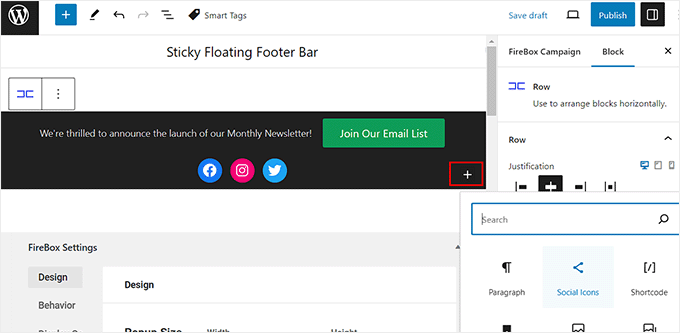
Na twoim ekranie otworzy się teraz edytor bloków, w którym możesz zacząć od dodania nazwy dla pływającego paska.
Następnie można edytować tekst w stopce, klikając go i utworzyć nowe bloki, klikając przycisk “+”. Spowoduje to otwarcie menu bloków, w którym można dodawać obrazki, nagłówki, akapity, filmy, cytaty lub bloki list.
Na przykład, jeśli chcesz dodać uchwyty mediów społecznościowych, możesz wybrać blok Ikonki społecznościowe. Następnie można dodać konta mediów społecznościowych i odnośniki za pomocą panelu bloków.
Więcej szczegółów można znaleźć w naszym poradniku na temat dodawania ikonek mediów społecznościowych w menu WordPress.
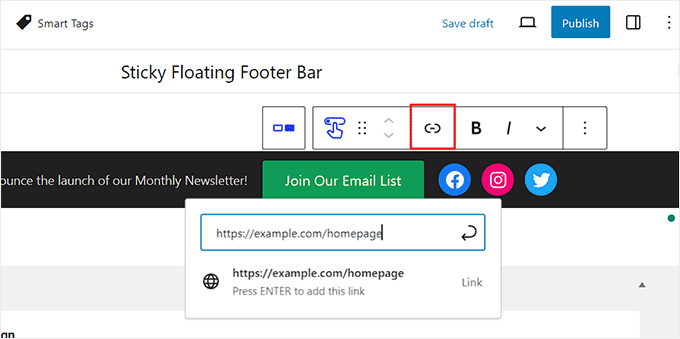
Możesz także zmienić tekst w bloku przycisku i dodać odnośnik do strony, na którą chcesz kierować użytkowników, klikając ikonkę odnośnika na pasku narzędzi bloku.
Następnie wpisz adres URL twojego wyboru i naciśnij “Enter”.
Następnie możesz przewinąć w dół do sekcji “Ustawienia Firebox”.
W tym miejscu można zmienić kolor tła, kolor tekstu, wyrównanie, rozmiar, dopełnienie i margines dla pływającego paska stopki.
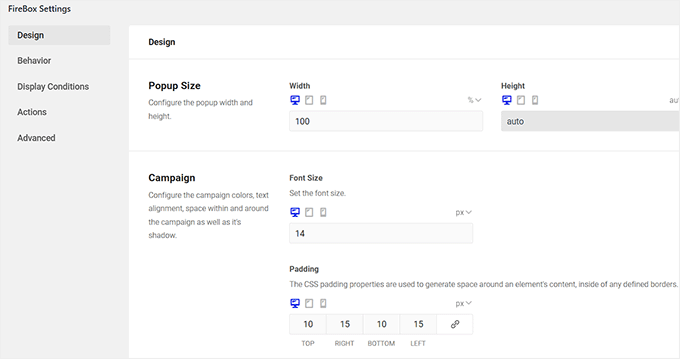
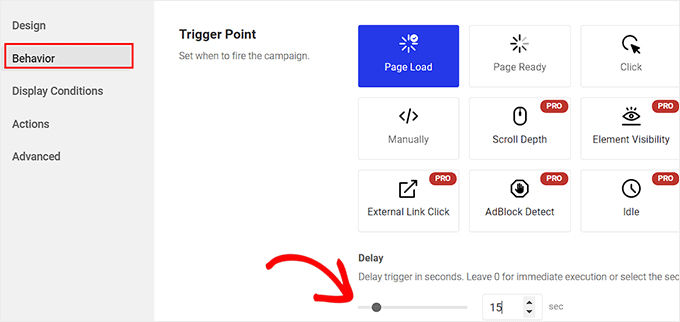
Następnie przejdź do karty “Zachowanie” z lewej kolumny i wybierz “Wczytywanie strony” jako punkt wyzwalania pływającego paska.
Następnie użyj suwaka “Opóźnienie”, aby wybrać czas opóźnienia dla pływającego paska. Na przykład, jeśli przeciągniesz suwak na 15 sekund, pływający pasek stopki zostanie wyświetlony, gdy użytkownik spędzi 15 sekund na twojej witrynie.
Jeśli chcesz, aby przypięty pływający pasek stopki był wyświetlany natychmiast, możesz ustawić suwak na 0.
Następnie możesz pozostawić inne ustawienia bez zmian lub skonfigurować je zgodnie z twoimi upodobaniami.
Po zakończeniu nie zapomnij kliknąć przycisku “Opublikuj” u góry.
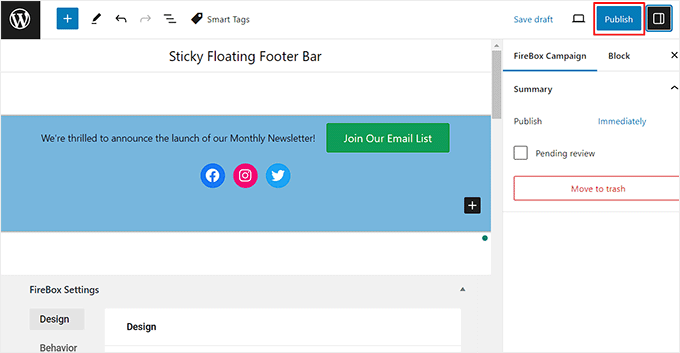
Teraz przejdź na twoją witrynę WordPress, aby zobaczyć przypięty pływający pasek stopki w działaniu.
Tak to wyglądało na naszej witrynie demonstracyjnej.

Bonus: Stwórz przypięte pływające menu nawigacyjne w WordPressie
Oprócz dodania przypiętego paska stopki, możesz również utworzyć przypięte pływające menu nawigacyjne na twojej witrynie WordPress.
Menu nawigacyjne zawiera odnośniki do najważniejszych stron na twoim blogu WordPress i działa jako struktura organizacyjna witryny internetowej.
Jeśli to menu zostanie przypięte, pozostanie widoczne na twojej stronie przez cały czas, nawet gdy użytkownik przewinie ekran w dół. Może to zwiększyć zaangażowanie i ułatwić poruszanie się po twojej witrynie internetowej.

Aby utworzyć przypięte pływające menu nawigacyjne, wystarczy zainstalować i włączyć wtyczkę Sticky Menu & Sticky Header. Aby uzyskać szczegółowe informacje, zobacz nasz poradnik dotyczący instalacji wtyczki WordPress.
Po włączaniu, przejdź na stronę Ustawienia ” Przyklejone menu z kokpitu WordPress i wpisz #main-navigation obok opcji “Przyklejony element (wymagany)”.
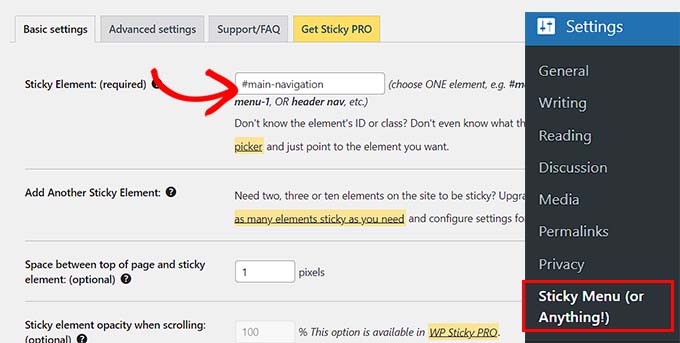
Następnie kliknij przycisk “Zapisz zmiany”, aby zapisać twoje ustawienia. Przypięte pływające menu nawigacyjne zostało pomyślnie utworzone.
Aby uzyskać szczegółowe instrukcje, zapoznaj się z naszym poradnikiem na temat tworzenia przypiętego pływającego menu nawigacyjnego w WordPress.
Mamy nadzieję, że ten artykuł pomógł ci dowiedzieć się, jak łatwo utworzyć pływający przypięty pasek stopki w WordPress. Możesz również zapoznać się z naszym przewodnikiem dla początkujących na temat dodawania kodu nagłówka i stopki w WordPress oraz naszą listą kontrolną rzeczy, które należy dodać do stopki na twojej witrynie WordPress.
If you liked this article, then please subscribe to our YouTube Channel for WordPress video tutorials. You can also find us on Twitter and Facebook.


Moinuddin Waheed
Having a floating footer bar is very effective for marketing and lead generation.
It gives a constant temptation in the users mind about the ongoing promotions and offers.
I have made purchase in the past because of this constant reminder and a fomo that this offer would end up soon.
Thanks for step by step breakdown of steps of how can we make one for our websites.
WPBeginner Support
You’re welcome, glad our guide was helpful!
Admin
Hajjalah
I use the OptinMonster plugin to add a floating footer bar with my social links which has drastically increased my social media audience, courtesy of this detailed step by step article .
But if I may ask. Is it possible to add some code so that the OptinMonster plugin footer bar does not appear or appears after when a footer Ad like Google AdSense footer Ads is available?
WPBeginner Support
You would want to reach out to OptinMonster’s support and they can help you look into and/or set up something like that
Admin
Ahmed Omar
An excellent tutorial on creating a “sticky” floating footer bar in WordPress
Your step-by-step guide, especially the first method is clear and effective.
I use the first method for this floating footer
Thanks for this practical solution
WPBeginner Support
You’re welcome!
Admin
Steve Alvi
Please I want a close button with this footer floating bar.
WPBeginner Support
OptinMonster would be the method that allows you to have a close button the easiest.
Admin
Jiří Vaněk
I use Optin Monster where I can configure the closing and even measure the closing. That way I know how many people used the floating bar and how many closed it because they weren’t interested.
Trendy Avinash
Worked Like a Charm,Without any Plugins.
Thanks
WPBeginner Support
Glad our guide was helpful
Admin
Alejandro Ferguson
The floating footer code really works. Thank u
WPBeginner Support
Glad our guide could help set it up
Admin
John SMith
How to add a FB sharing button in a floating bar in the only mobile, not for desktop.
WPBeginner Support
You would want to take a look into option 2 in our social media plugins here: https://www.wpbeginner.com/plugins/best-social-media-plugins-for-wordpress/
Admin
wlepcha
How to add menus in the sticky footer instead of random ads.
WPBeginner Support
You would want to take a look at our article here: https://www.wpbeginner.com/wp-themes/how-to-create-a-sticky-floating-navigation-menu-in-wordpress/
Admin
Marius
Very nice tutorial. I implemented the manual code and worked like a charm. Only one more feature I need… can we also have a X or close button to close the floatingbar and remain like this for the rest of the visit? I know, cookies are involved, but maybe you can give us a simple solution. Thank you!
Greg Guz
Very clear and east to follow tutorial.
Floating bar seem to work absolutely fine, but I’m getting following error in chrome console:
Failed to load resource: the server responded with a status of 404 ()
Any ideas?
Ankush jain
Very helpful your website
thank you very much
Mark Rowles
Just a quick pointer CSS wont work for this.
You’ve got fixedBar in the html as a class name (capital B) and you’ve got fixedbar in the css (lowercase b) so the css doesn’t apply.
Can someone correct the code please to help others that discover this post?
WPBeginner Support
Hey Mark,
Thanks for pointing this out. We have updated the code.
Admin
Robi
Dear WPBeginner, and Friends
If I have specific section that I’ve created using Elementor Page Builder, How I can use it as a custom sticky footer? (It contains more than one column, some buttons and text). I want this type of sticky footer, Instead of simple text as explained in this tutorial.
Thanks..
Daniel
1) Added code just before the tag in the footer.php from my theme dir /wp-content/themes/mytheme/
2) Added code to my theme dir /wp-content/themes//mytheme/style.css not working deleted and then i try to added from the theme option to custom css menu same problem not working
3) Added floatingbar.js with the code inside in /wp-content/themes/mytheme/js
4) Added code to functions.php first not working.. tried with site-specific plugin also same thing
I tried on both website different theme same problem not working just sit there it`s not floating
Some help will be welcome… I really need this
WPBeginner Support
Hey Daniel, try using Inspect tool to troubleshoot any issue with CSS.
Admin
Daniel
Thanks for the replay but for me messing with css and js it`s like building a space ship… i will give a try to figure out whats rong
Regards
Daniel
Daniel
I used the inspector tools and i don`t see any read lines there….
Dueadla Framin
I have the same issue! The code you posted isn’t even working on default twenty sixteen theme. It’s not floating it’s just stuck on the bottom of the webpage after you scroll all the way to the bottom.
Igor
there is an error in the fixedBar reference in the css code (it is referencing as “.fixedbar” whereas it should be “.fixedBar”. Change that and see if it works.
henrykene
WpBeginner please i will like to use it for displaying my Adsense ads on mobile views. How will i go about it and what are the code to make it show Adsense stick footer for mobile viewers?
Nawaf
Awesome.
But there is a bug. When you open it in mobile. The ribbon gets cutted. And u can see only half of it
Tip
In my new theme, I have the option of using an infinite scroll feature. This is great except that the reader would have to scroll a long time to reach my old footer, which is where I put the legal disclosures, etc.
With this floating footer bar, I was able to nicely put the links there and now I can use the infinite scroll feature without having to reposition a bunch of required links.
Thanks for this tutorial. I learned a little bit more PHP and CSS too!
Sarah Noah
I have a client who wants to have a link to REQUEST A QUOTE on every page so when I saw this sticky footer it seemed perfect until I read that somer users are annoyed by it. Do you guys think REQUEST A QUOTE stuck on the bottom of every page is annoying? Of course it is the most important thing the company wants the user to do.
Roy E
Footer bar shows fine in FireFox but is not sticky in IE11 where I had to scroll down to see “About WPBeginner”, “Site Links”, and “Sites We Like” ??
Roy E
Of course, when I pressed Enter on the previous comment ( IE issue), the sticky footer bar appeared. Not sure what happened but the problem went away. Please disregard this comment and the previous one.
yugishtha
do we also have a floating top bar menu plugin for WP?
Hutzel
I tried all, but it does not Show me the fixed footer. Can somebody help or assist me please? thanks
Devendra Meena
Is there any plug in, which can have some scripts on a floating box, and with a x button to close it.
Khushal Rao
this can also be used to showing ads too..
Dick Sijtsma
Lowering the opacity to, for example 0.60 gives the visitor a glimps of the underlying content. I think that would be a nice effect. But changing the opacity of the bar, changes the opacity of the text too. And that ‘dilutes’ the message. Any trick to prevent that?
Thanks.
Jan dB
As mentioned earlier, this is a very easy tutorial and works like a charm on most computers.
However, I also have issues regarding the mobile browsers.
Have you already come up with a solution for that?
Thanks and keep up the good work!
Editorial Staff
For mobile browsers if you have a responsive design, then you can simply use media queries and display: none the entire footer bar.
Admin
Theresa @DearCreatives
Nice. I am actually looking for a tutorial for adding script to top of post that is there every time I post for disclosure purposes. If you have one like that or know of a plugin can you send me an @DearCreatives on twitter or email me thanks!!
Dick Sijtsma
Hi, looks good, but i do understand the reasons some people dislike these kinds of footers very much. Nevertheless i’m trying to accomplish this effect too.
In the source of this very page, i saw you externalized the javascript. You’ve put it in the main.js javascript file, and linked this main file to the page in the header.
So far so good, i can manage that. But, i can’t find the place where the ‘randomtip’ function is called.
In short my question is: how do i externalize the javascript? Hope to hear from you.
Matthew
Great tutorial. One issue that other might also run into – I only have one footer link (as opposed to having several in rotation) and this footer bar shows even on the page that I link to in the footer. Do you know of a quick way to not show this footer on particular pages? Or to, perhaps, only show it on the homepage?
Editorial Staff
Sure just wrap the text with the conditional statement is_front_page().
Admin
Antonio
Here a true beginner. How do I actually do that? I totally new to WP and PHP. As far as I understand I have to put somewhere in the footer.php but I really have no idea where. Great article though. It managed to add it to my blog as well
Caio
I like it, but it is a bit too distracting. Maybe make it nice and light by turning down the opacity, and then adding a style statement on hover to turn the opacity back up to .9
Sopheak
Wow! It was a great tutorial.
Pawan
Great, I was looking for same.
Sai Kumar
Hi, this sticky floating footer bar is really awesome! I am going to add it in my blog for sure. Thanks a lot for Sharing!!
Max Manroe
Wow nice tutorial and think this is great, I will try it to my blog. Thanks
Zseller Istvan
Guys, this is the only thing that I really hate about WpBeginner. When I read your articles on my tablet, with Opera this footer bar stays in the middle of the page for seconds when scrolling. It is a new tablet, and powerful enough. The footer bar covers the content, which is really annoying. After some time it moves to place.
Editorial Staff
We are working on a mobile/tablet version. This won’t be an issue soon enough.
Admin
Salman Ahmad
Wow ! This is Awesome ,Thanks for sharing
Peter
Thanks a lot for providing us this great tutorial. Definitely it will be helpful for me.
Amitabha Chakraborty
Hi
Nice tutorial. Was thinking a “X” button to close it if it annoys someone would have been great.
Regards
Amitabha
David
I like a footer bar. I think its a great place to put social sharing buttons. I made my own on a client’s site but it has the option of being able to close. It also holds the go to the top button. Pretty nifty. However, like the footer bar I made, on my HTC EVO 4G your footer bar doesn’t stick at the bottom as it should. It actually is stuck in the middle of an article and is really annoying because it covers up a bit of the text. The bar I made can be closed so it is only a quick annoyance. Your bar cannot so I can never read that text. Again this is on my phone. If you can figure out the workaround please let me know.
I came to this article through your newsletter which is great. Thanks for that.
Michael
Like or hate these types of bars, there is great value in seeing how the code is written to implement such a thing, at least. I use Hello Bar and the Wibya bar on several of my sites and although I think some people have become blind to them, including myself, and some hate them, they still work to help convert and share content a lot of the time.
I appreciate what I view as a helpful little code lesson. Great site!
Taryn Fox
I personally feel that the floating footer bar is an extremely user-hostile feature, especially one like yours which is a) unhideable, and b) expands to twice its intended size (or greater) when viewed while the font size is increased.
Speaking of which, even with nosquint magnifying the rest of the text on this site, the text in the comments field is tiny and hard to read if you have visual accessibility issues.
Speaking of other accessibility issues, asking for a person’s “Real Name” is hostile to anyone who uses a pseudonym. This includes trans women, people who are being stalked, people who are hiding their online activity from others who are capable of hurting them, and people who simply prefer and are better known by their pseudonyms than their legal or birth names (both of which are more inclusive and accurate terms for what you call a “real name”).
Also, you misspelled “meaningful” in the “Add a comment” notice.
I wasn’t going to leave a long rambling comment of criticism, but I feel most people have banner blindness to footer bars, and are ambivalent towards them at best and annoyed by them at worst. Most people who aren’t web designers, anyway. I thought maybe someone should speak up for the people who are actually affected by them. Then I ran into the other issues once I went to your site from Google Reader, and tried to leave a comment.
Thank you for your tutorials, and I hope things go well for you.
Editorial Staff
Hey Taryn,
We really appreciate your invaluable feedback. There are definitely pros and cons to having a floating footer bar like this ones. The cons you have already pointed out. We thought about doing a cookie tracking option where regular users can close the bar and never have it shown again. But even the regular users sometime miss out on great deals because of that. Also if they clear their browser’s cache or use a different computer, the bar shows up again. Yet another downside of cookie tracking. We’ve given extensive thoughts of having user registration and offer personalization on the site.
As for comments, the real name text in the field is there to serve one purpose, stop spammers. If you read the comments policy, it says “We do not allow Keywords stuffed in the name field. You must use your name or nick name for commenting.” Often folks use their nicknames, and we are completely ok with it. But if your nickname is “best insurance company” or something like that… then we mark it as spam.
Thanks for pointing out the typo. We have fixed that.
Admin
Partha Bhattacharya
This is with respect to Taryn’s comment above:
“…I feel most people have banner blindness to footer bars, and are ambivalent towards them at best and annoyed by them at worst.”
Since you continue using them there is no doubt you get benefits from them, and people do click on them to remain updated just as I did just now…coming here from another page.
Would you mind sharing some stats / lookins as to how effective is the footer bar for you, and also how effective it is as against using a header bar!
staion
Thanks for this easy and amazing small tutorials! I’ve already implemented it on my site, but without the jquery thing, just using it as announcements.
FreedomJackson
Awesome thanks for sharing this dude I’m doing some updating and I was trying to find a good way to add this footer bar.
mucho grande gracias senior