Jeśli pracujesz z WordPressem, prawdopodobnie wiesz, jak ważne jest testowanie rzeczy przed wprowadzeniem zmian w twojej witrynie na żywo. W WPBeginner często tworzymy testowe witryny internetowe na naszych komputerach, aby wypróbować nowe motywy i wtyczki. Pozwala nam to odkrywać nowe rzeczy bez uszkadzania naszych witryn internetowych.
Jednym z najlepszych sposobów na stworzenie testowej witryny internetowej jest skorzystanie z bezpłatnego narzędzia o nazwie XAMPP. XAMPP ułatwia skonfigurowanie WordPressa na twoim własnym komputerze. Do utworzenia witryny testowej na twoim komputerze nie potrzebujesz hosta ani połączenia z Internetem.
W tym artykule pokażemy, jak łatwo utworzyć lokalną witrynę internetową WordPress przy użyciu XAMPP. Zapewni to bezpieczne miejsce do eksperymentowania z WordPressem, próbowania nowych rzeczy i doskonalenia umiejętności tworzenia witryn internetowych bez wpływu na twoją witrynę na żywo.

Dlaczego warto stworzyć regionalną witrynę WordPress?
Tworzenie lokalnych witryn WordPress jest powszechną praktyką wśród programistów i właścicieli witryn. Pozwala ona na przetestowanie WordPressa bez konieczności tworzenia rzeczywistej witryny internetowej w Internecie.
Lokalne witryny internetowe są widoczne tylko na twoim komputerze. Możesz wypróbować różne motywy i wtyczki WordPress, przetestować ich funkcje i nauczyć się podstaw WordPress.
Jeśli masz już witrynę internetową WordPress, możesz utworzyć lokalną kopię swojej witryny na komputerze, aby wypróbować nowe aktualizacje wtyczek przed wdrożeniem ich w witrynie na żywo.
Ważne: Lokalna witryna internetowa będzie widoczna tylko na twoim komputerze. Jeśli chcesz stworzyć witrynę internetową na żywo, będziesz potrzebować nazwy domeny i hostingu WordPress.
Postępuj zgodnie z instrukcjami krok po kroku w naszym przewodniku na temat zakładania bloga WordPress, gdy będziesz gotowy do utworzenia witryny internetowej na żywo.
Powiedziawszy to, sprawdźmy, jak zainstalować WordPressa lokalnie w systemie Windows, Mac lub Linux przy użyciu XAMPP.
Czym jest XAMPP?
XAMPP to pakiet oprogramowania, który zawiera wszystkie rzeczy potrzebne do skonfigurowania lokalnego środowiska serwerowego na twoim komputerze.
Aby utworzyć lokalną witrynę WordPress, musisz skonfigurować oprogramowanie serwera WWW (Apache), PHP i MySQL na twoim komputerze.
PHP to język programowania, a MySQL to oprogramowanie do zarządzania bazą danych. Oba są wymagane do uruchomienia WordPressa.
Instalowanie ich osobno jest dość trudne dla początkujących. Tutaj z pomocą przychodzi XAMPP.
XAMPP ułatwia tworzenie witryn internetowych WordPress lokalnie. Jest on dostępny dla komputerów z systemami Windows, Mac i Linux.
Zacznijmy od zainstalowania XAMPP i skonfigurowania go do uruchomienia twojej regionalnej witryny WordPress.
Instalacja XAMPP na twoim komputerze
Najpierw należy przejść na witrynę internetową XAMPP i kliknąć przycisk “Pobierz” dla twojego systemu operacyjnego.
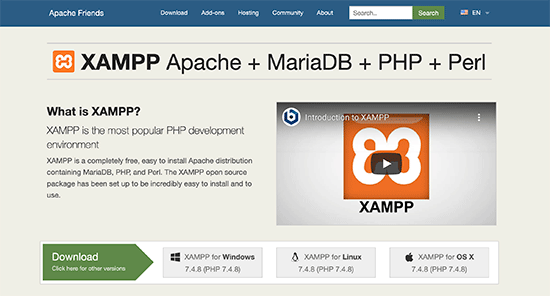
W zależności od twojego systemu operacyjnego, kreator instalacji i interfejs aplikacji mogą różnić się od przedstawionych tutaj zrzutów ekranu. Na potrzeby tego artykułu przedstawimy wersję oprogramowania dla systemu Windows.
Po pobraniu XAMPP należy kliknąć i uruchomić instalator.
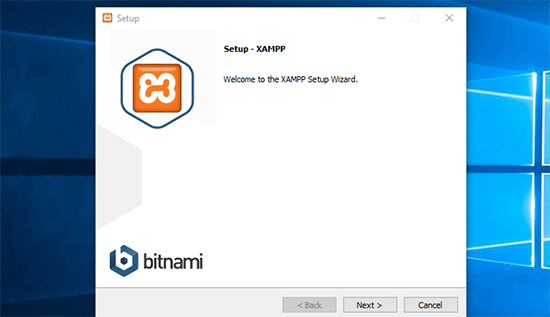
XAMPP zapyta, gdzie zainstalować oprogramowanie i które pakiety chcesz zainstalować. Domyślne ustawienia będą odpowiednie dla większości użytkowników. Klikaj dalej przycisk “Dalej”, aby zakończyć działanie kreatora konfiguracji.
Po zakończeniu działania kreatora zaznacz opcję “uruchom panel sterowania teraz”, a następnie kliknij przycisk “Zakończ”.
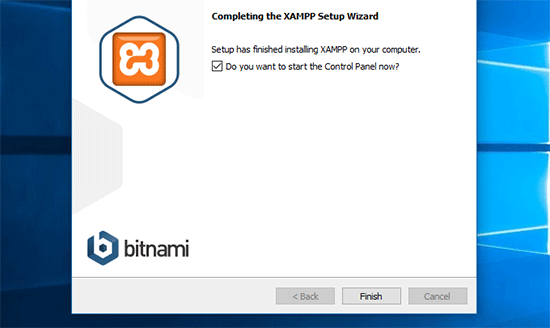
Spowoduje to uruchomienie aplikacji XAMPP Control Panel.
Korzystając z aplikacji XAMPP, możesz uruchomić serwer WWW Apache jako twój serwer regionalny i MySQL jako serwer bazy danych. Kliknij przycisk “Start” obok Apache i MySQL.
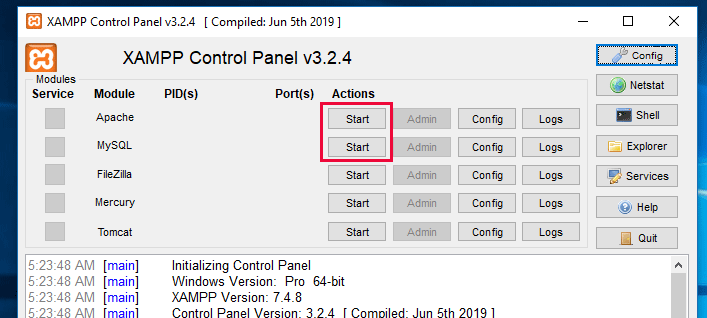
XAMPP uruchomi teraz Apache i MySQL.
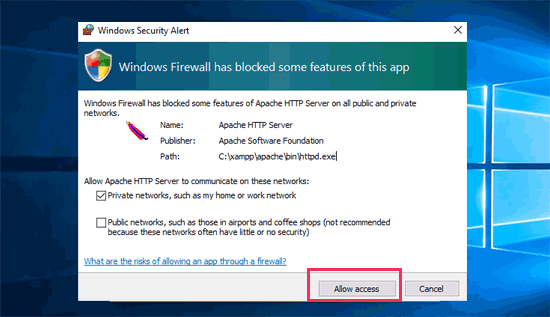
Może zostać wyświetlone powiadomienie zapory systemu Windows. Ważne jest, abyś kliknął przycisk “Zezwalaj na dostęp”, aby obie aplikacje mogły działać na twoim komputerze.
Po uruchomieniu obu aplikacji ich nazwy zostaną podświetlone na zielono.
Teraz jesteś gotowy do utworzenia lokalnej witryny internetowej i zainstalowania WordPressa przy użyciu XAMPP.
Tworzenie regionalnej witryny WordPress za pomocą XAMPP
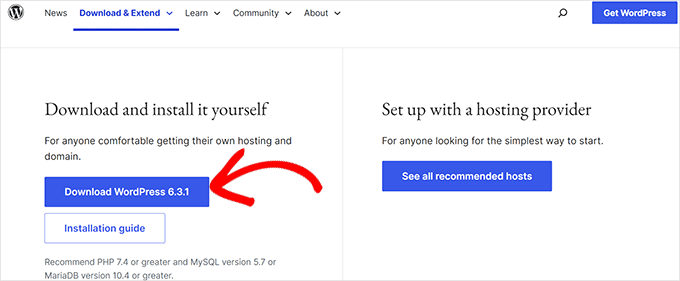
Najpierw należy pobrać WordPress. Przejdź na witrynę internetową WordPress.org i kliknij przycisk “Pobierz WordPress”.
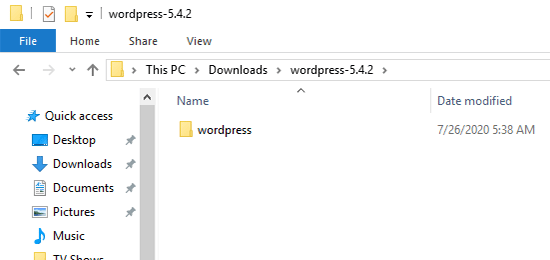
Po pobraniu WordPressa należy rozpakować plik zip, po czym pojawi się katalog wordpress.
Należy skopiować ten katalog.
Następnie przejdź do twojego katalogu instalacyjnego XAMPP.
W systemie Windows będzie to C:/Program Files/XAMPP/htdocs lub C:/Xampp/htdocs.
Na komputerach Mac będzie to /Applications/XAMPP/htdocs.
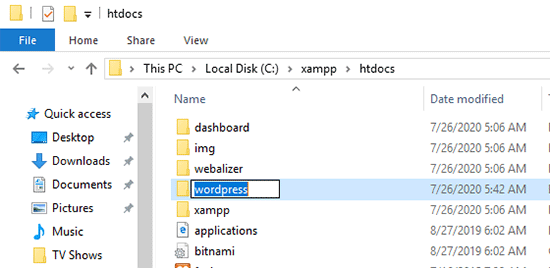
Wklej skopiowany wcześniej katalog wordpress do folderu “htdocs”.
Zalecamy zmianę nazwy katalogu “wordpress” na “witryna internetowa” lub inną. Pomoże to łatwo zidentyfikować twoją witrynę regionalną.
Następnie należy otworzyć twoją ulubioną przeglądarkę internetową.
Możesz wpisz następujący adres URL w pasku adresu twojej przeglądarki:
https://localhost/website1/
Jeśli zmieniłeś nazwę katalogu WordPress na inną, upewnij się, że zastąpiłeś “website1” twoją własną nazwą katalogu.
Spowoduje to wczytywanie kreatora instalacji WordPress i zostaniesz poproszony o wybranie języka. Po wybraniu języka kliknij przycisk “Kontynuuj”.
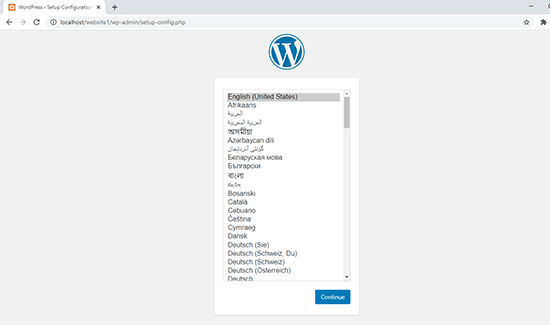
Na następnym ekranie zobaczysz ekran powitalny WordPress.
Zawiera powiadomienie, że WordPress potrzebuje nazwy bazy danych, nazwy użytkownika bazy danych, hasła i informacji o hoście.
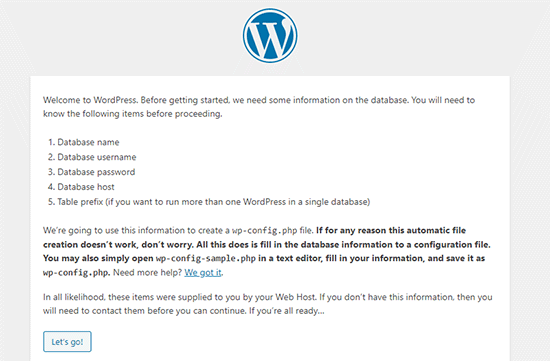
Stwórzmy bazę danych dla twojej witryny WordPress.
Należy otworzyć nową kartę przeglądarki i przejść na stronę https://localhost/phpmyadmin/.
Spowoduje to uruchomienie aplikacji phpMyAdmin, która jest preinstalowana z XAMPP. Pozwala ona na łatwe zarządzanie twoją bazą danych przy użyciu prostszego interfejsu.
Musisz kliknąć na “Databases” i podać nazwę twojej nowej bazy danych. Następnie kliknij przycisk “Utwórz”, aby kontynuować.
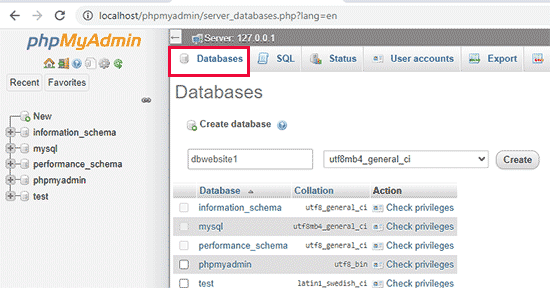
Teraz, gdy już utworzyłeś bazę danych, możesz użyć jej dla twojej witryny WordPress.
Przełącz się z powrotem na kartę przeglądarki /localhost/website1/ i kliknij przycisk “Let’s Go”.
Na następnym ekranie zostaniesz poproszony o podanie informacji o twojej bazie danych WordPress.
Wpisz nazwę bazy danych, którą utworzyłeś wcześniej. Twoja nazwa użytkownika to “root”, a pole hasła należy pozostawić puste. W polu host bazy danych należy użyć localhost.
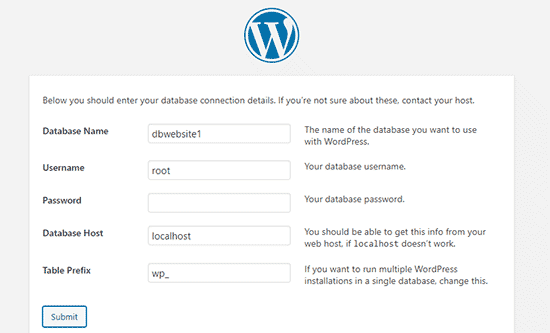
Po zakończeniu kliknij przycisk “Prześlij”, aby kontynuować.
Jeśli korzystasz z systemu Windows lub Linux, WordPress zapisze te ustawienia w twoim pliku konfiguracyjnym WordPress o nazwie wp-config.php.
Jeśli jednak korzystasz z komputera Mac, wyświetli on treść pliku i poprosi o jego utworzenie.
Musisz utworzyć ten plik w katalogu głównym twojej witryny internetowej.
Po utworzeniu pliku wklej do niego skopiowany wcześniej tekst. Następnie musisz zapisać plik i powrócić do instalatora WordPress, aby kontynuować.
W następnym kroku WordPress poprosi Cię o podanie informacji o Twojej witrynie internetowej. Najpierw wpisz tytuł, którego chcesz użyć dla tej witryny.
Następnie należy wpisz nazwę użytkownika, hasło i adres e-mail dla twojego konta administratora.
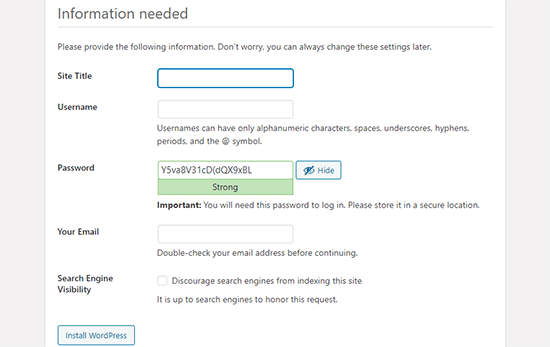
Po wypełnieniu wszystkich informacji kliknij przycisk “Zainstaluj WordPress”, aby kontynuować.
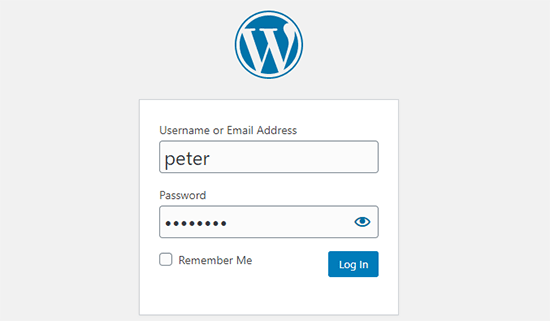
WordPress uruchomi teraz instalację i poprosi o logowanie się po jej zakończeniu.
Możesz logować się do swojej witryny internetowej, przechodząc do strony /localhost/website1/wp-admin i używając nazwy użytkownika i hasła, które wpiszesz podczas instalacji.
Rzeczy do wypróbowania po utworzeniu regionalnej witryny WordPress
Po utworzeniu Twojej regionalnej witryny WordPress za pomocą XAMPP, możesz pracować nad nią tak, jak nad witryną WordPress na żywo.
Przejdź do menu Wygląd w panelu bocznym administratora WordPress, aby dostosować wygląd swojej witryny lub zainstalować nowy motyw.
Oto kilka świetnych darmowych motywów, które możesz wypróbować.
Następną rzeczą, którą chciałbyś wypróbować, jest zainstalowanie kilku wtyczek WordPress.
Wtyczki są jak aplikacje dla twojej witryny WordPress i pozwalają dodawać fajne funkcje, takie jak formularz kontaktowy, przyciski mediów społecznościowych, sklep e-handel i wiele innych.
Potrzebujesz pomocy w instalacji wtyczek? Zobacz nasz przewodnik krok po kroku, jak zainstalować wtyczkę WordPress.
Bonus: Przeniesienie regionalnej witryny WordPress na serwer Live
Po zakończeniu pracy nad regionalną witryną WordPress warto przenieść ją na serwer live, aby stworzyć swój pierwszy blog lub witrynę WordPress.
Aby to zrobić, będziesz potrzebować nazwy domeny i konta hostingowego. Zwykle nazwa domeny kosztuje 14,99 USD, a hosting witryny internetowej zaczyna się od 7,99 USD miesięcznie.
To zbyt wiele, jeśli dopiero zaczynasz.
Na szczęście Bluehost oferuje użytkownikom WPBeginner bezpłatną nazwę domeny z hojną zniżką na hosting. Zasadniczo możesz zacząć za 1,99 USD miesięcznie.
Aby uzyskać więcej rekomendacji dotyczących hostingu, zapoznaj się z naszym kompletnym przewodnikiem po hostingu WordPress.
Po zarejestrowaniu się na hostingu, można postępować zgodnie z naszym przewodnikiem krok po kroku, jak przenieść WordPress z serwera regionalnego do witryny na żywo.
Warto również zapoznać się z alternatywnymi sposobami tworzenia lokalnych witryn WordPress w systemie Windows przy użyciu Wampserver i na komputerach Mac przy użyciu MAMP.
Przewodniki ekspertów po regionalnych witrynach WordPress
Mamy nadzieję, że ten artykuł pomógł ci dowiedzieć się, jak utworzyć lokalną witrynę WordPress przy użyciu XAMPP. Możesz również zapoznać się z innymi przewodnikami związanymi z lokalnymi instalacjami WordPress:
- Słowniczek: Localhost
- Jak zainstalować WordPress lokalnie na Macu (2 proste sposoby)
- Jak zainstalować WordPress na komputerze z systemem Windows (2 metody)
- Jak przenieść WordPressa z regionalnego serwera na witrynę Live (2 metody)
- Jak przenieść witrynę WordPress na żywo na serwer lokalny?
- Jak odbierać e-maile WordPress z Localhost za pomocą SMTP?
- Jak zresetować hasło administratora WordPress na Localhost
- Jak łatwo stworzyć witrynę Staging dla WordPress (krok po kroku)
If you liked this article, then please subscribe to our YouTube Channel for WordPress video tutorials. You can also find us on Twitter and Facebook.


André Bruwer
Hi there WPBEGINNER SUPPORT
Great article thank you
I was wondering… is it better to develop a wp website for a client live or better to build it locally then transfer it to the hosted wp site with duplicator or something similar?
Any advise would be greatly appreciated. Can’t figure this one out.
Thanks
André
WPBeginner Support
Hi André Bruwer,
It depends on developers own preferences. If a site hasn’t been live before then they can work on it using a maintenance mode or coming soon plugin. However, more developers prefer to work locally and then transfer a website to a live server.
Admin
demola
pls i want to move my wordpresite from my laptop to another laptop i use xamp as a local server
Thomas James Keely
I was up and running within minutes. Thank you so much!!!
Chaitra
Hi, I am getting following error when I connect to localhost/website1
You don’t have permission to access /website1/ on this server.
Additionally, a 403 Forbidden error was encountered while trying to use an ErrorDocument to handle the request.
Chaitra
Hi, I get the following error when I access localhost/website1 –
You don’t have permission to access /website1/ on this server.
Additionally, a 403 Forbidden error was encountered while trying to use an ErrorDocument to handle the request.
Jay
your article is very helpful for wp beginner.
rocky
Thanks for the Knowledge but how can i make it live through Xampp. Let us know if theres any tutorial
bala
yes there is a way to put your localhost online, you should redirect your domain name to your computer’s ip address
Jojo
Hi,
I followed your tutorial and created a wordpress site. How can I create another local wordpress site with this setup?
sekar ramu
Thanks. Simple and Straightforward
Eleazar
Hi Guy. Your tutorial is very straightforward. I liked it. Very clear and easy to follow. Tkanks
Jerry
Very straight forward tutorial! Thank you.
krishan pal singh
Very helpful tutorial for me… Thank you so much
paul
hi, i have been able to login to wordpress using xampp, but when i click on the themes area i only see three themes. when i try to install a new theme, im notified that there is an error. please i need your help.
Shamrat Hossain
This article was really helpful for me . Hope You will be doing good works like this for us in future ..
Thanks
Abhijith
Hi Team
I have problem with xampp server once installation itz working fine after shutdown if am going to using again in the xamm server buttons not working
it asking again and again tomcat file….please let me know how to fix it
Suraj Barthwal
you’r article was really helpful. i do have a query for you though, what should i do if i wanted to extract my wordpress live website so i could use it in future.
Mario Bergeron
Hi,
Thanks for your article really helpful. Everything works fine, installation etc., but I try to install a theme on my WP and i got this message ”The uploaded file exceeds the upload_max_filesize in php.ini.” What can I do to install my theme??
Thank you to help me.
Mario Bergeron
WPBeginner Support
Hi Mario,
Please see our guide on how to increase maximum file size upload limit in WordPress.
Admin
JERSon
Hi ALL,
im stuck at localhost/website1 …it will give the error page
This site can’t be reached
localhost refused to connect.
Search Google for localhost website1
ERR_CONNECTION_REFUSED
Please help
Innocent
Make sure your apache and mysql is running. Then try again
Emmanuel
Hello WordPress, I have installed and used Xampp yesterday and it worked very fine but whike trying to open and use it today, its taking back to the installation process and asking for a new storage location. How do I go about this?
ayush singh chauhan
Sir , when i try opening localhost/website1
then something else opens which is not similar to yours.
that is showing index of website ..
what should i do now
WPBeginner Support
Hi Ayush,
Restart XAMPP and then try again.
Admin
Stanley
When I finish with a website and wish to build another different website, how do I go about it? Thanks.
WPBeginner Support
Hi Stanley,
Create a new folder for your website inside htdocs folder and repeat all the steps mentioned under ‘Creating a Local WordPress Site with XAMPP’ section.
Admin
Jonathan Pienaar
Great tutorial, and works 99% for Linux. (I had to create wp-config.php manually for some reason).
Only other issue: trying to use the Elementor Page Builder plugin, but it requires an FTP login/password. Tried starting FTP server, but can’ figure out how to configure it so that I can give Elementor FTP access/download the plugin.
(Hope this makes sense).
Bhagwat Pawar
nice and practically perfect. can i add email functionality here installing gmail smtp or wp smtp plugin
Jane
This was so easy to follow. Thank you very much,
When I want to upload a theme in my new wordpress I get this error: ‘The uploaded file exceeds the upload_max_filesize directive in php.ini.’
Can I do anything about this?
WPBeginner Support
Hi Jane,
Please see our guide on how to increase maximum file upload size in WordPress.
Admin
Kumar
Thank you! Wonderfully detailed step-by-step instructions. Was able to install WordPress on my local machine without a problem. Much appreciated.
Julie
I am having the same problem James had:
Hi! I have successfully installed my xamp server, wordpress and database. My question is, after logging in to wordpress, I cannot see any dashboard panel wherein I can edit my themes and install plugins. Please help! Thanks.
Has anyone found a solution?
Thanks!
Eleonro
Hi, I have issues at login, when I try to log on, wp server says its invalid, what can I do?
James
Hi! I have successfully installed my xamp server, wordpress and database. My question is, after logging in to wordpress, I cannot see any dashboard panel wherein I can edit my themes and install plugins. Please help! Thanks.
Ruma
when I am submitting my data base name,username and password it is saying try again i have written each and every thing right name
Kenny
Leave the password space blank
Dani
To anyone having an issue with the localhost/website1 link not working, how I got it to work (on mac, might work for windows) was heading over to the Network tab in XAMPP and pressing enable. Then I took the port number (in my case it was localhost:8080) and then added that to the url. It looked like localhost:8080/website1.
Good luck!
Maria
Dani, Thanks so much for your post. I was having the same issue. After reading your post, I was able to get to the next step. few!
Hillary
I have set up the WordPress website, but yet i am still having issues upload some plugins that come with the themes i want to use. How do i get to correct this?
Thanks
Maheshwaran
Thanks you so much.. Your step by step contents helps me lot.
Nicholas
Thanks you so much ..
But i have faced one problem, after putting WordPress files into htdocs, i went to my browser and searched for “localhost/WordPress ” and i got ” error 404 Object not found ” how can i please fix that problem?
Thanks
Amokola Stephen
Did you start services in your local server(xamp)? if not please navigate xamp control panel and make sure that you start apache and mysql services
Alexander
I really like your post, thank you for sharing such a great post. Setting up wordpress website on localhost using XAMPP is the best solution you have. It gives you an option to explore themes and plugins as well. When i was researching how to work on localhost i have found two great resources through which anyone can easily learn to launch wordpress using localhost.
https://www.wpbeginner.com/wp-tutorials/how-to-create-a-local-wordpress-site-using-xampp/
Aligo
Thank you very much for this article.. I really followed it and was successful in creating the website
DavidA
Thank you for this article — it is great to be able to work at the website locally before exposing it to the world.
Is it possible to have more than one website locally? I have another site that I need to modify/see locally. How would I add this to the other without getting them mixed?
Thank you
WPBeginner Support
Hi,
You can add more websites by simply adding a new folder under /XAMPP/htdocs/.
Admin
DavidA
Thank you – the WPBeginners site/articles/support team have been a God-send.
Please keep doing what you are doing!(:0)!
Stanley
Thanks at WP team. I added another WordPress folder and it’s not working. I named this second folder WordPress1 since the first site database is WordPress and it didn’t work. Please, do help. Thanks.
WPBeginner Support
Hi Stanley,
Do you see an error when you visit the website in your browser?
Trifina
For Mac users you recommended:
“You will need to create this file in your website’s root folder.”
Can you elaborate? Where can i find this folder?
WPBeginner Support
Hey Triffina,
Normally, your XAMPP website folders are stored in /Applications/XAMPP/xamppfiles/htdocs/ folder.
Admin
Ann
followed all the steps but when i put “localhost/website1”, it shows an error saying “Error establishing a database connection”, also tried restarting my xampp, yet still the same problem exist.
Mike
Get an Object not found message when I put the localhost/website1 in my browser. It reads the following:
Error 404
localhost
Apache/2.4.25 (Win32) OpenSSL/1.0.2j PHP/5.6.30
Any ideas guys?
Thanks
Chris
good afternoon,
thank you for your article. It was easy to follow. I have managed to install WP offline on my pc but I cannot figure out how to login to wp-admin and start working offline.
I know you mentioned that we should login at /localhost/etc…. but where do I enter that? do I open it on my browser?
thank you
WPBeginner Support
Hi Chris,
Yes, you will need to enter that in your browser’s address bar.
Admin
Amy
Hi, thanks for this great tutorial.
I need to update the php.ini as I am getting the error ‘The uploaded file exceeds the upload_max_filesize directive in php.ini.’ how do I find this on localhost ?
Thanks!
Ratnesh Tripathi
Great article sir, but I am not able to login into WordPress admin panel.
Please provide solution
Mike
am not getting the welcome to word press page what’s wrong, it’s got — Index of /website1 —at the top
abdulmuluq
please it showing me database not found when I try to input database name in my wp
sam
Yeah, It happened to me too. You’ve gotta create your database name in the localhost/phpMyAdmin section in your browser before going back to fill the pieces of information and also the username will be root and the password will be empty. You’re good to go
divp
Good one thanks for sharing
Raymart
Which is much faster, XAMPP or WAMP?
Shaedar
Thanks for the detailed guide… i followed the steps as outlined above an it all worked out well until i tried to launch wordpress on my browser by entering “localhost/website1” Instead of launching, its showed “Index/website1”
please what could be the problem?
WPBeginner Support
Hi Shaeder,
Try to restart XAMPP, make sure you copied the WordPress folder and the website1 folder actually contains your WordPress files.
Admin
Shaedar
Thanks so much… working perfectly now.
Rodney Lacambra
Having a local WordPress site is great hence testing functionality, plugins, and themes before making it live.
It’s also much faster compare to live.
Thanks, great article.
Paul Guzman
This worked to perfection. Can’t believe I actually did this. Instructions were “Right On”. This made my day!
Soham Pratap
Much creative way to just design put up the content … experiment and when you are done!! get your site online
Om
What about Wampserver is it the same ?
WPBeginner Support
WAMPserver is also an Apache distribution maintained by different folks. But yes it also allows you to create local WordPress sites on your Windows computer.
Admin