Jeśli pracujesz z WordPressem, prawdopodobnie wiesz, jak ważne jest testowanie rzeczy przed wprowadzeniem zmian w twojej witrynie na żywo. W WPBeginner często tworzymy testowe witryny internetowe na naszych komputerach, aby wypróbować nowe motywy i wtyczki. Pozwala nam to odkrywać nowe rzeczy bez uszkadzania naszych witryn internetowych.
Jednym z najlepszych sposobów na stworzenie testowej witryny internetowej jest skorzystanie z bezpłatnego narzędzia o nazwie XAMPP. XAMPP ułatwia skonfigurowanie WordPressa na twoim własnym komputerze. Do utworzenia witryny testowej na twoim komputerze nie potrzebujesz hosta ani połączenia z Internetem.
W tym artykule pokażemy, jak łatwo utworzyć lokalną witrynę internetową WordPress przy użyciu XAMPP. Zapewni to bezpieczne miejsce do eksperymentowania z WordPressem, próbowania nowych rzeczy i doskonalenia umiejętności tworzenia witryn internetowych bez wpływu na twoją witrynę na żywo.

Dlaczego warto stworzyć regionalną witrynę WordPress?
Tworzenie lokalnych witryn WordPress jest powszechną praktyką wśród programistów i właścicieli witryn. Pozwala ona na przetestowanie WordPressa bez konieczności tworzenia rzeczywistej witryny internetowej w Internecie.
Lokalne witryny internetowe są widoczne tylko na twoim komputerze. Możesz wypróbować różne motywy i wtyczki WordPress, przetestować ich funkcje i nauczyć się podstaw WordPress.
Jeśli masz już witrynę internetową WordPress, możesz utworzyć lokalną kopię swojej witryny na komputerze, aby wypróbować nowe aktualizacje wtyczek przed wdrożeniem ich w witrynie na żywo.
Ważne: Lokalna witryna internetowa będzie widoczna tylko na twoim komputerze. Jeśli chcesz stworzyć witrynę internetową na żywo, będziesz potrzebować nazwy domeny i hostingu WordPress.
Postępuj zgodnie z instrukcjami krok po kroku w naszym przewodniku na temat zakładania bloga WordPress, gdy będziesz gotowy do utworzenia witryny internetowej na żywo.
Powiedziawszy to, sprawdźmy, jak zainstalować WordPressa lokalnie w systemie Windows, Mac lub Linux przy użyciu XAMPP.
Czym jest XAMPP?
XAMPP to pakiet oprogramowania, który zawiera wszystkie rzeczy potrzebne do skonfigurowania lokalnego środowiska serwerowego na twoim komputerze.
Aby utworzyć lokalną witrynę WordPress, musisz skonfigurować oprogramowanie serwera WWW (Apache), PHP i MySQL na twoim komputerze.
PHP to język programowania, a MySQL to oprogramowanie do zarządzania bazą danych. Oba są wymagane do uruchomienia WordPressa.
Instalowanie ich osobno jest dość trudne dla początkujących. Tutaj z pomocą przychodzi XAMPP.
XAMPP ułatwia tworzenie witryn internetowych WordPress lokalnie. Jest on dostępny dla komputerów z systemami Windows, Mac i Linux.
Zacznijmy od zainstalowania XAMPP i skonfigurowania go do uruchomienia twojej regionalnej witryny WordPress.
Instalacja XAMPP na twoim komputerze
Najpierw należy przejść na witrynę internetową XAMPP i kliknąć przycisk “Pobierz” dla twojego systemu operacyjnego.
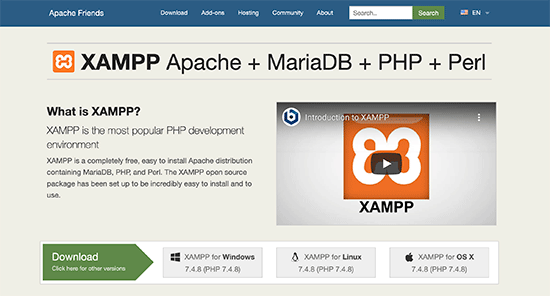
W zależności od twojego systemu operacyjnego, kreator instalacji i interfejs aplikacji mogą różnić się od przedstawionych tutaj zrzutów ekranu. Na potrzeby tego artykułu przedstawimy wersję oprogramowania dla systemu Windows.
Po pobraniu XAMPP należy kliknąć i uruchomić instalator.
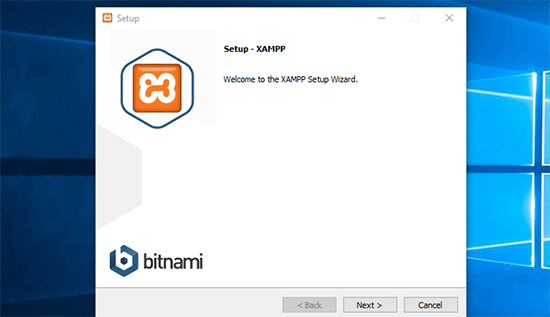
XAMPP zapyta, gdzie zainstalować oprogramowanie i które pakiety chcesz zainstalować. Domyślne ustawienia będą odpowiednie dla większości użytkowników. Klikaj dalej przycisk “Dalej”, aby zakończyć działanie kreatora konfiguracji.
Po zakończeniu działania kreatora zaznacz opcję “uruchom panel sterowania teraz”, a następnie kliknij przycisk “Zakończ”.
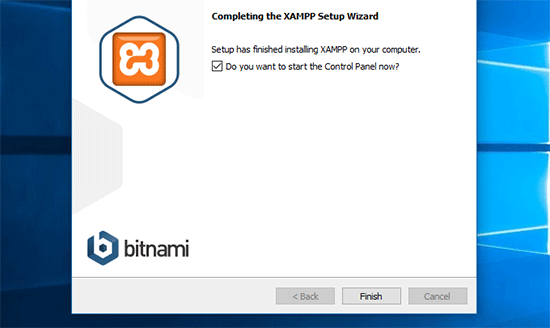
Spowoduje to uruchomienie aplikacji XAMPP Control Panel.
Korzystając z aplikacji XAMPP, możesz uruchomić serwer WWW Apache jako twój serwer regionalny i MySQL jako serwer bazy danych. Kliknij przycisk “Start” obok Apache i MySQL.
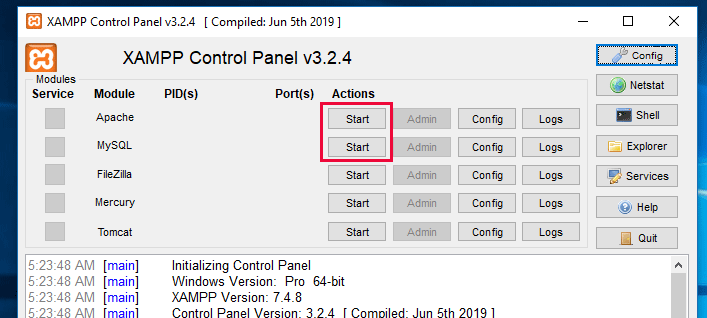
XAMPP uruchomi teraz Apache i MySQL.
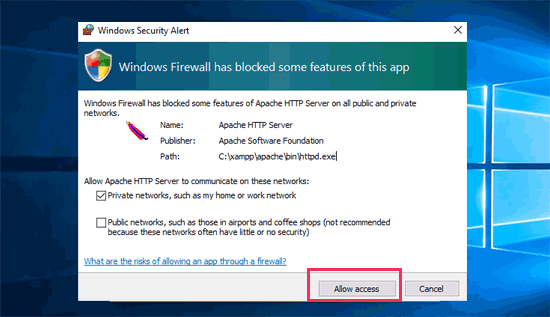
Może zostać wyświetlone powiadomienie zapory systemu Windows. Ważne jest, abyś kliknął przycisk “Zezwalaj na dostęp”, aby obie aplikacje mogły działać na twoim komputerze.
Po uruchomieniu obu aplikacji ich nazwy zostaną podświetlone na zielono.
Teraz jesteś gotowy do utworzenia lokalnej witryny internetowej i zainstalowania WordPressa przy użyciu XAMPP.
Tworzenie regionalnej witryny WordPress za pomocą XAMPP
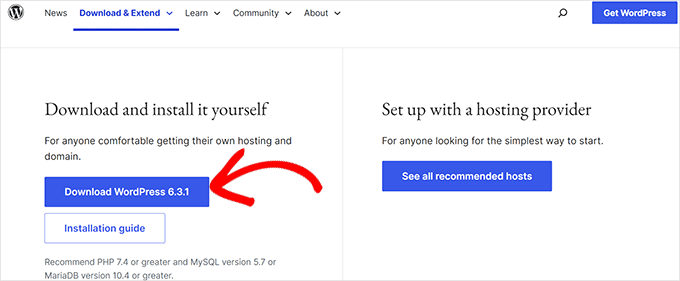
Najpierw należy pobrać WordPress. Przejdź na witrynę internetową WordPress.org i kliknij przycisk “Pobierz WordPress”.
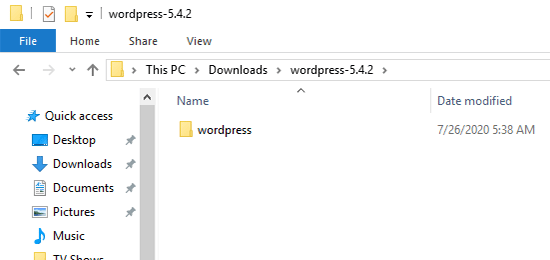
Po pobraniu WordPressa należy rozpakować plik zip, po czym pojawi się katalog wordpress.
Należy skopiować ten katalog.
Następnie przejdź do twojego katalogu instalacyjnego XAMPP.
W systemie Windows będzie to C:/Program Files/XAMPP/htdocs lub C:/Xampp/htdocs.
Na komputerach Mac będzie to /Applications/XAMPP/htdocs.
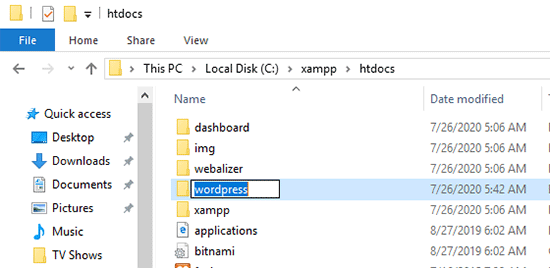
Wklej skopiowany wcześniej katalog wordpress do folderu “htdocs”.
Zalecamy zmianę nazwy katalogu “wordpress” na “witryna internetowa” lub inną. Pomoże to łatwo zidentyfikować twoją witrynę regionalną.
Następnie należy otworzyć twoją ulubioną przeglądarkę internetową.
Możesz wpisz następujący adres URL w pasku adresu twojej przeglądarki:
https://localhost/website1/
Jeśli zmieniłeś nazwę katalogu WordPress na inną, upewnij się, że zastąpiłeś “website1” twoją własną nazwą katalogu.
Spowoduje to wczytywanie kreatora instalacji WordPress i zostaniesz poproszony o wybranie języka. Po wybraniu języka kliknij przycisk “Kontynuuj”.
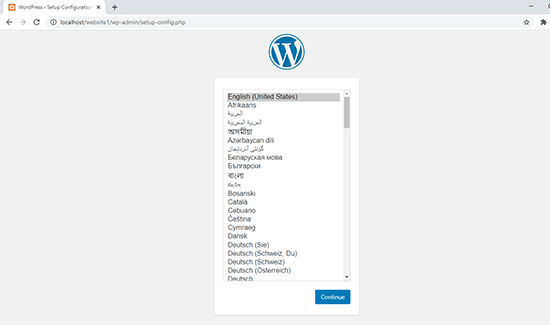
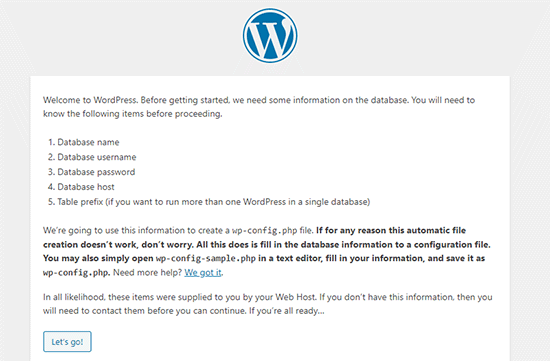
Na następnym ekranie zobaczysz ekran powitalny WordPress.
Zawiera powiadomienie, że WordPress potrzebuje nazwy bazy danych, nazwy użytkownika bazy danych, hasła i informacji o hoście.
Stwórzmy bazę danych dla twojej witryny WordPress.
Należy otworzyć nową kartę przeglądarki i przejść na stronę https://localhost/phpmyadmin/.
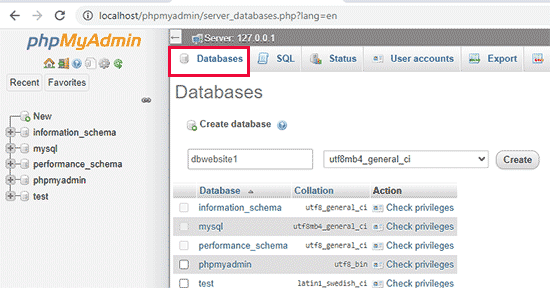
Spowoduje to uruchomienie aplikacji phpMyAdmin, która jest preinstalowana z XAMPP. Pozwala ona na łatwe zarządzanie twoją bazą danych przy użyciu prostszego interfejsu.
Musisz kliknąć na “Databases” i podać nazwę twojej nowej bazy danych. Następnie kliknij przycisk “Utwórz”, aby kontynuować.
Teraz, gdy już utworzyłeś bazę danych, możesz użyć jej dla twojej witryny WordPress.
Przełącz się z powrotem na kartę przeglądarki /localhost/website1/ i kliknij przycisk “Let’s Go”.
Na następnym ekranie zostaniesz poproszony o podanie informacji o twojej bazie danych WordPress.
Wpisz nazwę bazy danych, którą utworzyłeś wcześniej. Twoja nazwa użytkownika to “root”, a pole hasła należy pozostawić puste. W polu host bazy danych należy użyć localhost.
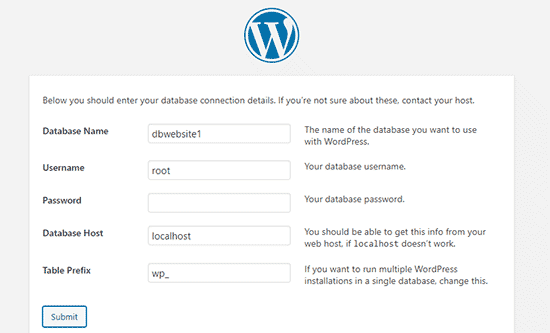
Po zakończeniu kliknij przycisk “Prześlij”, aby kontynuować.
Jeśli korzystasz z systemu Windows lub Linux, WordPress zapisze te ustawienia w twoim pliku konfiguracyjnym WordPress o nazwie wp-config.php.
Jeśli jednak korzystasz z komputera Mac, wyświetli on treść pliku i poprosi o jego utworzenie.
Musisz utworzyć ten plik w katalogu głównym twojej witryny internetowej.
Po utworzeniu pliku wklej do niego skopiowany wcześniej tekst. Następnie musisz zapisać plik i powrócić do instalatora WordPress, aby kontynuować.
W następnym kroku WordPress poprosi Cię o podanie informacji o Twojej witrynie internetowej. Najpierw wpisz tytuł, którego chcesz użyć dla tej witryny.
Następnie należy wpisz nazwę użytkownika, hasło i adres e-mail dla twojego konta administratora.
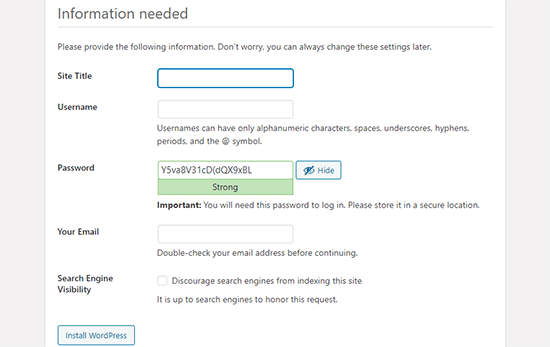
Po wypełnieniu wszystkich informacji kliknij przycisk “Zainstaluj WordPress”, aby kontynuować.
WordPress uruchomi teraz instalację i poprosi o logowanie się po jej zakończeniu.
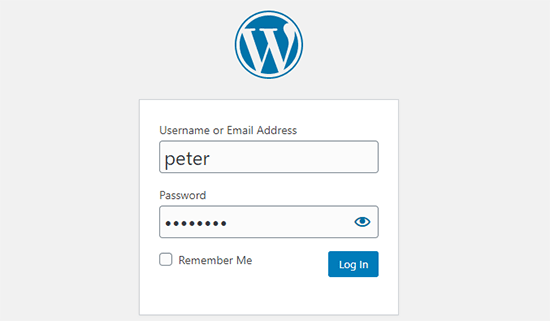
Możesz logować się do swojej witryny internetowej, przechodząc do strony /localhost/website1/wp-admin i używając nazwy użytkownika i hasła, które wpiszesz podczas instalacji.
Rzeczy do wypróbowania po utworzeniu regionalnej witryny WordPress
Po utworzeniu Twojej regionalnej witryny WordPress za pomocą XAMPP, możesz pracować nad nią tak, jak nad witryną WordPress na żywo.
Przejdź do menu Wygląd w panelu bocznym administratora WordPress, aby dostosować wygląd swojej witryny lub zainstalować nowy motyw.
Oto kilka świetnych darmowych motywów, które możesz wypróbować.
Następną rzeczą, którą chciałbyś wypróbować, jest zainstalowanie kilku wtyczek WordPress.
Wtyczki są jak aplikacje dla twojej witryny WordPress i pozwalają dodawać fajne funkcje, takie jak formularz kontaktowy, przyciski mediów społecznościowych, sklep e-handel i wiele innych.
Potrzebujesz pomocy w instalacji wtyczek? Zobacz nasz przewodnik krok po kroku, jak zainstalować wtyczkę WordPress.
Bonus: Przeniesienie regionalnej witryny WordPress na serwer Live
Po zakończeniu pracy nad regionalną witryną WordPress warto przenieść ją na serwer live, aby stworzyć swój pierwszy blog lub witrynę WordPress.
Aby to zrobić, będziesz potrzebować nazwy domeny i konta hostingowego. Zwykle nazwa domeny kosztuje 14,99 USD, a hosting witryny internetowej zaczyna się od 7,99 USD miesięcznie.
To zbyt wiele, jeśli dopiero zaczynasz.
Na szczęście Bluehost oferuje użytkownikom WPBeginner bezpłatną nazwę domeny z hojną zniżką na hosting. Zasadniczo możesz zacząć za 1,99 USD miesięcznie.
Aby uzyskać więcej rekomendacji dotyczących hostingu, zapoznaj się z naszym kompletnym przewodnikiem po hostingu WordPress.
Po zarejestrowaniu się na hostingu, można postępować zgodnie z naszym przewodnikiem krok po kroku, jak przenieść WordPress z serwera regionalnego do witryny na żywo.
Warto również zapoznać się z alternatywnymi sposobami tworzenia lokalnych witryn WordPress w systemie Windows przy użyciu Wampserver i na komputerach Mac przy użyciu MAMP.
Przewodniki ekspertów po regionalnych witrynach WordPress
Mamy nadzieję, że ten artykuł pomógł ci dowiedzieć się, jak utworzyć lokalną witrynę WordPress przy użyciu XAMPP. Możesz również zapoznać się z innymi przewodnikami związanymi z lokalnymi instalacjami WordPress:
- Słowniczek: Localhost
- Jak zainstalować WordPress lokalnie na Macu (2 proste sposoby)
- Jak zainstalować WordPress na komputerze z systemem Windows (2 metody)
- Jak przenieść WordPressa z regionalnego serwera na witrynę Live (2 metody)
- Jak przenieść witrynę WordPress na żywo na serwer lokalny?
- Jak odbierać e-maile WordPress z Localhost za pomocą SMTP?
- Jak zresetować hasło administratora WordPress na Localhost
- Jak łatwo stworzyć witrynę Staging dla WordPress (krok po kroku)
If you liked this article, then please subscribe to our YouTube Channel for WordPress video tutorials. You can also find us on Twitter and Facebook.


Moinuddin Waheed
I have been using xampp for a long time and first time when I installed it , it was for running php code.
I have also used it for wordpress local environment for understanding and developing websites locally.
one thing that has bother me regarding wordpress installation is username and password.
why we keep user as root and password blank?
this is not the case for live servers though?
WPBeginner Support
It is not something that you would use for a live site but the username being root and the password being blank is the defaults for XAMPP. As your local site would only be active on your computer you do not need to change it for your local XMPP installation.
Admin
Jiří Vaněk
Sometimes I use XAMPP. The only problem I sometimes encounter is shared hosting, to which the website is migrated from localhost. The problem is that the PHP limits are not always set in the same way on the shared server, or even the PHP version does not match (on the local 8.x and on the server, for example, the old version 7.x). This can often cause a problem in the functionality of the website, which was debugged on a different PHP than the one on the server. That’s probably the only flaw.
Donatas
Hi, I have used these Xampp instructions to create a server on a PC (Windows 10 Education N). Everything worked perfectly fine and it’s a very useful article. I stuck in one place because I thought the database credentials folder had to be manualy created on Windows the same way it has to be on a Mac but these steps were exclusively for Mac. Thanks a lot!
WPBeginner Support
You’re welcome, glad our guide was helpful!
Admin
Paul
After having created the database and entered the database connection details, hitting submit gets me this message “There has been a critical error on this website”. Checked everything twice, what should I do?
Thank you for your attention.
WPBeginner Support
For a fresh install, you would want to check the error log for XAMP to help narrow down the specific reason.
Admin
John
Error logs didn’t help. But, as it turns out, for some reason, the most recent version of Xampp caused the same “critical error” response to happen for me too. I ended up uninstalling that version and went with the previous version of Xampp and presto! It works.
lee kent
Hello. If I were to follow these steps and then decide i wanted to make another site, How would you create a new website locally?
WPBeginner Support
You would create a new folder and database and install the site in the new folder.
Admin
Smita
Thanks for detailed steps. Very useful.
WPBeginner Support
Glad our guide was helpful
Admin
Tife
Can I use local Host to develop my custom wordpress theme also.
WPBeginner Support
You can if you would like.
Admin
priyanka
I’m getting this error
Your server is running PHP version 5.6.3 but WordPress 5.5.3 requires at least 5.6.20.
p/lease help
WPBeginner Support
It is saying you want to upgrade the PHP you are using for your site to remove that error.
Admin
tarun
I get the following error, when I run http://localhost/mysite/wp-admin/setup-config.php
One or more database tables are unavailable. The database may need to be repaired.
I tried to do global search for “WP-config” file in my xampp folder but just found “wp-config-sample”. though I added the below line in
“wp-config-sample.php” file
// define(‘WP_ALLOW_REPAIR’, true);
not really sure what to do after that.
WPBeginner Support
You would want to open phpMyAdmin and run the repair on all of your tables and if that does not work you would need to reach out to XAMPP’s support
Admin
tarun
I am not able to figure out why I am getting this strange error, though I tried to reinstall and connect several times, all I did was I tried to drop my existing database and tried to create a new wrodpress login but All I can see is the following error
One or more database tables are unavailable. The database may need to be repaired.
WPBeginner Support
You would want to try to repair your database, you can also use method 3 in our article below:
https://www.wpbeginner.com/wp-tutorials/how-to-fix-the-error-establishing-a-database-connection-in-wordpress/
Admin
Mohsin Zubair
Hi Sir, I hope you are doing well. I am facing this error while creating data base.
Error
MySQL said: Documentation
Cannot connect: invalid settings.
phpMyAdmin tried to connect to the MySQL server, and the server rejected the connection. You should check the host, username and password in your configuration and make sure that they correspond to the information given by the administrator of the MySQL server.
WPBeginner Support
You would want to check your configuration settings to see if it is set incorrectly.
Admin
David
This is exactly what I have been looking for: a local testing server to develop a website without signing up to a plan/paid service first.
The explanations are brilliant and easy to follow. It’s genius! Many thanks.
WPBeginner Support
You’re welcome, glad our guide was helpful
Admin
Ray Silva
I installed wordpress. Then I put the wordpress folder in xampp’s htdocs folder. When I go to localhost on my browser, I get sent to the xampp dashboard and welcome to xampp page.
WPBeginner Support
You may want to try localhost/foldername where foldername is the name of the folder where you placed WordPress to see if that is how it is currently set up.
Admin
Hussain Abbas
Hi
My url to login to WordPress dashboard is coming as “/localhost/sitename/wordpress/wp-admin” whereas as per the above instructions it should be “/localhost/sitename/wp-admin” .
Would request your help to know how can I remove “wordpess” from the link.
Thanks
WPBeginner Support
For that, you installed the site in a folder named WordPress, if you are just starting out you can reinstall the site without the WordPress folder.
Admin
muhammad waqar
easy and good tutorial for beginners
WPBeginner Support
Glad you found our guide helpful
Admin
Darren Howes
Hi,
Great instructions, complete novice, everything is working apart from when I try to add/upload images I get the the message
Unable to create directory wp-content/uploads/2020/09. Is its parent directory writable by the server?
I am working on a mac, any ideas on how to solve this?
Regards
Darren
WPBeginner Support
You would need to navigate to your XAMPP folder, right-click, and modify your sharing for that folder so that it can be updated.
Admin
marni
When setting up WordPress I used “admin” as the user name and changed the password supplied by WordPress. As a precaution I copied the supplied password. I cannot log in with either password (no typing errors).
WPBeginner Support
You should be able to force reset the password using the database method in our guide below:
https://www.wpbeginner.com/beginners-guide/how-to-change-your-password-in-wordpress/
Admin
gaurav sachan
everything is done but database is not created so please me that why are not creting database in my php
WPBeginner Support
You would need to manually create the database in the phpMyAdmin interface
Admin
Dimitris
Hello after following the procedure after the following step:
Next, you need to open your favorite web browser and visit localhost/website1. You will see a page like this:
I get this message on the screen.
Warning: require_once: failed to open stream: No such file or directory
WPBeginner Support
You may need to try unzipping the WordPress files again, the most common reason for this issue is covered in our article below:
https://www.wpbeginner.com/wp-tutorials/how-to-fix-the-wordpress-failed-to-open-stream-error
You can follow our guide for manually updating your site and you wouldn’t need to use FTP to readd the files, our guide on this can be found below:
https://www.wpbeginner.com/beginners-guide/ultimate-guide-to-upgrade-wordpress-for-beginners-infograph
Admin
Muhammad Kamran Khan
after all these setting localhost/website1 started working. after shut down and restarted my laptop now when i go to localhost/website1/wp-admin/ error message came : This site cant be reached. localhost refused to connect.
WPBeginner Support
You would want to ensure XAMPP is running to be able to see your site
Admin
dilshan
This is really helpful because sometimes I want test some plugins but i dont want to install them to my website. I can try them in this local host site thanks to you
WPBeginner Support
Glad our guide was helpful
Admin
Osazuwa
A very helpful tutorial.
I have implemented them
But on loading
Localhost/website1
it displays
Parse error: syntax error, unexpected’.’ expecting ‘&’ or variable (T_VARIABLE) in C:\xampp\htcdocs\website1\wp-includes\functions.php on line 1081
Thanks
WPBeginner Support
You would want to ensure the PHP you are using is up to date for the most common reason for that error.
Admin
Julio Talaverano
Hi,
Yesterday I installed XAMPP and WordPress and I worked a bit on a new page using localhost/wordpress.
I also installed some Plugins in WordPress.
But today when put into the browser localhost/wordpress I just get the Page I created yesterday.
Could you please tell me how I can continue editing my page with WordPress?
Thanks
WPBeginner Support
If we’re understanding your question correctly, you would want to ensure XAMPP is running for your site to be visible when visiting the page.
Admin
Ronny
Hello,
As always your tutorials are great. One question though. How do I make multiple localhosts using Xampp.
Think of me as a noob the this. I’ve read a few other tutorials on the subject, but it seems they assume one would have some deeper understanding of processes.
WPBeginner Support
You would create a folder with a different name in the htdocs folder and follow the steps under the ‘Creating a Local WordPress Site with XAMPP’ section and navigate to the new site’s folder when you want to see the other site rather than your first site.
Admin
Calvin Mutashu
Thanks 4 a clear step by step guide. Keep the good work.
WPBeginner Support
You’re welcome, glad you liked our guide
Admin
Anjuli
Hello! My browser cannot open to localhost after putting the WordPress folder to htdocs and renaming it to website1. What should I do? Thank you.
WPBeginner Support
If you’re returning to the site after a day, please ensure XAMPP is running on your computer for it to load porperly.
Admin
SANTOS
Hi, how do I take my local wordpress site to a live wordpress site with a domain name?
WPBeginner Support
Once you purchase hosting with a domain name, you would follow our guide here:
https://www.wpbeginner.com/wp-tutorials/how-to-move-wordpress-from-local-server-to-live-site/
Admin
Zaid
I have a question if i am customizing my localhost wordpress site and my pc turned off. I will loss my site..?
WPBeginner Support
No, as long as you save your changes those saved changes will remain the next time you pull up your local installation
Admin
Carla
Guys, Just wanted to say thank you for this post! I successfully implemented a localhost on my computer thanks to your clear, step-by-step process outlined in the post! So excited to get practising my wp skills on this new installation!
WPBeginner Support
Awesome, glad our guide could help get you set up
Admin
Victor
Great job!! Is there a way, or a tutorial to transfer an existing website to this service ? This one deals with a brand new one. I have a website, and I’d love to add it to XAMPP! Thanks !
WPBeginner Support
For that, you would want to take a look at our article here:
https://www.wpbeginner.com/wp-tutorials/how-to-move-live-wordpress-site-to-local-server/
Admin
Blessings Chibisa
Guys I installed WordPress on a local machine. Am using xamp server I created a database but they is a problem in connection of WordPress and the database…. What should I do ?
Help me pliz
WPBeginner Support
For an error with your database connection, you would want to take a look at our article here: https://www.wpbeginner.com/wp-tutorials/how-to-fix-the-error-establishing-a-database-connection-in-wordpress/
Admin
Vikas
Great artice. It worked perfectly. I am a new learner. Sir could you guide me about How I could run multiple local sites using xampp.
Any help will be aporeciated.
WPBeginner Support
You would want to create a new folder for the next site and then you should be able to follow the directions in the article to create a new database and site.
Admin
AASIMA
SIR.
I successfully followed your instructions to make a website on the localhost. but the next day it doesn’t open and showing some error?
WPBeginner Support
You would want to be sure XAMPP is running to see your local site
Admin
Mate
Good guys
I have my website running on local xampp server on windows 10 system I want to move to my new Mac pro computer how do I do it? thanks.
WPBeginner Support
You would follow the steps in our article here: https://www.wpbeginner.com/wp-tutorials/how-to-move-live-wordpress-site-to-local-server/
Admin
Keith
I followed your directions and it was great, thanks.
I am trying to upload the AVADA theme that I have install previously on Hostgator and it worked.
It is 6mb and a zip file.
When I try to add this theme I get this message: “The uploaded file exceeds the upload_max_filesize directive in php.ini”.
Where am I going wrong? Thank You,
WPBeginner Support
You may want to ensure that there isn’t the theme files in what you’re uploading. If it’s only the theme’s files then you can update your upload size on your XAMPP site using the methods in our article here: https://www.wpbeginner.com/wp-tutorials/how-to-increase-the-maximum-file-upload-size-in-wordpress/
Admin
Deepak Singh
Very helpful post, thanks for this..
WPBeginner Support
You’re welcome
Admin
Mary
Good evening, thanks for the great work done here. I have followed these steps and I am unable to log in to my website. All I am getting is this. I am feed up already. Connection for controluser as defined in your configuration failed.
WPBeginner Support
You would want to reach out to XAMPP’s support as there are multiple possible reasons from mysql not running to needing to reinstall xampp
Admin
Sam Arora
Your site is so much helpful, had a great lesson here
WPBeginner Support
You’re welcome, glad our site could be helpful
Admin
Kashif Ch
Assalam o Alikum Sir!
Currently, I am learning WordPress and want to build different websites like membership website, LMS, e-commerce store for learning best practices.
Can we create two different websites using localhost or any other free hosting?
WPBeginner Support
For a local installation, you should only need to create a new database and folder for the second site, for free hosting you may want to first take a look at our page and the warning at the beginning here: https://www.wpbeginner.com/showcase/best-free-website-hosting-compared/
Admin
Xander
I followed the steps and it worked perfectly yesterday.
This morning, trying to connect to the localhost I received the following error:
“This site can’t be reached localhost refused to connect.
Search Google for localhost wordpress jack admin
ERR_CONNECTION_REFUSED”
WPBeginner Support
Is your XAMPP running when you try to connect to your localhost?
Admin
Samar Jamil
Thanks for sharing!
WPBeginner Support
Glad you liked the article
Admin
Daniyal
Hello there,
I’ve followed all the steps given in the article but stuck when I click “Install WordPress”, it gives me an error > “The site is experiencing technical difficulties”
after setting Site Title, username, password, email.
Can you help me, please
WPBeginner Support
There are a few possible reasons for that error message. To start resolving it you would want to go through the options in our article here: https://www.wpbeginner.com/wp-tutorials/how-to-fix-the-wordpress-white-screen-of-death/
Admin
haley
Thank you for this article. I am on the step where I need to open up the local site in a web browser but when I do, I get an error page saying “the local host has refused to connect.” I’m guessing I messed up on one of the former steps but I don’t know which one. I’m working on a Mac.
Any guidance would be appreciated!
WPBeginner Support
If you are returning to the site you would want to ensure xampp is running when trying to view your local site
Admin
Charlie McCormack
Hi
Thanks for this. Installation went 100%
I am trying to test Divi which has to be loaded from a zip file
I get this when I try to install it from aperance/upload theme
The uploaded file exceeds the upload_max_filesize directive in php.ini.
Any solutions would be great
Charlie
WPBeginner Support
You could increase the maximum upload size using:
https://www.wpbeginner.com/wp-tutorials/how-to-increase-the-maximum-file-upload-size-in-wordpress/
Another option would be to add the unziped theme folder where your themes are:
https://www.wpbeginner.com/beginners-guide/how-to-install-a-wordpress-theme/
Admin
Charlie McCormack
Thanks for your reply
I cannot log in on the FTP maybe because its on a local drive
I am trying to load the theme the way you say
and still get the error.I
I bought a new domain name so will try to load it live and work on it like that
Thanks again
Charlie
WPBeginner Support
On a local site, you can use your built-in file manager rather than FTP to add the folder to your WordPress site
YINGLI
Hi, thanks for writing this article!
I have a question though:
I am at the step where I have to fill in a site title, username, password and email address for my admin account for WordPress. May I know whether the information that I use here should be the same as the information that I would use for my actual online WordPress account? I have an existing unlaunched WordPress site through Bluehost.
Thanks so much!
WPBeginner Support
It is not required but if you’re creating a local site to test then it may be a good idea to set that as the same.
Admin
Pooja
Thanks for help , best artical
WPBeginner Support
You’re welcome
Admin
Karen
thanks for the great video. question. am i understanding the process correctly? 1) set up a test site (mysite1) But should i also set up a database/wp install for each client website that I build (and maintain)? I’m guessing yes.
WPBeginner Support
Yes, you would want a different install and database for each local site
Admin
Miso
Great job, simple, straightforward. That’s exactly what a beginner, like me needs.
WPBeginner Support
Thank you, glad our tutorial was helpful
Admin
God's Son
Hi,i am very glad and grateful to you for this article. It was very simple and comprehensive,the photo illustrations helped me a lot. You are a great teacher,i hope i will be able to learn and share my knowlege with others like you soon,thanks.
WPBeginner Support
Happy our articles can simplify this process for you
Admin
Aftab Hussain
Thanks for such a nice guideline. I have successfully install wordpress on my local computer by the help of this post.
WPBeginner Support
Glad our article could help
Admin