Chcesz odblokować jeszcze więcej możliwości organizacyjnych w WordPress? Spróbuj dodać własne pola meta do swoich dostosowanych taksonomii.
Własne taksonomie pozwalają uporządkować twoje treści poza kategoriami i tagami. Czasami jednak okazuje się, że warto dodać dodatkowe szczegóły i pola do ich opisania, w czym pomagają własne meta-pola.
W tym artykule pokażemy, jak dodać dodatkowe pola meta do twoich własnych taksonomii w WordPress.

Kiedy należy dodać własne pola meta do dostosowanej taksonomii?
Kiedy tworzysz nowe treści na swojej witrynie internetowej WordPress, możesz je organizować za pomocą dwóch domyślnych taksonomii, kategorii i tagów.
Niektóre witryny internetowe korzystają z własnych taksonomii. Pozwalają one sortować twoją treść na dodatkowe sposoby.
Na przykład witryna internetowa, na której wpisane są recenzje książek, może dodać taksonomie “Tematy” i “Autorzy”, aby odwiedzający mogli szybko znaleźć interesujące ich recenzje.
Aby uzyskać więcej informacji, zapoznaj się z naszym przewodnikiem na temat tworzenia własnych taksonomii w WordPress.
Każda taksonomia ma domyślnie tylko trzy lub cztery pola: nazwę, uproszczoną nazwę, nadrzędny element (jeśli jest hierarchiczny) i opis.
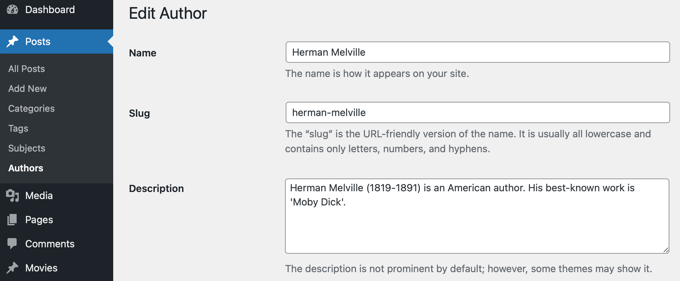
Czasami warto dodać dodatkowe pola, aby lepiej opisać taksonomię. Na przykład można dodać pole “rok urodzenia” do taksonomii “autorzy”.
Mając to na uwadze, oto jak dodać niestandardowe pola meta do własnych taksonomii w WordPress.
Krok 1: Dodawanie własnych pól meta do dostosowanych taksonomii w WordPressie
Najpierw należy zainstalować i włączyć wtyczkę Advanced Custom Fields. Aby dowiedzieć się więcej, zobacz nasz przewodnik krok po kroku, jak zainstalować wtyczkę WordPress.
Następnie przejdź do strony Custom Fields ” Add New. Tutaj możesz dodać grupę pól zawierającą jedno lub więcej nowych pól.
Zostaniesz poproszony o nadanie grupie pól tytułu, który będzie wyświetlany wraz z nowymi polami podczas dodawania lub edytowania taksonomii. W tym poradniku chcemy dodać własne pole do taksonomii Autorzy, więc nazwiemy grupę pól “Szczegóły autora”.
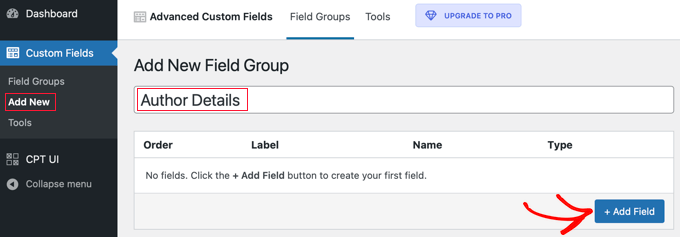
Gdy to zrobisz, kliknij przycisk “+ Dodaj pole”, aby dodać pole. Pojawi się nowy formularz, w którym można wypełnić szczegóły nowego pola.
Gdy wpiszesz etykietę pola, nazwa pola zostanie utworzona automatycznie i możesz ją edytować, jeśli chcesz. Będziesz musiał użyć nazwy pola w dalszej części poradnika, więc zanotuj ją.
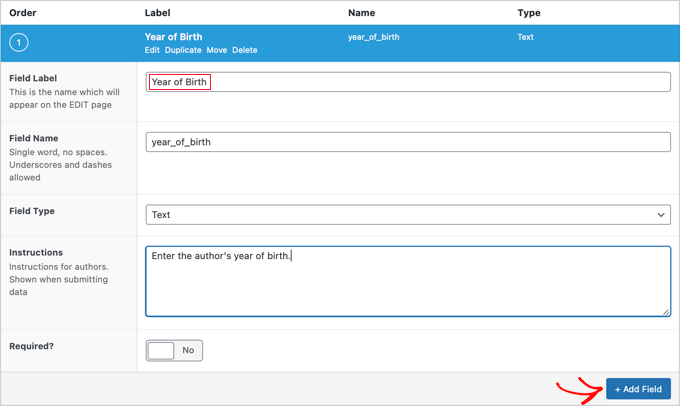
Teraz powinieneś wypełnić inne szczegóły dotyczące pola, takie jak rodzaj pola, instrukcje dla twoich autorów, którzy będą wypełniać formularz i czy to pole jest wymagane. Inne opcje, które nie zostały pokazane na zrzucie ekranu, obejmują tekst domyślny, tekst zastępczy, limit znaków i inne.
Jeśli chcesz dodać drugie pole, kliknij przycisk “+ Dodaj pole” i powtórz proces. W przeciwnym razie wystarczy przewinąć w dół do sekcji Lokalizacja.
W tym miejscu można utworzyć reguły opisujące miejsce wyświetlania nowego pola. Powinieneś wybrać “Taxonomy” z pierwszego menu rozwijanego i pozostawić środkowe pole jako “is equal to”. Na koniec należy wybrać odpowiednią własną taksonomię dla ostatniego pola. W tym poradniku wybierzemy “Autor”.

Jeśli chcesz dodać to pole do innej taksonomii, możesz kliknąć przycisk “Dodaj grupę reguł” i powtórzyć ten krok.
Teraz należy dostosować wszelkie inne ustawienia na stronie. My po prostu pozostawimy wartości domyślne. Po zakończeniu przewiń stronę do góry i kliknij przycisk “Opublikuj”.

Gratulacje, pomyślnie dodałeś niestandardowe pole meta do własnej taksonomii w WordPress. Przed Tobą jednak jeszcze trochę pracy.
Krok 2: Dodawanie danych do nowego własnego pola meta
Chociaż taksonomia ma nowe pole, nie zawiera jeszcze żadnych danych. Powinieneś poświęcić trochę czasu, aby zrobić to teraz.
W naszym przykładzie musimy wpisz rok urodzenia każdego autora. Aby to zrobić, musimy przejść do Wpisy ” Autorzy i kliknąć nazwę autora, którego chcemy edytować.

Następnie możemy wpisz dane do nowego pola. W tym przypadku wpiszemy rok urodzenia danego autora. Nie zapomnij kliknąć przycisku “Aktualizuj”, aby zapisać nowe dane.
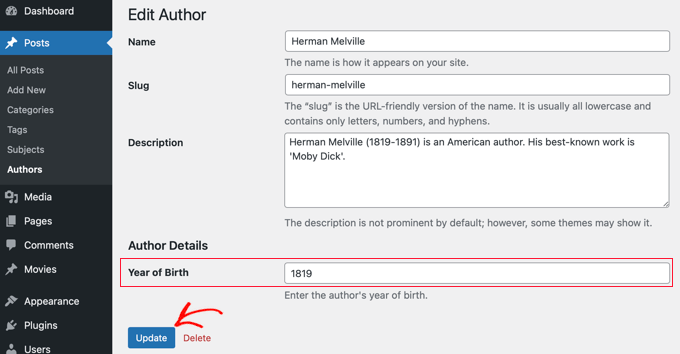
Powinieneś wykonać te same kroki na swojej witrynie internetowej, aby dodać dane do dostosowanej taksonomii.
Po zakończeniu pozostaje jeszcze jeden krok. Chociaż możesz zobaczyć własne pole, gdy logujesz się do obszaru administracyjnego WordPress, klienci odwiedzający twoją witrynę internetową nie będą mogli go zobaczyć. Konieczne będzie dodanie pola do strony archiwum własnej taksonomii.
Krok 3: Wyświetlanie własnego pola meta na twojej stronie archiwum taksonomii
W tym kroku musisz dodać kod do plików twojego motywu. Jeśli nie robiłeś tego wcześniej, zapoznaj się z naszym przewodnikiem dla początkujących, jak wklejać fragmenty kodu z sieci do WordPressa.
Pierwszą rzeczą, którą musisz zrobić, to wejść do katalogu twojego motywu i poszukać pliku archiwum taksonomii. Będzie on miał nazwę taką jak taxonomy-YOURTAXONOMYNAME.php.
Na przykład, jeśli masz własną taksonomię o nazwie “autorzy”, musisz poszukać pliku o nazwie taxonomy-authors.php.
Jeśli nie widzisz tego pliku, poszukaj pliku archive.php. Będziesz musiał utworzyć duplikat tego pliku i nazwać go tak, jak opisano powyżej.
Uwaga: Jeśli twój motyw nie zawiera archive.php, to prawdopodobnie korzystasz z frameworka motywu WordPress i będziesz musiał ręcznie utworzyć archiwum taksonomii. Dobrym punktem wyjścia do nauki tworzenia archiwów jest nasz przewodnik na temat tworzenia własnych stron archiwalnych w WordPress.
Teraz musisz dodać następujący kod do archiwum taksonomii tuż przed pętlą:
1 2 3 4 5 6 7 8 9 10 11 12 | <?php// get the current taxonomy term$term = get_queried_object();// get the taxonomy meta field$taxonomymetafield = get_field('FIELDNAME', $term);// display the taxonomy meta fieldecho $taxonomymetafield;?> |
Zwróć uwagę, że musisz zastąpić “FIELDNAME” rzeczywistą nazwą pola, którą utworzyłeś powyżej. Pamiętaj, że poprosiliśmy Cię o jej zanotowanie.
W naszym przykładzie nazwa pola to “year_of_birth”. Dodamy również opis, aby odwiedzający zrozumieli, co oznacza to pole. Dodamy więc następujący kod do pliku archiwum taksonomii taxonomy-authors.php:
1 2 3 4 5 6 7 8 9 10 11 12 13 | <?php// get the current taxonomy term$term = get_queried_object();// get the taxonomy meta field$taxonomymetafield = get_field('year_of_birth', $term);// display the taxonomy meta fieldecho "Year of birth: ";echo $taxonomymetafield;?> |
Oto jak to wyglądało, gdy testowaliśmy to na naszej witrynie demonstracyjnej:
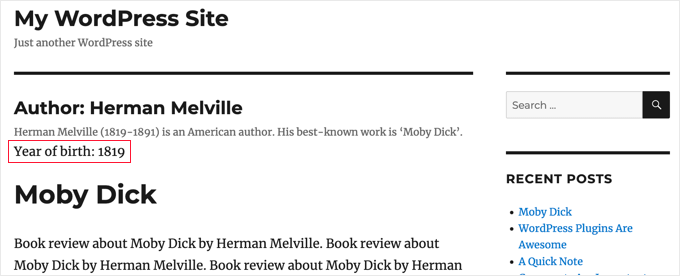
Mamy nadzieję, że ten poradnik pomógł ci dowiedzieć się, jak dodać niestandardowe pola meta do własnych taksonomii w WordPress. Możesz również dowiedzieć się, jak dodać słowa kluczowe i meta opis w WordPressie lub sprawdzić naszą listę niezbędnych wtyczek WordPress, aby rozwinąć twoją witrynę.
If you liked this article, then please subscribe to our YouTube Channel for WordPress video tutorials. You can also find us on Twitter and Facebook.


Tarek Anandan
If you can’t your data to display and you’re using a recent version of WordPress, use get_term_meta() instead of get_tax_meta().
Subin
here’s my code:
$config = array(
‘id’ => ‘tax_meta_box’, // meta box id, unique per meta box
‘title’ => ‘Tax Meta Box’, // meta box title
‘pages’ => array(‘category’), // taxonomy name, accept categories, post_tag and custom taxonomies
‘context’ => ‘normal’, // where the meta box appear: normal (default), advanced, side; optional
‘fields’ => array(), // list of meta fields (can be added by field arrays)
‘local_images’ => false, // Use local or hosted images (meta box images for add/remove)
‘use_with_theme’ => get_template_directory_uri() . ‘/Tax-Meta-Class/Tax-meta-class’
);
/*
* Initiate your meta box
*/
$my_meta = new Tax_Meta_Class($config);
//Image field
$my_meta->addImage(‘image_field’,array(‘name’=> __(‘My Image ‘,’tax-meta’)));
$my_meta->Finish();
———————————————————————————————————————–
term_id;
$saved_data = get_tax_meta($term_id,’image_field’,true);
echo ”;
echo $term_id; // Echoes ‘1’ which is the category ID
echo $saved_data; // Doesn’t show anything . Wonder Why!!
exit;
?>
James Dower
I’m also having issues getting the path for an uploaded image. It just echos:
Array
…text fields are fine.
I’m using:
$prefix = ‘ttp_’;
$my_meta->addImage($prefix.’logo_id’,array(‘name’=> __(‘Logo’,’tax-meta’)));
And on the taxonomy.php page:
$logo = get_tax_meta($term->term_id, ttp_logo_id);
Can anyone help please? I’ve been at this for HOURS!
James Dower
…and is anyone please able to explain how to echo repeater fields?!
James Dower
For all those struggling to get this to read out, I found a stray apostrophe in there, this works for me:
$data = get_tax_meta($term->term_id, ba_text_field_id);
echo $data;
siva
Hi Team very very thank you…..
Ketan
Hi,
I am activate plugin. but i don’t show where i can add custom taxonomy filed in admin side. please replay me.
Thanks,
Ketan.
Francisco
Thanks a lot this has been very useful!!!!
I displayer correclty a text field using this code:
//Get the correct taxonomy ID by slug
$term = get_term_by( ‘slug’, get_query_var( ‘term’ ), get_query_var( ‘taxonomy’ ) );
//Get Taxonomy Meta
$saved_data = get_tax_meta($term->term_id,’ba_text_field_id’);
echo $saved_data;
BUT I need to display an image too, I’m using this php code in my template:
//Get the correct taxonomy ID by slug
$term = get_term_by( ‘slug’, get_query_var( ‘term’ ), get_query_var( ‘taxonomy’ ) );
//Get Taxonomy Meta
$saved_data = get_tax_meta($term->term_id,’ba_image_field_id’);
echo $saved_data;
But it doesn’t display anything!
It just shows a single word “array”
What could be wrong?
David Beastall
Thanks for that, the tutorial seems incomplete imo.
Hemanta Chakladar
I’m also searching for that.
Hemanta Chakladar
I’m stuck.
I can see meta data option in wordpress category and not in my custom taxonomy. Where can I add this option to add custom meta in my custom taxonomy ? Where that is defined ?
Marco Panichi
How to add a multiple checkbox in order to select one or more users?
Ankur
Hi Marco, Did you get any answer on it? I am also looking for the same functionality.
Joe Chow
thanks a lot.I can see there are bunch of fields showed at the post category. However, I just want to know how to make the code to be used for woocommerce product category only.
Can anyone give a tip?
Joe
How would you get the taxonomy information on a custom page template instead of a taxonomy.php page?
Jason Gateman
Thanks for this tutorial! How do I get the meta to show on a custom post page I have created as opposed to just the taxonomy page?
AD
Hi Guys,
For those who are having issues with displaying the content that is saved. Use the prefix in front of the key.
//Get Taxonomy Meta
$saved_data = get_tax_meta($term->term_id,’text_field_id’);
echo $saved_data;
That should be ba_text_field_id (Given that the prefix is ba_) .
Hope this helps cheers.
Dan
I wanted to second this comment, as it can be quite puzzling to figure out why the example doesn’t work. If you look in the “Tax meta class” file you will see at the top that Ohad defines a $prefix variable that is appended to each save function.
So in order to get the result to echo out, you need to include the prefix. You can set the prefix to anything you want, including “”. I have no idea what “ba_” stands for, but that is what is in there by default.
The example should read:
$saved_data = get_tax_meta($term->term_id,’ba_text_field_id’);
Chris
Thanks a lot! Works great. You saved me a lot of time coding.
Ante
Ok, I’m stuck.
//Get the correct taxonomy ID by slug
$term = get_term_by( ‘slug’, get_query_var( ‘term’ ), get_query_var( ‘taxonomy’ ) );
//Get Taxonomy Meta
$saved_data = get_tax_meta($term->term_id,’text_field_id’);
echo $saved_data;
So ‘taxonomy’ is my custom taxonomy, let’s say ‘project_clients’
‘text_field_id’ is the id of input field, it’s $prefix.’text_area’…
What’s ‘term’ ?????
Steve
Ante,
Have you had any progress with this??
I’m wondering the same question – poured over so many comments and pages talking about this, but cannot find a resolution. Any help would be appreciated if you have found the answer.
Simply adding the following to my taxonomy.php file is not working:
//Get the correct taxonomy ID by slug
$term = get_term_by( ‘slug’, get_query_var( ‘term’ ), get_query_var( ‘taxonomy’ ) );
//Get Taxonomy Meta
$saved_data = get_tax_meta($term->term_id,’text_field_id’);
echo $saved_data;
fp-admin
I am trying to add whatever I put in the WYSIWYG to the front end of the website. I honestly have no clue what I’m doing but this is my code so far:
term_id,’wysiwyg_field_id’);
?>
<a href="”>
ELiane
Hi,
I used the plugin but I can get the code on my Taxonomy.php.
I Use this code to display the field
term_id,’text_field_id’);
echo $saved_data;
?>
Do I have to do something else?
Thanks
WPBeginner Support
yes if you have followed all instructions as described above, then it should work.
Admin
Tejas Deshmukh
Hello, Specially Thanks for this Idea. This plugin is working superb. I have added three extra fields in Perticular Term add, edit option. but when i create category in it at that term at that time I can’t store value for that extra three fields. So any suggestion for that?
alexut
But how do I get the data out of the archive page? you should add this also as this is a common request.
Kisshomaru
Brilliant! You have no ideea how much time I spent looking for a way to add “quantities” to “products”. This not being a commerce site, it was cumbersome to have a food post tied to an Ingredients taxonomy and not to be able to modify the number of cucumbers for each post.
Thank You!
Mike Jackson
Hi – I’m having trouble getting this to work. I have the data fields visible in my custom taxonomy but I cannot call the data in my brand-description.php using the php code you pasted at the bottom of your article. It doesn’t show an error, it just doesn’t work.
I’d really appreciate some further explanation with this if you have the time.
Thanks
Mike Jackson
This is quite a find! Been trying to solve this for a few weeks. Any idea how to add the new fields to the columns?
Mike Jackson
I’m also having trouble outputting anything on the page. I have this code applied and data in the fields but nothing showing on the site
term_id,’textarea_field_id’);
echo $saved_data;
?>
Editorial Staff
This code works on taxonomy archive page. If it is not displaying then chances are that the code is not able to get the taxonomy ID. At least that would be my guess.
-Syed
Admin
FJ
Well, this sounds nice and did the trick on the categories but for any reason, it didn’t on a custom taxonomy of mine. Did I miss something ? Is there a hook somewhere I didn’t look at ?
Anyway thanks a lot for those enlightening on Ohad’s work. I hanged around it wondering how on earth I could use it properly. I’m just the do-it-yourself type, not a real developper, I’m sure you’ll have understood already.
Thanks again.
Editorial Staff
In line 24 of example-usage.php, you should be able to specify your custom taxonomy.
Admin
Ben
To clarify – Line 24 of taxonomy-fields.php
‘pages’ => array(‘category’), // taxonomy name, accept categories, post_tag and custom taxonomies
CHANGE the XXX to whatever your custom taxonomy is called
‘pages’ => array(‘xxxxx’), // taxonomy name, accept categories, post_tag and custom taxonomies
Kobbe
@ Editor please forgive me, How do i output a text field
Editorial Staff
You have to use the PHP code that we shared. Make sure to change the field name to the one that you have.
Admin
Kobbe
Thanks editor i really appreciate for the reply, This is how class-usage-demo.php – http://pastebin.com/ctZPeS0w
This is what i’m doing but not displaying/outputting anything what am i doing wrong..? and is it possible to display the code (if possible) anywhere in my theme…Thanks
Editorial Staff
The code you have is simply setting up the admin side of things. To display the code, look at the PHP code that we have shared in the article. You have to use that in your taxonomy archive file.
gaurav kaushik
its cool..
but where it save the data…? in postmeta table or it create a new table?
Editorial Staff
It does it in the options table.
Admin
Gaurav Kaushik
can we change the backend of this plugin..i mean we want to create a termmeta table (meta_id,term_id,meta_key,meta_value) ..and save the taxonomy meta here…or connect it with this plugin? http://wordpress.org/extend/plugins/simple-term-meta/
Jim
Cool stuff. I will implement this on our blog in the future.
Michelle
Oh thanks you so much, I’ve been wondering how to identify tags as being English or Spanish for my bilingual site – this helps enormously
Jaime
I actually just finished coding up custom fields for a custom taxonomy for a project I’m working on. I love the flexibility – will certainly check out the plugin for future projects!
Editorial Staff
Yes that is the best part about it. We love stumbling onto libraries like this one which makes the life of developers much easier.
Admin