Slow loading times are frustrating for visitors and bad for your business. If your website takes too long to load, users will likely hit the back button before seeing your content.
At WPBeginner, we use Cloudflare’s CDN to ensure our site loads lightning fast for readers around the world. The best part is that their free plan offers powerful speed and security improvements without any cost.
In this tutorial, we will show you how to setup Cloudflare free CDN in WordPress step-by-step. You will learn how to configure it correctly to boost your site’s performance immediately.
What Is a CDN?
A CDN (Content Delivery Network) is a network of servers spread across the globe that store copies of your website’s files. When someone visits your site, the CDN delivers content from the server closest to them, making your pages load much faster.
Here’s the problem with traditional hosting: Your web hosting service typically serves all visitors from one location. Whether someone is browsing from next door or halfway around the world, they’re all accessing the same server.
This creates a bottleneck. A visitor in Australia trying to access a website hosted in New York will experience much slower loading times than someone in New Jersey. The data has to travel thousands of miles, which adds precious seconds to your page load time.
CDNs solve this by placing edge servers in strategic locations worldwide. These servers store cached copies of your website’s static content (like images, CSS files, and JavaScript) and serve them to nearby users.
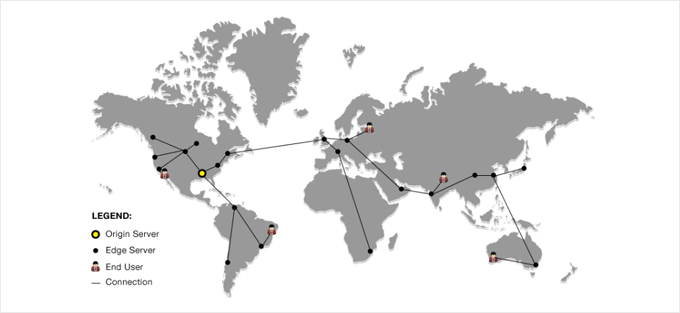
Here’s how it works in practice: When someone in Germany visits your WordPress website, the CDN automatically routes their request to the nearest server in Europe instead of your origin server in the US. This dramatically reduces loading time.
CDNs can significantly reduce page load times for international visitors. This speed improvement has a real business impact – faster sites keep visitors engaged, reduce bounce rates, and often see better conversion rates.
Beyond speed, CDNs offer additional benefits for your WordPress site’s performance:
- Improved SEO rankings – Google considers page speed as a ranking factor
- Better server stability – CDNs reduce load on your main server, preventing crashes during traffic spikes
- Enhanced security – Many CDNs include DDoS protection and web application firewalls
- Bandwidth savings – CDNs handle static content delivery, reducing your hosting bandwidth usage
For a deeper dive into CDN benefits, check out our comprehensive guide on why you need a CDN for your WordPress blog.
What Is Cloudflare CDN?

Cloudflare is one of the most popular free CDN providers on the Internet. It is a large network of globally distributed servers that automatically caches static content and delivers dynamic content quickly.
On top of a CDN service, Cloudflare is also a cloud-based website firewall and a distributed proxy server. This means that it monitors all incoming traffic to your website and blocks suspicious traffic even before it reaches your server.
It offers a free basic plan suitable for small business websites and blogs, and paid plans starting at $20 per month.
Cloudflare is an excellent choice for small businesses looking for a free CDN. However, if you want to fully utilize all of Cloudflare’s features, then you will need the Business plan, which costs $200 per month.

Related: See our post on why WPBeginner switched from Sucuri to Cloudflare.
With that being said, let’s take a look at how to set up Cloudflare Free CDN in WordPress. You can use the quick links below to jump to the different parts of the tutorial:
- Setting Up Your Cloudflare Account
- Configuring an Important Cloudflare Setting
- Optimizing Cloudflare for WordPress Using a Plugin
- Frequently Asked Questions About Cloudflare CDN
- Additional Resources
Setting Up Your Cloudflare Account
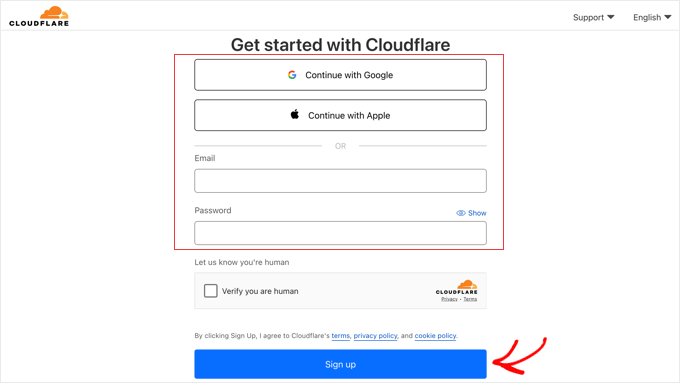
To begin, you need to visit the Cloudflare website and click on the ‘Start for free’ button.

On the next page, you need to enter your email address and password to create a Cloudflare account. Alternatively, you can sign up using your Google or Apple credentials.
Simply enter the information required, and then click on the ‘Sign up’ button.
When you finish signing up, you can connect your site to start sending your web traffic through Cloudflare. You just need to enter your website into the ‘Enter an existing domain’ field.
Make sure you only type your site’s domain name, such as example.com. You don’t need to type the full URL or any extra characters.
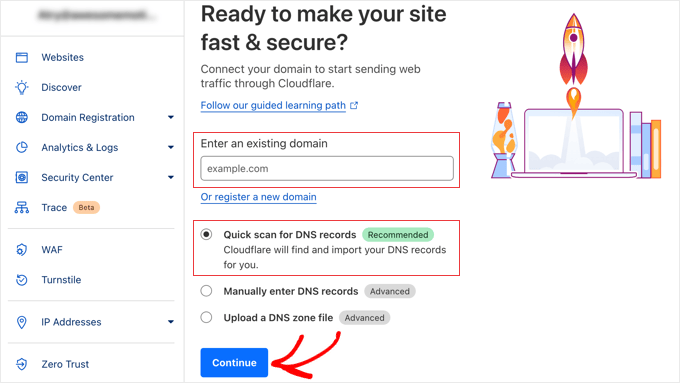
Make sure the ‘Quick scan for DNS records’ is selected, and then click the ‘Continue’ button.
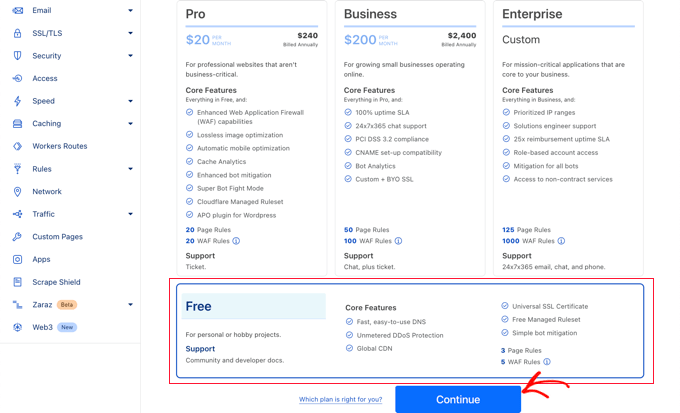
On the next screen, you will be asked to choose the type of Cloudflare plan you want. For this tutorial, we will choose the free Cloudflare plan. Then, click the ‘Continue’ button.
After that, Cloudflare will show you a list of all the DNS records their systems found. These will include your subdomains as well.
The DNS records you want to pass through Cloudflare should have an orange cloud icon, while the DNS records that will bypass Cloudflare will have a gray cloud icon.
You need to review the list to make sure that your primary domain is active on Cloudflare with an orange cloud icon.
Important: You must also scroll down and check that your MX records (used for email) are listed correctly. If your email records are missing, your business email will stop working.
Simply click the ‘Proxy status’ toggle to change the status of your domain if needed.
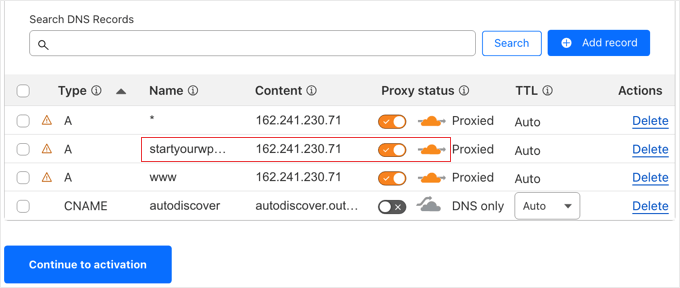
Once you have verified your DNS records, just click on the ‘Continue to activation’ button.
During the next step of your setup, Cloudflare will ask you to update your nameservers. You will be asked to change your nameservers to new ones assigned by Cloudflare.
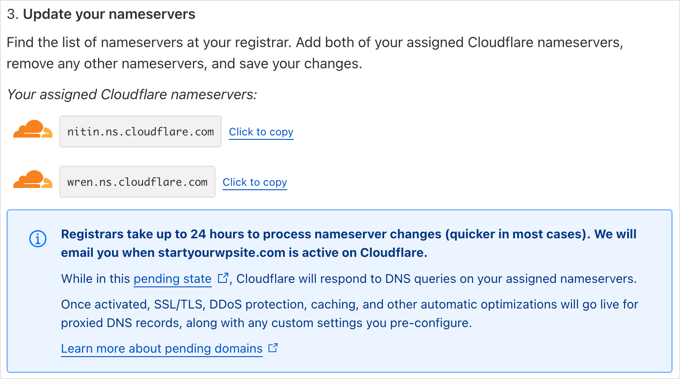
Note: Changing nameservers can take some time to propagate throughout the internet. During this time, your website may become inaccessible to some users.
You can change nameservers from your domain registrar account, like Network Solutions.
Or, if you got a free domain from your web hosting provider, then you will have to change the nameservers by logging in to your hosting account.
For the sake of this tutorial, we will be showing you how to change the nameservers from the Bluehost control panel.
While the process is similar across hosting companies, you can always ask your hosting provider for detailed instructions for their control panel.
Once you are logged in to your Bluehost dashboard, go to the ‘Domains’ section and click the ‘Settings’ button next to your domain name.

Next, you need to scroll down to the Advanced Settings section and expand it by clicking the arrow on the right of the screen. This will show your website’s DNS settings, including the nameservers.
Next to ‘Nameservers (DNS), you should click the ‘Manage’ button.
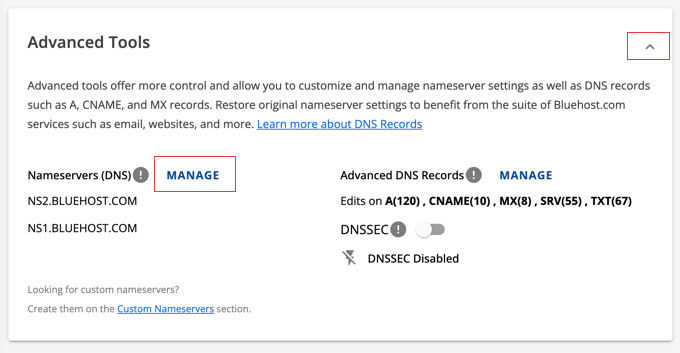
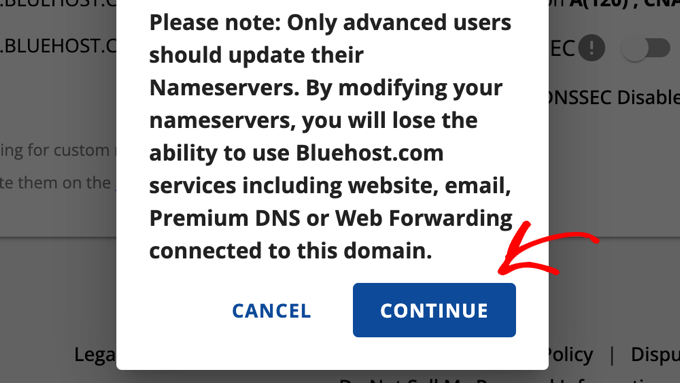
This will pop up a warning that only advanced users should update their nameservers.
You need to click the ‘Continue’ button to acknowledge this and move on to the next step.
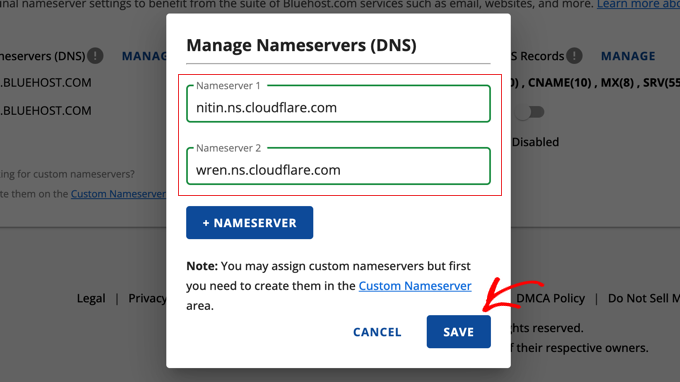
Next, you need to enter the nameservers provided by Cloudflare.
Then, click the ‘Save’ button.
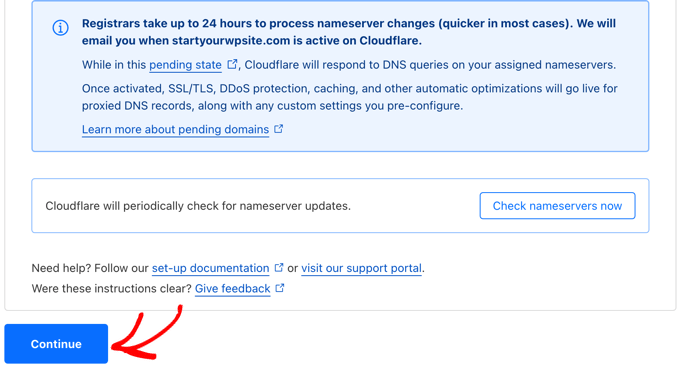
After that, you need to go back to the Cloudflare setup page and click the ‘Check nameservers now’ button. Cloudflare will now your nameservers periodically and send you an email once they are active.
In the meantime, you can click the ‘Continue’ button to finish the setup.
That’s it! It will take a few minutes to update your domain nameservers and activate Cloudflare.
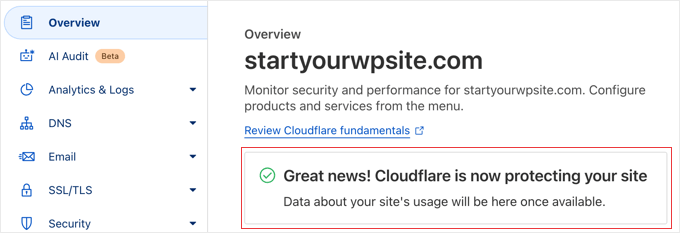
Once activated, you will see the success message in your Cloudflare dashboard.
Note: The above screenshots show the Bluehost control panel. Your nameserver settings may look different if you are using a different hosting provider.
Critical Step: Configure SSL/TLS Encryption
Before you move on, there is one vital setting you must check to ensure your website doesn’t break.
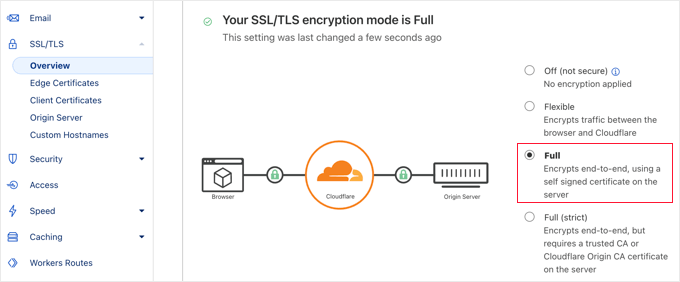
If your WordPress site has an SSL certificate (you see a padlock icon in your browser), you must set Cloudflare’s SSL/TLS encryption mode to ‘Full’ or ‘Full (Strict)’.
If you leave it on ‘Flexible’, your site may get stuck in an infinite redirect loop error.
Simply click the SSL/TLS menu in the Cloudflare dashboard and switch the mode to Full.
Configuring an Important Cloudflare Setting
While Cloudflare is now protecting your site, you need to configure an important setting while you are still on the Cloudflare website. Once this is done, you will install the Cloudflare plugin on your WordPress website to finish the setup process.
We recommend configuring Cloudflare with page rules so that your WordPress admin area does not pass through it. This avoids potential caching issues that can affect admin functionality.
Cloudflare allows you to set up three free page rules. If you want to add more page rules, then you need to pay $5 per month for 5 extra rules.
First, you need to click the Rules » Page Rules option in the menu on the left of the page. After that, you can click the ‘Create Page Rule’ button.
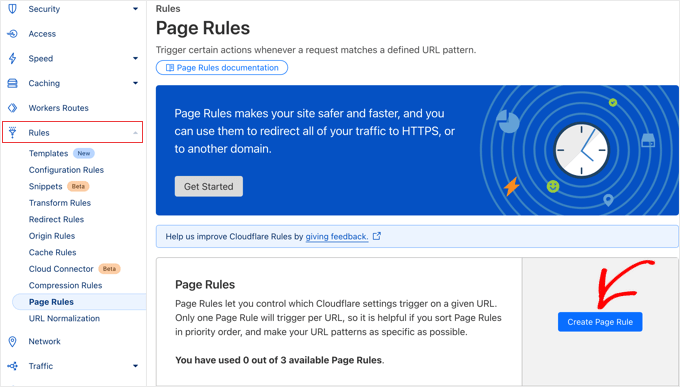
Now, you need to type the following settings into the rule. You can click the ‘+ Add a Setting’ button to add new rows for additional settings:
- Page URL: *example.com/wp-admin*
- Cache Level – Bypass
- Disable Performance
- Disable Apps
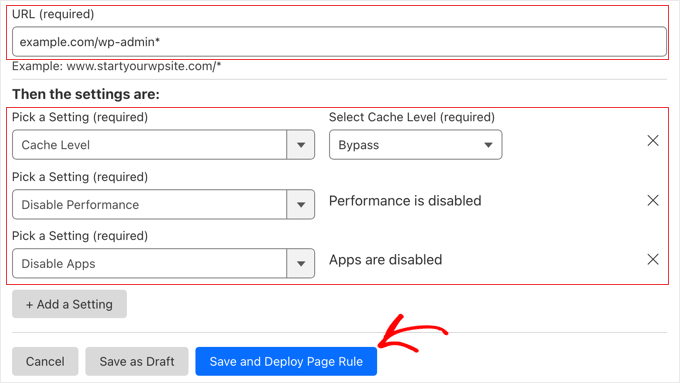
When you are done, make sure you click ‘Save and Deploy’ to add the new rule.
Once that has been done, you will complete the Cloudflare setup using the official Cloudflare WordPress plugin.
Optimizing Cloudflare for WordPress Using a Plugin
Cloudflare offers a dedicated WordPress plugin for one-click WordPress-optimized settings. It integrates Cloudflare features smoothly with WordPress to provide the best compatibility and functionality.
The plugin lets you quickly set up Cloudflare on your WordPress site, add web application firewall (WAF) rulesets, automatically purge the cache, and more.
To get started, install and activate the Cloudflare plugin on your website. For more details, see our step-by-step guide on how to install a WordPress plugin.
Note: This plugin is official and safe to use. Its primary function is to help you clear the Cloudflare cache directly from your WordPress admin area, so you don’t have to log in to the Cloudflare dashboard every time you update a post.
Once done, you need to visit Settings » Cloudflare in your admin panel to configure the Cloudflare settings.
On the settings page, you will see a ‘Create Your Free Account’ button and a sign-in option for existing accounts. Simply click the ‘Sign in here’ link.
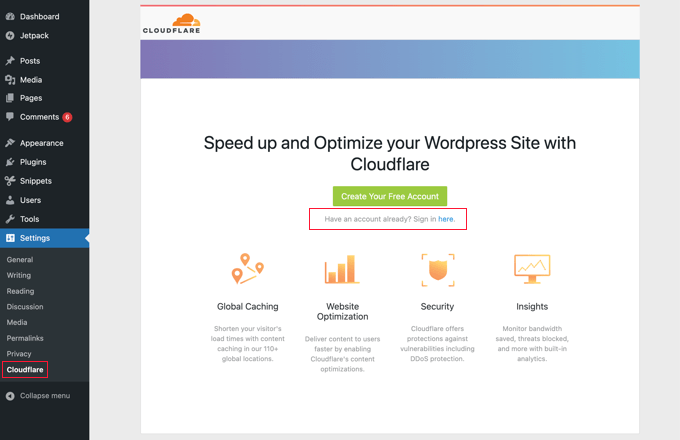
On the next screen, you will need to enter your Cloudflare email and API key.
Click the ‘Get your API key from here’ link.
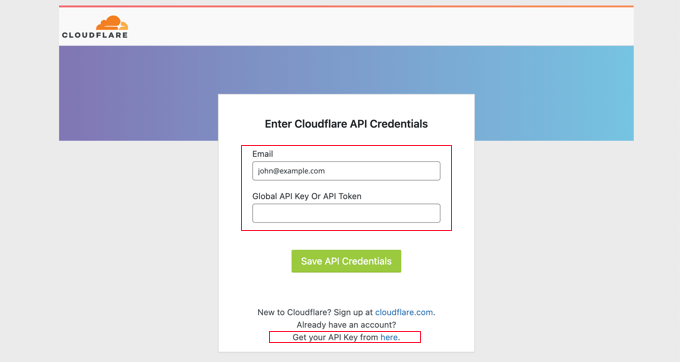
This will bring up a popup for your account area on the Cloudflare website.
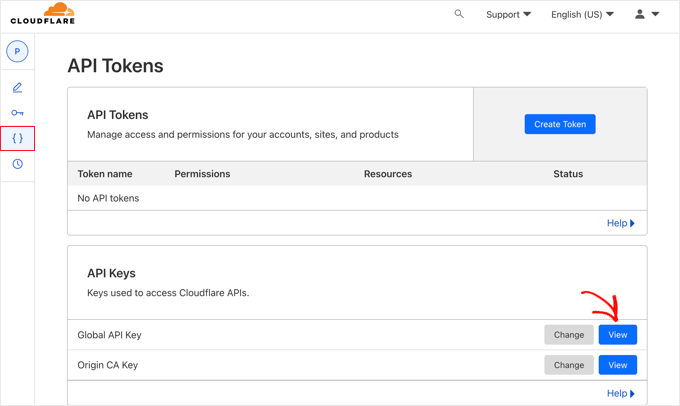
Make sure you are on your ‘My Profile’ page, and then click on the ‘API Tokens’ tab in the left sidebar.
After that, go to the ‘Global API Key’ section and click on the ‘View’ button.
This will open a popup and display your API key.
Simply click on the key to copy it.
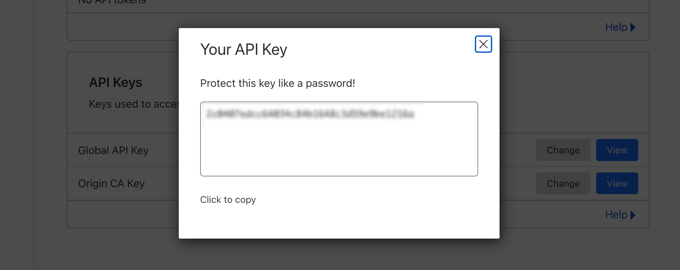
Security Note: Your Global API Key is like a master password for your Cloudflare account. Do not share it with anyone or use it in plugins that you do not trust.
Next, you need to come back to your WordPress dashboard and enter your email address and API key.
Then, click the ‘Save API Credentials’ button.
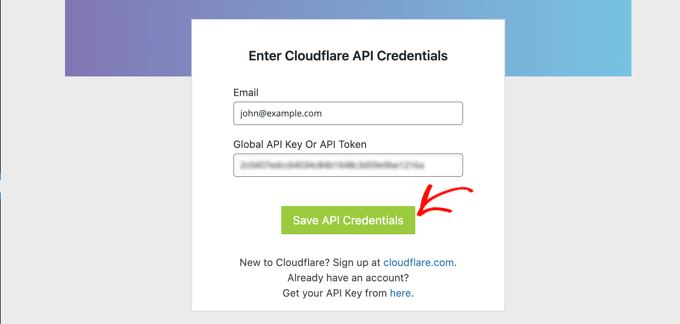
After that, the Cloudflare settings will appear on your dashboard.
From here, you can apply a single-click WordPress optimization, purge the cache, enable automatic cache, and more.
To optimize your WordPress site, click the ‘Apply’ button next to ‘Apply Default Settings’. This will execute some configuration changes that Cloudflare recommends for optimal WordPress performance.
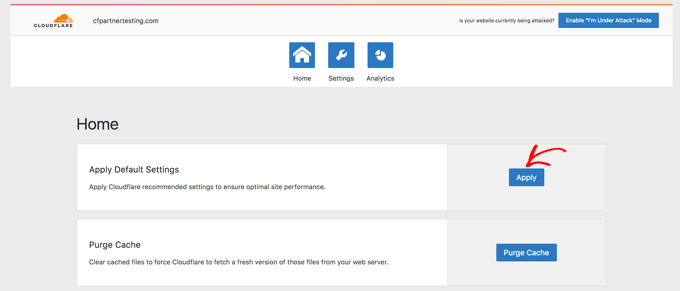
Next, click on the ‘Settings’ menu option.
Here, you will find more site optimization settings.
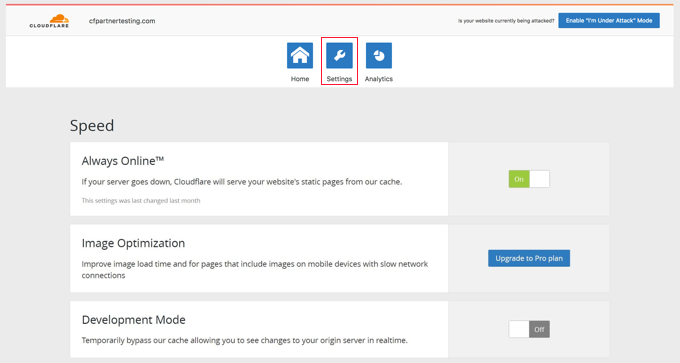
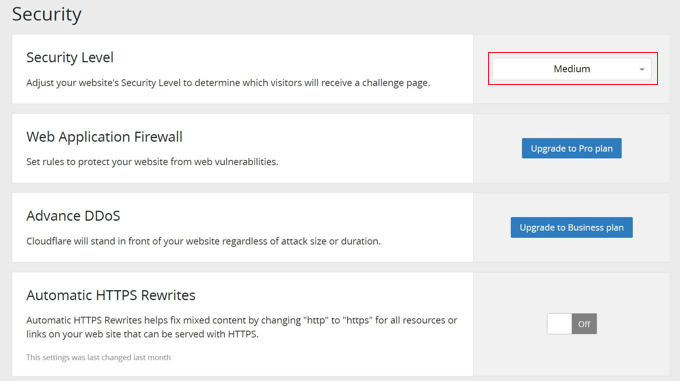
You can scroll down on this screen to find the ‘Security’ section.
The security level is medium by default. To improve your website’s security, you can select ‘High’ from the dropdown list.
And that’s it! You’re all done.
Frequently Asked Questions About Cloudflare CDN
We often receive questions from our readers about using Cloudflare with WordPress. Here are the answers to some of the most common questions.
1. Is Cloudflare really free?
Yes, Cloudflare offers a completely free plan that never expires. It provides all the essential features a small business or personal blog needs to speed up their website.
2. Does Cloudflare replace my web hosting provider?
No, Cloudflare is not a replacement for your web hosting provider. You still need a hosting service like SiteGround or Bluehost to store your website files.
3. Will Cloudflare work with my caching plugin?
Yes, Cloudflare works excellently alongside popular caching plugins. We use WP Rocket combined with Cloudflare to ensure maximum performance.
4. Will changing nameservers break my email?
Cloudflare usually copies your email records automatically during the setup scan. However, we always recommend double-checking your DNS records to make sure your email settings are correct before finishing the setup.
5. How long does it take for Cloudflare to start working?
DNS changes can take up to 24 hours to propagate globally, but it often happens much faster (usually within minutes). If the Cloudflare dashboard says your site is active, but you still don’t see changes, try clearing your browser cache.
Additional Resources
Now that you have set up Cloudflare, you might want to learn more about improving your website’s performance and security. Here are some guides to help you get started:
- The Ultimate Guide to Boost WordPress Speed & Performance
- Best WordPress Caching Plugins to Speed Up Your Website
- How to Stop and Prevent a DDoS Attack on WordPress
- How to Optimize Images for Web Performance Without Losing Quality
- How to Fix the 502 Bad Gateway Error in WordPress
If you liked this article, then please subscribe to our YouTube Channel for WordPress video tutorials. You can also find us on Twitter and Facebook.


Hmi
Hi awesome tutorial! Thank you!
There is no security level anymore in the setting. What should I choose?
Best Regards
WPBeginner Support
Thank you for letting us know about this, we will look into updating the article but the setting should currently be in your zone rules.
Admin
kzain
Awesome post! Setting up Cloudflare’s free CDN in WordPress can seem daunting, but this guide made it a breeze. I love how you’ve broken down the process into simple, easy-to-follow steps. Your tip on configuring the SSL certificate is particularly helpful. Thanks for showing us how to boost our website’s performance and security without breaking the bank. Cloudflare and WordPress are a match made in heaven, and this post is the perfect matchmaker! Keep up the fantastic work, WPBeginner!
Gabriel Ahulo
Finally, I’ve been able to integrate cloud flare to my site .
WPBeginner Support
Glad our guide was helpful!
Admin
Nelson
My hosting provider connected my website over Cloudflare CDN.
But main problem is with website speed.
Speed with direct access 100% and when accessed via CDN 85%. How can it be fixed?
WPBeginner Support
It would depend on the reason why it says that the speed is lower, we would recommend taking a look at our guide below for understanding and using speed tests:
https://www.wpbeginner.com/beginners-guide/how-to-properly-run-a-website-speed-test-best-tools/
Admin
Andrew Hansen
My hosting plan through Host gator says it has cloudflare installed. Is that good, or should I uninstall it through the hosting plan and manually add it so i can customize my options?
WPBeginner Support
It would depend on how Cloudflare is set up on your account, if you have access to cloudflare’s settings then you can continue to use what is on your account without worrying.
Admin
Andrew Hansen
I do not have control over settings.
WPBeginner Support
Jus to be safe, check with your host as there may be a hidden settings area for Cloudflare in the hosting settings.
Andrew Hansen
I checked the information regarding cloudflare through Hostgator. you can manage what level caching (assets only, assets and web pages, or assets and web pages extended) and you can clear the cache, but hostgator says under the cons of using it “No option to customize – Currently, you cannot customize cache settings (for example, which content gets cached, the cache timing, etc.) for the CDN.”
Jiří Vaněk
I use Cloudflare DNS along with their CDN. The integration of Cloudflare CDN into the WP Rocket plugin, which I use for caching, is fantastic. The CDN can be linked with the caching plugin, allowing for the simultaneous clearing of both the website cache and the CDN cache with a single button in WP Rocket.
WPBeginner Support
Connections like that to help simplify the process are very helpful
Admin
Ralph
I plan on making website from europe server (cheaper) to US users and this guide is godsend! Even better it is possible to do it for free. Thank you for this detailed guide. It will definitely help me setting everything up as I never really understood how to do this. Every other guide was lacking details and was too general.
WPBeginner Support
Glad to hear our guide was helpful
Admin
Salman
Hi, I use the “WPS Hide Login” plugin. While creating a page rule for the login page should I use the default login URL or the new login URL which I am using with the help of the plugin?
WPBeginner Support
If the login page is on a different URL you would want to set the page rule for the active login page that users would visit.
Admin
Neal Umphred
Thanks for another useful how-to article!
Regarding the ‘Always Use HTTPS’ option, you wrote: “Some users have reported issues when using this setting with Cloudflare.”
What are those issues?
WPBeginner Support
The errors vary between sites so we don’t have a specific list of errors to point to at the moment.
Admin
Sohil Jain
If I setup comment on my main domain wil it will be setup automatically to subdomain too? Because I don’t want cloudflare setup to apply to subdomain as I only want on main domain. So where to click so that it will not apply to subdomain
Thanks
WPBeginner Support
There is an option in Cloudflare to exclude a subdomain so you wouldn’t need to worry about that.
Admin
Evindu Shavinda
I added Cloudflare to my website today. So, I had to remove my hosting’s nameservers & replace them with Cloudflare nameservers from my domain registrar.
This is the question – 1. So, how my hosting account still works? I have removed its nameservers from the domain registrar
Aftab
Don’t worry about hosting. Cloudflare doesn’t modify or change your hosting configuration. Your site will be hosted on your current host only. The reason why cloudflare asks you to change the nameserver because it passes your site through their DNS. It routes your web traffic through the Cloudflare network. So they can proxy your traffic through their network. Cloudflare offers security, ddos protection to all the sites that are configured with their nameservers. You don’t need to spend a single penny to configure your site through network. It’s a part of the free plan. No matter how many sites you have.
Nina Cen
When I tried to add the page rules for my wordpress login page, I got message “Not Acceptable! An appropriate representation of the requested resource could not be found on this server. This error was generated by Mod_Security.”
Is anything I did wrong? Or I just need to wait for a little while to try again?
WPBeginner Support
You would want to check with your hosting company for that specific error as that normally means they have a security rule set to prevent certain things on your site.
Admin
Shyam
I s there a way to turn off the second loading screen for security verification purposes and that CAPTCHA page which you have mentioned in the Cons of Cloudflare?
WPBeginner Support
You should be able to change the settings to remove that if you wanted but you would want to check with CloudFlare for the current method.
Admin
Lou
I’m setting up Cloudflare – thanks to your article! I’ve already got W3 super cache plugin – do I need both? Are they going to confuse each other? Total newb question I know!
WPBeginner Support
They have slightly different functions and there is an integration so the two can work with each other without an issue.
Admin
Faith Nte
Thank you for this guide. It helped me reduce the time my page loads
WPBeginner Support
Glad our guide was helpful
Admin
Muntaha
What if someone mistakenly adds the wrong parameters in page rules and then deployed it. Is there any way back to change page rules after deploying it?
WPBeginner Support
You can change your settings after setting them if you need to.
Admin
bali kratom
thanks for sharing this content
WPBeginner Support
You’re welcome
Admin
Will
Probably a noob question, but I have a lot of existing video and photo files on my site. Will they all be migrated to Cloudflare’s CDN or do I have to do that manually? I followed the setup steps, but my content still takes forever to load, and when I view its URL, it’s still showing my site’s URL and path.
WPBeginner Support
You shouldn’t need to transfer your content, for the slow loading you may want to reach out to CloudFlare for them to take a look
Admin
Brooke
Thanks so much for this, helps a lot!
Just to be clear, even though I’ve added my site to cloudflare, I still need to get an SSL cert separately? Cloudflare does not supply ssl cert?
Thanks again!
WPBeginner Support
You would want to take a look again under the Configuring Most Important Cloudflare Settings section for CloudFlare’s SSL
Admin
Ibraham Aali
Admin, kindly answer these question like
After changing the DNS, who is actually will my hosting provider? The hoster OR cloudflare and all editing can be done by same cpanel?
WPBeginner Support
Your hosting provider would still be your hosting provider.
Admin
Soumya
thank you very much, I was looking for a proper step-by-step Cloudflare set up! and TA DA!! you guys are savior.
It would be great if you publish about the best of cloudflare settings, from the plugin.
WPBeginner Support
Glad you found our article helpful
Admin
Alabura
Thank you for such a great publications, it really help me set up my cloud flare account easily. Keep the good work.
WPBeginner Support
You’re welcome, glad our guide was helpful
Admin
Bryan Wagar
Very helpful information and with the pictures for verification i could confirm everything instead of guessing, thankyou very much for compiling this! It is BRILLIANT
WPBeginner Support
You’re welcome, glad our guide could be helpful
Admin
PKV
superb guide, easy to follow thanks
WPBeginner Support
Glad our guide was helpful
Admin
randhir singh
I want to know which is the best CDN ? cloud Flare or max
WPBeginner Support
Hi Randhir,
At WPBeginner, we recommend MaxCDN. However, if you want to use the free CDN, then Cloudflare can be a good solution.
Admin
anurag saxena
If i will use cloudfare free version and will change the nameserver then it means my website will run on cloudfare server then how i can edit my website? through cloudfare or my present hosting provider? pls tell me detail.
andy
The only reason I use cloudflare because you can hide where you hosting the site.
Mehmet
i am wondering..
for cloudflare, we need to point the DNS to theirs..
so how we gonna use custom email set up using our own domain (which also need to point the DNS to the email provider) ?
as far as i know, we can’t use two DNS .. (actually we can, but it is expensive)
Aqib
I am using custom email and cloudflare. Cloudflare doesn’t affect my custom email working.
Abhi
If my domain is from go daddy and hostino is from inmotion hosting and I change my domain name server to my hosting now I want to join cloudfare to it then what can I do?
andy
I try to help answer. from godaddy change nameserver to cloudflare, and from cloudflare, set up your DNS and point to your in motion hosting ip address.
Syed Shan
After Setting Our Host DNS To Cloudfare DNS, Which bandwidth and storage will be used from our local hosting plan e.g godaddy, namecheap etc or Cloudfare ?
Haydrion Rayel
The reasons why I don’t use cloudflare is because of changing the nameservers and second like in this article : it blocks some of the legitime users and that is what I really hate.
I don’t use third party websites where I don’t have full control of it. I saw a couple of times there are you human google click on pictures and it takes forever.
MaxCDN is the only option because you only have to add a cname .. but still ..
Haydrion Rayel
The reasons why I don’t use cloudflare is because of changing the nameservers and second like in this article : it blocks some of the legitime users and that is what I really hate.
I don’t use third party websites where I don’t have full control of it. I saw a couple of times there are you human google click on pictures and it takes forever.
MaxCDN is the onlly option because you only have to add a cname .. but still ..
abhishek purohit
My site is on wordpress and running on godaddy vps server with ssl certificate but it has lots of page load time, now, should I go for cdn cloud flare free account if yes than what about all static IP given with vps account , they will not useable and is vps based site need cloud flare ?
Munna Hossain
Page loading time is an important issue to get good user experience. This LoudFlare helps us to increase the page loading. Can you tell me which one is better to improve page speed, plugin or CDN?
Iain
HI
Just to let you know
I have had a joomla website working on the Free plan and SSL
Not sure if your previous post is now outdated but it is possible.
Regards
Mircea Pop
You can use the provided Cloudflare SSL but you are unable to use your own SSL on free account
koushil
bro can we use this for blogspot blog ?
King Rayhan
of course why not
Ikechukwu
This was very helpful. Thanks.
munetsi
i am actually caught in between-
which provider should i choose for my site,
between cloudfare or maxcdn
Editorial Staff
We use MaxCDN for our sites.
Admin
SOTHEA
This is truly awesome tip. Anyways, I have a question. If my website contents and domain name are hosted in different hosting companies. In this case, I need to change Name Servers to CloundFlare for both. Am I correct?
Anubhav
Did you find the solution for this as i have different hosting provider and domain name provider is different .If you know the solution then please let me know
Ummi Mental
after changing the DNS, who is actually will my hosting provider? The hoster OR cloudflare and all editing can be done by same cpanel?
Captain Asif
Really very helpful article i have setup my wordpress site with cloudflare
Joe
What minification services do you recommend that work well with Cloudfare? This is for a Wordpress site that may have potentially high traffic spikes out of the blue. Thanks
bobzyouruncle
I live at the bottom of Africa (Cape Town) with none of their servers close to me am I correct in thinking that Cloud Flare will slow down my website. Most of my traffic is local. I have the same issues with CDNs none of them are close to my location, Europe is the closest. Is my thinking correct?
Damon Billian
CloudFlare would add a little latency because we currently don’t have any data centers in SA just yet (being looked at). Visitors from SA would currently hit a data center in Europe.
On the other hand, if you have visitors from a lot of other locations (EU, America, Asia, etc.), then the site would be faster for them.
munetsi
was just checking ,looks like they have servers in johannesburg.
Adesanmi Adedotun
I have heard about cloudflare but have not tried to make use of it, bout talking about the fact that my site might be down during the propagation of my name server,how long could this take?
WPBeginner Support
It varies, it can take a few hours to a full day.
Admin
Einstein
You will not experience any downtime while you switch to Cloudflare if you do it correctly.
Damon Billian
You should not have any downtime at all switching to CloudFlare’s nameservers.
Robby McCullough
I am a huge fan of CloudFlare. At my shop, we do a lot of sites for professional photographers. CF does an amazing job at making image heavy pages load in a snap!
One tip, don’t forget about CF’s developer mode when you’re making changes. I’ve bashed my head against the wall for some time when my CSS changes weren’t showing up — CF was serving a cached page!
Boby
When my website has ‘heavy load’ CloudFlare will make the users access screenshot of the website.
Abhisek
Cloudflare breaks my site’s design. I have a off-canvas menu and Cloudflare’s rocketloader and minification breaks ,y site’s design. So, I have to stick with basic W3 Total cache. Besides Cloudflare actually speeds up your site.
Damon Billian
Those features are actually optional and easy to turn off. If you’re using a minify service already, then you don’t want to turn ours on as well (something eventually will break running two minify options at the same time). Rocket Loader would have the potential to impact JavaScript and jQuery & would generally impact something like widgets.
Joe
What Wordpress theme were you using? That way we can know to avoid using that theme with Cloudfare.