
Czy chcesz zmienić styl formularza komentarzy WordPress na twojej witrynie internetowej? W WPBeginner spędziliśmy lata eksperymentując z różnymi sposobami na zwiększenie zaangażowania użytkowników i odkryliśmy, że dobrze wyglądający, przyjazny dla użytkownika formularz komentarza może mieć ogromne znaczenie.
Komentarze odgrywają ważną rolę w budowaniu zaangażowania użytkowników na witrynie internetowej. Jeśli sprawisz, że pozostawianie komentarzy przez użytkowników będzie łatwe i atrakcyjne wizualnie, zachęcisz ich do dyskusji i interakcji na twojej witrynie internetowej.
W tym artykule pokażemy ci, jak łatwo stylizować formularz komentarza WordPress, aby zwiększyć zaangażowanie na twojej witrynie internetowej.

Przed rozpoczęciem
Motywy WordPress kontrolują wygląd twojej witryny internetowej. Każdy motyw WordPress zawiera kilka plików, w tym pliki szablonów, funkcje, skrypty JavaScript i arkusze stylów.
Arkusze stylów zawierają reguły CSS dla wszystkich elementów używanych przez twój motyw WordPress. Możesz dodać własny CSS, aby zastąpić reguły stylu motywu.
Jeśli nie robiłeś tego wcześniej, zobacz nasz artykuł o tym, jak dodać własny CSS w WordPress dla początkujących.
Oprócz CSS, możesz również potrzebować dodać kilka funkcji, aby zmodyfikować domyślny wygląd twojego formularza komentarza WordPress. Jeśli nie robiłeś tego wcześniej, zapoznaj się z naszym artykułem na temat kopiowania i wklejania kodu w WordPress.
Biorąc to pod uwagę, przyjrzyjmy się, jak stylizować formularz komentarza WordPress.
Ponieważ jest to dość obszerny przewodnik, stworzyliśmy spis treści ułatwiający nawigację:
- Styling WordPress Comment Form Using SeedProd Theme Builder
- Change WordPress Comments with Default CSS Classes
- Adding Social Login to WordPress Comments
- Adding Comment Policy Text in WordPress Comment Form
- Move Comment Text Field to Bottom
- Remove Website (URL) Field from WordPress Comment Form
- Add a Subscribe to Comments Checkbox in WordPress
- Add Custom Fields to WordPress Comment Form
Stylizacja formularza komentarza WordPress za pomocą SeedProd Theme Builder
Ta metoda wymaga SeedProd, który jest najlepszą wtyczką do tworzenia stron i motywów WordPress na rynku.
Jest to zalecane dla początkujących bez doświadczenia w kodowaniu. Wadą tej metody jest jednak to, że zastąpi ona twój istniejący motyw WordPress własnym konfiguratorem.
Najpierw należy zainstalować i włączyć wtyczkę SeedProd. Aby uzyskać więcej informacji, zobacz nasz przewodnik krok po kroku, jak zainstalować wtyczkę WordPress.
Uwaga: Aby uzyskać dostęp do funkcji tworzenia motywów, wymagany jest co najmniej plan PRO.
Po włączaniu musisz utworzyć szablony dla własnego motywu WordPress. SeedProd umożliwia łatwe generowanie tych szablonów przy użyciu jednego z wbudowanych motywów.
Aby uzyskać szczegółowe instrukcje, zapoznaj się z naszym poradnikiem na temat tworzenia własnego motywu WordPress bez kodowania.
Po wygenerowaniu twoich szablonów motywów, musisz kliknąć odnośnik “Edytuj projekt” pod szablonem pojedynczego wpisu.

Spowoduje to wczytywanie podglądu pojedynczego wpisu w interfejsie kreatora motywów SeedProd. W dolnej części podglądu zostanie powiadomiony blok formularza komentarza.

Wystarczy kliknąć na formularz komentarza, a w lewym panelu pojawią się jego właściwości.
Z tego miejsca możesz dodać notatkę do komentarza lub politykę prywatności, możesz także przełączyć się na kartę “Zaawansowane”, aby edytować styl formularza komentarza bez pisania kodu CSS.

Po zakończeniu nie zapomnij kliknąć przycisku “Zapisz”, aby opublikować twoje zmiany.
SeedProd sprawia, że bardzo łatwo jest zmienić styl dowolnego elementu na twojej witrynie internetowej bez pisania kodu.
Jest to jednak narzędzie do tworzenia motywów i być może korzystasz już z motywu WordPress, który Ci się podoba. W takim przypadku poniższe wskazówki pomogą ci ręcznie zmienić style formularzy komentarzy w WordPress.
Zmiana stylu formularza komentarza w WordPress
Wewnątrz większości motywów WordPress znajduje się szablon o nazwie comments.php. Plik ten służy do wyświetlania komentarzy i formularzy komentarzy na twoich wpisach na blogu. Formularz komentarza WordPress jest generowany za pomocą funkcji: <?php comment_form(); ?>.
Domyślnie funkcja ta generuje twój formularz komentarza z trzema polami tekstowymi (imię i nazwisko, e-mail i witryna internetowa), polem tekstowym na tekst komentarza, polem wyboru zgodności z RODO i przyciskiem przesyłania.
Możesz łatwo zmodyfikować każde z tych pól, po prostu modyfikując domyślne klasy CSS. Poniżej znajduje się lista domyślnych klas CSS, które WordPress dodaje do każdego formularza komentarza.
1 2 3 4 5 6 7 8 9 10 11 12 13 14 15 16 17 18 | #respond { }#reply-title { }#cancel-comment-reply-link { }#commentform { }#author { }#email { }#url { }#comment#submit.comment-notes { }.required { }.comment-form-author { }.comment-form-email { }.comment-form-url { }.comment-form-comment { }.comment-form-cookies-consent { }.form-allowed-tags { }.form-submit |
Poprzez prostą modyfikację tych klas CSS, możesz całkowicie zmienić wygląd twojego formularza komentarzy WordPress.
Spróbujmy zmienić kilka rzeczy, aby zorientować się, jak to działa.
Po pierwsze, zaczniemy od podświetlenia włączonego pola formularza. Podświetlanie obecnego, aktualnego pola sprawia, że twój formularz jest bardziej dostępny dla osób o specjalnych potrzebach, a także sprawia, że formularz komentarza wygląda ładniej na mniejszych urządzeniach.
1 2 3 4 5 6 7 8 9 10 11 12 13 14 15 16 17 18 19 20 21 22 23 24 25 26 | #respond {background: #fbfbfb;padding:0 10px 0 10px;}/* Highlight active form field */#respond input[type=text], textarea { -webkit-transition: all 0.30s ease-in-out; -moz-transition: all 0.30s ease-in-out; -ms-transition: all 0.30s ease-in-out; -o-transition: all 0.30s ease-in-out; outline: none; padding: 3px 0px 3px 3px; margin: 5px 1px 3px 0px; border: 1px solid #DDDDDD;}#respond input[type=text]:focus,input[type=email]:focus,input[type=url]:focus,textarea:focus {box-shadow: 0 0 5px rgba(81, 203, 238, 1);margin: 5px 1px 3px 0px;border: 2px solid rgba(81, 203, 238, 1);} |
Tak wyglądał nasz formularz w motywie WordPress Twenty Sixteen po zmianach:

Korzystając z tych klas, można zmienić sposób wyświetlania tekstu w polach wejściowych. Pójdziemy dalej i zmienimy styl tekstu w polach nazwy autora i adresu URL.
1 2 3 4 5 6 7 8 9 10 11 | #author, #email {font-family: "Open Sans", "Droid Sans", Arial;font-style:italic;color:#1d1d1d;letter-spacing:.1em;} #url {color: #1d1d1d;font-family: "Luicida Console", "Courier New", "Courier", monospace;} |
Jeśli przyjrzysz się uważnie poniższemu zrzutowi ekranu, krój pola nazwy i e-mail jest inny niż adres URL witryny internetowej.

Możesz także zmienić styl przycisku przesyłania formularza komentarza WordPress. Zamiast używać domyślnego przycisku przesyłania, nadajmy mu gradient CSS3 i cień pudełka.
1 2 3 4 5 6 7 8 9 10 11 12 13 14 15 16 17 18 19 20 21 22 23 24 25 26 27 28 29 30 31 32 33 34 | #submit {background:-moz-linear-gradient(top, #44c767 5%, #5cbf2a 100%);background:-webkit-linear-gradient(top, #44c767 5%, #5cbf2a 100%);background:-o-linear-gradient(top, #44c767 5%, #5cbf2a 100%);background:-ms-linear-gradient(top, #44c767 5%, #5cbf2a 100%);background:linear-gradient(to bottom, #44c767 5%, #5cbf2a 100%);background-color:#44c767;-moz-border-radius:28px;-webkit-border-radius:28px;border-radius:28px;border:1px solid #18ab29;display:inline-block;cursor:pointer;color:#ffffff;font-family:Arial;font-size:17px;padding:16px 31px;text-decoration:none;text-shadow:0px 1px 0px #2f6627;} #submit:hover {background:-webkit-gradient(linear, left top, left bottom, color-stop(0.05, #5cbf2a), color-stop(1, #44c767));background:-moz-linear-gradient(top, #5cbf2a 5%, #44c767 100%);background:-webkit-linear-gradient(top, #5cbf2a 5%, #44c767 100%);background:-o-linear-gradient(top, #5cbf2a 5%, #44c767 100%);background:-ms-linear-gradient(top, #5cbf2a 5%, #44c767 100%);background:linear-gradient(to bottom, #5cbf2a 5%, #44c767 100%);background-color:#5cbf2a;}#submit:active {position:relative;top:1px;} |

Przenoszenie formularzy komentarzy WordPress na wyższy poziom
Być może myślisz, że to zbyt proste. Cóż, musimy zacząć od tego, aby każdy mógł nadążyć.
Możesz jednak przenieść swój formularz komentarza WordPress na wyższy poziom, zmieniając układ pól formularza, dodając logowanie społecznościowe, subskrypcje komentarzy, tagi komentarzy, szybkie tagi i wiele innych.
Dodaj logowanie społecznościowe do komentarzy WordPress
Zacznijmy od dodania loginów społecznościowych do komentarzy WordPress.
Pierwszą rzeczą, którą musisz zrobić, jest zainstalowanie i włączanie wtyczki Super Socializer. Aby uzyskać więcej informacji, zobacz nasz przewodnik krok po kroku, jak zainstalować wtyczkę WordPress.
Po włączaniu należy przejść na stronę Super Socializer ” Social Login, a następnie zaznaczyć pole “Enable Social Login”.

Spowoduje to wyświetlenie panelu opcji logowania społecznościowego. Najpierw kliknij kartę “Konfiguracja zaawansowana”.
Następnie upewnij się, że pole “Włącz przy formularzu komentarza” jest zaznaczone.

Następnie kliknij kartę “Konfiguracja podstawowa”. Tutaj możesz wybrać sieci społecznościowe, które chcesz dodać, zaznaczając pola w sekcji “Wybierz media społecznościowe”.

Poniżej wtyczka będzie wymagać kluczy API w celu połączenia się z platformami społecznościowymi. Wystarczy kliknąć ikonkę “znaku zapytania”, aby wyświetlić instrukcje, jak je uzyskać dla każdej platformy.

Po zakończeniu kliknij przycisk “Zapisz zmiany”, aby zapisać twoje ustawienia logowania społecznościowego.
Możesz teraz przejść na swoją witrynę internetową, aby zobaczyć przyciski logowania społecznościowego nad formularzem komentarza.

Dodawanie tekstu polityki komentarzy przed lub po formularzu komentarza
Kochamy wszystkich naszych użytkowników i naprawdę doceniamy, że poświęcają kilka minut na pozostawienie komentarza na naszej witrynie. Aby jednak stworzyć zdrowe środowisko dyskusyjne, ważne jest, aby moderować komentarze.
Aby zapewnić pełną przejrzystość, stworzyliśmy stronę polityki komentarzy, ale nie można po prostu umieścić tego odnośnika w stopce.
Chcieliśmy, aby nasza polityka komentarzy była widoczna dla wszystkich użytkowników, którzy zostawiają komentarz. Dlatego zdecydowaliśmy się dodać politykę komentarzy w naszym formularzu komentarza WordPress.
Jeśli chcesz dodać stronę z polityką komentarzy, to pierwszą rzeczą, którą musisz zrobić, jest utworzenie strony WordPress i zdefiniowanie swojej polityki komentarzy (możesz ukraść naszą i zmodyfikować ją do swoich potrzeb).
Następnie możesz dodać następujący kod w pliku functions.php twojego motywu lub we fragmencie kodu wtyczki.
1 2 3 4 5 6 | function wpbeginner_comment_text_before($arg) { $arg['comment_notes_before'] .= '<p class="comment-policy"">We are glad you have chosen to leave a comment. Please keep in mind that comments are moderated according to our <a href="http://www.example.com/comment-policy-page/">comment policy</a>.</p>'; return $arg;}add_filter('comment_form_defaults', 'wpbeginner_comment_text_before'); |
Powyższy kod zastąpi domyślny formularz komentarza przed notatkami tym tekstem. Dodaliśmy również klasę CSS w kodzie, dzięki czemu możemy wyróżnić powiadomienie za pomocą CSS. Oto przykładowy CSS, którego użyliśmy:
1 2 3 4 5 6 7 8 9 | p.comment-policy { border: 1px solid #ffd499; background-color: #fff4e5; border-radius: 5px; padding: 10px; margin: 10px 0px 10px 0px; font-size: small; font-style: italic;} |
Tak to wyglądało na naszej witrynie testowej:

Jeśli chcesz wyświetlić odnośnik po obszarze tekstowym komentarza, użyj następującego kodu.
1 2 3 4 5 6 | function wpbeginner_comment_text_after($arg) { $arg['comment_notes_after'] .= '<p class="comment-policy"">We are glad you have chosen to leave a comment. Please keep in mind that comments are moderated according to our <a href="http://www.example.com/comment-policy-page/">comment policy</a>.</p>'; return $arg;}add_filter('comment_form_defaults', 'wpbeginner_comment_text_after'); |
Nie zapomnij odpowiednio zmienić adresu URL, tak aby trafiał na twoją stronę polityki komentarzy, a nie na example.com.
Przenieś pole tekstowe komentarza na dół
Domyślnie formularz komentarza WordPress wyświetla najpierw obszar tekstowy komentarza, a następnie pola nazwy, e-maila i witryny internetowej. Zmiana ta została wprowadzona w WordPress 4.4.
Wcześniej witryny WordPress wyświetlały najpierw pola nazwy, e-maila i witryny internetowej, a następnie pole tekstowe komentarza. Uznaliśmy, że nasi użytkownicy są przyzwyczajeni do oglądania formularza komentarza w tej kolejności, więc nadal używamy starej kolejności pól na WPBeginner.
Jeśli chcesz to zrobić, wystarczy, że dodasz poniższy kod do pliku functions.php twojego motywu lub fragmentu kodu wtyczki.
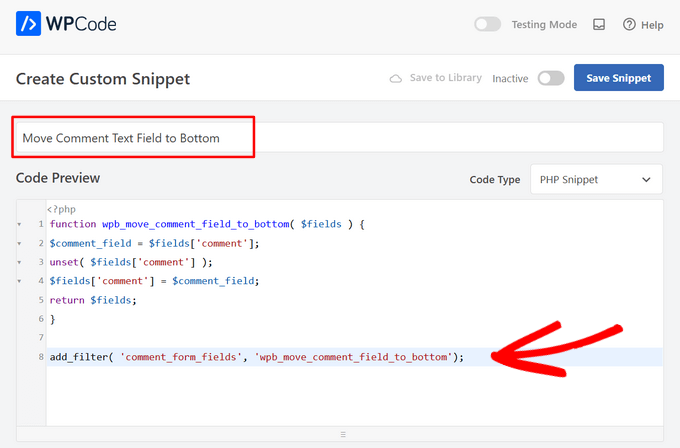
1 2 3 4 5 6 7 8 | function wpb_move_comment_field_to_bottom( $fields ) {$comment_field = $fields['comment'];unset( $fields['comment'] );$fields['comment'] = $comment_field;return $fields;}add_filter( 'comment_form_fields', 'wpb_move_comment_field_to_bottom'); |
Zawsze zalecamy dodawanie kodu w WordPressie za pomocą wtyczki fragmentów kodu, takiej jak WPCode. Ułatwia to dodawanie własnego konfiguratora bez edytowania pliku functions.php, więc nie musisz się martwić, że zepsujesz swoją witrynę.
Aby rozpocząć, należy zainstalować i włączyć bezpłatną wtyczkę WPCode. Aby uzyskać instrukcje, zobacz ten przewodnik na temat instalacji wtyczki WordPress.
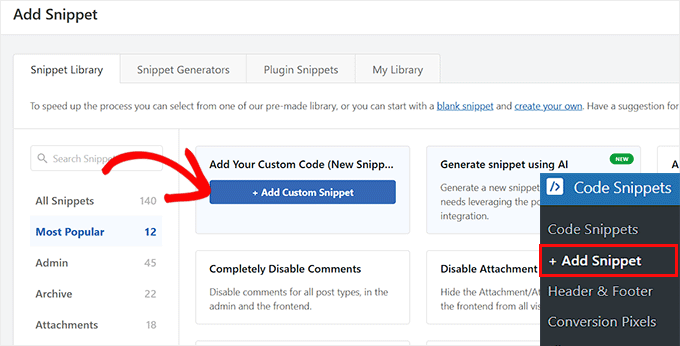
Po włączaniu, przejdź do Code Snippets ” + Add Snippet z kokpitu WordPress.
Następnie znajdź opcję “Add Your Custom Code (New Snippet)” i kliknij znajdujący się pod nią przycisk “+ Add Custom Snippet”.
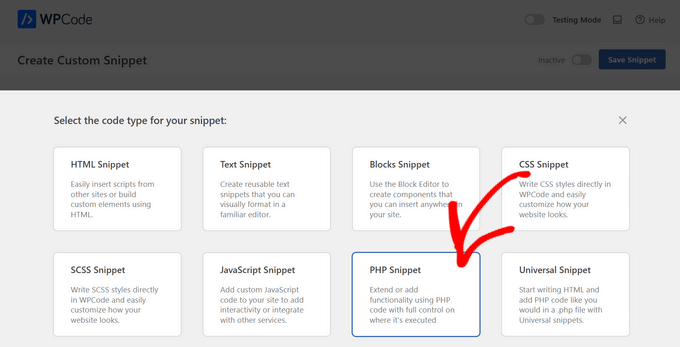
Następnie należy wybrać “Fragment kodu PHP” jako rodzaj kodu z listy opcji, które pojawią się na ekranie.
Następnie dodaj tytuł twojego fragmentu kodu na górze strony, może to być cokolwiek, co pomoże ci zapamiętać, do czego służy kod.
Następnie wklej powyższy kod w polu “Podgląd kodu”.
Na koniec wystarczy przełączyć przełącznik z “Nieaktywny” na “Aktywny” i kliknąć przycisk “Zapisz fragment kodu”.

Ten kod po prostu przenosi pole tekstowe komentarza na dół.

Usuwanie pola witryny internetowej (adresu URL) z formularza komentarza WordPressa
Pole witryny internetowej w formularzu komentarza przyciąga wielu spamerów. Jego usuwanie nie powstrzyma spamerów ani nawet nie zmniejszy liczby spamerskich komentarzy, ale z pewnością uchroni przed przypadkowym zatwierdzeniem komentarza ze złym odnośnikiem do witryny internetowej autora.
Zmniejszy to również pole z formularza komentarza, czyniąc go łatwiejszym i bardziej przyjaznym dla użytkownika. Więcej informacji na ten temat można znaleźć w naszym artykule na temat usuwania pola adresu URL witryny internetowej z formularza komentarza WordPress.
Aby usuwać pole adresu URL z formularza komentarza, wystarczy dodać poniższy kod do twojego pliku functions.php lub fragmentu kodu wtyczki.
1 2 3 4 5 | function wpbeginner_remove_comment_url($arg) { $arg['url'] = ''; return $arg;}add_filter('comment_form_default_fields', 'wpbeginner_remove_comment_url'); |

Możesz wykonać te same kroki z poprzedniej sekcji, aby bezpiecznie dodać ten kod w WordPressie za pomocą wtyczki WPCode.
Dodaj pole wyboru subskrypcji komentarzy w WordPress
Kiedy użytkownicy zostawiają komentarz na twojej witrynie internetowej, mogą chcieć śledzić ten wątek, aby sprawdzić, czy ktoś odpowiedział na ich komentarz. Dodając pole wyboru subskrypcji komentarzy, włączasz użytkownikom możliwość otrzymywania natychmiastowych powiadomień za każdym razem, gdy we wpisie pojawi się nowy komentarz.
Aby dodać to pole wyboru, należy najpierw zainstalować i włączyć wtyczkę Subscribe to Comments Reloaded. Po włączaniu należy przejść na stronę StCR ” Comment Form, aby skonfigurować ustawienia wtyczki.

Aby uzyskać szczegółowe instrukcje krok po kroku, zapoznaj się z naszym artykułem na temat tego, jak umożliwić użytkownikom subskrybowanie komentarzy w WordPress.
Dodaj dodatkowe pola do formularza komentarza WordPress
Chcesz dodać dodatkowe pola do twojego formularza komentarzy WordPress? Na przykład opcjonalne pole, w którym użytkownicy mogą dodać swoją nazwę użytkownika Twittera?
Wystarczy zainstalować i włączać wtyczkę WordPress Comments Fields. Po włączaniu przejdź do strony “Pola komentarzy” i przełącz się na kartę “Pola komentarzy”.

Wystarczy przeciągnąć i upuścić pole własne i nadać mu tytuł, opis i nazwę danych.
Po zakończeniu dodawania pól nie zapomnij kliknąć przycisku “Zapisz wszystkie zmiany”.
Możesz teraz zobaczyć swój formularz komentarza, aby zobaczyć pola własne w działaniach.

Pola konfiguratora są następnie wyświetlane w moderacji komentarzy i pod ich treścią.

Więcej szczegółów można znaleźć w naszym poradniku na temat dodawania pól własnych do formularza komentarza w WordPress.
Mamy nadzieję, że ten artykuł pomógł ci dowiedzieć się, jak stylizować formularz komentarza WordPress, aby był przyjemniejszy dla twoich użytkowników. Możesz również zapoznać się z naszymi wskazówkami, aby uzyskać więcej komentarzy na temat twoich wpisów na blogu WordPress oraz z naszą ekspercką listą najlepszych wtyczek do mediów społecznościowych dla WordPress.
If you liked this article, then please subscribe to our YouTube Channel for WordPress video tutorials. You can also find us on Twitter and Facebook.


 in 2024")
tom
Great Article! thanks a lot
WPBeginner Support
You’re welcome
Admin
mobileninja
Thank you so much. It is very helpful article.
WPBeginner Support
Glad it could be helpful
Admin
Emma
Hi. Great tutorial. I wanted to refrain my users from adding their website url to the comment section, because it causes crashes for some users (no idea why). I succeeded, but now it still says the usual “remember my name, e-mail adres and website for the next time I leave a comment”. Do you know how to fix that?
WPBeginner Support
You may want to check with your theme’s support and let them know about the crashing and editing that message.
Admin
WPBeginner Support
Glad our guide could help
Admin
Deepak Bharti
Thanks for sharing this type of article. it is helpful for me and my website.
WPBeginner Support
Glad our article could be helpful
Admin
Rubel Ahmed
Hello
Nice article and I have used some of your suggestions but I found a code error that needs fixing under ‘Adding Comment Policy Text Before or After Comment Form’.
You have placed the add filter within the function or otherwise it won’t get executed, it needs to be moved outside of the function.
Rubel
WPBeginner Support
Both filters should be outside the function but we will certainly take another look and update if we can see the error
Admin
suvo
obviously like your web-site Post Thanks for Shearing. i Read your Blog every day.it very bothersome to tell the reality then again I’ll definitely come back again.Please write more about this topics.
WPBeginner Support
Glad you like our articles
Admin
ARPIT
The Information you’ve provided here is very good. Nice Tutorial. Thanks for sharing. I was looking for a long time for this.It’s really helping me get more familiar with WordPress!
WPBeginner Support
Hi Arpit,
We are glad you found the tutorial helpful.
Admin
Hồ Ngọc Thanh
I can’t find #respond { }
#reply-title { }
#cancel-comment-reply-link { }
#commentform { }
#author { }
#email { }
#url { }
#comment
#submit
in my wordpress theme?
WPBeginner Support
Your theme may have styled it differently, for finding what they are you would want to take a look at our article: https://www.wpbeginner.com/wp-tutorials/basics-of-inspect-element-with-your-wordpress-site/
The # would be for the ID of the object so if something had the ID of button then it would be #button
Admin
Chintan
How to add real-time comment preview?
Paulina
Hello, thank you for this very useful article. I am interested in adding a text before the button “submit”. In the code that you are providing here: would I need to change the words ‘wpbeginner’ to anything else that is connected to my own site?
Akramul Hasan
Hello Paulina,
You can add text or anything before Submit button by using a simple filter hook that works for comments form fields.
Hena
wow!! It’s very good
Woolker Cherenfant
Hi! Great article as usual. But I am wondering how can I change the word “says” in the comment section. I want to translate it into Haitian Creole “di”. Any help with that?
Thanks in advance.
—Woolker
Tisha
Is it possible to copy the code to blogger?. Because I want to make WordPress style comment in my Blogger blog. Thanks for your help.
Mate Hodi
Hey!
Great article! I was looking for a solution to change the “Leave a Reply” part. Do you have any idea how I may change it?
Neeraj
This is a helpful guide which gave thorough guidance to me about Comments Section Optimization.
Kevin Byrnes
Excellent article. I will be facing some of these issues as well..
JP
Hi
I love your tutorials! I still have a question though; is it popular to change the greyish background color of the entire comment form to some thing else? Perhaps even to an image instead of a solid color?
Mahesh
I’m Loving Your Tuts It is very Easy to Understand and More Useful any Where.
Thanks For Sharing Sir.
Lisa Marten
Can I put the comment box to be fill in above the list of posted comments instead of below?
WPBeginner Support
Yes you can.
Admin
SiRetu
Is there any complete tutorial? I mean start from scratch including creating comments.php file from the first time. Thanks, great tutorial as always
Luis Izquierdo
I am customizing my wp themes child theme and I was able to place the policy text above the comment form. But it only shows to logged out users. How do I get it to show to Logged in users?
Luca Morelli
Hello great tutorial: thanks!
I keep improving my knowledge about WordPress thanks to your lessons. I have a question (I don’t know much about php): I managed to add the comment policy text before the submit button, but I noticed that if I click “reply” and see your codes, the php output is inside the paragraph tag together with a class named “commentpolicy”. How did you achieve that (e.g. how to style the php output on an HTML webpage with a tag and a class, which can then be styled with CSS)?
Hopefully I explained it correctly and my question makes sense.
Again many thanks for all your tutorials.
Luca
WPBeginner Support
We are not sure what you are trying to ask. Can you please explain bit more? Thanks.
Admin
Jayanta
I have the same question. Trying to clarify a bit.
I have added your snippet to get the comment policy text before comment field. But This is only some text, no special div class is added for that text. So, I am not able to style it using css (I would like to make the text smaller, or may be put a border-box to it). Please guide us. Hope it makes sense now. Thank you so much.
Erick
How do you make comments look like this website?
gift charles
Thank you very much for this,i was looking for a long time for a way to make the built in comments look better because i prefer them to other services like facebook comments or disqus
Adnan Bashir
As you have noticed, the newest version of WP (4.4) is displaying Name and Email form below Text box, do you have any idea how to revert it to old style (Name and Email box above the Text box) ?
Thanks
WPBeginner Support
Please take a look at How to move comment text field to bottom in WordPress 4.4
Admin
Adnan Bashir
Thank you, now the Comment form is looking better
mario
Hello, great tutorial !
But I’d like to know one more thing: is it possible to add a checkbox for the privacy policy? Since wordpress system collect the ip, I want my users to check teh box before sending the message. Any suggestion ? Thank you !
WPBeginner Support
Please see our article on how to add custom fields to comments form in WordPress.
Admin
Ramon
I would like to have the input comments fields above the comments them self so my customers can leave a comment without the need to scroll all the way down the page.
Is there an easy way to accomplish this?
Thank you.
dragons
Is there any way to ad an EDIT button for the commenters? So they can fix typos and such? Also what if the site wants to allow commenters the ability to upload images in the comments? Is there a way to do that?
Rick Hellewell
Good tutorial. Used it to develop my own customized contact form
plugin, where I re-define the $args for the comment form fields.
But it turns out, while testing, that some themes create their own
‘textarea’ field, which adds to my ‘textarea’ field, resulting in two
comment text fields. Not good.
I have set my add_filter( ‘comment_form_default_fields’…. with a
higher priority (99) so that it happens later in the ‘page build’ (after
the theme does it’s comment_form_default_fields), but the duplicates
comment text boxes are still there. Also tried a priority of 8, and that
didn’t do it either.
So, can you think of a generic (works for any theme) that can
determine if the comment field has already been defined? And, if the
duplicate is found, remove the one in the theme, so I can replace it
with mine?
I understand that the problem is caused by bad coding practices on the theme, but would like to find a workaround.
Thanks….Rick…
Larisa Frolova
Thank you!
I’ve searched the forums and Google for this, but I’m still a little confused as to what to do. If I just want to change the LOCATION of the comment/reply link that appears on posts, how do I do that? It’s not that I want to make it invisible, or change the wording – I just want it to be at the bottom of a post, not at the top.
How do I go about doing that for the Twenty-Twelve theme?
Mikael
I like this layout!
lflier
Very helpful!
I’m really liking the Disqus comment system you’re now using. It’s slick and very inviting. I find myself leaving more comments on sites using Disqus.
But I’m discouraged from using it on my own site by the lack of integration with BuddyPress activity stream. So the more I can do to streamline the native WordPress comment system and make it as inviting as Disqus, the better. Thanks again for your tutorial.
Therese
Thank you so much for all this! It’s really helping me get more familiar with WordPress!
I’ve got the social media logins, I’ve got the border sorted, but now I am totally stuck in trying to find *where* to edit the font for the comment box’s individual boxes.
I can’t figure it out.
Can you please tell me where exactly to find that? You don’t specify this clearly enough in the tutorial.
WPBeginner Support
Please see how we changed fonts for #author and #url input fields in the article. To change font in the comment box you can use something like this:
#comment {font-family:arial,verdana,sans-serif;font-size:16px;}1-click Use in WordPress
Admin
JG
how do I add a required checkbox people have to tick before the form gets submitted? I have tried adding the field in via adding a field under add_filter(‘comment_form_default_fields,) while the field shows the form can still be submitted without ticking the box.
Jewel
Thank you a lot…
Bhushan
I’m trying
Ann
I read through your tutorial… and was wondering if it can be applied to a WordPress site that has a Genesis Framework and Child theme. I am using the Epic Child theme by the way. Thanks for your help.
WPBeginner Support
Yes some parts of the tutorial can be directly applied to your child theme. For CSS styling you need to over ride your childtheme’s CSS.
Admin
Jonathan
Any idea how to place those checkboxes for Subcribe to Comments and other plugins so that they appear above the Submit button? Is there a way define where wordpress would normally include those items?
WPBeginner Support
if you are using Subscribe to comments plugin then you can place
<?php show_subscription_checkbox(); ?>in your templates where you want the subscription checkbox to appear.Admin
Jeff Hilron
Im trying to figure out how to get the round avatars.
Editorial Staff
Here is a tutorial for you:
https://www.wpbeginner.com/wp-themes/how-to-display-round-gravatar-images-in-wordpress/
Admin
Ravinder
Nice Tutorial. the information you have provided here is very good. I was searching for it from a while. Thanks for sharing.
mohib
This is a wonderfull tuturial, “Click here to cancel repley” i want ot chage this name, but not found any way, would you pls help me ?
Mike Lee
Hi, your tutorial is so wonderful and i would like to ask how to make the comment form appear under the specific comment when clicking the ‘Reply’ word of that coment.
Thanks
Editorial Staff
This happens by default in the WordPress theme when you allow threaded comments. WordPress loads comment-reply.min.js. If your theme is not loading that, then you need to load it.
Admin
Jae
I have the Elegant Tonight theme on my WordPress, and I have my dashboard-settings-discussion set to: Enable threaded (nested) comments 3 levels deep. So, I should be seeing threaded comments, but I am not. WordPress doesn’t seem to be loading comment-reply.min.js. Where in my comments.php theme do I add this? And do I add exactly that, or in some other coding format? Thank you for any advice!
Editorial Staff
Hey Jae,
Elegant themes staff is better equipped to answer that question because we are not very familiar with that theme. When you pay for Elegant Themes, you also get access to their support.
Robo Ek
Helpful article once again from you. Maybe you should change your name. Even professionals would find your tutorial useful
Adrian Robertson
Another nice tutorial from you guys, time and time again when I can’t remember how to do something I end up on your site.
Great work!
Mattia
Hi guys thanks a lot. Just a question: which is the difference between and . With this last one, your adivecs don’t work!
Mattia
sorry the output deleted my question: difference between “comment_form” and “comment_template”…
Editorial Staff
No problem. So comments_template is a function that loads the template used to display comments. It loads the comments.php file by default however you can use another file if you have a customized version. The comments.php file usually contains the code to load all the comments, and it also contains the function comment_form. The commnent_form function outputs the actual comment form (name, email, website, message, submit button, etc).
Hope that helped clear things up
Admin
Mattia
It did. Thanks
Sue Kearney
I’m loving all of this juicy input, some of which I’ve shamelessly lifted from what you do. I’m about halfway done. Check it out here: http://goo.gl/8r9uO
Thanks again!
Ernice Gilbert
Hello, how do I add a reply button in the comments box just like yours to my wordpress site? It is a plugin or tweaking of code?
Thanks.
Editorial Staff
Hey Ernice,
It is not a plugin. We are using the same technique showed in this article. Instead of using background color, we are using the background image property of CSS.
Admin
Rifat Bin Sharif
In my wordpress theme, I just noticed that in comment area there is a word ”says’ but I couldn’t find it in comments.php file. How to remove this text?
Thanks
Colin Crawford
Hi Nice article and I have used some of your suggestions but I found a code error that needs fixing under ‘Adding Comment Policy Text Before or After Comment Form’.
You have placed the add filter within the function or otherwise it won’t get executed, it needs to be moved outside of the function.
Colin
Editorial Staff
Fixed it
Admin
Gaelyn
All wonderful suggestions. Now, how do you change the word “responses” to “comment” and make it more prominent. On Suffusion theme. Thanks.
Editorial Staff
Edit your comment.php file in the theme to make the change.
Admin
Umer Rock
I just want to add a Image just right on Comment Box, How i can, for example this is a screenshot of comment box : http://oi48.tinypic.com/2itrket.jpg
Editorial Staff
You could probably use the filters shown in the article and CSS to make it look like that.
Admin
Umer Rock
Ok. Thank you, let me consider again on article. well i am not expert with CSS.