Na przestrzeni lat WPBeginner otrzymywał wiele pytań dotyczących tagów, w tym jedno z nich dotyczyło tego, czy warto stylizować tagi WordPress, aby wyróżniały się na stronie.
Tagi pomagają w organizacji treści według tematów. Działają podobnie do hashtagów w postach na blogu WordPress i pomagają użytkownikom odkrywać więcej treści. Jednak z naszego doświadczenia wynika, że jeśli tagi nie wyróżniają się wizualnie, mogą zostać przeoczone.
W tym artykule pokażemy, jak łatwo stylizować tagi w WordPressie, aby zwiększyć zaangażowanie użytkowników i liczbę wyświetleń stron w Twojej witrynie.

Jak wyświetlać tagi w WordPress
WordPress zawiera dwie główne taksonomie zwane kategoriami i tagami. Podczas gdy kategorie służą do głównych obszarów Twoich treści, tagi pozwalają na sortowanie treści według bardziej szczegółowych tematów.
Wiele popularnych motywów WordPress domyślnie wyświetla tagi na górze lub na dole Twoich postów.

Możesz jednak również wyświetlać tagi na stronach archiwum, w stopce, paskach bocznych i prawie wszędzie, gdzie chcesz w WordPress.
Aby wstawić chmurę tagów do swoich postów, stron i widżetów bocznych, możesz po prostu dodać blok „Chmura tagów”.
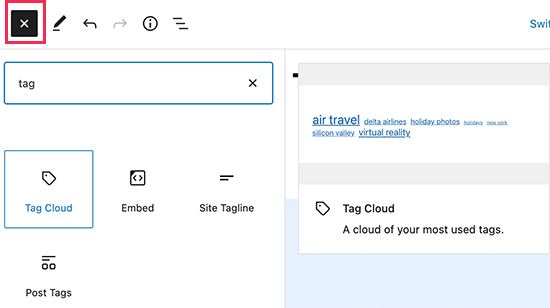
Chmura tagów nadaje każdemu tagowi inny rozmiar czcionki w zależności od liczby postów. Możesz również wybrać wyświetlanie liczby postów obok każdego tagu.

To są tylko domyślne opcje dostępne w WordPress, ale co jeśli chcesz jeszcze bardziej dostosować swoje tagi? Pokażemy Ci jak.
Przyjrzyjmy się, jak łatwo stylizować tagi w WordPressie.
Stylizacja domyślnej chmury tagów w WordPressie
Po dodaniu bloku Chmura tagów do wpisu lub strony możesz go dostosować, dodając niestandardowy kod CSS.
Blok chmury tagów automatycznie zawiera domyślne klasy CSS generowane przez WordPress, które można wykorzystać do ich stylizacji.
Aby dodać niestandardowy CSS do swojej witryny WordPress, przejdź do strony Wygląd » Dostosuj i przejdź do zakładki Dodatkowy CSS.
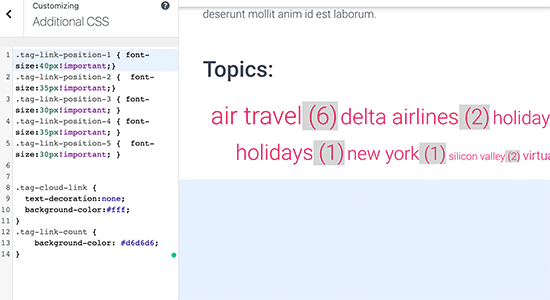
Możesz zacząć od dodania tego niestandardowego kodu CSS jako punktu wyjścia.
.tag-link-position-1 { font-size:40px!important;}
.tag-link-position-2 {  font-size:35px!important;}
.tag-link-position-3 { font-size:30px!important; }
.tag-link-position-4 { font-size:35px!important; }
.tag-link-position-5 {  font-size:30px!important; }


.tag-cloud-link {
    text-decoration:none;
    background-color:#fff;
}
.tag-link-count {
    background-color: #d6d6d6;
}
Jak widać, możesz użyć klasy .tag-link-position, aby dostosować styl w zależności od pozycji linków. Tagi z większą liczbą postów znajdują się wyżej, a te z mniejszą liczbą postów niżej.
Jeśli chcesz, aby wszystkie tagi w bloku chmury tagów miały ten sam rozmiar, możesz użyć następującego kodu CSS:
.tag-cloud-link {
font-size:16px !important;
border:1px solid #d6d6d6;
}
.tag-cloud-link {
    text-decoration:none;
    background-color:#fff;
}
.tag-link-count {
    background-color: #d6d6d6;

}
Tak to wyglądało na naszej stronie testowej:

Stylizacja tagów postów w WordPress
Oprócz stylizacji chmur tagów, możesz również chcieć stylizować tagi postów wyświetlane na Twoich indywidualnych postach na blogu. Zazwyczaj Twój motyw WordPress wyświetla je u góry lub u dołu tytułu posta lub treści posta.
Możesz najechać kursorem na tagi i kliknąć prawym przyciskiem myszy, aby użyć narzędzia Inspekcja, aby wyświetlić klasy CSS używane przez Twój motyw WordPress.
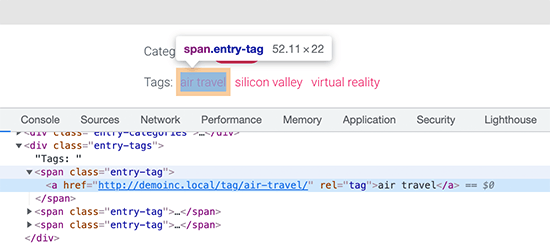
Następnie możesz użyć tych klas CSS w swoim niestandardowym CSS. Poniżej znajduje się przykładowy kod oparty na klasach CSS z naszego motywu testowego:
.entry-tag {
padding: 5px 8px;
border-radius: 12px;
text-transform: lowercase;
background-color: #e91e63;
color:#fff;
}
.entry-tags a {
color:#fff;
font-size:small;
font-weight:bold;
}
Tak to wyglądało na naszej stronie testowej.

Tworzenie niestandardowej chmury tagów w WordPress
Domyślny blok chmury tagów jest łatwy w użyciu, ale niektórzy zaawansowani użytkownicy mogą chcieć go dostosować, aby uzyskać większą elastyczność.
Ta metoda pozwala na dodanie własnych klas HTML i CSS otaczających chmurę tagów. Możesz ich następnie użyć do dostosowania wyglądu chmury tagów do własnych wymagań.
Pierwszą rzeczą, którą musisz zrobić, jest skopiowanie i wklejenie tego kodu do pliku functions.php swojego motywu lub do wtyczki fragmentów kodu:
function wpb_tags() {
$wpbtags =  get_tags();
foreach ($wpbtags as $tag) {
$string .= '<span class="tagbox"><a class="taglink" href="'. get_tag_link($tag->term_id) .'">'. $tag->name . '</a><span class="tagcount">'. $tag->count .'</span></span>' . "\n"   ;
}
return $string;
}
add_shortcode('wpbtags' , 'wpb_tags' );
Zalecamy dodanie tego kodu za pomocą WPCode, najlepszej wtyczki do fragmentów kodu dla WordPress. Pozwala ona na łatwe dodawanie niestandardowego kodu w WordPress bez edycji pliku functions.php motywu, dzięki czemu nie uszkodzisz swojej witryny.
Aby rozpocząć, zainstaluj i aktywuj bezpłatną wtyczkę WPCode. Jeśli potrzebujesz pomocy, zapoznaj się z naszym poradnikiem jak zainstalować wtyczkę WordPress.
Po aktywacji wtyczki przejdź do Fragmenty kodu » Dodaj fragment z panelu administracyjnego WordPress.
Następnie najedź kursorem myszy na opcję „Dodaj własny kod (nowy fragment)” i kliknij przycisk „Użyj fragmentu”.
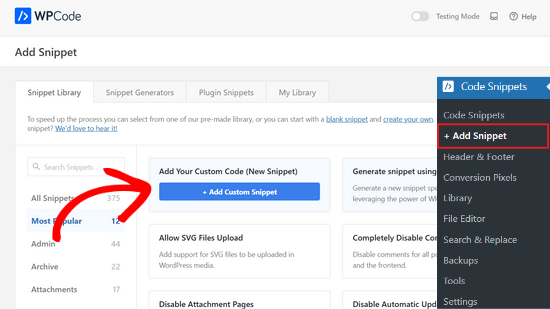
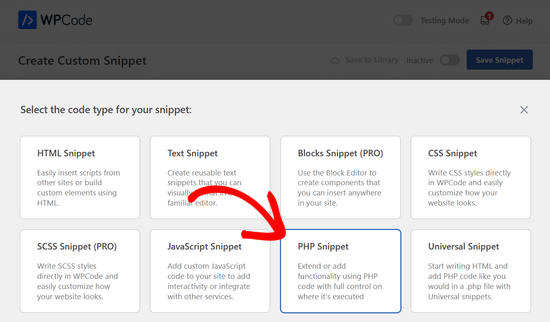
Stąd musisz wybrać „Fragment PHP” jako typ kodu z listy dostępnych opcji.
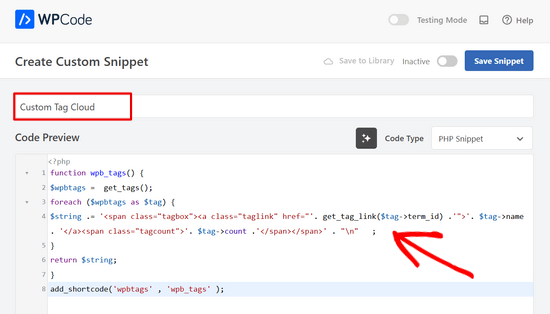
Następnie możesz dodać tytuł dla fragmentu na górze strony. Może to być cokolwiek, co pomoże Ci zapamiętać, do czego służy kod.
Następnie po prostu wklej powyższy kod do pola „Podgląd kodu”.
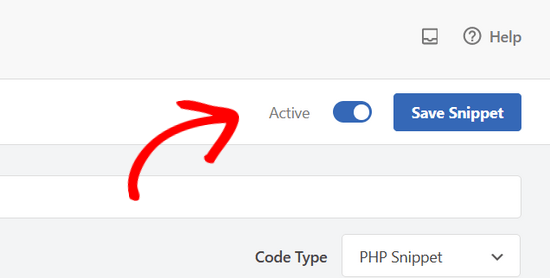
Następnie wystarczy przełączyć przełącznik z pozycji „Nieaktywny” na „Aktywny” i kliknąć przycisk „Zapisz fragment”.
Ten kod dodaje skrócony kod, który wyświetla wszystkie Twoje tagi wraz z liczbą postów obok nich.
Aby wyświetlić go na stronie archiwum lub w widżecie, musisz użyć tego skróconego kodu:
[wpbtags]
Użycie samego tego kodu spowoduje wyświetlenie tylko linków do tagów i liczby postów obok nich. Dodajmy trochę CSS, aby wyglądało lepiej. Po prostu skopiuj i wklej ten niestandardowy CSS do swojej witryny.
.tagbox {
background-color:#eee;
border: 1px solid #ccc;
margin:0px 10px 10px 0px;
line-height: 200%;
padding:2px 0 2px 2px;

}
.taglink  {
padding:2px;
}

.tagbox a, .tagbox a:visited, .tagbox a:active {
text-decoration:none;
}

.tagcount {
background-color:green;
color:white;
position: relative;
padding:2px;
}
Zachęcamy do modyfikacji CSS, aby dostosować ją do własnych potrzeb. Tak to wyglądało na naszej stronie demonstracyjnej:

Mamy nadzieję, że ten artykuł pomógł Ci dowiedzieć się, jak łatwo stylizować tagi w WordPress. Możesz również zapoznać się z naszym przewodnikiem na temat ukrywania lub stylizowania podkategorii w WordPress lub przejrzeć listę przydatnych wskazówek, sztuczek i hacków WordPress.
Jeśli podobał Ci się ten artykuł, zasubskrybuj nasz kanał YouTube po samouczki wideo WordPress. Możesz nas również znaleźć na Twitterze i Facebooku.


kzain
Stylizacja tagów w WordPress może znacząco wpłynąć na ogólny wygląd i charakter bloga. Uwielbiam to, że rozbiłeś proces na proste kroki; przykłady CSS są naprawdę pomocne. Twoja wskazówka dotycząca używania motywu potomnego, aby uniknąć utraty dostosowań, jest również bardzo doceniana. Teraz wreszcie mogę nadać moim tagom zasłużoną metamorfozę! Dziękuję za podzielenie się swoją wiedzą i uczynienie personalizacji WordPress bardziej dostępną dla nas wszystkich.
Jiří Vaněk
Kiedy przeczytałem ten artykuł, poczułem chęć stworzenia własnej chmury tagów. Użyłem Twojego fragmentu, ale zmodyfikowałem kolory i lekko zaokrągliłem rogi. Działało jak magia. Miło jest mieć tagi w tym samym kolorze co motyw całej strony internetowej. Może to drobny szczegół, ale jest bardzo przyjemny.
Dennis Muthomi
przewodnik krok po kroku i fragmenty kodu są bardzo pomocne
SZYBKIE PYTANIE: Jeśli zastosuję te fragmenty kodu do stylizacji moich tagów, a później zdecyduję się zmienić mój motyw WordPress, czy stylizacja tagów zmieni się zgodnie z domyślnymi stylami nowego motywu, czy też pozostanie przy dostosowaniach, które wprowadziłem za pomocą tych fragmentów kodu?
Komentarze WPBeginner
CSS, który dodałeś, powinien pozostać, ale nadal może być konieczne edytowanie CSS w zależności od tego, jak CSS nowego motywu wpływa na stylizację i czy występują jakieś konflikty.
Dennis Muthomi
Witaj, dziękuję za pomocne wyjaśnienie!
Tak długo, jak mogę zachować dostosowania z drobnymi poprawkami, jest to bardzo przydatna informacja.
Jedno dodatkowe pytanie – przełączając motywy, jaki byłby najlepszy sposób na sprawdzenie i rozwiązanie wszelkich konfliktów CSS, które wpływają na stylizację tagów?
Wsparcie WPBeginner
Nie mamy konkretnego najlepszego sposobu, który moglibyśmy polecić. Byłoby to coś, co musiałbyś ręcznie sprawdzić.
Jiří Vaněk
Tylko nawiązując do pytania Dennisa. Czy lepiej dodać CSS za pomocą WP Code, czy umieścić go bezpośrednio w szablonie? Zakładam, że jeśli umieszczę go w szablonie, stracę ustawienia po zmianie motywu, ale jeśli użyję WP Code, style pozostaną nawet po zmianie motywu. Czy to prawda?
Komentarze WPBeginner
Poprawnie. Jest to podobne do użycia sekcji Dodatkowe CSS w narzędziu dostosowywania motywu.
Niemniej jednak, potrzebny CSS będzie różny w zależności od motywu, więc jego użyteczność będzie się różnić.
Nikola
Świetny poradnik, dzięki!
Czy byłoby możliwe uporządkowanie tagów według najczęściej używanych i ograniczenie liczby wyświetlanych tagów?
Wsparcie WPBeginner
Obecnie potrzebowałbyś do tego wtyczki lub niestandardowego kodu, nie mamy obecnie zalecanej metody.
Admin
Jemma Pollari
Świetnie, dzięki. To naprawdę pomogło.
Wsparcie WPBeginner
Glad our guide could help
Admin
Joe Smith
To świetne! Dokładnie tego szukałem i bardzo eleganckie. Mam tylko jedno pytanie: jeśli chciałbym dodać więcej miejsca między tagami, jak zmodyfikować CSS? Próbowałem zmieniać kilka ustawień w powyższym CSS, ale żadne z nich nie dodaje po prostu białego miejsca między tagami.
Wsparcie WPBeginner
You would want to increase the padding for what you’re wanting
Admin
Ibiye Ambille
Cześć, chciałbym przenieść tagi moich postów poniżej obrazka wyróżniającego.
Wsparcie WPBeginner
W tym celu należy skontaktować się z pomocą techniczną swojego konkretnego motywu, ponieważ każdy motyw ma własną lokalizację dla obrazu wyróżniającego.
Admin
Trishah
Próbuję dodać klasę CSS „current” do tagów dla pojedynczego posta. Kilka znalezionych rozwiązań już nie działa. Jak mógłbym to zrobić?
Wsparcie WPBeginner
To zależałoby od Twojego konkretnego motywu. Jeśli skontaktujesz się z pomocą techniczną swojego motywu, powinni być w stanie poinformować Cię, gdzie możesz dodać tę klasę dla swoich tagów.
Admin
uche Peter
Moje tagi są wymienione seryjnie.. Brak obramowania, nic, nic,,, tylko tekst... proszę, jak nadać im obramowanie z kolorem tła
Kingsolomon
Jak zastosować CSS, proszę
Hugo
Moja chmura tagów nie wygląda jak chmura, ale jak lista, ponieważ po każdym span wstawiana jest przerwa. Jak mogę usunąć te przerwy?
Wsparcie WPBeginner
Cześć Hugo,
Ten artykuł omawia, jak stylizować tagi na różne sposoby. Jeśli chcesz chmurę tagów, możesz użyć domyślnego widżetu chmury tagów WordPress. Możesz również użyć szablonu tagu
1-click Use in WordPress
Admin
bob
Rozumiem, że pokazałeś inną stronę o tym, jak ograniczyć liczbę tagów, ale jak mogę to zrobić z tym przykładem? Wydaje się, że metoda podana w linku nie działa w połączeniu z tym.
Amy Croson
Mam problem z dodaniem tego i wierzę, że ogranicza mnie mój motyw „Chosen”. Skopiowałem i wkleiłem wszystko do mojego php i pojawiają się błędy. Obecnie jestem informowany, że w tym szczególe jest nieznany „.”. Czy jest jakiś sposób, aby sformatować to bez używania „.” przed .taglink, .tagbox i .tagcount?
Val Archer
Cześć – szukam sposobu na wyświetlenie tagów na stronie category-slug.php. Czy wiesz może, gdzie mogę znaleźć ten tutorial?
Do tej pory utworzyłem kategorię [nazwa-strony]/category/recipes i plik category-recipes.php.
Oznaczam przepisy, np. Śniadanie, Obiad itp.
Chciałbym, aby tagi wyświetlały się w category-recipes.php w ten sposób. Nie wiem, co robię. Kopiuję z mojego pliku category.php.
Archiwa dla kategorii:
Śniadanie
teraz wyświetla wszystkie posty oznaczone tagiem Śniadanie coś w tym stylu:
<a href="”>
przez / / opublikowano w cat_name . ‘ ‘;} ?>
Obiad
teraz wyświetla wszystkie posty oznaczone tagiem Obiad coś w tym stylu:
<a href="”>
przez / / opublikowano w cat_name . ‘ ‘;} ?>
[Następnie na końcu wszystkich Tagów:]
</div
Czy wiesz, gdzie mogę uzyskać pomoc w tej sprawie?
dziękuję! – Val
Wsparcie WPBeginner
Czy próbowałeś dodać:
<?php the_tags('posted in:', '' ,'' ); ?>Admin
Magistar
Kod działa dobrze dla chmury tagów. Chciałbym jednak zastosować to do tagów postów (czyli tagów powiązanych z postem i ich liczby, zamiast dużej listy).
Próbowałem czegoś z wp_get_post_tags, ale tak naprawdę nie udało mi się tego uruchomić. Jakieś sugestie?
Zespół WPBeginner
Możesz użyć get_terms zamiast get_tags, zobacz tę stronę codex:
http://codex.wordpress.org/Function_Reference/get_terms
DER KUNSTBLOG
To świetnie, dodałem Twój kod do wtyczki specyficznej dla witryny – ale czy jest możliwość, aby zmienić go w taki sposób, aby rozmiar czcionki zależał od tego, jak często tag jest używany? Masz jakieś pomysły? Dzięki!
Zespół WPBeginner
Tak, jest to możliwe, w pierwszym fragmencie kodu musisz zastąpić get_tags funkcją wp_tag_cloud. Tak jak tutaj:
$wpbtags = wp_tag_cloud('smallest=15&largest=40&number=50&orderby=count&format=array');
Gość
Jak zrobić to samo z niestandardową chmurą tagów dla kategorii i niestandardowych taksonomii?
Terence O'Neill
Hej kolego; Jak zrobię dokładnie to samo (wyświetlanie za pomocą shortcode) dla kategorii i niestandardowych taksonomii? Dzięki za tutorial. Działa jak marzenie.