
Unikalna stylizacja każdego postu WordPress może sprawić, że Twoja witryna będzie się wyróżniać. To świetny sposób na wyróżnienie określonych treści lub dopasowanie projektu do klimatu marki.
Niektóre witryny używają niestandardowych teł dla przyklejonych postów lub nadają każdej kategorii własny styl. Modyfikacje te mogą sprawić, że treści będą bardziej uporządkowane i atrakcyjne wizualnie.
Jednak osiągnięcie tego celu nie zawsze jest proste. Bez odpowiednich narzędzi i kroków możesz spędzić godziny na próbach i błędach. Lub, co gorsza, możesz zepsuć układ swojej witryny.
Przeprowadziliśmy dla Ciebie badania i odkryliśmy kilka prostych metod na zmianę stylu Twoich postów. Korzystając z WPCode, najlepszej wtyczki do fragmentów kodu dla WordPressa, możesz łatwo dodawać niestandardowe style do swoich postów i uzyskać unikalny wygląd każdego z nich bez wysiłku.
W tym przewodniku pokażemy ci krok po kroku, jak stylizować każdy post w inny sposób.

Uwaga: Ten poradnik wymaga dodania własnego CSS w WordPress. Będziesz także musiał być w stanie korzystać z narzędzia Inspect i mieć podstawową wiedzę na temat CSS, więc może nie być odpowiedni dla zupełnie początkujących.
Plusy i minusy stylizowania każdego wpisu na WordPressie w inny sposób
Jeśli posiadasz bloga WordPress, stylizowanie każdego postu w inny sposób może stworzyć unikalne wrażenia wizualne, w których różne kolory są powiązane z różnymi kategoriami lub typami treści.
Na przykład, możesz użyć innego koloru tła dla list artykułów, postów na blogu i poradników. Może to natychmiast przyciągnąć uwagę użytkowników i zwiększyć ich zaangażowanie.
Należy pamiętać, że takie rozwiązanie może mieć również pewne poważne wady. Na przykład, będziesz musiał regularnie dbać o wygląd każdego wpisu WordPress, co może być czasochłonne.
Ponadto może to zapewnić niespójne wrażenia użytkownika i nie pomoże w budowaniu tożsamości marki. Głównie dlatego, że musisz używać tych samych kolorów w całej witrynie, aby stworzyć wizerunek swojej firmy.
Jeśli jesteś początkującym, to dodanie niestandardowego CSS do stylu każdego postu może być również trudne. W związku z tym pokażemy ci, jak łatwo nadać inny styl każdemu postowi WordPress.
Oto krótki przegląd wszystkich tematów, które omówimy w tym przewodniku:
Zaczynajmy.
Jak stylizować poszczególne wpisy w WordPressie?
WordPress dodaje domyślne klasy CSS do różnych elementów na twojej witrynie internetowej. Motywy używają rdzennej funkcji WordPressa o nazwie post_class(), aby powiedzieć WordPressowi, gdzie dodać te domyślne klasy CSS dla wpisów.
Jeśli przejdziesz na twoją witrynę internetową i użyjesz narzędzia Inspect w przeglądarce, będziesz mógł zobaczyć te klasy dodane dla każdego wpisu.

Poniżej znajdują się klasy CSS dodawane domyślnie w zależności od tego, którą stronę zobaczy użytkownik:
- .identyfikator wpisu
- .wpis
- .attachment
- .przypięty
- .hentry (strony mikroformatu hAtom)
- .category-ID
- .category-name
- .tag-name
- .format-{format-name}
- .type-{nazwa-typu-wpisu}
- .has-post-thumbnail
Przykładowe dane wyjściowe wyglądają następująco:
1 | <article id="post-412" class="post-412 post type-post status-publish format-standard hentry category-news"> |
Każdy wpis WordPress można stylizować w inny sposób za pomocą odpowiednich klas CSS lub identyfikatorów. Aby to zrobić, należy najpierw znaleźć identyfikator wpisu dla danego wpisu.
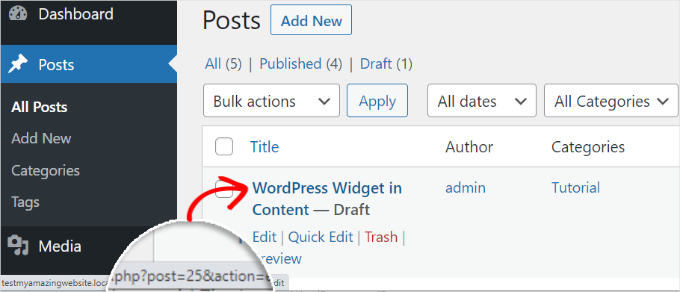
W tym celu musisz przejść na stronę Wpisy ” Wszystkie wpisy z kokpitu WordPress i najechać kursorem myszy na wpis.
Adres URL wpisu pojawi się teraz w lewym dolnym rogu twojego ekranu. Tutaj można znaleźć identyfikator wpisu, patrząc na liczbę między “post=” i “&action”.
W poniższym przykładzie identyfikator wpisu to 25.
Gdy już to zrobisz, musisz dodać klasę CSS wraz z własnym kodem do plików motywu lub w konfiguratorze motywu. Może to być jednak ryzykowne i zepsuć twoją witrynę jednym błędem.
Dlatego zamiast tego zalecamy korzystanie z WPCode. Jest to najlepsza wtyczka do fragmentów kodu WordPress i najbezpieczniejszy sposób dodawania niestandardowego kodu do witryny.
Najpierw należy zainstalować i włączyć darmową wtyczkę WPCode. Aby uzyskać szczegółowe informacje, zapoznaj się z naszym przewodnikiem dla początkujących, jak zainstalować wtyczkę WordPress.
Uwaga: Jeśli podoba ci się darmowa wersja, aktualizacja do WPCode Pro może przenieść twoje wrażenia na wyższy poziom. Wersja premium odblokowuje dostęp do ponad 100 sprawdzonych przez ekspertów fragmentów kodu, inteligentnej logiki warunkowej, zaplanowanych zmian kodu i wielu innych funkcji.
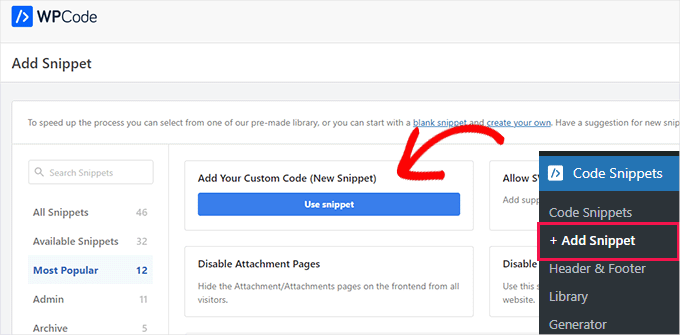
Po włączaniu przejdź na stronę Fragmenty kodu ” + Dodaj fragment z kokpitu WordPress. Tutaj kliknij przycisk “Użyj fragmentu” pod opcją “Dodaj swój konfigurator kodu (nowy fragment)”.
Spowoduje to przejście do strony “Create Custom Snippet”, gdzie można zacząć od dodania nazwy fragmentu kodu. Następnie wybierzmy “CSS Snippet” jako typ kodu z rozwijanego menu po prawej stronie.
Następnie należy dodać klasę CSS i identyfikator twojego wpisu w polu “Podgląd kodu” w następujący sposób:
1 | .post-13 { } |
Następnie możesz dodać dowolny własny kod CSS między nawiasami, aby nadać styl twojemu wpisowi.

Na przykład, jeśli chcesz zmienić kolor tła pojedynczego wpisu, możesz dodać następujący własny kod CSS. Pamiętaj, że musisz zastąpić identyfikator wpisu w tym kodzie twoim identyfikatorem. Tam, gdzie jest to . wpis-13, twój może być .wpis-23873.
Możesz również zmienić kod szesnastkowy koloru tła na dowolny wybrany przez ciebie kolor:
1 2 3 4 | .post-13 {background-color: #FF0303;color:#FFFFFF;} |
Następnie przełącz przełącznik “Nieaktywny” u góry na “Aktywny” i kliknij przycisk “Zapisz fragment kodu”, aby zapisać twoje ustawienia.
Własny kod CSS będzie teraz automatycznie wykonywany w twoim indywidualnym wpisie po włączaniu fragmentu kodu.

Przejdź na swój wpis na blogu WordPress, aby zobaczyć zmiany w czasie rzeczywistym.
Możesz także dodać inne własne fragmenty kodu CSS w polu “Podgląd kodu”, aby zmienić kolor zaznaczenia tekstu, kolor tekstu, kolor odnośników wewnętrznych i wiele więcej.

Więcej informacji można znaleźć w naszym przewodniku dla początkujących na temat dostosowywania kolorów w WordPress.
Jak stylizować wpisy w określonej kategorii
Jeśli chcesz stylizować wszystkie wpisy należące do określonej kategorii, możesz to również zrobić za pomocą WPCode.
Musisz przejść na stronę Code Snippets ” + Add Snippet i wybrać opcję “Add Your Custom Code (New Snippet)”.
Następnie utwórz nazwę fragmentu kodu na nowej stronie i wybierz “CSS Snippet” jako rodzaj kodu. Następnie wpisz klasę CSS określonej kategorii w polu podglądu kodu w następujący sposób, używając uproszczonej nazwy kategorii po myślniku:
.category-books { }
Gdy już to zrobisz, możesz dodać dowolny niestandardowy fragment kodu CSS do pola i zastosować go do wszystkich postów w różnych kategoriach.

Na przykład, jeśli chcesz zmienić wielkość i styl czcionki dla wszystkich wpisów w określonej kategorii, możesz użyć poniższego fragmentu kodu. Pamiętaj tylko, aby zastąpić nazwę kategorii zgodnie z twoją witryną internetową.
1 2 3 4 | category-books { font-size: 18px; font-style: italic;} |
Następnie musisz przełączyć przełącznik “Nieaktywny” na “Aktywny” u góry.
Następnie kliknij przycisk “Zapisz fragment kodu”, aby zapisać ustawienia.

Możesz teraz przejść na wszystkie wpisy w określonej kategorii, aby zobaczyć zmiany, które zostały zastosowane za pomocą kodu CSS.
Tak to wyglądało na naszej stronie demonstracyjnej:

Jak nadać wpisom różny styl w zależności od autora?
Domyślne klasy CSS generowane przez funkcję the_posts( ) nie zawierają nazwy autora jako klasy CSS.
Jeśli chcesz dostosować styl każdego wpisu na podstawie autora, musisz najpierw dodać nazwę autora jako klasę CSS.
Aby to zrobić za pomocą WPCode, można wybrać opcję “Dodaj swój własny kod (nowy fragment kodu)”.
Spowoduje to przejście do strony “Create Custom Snippet”, gdzie należy dodać nazwę fragmentu kodu i wybrać “PHP Snippet” jako rodzaj kodu.
Następnie wystarczy dodać następujący niestandardowy kod w polu “Podgląd kodu” i zastąpić “nazwa_użytkownika” nazwą autora.
1 2 | $author = get_the_author_meta('user_nicename'); ?><article id="post-<?php the_ID(); ?>" <?php post_class( $author ); |
Na koniec możesz przełączyć przełącznik “Nieaktywny” na “Aktywny” i kliknąć przycisk “Zapisz fragment kodu”, aby zapisać ustawienia.
Powinno to wyglądać następująco:

Ten kod doda teraz nazwę nicename użytkownika jako klasę CSS. Nicename to przyjazna dla adresu URL nazwa używana przez WordPress. Nie zawiera spacji, a wszystkie znaki są pisane małymi literami, co czyni ją idealną do użycia jako klasa CSS.
Teraz musisz ponownie odwiedzić stronę Fragmenty kodu ” + Dodaj fragment kodu i wybrać opcję “Dodaj swój własny kod (nowy fragment kodu)”.
Na następnym ekranie będziesz chciał dodać nazwę dla swojego niestandardowego kodu i wybrać “CSS Snippet” jako typ kodu z rozwijanego menu po prawej stronie.
Następnie można dodać nazwę konkretnego autora w polu “Podgląd kodu” w następujący sposób:
1 | .sarahclare |
Następnym krokiem jest dodanie niestandardowego kodu CSS, aby zmienić kolor tła, rozmiar obramowania, kolor tekstu i inne.

Możesz użyć poniższego kodu, aby zmienić kolor tła wpisów autora i dodać obramowanie do obszaru treści.
1 2 3 4 | .sarahclare {background-color:#EEE;border:1px solid #CCC;} |
Po zakończeniu kliknij przycisk “Zapisz fragment kodu” u góry.
Następnie nie zapomnij przełączyć przełącznika “Nieaktywny” na “Aktywny”.

Dostosowany kod zostanie automatycznie wykonany po włączaniu.
Możesz teraz przejść na wpis konkretnego autora, aby zobaczyć zmiany.

Jak stylizować wpisy na podstawie popularności przy użyciu liczby komentarzy?
Być może widziałeś witryny z widżetami popularnych wpisów, które czasami są oparte na liczbie komentarzy. W tym przykładzie pokażemy, jak inaczej stylizować wpisy za pomocą liczby komentarzy.
Najpierw musimy pobrać liczbę komentarzy i powiązać z nią klasę.
Aby uzyskać liczbę komentarzy, musisz dodać następujący kod do plików twojego motywu lub możesz użyć wtyczki fragmentów kodu, takiej jak WPCode.
Wystarczy wybrać opcję “Add Your Custom Code (New Snippet)”, aby uruchomić stronę “Create Custom Snippet” w WPCode.
W tym miejscu należy wybrać “Fragment kodu PHP” jako “Typ kodu”, a następnie skopiować i wkleić poniższy kod w polu “Podgląd kodu”:
1 2 3 4 5 6 7 8 9 10 11 12 | <?php $postid = get_the_ID(); $total_comment_count = wp_count_comments($postid); $my_comment_count = $total_comment_count->approved; if ($my_comment_count <10) { $my_comment_count = 'new'; } elseif ($my_comment_count >= 10 && $my_comment_count <20) { $my_comment_count = 'emerging'; } elseif ($my_comment_count >= 20) { $my_comment_count = 'popular'; }?> |
Następnie kliknijmy przycisk “Zapisz fragment kodu” i przełącz przełącznik “Nieaktywny” na “Aktywny”, aby zapisać ustawienia.
Ten kod sprawdza liczbę komentarzy dla wyświetlanego posta i przypisuje im wartość na podstawie tej liczby.
Na przykład posty z mniej niż 10 komentarzami otrzymują klasę o nazwie new, mniej niż 20 jest określanych jako emerging, a wszystko powyżej 20 komentarzy jest popularne.

Teraz musisz dodać liczbę komentarzy jako klasę CSS do funkcji post_class. Aby to zrobić, należy ponownie otworzyć stronę “Create Custom Snippet” i wybrać opcję “PHP Snippet” z rozwijanego menu.
Następnie możesz dodać następujący niestandardowy kod do pola podglądu:
1 | <article id="post-<?php the_ID(); ?>" <?php post_class( $my_comment_count ); ?>> |
Następnie wystarczy kliknąć przycisk “Zapisz fragment kodu”.
Następnie można przełączyć przełącznik “Nieaktywny” na “Aktywny”.

Spowoduje to utwórzenie nowych, pojawiających się i popularnych klas CSS do wszystkich wpisów na podstawie liczby komentarzy, które ma każdy wpis. Możesz teraz dodać własny CSS, aby stylizować każdy wpis na podstawie jego popularności.
Można na przykład użyć poniższego kodu, aby dodać różne kolory obramowania dla postów w zależności od liczby opublikowanych komentarzy:
1 2 3 | .new {border: 1px solid #FFFF00;}.emerging {border: 1px dashed #FF9933;}.popular {border: 1px dashed #CC0000;} |
Po zakończeniu nie zapomnij kliknąć przycisku “Zapisz fragment kodu”, aby zapisać twoje ustawienia.

Bonus: Wyświetl inny panel boczny dla każdego wpisu w WordPressie
Po stylizacji każdego wpisu w inny sposób, możesz również dodać unikatowy panel boczny dla każdego wpisu. Pozwoli to zaprezentować konkretne treści związane z danym artykułem, którymi użytkownicy mogą być zainteresowani.
Na przykład, jeśli prowadzisz bloga podróżniczego i opublikowałeś wpis o miejscach, które warto przejść na Florydzie, możesz utworzyć specjalny panel boczny wyświetlający pakiety turystyczne na Florydę. Alternatywnie możesz wyświetlić formularz rejestracyjny na organizowaną przez siebie wycieczkę na Florydę.
Możesz użyć SeedProd, najlepszej wtyczki do tworzenia stron dla WordPressa, aby wyświetlić inny pasek boczny dla każdego posta.

Posiada interfejs typu “przeciągnij i upuść”, ponad 320 gotowych szablonów i integracje z usługami e-mail marketingu, co czyni go doskonałym wyborem.
Po włączaniu wtyczki można wybrać własną stronę jako projekt strony docelowej, a następnie układ z panelem bocznym.
Następnie można łatwo przeciągać i upuszczać wybrane bloki z lewej kolumny, w tym formularze kontaktowe, archiwa, rozdania, pola wyszukiwania, komentarze i inne.
Po zakończeniu wystarczy kliknąć przyciski “Zapisz” i “Opublikuj” z menu rozwijanego u góry.
Z powodzeniem zaprojektowałeś pasek boczny dla postu lub strony WordPress.

Aby uzyskać więcej szczegółów, zapraszamy do zapoznania się z naszym poradnikiem na temat wyświetlania innego paska bocznego dla każdego postu i strony w WordPress.
Uzyskaj niestandardową, wydajną witrynę WordPress bez kłopotów! Dzięki naszej usłudze projektowania witryn WordPress otrzymasz dedykowanego kierownika projektu, który urzeczywistni Twoją wizję i szybko dostarczy profesjonalnie wykonaną witrynę. Skoncentruj się na swojej działalności, podczas gdy my zajmiemy się projektowaniem – umów się na bezpłatną rozmowę już dziś!
Mamy nadzieję, że ten artykuł pomógł ci dowiedzieć się, jak inaczej stylizować każdy post WordPress. Możesz również zapoznać się z naszymi przewodnikami dla początkujących, jak dodać favicon i jak dodać spadające płatki śniegu do swojego bloga WordPress.
If you liked this article, then please subscribe to our YouTube Channel for WordPress video tutorials. You can also find us on Twitter and Facebook.
 in 2024")


Rafael
Nice article. I guess I could use something like this to check the category of a post and place a custom CSS to change the style of part of the website according to the category, right?
I’m looking to set different colors only to the background of the Title of the Post for each Category in a Blog.
Kany
Hi, great article. How to custom css style latest blog news? Just the latest one, any idea? Tnx.
WPBeginner Support
Your theme would need to add something that can be targeted by CSS, at the moment we do not have a recommended method for adding that.
Admin
Les
Great article. I wanted to set the default Font size per category and followed the instruction by adding the code to the Style.css file but when I added a new post the font was the old size. See code? What am I missing?
/* Begin Additional CSS Styles */
.art-blockheader .t, .art-vmenublockheader .t {white-space: nowrap;}
.desktop .art-nav-inner{width: 1200px!important;}
.category-firstg {
font-size: 18px;
font-style: bold;
}
/* End Additional CSS Styles */
William D
Great article, thank you very much. Could the read more button color/text color also be changed in a similar manner? Something (I probably did) has changed my buttons in a very unpleasant way and I’m having a heck of a time trying to figure out how to make them pleasant again.
Thanks in advance for any help you might provide!
Matus
Great tutorial. Simple and clear explanation.
Neon Emmanuel
Hello, if i include this in single.php it echo back the current post title, but works fine in index.php, any suggestion to this?
MayMyatKhine
Hello,Please send to me the new event to use the wordpress.
marisa
This is a great article but I’m having trouble with placing
ID, ‘post-class’); ?>
Where exactly in the loop do I put it? I am using underscore.me with foundation 5 and my new class isn’t appearing.
Alberto Hartzet
Perfect!, ty. What about the first and “the last” post? any ideas?
Nadeem
Thanx alot bro..its very helpful
RW
yet another bookmark! great post! thank you…
Payal
Very informative, thank you. I’ve bookmarked this page.
I also have a question: What if I wanted to style the first (latest) post differently — so that the post displayed at the top of my index page shows up differently?
James
Hey there, I’m struggling with this atm..
My post loop doesnt seem to have a post_class function so I cant figure out where to place the above code…
This is the loop I use for posts, where would I place the above code? Or how could I get custom fields to work using this?
Editorial Staff
You have to add something like this on your post loop:
<div id="post-<?php the_ID(); ?>"<?php post_class(); ?>>1-click Use in WordPress
Admin
Jon Fuller
Hello, I am quite new to making WordPress themes and I am looking for a way to display each post in a box of its own which is seperated by a margin top and bottom. Please explain how this is possible.
Thanks
Editorial Staff
By default each post is inside its own div element. You just have to use CSS to add margin-top and bottom.
Admin
Shaun
Curious, how could this be applied to adding a CSS class to only posts posted that have the same “meta value” or “meta value number”?
Thanks for the great tutorial by the way!
Best
Editorial Staff
We showed how to do it with custom fields, but that’s being done by key. But if you have the same key with multiple values, then you should get_post_custom_values function.
Admin
Em
Just found this post and it is great, clear, succinct and spot on, many thanks
Jim
I would like to do something where post one gets the class “1”, post two gets “2” post three gets “3”, and then it repeats this order, so post four gets “1” again.
Any tips? it’s just repeating three different classes every three posts.
Editorial Staff
You would have to use the super loop option.
Admin
Brit
What I’m trying to do specifically is just make it so when someone lands on my blog, that the thumbnail (which is just a circle with the post title) is a different color for ONLY the most recent post. I’m at a loss of how to make this happen. Everything I’ve found is category or order specific. Thoughts?
Editorial Staff
Brit, you would have to use the last method “Super Loop”. That is probably the only way of doing it because all what you would do is on the first post, you add a unique class such as “first-post” , and then style that using your CSS file.
Admin
Jayaseelan Arumugam
It is very Nice and useful post. Especially I like the way to Style Posts based on Custom Fields. Thanks.
Kathleen
Thanks for this great article! It’s exactly what I searched for and so much helpful!
dina
How do I add unique class to the 3rd, 6th, 9th, and 12nd posts in super loop. Thanks!
vajrasar
Well, that is a very good piece. I got what you said, but can you shed some light on how am gonna implement this on my Genesis driven News Child theme, as I am supposed to do all this with function.php
I would like to style category specific posts differently. Thanks a lot for this piece. very informative.
Editorial Staff
So if you are just using the post class method, then Genesis has the field under their Layout settings for each post. You can enter a custom class and style it that way. The rest can get pretty complicated depending on all the hooks and such. We don’t necessary do genesis specific articles here.
Admin
jim
What do you mean index.php in the loop. which index.php. Mine has nothing like yours. This is the 10th post I’ve read where no one has explained this basic concept properly. And what about the CSS. Last 10 posts didn’t explain that either. Internet is getting worse and worse.
Editorial Staff
Hey Jim,
Every WordPress theme does things differently. The concept of loop is pretty well explained in the WordPress Codex. It requires a simple google search: Loop WordPress which will take you to: http://codex.wordpress.org/The_Loop
Because every theme varies, some utilize a separate loop.php file others are child themes which don’t even have index.php files. It is really hard to explain all of those concepts. When we put tutorials in a theme category, we expect the users to have a fair knowledge of how WordPress themes work (even if you don’t know PHP).
Admin
Haider E Karrar
I think you should be using filters instead in combination with the template tags here http://codex.wordpress.org/Conditional_Tags
For example
function my_post_css_filters($content) {
if(is_category(…))
return ” $content “;
else if (something else)
….
}
add_filter(‘the_content’, ‘my_post_css_filters’, 1) — (priority 1, not sure what else it may affect).
Hossein
Hi..
How i can wrap every 4 posts in a div ?
gashface
Nevermind got that working, but NOW it doesn’t style each post differently, it just styles them all according to the first post author it finds?
gashface
Is there a way to specificy a tag like H2 is styled by author I am trying .username h2{} for example but it won’t work?
gashface
This doesn’t show the author with me just a blank space, pasted your exact code, any ideas? posts made by admin and are private, does that make a difference?
wpbeginner
@gashface not it doesn’t make a difference whether the post is private or public… If it is returning a white page, then you are pasting the code in a wrong place.
gashface
I realised it was because I was putting the code before the call to the loop, I thought you meant before the if have posts etc.. when it needs to go after that, thanks for the heads up
KimeeDoherty
This was a little helpful, but I am still lost Not sure how to include the loop file in order to override the template. You started the <div> tag but not ended them, what’s inside the div? I’m lost
kristelvdakker
Thank you so much for this post! It has been very helpful.
Stuart
Hi, thanks for the ideas – especially the super loop – pleased to have got it working on my site.
But I wonder, complete php beginner here, so is there a way to adapt the code so each subsequent page of posts doesn’t get the styling that posts 1, 2, 3, & 4 get on the first page.
In other words, I only want the first four posts on the first page to look any different to the rest.
Cheers,
Stu
Editorial Staff
Yes. You can use is_paged() conditional tag, so it only shows up on the first page, but not the others. You can also use is_home() … so only on the homepage.
Admin
Stuart
Cool – thank you. Looks like is_paged() is the one for me – but unfortunately, my novice abilities mean I’m struggling to work out how to integrate it in to the code.
Stuart
Got there in the end…
Michael
If you wanted to use this approach to separate posts visually based on their published date. How would you go about it? For example: style the 5 posts published on the 1st with a black background, and then style the posts published on the 2nd with a red background? Thanks in advance!
Editorial Staff
The best way to do this is using the superloop method. Where you use the counter variable to set the post class values.
Admin
Dale
I am trying to style each authors name a different colour on our wordpress website and I have followed your code as below:
Whilst this code is kind of working on my wordpress theme it is putting end quotation marks after class-2 but before the authors name so the class is being closed without the name in it. I only found this out by putting that php inside the body where you can see the full string.
Does anyone have any ideas why this is happening?
Dale
Sorry it stripped out the php I posted but here is the class output of styling my posts by the authors name. The author here is called admin, and as you can see the closing tag is before the author name admin.
“post-395 post type-post hentry category-uncategorized class-1 class-2″admin
Bec
Great post! That info is awesome for adding those extra special custom features to your design.
Adam W. Warner
Indeed a great post, hats off! However, I couldn’t help but keep thinking about when it’s time to upgrade the theme you’re making all these custom edits to. I try to use the functions file whenever possible to avoid overwrites.
I would think it would be better to roll these loop edits into a function. I know that with Parent Themes like Thematic, Hybrid, Genesis, etc…that it’s possible (and advisable) to filter the loop and thus add these changes.
@Ken – Maybe your plugin would negate the need for any functions altogether?
Anyway, just my two cents and congrats Syed and the team on your continuing excellence on this site!
Azad Shaikh
Very useful post indeed. Why don’t you publish some wordpress themes with your awesome ideas and functionality. I would be great success.
Thanks!
Ken
Your article has giving me a few ideas on how to improve my plugin, thanks for that!
I just wrote a plugin (Scripts n Styles) for adding CSS directly to the head element from the post/page editing screen. (Only admin users can do this though.) It’s not as robust (or rather, doesn’t address the same thing) as your solution because the CSS only appears on the single view, not in the lists (archives).
I’m considering adding the functionality to include a class name into post_class, but via a meta box on the admin screen. Then, the admin would only have to add the css to his theme. (Or, perhaps a setting screen to facilitate this?)
Anyway, the Super Loop seems useful for theming in general, I’ll have to include that in my next one!
Connor Crosby
Wow, that is a great post! Perfect timing since I am making a new WordPress theme