Czy chcesz dodać czcionki internetowe Google do swojego motywu WordPress?
Czcionki Google pozwalają łatwo używać pięknych czcionek internetowych na Twojej stronie WordPress. Możesz ich używać, aby poprawić typografię, doświadczenie użytkownika i estetykę swojej strony.
Ten artykuł pokaże Ci, jak prawidłowo dodać czcionki internetowe Google do motywów WordPress.
Oto krótkie omówienie tematów, które poruszymy w tym przewodniku.
- Znajdowanie najlepszych czcionek Google dla Twojego motywu WordPress
- Metoda 1. Dodawanie czcionek Google do motywu za pomocą wtyczki
- Metoda 2. Dodawanie czcionek Google Web do nagłówka Twojego motywu
- Metoda 3. Dodaj Google Fonts w arkuszu stylów motywu
- Metoda 4. Prawidłowe dodawanie czcionek Google w WordPress
- Sekcja bonusowa: Jak czcionki internetowe wpływają na szybkość WordPressa
Znajdowanie najlepszych czcionek Google dla Twojego motywu WordPress
Pierwszą rzeczą, którą musisz zrobić, to znaleźć czcionki Google, które Ci się podobają. Po prostu odwiedź stronę Google Fonts i przeglądaj bibliotekę.
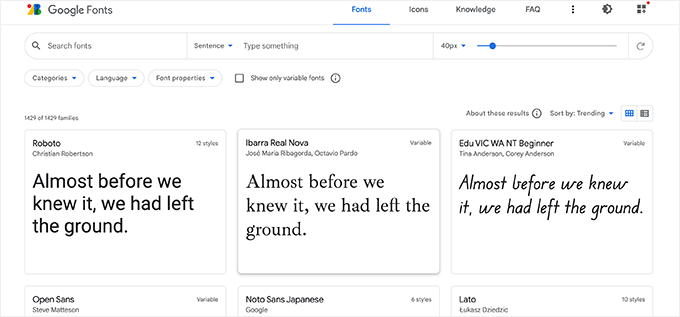
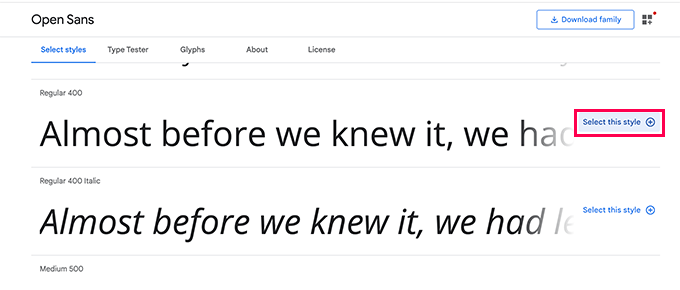
Gdy znajdziesz czcionkę bezpieczną dla sieci, która Ci się podoba, kliknij ją, aby zobaczyć dostępne style.
Możesz wybrać style, których chcesz używać na swojej stronie internetowej.
Następnie kliknij przycisk „Wyświetl wybrane rodziny”, który otworzy pasek boczny.
Tutaj znajdziesz instrukcje użytkowania w sekcji „Użycie w sieci”.
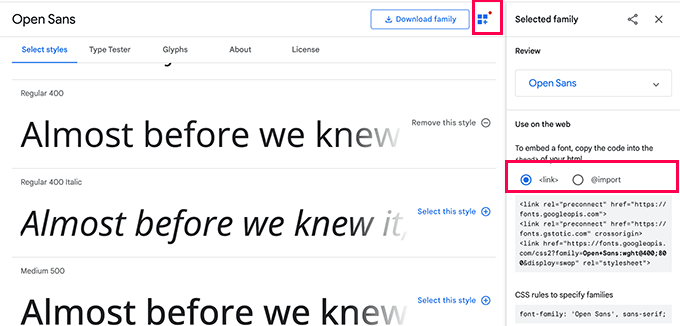
Zobaczysz, że są dwie różne zakładki do dodawania czcionki do Twojej witryny
Pierwsza to metoda Link, która jest zalecanym standardowym sposobem dodawania czcionek internetowych.
Druga zakładka używa metody CSS @import, która pozwala ładować czcionki za pośrednictwem arkusza stylów CSS.
Pokażemy Ci, jak używać każdej z tych metod oraz jakie są ich zalety i wady.
Uwaga: W przypadku niektórych z tych metod będziesz musiał edytować pliki motywu WordPress. Możesz to zrobić, łącząc się ze swoją witryną za pomocą klienta FTP lub aplikacji Menedżer plików w panelu sterowania hostingu.
Po połączeniu musisz odwiedzić folder /wp-content/themes/Nazwa-Twojego-Motywu/. Stamtąd znajdziesz pliki motywu, które być może będziesz musiał edytować do celów tego poradnika.

Aby uzyskać więcej informacji, zobacz nasz samouczek na temat kopiowania i wklejania fragmentów kodu w WordPress.
Metoda 1. Dodawanie czcionek Google do motywu za pomocą wtyczki
W tej metodzie użyjemy wtyczki WordPress do ładowania czcionek Google.
Najpierw musisz zainstalować i aktywować Wtyczkę czcionek. Więcej szczegółów znajdziesz w naszym przewodniku krok po kroku na temat jak zainstalować wtyczkę WordPress.
Po aktywacji musisz odwiedzić stronę Wygląd » Dostosuj, aby uruchomić narzędzie do dostosowywania motywu. Stamtąd zobaczysz nową zakładkę Wtyczka czcionek.
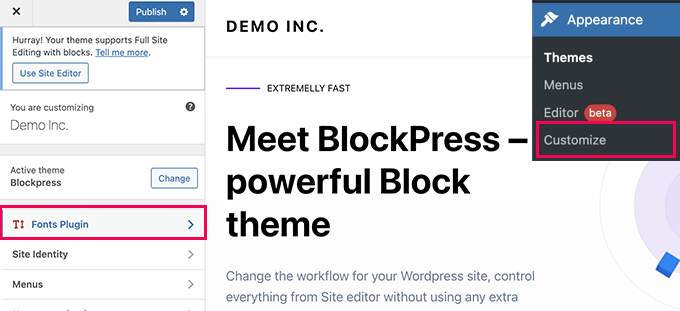
Kliknięcie go pokaże opcje wtyczki.
Możesz wybrać użycie czcionek Google dla różnych obszarów swojej witryny.
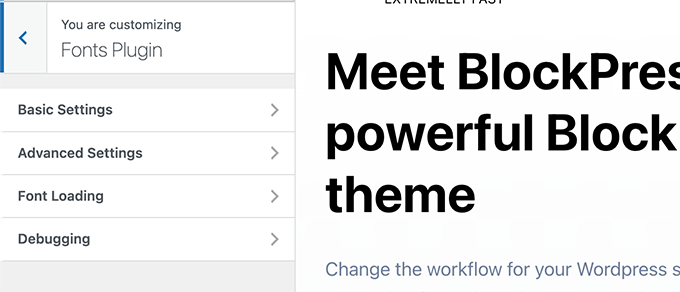
Alternatywnie, możesz również po prostu wybrać ładowanie czcionki dla swojego motywu WordPress.
Po prostu przełącz się na zakładkę Zaawansowane ustawienia » Ładuj tylko czcionki.
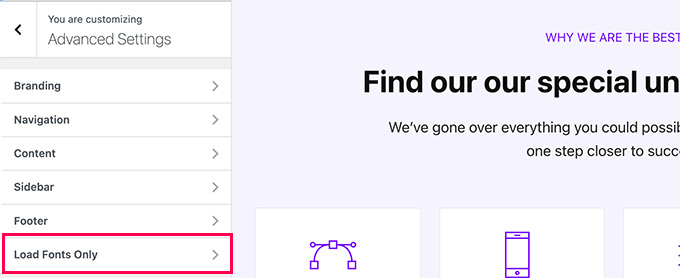
Stąd możesz wybrać czcionki Google, które chcesz załadować dla swojego motywu WordPress.
Po prostu wpisz nazwę czcionki, a następnie ją wybierz.

Po zakończeniu nie zapomnij kliknąć przycisku Publikuj, aby zapisać zmiany.
Teraz, jeśli użyłeś zaawansowanych funkcji wtyczki do przypisania czcionek dla różnych obszarów Twojej strony, to one będą działać automatycznie.
Z drugiej strony, jeśli zdecydowałeś się ładować tylko czcionki, będziesz musiał dodać dla nich reguły niestandardowego CSS. Na przykład, oto jak załadować czcionkę dla elementu akapitu w całej witrynie.
p {
font-family: 'Open Sans', sans-serif;
}
Metoda 2. Dodawanie czcionek Google Web do nagłówka Twojego motywu
Ta metoda jest najprostszym sposobem na dodanie czcionek Google bezpośrednio do Twojego motywu WordPress.
Po prostu edytuj plik header.php swojego motywu WordPress lub motywu potomnego. Następnie skopiuj i wklej kod Link przed kodem linku do arkusza stylów Twojego motywu WordPress.
Oto jak to będzie wyglądać:
<link rel="preconnect" href="https://fonts.googleapis.com">
<link rel="preconnect" href="https://fonts.gstatic.com" crossorigin>
<link href="https://fonts.googleapis.com/css2?family=Open+Sans:wght@400;800&display=swap" rel="stylesheet">
<link rel="stylesheet" type="text/css" href="YOUR THEME STYLESHEET" media="screen">
Zasadniczo celem jest umieszczenie żądania czcionki tak wcześnie, jak to możliwe. Pozwala to przeglądarce użytkownika na pobranie czcionek przed renderowaniem strony.
Po wykonaniu tej czynności możesz użyć czcionki w pliku CSS swojego motywu:
h1 {
    font-family: 'Open Sans',  sans- serif;
}
Metoda 3. Dodaj czcionki Google w arkuszu stylów motywu
W tej metodzie zaimportujemy CSS czcionki do głównego pliku CSS naszego motywu WordPress.
Po prostu edytuj plik style.css w głównym folderze motywu WordPress i dodaj kod z zakładki „@import” na początku pliku CSS.
@import url('https://fonts.googleapis.com/css2?family=Open+Sans:wght@400;800&display=swap');
Tak to wyglądało w pliku style.css naszej strony demonstracyjnej.

Ważne: Upewnij się, że dodałeś linię @import na początku swojego pliku CSS.
Metoda 4. Prawidłowe dodawanie czcionek Google w WordPress
Dwie pierwsze metody, o których wspomnieliśmy wcześniej, wymagają bezpośredniego dodawania czcionek poprzez edycję plików motywu WordPress.
Działa to dobrze, jeśli używasz motywu potomnego do wprowadzania wszystkich zmian.
Z drugiej strony, jeśli wprowadzasz te zmiany w głównym motywie, Twoje zmiany zostaną utracone przy następnej aktualizacji motywu.
Łatwiejszym rozwiązaniem jest zaprogramowanie dodania kodu, który automatycznie załaduje czcionki Google do użycia w motywie WordPress.
Aby to zrobić, musisz dodać fragment niestandardowego kodu do wtyczki specyficznej dla witryny lub za pomocą wtyczki do niestandardowego kodu. Szczegółowe informacje znajdziesz w naszym poradniku jak dodać niestandardowy kod w WordPress.
Po prostu dodaj poniższy fragment kodu do swojej strony WordPress.
function wpb_add_google_fonts() {

wp_enqueue_style( 'wpb-google-fonts', 'https://fonts.googleapis.com/css?family=Open+Sans:300italic,400italic,700italic,400,700,300', false );
}

add_action( 'wp_enqueue_scripts', 'wpb_add_google_fonts' );
Uwaga: Nie zapomnij zastąpić adresu URL adresem URL czcionek Google, które chcesz dodać.
To wszystko, WordPress będzie teraz używał metody Link do automatycznego pobierania czcionek Google, które dodałeś.
Możesz to potwierdzić, przeglądając kod źródłowy swojej strony internetowej, tam zobaczysz arkusz stylów Google Fonts dodany w stopce Twojej strony.

Sekcja bonusowa: Jak czcionki internetowe wpływają na szybkość WordPressa
Czcionki Google ładują się niezwykle szybko, ponieważ są serwowane za pośrednictwem ogromnej sieci CDN Google z lokalizacjami serwerów na całym świecie.
Ponieważ te czcionki są używane przez miliony stron internetowych, istnieje duża szansa, że użytkownicy mogą już mieć je zapisane w pamięci podręcznej przeglądarki.
Zmniejsza to ich wpływ na szybkość ładowania Twojej strony internetowej. Możesz dodatkowo zmniejszyć ten wpływ, używając tylko jednej lub dwóch czcionek internetowych w swoim projekcie.
Aby uzyskać więcej wskazówek, zapoznaj się z naszym kompletnym przewodnikiem po wydajności i szybkości WordPressa dla początkujących.
Mamy nadzieję, że ten przewodnik pomógł Ci dowiedzieć się, jak łatwo dodać czcionki Google Web Fonts do Twojego motywu WordPress. Możesz również zapoznać się z naszym przewodnikiem na temat tworzenia niestandardowego motywu WordPress od podstaw bez kodowania oraz naszą listą najlepszych darmowych usług hostingowych dla stron internetowych.
Jeśli podobał Ci się ten artykuł, zasubskrybuj nasz kanał YouTube po samouczki wideo WordPress. Możesz nas również znaleźć na Twitterze i Facebooku.


Jiří Vaněk
To świetnie, że podałeś informacje o tym, jak ładować czcionki lokalnie na stronie internetowej. Długo walczyłem z szybkością i próbowałem wszystko zoptymalizować. To była pierwsza strona, na której ktoś doradził mi ładowanie czcionek lokalnie i to naprawdę działa. To były tylko milisekundy, ale mimo to szybkość strony się poprawiła. Czasami te milisekundy decydują o różnicy między zielonym a pomarańczowym w PageSpeed Insights lub Google Search Console.
Armando
Zauważyłem, że ten film/instrukcje są z 2015 roku, a zrzuty ekranu itp. są inne. Kiedy próbowałem osadzić kod Google Fonts w moim pliku header.php, tak jak pokazano, pojawił się błąd. Myślę więc, że ten tutorial może wymagać aktualizacji? Nie jestem pewien, ale… Dziękuję.
Wsparcie WPBeginner
Dziękujemy za Twoją opinię, na pewno postaramy się zaktualizować ten artykuł, gdy tylko będzie to możliwe.
Admin
Wout
Dzięki za artykuł! Proszę zamień http: w fonts.googleapis.com/css… na https: w funkcji do kolejkowania Google Fonts, aby umożliwić zaszyfrowane połączenie z googleapis.com...
Wsparcie WPBeginner
Thanks for pointing this out, we will be sure to update the links as soon as we are able
Admin
Sofia
Jestem całkiem pewien, że jest rok 2017, dlaczego w ogóle musimy się tego wszystkiego uczyć :”((
charles
Czy to nadal właściwy sposób na zrobienie tego?
Renee
Czcionka się wyświetla, ale nie mogę dowiedzieć się, jak ją pogrubić.
Oto przykład tego, co zrobiłem w CSS.
font-family:”Open Sans”, sans-serif;
font-weight:bold;
w linku, który dodałem do mojego header.php, dodałem to:
próbowałem zastąpić 700 pogrubieniem, ale bez powodzenia...
jakieś pomysły?
z góry dziękuję
Isaac Anderson
Upewnij się, że sprawdziłeś pożądane grubości czcionek w Google Fonts po wybraniu ich w zakładce „dostosuj”.
Louis
Działa idealnie! Dzięki.
josh
Co? Co to wszystko znaczy? Jak mogę sprawić, żeby po prostu dodać czcionkę Google w moim poście lub stronie?
Shubham Kumar
Co myślisz o asynchronicznym importowaniu czcionek Google Web za pomocą JavaScript, jak wspomniano tutaj:
Dzięki
Shubham
Jordan
Jedno szybkie pytanie – sprawdziłem dokumentację funkcji wp_enqueue_style(). Jej pierwszym argumentem jest ciąg znaków, który oznacza nazwę arkusza stylów. W twoim przykładzie używasz „wpb-google-fonts” jako pierwszego argumentu. Skąd mam wiedzieć, co wpisać tutaj dla mojej strony?
pete rome
gdzie dokładnie mam wkleić rzeczy w nagłówku? zawsze widzę, ale ludzie nigdy dokładnie nie wyjaśniają, gdzie to jest.
Carla DeLauder
Co robi „false” w tej funkcji? Inne dodane funkcje go nie zawierają.
Dziękuję.
Kev
to jest argument za nagłówkiem lub stopką. Ponieważ najlepszą praktyką jest umieszczanie [prawie] wszystkich skryptów w nagłówku, domyślnie jest to „true” => stopka, podczas gdy „false” oznaczałoby NIE w stopce, ale zamiast tego w nagłówku.
Niestety, skrypty czcionek zatrzymują wszystko inne, więc umieszczanie ich w nagłówku jest trochę słabe, dlatego ten artykuł mówi o upewnieniu się, że uwzględniasz tylko te czcionki, których faktycznie będziesz używać. Z drugiej strony, umieszczenie ich w stopce może spowodować chwilowe ładowanie domyślnych czcionek, takich jak Arial, na ekranie podczas malowania, dopóki czcionka internetowa się nie załaduje. To okropne zastrzeżenie, ale tak jest.
Praktyką, którą wprowadzam do swojego przepływu pracy, jest warunkowe ładowanie czcionek w zależności od ich użycia na stronie. Na przykład, może „pogrubienie” jest używane tylko w nagłówkach h2 i h3 w szablonach postów na blogu (single.php), wtedy napiszę warunkowe dodawanie skryptu pogrubienia, aby był on dodawany tylko wtedy, gdy jesteś na szablonie single.php.
Mam nadzieję, że to pomoże.
Kev
Dodatkowo, warto zauważyć.
Przez „pogrubiony” miałem na myśli konkretną, pogrubioną wersję rodziny czcionek. <= tylko informacyjnie.
Kenneth John Odle
Od wersji WordPress 3.3, wp_print_styles jest przestarzałe.
Bram
Tak, powinieneś zaktualizować ten artykuł.
Wsparcie WPBeginner
Zaktualizowano.
Admin
Wsparcie WPBeginner
Zaktualizowaliśmy artykuł, teraz pokazuje, jak dodać czcionki Google przy użyciu odpowiedniej funkcji
wp_enqueue_stylei haka akcji wp_enqueue_scripts.Admin
isak
Jak dodać dwie rodziny czcionek przez functions.php?
Kwiecień
Używam wtyczki Punch Fonts do dodawania czcionek Google, ale nie jestem pewien, jak uzyskać tylko nagłówek 1 dla pożądanej czcionki. Nie potrzebuję tej czcionki dla nagłówków 2-6, więc chcę użyć czcionki Google tylko dla nagłówka pierwszego. Jak to napisać w parametrze?
Obecnie używam: Oleo+Script+Swash+Caps:400
Melissa
Cóż, jeśli ktoś ma problem, istnieje również wtyczka o nazwie Easy Google Fonts. Bardzo pomocna.
Melissa
Witam,
Próbowałem wszystkich trzech metod, ale żadna z nich nie zadziałała w pełni. Wydaje się, że dotyczy to tylko niektórych elementów, a nie innych, które określiłem z tą czcionką w arkuszu stylów.
Kiedy używam Inspektora Elementów dla elementu, do którego nie zastosowano mojej czcionki Google, widzę to:
#site-title {
font-family: \’Questrial\’, Helvetica, Arial, sans-serif;
Co oznaczają te \\ wokół mojej czcionki? Mam na myśli, że wygląda to na błąd, ale nie mogę rozgryźć, co robię źle? Co to może być? Jakiś kod nadpisujący mój, z wyższym priorytetem? ale gdzie? jak? Arghhhh doprowadza mnie to do szału
Ali Sajjad
Droga Redakcjo, chcę dodać wszystkie czcionki Google Web na tej stronie, a następnie użyć ich w moich środkach,
ale nie chcę używać zbyt wielu linków w pliku nagłówka. Jakiś inny sposób?
Wsparcie WPBeginner
Dodaj tylko te czcionki, których chcesz używać.
Admin
Anurag
Mam bloga ( http://www.goingtechy.com/ ). Problem polega na tym, że chcę zoptymalizować dostarczanie CSS dla czcionki Google, której moja witryna już używa. Więc witryna już ma czcionki Google. Jak mogę to zoptymalizować?
Samantha
Dziękuję bardzo za ten post! Dla kogoś, kto nie ma formalnego szkolenia z html/css, byłem pod wrażeniem prostoty tego postu.
Tanisha
So easy and go it to work perfectly. Thanks for this.
Greg
Cześć,
Używając Genesis i motywu Parallax Pro…
Ale nowy w rzeczach takich jak php itp.
Dodałem ten kod do pliku functions.php zgodnie z Twoimi instrukcjami:
add_action( ‘genesis_meta’, ‘wpb_add_google_fonts’, 5);
function wpb_add_google_fonts() { echo ”; }
Nagłówki używające powyższej czcionki pozostają niezmienione.
Pytania:
1. Czy słusznie zakładam, że powyższy kod to jedyna rzecz, którą mam dodać?
2. Gdzie dokładnie należy dodać kod – na początku czy na końcu pliku functions.php?
2. Czy czegoś brakuje w kodzie?
3. Czy powinienem coś dodać do pliku style.css?
Dziękuję za pomoc
Pozdrawiam
Greg
Wsparcie WPBeginner
Greg, wydaje się nam w porządku. Myślimy, że WordPress prawdopodobnie pominął część Twojego kodu, w której wyświetlałeś link do czcionki. Tak, będziesz musiał użyć CSS, aby ustawić reguły stylu dla selektorów, w których chcesz użyć swojej czcionki Google.
Admin
Tony Porto
Żadne z powyższych nie jest wystarczająco dobre, wszyscy wiemy, że „wp_enqueue_style( ‘google-font’)” to „technicznie poprawny sposób wywoływania skryptu, ale w tym przypadku Twój <header będzie wyglądał tak;
CZCIONKA 1:
CZCIONKA 2:
CZCIONKA 3:
CZCIONKA 4:
Nie dobrze, musi być tak:
Akmal
Gdzie powinienem wkleić powyższy kod? Nie mogłem znaleźć ostatniej linii kodu w moim pliku header.php? Czy możesz mi podać instrukcje krok po kroku?
Dzięki.
Wsparcie WPBeginner
W pliku header.php znajdziesz
</head>, możesz wkleić ten kod w dowolnym miejscu przed tym tagiem.Admin
Sarah
Próbowałem przepisać poniższe, a nadal nic się nie zmienia;
/* Importuj czcionki
———————————————————— */
add_action( ‘genesis_meta’, ‘wpb_add_google_fonts’, 5);
function wpb_add_google_fonts () { echo ‘’; }
/* Domyślne
Zadziałało za pierwszym razem. Jestem taka zdezorientowana!
Dziękuję za pomoc.
Sarah
Cześć,
Byłem z siebie tak dumny, że skopiowałem kod i zmieniłem czcionkę, która wydawała mi się za duża dla mojej strony. Kiedy próbowałem zmienić ją na coś innego, musiałem coś pomylić i nadal wyświetla się tylko jeden styl czcionki, nawet gdy bawię się kodami. Czuję się teraz jak głupek – nie znam się na technologii. Czy ktoś może mi pomóc? Zrobiłem to z liczbami i bez nich, na wypadek gdyby nie były one częścią tego. Dziękuję. Oto najnowsza wersja, którą wprowadziłem.....
/* Importuj czcionki
———————————————————— */
1 add_action( ‘genesis_meta’, ‘wpb_add_google_fonts’, 5); 2 3 function wpb_add_google_fonts() { 4 echo ””; 5 }
/* Domyślne
———————————————————— */
Wsparcie WPBeginner
mam nadzieję, że nie wpisałeś liczb z kodem Czy wpisałeś?
Admin
Sarah
Brak liczb, ale tym razem czegoś mi brakuje. To jest dokładnie to, co mam w mojej tabeli;
add_action( ‘genesis_meta’, ‘wpb_add_google_fonts’, 5);
function wpb_add_google_fonts() { echo "; }
Sarah
Wygląda na to, że kod zadziałał... na jednym komputerze. Nie zadziałał na dwóch innych, których używam.
Czy możesz zasugerować, dlaczego tak się mogło stać?
Wielkie dzięki
Karissa Skirmont
Jak można używać wielu czcionek Google w pliku functions.php?
Miałem to:
//* Enqueue Google fonts
add_action( 'wp_enqueue_scripts', 'executive_google_fonts' );
function executive_google_fonts() {
	wp_enqueue_style( 'google-font', '//fonts.googleapis.com/css?family=Open+Sans:400italic,700italic,400,700', array(), CHILD_THEME_VERSION );
	wp_enqueue_style( 'google-font', '//fonts.googleapis.com/css?family=Dancing+Script:400italic,700italic,400,700', array(), CHILD_THEME_VERSION );
}
Ale Dancing Script nie wyświetlał się jako czcionka na moim drugim komputerze, iPhonie ani tablecie.
Usunąłem Open Sans i zaczęło działać.
Wsparcie WPBeginner
@Karissa, pierwszy argument w funkcji wp_enqueue_style to uchwyt dla skryptu stylów, który ładujesz. Spróbuj zamiast tego tego kodu:
//* Enqueue Google fonts add_action( 'wp_enqueue_scripts', 'executive_google_fonts' ); function executive_google_fonts() { wp_enqueue_style( 'google-font', '//fonts.googleapis.com/css?family=Open+Sans:400italic,700italic,400,700', array(), 20131111 ); wp_enqueue_style( 'google-font-2', '//fonts.googleapis.com/css?family=Dancing+Script:400italic,700italic,400,700', array(), 20131111 ); }1-click Use in WordPress
Admin
Karissa Skirmont
Nieważne, odkryłem, że potrzebuję użyć linku takiego jak ten:
‘//fonts.googleapis.com/css?family=Euphoria+Script|Rouge+Script|Montez|Federo|Great+Vibes|Clicker+Script|Dancing+Script:400,700|Satisfy|Ruthie|Rochester|Open+Sans|Open+Sans+Condensed:300’
Karissa Skirmont
Ach, rozumiem, odpowiedziałem powyżej, zanim odświeżyłem stronę i zobaczyłem Twoją odpowiedź.
Używając linku, który Google podaje, gdy masz zaznaczone wiele czcionek, generuje to taki wynik i możesz łatwiej wypróbować różne czcionki na żywo na stronie.
Chaitanya
Thank you so much!! Whenever I need any WordPress help, I come directly to wpbeginner as I know I would find a best solution here. You guys don’t know how much you have helped beginners like me, Appreciate you support
Long Live WPBeginner…
Pozdrawiam,
Chaitanya
Jenny
Meh, lubię używać importu. Mniej pracy dla mnie, bo jestem leniwy~
pete rome
tak, za dużo pracy w każdej metodzie tutaj i nie powinno być potrzeby dodawania czegokolwiek do arkusza stylów, znajdź wtyczkę
Jimmy Reynolds
A you mean the nerd way
mzilverberg
Czegoś, co tu pominąłem, to komentarze warunkowe, aby czcionki Google Web Fonts działały w IE8 i starszych, jeśli żądasz więcej niż jednego kroju czcionki. Na przykład:
<link href=”http://fonts.googleapis.com/css?family=Cabin:400,700″ rel=”stylesheet” type=”text/css” />Dlatego stworzyłem funkcję do ładowania czcionek: https://github.com/mzilverberg/LoadGoogleWebfonts
Mój skrypt umieszcza również odpowiednie adresy URL zastępcze w komentarzu warunkowym.
Za pomocą kilku linii kodu można to również zaimplementować w functions.php w motywie Wordpress.
Greg
A co z dodawaniem czcionek Google do panelu administratora?
Personel redakcyjny
Dlaczego chciałbyś dodać Google Fonts do panelu administracyjnego?
Admin
Bruce Smith
Aby zachować funkcję WYSIWYG w edytorze treści administracyjnych. Aby widzieć tę samą czcionkę w edytorze administracyjnym, co na mojej stronie internetowej.
Dan Merhar
Właściwie zastanawiałem się, jak zrobić to samo (i to pierwszy wynik, który wyskoczył w Google).
Wiem, że istnieją wtyczki dodające funkcjonalność Google Webfonts do edytora WYSIWYG, ale strasznie go spowalniają. Zamierzam przyjrzeć się temu bliżej i sprawdzić, czy istnieje prosty sposób na dodanie jednej lub dwóch czcionek.
Marleen
Dzięki wielkie za udostępnienie, jestem z tego bardzo zadowolony. Jestem użytkownikiem Genesis i zacząłem używać @import, ponieważ jest już zaimplementowane w arkuszu stylów. Czuję się znacznie lepiej z tym rozwiązaniem.
Szczęśliwego 2013 roku!
jeff
W swoim kodzie czy zastępuję „TWÓJ ARKUSZ STYLI MOTYWU” czymś??
mój to STYLE.CSS, czy musi to być adres URL??
dzięki,
Jeff
Personel redakcyjny
Tak, musisz tam wstawić ścieżkę do pliku style.css swojego motywu.
Admin
Charles
Tego używam…..
Dodaj to do pliku functions.php swojego motywu:
/*----------------------------------*/
/* Load CSS Files
/*----------------------------------*/
	if(!function_exists('load_theme_styles'))
	{
		function load_theme_styles()
		{
			if (!is_admin()) {

				$cssURL = get_template_directory_uri().'/css/';
				$fontURL = 'http://fonts.googleapis.com/css?family=Lora|Oswald';

				// Registering New Styles
				wp_register_style('googleFont', $fontURL);
				wp_register_style('style', $cssURL.'/style.css', 'googleFont', '1.0', 'screen');
				wp_register_style('print', $cssURL.'/print.css', 'googleFont', '1.0', 'print');

				// Enqueing Styles
				wp_enqueue_style('googleFont');
				wp_enqueue_style('style');
				wp_enqueue_style('print');

			}
		}
	}
	add_action('wp_enqueue_style', 'load_theme_styles');
Co o tym myślisz?
Chris Reynolds
To jest POPRAWNY sposób dodawania czcionek Google. Zawsze używaj wp_register_style/wp_enqueue_style
David
Jeszcze lepiej, dodaj warunkowy komentarz, aby serwować czcionki oddzielnie dla IE 7 i 8:
Stąd:
http://www.smashingmagazine.com/2012/07/11/avoiding-faux-weights-styles-google-web-fonts/
Bryan Nickson
Fajne poradniki. Chciałem czegoś takiego.. Brawo!!
Peter
A co z opcją JS, czy jest to szybsza opcja, czy lepsza? Dzięki
Personel redakcyjny
Metoda opisana w tym artykule jest zdecydowanie najbardziej polecana.
Admin
QLStudio
W swojej odpowiedzi nie dodajesz CSS – czy to naprawdę najlepszy sposób na jego dodanie?
Chris
Świetny artykuł! Myślę, że byłoby fajnie, gdyby WordPress domyślnie zawierał czcionki Google, ale to wydaje się wystarczająco proste. Dzięki za wyjaśnienie!
Personel redakcyjny
Google Fonts are great, but not everyone uses it (considering the amount of folks who use WordPress). WordPress has a 95% rule. If the feature would not satisfy 95% of the audience, then it is usually falls in the plugins category. However, sometimes exceptions are made. We can assure you that the Core WP team, will not make this into an exception though
Admin
Aaron Crow
Jesteś super, człowieku! Dokładnie tego szukałem! Dzięki za ten post… Szukałem wieki, żeby znaleźć coś o dodawaniu tego do mojego motywu. Cieszę się, że trafiłem na Twoją stronę.
Anderson Curry
Świetny post i nawet jeśli istnieje wtyczka do tego, zawsze lepiej jest nauczyć się sposobu bez wtyczki.
Brad
Czyli oczywiście nie akceptujesz używania kilku wtyczek do czcionek Google. W takim przypadku będę musiał ponownie przejrzeć moje pliki CSS.
sadhu
Nie rozumiem drugiej części, czyli dodawania czcionki do funkcji dodawania akcji Genesis... czy to inna metoda dodawania czcionki Google Web Font?
i wiem, że nie musimy uwzględniać wszystkich stylów czcionki, ale zalecana metoda, która jest http://fonts.googleapis.com/css?family=Lora|Oswald
na przykład, co jeśli chcę tylko pogrubiony styl dla Lora i lekki styl dla Oswalda, jak wtedy połączyć style czcionek?
dzięki
Personel redakcyjny
Druga część jest TYLKO dla użytkowników Genesis. Jeśli nie używasz Genesis Theme Framework, nie potrzebujesz tej części. Aby połączyć style tak, jak chcesz, oto jak to zrobić:
http://fonts.googleapis.com/css?family=Oswald:300|Lora:700
Admin
Anton
Co mam zrobić, jeśli chcę użyć @font-face w Genesis Framework, tak jak pokazałeś tutaj z Google Webfonts, czy jest na to jakieś rozwiązanie.
Szukałem cały dzień, ponieważ moje czcionki ładują się niesamowicie wolno!
Pozdrawiam
Gautam Doddamani
świetny tutorial… w zasadzie używam wtyczki wp google fonts… czy poleciłbyś tę wtyczkę, czy ręczne wykonanie, jak opisano powyżej… która jest wydajniejsza pod względem wydajności?
Personel redakcyjny
Nie próbowałem tej wtyczki. Ale staramy się unikać tego typu wtyczek, ponieważ można to zrobić łatwiej za pomocą plików motywu.
Admin
Gautam Doddamani
sweet…thanks will edit my theme instead of using a plugin
Pippin
Unikanie wtyczki Google Fonts tylko dlatego, że jest wtyczką, nie jest dobrym powodem. Używanie wtyczki zapewnia znacznie większą elastyczność niż umieszczanie jej w motywie, zwłaszcza jeśli kiedykolwiek zdecydujesz się zmienić motyw.
Personel redakcyjny
Moim zdaniem czcionki w większości przypadków są uważane za elementy stylistyczne, zależne od motywu, i zazwyczaj zmieniają się po przełączeniu na inny motyw.
Siddanth Adiga
Świetny post, szukałem właśnie tego, próbowałem swoich sił z CSS i fontface. Spróbuję też tego, dzięki.
Konstantin Kovshenin
The “Right” way would be to use the wp_enqueue_style function Here’s some more thoughts: http://kovshenin.com/2012/on-wordpress-theme-frameworks/
Personel redakcyjny
Konstantin, całkowicie się z Tobą zgadzam. Funkcja wp_enqueue_style powinna być zawsze używana. Tak właśnie próbowałem zrobić na początku, zgodnie z sugestią Nathana Rice'a w artykule StudioPress o Google Fonts. Z wyjątkiem tego, że Google jasno stwierdza, że style czcionek powinny być ładowane przed wszystkim innym. Używając wp_enqueue_style, a następnie drukując je za pomocą wp_print_styles, powodowało to drukowanie elementu po załadowaniu głównego arkusza stylów. To był powód, dla którego musiałem podpiąć się pod hak genesis_meta(). Tak czy inaczej, całkowicie zgadzam się z Twoimi przemyśleniami w Twoim artykule.
Admin
Japh
I’m a little late to this, but I wanted to mention that you could still use
wp_enqueue_style, just set the priority higher so that they are loaded firstBob R
Świetny tutorial. Jedna uwaga: pierwszy obrazek w artykule miał pokazywać zakładkę @import, prawda?
Personel redakcyjny
Nie, nie miało się tak wyświetlać.
Admin