Czy chcesz dodać dwuetapową weryfikację Google Authenticator do swojej witryny WordPress?
Same hasła nie wystarczą, aby odeprzeć hakerów i nieautoryzowanych użytkowników. Na szczęście korzystanie z dwuetapowej weryfikacji Google Authenticator może dodać dodatkową warstwę zabezpieczeń do twojej witryny internetowej.
W tym artykule pokażemy, jak dodać weryfikację dwuetapową na twojej witrynie WordPress za pomocą aplikacji Google Authenticator.
Czym jest aplikacja Google Authenticator i dlaczego potrzebujesz jej dla swojej witryny WordPress?
Aplikacja Google Authenticator to aplikacja mobilna, która dodaje drugą warstwę uwierzytelniania za każdym razem, gdy logujesz się do aplikacji lub witryny internetowej innej firmy, takiej jak WordPress.
Niestety, hasła można czasem złamać. Jeśli używasz tego samego hasła na wielu witrynach internetowych, wyciek zabezpieczeń na jednej z nich naraża twoje pozostałe konta na niebezpieczeństwo. Często ludzie są leniwi i nie zmieniają swoich haseł nawet po otrzymaniu e-maila o naruszeniu zabezpieczeń na dużej witrynie.
Cóż, weryfikacja dwuetapowa jest rozwiązaniem właśnie dla tego. Nawet jeśli haker zna twoją nazwę użytkownika i hasło do WordPressa, nie będzie w stanie uzyskać dostępu do twojej witryny internetowej WordPress, chyba że ma ograniczony czasowo losowy kod zabezpieczenia (dostarczany przez Google Authenticator).
Ponieważ Twój blog jest bezpośrednio połączony z Twoim urządzeniem mobilnym, będziesz jedyną osobą mającą dostęp do pobrania unikatowego kodu dla każdego logowania. Kod wygasa po krótkim czasie ze względów bezpieczeństwa.
Aplikacja Google Authenticator to tylko jeden z przykładów aplikacji mobilnej, która zapewnia uwierzytelnianie dwuskładnikowe (2FA) dla różnych kont i usług online.
Generuje jednorazowe hasła czasowe (TOTP), które służą jako drugi czynnik uwierzytelniania podczas logowania się na konto.
Jeśli nadal nie jesteś przekonany, jak ważne jest zabezpieczenie WordPressa, to powinieneś zobaczyć, jak cyfrowe życie jednego z autorów Wired.com zostało zniszczone.
Po przeczytaniu tej relacji wskoczyliśmy na pokład z 2-etapowym uwierzytelnianiem dla naszych kont Google i większości innych usług, które oferują tę funkcję. Jeśli jesteś tak samo świadomy bezpieczeństwa jak my i cenisz swojego bloga, to powinieneś zastosować się do tej wskazówki, aby poprawić zabezpieczenia WordPressa.
Uwaga: Google Authenticator działa tylko na urządzeniach z systemami iOS, Android, Windows Phone, webOS, PalmOS i BlackBerry. Innymi słowy, do logowania się do witryny internetowej potrzebny będzie twój smartfon.
Aby jeszcze bardziej poprawić twoje zabezpieczenia, zalecamy przyjrzenie się również innym metodom. Na przykład oprogramowanie takie jak 1Password może pomóc w zarządzaniu twoimi hasłami w jednym miejscu i zapewnić, że są one wystarczająco silne, aby oprzeć się potencjalnym hakerom.
Powiedziawszy to, przejdźmy do poradnika, jak dodać 2-etapową weryfikację Google Authenticator do twojej witryny WordPress.
Jak dodać Google Authenticator do WordPressa?
Pierwszą rzeczą, którą musisz zrobić, jest zainstalowanie aplikacji Google Authenticator na twoim telefonie. Na potrzeby tego poradnika będziemy używać terminologii iOS, ale proces jest podobny również dla innych urządzeń.
Krok 1: Zainstaluj aplikację Google Authenticator na twoim urządzeniu mobilnym
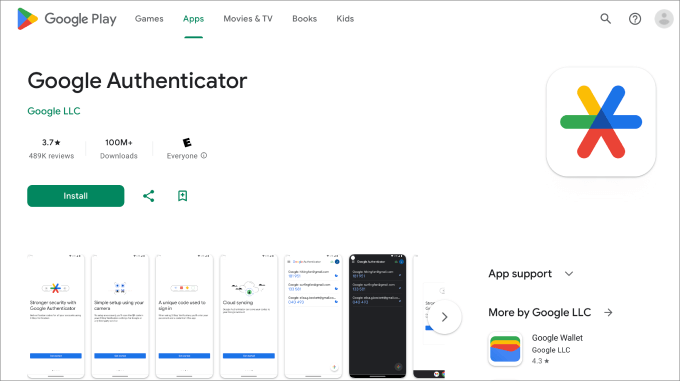
Przejdź na stronę App Store, wyszukaj “Google Authenticator”, a następnie kliknij “Zainstaluj” aplikację.
Wróćmy teraz do twojego kokpitu WordPress.
Krok 2: Zainstalowanie wtyczki Google Authenticator MiniOrange
Śmiało, zainstaluj i włącz wtyczkę MiniOrange’s Google Authenticator. Aby uzyskać więcej informacji, zapoznaj się z naszym przewodnikiem krok po kroku, jak zainstalować wtyczkę WordPress.
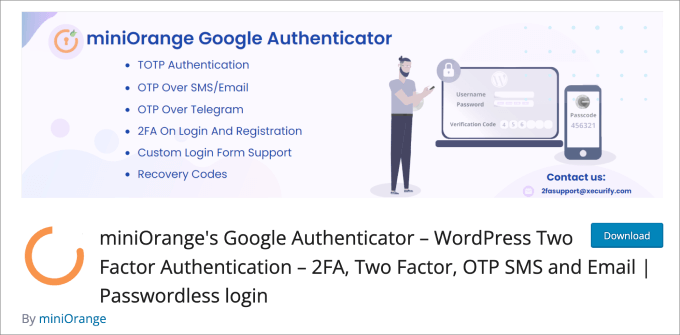
Jest to darmowa wtyczka WordPress, która pomaga zabezpieczyć twoją witrynę przed nieautoryzowanym dostępem. Za każdym razem, gdy logujesz się do WordPressa, zostaniesz poproszony o wpiszenie jednorazowego kodu dostępu z aplikacji Google Authenticator, aby zweryfikować twoją tożsamość.
Po włączaniu wtyczki zostaniesz przeniesiony do kreatora konfiguracji. Wystarczy postępować zgodnie z procesem, aby skonfigurować twoje uwierzytelnianie dwuskładnikowe Google Authenticator w WordPress.
Krok 3: Ukończenie kreatora konfiguracji
Zacznij od kliknięcia przycisku “Zaczynamy!”.
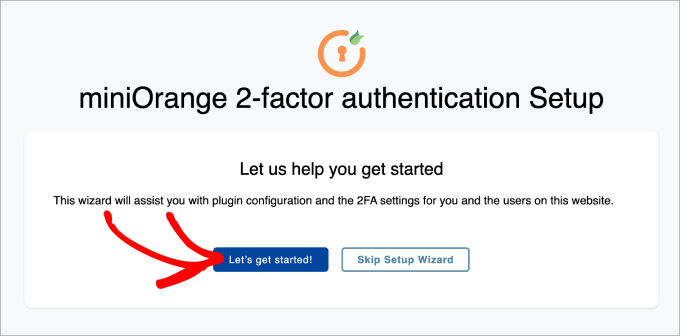
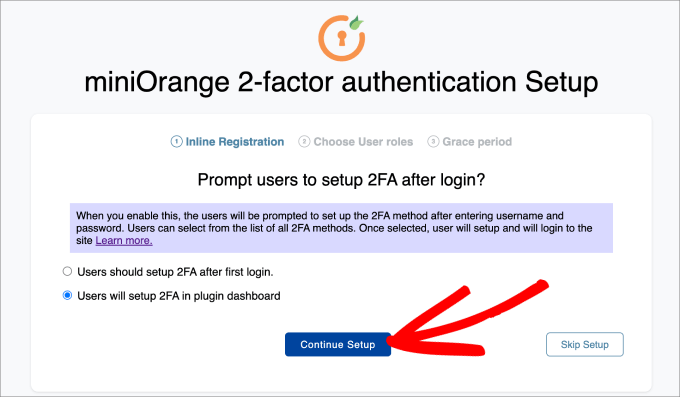
Następnie zostaniesz zapytany, czy chcesz skonfigurować 2FA po pierwszym logowaniu, czy w kokpicie wtyczki. Każda z tych metod jest odpowiednia.
Kliknij “Kontynuuj konfigurację”.
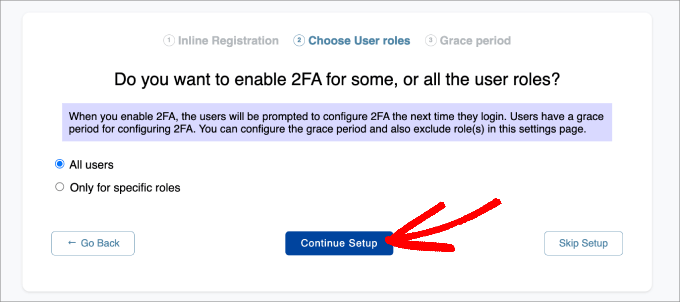
Następnym krokiem jest wybranie, do kogo ma mieć zastosowanie 2FA. Możesz wybrać wszystkich użytkowników dla maksymalnego zabezpieczenia lub zastosować je tylko do niektórych ról użytkowników.
Następnie naciśnij “Kontynuuj konfigurację”.
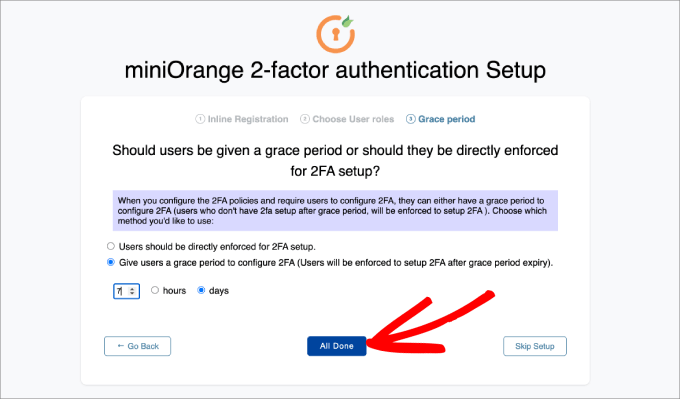
Na koniec zostaniesz zapytany, czy chcesz bezpośrednio wymusić 2FA natychmiast, czy dać użytkownikom okres karencji.
Jeśli zdecydujesz się dać użytkownikom okres karencji, możesz wybrać jego długość w godzinach i dniach. Po zakończeniu kliknij “Wszystko gotowe”.
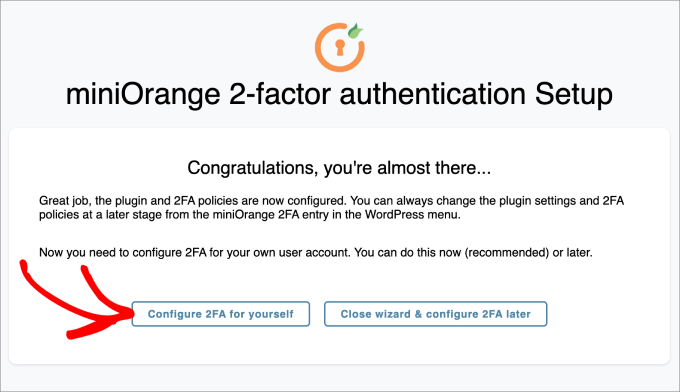
Po zakończeniu procesu konfiguracji możesz zdecydować, czy chcesz skonfigurować 2FA dla siebie teraz, czy później.
Kliknij przycisk “Skonfiguruj 2FA dla siebie”.
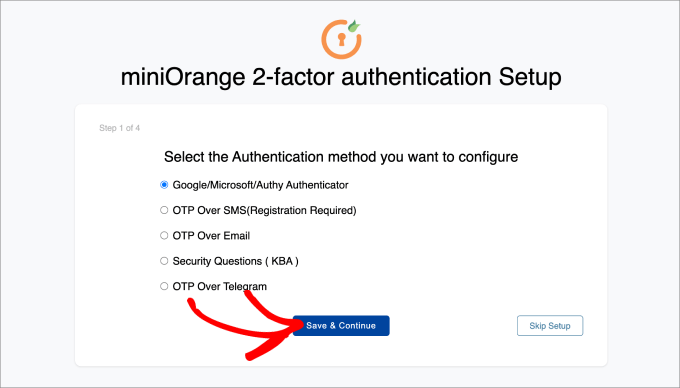
W tym miejscu zostaniesz poproszony o wpisz metodę uwierzytelniania dwuskładnikowego, którą chcesz dodać do swojej witryny WordPress.
W tym poradniku wybierzemy “Google/Microsoft/Authy Authenticator”. Następnie naciśnij przycisk “Zapisz i kontynuuj”.
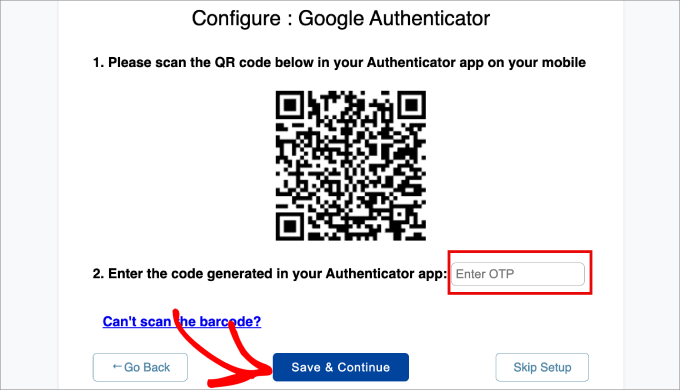
Następnie zostaniesz poproszony o zeskanowanie kodu kreskowego na ekranie. Oznacza to, że musisz uruchomić aplikację Google Authenticator na swoim telefonie i zeskanować wyświetlony kod kreskowy.
W twojej aplikacji Google Authenticator na urządzeniu mobilnym naciśnij ikonkę “+” na dole, a następnie wybierz opcję “Zeskanuj kod QR”. Następnie skieruj kamerę twojego telefonu na ekran komputera, aby zeskanować kod kreskowy.
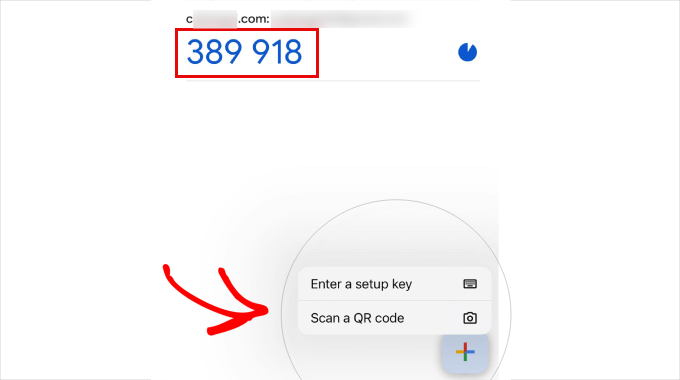
Z tego miejsca na twoim urządzeniu mobilnym pojawi się jednorazowy kod dostępu (OTP).
Wpisz ten rodzaj danych w kroku 2 na twoim komputerze. Następnie możesz kliknąć “Zapisz i kontynuuj”.
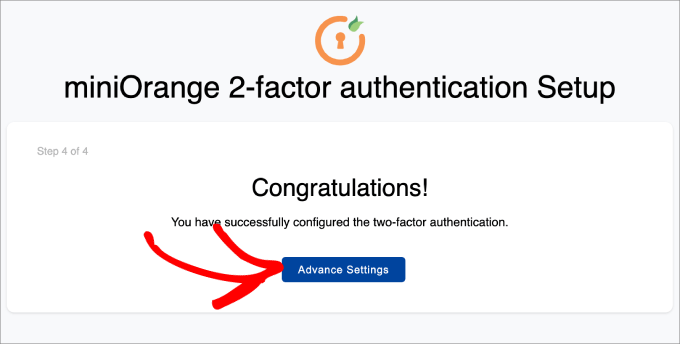
Teraz powinien pojawić się komunikat o pomyślnym skonfigurowaniu uwierzytelniania dwuskładnikowego.
Wystarczy wybrać “Ustawienia zaawansowane”.
Krok 4: Dodanie pytań dotyczących zabezpieczeń
Oprócz dodania uwierzytelniania dwuskładnikowego Google Authenticator, prawdopodobnie będziesz chciał również dodać pytania dotyczące zabezpieczeń.
Jeśli nie możesz uzyskać dostępu do aplikacji Google Authenticator, nadal możesz logować się do twojej witryny internetowej WordPress, jeśli odpowiesz na pytania dotyczące zabezpieczeń, które dla siebie skonfigurowałeś.
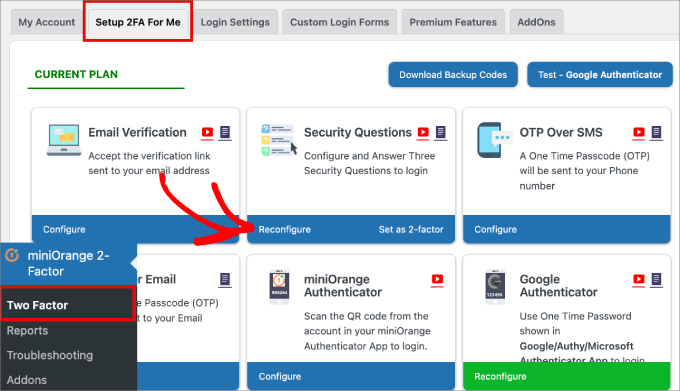
Musisz przejść do strony Mini Orange 2-Factor ” Two Factor w twoim kokpicie administracyjnym WordPress. Następnie, na karcie Setup 2FA For Me, znajdź metodę Security Questions i kliknij “Reconfigure”.
Pamiętaj, że możesz również skonfigurować inne rodzaje metod uwierzytelniania dwuskładnikowego, takie jak weryfikacja przez e-mail, OTP przez SMS, OTP przez e-mail, OTP przez Telegram, a nawet Duo Authenticator.
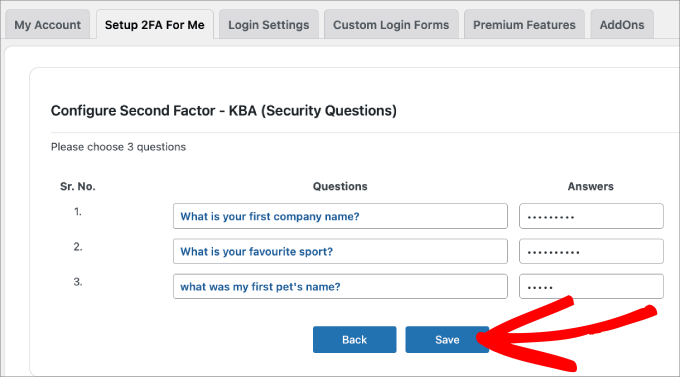
Następnie będziesz mógł wybrać do trzech pytań dotyczących zabezpieczeń. Możesz wybrać dwa z nich z rozwijanego menu, a trzecie będzie własnym pytaniem, które możesz wymyślić samodzielnie.
Następnie wpisz rodzaj odpowiedzi dla każdego z nich i naciśnij przycisk “Zapisz”.
Krok 5: Przetestuj to sam
Gdy wszystko jest już skonfigurowane, możesz przetestować je samodzielnie.
Po prostu wyloguj się z twojego kokpitu WordPress i spróbuj zalogować się ponownie.
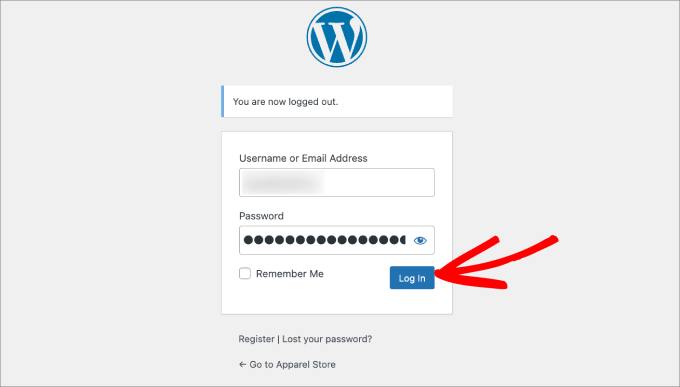
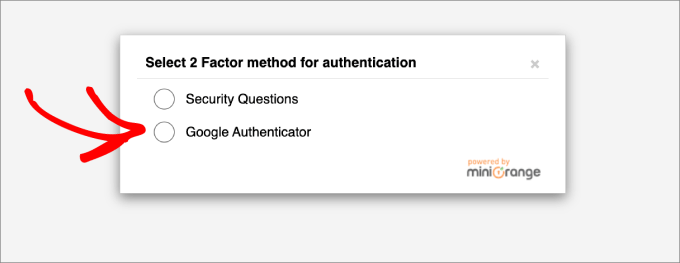
Zostaniesz teraz przeniesiony na stronę, na której możesz odpowiedzieć na pytania dotyczące zabezpieczeń lub użyć Google Authenticator, aby wpisz swój jednorazowy kod dostępu.
Przejdź dalej i wybierz opcję “Google Authenticator”.
Na tym ekranie zostaniesz poproszony o wpisz swój OTP z aplikacji Google Authenticator.
Wpisz rodzaj kodu, a następnie kliknij “Zatwierdź”.
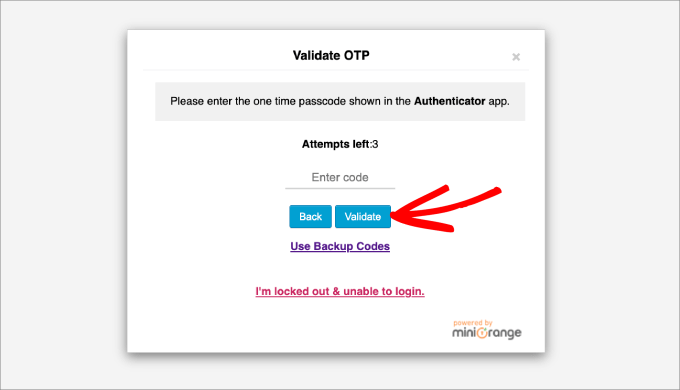
Teraz wylądujesz z powrotem w twoim kokpicie administracyjnym WordPress, jak zwykle.
Na koniec zalecamy wszystkim włączenie weryfikacji dwuetapowej na swoich kontach Google. Można to również skonfigurować za pomocą Google Authenticator, jak pokazano w tym poradniku.
Mamy nadzieję, że ten artykuł pomógł Ci dodać dwuetapową weryfikację Google Authenticator do Twojej witryny internetowej WordPress. Możesz również zapoznać się z naszym artykułem na temat najczęstszych błędów WordPressa i sposobów ich popraw ki lub z naszym przewodnikiem na temat zwiększenia szybkości i wydajności WordPressa.
If you liked this article, then please subscribe to our YouTube Channel for WordPress video tutorials. You can also find us on Twitter and Facebook.


Hajjalah
This worked like magic indeed. At first it seemed to be a complicated process but I successfully set the Google authenticator on my website with a lot of ease.
This has enabled to completely stop the constant threats from hackers who were always trying to illegally login to my WordPress admin dashboard. This is one of the best security features I have ever implemented. Thanks WPBeginner.
David
I just tried this and it locked me out of my website. The codes weren’t working. How can I remove this authenticator and get my site back. Pls help
WPBeginner Support
You can deactivate the plugin following our guide below:
https://www.wpbeginner.com/beginners-guide/how-to-easily-deactivate-wordpress-plugins/
Admin
ANOOP VAISH
what have to do if mobile lost please discribe
WPBeginner Support
Hi Anoop,
In that case you will have to deactivate WordPress plugins via FTP to login.
Admin
yasir khan saqlaini
i am using this feature but i want to know how will i get google authenticator code while login wp dashbord.
WPBeginner Support
Hello Yasir,
You will get Google Authenticator code inside the app you installed on your phone.
Admin
Danny D
I’m surprised that nobody has mentioned Clef. This is the best 2-factor authentication for WordPress (and a lot of other websites as well). No passwords involved after initial setup. They have iOS and Android apps as well as chrome extensions to help with the setup. Works like a charm for me.
Sacha
I agree – I absolutely love Clef. It makes things so easy and secure.
rohit
Message To Syed Balkhi,
Well Fake GURUs Try to hack my website 100 Times a day Finally I have started using Google Authenticator and I change my Password every 10 days. I appreciate Your skills Thanks a lot.
Akhil K A
Hi.
The plugin is compatible up to WP 3.8.8
Can I install on the latest version?
Thanks.
WPBeginner Support
Yes you can. Please see, Should you install plugins not tested with your WordPress version.
Admin
Erick Perez
you guys don’t use this on your own website, how come?
handi priyono
Hello dude,, thanks for help me by writting this useful post.
this post very help me to prevent hacker to login to my web. thanks !!
WPBeginner Staff
Please contact WordPress.com support.
WPBeginner Staff
You can deactivate the plugin using an FTP client. See our guide on how to disable all plugins using FTP without wp-admin access.
Kavitha Krishnan
I am using the WP.com hosting. So this option will not work for me.
Kavitha Krishnan
Hi, I have uninstalled the Google app by mistake now i am unable to login to WP. i requested the account recovery also nothing worked. Is there any solution for my issue.
Sriram
Hi,
What if I have a custom login page? How can I integrate this plugin in my custom login page?
Lorena Dennison
I have my wordpress blog set up to receive a SMS code to log in… well my cell phone is shut off and can’t get the SMS Code…. so how can I log in and take that SMS off my blog?
WPBeginner Support
You can’t unless you disable the plugin used to enable this two step authentication.
Admin
Kamran Abdul Aziz
Aha, Google Authenticator & Authy they always works for me,
However is there any option where we can force users to use 2 Step verification?
Am not allowing my users to access the Backend, Their profile & everything is limited to front end only.
I don’t want them to access their backend & Setup 2 step.
Any solutions?
Brenda
I installed the two-step google authenticator, both the app and the plugin. I updated the app and now all of the sudden I can’t generate a verification code, and therefore have not been able to login to my WordPress. I have no idea what “login using FTP” or who my webmaster is. I signed up for a free worpress account because I wanted to start a little blog and now it appears to me I have to be a computer wizard to do something so basic, which is login!! Can you please help? And explain it to me like I’m a third grader. I don’t have the tech savviness you all do.
Thank you in advance
WPBeginner Support
You mentioned that you have a free WordPress account. Does your blog address has wordpress.com in it? If that’s the case, then this tutorial is not for you. You need to contact WordPress.com support for assistance.
Admin
Zulfa Permata Suri
I have set up two-step authentication for my wordpress blog. Suddenly I cant log-in it said the authentication code that i type is invalid and now I am locked out of my wordpress account.
Help me please, I want to use my wordpress but I cant log-in T.T
Editorial Staff
Login to WordPress using FTP and delete the plugin.
Admin
Alyson
Hi – I lost my phone with my google authenticator on it and now I can’t get into my site. I don’t know how to log in using ftp ..
HELP?
Thanks!
Editorial Staff
Contact your webhosting provider. They’re the only one who have your FTP access and can help delete the plugin.
Cara Isaacs
Hey,
I recently set up two-step authentication for my wordpress blog. Downloaded the google app and it all worked fine with log-in. Then changed the name of my blog and accidentally deleted the google authenticator app and now I am locked out of my wordpress account as it asks for the code yet I cannot generate a code because I can’t access my account to get the key.
I hope you can help.. PLEASE!
Editorial Staff
Use FTP to delete the plugin.
Admin
Cara
Thanks for your reply. I just downloaded the ftp software except it can’t seem to connect to the server. Looks like I will be starting a new blog…
Editorial Staff
Hey Cara. Starting a new blog is not a good solution. Please get in touch with your hosting provider or send us an email. We can help you restore this and get it sorted out.
Everett Patterson
Well I did some research and found that the hosting time may be different than the phone time and may cause issues with the codes.
I was able to log in to my Cpanel and delete the plugin. I still want to use it though so I added it back in and used the relaxed mode this time. Seems to be working now.
Thanks for this post, very helpful.
Everett Patterson
Uh Oh. I locked myself out of my site.
Here’s what I did:
Added the plugin to my blog
Activated it, but didn’t check the “Active” box
Added authenticator to my android
Scanned the QR code
Checked “Active” box
Signed out
My phone gives me a new code every minute, but none of them work. What now?
Austin
I did this too…. I logged into my host via FTP and deleted the Google Authenticator plugin.
Then I went through the process again and the plugin/app combo worked like a charm!
Hope you’re able to get back into your site (if you haven’t already).
Maria Muir
I installed the plugin, followed the simple steps and have now been locked out of my site. I also have the failed attempt log in plugin which has blocked me for 3 failed attempts so now have to wait. I did put in the correct details and authentication code, I tripled checked the installation and settings, all are correct. So why can’t I log back in?
Editorial Staff
Run this plugin in the relaxed mode.
Admin
Chris Burbridge
It does concern me that when you install the plugin, you have to activate it user by user. That doesn’t make sense to me. Wouldn’t an administrator want to have it work for all users, otherwise there are holes in the net?
I have been trying this one, which is really great — http://wordpress.org/extend/plugins/duo-wordpress/ — there’s a free option, and it works similarly. It is very slick, with a smart phone.
Editorial Staff
The reason why Google Authenticator requires each user to enable it themselves is because they have to connect their device with it. Google Authenticator is a great solution if you don’t like paying for a service. We are using it on our site. All we did was send an email to all users and ask them to turn it on.
Yes it requires a little bit of extra work, but it is surely worth it for a small company like ours. If you have hundreds of people in your team, then it would be worth to automate it with a service like the one you linked.
Admin
Michael
This works great with Limit Login Attempts plug in. Great security feature if your blog does not have SSL capabilities.
yatin
i love your site very helpful
what if Google authenticator app got uninstalled by mistake !!!!
after that how can i login in my wordpress site ?
Editorial Staff
Delete the plugin. Then re-do the process.
Admin
Gerard
Good article, good plugin and good subject
Love Authenticator app.
Kind regards,
Gerard.
Umer Rock
Buy Syed bro it is not linked to google account ? then why you used google athenticator word , i think it is kind of 2 step verification system only,
Editorial Staff
If you read the post carefully, you will see that the app this plugin uses is called Google Authenticator. Without using that application this would not work. If you actually follow the tutorial and download the application, then you will see that application is made by Google Inc.
Admin
Hadley
I was able to successfully set up the Google Authenticator app for myself as an admin on my site, but was not able to set it up successfully for an editor on the same site. On the other user’s profile settings under Google Authenticator, the only options are to hide the Authenticator settings or make the user active with Google Authenticator. There aren’t the same options to type in a site description or view a secret code. After installing the app successfully to the other user’s phone, she was not able to sign in to the site and I’m wondering if this is due to the profile settings. Any advice?
Editorial Staff
Interesting. It is probably best to contact the plugin author and see what the issue could be.
Admin
Ahmad Awais
Putting our login authentication in hands of a 3rd party plugin?
Not more than 5k Downloads! What about its authenticity? Are you using it yourself #justcurious.
I am happy with .htpaswrd file.
Should we trust this code?
Except this a nice plugin for sure.
Editorial Staff
The plugin has low downloads because not many people have jumped on board with this 2-step verification method. If you are happy with .htpaswd, then good for you. Yes, we are using it on our site along with all the other security measures.
Admin
Dilawer Pirzada
Buzz! After my great efforts on securing WordPress blog from spammers and hackers, I myself today found a great plugin to stop hackers!
Thanks for the plugin!
Santel Phin
Hi,
I have completed the setup and it works great. But do I have possibility to choose how to the verification code.
I did the same setup for my Google account, but it send via SMS in stead. And I do prefer this mode as well if it is possible.
But I don’t see any setting to chose send via SMS. Hope you can give me an idea if it is possible or not.
Thanks
Editorial Staff
No the SMS option is not available. Mainly because for that you need a sending service which blogs are not equipped with. There is another plugin called “2-step verification” that has the option to email the code. But no SMS.
Admin
Navneet Singh
Plugin looking simple and POWERFUL.!!
Saad
This Will Be Useful For Stopping Brute Force
Geoffrey Gordon
Thanks Syed
WordPress security has always been a big issue in general, so the more educated people are regarding WordPress security the better. This is especially important as people see WordPress as a quick way to get a website up and running. Then one day without warning BANG their website is down by some hacker.
Busy checking out the Google authentication plugin for WordPress, looks good. I have ask though with all the security plugin’s installed on ones blog plus other plugins it tends to slow down the website. Sometimes its better to code what a plugin can do straight into your blog, rather than keep adding another plugin.
Editorial Staff
This plugin works in the backend, so it will not have an impact on your site’s load time on the front-end.
Admin
Landfoci
Good plugin. Thanks your share