Zastanawiasz się, dlaczego twoje e-maile z WordPressa nie docierają do skrzynek odbiorczych? Nie jesteś sam!
Wielu właścicieli witryn internetowych boryka się z tym problemem, ponieważ większość hostów internetowych ogranicza domyślną funkcję poczty PHP, co powoduje, że wiadomości e-mail gubią się lub trafiają do spamu.
Poprawkę można łatwo uzyskać, korzystając z serwera SMTP Gmaila – niezawodnego, bezpłatnego rozwiązania, które zapewnia prawidłowe dostarczanie twoich e-maili. Sami z niego korzystaliśmy i stwierdziliśmy, że jest to świetny wybór dla blogerów, małych firm i każdego, kto chce bezproblemowo wysyłać wiadomości e-mail.
W tym przewodniku pokażemy ci dokładnie, jak skonfigurować Gmail SMTP w WordPressie, aby twoje e-maile docierały do skrzynek odbiorczych za każdym razem. ✅

Dlaczego i kiedy potrzebny jest serwer SMTP Gmaila dla e-maili z WordPressa?
Twoja witryna WordPress wysyła wiadomości e-mail, aby powiadomić Cię o rejestracji nowego użytkownika, zresetowaniu utraconego hasła, automatycznych aktualizacjach i powiadomieniach z formularzy kontaktowych.
Domyślnie WordPress używa funkcji poczty PHP do wysyłania powiadomień e-mail. Jednak funkcja ta nie działa zgodnie z oczekiwaniami z kilku powodów.
Większość firm hostingowych WordPress ogranicza korzystanie z tej funkcji, aby zapobiec nadużyciom i spamowi.
Filtry antyspamowe popularnych dostawców usług pocztowych sprawdzają przychodzące wiadomości e-mail, aby monitorować, czy są one wysyłane z autentycznych serwerów pocztowych. Czasami domyślne e-maile z WordPressa mogą nie przejść tej kontroli i nawet nie trafić do katalogu spamu.
SMTP (Simple Mail Transfer Protocol) jest branżowym standardem wysyłania e-maili. W przeciwieństwie do funkcji poczty PHP, SMTP używa odpowiedniego uwierzytelniania, co zwiększa dostarczalność e-maili.
Gmail udostępnia usługę SMTP, której możesz używać do wysyłania e-maili z twojej witryny WordPress. Ich serwery są najlepszą opcją, jeśli chcesz tylko wysyłać e-maile z powiadomieniami WordPress do siebie i kilku użytkowników Twojej witryny.
Jednak w przypadku, gdy chcesz wysyłać e-maile z newsletterem lub masz sklep internetowy.
W takim przypadku powinieneś skorzystać z dostawcy usług masowej wysyłki e-maili, takiego jak Constant Contact, Brevo (dawniej Sendinblue) lub Mailgun.
Darmowa a płatna usługa Gmail SMTP dla WordPress
Do wysyłania e-maili związanych z WordPressem możesz użyć twojego darmowego konta Gmail. Jednak dla lepszej dostarczalności zalecamy korzystanie z płatnego Google Workspace.
Dzięki Google Workspace otrzymujesz swój własny , profesjonalny adres e-mail, taki jak name@yoursite.com.
Google Workspace wymaga dodania rekordów MX do twojej nazwy domeny. Oznacza to, że twoje e-maile będą wydawać się pochodzić z twojej nazwy domeny, co pomaga zwiększyć autentyczność i zapewnić lepszą dostarczalność.
Jeśli wolisz instrukcje pisemne, po prostu czytaj dalej. Oto krótki przegląd wszystkich metod, które omówimy w tym przewodniku:
Gotowy? Zaczynajmy.
Jak wysyłać e-maile z WordPressa za pomocą serwera SMTP Gmaila?
Jeśli zdecydujesz się na korzystanie z Google Workspace, to najpierw musisz skonfigurować swoją domenę do pracy z Google Apps. Mamy poradnik krok po kroku, jak skonfigurować profesjonalny adres e-mail z Google Workspace.
Pozostałe instrukcje są takie same niezależnie od tego, czy korzystasz z płatnego, czy bezpłatnego konta Gmail.
Teraz WP Mail SMTP jest najlepszą wtyczką WordPress SMTP na rynku. Umożliwia łatwe korzystanie z dowolnego serwera SMTP do wysyłania e-maili WordPress z wyższą dostarczalnością.
Uwaga: Sami używamy WP Mail SMTP na naszej witrynie i widzieliśmy, jak pomaga upewnić się, że wszystkie nasze e-maile docierają do skrzynek odbiorczych użytkowników – a nie do katalogu spamu. Zobacz naszą pełną recenzję WP Mail SM TP, aby uzyskać wgląd w jego funkcje!
Zainstalujmy więc i włączmy wtyczkę WP Mail SMTP. Aby uzyskać więcej informacji, zobacz nasz przewodnik krok po kroku, jak zainstalować wtyczkę WordPress.
Chociaż istnieje darmowa wersja, zalecamy zakup płatnej wersji o nazwie WP Mail SMTP Pro, która daje dostęp do pomocy technicznej premium, większej liczby usług pocztowych i konfiguracji w białych rękawiczkach przez jednego z ich ekspertów.
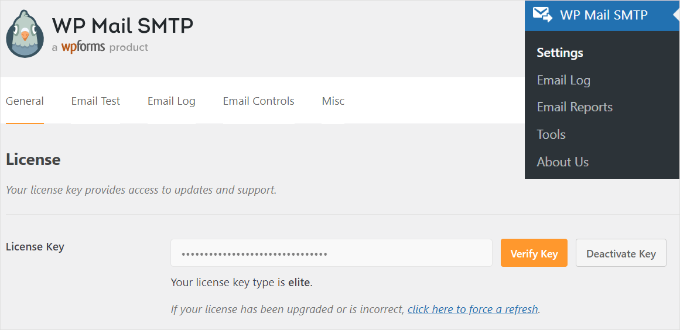
Po włączaniu należy przejść na sekcję Ustawienia ” WP Mail SMTP, aby skonfigurować ustawienia wtyczki. Następnie wpisz swój klucz licencyjny i kliknij przycisk “Zweryfikuj klucz”. Klucz można znaleźć w obszarze twojego konta WP Mail SMTP.
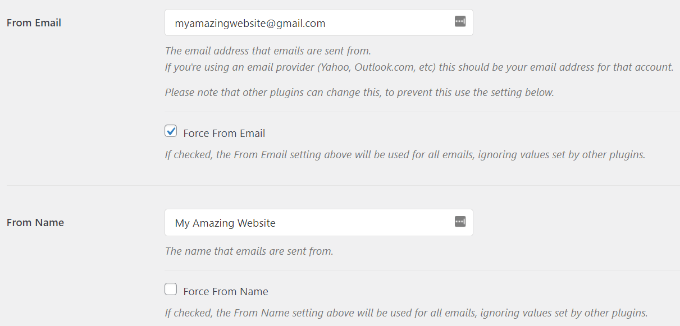
W karcie ustawień “Ogólne” musisz upewnić się, że w polu “Od e-mail” używasz swojego adresu e-mail Gmail.
Następnie należy podać nazwę nadawcy.
Wtyczka WP Mail SMTP oferuje 3 sposoby na połączenie twojej witryny WordPress z serwerami Gmail:
- Pierwsza metoda wykorzystuje instalację jednym kliknięciem, która jest najłatwiejsza i najbardziej przyjazna dla początkujących, ale jest dostępna tylko dla użytkowników wtyczek premium.
- Druga metoda wykorzystuje uwierzytelnianie OAuth. Ta metoda jest zabezpieczona i nie wymaga wtyczki premium.
- Trzecią metodą jest ręczna konfiguracja ustawień SMTP Gmaila. Ogólnie rzecz biorąc, nie zalecamy tej metody, ponieważ jest ona mniej bezpieczna.
Mając to na uwadze, skonfigurujmy WordPressa tak, aby korzystał z Gmail SMTP do wysyłania e-maili.
Metoda 1: Konfiguracja Gmaila do wysyłania e-maili WordPress za pomocą instalacji jednym kliknięciem
Ta metoda jest najszybsza i najłatwiejsza dla każdego, co oznacza, że może pomóc zaoszczędzić czas i zamieszanie.
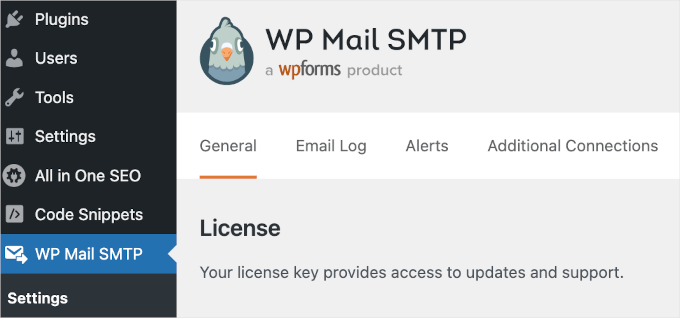
Po zainstalowaniu i włączaniu wtyczki WP Mail SMTP, przejdźmy do WP Mail SMTP ” Ustawienia i upewnijmy się, że jesteśmy na karcie “Ogólne”.
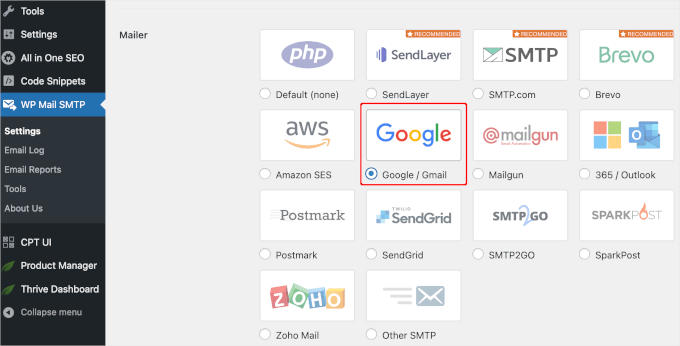
Następnie należy wybrać “Google / Gmail” w sekcji “Usługa pocztowa”.
Umożliwi to skorzystanie z opcji “Konfiguracja jednym kliknięciem”.
Następnym krokiem jest autoryzacja twojego konta Google.
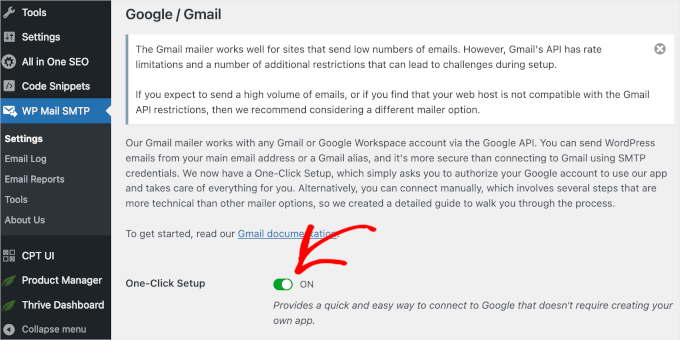
Zobaczysz sekcję “Google / Gmail” poniżej “Usługi pocztowe” na twoim ekranie. Kliknij przełącznik, aby włączyć funkcję instalacji jednym kliknięciem.
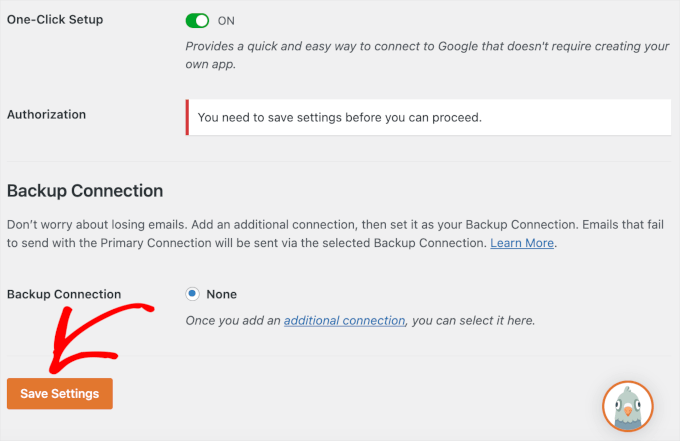
Następnie może pojawić się powiadomienie o konieczności zapisania zmian, aby kontynuować proces autoryzacji.
Kliknijmy więc przycisk “Zapisz ustawienia”.
Następnie powinieneś być w stanie kontynuować proces.
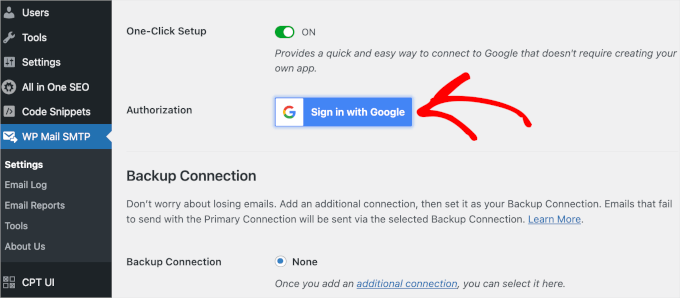
Zostaniesz poproszony o zalogowanie się na twoje konto Google. Wystarczy kliknąć przycisk “Zaloguj się w Google” i wybrać konto.
Następnie Google poprosi o zgodę na wysyłanie e-maili przez WP Mail SMTP w twoim imieniu.
Możesz kliknąć “Zezwól”, aby kontynuować.
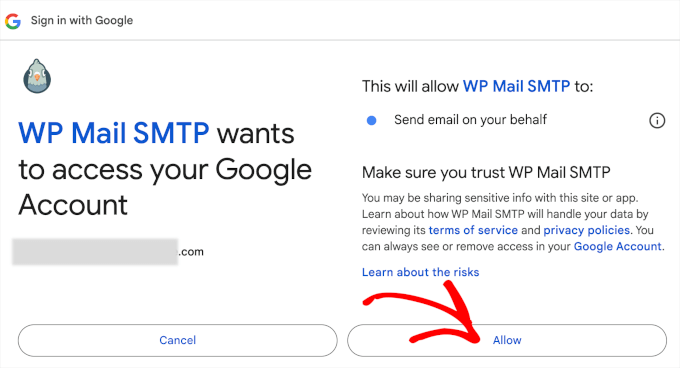
Po kliknięciu przycisku zostaniesz przekierowany z powrotem do karty “Ogólne” WP Mail SMTP w obszarze administracyjnym WordPress.
W tym miejscu należy przewinąć w dół do sekcji “Autoryzacja”, aby sprawdzić, czy skonfigurowane konto Gmail zostało pomyślnie połączone.
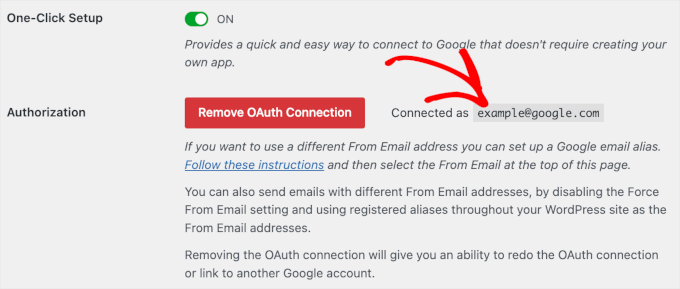
To wszystko! Udało ci się połączyć twoje konto Gmail z WP Mail SMTP za pomocą metody One-Click Setup!
Metoda 2: Konfiguracja Gmaila do wysyłania e-maili z WordPressa przy użyciu protokołu OAuth
Ta metoda jest świetną opcją , jeśli korzystasz z darmowej wersji wtyczki WP Mail SMTP. Jest zabezpieczona, a po jej skonfigurowaniu nigdy nie będziesz musiał robić tego ponownie.
Musisz zacząć od wybrania “Google/Gmail” jako twojej usługi pocztowej.
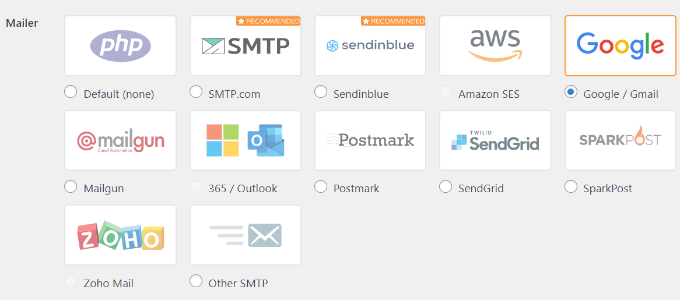
Następnie zobaczysz trzy pola, które musisz wypełnić po przewinięciu w dół.
Wystarczy wypełnić pola“Identyfikator klienta”, “Sekret klienta” i“Autoryzowany URI przekierowania“.
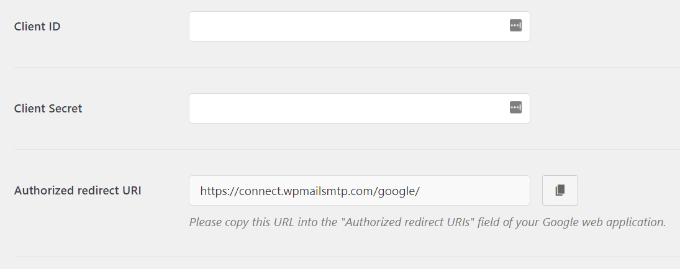
Skonfigurujmy te pola.
Tworzenie aplikacji i generowanie kluczy API dla Gmaila
Aby rozpocząć, wystarczy przejść na witrynę internetową Google Cloud Platform, a następnie kliknąć “Mój pierwszy projekt” u góry.
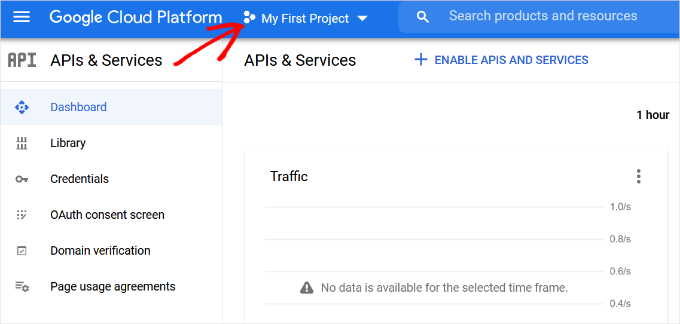
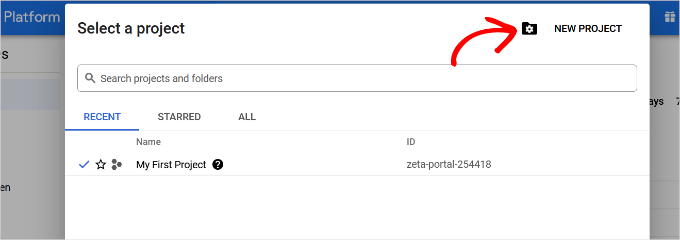
Otworzy się małe wyskakujące okno, w którym można wybrać twój projekt.
Kliknij opcję “Nowy projekt”.
Na następnym ekranie zostaniesz poproszony o podanie nazwy twojego projektu.
Zalecamy nadanie mu zapadającej w pamięć nazwy, aby można go było łatwo rozpoznać w przyszłości.
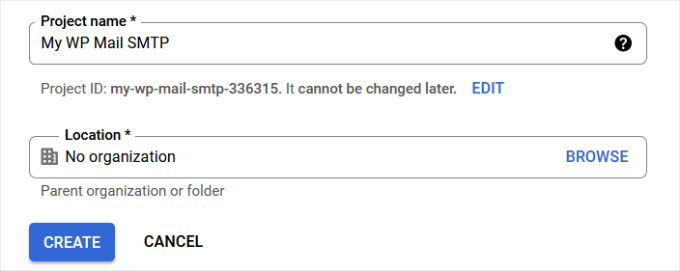
Następnie kliknijmy przycisk “Utwórz”, aby kontynuować.
Konsola deweloperska utworzy teraz twój projekt i przeniesie cię do jego kokpitu.
Google oferuje programistom dostęp do wielu swoich interfejsów API i usług. Należy włączyć interfejsy API, które będą potrzebne w tym projekcie.
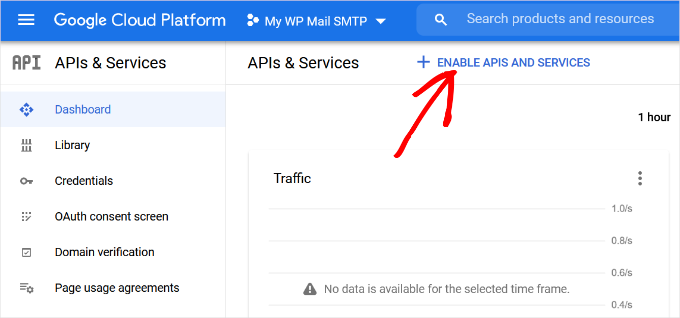
Wystarczy kliknąć przycisk “Włącz interfejsy API i usługi”, aby kontynuować.
Spowoduje to przejście do strony biblioteki API.
Z tego miejsca możesz wpisać Gmail w polu wyszukiwania, aby szybko znaleźć Gmail API i kliknąć, aby go wybrać.

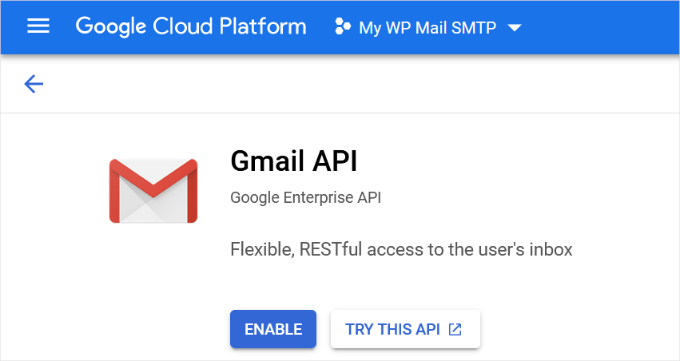
Zobaczysz teraz przegląd interfejsu API i jego możliwości.
Wystarczy kliknąć przycisk “Włącz”, aby kontynuować.
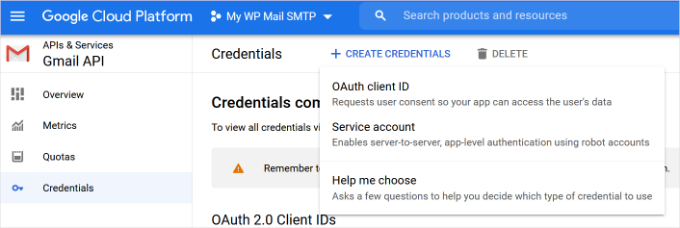
Teraz, gdy twój interfejs API jest włączony, następnym krokiem jest utworzenie danych uwierzytelniających, których możesz użyć w ustawieniach wtyczki WP Mail SMTP.
Aby kontynuować, kliknij przycisk “+ Utwórz dane uwierzytelniające” i wybierz opcję “Pomóż mi wybrać” z menu rozwijanego.
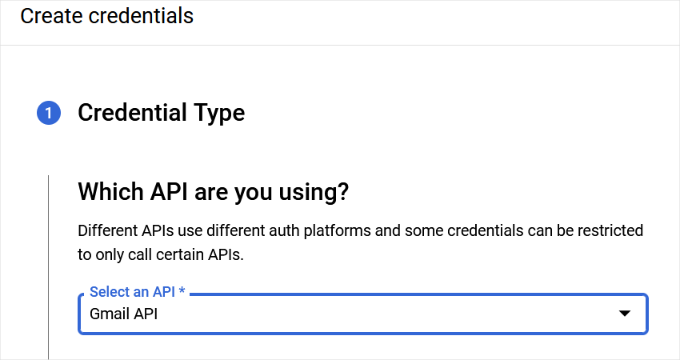
Na następnym ekranie zostaniesz zapytany, którego API chcesz użyć.
Śmiało i wybierz “Gmail API” z rozwijanego menu “Którego API używasz?”.
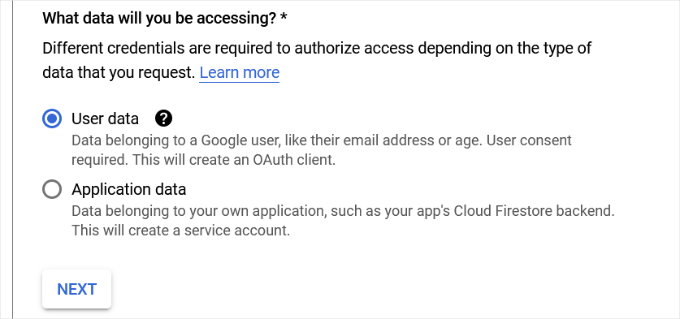
Następnie wybierz “Dane użytkownika” w polu “Do jakich danych będziesz mieć dostęp?”.
Po wykonaniu tej czynności kliknij przycisk “Dalej”.
Teraz musisz wpisz informacje o twojej aplikacji.
Możesz zacząć od nadania nazwy twojej aplikacji, wybrania podanego adresu e-mail i dodania logo aplikacji, jeśli chcesz.
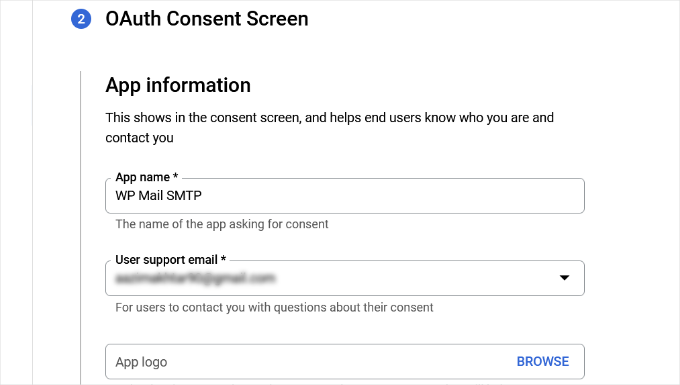
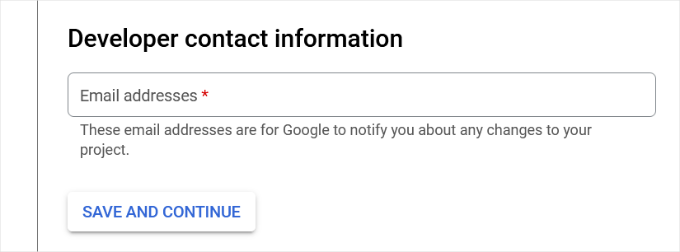
Następnie należy przewinąć w dół i wpisz dane kontaktowe dewelopera.
Po wpiszeniu adresu e-mail wystarczy kliknąć przycisk “Zapisz i kontynuuj”.
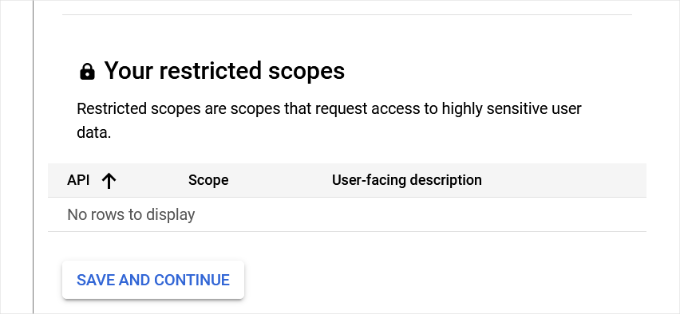
Na następnym ekranie możesz skonfigurować “Zakresy” dla Gmail API. Jest to krok opcjonalny i można go na razie pominąć.
Wystarczy przewinąć stronę w dół i kliknąć przycisk “Zapisz i kontynuuj”.
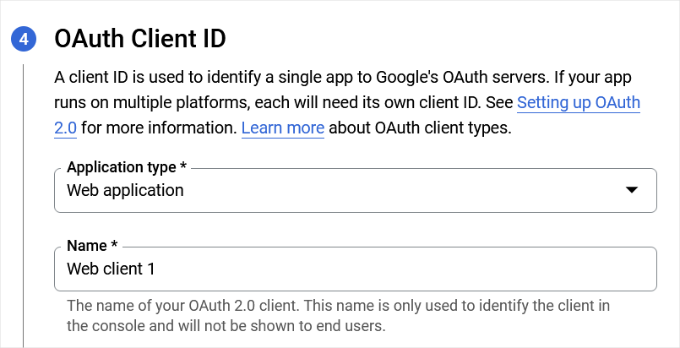
Następnie wpisz szczegóły w sekcji “Identyfikator klienta OAuth”.
Możesz zacząć od wybrania “Aplikacji internetowej” jako “Rodzaju aplikacji” z menu rozwijanego, a następnie wpisz nazwę.
Po przewinięciu w dół zobaczysz opcje dla “Autoryzowanych źródeł JavaScript”. Możesz je pominąć i przejść do opcji “Autoryzowane URI przekierowania”.
Kliknij przycisk “+ Dodaj adres URL” w sekcji “Autoryzowane URI przekierowania” i wpisz adres https://connect.wpmailsmtp.com/google/ w polu "URI".
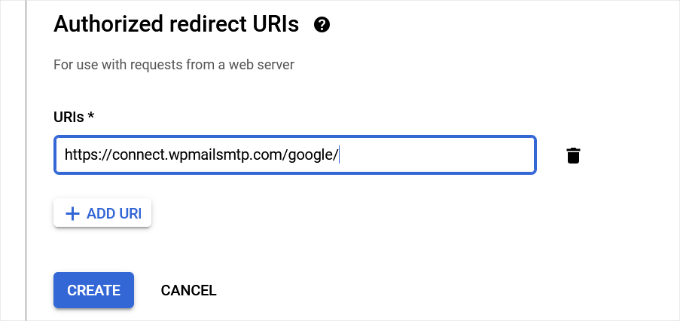
Gdy już wpiszesz adres URL, po prostu kliknij przycisk “Utwórz”.
Następnie zobaczysz swoje dane uwierzytelniające w obszarze “Twoje dane uwierzytelniające”.
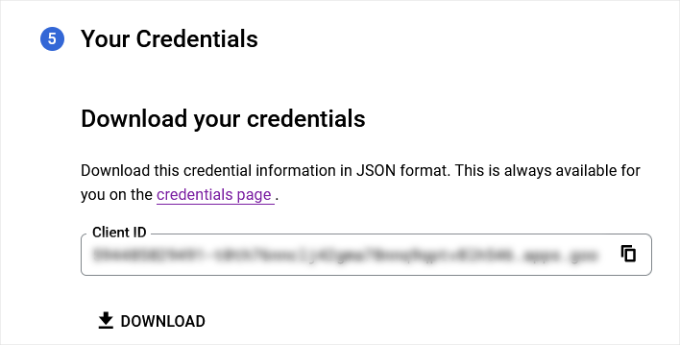
Kliknij przycisk “Gotowe” na dole, aby przejść dalej.
Zostaniesz przeniesiony na stronę z danymi uwierzytelniającymi twojego projektu.
Na tej stronie znajdują się Twoje ostatnio utworzone dane uwierzytelniające. Aby kontynuować, należy kliknąć ikonkę edycji obok danych uwierzytelniających.
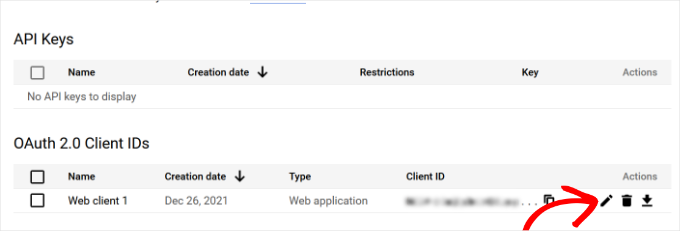
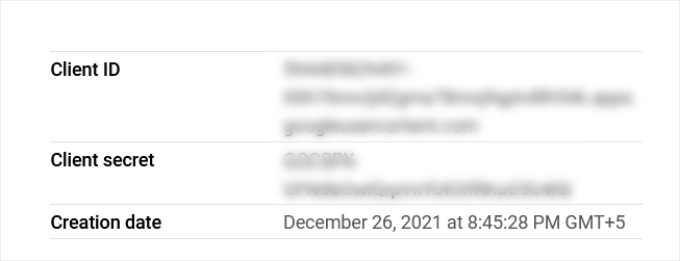
Spowoduje to przejście do strony edycji danych uwierzytelniających, gdzie będziesz mógł zobaczyć swój sekret klienta i identyfikator klienta.
Wszystko, co musisz zrobić, to skopiować i wkleić klucz na stronie ustawień twojej wtyczki.
Po zakończeniu możesz powrócić do strony ustawień wtyczki w twoim obszarze administracyjnym WordPress.
Teraz, gdy masz już zarówno identyfikator klienta, jak i klucz prywatny klienta, musisz kliknąć przycisk “Zapisz ustawienia”, aby kontynuować.
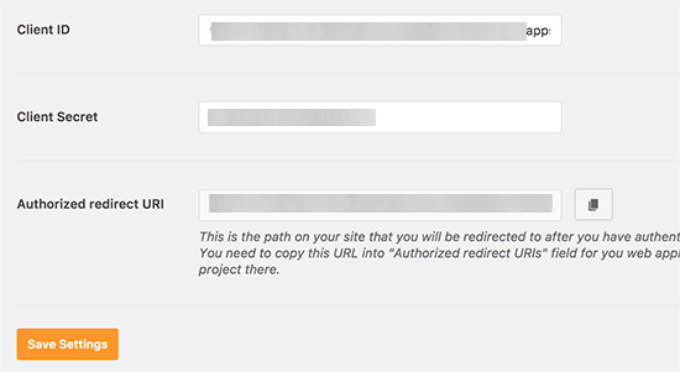
Wtyczka zapamięta teraz twoje ustawienia i przeładuje stronę.
Następnie należy przewinąć do dołu strony ustawień i kliknąć przycisk “Zezwalaj wtyczce na wysyłanie e-maili przy użyciu twojego konta Google”.
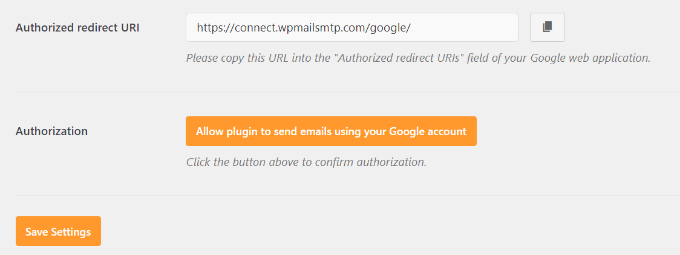
Spowoduje to przejście do Twojego konta Google.
Następnie zostaniesz poproszony o udzielenie witrynie internetowej pozwolenia na wysyłanie e-maili w twoim imieniu.
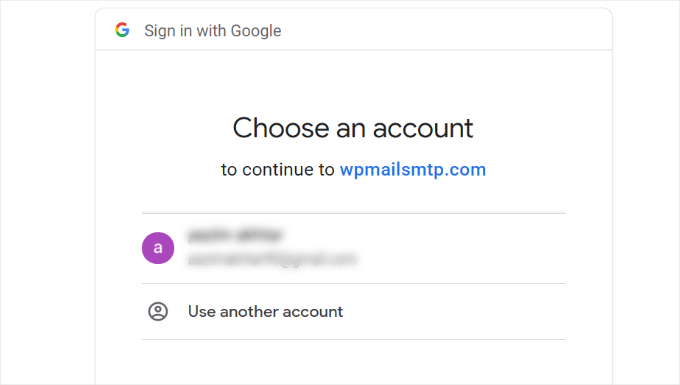
Wystarczy wybrać twoje konto Gmail i wyrazić zgodę na odnośnik do projektu Google API.
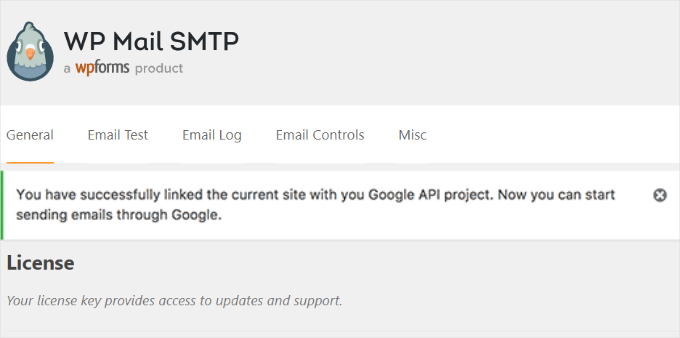
Następnie zostaniesz przekierowany z powrotem na twoją witrynę internetową, gdzie zobaczysz komunikat o powodzeniu.
Metoda 3: Konfiguracja Gmail SMTP jako nadawcy SMTP
Ta metoda umożliwia ręczne łączenie się z serwerami SMTP Gmaila w celu wysyłania twoich e-maili WordPress.
Po pierwsze, będziesz chciał przejść do Ustawienia ” WP Mail SMTP z twojego obszaru administracyjnego WordPress, aby skonfigurować ustawienia wtyczki.
Z tego miejsca możesz zacząć od podania adresu Gmail, którego chcesz użyć w polu “Od e-maila” i twojego imienia w polu “Od imienia”.

Następnie wybierzmy “Inne SMTP” jako twoją usługę pocztową.
Należy również zaznaczyć pole obok ścieżki powrotu.
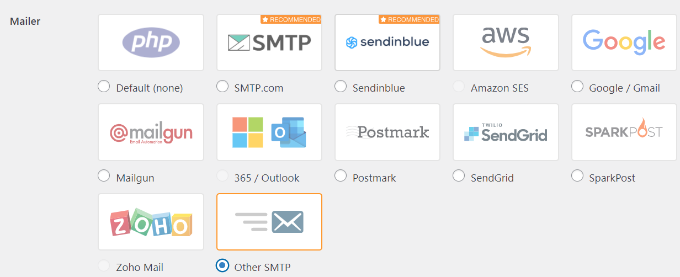
Następnie możesz przewinąć w dół do sekcji “Inne SMTP”.
Tutaj skonfigurujesz więcej ustawień, aby połączyć się z serwerami SMTP Gmaila.
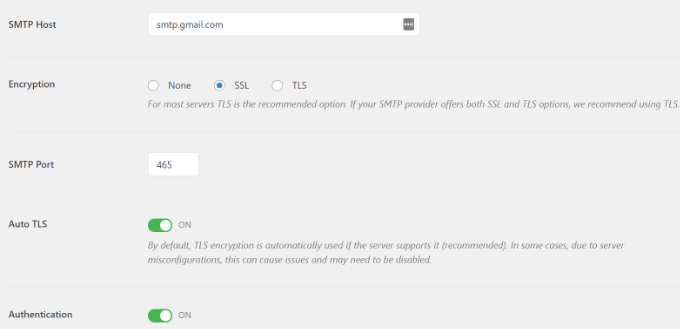
Oto dokładna konfiguracja, którą należy dodać do ustawień wtyczki:
- Host SMTP: smtp.gmail.com
- Szyfrowanie: Użyj szyfrowania SSL
- Port SMTP: 465 (powinien pojawić się automatycznie po wybraniu szyfrowania SSL).
- Auto TLS: Wyłącz TLS
- Uwierzytelnianie: Włącz uwierzytelnianie
- Nazwa użytkownika SMTP: Twój pełny adres Gmail, np. john.smith@yourdomain.com lub john.smith@gmail.com.
- Hasło SMTP: Hasło twojego konta Gmail.
Po zakończeniu kliknij przycisk “Zapisz zmiany”, aby zapisać twoje ustawienia.
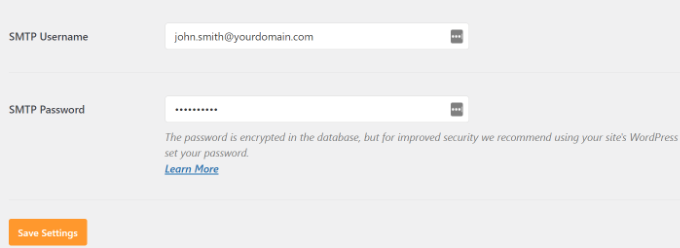
To wszystko; pomyślnie skonfigurowałeś WP Mail SMTP do korzystania z serwerów Gmail SMTP.
Testowanie twoich ustawień WP Mail SMTP
Wtyczka WP Mail SMTP pozwala przetestować twoje ustawienia e-mail, dzięki czemu możesz upewnić się, że wszystko działa poprawnie.
Należy przejść do Ustawienia ” WP Mail SMTP i kliknąć na kartę “Test e-mail”.
Następnie wystarczy podać dostępny adres e-mail w polu “Wyślij do”, a następnie kliknąć przycisk “Wyślij e-mail”.
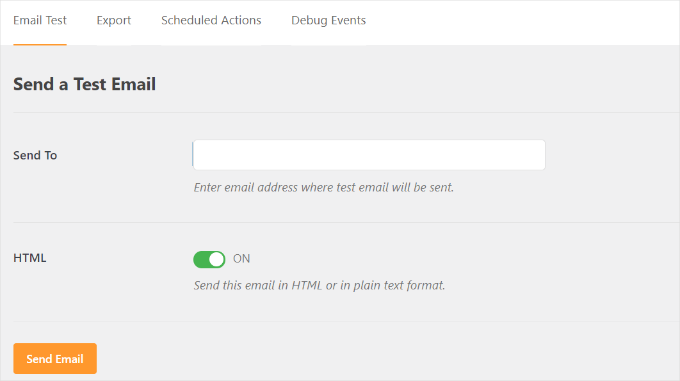
Następnie powinien zostać wyświetlony komunikat o powodzeniu.
Aby się upewnić, możesz sprawdzić swoją skrzynkę odbiorczą, aby zobaczyć wiadomość z tematem “WP Mail SMTP: Testuj e-mail do…”.
To wszystko; pomyślnie skonfigurowałeś swoją witrynę WordPress do wysyłania e-maili za pomocą serwerów SMTP Gmaila.
Zyskaj więcej dzięki WP Mail SMTP Pro
Jeśli chcesz jeszcze więcej funkcjonalności, powinieneś wypróbować WP Mail SMTP Pro. W wersji Pro wtyczki można łączyć się z:
- Google Workspace/Gmail
- Amazon SES
- Mailgun
- Office 365 / Outlook.com
- SendGrid
- I więcej
Otrzymujesz również dodatkowe funkcje, takie jak logowanie się do poczty e-mail, możliwość dostrojenia lub kontrolowania, które powiadomienia wysyła twoja witryna WordPress i wiele więcej.
Rozwiązywanie problemów z niedziałającym SMTP w Gmailu
Widzieliśmy, że użytkownicy napotkali kilka problemów podczas korzystania z Gmail SMTP z niektórymi konfiguracjami hostingu współdzielonego.
Możesz wykonać następujące kroki, aby poprawić problem Gmail SMTP:
Najpierw musisz logować się na twoje konto cPanel. Następnie należy znaleźć przycisk “+ Utwórz” na stronie kont e-mail.

Wystarczy utworzyć konto e-mail odpowiadające twojemu adresowi e-mail w Google Apps.
Tworząc konto e-mail, zasadniczo sprawiasz, że twój serwer hostingowy jest świadomy adresu e-mail, który powinien wysyłać wiadomości e-mail. Ten krok jest obejściem, aby przekonać serwer, że wysyłasz e-maile za jego pośrednictwem, nawet jeśli planujesz korzystać z serwera SMTP Gmaila.
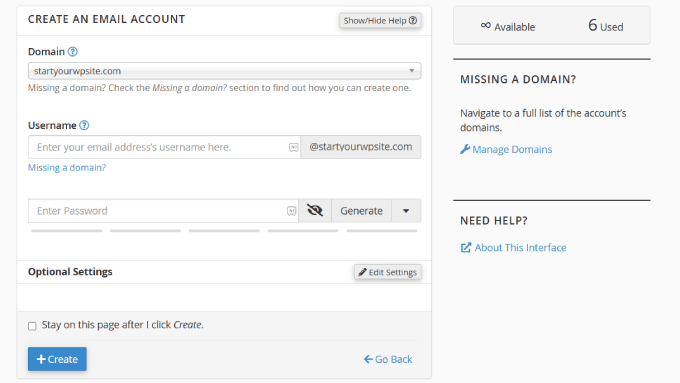
Może się to wydawać dziwne, ponieważ nie używasz twojego serwera do wysyłania e-maili. Zasadniczo oszukuje twój serwer, aby uwierzył, że wysyłasz e-mail przez serwer.
Z twojego konta cPanel przejdźmy do Rekordów MX i zmieńmy routing MX z automatycznego na zdalny. Należy pamiętać, że może to być trochę trudne do znalezienia, ponieważ każdy host ma teraz własny interfejs cPanel.
Następnie należy poszukać małego odnośnika obok MX z napisem “Email Routing: Remote Mail Exchanger”.
Następnie możesz zalogować się z powrotem do swojej witryny WordPress i wysłać testowy e-mail. Aby uzyskać więcej informacji, możesz skorzystać z naszego przewodnika na temat zmiany rekordów MX dla twojej witryny WordPress w oparciu o twoją usługę hostingową.
Film instruktażowy
🎥 Obejrzyj nasz poradnik wideo krok po kroku poniżej, aby szybko skonfigurować Gmail SMTP w WordPress i upewnić się, że twoje e-maile są dostarczane niezawodnie.
Po prostu wciśnij play i podążaj za nami!
Mamy nadzieję, że ten artykuł pomógł ci dowiedzieć się, jak wysyłać e-maile w WordPressie za pomocą serwera SMTP Gmaila. Możesz również zapoznać się z naszymi poradami ekspertów dotyczącymi rozwiązywania problemów, gdy formularz WordPress nie działa, oraz z naszym przewodnikiem na temat eksportowania wpisów formularza WordPress do plików CSV i Excel.
If you liked this article, then please subscribe to our YouTube Channel for WordPress video tutorials. You can also find us on Twitter and Facebook.


David
Hi, I used this tutorial last year to install and configure the Gmail SMTP plugin. Until very recently, the Gmail SMTP plugin in conjunction with my website’s contact form worked perfectly. But I tested my website’s contact form today, and I got the following fatal-error message:
Fatal error: Uncaught exception ‘Google_Auth_Exception’ with message ‘Error refreshing the OAuth2 token, message: ‘{ “error” : “invalid_grant” }”
I don’t have a clue what that means. I get the same fatal-error message when I use the plugin to send a test message at Gmail SMTP plugin>Settings>Test email.
I haven’t changed any of the plugin settings since I first installed it a year ago, and I haven’t done anything new with my Google Console account either. I’m using the most recent version of the Gmail SMTP plugin, and also the newest version of WordPress.
Any ideas or suggestions?
Thanks!
WPBeginner Support
Hey David,
It seems like your Oauth2 token has expired. Try following the tutorial again from the beginning to set it up again.
Admin
Ehsan
Thank U very much – one of my problem was this “my emails goes to spam folder”
with this service(Method 1) Now It’s great – of course after 14 days you must pay for that but still it’s prefect
I have question;
Can I send 100 Emails like newsletter for my customer is it OK for Google!?
I afraid my Emails after it goes to spam folder again
Sharon
I did everything as described, but the contact form on my website still does not work.
Adondriel
Hey, add a thing at the end for the troubleshooting thing: “Check with your website host and verify that they do not block outgoing requests by default.” I know 1. GoDaddy does this, and won’t let you unblock. and 2. Namecheap also blocks by default but you just gotta contact support, give em your info and ask em to unblock port 587 and boom, it’ll all work again.
Lucas
You save my life!
Tks!
adam
i keep getting a Error: redirect_uri_mismatch when i press ‘grant permission’. It’s driving me nuts as I can’t work out what is wrong? Everything seems to match.
Adam
Grzegorz
Same here. i get redirect_uri_mismatch
Macky
This video has been a fantastic help.
I’m a complete WordPress beginner.The step-by step instructions are very easy to follow. Now my emails are working perfectly!! Plus I also learnt how to insert headers & footers with ease.
Thanks once again!!
WPBeginner Support
Hi Macky,
We are glad you found the video helpful. You may also want to subscribe to our YouTube Channel for WordPress video tutorials.
Admin
Fabio
Your tutorial saved my site! Thank you very much mate!
Maggie Z
A follow-up question – because of the login conflict issue, I was also considering using WP Mail SMTP. However, many users on the support forum for that plugin express concern that the password for the email account is visible on the admin page in plain text.
I have a firewall set up that prevents non-admins from getting in to the back end, so is there any real security concern regarding the password showing in plain text? Any advice much appreciated!!!
Maggie Z
After troubleshooting quite a bit, I finally relented and went with WP Mail SMTP, which requires the “allow less secure apps” solution – a tech support person at G Suite told me that it was safe, and it seems like the only way to go for my particular setup. Appears to be working now. Thanks for the incredibly clear instructions!!! I am now a firm fan of this site.
Maggie Zellner
The video is fantastic, and the plugin installed perfectly. Unfortunately I didn’t realize until after I went through the whole process (because I didn’t read the documentation on the plugin carefully), the Gmail SMTP plugin eliminates the need for users to log in, and therefore it interfered with the login process that we have instituted for paid members on our website (which we manage through a plugin called PaidMembershipsPro).
Is there any way to disable that aspect of this plugin, so I can send all email via our Gmail account, but can still have users log in and out?
Eric
Great article! However, I am unclear on something when using WordPress for sending newsletters. What is the difference between those mass emailing service providers (mailgun & Sendgrid) and using Google Apps for work SMTP?
Can’t we use Google Apps for work to send newsletters just as well?
WPBeginner Support
with Google Apps for Work, you can only send an email to 500 recipients max (for paid business accounts). You cannot use it for newsletters.
Admin
Eric
Thanks so much for your response! With Google Apps for Work only limiting to 500 recipients, then I suppose it would work if we sent it to 500 or less people.
My next question, is it max to send all at one time or per day? If we throttle it to only send out a few per minute, do you know if it would allow it to send thousands within a few hours?
Heather
Thank you so much! This was so helpful!
zim ejin
Hi, this was very informative thank you for posting. however i have a website hosted on aws ec2, and route53 for dns. i tried the secure configuration. it didn’t work. Is there a special configuration for self hosted websites on aws ec2/route53. btw : i don’t have a cpanel installed.
Lanrz
After granting access and clicking on the allow button, I was not being redirected back to wordpress and the SMTP status is still not connected.
Any advice on how I should go about doing it?
Thanks!
Nathalie
Doesn’t work: test email retuens Connection: opening to smtp.gmail.com:587, timeout=300, options=array ( ‘ssl’ => array ( ‘verify_peer’ => false, ‘verify_peer_name’ => false, ‘allow_self_signed’ => true, ),)
I checked Email Routing -> Remote Mail Exchanger but it didn’t help
Raph Divine
Thanks for the write-up. It really helped me! 5stars!
Real Name
This guide worked wonderfully until my server stopped sending emails and I can’t get it to work again. The “Test Email” tab doesn’t make it clear if the email has successfully sent or not since it just spews out 52 lines that don’t mean much to me. :/
Boro
Amazing Tutorial !!!!
Thank you
peter
Ok, so I have followed the OAuth instructions and my SMPT status button has gone green. However, whether through test email or my site, I can not send an email through the contact us form (pluggin contact form builder by web Durado). The hanging message say waiting for and eventually I get a 405 error notice.
Any thoughts.
Thomas
Hoping you can help me?
I tried setting up method 1 using gmail and I got the ‘green light’ from wordpress however when testing the email I receive the following error message after waiting 1 minute for it to send:
Connection: opening to smtp.gmail.com:587, timeout=300, options=array ()
Any ideas on how to fix this?
Very best,
Tom
Fernando Santos
This tutorial is awesome!
I have one question, though. I directed the contact form messages to a gmail group email address, but, for some reason, the messages aren’t being delivered. When I direct to a “real” e-mail address like the messages are normally delivered.
I would really appreciate if someone could give me a hand figuring out why this happens.
Thank you!!!
Paul
+1 for this question. Have exactly the same question as wish to use our info@.. address
Andres
Thanks guys for such useful article. I followed all the steps and was able to configure the email correctly. However, when I receive the email from mydomain.com address (sent by wordpress after purchasing a product), the user avatar (gmail picture) doesn’t appear even though mydomain.com has a picture already.
In fact, if I send an email directly from mydomain.com account via google for work, the receiver is able to see the image right away, but it’s not the case if the email is sent via wordpress.
Do you have any suggestions? Thanks a lot, and keep rocking!
Sahar
Thanks for this helpful information. You really helped me out in setting this up, and I appreciate you taking the time to create this useful information!
WPBeginner Support
Glad you found it helpful.
Admin
lokesh kumar CL
What is origin URI of the client application. its not accepting website URL ….please help me out
Susan
Excellent instructions and thanks for walking me through setting this up. I did try the MX record change but no luck there either.
I get a 405 Not allowed message when I try to send an email.
I am hosted by Bluehost and am using the DIVI theme.
If anyone has any ideas I would be very grateful.
Leista
Hello, having a similar issue. Getting a 405 error, and also hosted on Bluehost. By any chance, were you able to fix the problem? Thanks.
JDC
I had the same problem with bluehost. But this gave me the solution.
I uninstalled any extra plugin for mail, including smtp mailer or gmail smtp plugin and just used a random address like mynewaddress@example.com (replace example.com with your own domain name) and it worked. I sent an email to my gmail account I it passes all the filters. It seems that BlueHost validates the address if it is comming from the server that hosts that domain. In gmail you usually get a warning that says that this email might not have being validated, but my email are comming fine with custom wordpress email functions. No extra plugin needed.
Prashant Bhandarkar
Thank you so much. This was of great help. God Bless you!
Karmen
Awesome tutorial!!!
Louise
I have this working brilliantly with a Google apps for work account for a woocommerce solution on wordpress, thank you.
Should this work if I use a Google group mail instead of an account?
Thanks very much.
Brian Treiber
I am not using Google apps for work, I have everything set up and connected. I tried to send a test email however I get a 405 not allowed error. I went into my cpanel and changed the mx records to the recommended” remote.” Still can’t send. Does this mean I need to use the less secure method?
Jason North
I’m getting this error when I try to activate the plugin:
Plugin could not be activated because it triggered a fatal error. Parse error: syntax error, unexpected T_FUNCTION, expecting ‘)’ in /home3/north23/public_html/forcebrain/wp-content/plugins/gmail-smtp/google-api-php-client/src/Google/autoload.php on line 19
genie
Hello, I use gmail-smtp plugin but it conflict with ultimate membership. Could you help me ?
I try another wp mail smtp but in the last feld: user account pass. Google app not allow to login from plugin. Pls help
Thank you
Leslie Andrews
Clearly I’m doing something wrong. When I get to “add credentials” I’m getting this error message and can’t move forward.
Invalid Redirect: must end with a public top-level domain (such as .com or .org)
Any help would be great
WPBeginner Support
If you look at the URL closely, you will notice that you are missing a . between domainname and the TLD, yours is examplecom when it should be example.com.
Admin
Graham
Thanks for the tutorial, but I get this error when I try to send a test email:
Connection: opening to ssl://smtp.gmail.com:587, timeout=300, options=array ()
SMTP ERROR: Failed to connect to server: Connection refused (111)
SMTP connect() failed.
Does it have something to with my site being secured with SSL?
Tony
I’m having the same issue. Did you figure it out?
Tom
Nice Article, I’m having a few issues to get this working. So I Deactivated the Plugin and tested a Contact Form to see if all was the same before setting up Gmail SMTP, unfotunately No Emails are being sent through now.
Even though the Gmail SMTP Plugin is NOT active, do we need to reset back to the default settings somehow?
WPBeginner Support
Nope simply deactivating it would turn it off.
Admin
Jenny
Hi,
I have this all set up properly and the test email worked…I just commented on my own blog to see if I would get an email when a comment was posted but I unfortunately didn’t. Can someone help me figure out where I went wrong?
Sachin
Hey thanks for the tutorial. Everything works fine in Setup, but when mail is being sent the site freezes for about 5 mins. site doesnt open at that time. It doesnt respond at that time. Any idea what might be causing this issue. But the point is mail is sent at last finally
WPBeginner Support
Please contact your WordPress hosting provider. They may be able to help you better.
Admin
crissy
Hi,
I’m having problem with the test email send
Fatal error: Cannot redeclare class phpmailer in /home/mywebsite/wp-includes/class-phpmailer.php on line 29
please help
David
Hi, I just installed this plugin, and everything went perfectly–thanks to your excellent tutorial! (I definitely couldn’t have done it without you.) My website’s outgoing email immediately started landing in people’s inboxes rather than in their spam folders.
But since I’m a novice at these matters and don’t know SMTP from RSVP, I did some reading on SMTP, and on one website I came across made this statement:
“Another strategy that hackers use: If your app sends email using SMTP, the IP address will be recorded in the Received header lines. Either scrub the original Received line [no explanation provided of how that’s done], or don’t use SMTP for email submission.”
Is this something I should be concerned about security-wise? Or does this plugin solve this problem somehow? And if not, how should I fix it?
Thanks!
WPBeginner Support
You shouldn’t be concerned about it. Most popular email service providers and their spam filters can check if an email is originating from the IP address it claims to be coming from.
Admin
Rob
Thank YOU so much for this!! I’ll keep coming back for more!!
Travis
Thanks so much for this tutorial.
Originally I had this all setup and working fine, but I moved my website and did some other fixes to it, and suddenly mailing stopped working.
Previously I spent some time trying to set it up and get it to work, but then it “stopped” working randomly.
Anyways, option #1 really saved me a major headache.
Christine Tabor
I configured, and got the green go to go button… THANKS FOR THE STEP BY STEP…
(doing this on a client test site)…
BUT REGARDING GRAVITY FORMS (or any form plug in)… do I also need to change up the notification emails that I’ve used for the Gravity Forms submissions?
Is it ok for the “from” email I used in the configuration to be different than the gmail used to set i up?
The issue that started all this was client not getting his Gravity Form notifications.
SO, before I install on their live site… (which is ecommerce and SSL)… can you reply to this … and should I still use the TSL for the configuration? I wasn’t sure if a certificate on the site made any difference in configuring this.
Thanks,
Christine
WPBeginner Support
No you don’t need to change notification emails.
It is OK, but to ensure maximum deliverability you should use the email address that is actually sending the email.
You should try with SSL first for the Gmail Configuration.
Admin
Christine
Thanks for reply…little bit more clarification please.
I set up an email…info@domain.com as a forwarder in cpanel, and I forward to their Verizon email.
I left the Verizon email in the GF notification list, added the info email, and another alternate email.
So the info email is the one in Gmail plugin set up that is sending the email…is it ok that it’s a forwarder?
Also, when I set up the plugin, I used a gmail I had created … CompanyName@gmail.com
But not using it as the sending email or anywhere else.
I sent a test and it appears all worked… Should I go back and change to SSL instead of the TSL or leave as is?
Thanks again…
Christine
WPBeginner Support
Sounds about right. However, if it was up to us we would use the Gmail address as the sender and add the forwarding email address as the Reply-to address.
Tribhuwan Bhatt
Thank You
Tim R
Doesn’t work for me on April 14, 2016.
Things I do rarely work.
Connection: opening to smtp.gmail.com:587, timeout=300, options=array ()
SMTP ERROR: Failed to connect to server: Network is unreachable (101)
SMTP connect() failed.
Mailer Error: SMTP connect() failed.
Any point in fussing with this ?
zse
Hi,
I have this same error.
Did you solved this problem?
Regards
Tim R
Here’s a follow up:
Settings of my web host’s server made this impossible.
Switched hosts and now it works easy as pie.
Don’t forget to change settings on gmail account to allow for unregistered apps (a search will discover many instructions to do that so I won’t add it here)
Monica
Hey i tried allowing access for unregistered apps it still doesnt work for me.
I am getting the error:
Connection: opening to smtp.gmail.com:587, timeout=300, options=array ()
SMTP ERROR: Failed to connect to server: Connection refused (111)
SMTP connect() failed.
Any ideas ?
Bclose
Hi ,
Thanks for this ticket ..i was fighting with my emial provider weblayer and nothing. it worked with your magic touch , one simple note .. by the end of Ouauth when explaining to create a fake local email you forgot to include that we must use MX record and what is is , i search on google and found ALT2.ASPMX.L.GOOGLE.COM, but this last simply thing could be a danwfault for all readers
Either way thank you..a lot!
Kay
Thank you soooooo much for this! Worked like a charm. The instructions are 100% on point!
Tyler
Anyone get this working with google apps email? I’ve created API credentials. SMTP status is green. But Test email says connection refused. Already set mx to remote on godaddy. Are there any security setting ls in google apps email that have to be configured?
TJ
Nice article, was able to install the plugin and it sent the email from the plugin test email.
Fails when using Contact Form 7, any recommendations for a contact form plugin that this might work with?
Thanks
WPBeginner Support
You can try it with WPForms.
Admin
Muhammad
thanks for the nice post.i was thinking to set up this for my site.
Ripul
Interesting, however I am getting this error : “Error: redirect_uri_mismatch”
Ripul
I forgot to mention I am testing this on Localhost.
Rashmirekha Moharana
Hi Syed.
Thanks a lot for such a wonderful solution. Let me implement and see.
Kudos to you.