Czy chcesz wyświetlać wpisy WordPress w układzie siatki?
Układ siatki zapewnia większą elastyczność podczas wyświetlania twoich wpisów w WordPress. Może to być pomocne przy tworzeniu własnych stron.
W tym artykule pokażemy, jak łatwo wyświetlić twoje wpisy WordPress w układzie siatki w dowolnym miejscu na witrynie.
Kiedy potrzebny jest układ siatki dla WordPressa?
Każdy motyw WordPress obsługuje tradycyjny pionowy układ wpisów na blogu i sprawdza się to w przypadku większości rodzajów witryn internetowych. Układ ten może jednak zajmować dużo miejsca, zwłaszcza jeśli masz dużo wpisów.
Jeśli tworzysz własną stronę główną dla swojej witryny, możesz użyć układu siatki do wyświetlania ostatnich wpisów.
Dzięki temu zyskasz więcej miejsca na dodanie innych elementów do twojej strony głównej.
Dodatkowo, siatka wpisów wyróżni twoje wyróżniające się obrazki, dzięki czemu będzie atrakcyjna wizualnie i klikalna. Możesz także użyć siatki wpisów, aby zaprezentować swoje kreatywne portfolio i inne typy treści własnych.
Wiele motywów magazynowych i fotograficznych wykorzystuje już układ oparty na siatce do wyświetlania wpisów. Jeśli jednak twój motyw nie obsługuje tej funkcji, musisz ją dodać.
Powiedziawszy to, pokażmy, jak wyświetlić twoje wpisy WordPress w układzie siatki. Wystarczy skorzystać z poniższych odnośników, aby przejść bezpośrednio do wybranej metody.
- Tworzenie układu siatki za pomocą edytora bloków WordPress
- Tworzenie układu siatki za pomocą wtyczki Post Grid
- Tworzenie układu siatki za pomocą kreatora stron SeedProd
- Tworzenie układu siatki poprzez dodanie kodu do WordPressa
Film instruktażowy
Jeśli wolisz pisemne instrukcje, czytaj dalej.
Metoda 1. Utwórz układ siatki wpisów WordPress za pomocą edytora bloków
Ta metoda pozwala po prostu wyświetlić twoje wpisy i miniaturki w układzie siatki wpisów za pomocą edytora bloków WordPress. Istnieje wbudowany blok siatki wpisów, który pozwala stworzyć twoją własną siatkę.
Aby to zrobić, otwórz stronę, którą chcesz edytować, a następnie kliknij przycisk dodawania bloku “Plus” i wyszukaj “Query Loop”, a następnie kliknij blok zapytania, aby go dodać.
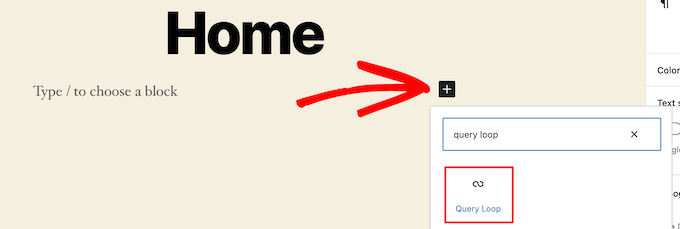
Ten blok dodaje twoją pętlę wpisów do strony.
Następnie kliknij opcję “Start Blank” u góry bloku, aby utworzyć siatkę wpisów.

Daje to kilka różnych możliwości wyboru w zależności od rodzaju informacji, które chcesz wyświetlić za pomocą siatki wpisów.
Wybierzemy opcję “Obrazek, data i tytuł”, ale możesz wybrać cokolwiek chcesz.

Następnie najedź kursorem na obrazek i wybierz opcję “Widok siatki”.
Zmieni to twoją listę w siatkę wpisów.

Następnie można dostosować informacje, które mają być wyświetlane.
Najpierw usuniemy paginację na dole bloku. Aby to zrobić, po prostu kliknij na nią i kliknij menu opcji “Trzy kropki”.
Następnie kliknij “Usuwanie paginacji”.

Spowoduje to automatyczne usuwanie elementu z bloku.
Możesz usunąć daty z wpisów w ten sam sposób lub pozostawić więcej informacji o wpisach dla Twoich odwiedzających.
Następnie dodamy odnośniki zarówno do miniaturki wpisu, jak i jego tytułu.
Wystarczy kliknąć miniaturkę twojego wpisu i włączyć przełącznik “Odnośnik do wpisu” w prawym panelu opcji.

Następnie zrób to samo dla tytułu twojego wpisu.
Gdy skończysz, kliknij przycisk “Aktualizuj” lub “Opublikuj”, aby Twój wpis stał się aktywny.
Teraz możesz przejść na swoją witrynę internetową WordPress, aby zobaczyć nową siatkę wpisów WordPress.

Możesz dodać ten blok do dowolnej strony lub wpisu. Jeśli chcesz użyć go jako strony archiwum twojego bloga, zapoznaj się z naszym przewodnikiem na temat tworzenia osobnej strony dla wpisów na blogu w WordPress.
Metoda 2. Utwórz układ siatki wpisów WordPress za pomocą wtyczki Post Grid
Ta metoda oferuje prosty sposób na dodanie konfigurowalnej siatki wpisów, którą możesz dodać w dowolnym miejscu na twojej witrynie internetowej.
Pierwszą rzeczą, którą musisz zrobić, to zainstalować i włączyć wtyczkę Post Grid. Aby uzyskać więcej informacji, zapoznaj się z naszym przewodnikiem na temat instalacji wtyczki WordPress.
Po włączaniu należy przejść na stronę Post Grid ” Add New, aby utworzyć twój pierwszy wpis.
Następnie nadaj tytuł twojemu wpisowi. Nie pojawi się on nigdzie na twojej stronie, a jedynie pomoże ci go zapamiętać.

Poniżej znajdują się ustawienia siatki wpisów podzielone na różne sekcje z wieloma kartami.
Najpierw należy kliknąć kartę “Query Post”. To tutaj zdefiniujesz typy treści, które chcesz wyświetlić w polu “Typy wpisów”.
Domyślnie wyświetla tylko wpisy, ale można dodać strony, a nawet własne typy treści.

Następnie należy kliknąć kartę “Układy”.
Następnie kliknij przycisk “Utwórz układ”. Zostanie on otwarty w nowym oknie.

Musisz nadać nazwę twojemu układowi. Następnie kliknij opcję “Ogólne”, a otworzy się lista tagów.
Tagi te są informacjami, które będą wyświetlane w siatce Twoich wpisów.

Wybierzemy opcję “Miniaturka z odnośnikiem” oraz opcję “Tytuł wpisu z odnośnikiem”.
Następnie kliknij “Opublikuj” lub “Aktualizuj”, aby zapisać twój układ.

Teraz wróć do oryginalnego edytora siatki wpisów w poprzedniej karcie, a dostępna będzie nowa opcja układu, którą możesz wybrać.
Wystarczy kliknąć nowy układ w sekcji “Układy elementów” u dołu ekranu.

Następnie kliknij kartę “Styl elementu”. Tutaj możesz ustawić rozmiar twojej siatki.
Domyślne ustawienia powinny działać dla większości witryn, ale jeśli nie, to można je zmienić tutaj.

Gdy skończysz, kliknij przycisk “Opublikuj” u góry strony, a twoja siatka będzie gotowa do dodania do twojego bloga WordPress.
Teraz należy kliknąć kartę “Shortcode”, a następnie skopiować krótki kod w polu “Post Grid Shortcode”.

Następnie otwórz stronę, na której chcesz wyświetlić twoją listę zablokowanych wpisów i kliknij przycisk dodawania bloku “Plus”.
Następnie wyszukaj “Krótki kod” i wybierz blok “Krótki kod”.

Następnie wklej skopiowany wcześniej krótki kod do pola.
Następnie kliknij przycisk “Aktualizuj” lub “Opublikuj”.

Teraz możesz zobaczyć swoją stronę, aby zobaczyć układ siatki wpisów WordPress na żywo.

Metoda 3. Utwórz układ siatki wpisów WordPress za pomocą wtyczki SeedProd Page Builder
Innym sposobem na utworzenie układu siatki wpisów jest użycie wtyczki do tworzenia stron SeedProd. Jest to najlepszy na rynku kreator stron WordPress typu “przeciągnij i upuść “, z którego korzysta ponad milion witryn internetowych.
SeedProd pomaga w łatwym tworzeniu własnych stron, a nawet całkowicie niestandardowych motywów WordPress bez pisania jakiegokolwiek kodu. Za pomocą wtyczki można tworzyć dowolne strony, takie jak strony 404, strony wkrótce dostępne, strony docelowe i inne.
Aby dowiedzieć się więcej, zapoznaj się z naszym przewodnikiem na temat tworzenia własnej strony w WordPress.
W kreatorze SeedProd, podczas konfigurowania własnej strony, wystarczy kliknąć przycisk plus “Dodaj sekcję” w dowolnym miejscu na stronie.
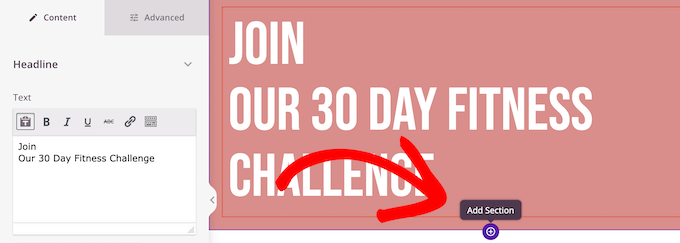
Spowoduje to wyświetlenie opcji utworzenia nowego bloku.
Następnie przeciągnij blok “Wpisy” na swoją stronę, co spowoduje automatyczne dodanie listy wpisów do twojej strony.

Teraz możesz dostosować ten blok za pomocą panelu opcji po lewej stronie.
Najpierw przewiń w dół do sekcji “Układ”. Tutaj możesz ustawić liczbę kolumn dla siatki wpisów na twoim blogu i włączyć przełączniki “Pokaż obrazek wyróżniający” i “Pokaż tytuł”.
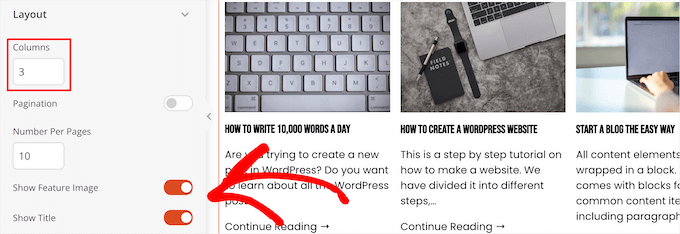
Następnie przewiń w dół do przełączników “Pokaż zajawkę” i “Pokaż Dowiedz się więcej” i wyłącz je, aby utworzyć prosty układ siatki wpisów na blogu.

Jeśli chcesz dostosować schemat kolorów, tekst i inne elementy, kliknij kartę “Zaawansowane” u góry lewej kolumny.
Następnie kliknij menu rozwijane “Tekst” i wprowadź swoje zmiany.

Możesz dowolnie konfigurować układ twojej strony i wpisów na blogu.
Po zakończeniu kliknij przycisk “Zapisz” i wybierz opcję “Opublikuj” u góry strony, aby wprowadzić twoje zmiany.
Teraz możesz zobaczyć nową siatkę wpisów na swojej witrynie internetowej.

Metoda 4. Tworzenie układu siatki wpisów WordPress poprzez dodanie kodu do WordPressa
Ta metoda wymaga podstawowej wiedzy na temat dodawania kodu do WordPressa. Jeśli nie robiłeś tego wcześniej, zapoznaj się z naszym przewodnikiem na temat kopiowania i wklejania kodu w WordPress.
Zanim utworzysz kod, musisz utworzyć nowy rozmiar obrazka, który będzie używany w siatce twojego wpisu. Aby dowiedzieć się więcej, zapoznaj się z naszym przewodnikiem na temat tworzenia dodatkowych rozmiarów obrazków w WordPress.
Następnie musisz znaleźć odpowiedni plik motywu WordPress, w którym dodasz fragment kodu. Na przykład, możesz dodać go do pliku single.php, aby pojawiał się na dole wszystkich twoich wpisów.
Możesz także utworzyć własny szablon strony i użyć go do wyświetlania układu siatki Twoich wpisów na blogu z miniaturkami.
Aby dowiedzieć się więcej, zobacz naszą ściągawkę z hierarchii szablonów WordPress, która pomoże znaleźć odpowiedni plik szablonu motywu.
Gdy już to zrobisz, możesz zacząć dodawać kod do WordPressa. Ponieważ fragment kodu jest dość długi, podzielimy go na sekcje.
Najpierw dodaj następujący fragment kodu do pliku szablonu twojego motywu.
1 2 3 4 5 6 7 8 9 10 11 12 | <?php$counter = 1; //start counter $grids = 2; //Grids per row global $query_string; //Need this to make pagination work /*Setting up our custom query (In here we are setting it to show 12 posts per page and eliminate all sticky posts*/query_posts($query_string . '&caller_get_posts=1&posts_per_page=12'); if(have_posts()) : while(have_posts()) : the_post();?> |
Ten fragment kodu ustawia zapytanie pętli wpisów. Jeśli chcesz, możesz zmienić zmienną “wpisy_na_stronę”, aby wyświetlić więcej wpisów na stronę.
Następnie dodaj następujący fragment kodu do pliku szablonu twojego motywu.
1 2 3 4 5 6 7 8 9 10 11 12 13 14 15 16 17 18 19 20 21 22 23 24 25 | <?php//Show the left hand side columnif($counter == 1) :?> <div class="griditemleft"> <div class="postimage"> <a href="<?php the_permalink(); ?>" title="<?php the_title_attribute(); ?>"><?php the_post_thumbnail('category-thumbnail'); ?></a> </div> <h2><a href="<?php the_permalink(); ?>" title="<?php the_title_attribute(); ?>"><?php the_title(); ?></a></h2> </div><?php//Show the right hand side columnelseif($counter == $grids) :?><div class="griditemright"> <div class="postimage"> <a href="<?php the_permalink(); ?>" title="<?php the_title_attribute(); ?>"><?php the_post_thumbnail('category-thumbnail'); ?></a> </div> <h2><a href="<?php the_permalink(); ?>" title="<?php the_title_attribute(); ?>"><?php the_title(); ?></a></h2> </div><div class="clear"></div><?php$counter = 0;endif;?> |
Ten fragment kodu tworzy dwie kolumny dla naszych wpisów i wyświetla tytuł oraz obrazek wpisu. Tworzy on również klasę CSS, której styl pokażemy później.
Odwołuje się również do “postimage”, więc musisz zmienić to na nazwę rozmiaru obrazka, który utworzyłeś wcześniej.
Następnie dodaj na końcu następujący fragment kodu.
1 2 3 4 5 6 | <?php$counter++;endwhile;//Post Navigation code goes hereendif;?> |
Ten fragment kodu po prostu zamyka pętlę. Daje również możliwość dodania nawigacji po wpisie, ale większość właścicieli witryn internetowych używa do tego innej wtyczki, więc nie uwzględniliśmy jej, aby uniknąć konfliktów kodu.
Oto jak wygląda końcowy fragment kodu.
1 2 3 4 5 6 7 8 9 10 11 12 13 14 15 16 17 18 19 20 21 22 23 24 25 26 27 28 29 30 31 32 33 34 35 36 37 38 39 40 41 42 43 44 45 46 47 | <div id="gridcontainer"><?php$counter = 1; //start counter $grids = 2; //Grids per row global $query_string; //Need this to make pagination work /*Setting up our custom query (In here we are setting it to show 12 posts per page and eliminate all sticky posts) */query_posts($query_string . '&caller_get_posts=1&posts_per_page=12'); if(have_posts()) : while(have_posts()) : the_post(); ?><?php//Show the left hand side columnif($counter == 1) :?> <div class="griditemleft"> <div class="postimage"> <a href="<?php the_permalink(); ?>" title="<?php the_title_attribute(); ?>"><?php the_post_thumbnail('category-thumbnail'); ?></a> </div> <h2><a href="<?php the_permalink(); ?>" title="<?php the_title_attribute(); ?>"><?php the_title(); ?></a></h2> </div><?php//Show the right hand side columnelseif($counter == $grids) :?><div class="griditemright"> <div class="postimage"> <a href="<?php the_permalink(); ?>" title="<?php the_title_attribute(); ?>"><?php the_post_thumbnail('category-thumbnail'); ?></a> </div> <h2><a href="<?php the_permalink(); ?>" title="<?php the_title_attribute(); ?>"><?php the_title(); ?></a></h2> </div><div class="clear"></div><?php$counter = 0;endif;?><?php$counter++;endwhile;//Pagination can go here if you want it.endif;?></div> |
Teraz musisz dodać następujący CSS do twojej witryny, aby upewnić się, że siatka wpisów będzie się ładnie wyświetlać.
Jeśli jeszcze tego nie zrobiłeś, zapoznaj się z naszym przewodnikiem na temat tego, jak łatwo dodać własny CSS do twojej witryny WordPress.
1 2 3 4 5 6 7 8 9 10 11 12 13 14 15 16 17 18 19 20 | #gridcontainer{ margin: 20px 0; width: 100%; }#gridcontainer h2 a{ color: #77787a; font-size: 13px;}#gridcontainer .griditemleft{ float: left; width: 278px; margin: 0 40px 40px 0;}#gridcontainer .griditemright{ float: left; width: 278px;}#gridcontainer .postimage{ margin: 0 0 10px 0;} |
Możesz modyfikować różne selektory CSS, aby zobaczyć, jak zmieniają one różne elementy twojego wpisu.
Mamy nadzieję, że ten artykuł pomógł ci dowiedzieć się, jak wyświetlać twoje wpisy WordPress w układzie siatki. Zachęcamy również do zapoznania się z naszym przewodnikiem na temat wyboru najlepszego oprogramowania do projektowania stron internetowych oraz naszym wyborem najlepszych programów do czatu na żywo dla małych firm.
If you liked this article, then please subscribe to our YouTube Channel for WordPress video tutorials. You can also find us on Twitter and Facebook.


Rachel
I tried to do this under ‘posts’ for my blog that has already been created. It didn’t work.
WPBeginner Support
You would want to ensure you have multiple blog posts published live on your site for them to be visible as the most common reason for that issue.
Admin
julie
Hi
I have tried this on my static homepage but it is not working.
Do I just add the one shortcode or both ( ie the php code also?)
using make theme.
do i just add it to the page as a paragraph and shortcode?
thanks
julie
WPBeginner Support
You should only need to add the shortcode to the page, if you reach out to the plugin’s support they should be able to let you know why it is not displaying properly
Admin
Paige
Is there a way to customize the thumbnails? I have mine set to the featured image, however some are different sizes and are cut off in the wrong areas.
WPBeginner Support
In the layout settings, you should be able to customize the display of the featured iamges
Admin
Lisa
I’m following all the steps to set this grid up on my homepage but it’s not displaying. I created a page, added the short code, and under settings–>reading I set my homepage to static with that page. What am I doing wrong?
p.s. I purchased a child theme (Foodie Pro), could that be my issue? Thanks!
WPBeginner Support
There may be a page template that could be causing a display issue, if you reach out to Post Grid’s support they should be able to help have it display properly
Admin
Jess
This was GREAT!!! Thankyou! I was able to apply this for my main blog page however I also have navigation for the different categories within my blog. How can I make it so that each of these category pages also displays as a grid?
Lu
I installed this plugin but my WordPress site have been automatically updated to Gutenberg and now a box appears in all my WordPress Post pages, covering the content so I can’t see it! The only way I can get rid of it is to de-install Post Grid. Anyone have any other ideas so I can use the Post Grid? Thanks for any help! L
Robert
I have the page set up but I have 5 posts that I did before that are not showing up on the new Post Grid.
How do I get the posts to show up on the grid?
Travenjo
Can anyone help me to have page grid and (not post grid) for my pages. How ro customize?
Hector
I’m using the Twenty Fourteen theme and this only gave me one option for layout instead of what you are showing and the one they let me use is a double but it just doesn’t work even the pagination got stuck on me so I don’t know what to do,is there a better plugin for my theme?
Aurangzaib
What a simple solution, i understand WP and PHP on a good level and this is the smartest and easiest solution to make a grid of posts and fetch them up from the DB, although the need is pretty rare if you are willing to make a different page for any purpose otherwise there are themes that have built-in support of many kinds of grids designs i customized and designed a bit on my web there at simspk.com, also keeping simple and clean content is the simplest way to achieve better ranks, Great post bro, keep them up!
Daniel Grove
What about for blog category pages? They just get listed vertically in my theme and it looks lame and wastes so much space! I want it to grid them just like the home blog page does.
Jess
Meeeee tooooo!!!!! Following to see if there is a response…..
WPBeginner Support
Hey Daniel and Jess,
The plugin’s premium version claims to have the option to create post grid for category archive pages. We didn’t test the premium version for the article. Please check the plugin website to learn more before buying.
Admin
Lori
I have the Dara theme with the Premium plan, and I am VERY NEW. Unfortunately, I just realized that plug-ins are only available with the Business plan, which I cannot afford to invest in at this time since it would triple my cost. Dara has a grid page option, but it only allows child pages to be displayed – I want POSTS to display from a specific category. Looks like I would have to create a static child page every time I want new content to appear in this Premium plan Dara grid page option, right??
WPBeginner Support
Hi Lori,
You can start with a self-hosted WordPress.org website which allows you to install plugins out of the box.
Admin
Carl
This is great but is this same process possible WITHOUT installing a plugin. How do you shows 10 different category separately? How select images for grid?
Brianna
This is awesome! Is there a way to edit from two across ( 2 columns) to three or four? When I change the settings to 20 posts a page, I am getting 2 columns and 10 rows.
Dale Kevin
Hi, I followed all the steps but it doesnt work. The page where I posted the shortcode of postgrid doesnt show up as my how page. Whats wrong? Maybe the Php code is needed?
I need you guidance. Thank you. I appreciate you response
Mr Thanh
Hi, that’s great plugin.
But i can’t creat a grid with three colums, only two colums.
How can i?
Holly
Hi,
I’ve used this plugin on all the sites i’ve created, i love it its so easy to use but im having a problem with the layout a little bit. Im using Layout 1 with 4 Columns and for some reason a row splits into two different rows, how do i stop this from happening?
Dee
Hello there. This was very helpful thank you. It works fine on the front page of my blog but wouldn’t work in the categories. Whenever a category is clicked in the header, the page shows the theme grid and not the Post Grid. How do I go about this? What page do I copy the code into please?
Thank you
DEE
Can anyone help with this please
Liah
My current theme doesn’t have the grid layout for the blog section. I’ve download the plugin and it works great but when I upload a new blog post does it automatically update the grid to include the latest post? Thank you for the super helpful video!
WPBeginner Support
Hi Liah,
Yes it will automatically update the grid.
Admin
Leanne
I’m trying to make the blog section of my site look nicer here – is there a way to automatically style the current blog posts in a grid rather than creating a new page and adding shortcode or editing php files?
WPBeginner Support
Hey Leanne,
You’d need to look for a WordPress theme that automatically displays your blog posts in a grid layout.
Admin
Joseph
Hi Thank you for the nice Article. Is there any way to make the same without plugin. If so how could i ?
Thanks
leighton
I want to use this but i am confused, I follow it but I dont see anything, I copy the shortcode but still nothing, do I have to upload images and text? can someone help?
Shahid
Great Article, just wanted to know if we can add post excerpt length in this plugin?
mike
This is cool for pages only. What if my posts belong under categories only. How do I add the shortcode to category archive. Thanks
Henry
This is just fine for pages! Still can’t figure how it works for posts! Someone help pls.
Dave Parks
I finally found “Taxonomy” setting on the plugin homepage – available if you buy the premium.
Which means the freebee is of zero value.
Dave Parks
The only category setting I see is
“Exclude by post ID
you can exclude post by ID, comma(,) separated”
With all due respect to the creator of this plugin, there’s no way I’m going input all the IDs I do not want to appear. The list is too long, and it will grow as I develop this site.
So is there some place to put in the one ID that I want to appear?
Tina Davidson
Hi – I finally have my blog up and running – yay! But want to add a store element to it. A “Shop Now” page. Do you think this its the best type of plug-in to use or is the one more efficient for a store set-up? Thanks so much! Tina
hasan
thanks for good knowledge
my website has two kinds of contents : post and pages.
can i add my new pages on homepage automatically without using widgets?
thanks again
Karthik
hi thanks for kind info,
please help me how to filter post by categories
hasan
thank you for good knowledge
i use a theme support magazine template on my site but it includes only posts .
how can i use this template for pages also not only posts ?
thanks again
WPBeginner Support
Please contact theme developer they will be able to help you better.
Admin
anil singh
thanks who do not know php and how to cutomize homepage this article will be helpful. i have one question which i searched all the web but not find any article. quetion is how can custmize homepage with category list without showing post area in homepage please make article for it . you can see example on freejobalert.in
judit
Will this pluggin work on wordpress.com?
WPBeginner Support
Please see our guide on the difference between self hosted WordPress.org vs free WordPress.com blog.
Admin
Tonia
Hi – i see an image in your blog article, does this support featured content image ?
natalie james
Thank you so much for this article, it is as though you were reading my mind and my wish list for my blog. I was easily able to follow your step by step instructions until the very end. Im not sure how to put my query correctly, I think what Im trying to say is that I would like the grid page to be my landing page of my blog. At the moment it is inside a post with a post heading. You do mention at the end that I can past the code into my themes file but unfortunately I dont know where that is. Hope this makes sense and I look forward to your reply.
thanks
Natalie
Paul Wandason
Hi Natalie,
I maybe wrong here – but I think you need to create a *page* with the grid on it, then if you go to “settings” then “reading” in the wordpress admin dashboard, you can set “Front page displays” to a static page, and select the page you’ve just created with the grid on it under the “front page” drop down menu.
Hope this helps, and good luck!
Paul