Wtyczka specyficzna dla witryny umożliwia łatwe dodawanie fragmentów kodu do witryny WordPress bez polegania na motywie. Pozwala to na użycie niestandardowego kodu w celu ulepszenia witryny i nie martwienia się o konieczność przerabiania wszystkiego, gdy motyw zostanie zaktualizowany.
W WPBeginner stworzyliśmy wiele wtyczek specyficznych dla witryny, aby dodać krótkie kody, nowe typy postów i inne funkcje do naszej witryny w przeszłości. Ponadto pomogliśmy naszym klientom rozpocząć korzystanie z wtyczek specyficznych dla witryny.
W tym artykule wyjaśnimy, jak utworzyć wtyczkę WordPress dla witryny i dlaczego jest to ważne.

Czym jest wtyczka WordPress specyficzna dla witryny?
Wtyczka WordPress specyficzna dla witryny to samodzielna wtyczka, której można użyć do dodania wszystkich fragmentów kodu konfiguratora, które nie są zależne od motywu.
Podczas pracy nad witryną często można znaleźć poradniki WordPress z prośbą o dodanie kodu do pliku functions.php motywu lub wtyczki specyficznej dla witryny.
WordPress nie jest dostarczany z wtyczką specyficzną dla witryny. Będziesz musiał stworzyć swoją własną, a następnie zainstalować ją i włączać.
Dlaczego warto stworzyć wtyczkę WordPress dla witryny?
Jak wspomnieliśmy wcześniej, często można natknąć się na poradniki pokazujące kod, który można dodać do pliku functions.php motywu lub wtyczki specyficznej dla witryny.
Te niestandardowe kody mogą być używane do dodawania nowych typów postów, taksonomii, krótkich kodów i mnóstwa hacków w celu ulepszenia witryny.
Jeśli dodasz własny kod do pliku funkcji motywu, zniknie on po aktualizacji lub zmianie twojego motywu.
Możesz utworzyć motyw potomny i użyć pliku funkcji motywu potomnego, aby zapisać twój kod. Twój kod zniknie jednak po zmianie motywu.
Wtyczka WordPress specyficzna dla witryny umożliwia łatwe dodawanie własnych fragmentów kodu do twojej witryny internetowej WordPress i upewnienie się, że są one niezależne od motywu. Jest to samodzielna wtyczka WordPress, co oznacza, że nie zależy od twojego motywu i możesz swobodnie aktualizować lub zmieniać swój motyw.
W związku z tym przyjrzyjmy się, jak łatwo dodać własny kod za pomocą wtyczki witrynowej. Pokażemy ci dwa sposoby, aby to zrobić i możesz wybrać metodę, która najbardziej ci odpowiada (wskazówka: metoda nr 2 jest łatwiejsza dla początkujących).
Metoda 1: Ręczne utworzenie wtyczki WordPress dla witryny
Wiemy, że dla początkujących może to brzmieć nieco geekowsko, ale postaramy się uczynić to tak prostym, jak to tylko możliwe.
Najpierw należy utworzyć nowy katalog na pulpicie i nazwać go nazwą twojej witryny internetowej. Na przykład: mywebsite-plugin.
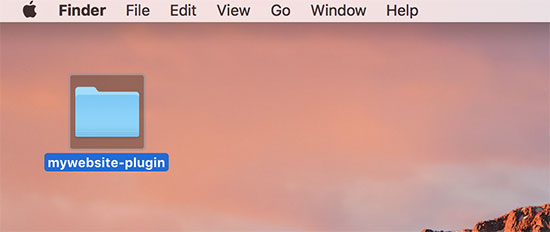
Teraz otwórz zwykły edytor tekstu na twoim komputerze, taki jak Notatnik lub TextEdit.
Musisz utworzyć nowy plik i zapisać go jako mywebsite-plugin.php w katalogu wtyczek na twoim pulpicie.
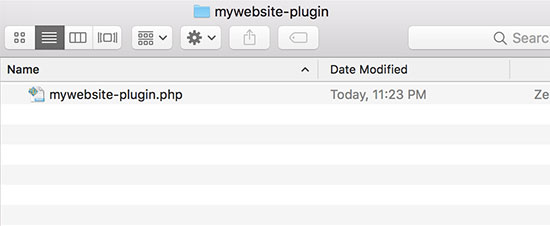
Twój plik wtyczki potrzebuje specjalnego kodu nagłówka, aby WordPress mógł rozpoznać go jako wtyczkę. Dodaj następujący kod do twojego pliku mywebsite-plugin.php:
1 2 3 4 5 6 7 8 9 | <?php/*Plugin Name: Site Plugin for example.comDescription: Site specific code changes for example.com*//* Start Adding Functions Below this Line *//* Stop Adding Functions Below this Line */?> |
Możesz zastąpić example.com twoją własną nazwą domeny. Gdy to zrobisz, twoja wtyczka specyficzna dla witryny jest gotowa.
Istnieją dwa sposoby na wgranie twojej wtyczki do witryny internetowej. Możesz przesłać ją za pośrednictwem twojego panelu administracyjnego WordPress lub użyć FTP.
1. Zainstaluj wtyczkę specyficzną dla witryny z obszaru administracyjnego WordPress (zalecane)
Ta metoda jest łatwiejsza i zalecana dla wszystkich użytkowników.
Po pierwsze, musisz utworzyć plik zip katalogu wtyczek dla twojej witryny.
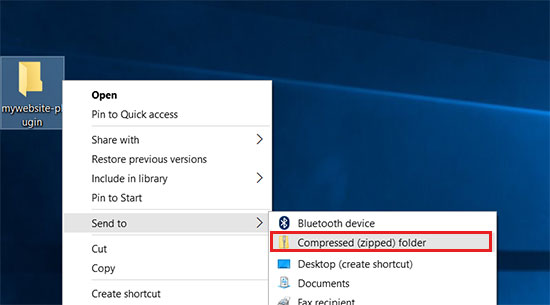
Użytkownicy systemu Windows mogą po prostu kliknąć prawym przyciskiem myszy katalog z wtyczką i wybrać opcję Wyślij do katalogu ” Skompresowane (zip).
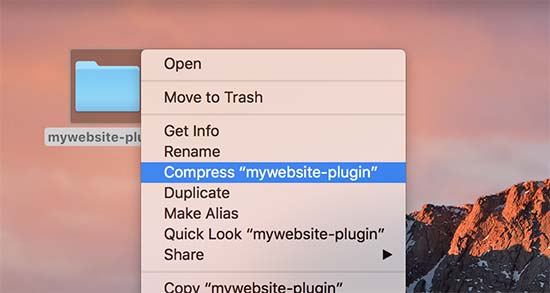
Użytkownicy komputerów Mac muszą kliknąć prawym przyciskiem myszy.
Następnie wybierz opcję “Compress mywebsite-plugin”.
Gdy masz już plik zip wtyczki, przejdź do strony Wtyczki ” Dodaj nowy w obszarze administracyjnym WordPress.
Następnie kliknij przycisk “Prześlij wtyczkę” na górze.
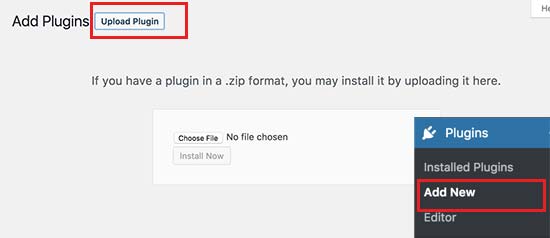
Następnie kliknij przycisk “Wybierz plik”, aby wybrać utworzony wcześniej plik zip, a następnie kliknij przycisk “Zainstaluj teraz”.
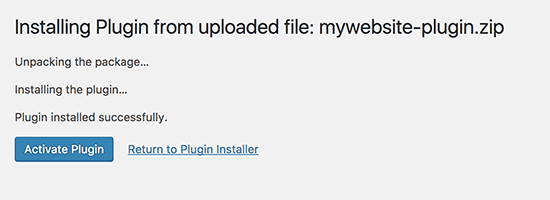
WordPress załaduje i zainstaluje teraz wtyczkę. Po przesłaniu wtyczki należy kliknąć przycisk “Włączanie wtyczki”, aby rozpocząć korzystanie z wtyczki specyficznej dla Twojej witryny.
2. Wgranie wtyczki WordPress dla twojej witryny przez FTP
W przypadku tej metody nie trzeba tworzyć pliku zip. Wtyczka zostanie przesłana przez FTP.
Najpierw musisz połączyć się z twoją witryną internetową za pomocą klienta FTP.
Po nawiązaniu połączenia należy przejść do katalogu /wp-content/plugins/ w kolumnie witryny zdalnej. Następnie należy wybrać katalog z wtyczkami dla twojej witryny i przesłać go do witryny internetowej.
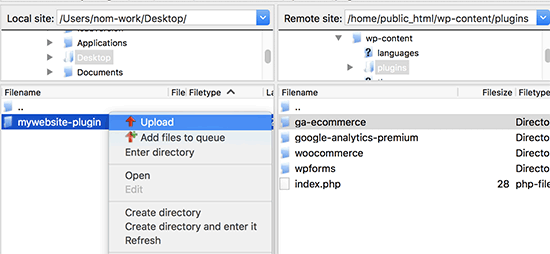
Twój klient FTP przeniesie teraz katalog z wtyczką specyficzną dla witryny do witryny internetowej WordPress. Spowoduje to zainstalowanie wtyczki na twojej witrynie internetowej.
Jednak nadal będziesz musiał włączać wtyczkę, aby zacząć z niej korzystać. Możesz to zrobić, przechodząc do strony “Wtyczki” w obszarze administracyjnym WordPress, a następnie klikając odnośnik “Włącz” pod twoją witryną.

To wszystko. Twoja witrynowa wtyczka jest teraz gotowa do użycia.
Dodawanie własnych fragmentów kodu do twojej witrynowej wtyczki
Istnieją dwa sposoby edytowania twojej wtyczki i dodawania do niej własnych fragmentów kodu.
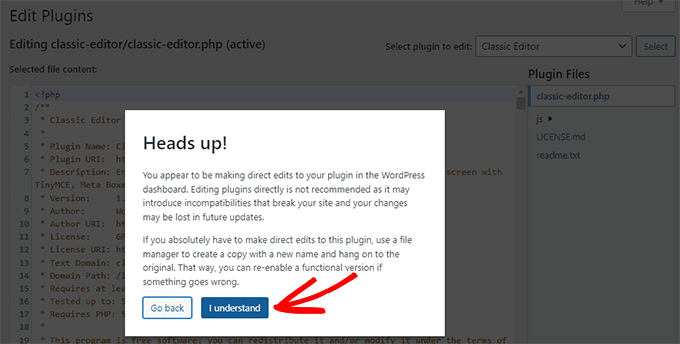
Pierwszą metodą jest zrobienie tego za pośrednictwem obszaru administracyjnego WordPress. Możesz przejść do strony Wtyczki ” Edytor.
Zobaczysz komunikat ostrzegawczy i musisz kliknąć przycisk “Rozumiem”, aby kontynuować. Alternatywnie, jeśli chcesz bezpieczniej edytować pliki, przejdź do drugiej metody poniżej.
Następnie należy wybrać twoją witrynową wtyczkę z rozwijanego menu oznaczonego “Wybierz wtyczkę do edycji”.
Edytor będzie wczytywał twój plik wtyczki i będziesz mógł dodawać do niego fragmenty kodu.
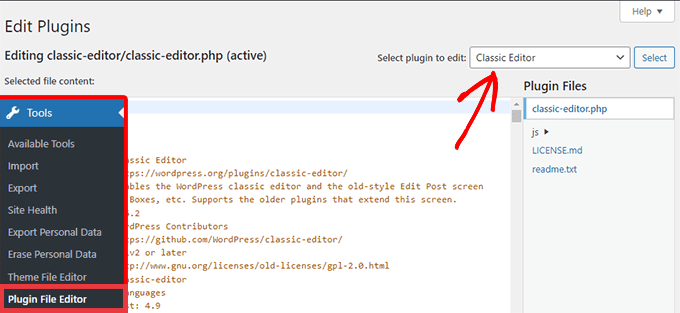
Po zakończeniu kliknij przycisk “Aktualizuj plik”, aby zapisać twoje zmiany.
Jeśli w twoim kodzie czegoś brakuje lub może on potencjalnie zepsuć twoją witrynę internetową, to edytor wtyczek automatycznie cofnie wprowadzone zmiany.
Jeśli jednak edytor zawiedzie i zobaczysz biały ekran śmierci, możesz użyć FTP do edycji twojego pliku wtyczki i cofnąć te zmiany.
Drugą metodą jest bezpośrednia edycja pliku wtyczki za pomocą FTP. Wystarczy przejść do katalogu wtyczki za pomocą twojego klienta FTP. Kliknij prawym przyciskiem myszy plik wtyczki, a następnie wybierz “Zobacz/Edytuj”.
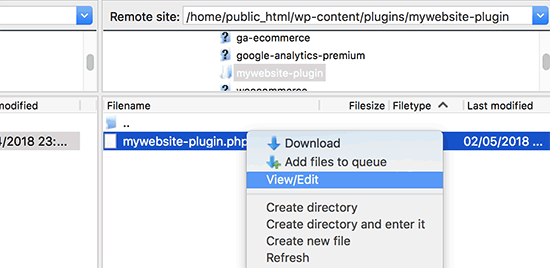
Możesz również pobrać plik wtyczki na twój komputer, edytować go, a następnie przesłać z powrotem.
Metoda 2: Dodanie własnego konfiguratora za pomocą WPCode (zalecane)
Ta metoda jest o wiele prostsza i daje lepszy sposób na zarządzanie twoimi indywidualnymi fragmentami kodu w WordPressie za pomocą WPCode.
Pierwszą rzeczą, którą musisz zrobić, to zainstalować i włączyć darmową wtyczkę WPCode na twojej witrynie internetowej. Aby uzyskać więcej informacji, zobacz nasz przewodnik krok po kroku, jak zainstalować wtyczkę WordPress.
Powiązany post: Aby uzyskać więcej informacji, zapoznaj się z naszą pełną recenzją WPCode.
Po włączaniu wtyczka doda nowy element menu o nazwie “Fragmenty kodu” do twojego menu administratora WordPress. Kliknięcie na nią przeniesie Cię na stronę, na której możesz zarządzać wszystkimi Twoimi własnymi konfiguratorami.
Aby dodać twój pierwszy fragment kodu, kliknij przycisk “Dodaj nowy”.
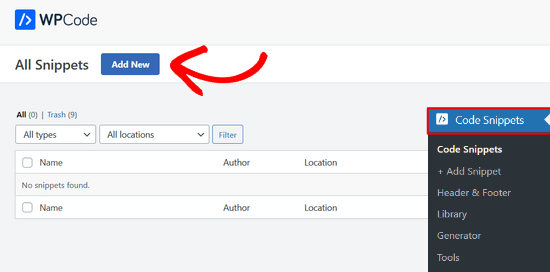
Spowoduje to przejście do strony “Dodaj fragment kodu”. Tutaj możesz wybrać fragment kodu z gotowej biblioteki lub dodać swój własny kod.
Aby dodać własny kod, przejdź do opcji “Add Your Custom Code (New Snippet)” i kliknij przycisk “Use snippet”.
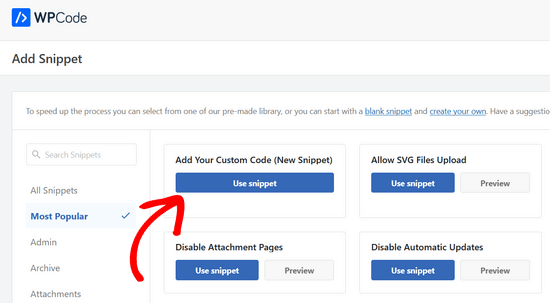
Teraz możesz wpisz tytuł dla własnego fragmentu kodu. Może to być cokolwiek, co pomoże zidentyfikować kod.
Następnie możesz wkleić fragment kodu do pola kodu. Musisz również wybrać typ “Fragment kodu PHP” z listy rozwijanej “Typ kodu” po prawej stronie.
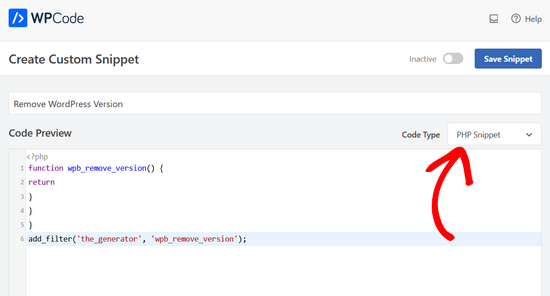
Możesz także dodać uwagi do kodu w sekcji “Podstawowe informacje”.
Powinieneś użyć tego obszaru, aby zapisać, co robi ten kod, gdzie go znalazłeś i dlaczego dodajesz go do swojej witryny internetowej. Pomoże to “przyszłym użytkownikom” zapamiętać, dlaczego “poprzedni użytkownicy” dodali ten kod.
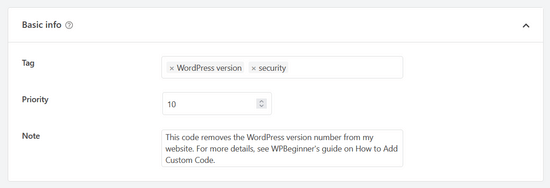
Masz również możliwość przypisania tagów do twoich fragmentów kodu, co może pomóc w uporządkowaniu fragmentów kodu według tematu i funkcjonalności.
Wtyczka pozwala również wybrać sposób uruchamiania fragmentu kodu. W sekcji “Insertion” można wybrać metodę “Auto Insert”, aby automatycznie wstawić i wykonać kod na twojej witrynie.
Możesz wybrać jedną z opcji w obszarze administracyjnym, front-end lub wszędzie. Jeśli nie masz pewności, zachowaj domyślną opcję “Uruchom wszędzie”.

Możesz też wybrać metodę “Krótki kod”. W przypadku tej metody fragment kodu nie jest wstawiony automatycznie. Po zapisaniu fragmentu kodu otrzymasz krótki kod, który możesz ręcznie wstawić w dowolnym miejscu na twojej witrynie.
Możesz także użyć sekcji “Inteligentna logika warunkowa”, aby pokazać lub ukryć automatycznie wstawione fragmenty kodu w oparciu o zestaw reguł.
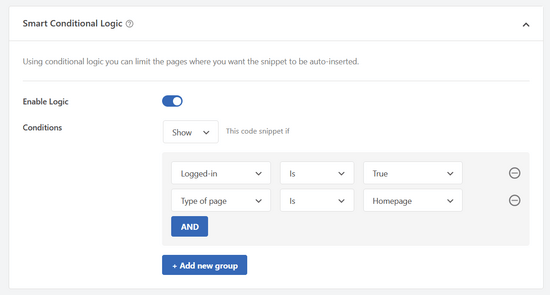
Można na przykład wczytywać fragmenty kodu tylko dla zalogowanych użytkowników, wczytywać fragmenty kodu PHP tylko pod określonymi adresami URL stron, wyświetlać fragmenty kodu na podstawie rodzaju strony i nie tylko.
Na koniec możesz przełączyć przełącznik z “Nieaktywny” na “Aktywny”, a następnie kliknąć przycisk “Zapisz fragment kodu”.
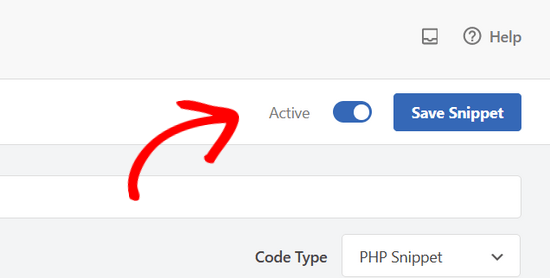
Jeśli chcesz zapisać fragment kodu bez włączania go, możesz kliknąć tylko przycisk “Zapisz fragment”.
Po zapisaniu i włączaniu fragmentu kodu, stanie się on automatycznie skuteczny na twojej witrynie internetowej, jeśli taką metodę wstawienia wybrałeś.
Więcej szczegółów można znaleźć w naszym przewodniku na temat łatwego dodawania własnych fragmentów kodu w WordPress.
Mamy nadzieję, że ten artykuł pomógł ci dowiedzieć się, dlaczego i jak stworzyć wtyczkę WordPress specyficzną dla witryny. Możesz również zapoznać się z naszą listą przydatnych wskazówek dotyczących plików funkcji i najbardziej poszukiwanych hacków WordPress, aby jak najlepiej wykorzystać twoją wtyczkę specyficzną dla witryny.
If you liked this article, then please subscribe to our YouTube Channel for WordPress video tutorials. You can also find us on Twitter and Facebook.


BSubra
Is it possible to add code snippets like Google Analytics Code, Adsense code in Site Specific Pliugin. Or only possible to add codes we generally put in functions.php file.
I mean, is it possible to add codes in site-specific plugin what we generally put in Header.php file.
WPBeginner Support
You can do that if you would like, you can also use the insert headers and footers plugin.
Admin
Bola Oussou
hi
Thanks for this tuto
however is there a way to make this plugging(not to be visible) not in plugging list and also in a specific folder (not wp-content folder) ?
Thanls
Tor-Bjorn Fjellner
Actually yes, there is:
Instead of placing the plugin in …/wp-content/plugins/ you put it in …/wp-content/mu-plugins/ (You may have to create that directory, if it’s not there yet.
Plugins that are placed in mu-plugins are ALWAYS run, so the only way to deactivate a MU plugin (MU currently is construed as “must use”) is to delete it (or remain the directly mu-plugins to something else…).
Judith
Hi I tried to do the Site-specific plugin, but it is not working, I get this message “The package could not be installed. No valid plugins were found.
Plugin installation failed.”
What do I do?
WPBeginner Support
Hi Judith,
This usually means that the plugin header information is incorrect. You can try again and make sure that your plugin header is exactly in the format displayed in the tutorial.
Admin
Jonathan Manheim
I get this same error. I have tried maybe 10 times. Uploaded through admin and on FTP. Cannot get it to upload. I am using TextEditor to paste the code. Notice several things you don’t mention in the post that I wonder could be an issue. First, won’t let me save the file as .php. I have to save it as .php.rtf OR .rtf then go back and rename the file after it is saved.
Second, not sure what you mean by making sure the format for the plugin header is exactly the same. Should the line number be in there? If so, I can’t get that to work. If I copy and paste with the line numbers, the green vertical line doesn’t show up and there is no space between the line numbers and the code. Or am I supposed to just copy the code (without the line numbers)? Either way, I’ve tried everything I can with my current Textedit application and it will not work.
Any ideas? I can send you screen shots of exactly what I have if you would like
WPBeginner Support
Hi Jonathan,
You will need to save file as .php. Please use a different text editor on Windows you can use Notepad or download Notepad++. On Mac, you can use TextEdit or download and install TextWrangler.
You don’t need to copy and paste line numbers.
Kacper
In my case the issue was that the file had Unicode encoding. Changing it to ANSI fixed the issue.
Ikram
Hi,
Good day!
Would like to know how to set a white paper in my blog post article to download it with add email address from the visitor.
Thanks, Ikram
WPBeginner Support
Hi Ikram,
You can do that with the pro version of WPForms. You will need at least Plus plan for that. After users enter their email address and click submit you can redirect them to the download page.
Admin
Alain Fradette
Great info! Thanks so much. I have been using WordPress for years and this little gem made it so much easier!
Abhijeet
I have edited some code in Style.css . Will it be overwritten if i update a theme?
is it possible to create style css file in this site specific plugin?
LFreitas
Yes, they will.
You should create a child theme and put your modifications there instead of in the original theme.
Read more: https://www.wpbeginner.com/glossary/child-theme/
dave
White screen on publishing pages.
The code works to show child pages on a parent page using the shortcode however I am getting white screen. Anyone know why?
Tommy
The plugin generated 3 characters of unexpected output during activation. If you notice “headers already sent” messages, problems with syndication feeds or other issues, try deactivating or removing this plugin.
Saurin
I believe best approach to add custom code to site is child theme. No matter if we need to customize theme or not. I mad a practice to always use child theme even if there is no customization. This habit saved my time & effort many times. I dont think it is good to create extra plugin for such customization.
I believe in minimum use of plugin no matter how simple you created one.
Jason
Which is better, site-specific plugin or Child Theme? or both?
I need to create a custom post type to add some major functionality to my site so is the plugin better or the child theme and its functions.php?
Thanks!
Josh
The thing is, is that you’re creating the plug-in yourself, using the functions the same exact way. So the answer to your question would be that neither is better, because you should be using them WITH each other.
Josh
Think of the site-specific plug-ins as functions that are independent of your theme.
Vickey
How would I create a create a new plugin directory in Azure? I have WordPress running on Azure using MS SQL Server, which I activated using Project NAMI.
vishal
not working on multisite with publisher theme can you help me this is my site and also tell me how can i remove featured image inside the post not from front page latest post
Nadia Khan
Hi there,
You WP Beginners are rock. and I want to thank you for your Struggles for us.
Now come to the point. I have installed an theme and in that theme, there is an function that is showing wp toolbar for guests, I have tried so many times to find this function in theme files to remove this, but i can’t. So please help me to remove that toolbar, that is showing to every visitor with wordpress logo and wordpress’s own link to their website. Screen Shot is attached.
Manuel
Does something like this work for plugins too? Im finding that I am making a few changes to plugins that I add to my site….many times deleting certain lines of code I dont want. I’m assuming that after I update that plugin, all my changes will be erased. How can I avoid this?
Elizabeth
Hi, thanks for the post. I’m getting an error when I activate the plugin for some reason:
Parse error: syntax error, unexpected ‘*’, expecting identifier (T_STRING) on line 9
Any ideas what I’ve done wrong?
Thanks!
WPBeginner Support
Hi Elizabeth,
There is an unexpected asterisk sign in the code on line 9 which is blocking the php script. Edit the file again and copy the code exactly as it is shown above. Make sure that you don’t copy line numbers in the code click on the Copy button at the top right corner of the code snippet box
.
Admin
Steven Denger
I tried naming the new folder as you did in the example but I got an error that said something in the way of you cannot use a name like this. This Instruction may be helpful to some – but it is very difficult and confusing to me and does not help at all. As I said – you need to explain this down to the fine details or otherwise these tutorals will not help. The name of this site is wp BEGINNER – and that is what I am. You project these tutorals to the more experienced.
I guess I will have to start going elswhere to get beginners instructiions because, most of time, wp beginner is not helpful – it is more like a techs only club.
Steven Denger
How do you get to the /wp-content/plugins/yoursitename-plugin/ in wordpress and upload a file there? I am lost on the first line of instruction. You guys always assume that we know these things in your instructions but they are not clear enough.
I went to cpanel and opened up the wpcontent > plugins – and it shows a list of plugins – but I am lost from this point. How do I go about uploading a file in here? I am a beginner – and you guys seem to always explain things like your instructing experienced techs. I am not but I go to WP Beginner to try to learn. It is usually difficult to follow your instructions and I end up having to go somewhere else in google search to find things explained down to a beginners level.
If you want to be more helpful try breaking things down a little more simple.
Manuel
Hey Steven,
I know the feeling! I’m far from a expert with wordpress and I pretty much live on google searches and this site trying to learn. I know a little bit and was able to get this to work. Send me your email and I’ll send you the steps with screenshots. I havent tested putting actual code into the plugin so we’ll see if that works….but I was able to see the newly created plugin on my admin page
Steven Denger
thank you manuel
NiceRazer
Hello, can you please tell me how to do that to? I’ve tried finding posts that would help me with this same prob but still didnt found it.
JoAnn Chateau
Thank you for the great advice and simple how-to instructions. I easily created a Site-Specific WordPress Plugin for my site and enabled shortcodes for widgets. Now I have less worry when changing themes, and I didn’t need to install another plugin. Again, thanks!
george
hi i followed the instruction on how to make a site plugin for my site. ive uploaded it but cant see it in my list of plugins.
any ideas why?
Dawn
I cannot find where the folders live in the plug in directory. I tried searching for: /wp-content/plugins/yoursitename-plugin/ (with my site name).
Kara
Never mind, I figured it out and got it activated. My hosting server was acting up, must have timed out or something…cheers!
Kara
I followed your instructions but i don’t know how to activate it. It doesn’t show in my list of plugind in my wp-admin. Can you help?
Sheyejinkazama
Thank you. Thank you so so much.
Molly
How do you get the plugin to “Network Activate” on a multi-site?