Każdego dnia pomagamy właścicielom witryn internetowych poprawiać ich wolno ładujące się strony za pośrednictwem WPBeginner. I prawie zawsze największy winowajca okazuje się ten sam: niezoptymalizowane obrazki pochłaniające cenną przepustowość i zasoby serwera.
Wyzwanie polega nie tylko na zmniejszaniu obrazków, ale także na robieniu tego bez zamieniania ich w pikselowy bałagan. Po tym, jak pomogliśmy niezliczonym właścicielom witryn internetowych rozwiązać ten problem, opracowaliśmy niezawodny system optymalizacji obrazków, który zachowuje jakość, jednocześnie znacznie poprawiając czasy wczytywania.
W tym przewodniku przeprowadzimy Cię przez nasz wypróbowany i przetestowany proces optymalizacji obrazków. Są to te same techniki, których używamy na naszych własnych witrynach, które obsługują miliony odwiedzających miesięcznie i działają niezależnie od twojej wiedzy technicznej.
Ponieważ jest to kompleksowy przewodnik po optymalizacji obrazów dla sieci, stworzyliśmy łatwy do naśladowania spis treści:
- What Is Image Optimization?
- What Are the Benefits of Image Optimization?
- How to Save and Optimize Images for Web Performance
- Best Image Optimization Tools and Programs
- Best Image Optimization Plugins for WordPress
- Final Thoughts and Best Practices for Image Optimization
- Expert Guides on Improving WordPress Performance
1. Czym jest optymalizacja obrazków?
Optymalizacja obrazków to proces zapisywania i dostarczania obrazków w najmniejszym możliwym rozmiarze pliku bez obniżania ogólnej jakości obrazka.
Choć proces ten wydaje się skomplikowany, w dzisiejszych czasach jest on dość prosty. Możesz użyć jednej z wielu wtyczek i narzędzi do optymalizacji obrazu, aby automatycznie skompresować obrazy nawet o 80% bez widocznej utraty jakości obrazka.
Oto przykład zoptymalizowanego i niezoptymalizowanego obrazka:
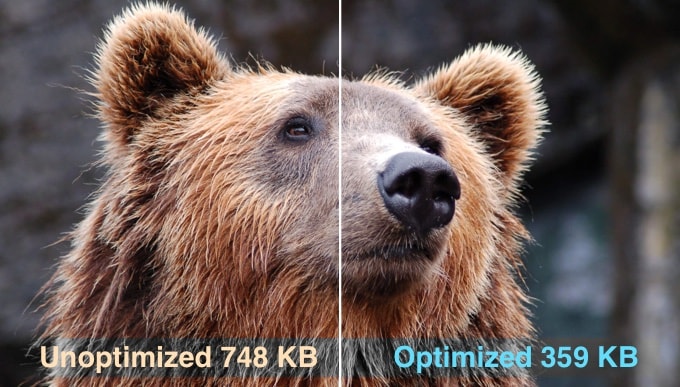
Jak widać, przy odpowiedniej optymalizacji ten sam obrazek może być nawet o 80% mniejszy od oryginału bez utraty jakości. W tym przykładzie obrazek jest mniejszy o 52%.
Jak działa optymalizacja obrazków?
Najprościej rzecz ujmując, optymalizacja obrazków polega na wykorzystaniu technologii kompresji.
Kompresja może być “stratna” lub “bezstratna”.
Kompresja bezstratna zmniejsza całkowity rozmiar pliku bez utraty jakości obrazka. W przypadku kompresji stratnej może wystąpić niewielka utrata jakości, ale w idealnym przypadku nie będzie ona zauważalna dla twoich odwiedzających.
Co oznacza optymalizacja obrazków?
Być może otrzymałeś zalecenie optymalizacji obrazków od pomocy technicznej Twojego hostingu WordPress lub narzędzia do testowania prędkości i zastanawiasz się, co musisz zrobić.
Będziesz musiał zmniejszyć rozmiar plików swoich obrazków, optymalizując je pod kątem sieci. Pokażemy ci, jak to zrobić krok po kroku.
2. Jakie są korzyści z optymalizacji obrazków?
Istnieje wiele korzyści płynących z optymalizacji twoich obrazków, ale oto najważniejsze z nich, o których powinieneś wiedzieć:
- Większa szybkość witryny internetowej
- Ulepszone rankingi SEO
- Wyższy ogólny współczynnik konwersji sprzedaży i potencjalnych klientów
- Mniej pamięci masowej i przepustowości (co może obniżyć koszty hostingu i CDN)
- Szybsze tworzenie kopii zapasowych witryn internetowych (co może obniżyć koszty przechowywania kopii zapasowych)
Obrazki są drugim po filmach najcięższym elementem na stronie internetowej. Według archiwum HTTP, obrazki stanowią 42% całkowitej wagi przeciętnej strony internetowej.
Ponieważ wiemy, że szybkie witryny internetowe zajmują wyższe pozycje w wyszukiwarkach (SEO) i mają lepszą konwersję, optymalizacja obrazków jest czymś, co każda witryna internetowa firmy musi zrobić, jeśli chce odnieść sukces online.
Być może zastanawiasz się teraz, jak dużą różnicę może naprawdę zrobić optymalizacja obrazków.
Według badania Strangeloop, jednosekundowe opóźnienie wczytywania witryny internetowej może kosztować 7% sprzedaży, 11% mniej odsłon i 16% spadek zadowolenia klientów.
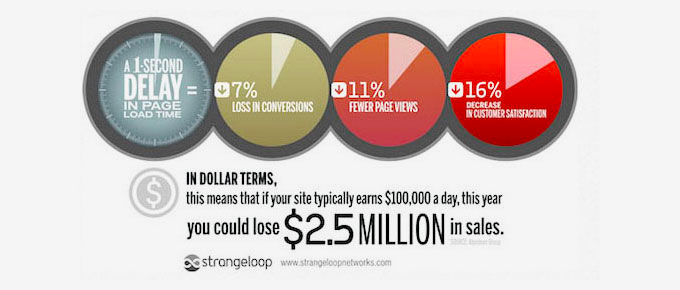
Jeśli nie są to wystarczające powody, aby przyspieszyć twoją witrynę internetową, to powinieneś wiedzieć, że wyszukiwarki takie jak Google również preferencyjnie traktują pod względem SEO szybciej ładujące się witryny.
Oznacza to, że optymalizując twoje obrazki dla sieci, możesz zarówno poprawić szybkość witryny internetowej, jak i poprawić rankingi SEO WordPress.
Film instruktażowy
Jeśli wolisz pisemne instrukcje, czytaj dalej.
3. Jak zapisywać i optymalizować obrazki pod kątem wydajności w sieci?
Kluczem do udanej optymalizacji obrazków pod kątem wydajności w sieci jest znalezienie idealnej równowagi między najmniejszym rozmiarem pliku a akceptowalną jakością obrazka.
Trzy rzeczy, które odgrywają ogromną rolę w optymalizacji obrazków to:
- Format pliku obrazka (JPEG vs. PNG vs. GIF)
- Kompresja (wyższa kompresja = mniejszy rozmiar pliku)
- Wymiary obrazka (wysokość i szerokość)
Wybierając odpowiednią kombinację tych trzech, możesz zmniejszyć rozmiar swojego obrazka nawet o 80%.
Przyjrzyjmy się każdemu z nich bardziej szczegółowo.
1. Format pliku Imagely
Dla większości właścicieli witryn internetowych jedyne trzy formaty plików obrazków, które naprawdę mają znaczenie, to JPEG, PNG i GIF. Wybór odpowiedniego rodzaju pliku odgrywa ważną rolę w optymalizacji obrazków.
Aby zachować prostotę, należy używać plików JPEG do zdjęć lub obrazków z dużą ilością kolorów, PNG do prostych lub przezroczystych obrazków, a GIF tylko do animowanych obrazków.
Dla tych, którzy nie znają różnicy między poszczególnymi rodzajami plików:
- Format obrazu PNG jest nieskompresowany, co oznacza, że jest to obrazek wyższej jakości. Wadą jest to, że rozmiary plików są znacznie większe.
- Z drugiej strony, JPEG to skompresowany format pliku, który nieznacznie obniża jakość obrazka w celu zapewnienia znacznie mniejszego rozmiaru pliku.
- Natomiast GIF wykorzystuje tylko 256 kolorów wraz z bezstratną kompresją, co czyni go najlepszym wyborem dla animowanych obrazków.
Na WPBeginner używamy wszystkich trzech formatów obrazków w zależności od ich rodzaju. Wiele witryn internetowych korzysta również z formatu WebP, który jest obecnie powszechnie obsługiwany.
Więcej informacji na temat formatów obrazków można znaleźć w naszym przewodniku WebP vs. PNG vs. JPEG: jaki jest najlepszy format obrazka dla WordPress.
2. Kompresja
Kolejną rzeczą jest kompresja obrazków, która odgrywa ogromną rolę w optymalizacji obrazków.
Dostępne są różne rodzaje i poziomy kompresji obrazków. Ustawienia dla każdego z nich różnią się w zależności od twojego narzędzia do kompresji obrazków.
Większość narzędzi do edycji obrazów, takich jak Adobe Photoshop, ON1 Photo, GIMP, Affinity Photo i inne, ma wbudowane funkcje kompresji obrazków.
Można również zapisywać obrazki normalnie, a następnie użyć narzędzia internetowego, takiego jak TinyPNG lub JPEGmini, aby ułatwić kompresję obrazków.
Chociaż wymagają one pewnego ręcznego wysiłku, te dwie metody pozwalają na kompresję obrazków przed wgraniem ich do WordPressa i to właśnie robimy na WPBeginner.
Istnieje również kilka popularnych wtyczek WordPress, takich jak Optimole i EWWW Image Optimizer, które mogą automatycznie kompresować obrazki podczas ich pierwszego przesyłania. Jest to wygodne i wielu początkujących, a nawet duże korporacje wolą korzystać z tych wtyczek do optymalizacji obrazków.
Więcej informacji na temat korzystania z wtyczek WordPress przedstawimy w dalszej części artykułu.
3. Wymiary obrazka
Zazwyczaj, gdy importujesz zdjęcie z twojego telefonu lub aparatu cyfrowego, ma ono bardzo wysoką rozdzielczość i duże wymiary pliku (wysokość i szerokość).
Zazwyczaj zdjęcia te mają rozdzielczość 300 DPI i wymiary od 2000 pikseli wzwyż. Podczas gdy wysokiej jakości zdjęcia dobrze nadają się do druku lub publikacji na pulpicie, ich duże rozmiary sprawiają, że nie nadają się do witryn internetowych.
Zmniejszenie wymiarów obrazka do bardziej rozsądnych może znacznie zmniejszyć rozmiar pliku. Możesz po prostu zmienić rozmiar obrazków za pomocą oprogramowania do edycji obrazków na twoim komputerze.
Na przykład, zoptymalizowaliśmy zdjęcie o rozdzielczości 300 DPI i wymiarach obrazka 4900×3200 pikseli. Oryginalny rozmiar pliku wynosił 1,8 MB.
Wybraliśmy format JPEG dla większej kompresji i zmieniliśmy wymiary na 1200×795 pikseli. Rozmiar pliku został zmniejszony do zaledwie 103 KB. To o 94% mniej niż oryginalny rozmiar pliku.
Teraz, gdy znasz już trzy ważne czynniki w optymalizacji obrazków, przyjrzyjmy się różnym narzędziom do optymalizacji obrazków dla właścicieli witryn internetowych.
4. Najlepsze narzędzia i programy do optymalizacji obrazków
Jak wspomnieliśmy wcześniej, większość programów do edycji obrazów zawiera ustawienia optymalizacji i kompresji obrazków.
Poza oprogramowaniem do edycji obrazów, istnieje również kilka potężnych darmowych narzędzi do optymalizacji obrazów, które można wykorzystać do optymalizacji obrazków na potrzeby sieci (za pomocą zaledwie kilku kliknięć).
Zalecamy korzystanie z tych narzędzi do optymalizacji obrazków przed przesłaniem ich do WordPressa, zwłaszcza jeśli jesteś perfekcjonistą.
Metoda ta pomaga zaoszczędzić miejsce na dysku na twoim koncie hostingowym WordPress i gwarantuje najszybszy obraz w najlepszej jakości, ponieważ ręcznie przeglądasz każdy obrazek.
Adobe Photoshop
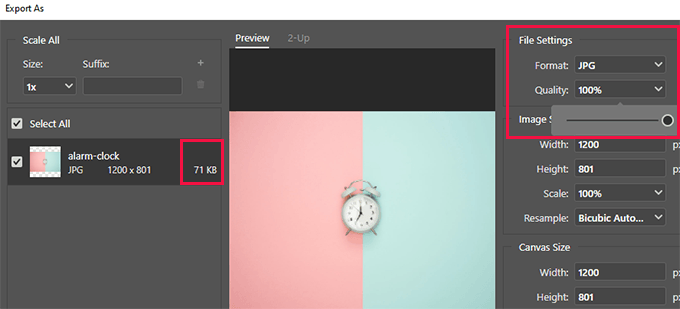
Adobe Photoshop to wysokiej klasy aplikacja do edycji obrazków, która umożliwia eksportowanie obrazów o mniejszym rozmiarze na potrzeby Internetu.
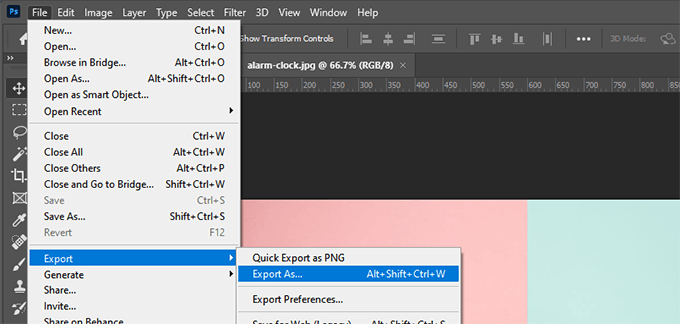
Za pomocą okna dialogowego eksportu można wybrać format pliku obrazka (JPG, PNG, GIF), który zapewnia najmniejszy rozmiar pliku.
Można również zmniejszyć jakość obrazka, kolory i inne opcje, aby jeszcze bardziej zmniejszyć rozmiar pliku.
GIMP
GIMP to darmowa i otwarta alternatywa dla Adobe Photoshop. Może być używany do optymalizacji twoich obrazków dla sieci. Wadą jest to, że nie jest tak łatwy w użyciu, jak niektóre inne rozwiązania z tej listy.
Najpierw musisz otworzyć swój obrazek w programie GIMP, a następnie wybrać opcję Plik ” Eksportuj jako…. Spowoduje to wyświetlenie okna dialogowego Eksportuj obrazek, w którym możesz nadać twojemu plikowi nową nazwę. Następnie należy kliknąć przycisk “Eksportuj”.
Zostaną wyświetlone opcje eksportu obrazków. W przypadku plików JPEG można użyć suwaka “Jakość”, aby wybrać poziom kompresji i zmniejszyć rozmiar pliku.
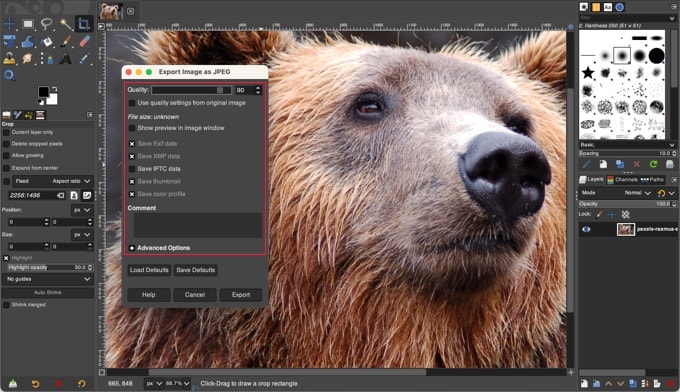
Na koniec należy kliknąć przycisk “Eksportuj”, aby zapisać zoptymalizowany plik obrazka.
TinyPNG
TinyPNG to darmowa aplikacja internetowa, która wykorzystuje inteligentną technikę kompresji stratnej w celu zmniejszenia rozmiaru twoich plików PNG i JPEG. Wszystko, co musisz zrobić, to wejść na ich witrynę internetową i przesłać swoje obrazki za pomocą prostego przeciągania i upuszczania.
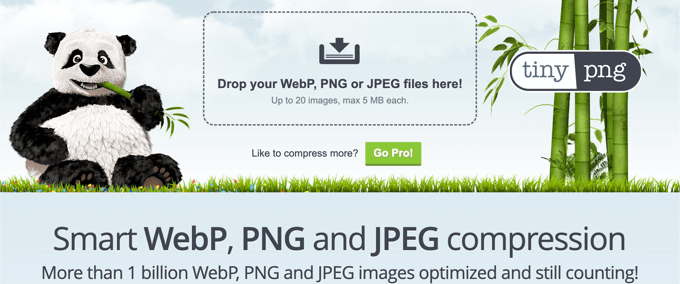
Skompresują obrazek i podadzą odnośnik do pobrania.
Mają również rozszerzenie dla Adobe Photoshop, którego używamy jako części naszego procesu edycji obrazków, ponieważ umożliwia dostęp do TinyPNG z poziomu Photoshopa.
Dla programistów mają API do automatycznej konwersji obrazków. Dodatkowo, dla początkujących, mają wtyczkę WordPress, która zrobi to za Ciebie. Więcej na ten temat powiemy później.
JPEGmini
JPEGmini wykorzystuje technologię bezstratnej kompresji, która znacznie zmniejsza rozmiar obrazków, nie mając wpływu na ich postrzeganą jakość. Można również porównać jakość oryginalnego obrazka i obrazka skompresowanego.
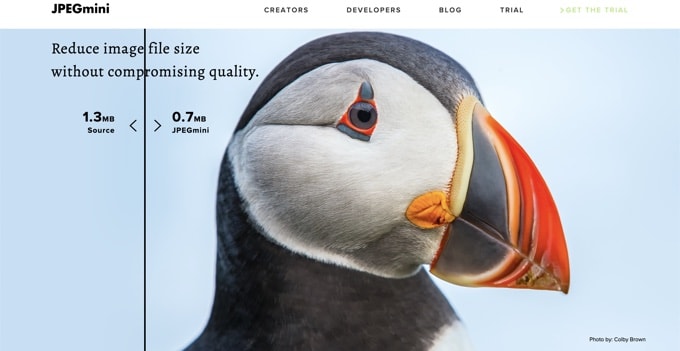
Możesz korzystać z ich wersji internetowej za darmo lub kupić program na twój komputer. Mają również płatne API do automatyzacji procesu dla twojego serwera.
ImageOptim
ImageOptim to narzędzie dla komputerów Mac, które pozwala kompresować obrazki bez utraty jakości poprzez znajdowanie najlepszych parametrów kompresji i usuwanie niepotrzebnych profili kolorów.
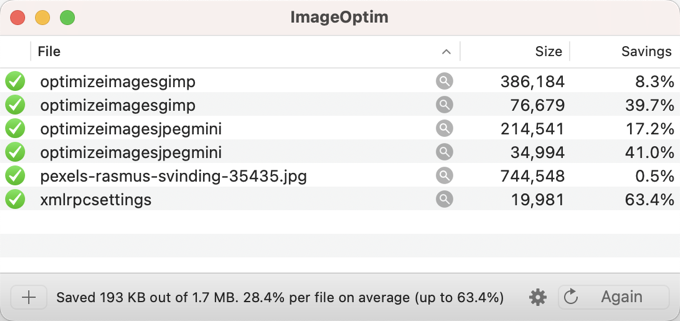
Alternatywą dla systemu Windows jest Trimage.
5. Najlepsze wtyczki do optymalizacji obrazków dla WordPressa
Uważamy, że najlepszym sposobem na optymalizację twoich obrazków jest zrobienie tego przed przesłaniem ich do WordPressa. Jeśli jednak prowadzisz witrynę z wieloma autorami lub potrzebujesz zautomatyzowanego rozwiązania, możesz wypróbować wtyczkę do kompresji obrazków WordPress.
Oto nasza lista najlepszych wtyczek WordPress do kompresji obrazków:
- Optimole, popularna wtyczka stworzona przez zespół odpowiedzialny za ThemeIsle
- EWWW Image Optimizer
- JPEG, PNG & WebP Image Compression, wtyczka autorstwa wspomnianego wyżej zespołu TinyPNG
- Imagify, wtyczka popularnego zespołu WP Rocket
- ShortPixel Image Optimizer
- Smush
- reSmush.it
- Envira Gallery to wtyczka do galerii WordPress z wbudowaną kompresją obrazków
Te wtyczki do optymalizacji obrazków WordPress pomogą ci przyspieszyć twoją witrynę internetową.
6. Końcowe przemyślenia i najlepsze praktyki dotyczące optymalizacji obrazków
Jeśli nie zapisujesz obrazków zoptymalizowanych pod kątem sieci, musisz zacząć robić to teraz. Zrobi to ogromną różnicę w szybkości Twojej witryny, a użytkownicy będą Ci za to wdzięczni.
Nie wspominając o tym, że szybsze witryny internetowe są świetne dla SEO i prawdopodobnie zauważysz wzrost w rankingach wyszukiwarek.
Poza optymalizacją obrazków, dwie rzeczy, które znacząco pomogą przyspieszyć twoją witrynę internetową, to korzystanie z wtyczki pamięci podręcznej WordPress i korzystanie z WordPress CDN.
W WPBeginner używamy WP Rocket, ponieważ łączy w sobie zarówno potężną pamięć podręczną, jak i funkcje optymalizacji obrazków, w tym leniwe wczytywanie i pomoc techniczną WebP, w jednym rozwiązaniu.
Alternatywnie możesz skorzystać z zarządzanej firmy hostingowej WordPress, ponieważ często oferują one zarówno pamięć podręczną, jak i CDN jako część platformy.
Przewodniki ekspertów na temat poprawy wydajności WordPressa
Mamy nadzieję, że ten artykuł pomógł ci dowiedzieć się, jak zoptymalizować obrazy w WordPress. Możesz również zapoznać się z innymi artykułami związanymi z poprawą wydajności WordPress:
- Najlepszy przewodnik po zwiększaniu szybkości i wydajności WordPressa
- Jak przyspieszyć wydajność WooCommerce
- Jak przeładować multimedia WordPress, aby poprawić szybkość witryny internetowej
- Najlepsze wtyczki WordPress do pamięci podręcznej, aby przyspieszyć twoją witrynę internetową
- Jak zoptymalizować rdzeń Web Vitals dla WordPress (Ultimate Guide)
- Jak skrócić czas do pierwszego bajtu (TTFB) w WordPress – Porady ekspertów
- Jak wykorzystać wtyczkę GTmetrix do poprawy wydajności witryny WordPress?
- Najszybszy hosting WordPress (testy wydajności)
- Ważne metryki do zmierzenia na twojej witrynie WordPress
- Jak prawidłowo przeprowadzić test szybkości witryny internetowej?
- Jak przeprowadzić test wytrzymałościowy witryny internetowej WordPress
If you liked this article, then please subscribe to our YouTube Channel for WordPress video tutorials. You can also find us on Twitter and Facebook.


Dennis Muthomi
Well for me I ALWAYS convert all my images to .webp file format before uploading them to my WordPress site.
I chose to use .webp over JPEG and PNG because it provides much better lossless compression, allowing the file size to be significantly reduced without affecting image quality.
Jiří Vaněk
Thanks for the tutorial. Personally, I used to convert the images to .webp format first and then upload them to the web in that format. This format seems to me to be the smallest in terms of data volume and at the same time still very high quality for a good user experience. I don’t use plugins for this, but I usually convert images in online converters or in computer software.
WPBeginner Comments
The .webp format can also be a good image format to use due to it’s small file size. We happen to have a guide on how to use .webp here, including some handy plugins to convert images into .webp: https://www.wpbeginner.com/wp-tutorials/how-to-use-webp-images-in-wordpress/
Converting via a plugin can be useful because it can convert directly on the website and in bulk.
Jiří Vaněk
But if I use the plugin, won’t it take up too much space on my FTP because the original file will be there too? But I will certainly be happy to go and look at your instructions. Thanks for the link.
WPBeginner Comments
You could always delete the original files. You can use the search feature on the Media admin page to search for filetypes, such as the .png or .jpg/.jpeg extensions.
Mrteesurez
This is a comprehensive guide.
It’s essential to optimize images in order to have fast website loading and content delivery.
You quoted that images are the second heaviest after video, what of audio, is audio lighter than images and how ?
WPBeginner Comments
Audio would tend to be between images and video. That said, depending on the amount of audio and the audio filetype, this is not an exact rule and it just depends on the files in question.
Mrteesurez
Thanks for your reply, the thing is, I used to see audio files bigger in term of size than images, most images are in kilobytes while audios are usually more than that, I think the duration for a audio to be played and delivered a meaningful message also contribute to it’s size.
Michelle N
Would love to say that this has been incredibly helpful, easy to digest and implement, I appreciate all the tools provided. Thank you! – from a beginner blogger
WPBeginner Support
Glad our guide was helpful
Admin
mohadese esmaeeli
By the way, another question I have is whether, when using image optimization plugins and optimizing previously uploaded images, the new images replace the old ones? Or do the original images remain in the WordPress media library, with the optimized images alongside them?
WPBeginner Support
It would depend on the specific plugin you are using as some will replace the image while others have the option to keep the original.
Admin
Jiří Vaněk
Many of them give you a choice whether you want to keep the original images or delete them. From personal experience, I recommend keeping the original images on the website (at least as a backup).
mohadese esmaeeli
Hello,
Greetings to you. This article appears to be quite comprehensive. I became acquainted with your website a few days ago and started reading the articles. I have decided to implement the same process on my website as I read through these articles.
I quickly reached point 2, focusing on site speed. To be honest, I have been working on my site for just a few days, and I have only managed to achieve a 10% increase in site speed.
WPBeginner Support
An improvement is still an improvement, we’re glad to hear our guide is helpful
Admin
mohadese esmaeeli
Yes, that’s exactly right. In this vast and competitive world, those who are always improving their website and offering something more than their competitors will be the winners. Otherwise, we will be the losers.
Moinuddin Waheed
Having optimizes images for websites or blogs is very important for the speed of the website.
Heavy image sizes takes time to load and causes the website to slow.
I have used some of the plugins for image optimisation.
But I think best option is to use caching plugins and CDN for the websites.
it lets the website speed not only fast but also helps in retaining the visitors.
WPBeginner Support
CDNs are normally for speed instead of retention but a fast loading site does help keep your visitors and helps make them want to return
Admin
Lewis
First of all, it’s important to note that not all image file types are created equal. JPEGs are generally going to be much smaller in file size than PNGs, for example, so it’s important to choose the right file type for the job.
Additionally, when it comes to resizing images, you should always resize them before you upload them to your website. This way, you can avoid having to serve oversized images to your visitors, which can slow down your site.
Finally, I wanted to point out that there are a number of plugins available that can help you automate the process of optimizing your images. WP Smush is a great option that can help you save time and ensure that your images are always properly optimized.
WPBeginner Support
Thanks for sharing your comment
Admin
Rebecca Gelsi
This is brilliant, thank you. I’m using JPEGmini after reading this article and am so relieved to have this aspect of our site sorted.
Andy
Thanks for the normal and simple explanation. I made a few mistakes with my photo content on my site, but with the help of your explanations, I figured out exactly what I needed to do. Thank you!
WPBeginner Support
Glad our guide was helpful
Admin
Tania
So helpful!! Thank you for sharing. Quick question – If I compress my images to an optimal/acceptable KB size directly in Photoshop using the Save for web setting mentioned above, and then upload to WordPress…is there a need to also run Shortpixel or another image compression plugin? Or is that redundant?
Trying to understand if there are added benefits to using a plugin vs Photoshop. Would love to hear your thoughts. Thanks!
WPBeginner Support
The plugins are an alternative, if you optimize your images before uploading them, you wouldn’t need to use an image optimization plugin
Admin
Shiv Raj Bhatt
Great idea to optimize images for faster loading website. Thanks for the info.
WPBeginner Support
Glad you like our content
Admin
Lauren
Excellent and thorough! Thank you!
WPBeginner Support
Glad our guide was helpful
Admin
Eddier Naranjo
The optimization plugins make a copy of the “heavy” image and serve the optimized version. But that increases the storage space on the site.
Is there a way to delete the old version and leave only the optimized image?
WPBeginner Support
We would recommend checking with the support for the plugin that you are using as they normally have an option to remove the unoptimized version.
Admin
Diane Talbotier
Hi, does resizing mean changing the size of the images as they are shown on the website, or resizing the size of the file , please?
And how do I know what is the optimal size?
WPBeginner Support
It would depend on what you mean, for compression in this guide, it is the size for the file. You can also reduce the width and height of an image if it is too large. Your specific theme would determine the specific image size you want to use.
Admin
Terri
You mentioned in your optimise example that your original photo was 300dpi, then you optimised it to a smaller file size. But you did not say what the target dpi was. Is it 72 for web? Or higher? Thanks for the informative article.
WPBeginner Support
That would depend on your personal preference and how large you are wanting/needing the images to be.
Admin
Romel
thanks a lot it cleared a lot of doubts.
WPBeginner Support
Glad our article was helpful
Admin
Odenyi Emmanuel Chidera
What I like most about wpbeginner is how they will give you information on what to implement on your own site but also tell you what they are using on their own site. It really helps me decide faster. Learning from a master is always easier. Thanks.
WPBeginner Support
You’re welcome, glad you like our content
Admin
Luz Manalo-Cruz
I’ve compressed images via TinyPNG and tried to replace the heavier images on my site with these (ie. I deleted the heavy photos and uploaded the compressed ones). However the media library is still uploading the old heavier images. Does that mean that I can’t replace the old images already uploaded? Will it only upload the compressed images that have not been uploaded at all?
WPBeginner Support
If you are replacing the heavier images, you would want to ensure you don’t have caching on your site that is showing the old image and when you upload the new image that you are uploading the correct image.
Admin
Giovanna
Thanks for the informative article, Syed.
Moving forward I am going to make sure to always use optimized images. Do you recommend I go back to already published posts and replace my images with optimized ones?
WPBeginner Support
If possible we would recommend updating your older images, the plugins we recommended should handle that for you
Admin
Percy Young
Thank you for your post. many nice tools. I wonder if theres any thing to be done to rezize images that have been previously uploaded, and how to delete images the worpress is not using any more.
WPBeginner Support
If you need to generate new images you could follow our guide here:
https://www.wpbeginner.com/plugins/regenerate-thumbnails-new-image-sizes-wordpress/
For removing the extra images there are media cleanup plugins that you are able to use
Admin
WPBeginner Support
Glad you’ll use our recommendations
Admin
Dr Amandeep Sandhu
Thanks for sharing such ideas….!
WPBeginner Support
You’re welcome, thanks for reading our articles
Admin
İbrahim BOZKURT
I’m a WordPress developer. I am writing from Turkey.
Very difficult to find quality WordPress resources.
I discovered you. I didn’t know English but learned English. Thanks to you everything.
WPBeginner Support
Thank you for reading our articles and congratulations on learning a new language
Admin
Felipe Adan Lerma
Hi, it seems maybe WordPress has incorporated some of this into its current image upload process, at least in the Premium bracket?
I ask cause I now get the option to choose the actual size or something larger or smaller?
Or is that process not an optimization / reduction in size of the image?
Thanks so much! Very important useful topic.
Adan
WPBeginner Support
It sounds like you may be talking about WordPress.com and they have custom plugins setup for sites on their service
Admin
Felipe Adan Lerma
Ahhh, yes, I forget the two WP’s differ, sorry. I’m still trying to figure out how to work where I am w/WP & it’s definitely via their .com sites. Thank so much then, WP – Adan
WPBeginner Support
No worries, should it help we have our article listing the differences here:
https://www.wpbeginner.com/beginners-guide/self-hosted-wordpress-org-vs-free-wordpress-com-infograph/
Anna
Very helpful info!! I was just researching how to do this when your email came through! Saved em time and effort and had just the advice I was looking for.
WPBeginner Support
Glad our guide and newsletter could be helpful
Admin
Lindsay
When saving on photoshop what width do you suggest for optimum web performance?
My theme is saving 1600×1050 for optimum header but what should I do for the body images. Theme designer doesn’t have a recommendation.
WPBeginner Support
If you’re going through the other steps in this article then the image size would be what would fit your content’s dimensions best so WordPress wouldn’t need to resize the image.
Admin
edccde
Please update that youtube video.First of all Jpegmini isn’t a web app and it is a software which i have to install in my pc.
WPBeginner Support
Thank you for letting us know about the video, we’ll certainly look into updating the video
Admin
Jackie
Is there way to compress images already uploaded to wordpress? Or do I need to compress all my images and then reupload into WP? THanks in advance for the advices.
Irina
Hi,
Need an advice: I need to upload Low res and Hi-res images (1200pix at 300dpi) so my customers can download them. I have no questions about LR image optimization. How can I save hi-res images? The size is up to 2 MB. I have hundreds of thousands of images…
Ratan Kumar
This post is awesome and really add value to my site. However, I recently tried to save images from flipkart but it saved in very low pixel format. Wondering if you can help me to figure out on how to do that.
Ray
I already bulk uploaded 1500 product images that were connected to image urls I found on the internet.
Now that I have those 1500 images already in my Media Library, how can I go back and resize and compress them?
Also, I’m confused about whether resizing means changing the size of the images as they are shown on the website, or resizing the size of the file.
Thanks!
Sara Lewis
what about the plugin ewww image optimizer?
WPBeginner Support
Hey Sara,
Yes its a good alternative. However, for better results we would still recommend optimizing images in your image editing program before uploading to WordPress.
Admin
Donna
I will be travelling to a place where internet connectivity is limited and expensive. So, I want to reduce the file size of my photos before I go online to upload them to my blog. Can someone please recommend for me what resolution and dpi would be good to use? The app I am planning to use asks for three measurements:
resolution – from 200 to 2048
DPI – from 72×72 to 300×300
jpeg quality (compression level) – from 0.00 to 1.00
Carrie
In the video she changes her pic. I understand the screen in PS. But you have not explained what should the width and height be in pixels for WP the limit is 2mb. What would be a good standard for sliders, etc for a wp site?
Carrie
Sorry for being the dunce in the corner, but could someone please clarify one thing? I installed the WP Smush it plugin and have been slowly working through all the photos I’ve uploaded to my site for the last 2 years. I’m doing 50 at a time, the free limit. However, now that I have the plugin, for future photo uploads, does having it mean I don’t have to use any other program to resize my photos before uploading them to my WP site? If I have an 8 MB photo and upload it to my site, the plugin does everything for me? I just want to confirm that the original photo is not still uploaded and saved to my host server, SiteGround. My site is wicked slow, I’ve run tons of diagnostics, and I still can’t figure out why except that everything points to my photos. Thanks!
Tony Squibb
Hi Carrie, I’m defo not an expert in any way but I do have experience with WP Smush it and yes, future uploads should be auto ‘smushed’. There is a little notification in the media gallery as you do so.
To check the causes of your slow site you can use GTmetrix and then open the waterfall page where it will show the times of the individual pages items loading. Once you know what is the problem you can then address it.
I hope that helps from one ‘dunce’ to another
Carrie
Hi Tony,
Thanks for weighing in! Unfortunately I uninstalled WP Smush and tried EWWW Image Optimizer along with the Thumbnail Regerate plugin (based on another bloggers suggestion) and royally messed up the photos on my site. I’m a newb with regards to how to manage my files through the FTP on my web host, so I ended up deleting a bunch of images (as in hundreds) and re-uploading them after resizing them manually in an image program. Turns out that too was a bad idea. Now I have a bunch of error messages when I render my site in my Google Console because when Google crawls my site, those files are now gone or moved. AGH! I’m on the verge of simply paying someone to revamp my site or quitting altogether. But I really appreciate that you took the time to leave a helpful comment.
Happy New Year! May 2017 be better than 2016.
Jeff
hi
Best Image Optimization Plugins for WordPress Site Which is?
Gagan
I was thinking what if i upload my Images to Google Blogger and use them on my wordpress Site by “Insert From URL” option?
Any suggestion if this is a Good Idea or no?
Thanks in advance
Zimbrul
I came back here as I’m looking for plugins that upload a large image as a optimised image straight to WordPress. I’m sure I’ve seen this somewhere here at WP Beginner but I cannot find it.
WPBeginner Support
Please take a look at Optimizing images with WP Smush pros, cons, and alternatives.
Admin
Jack
Photoshop is definitely the best one, for online services, kraken.io and resizeimage.net are good alternatives to tinypng.
tanveer
is xnview a good option for compressing images?
WPBeginner Support
We haven’t tried it.
Admin
Larry Aldrich
Someone mentioned RIOT in an earlier comment. It is my go-to app for minimizing images BEFORE you upload them. The compression rate is close to phenomenal. Sorry MAC users, but it’s only available for Windows.
Martin
Hello WPBeginner,
I would be very interested in the Windows version of Trimage you have apparently seen.
On the Trimage homepage you just see a link asking for help with the windows port…
Greg
I have got used to using Fireworks even though I have CS3
Zimbrul
Me too. I use CSS4 and still go to Fireworks for image optimisation.
Marianne P.
I just checked out the Trimage site and did not see the Windows version – just various *nix versions. Please point me in the right direction. Thanks so much – really great article!
Corinna
I was wondering if there was any way of reducing the size of the images already uploaded to a site? I have changed the way I upload them so in future all my images will be smaller. But I thought maybe it would be useful to change the size of those already uploaded.
Julie Anglesey
I would also like to know how to reduce the size of images already uploaded.
Zimbrul
It’s (or was) Smush-It.
Samiullah Khan
Search the web too much to find good solution to optimize images; but most of them most of them doesn’t let’s see tools mentioned in this post work or not
Graham
The article defines PNG as an uncompressed file format, but as far as I know, standard PNGs use lossless compression.
And I think it would be helpful to mention why you might choose one format over another for continuous tone images (eg. a photo) vs. limited palette images (eg. a logo).
Rob Dewing
Why no mention of Photoshop Elements, the cut down home use version of Photoshop? It does 90+% of the things full phat Photoshop will do, including ‘save for web’ image compression, all for less than $100.
Ines
Would you recommend to use Flickr to upload your images and then copy the HTML code to your wordpress site? What would you suggest for travel blogs that contain lots of pictures? Thanks.
WPBeginner Support
You can add flickr photos in WordPress by simply pasting the photo URL in a post. Normally we would not recommend it, because people will be viewing and finding your photos on Flickr and may never even get a chance to visit your website. However, if you feel that building a community around your photos on flickr is more useful for you, then sure go ahead.
Admin