
Dodanie formularza kontaktowego do witryny WordPress jest kluczem do skutecznej komunikacji z odwiedzającymi. Na przykład, formularz kontaktowy może umożliwić klientom kontakt z pytaniami lub opiniami na temat produktów i usług.
WordPress nie ma jednak wbudowanego narzędzia do tworzenia formularzy kontaktowych, co może być frustrujące, jeśli nie jesteś zaznajomiony z kodowaniem.
Na szczęście istnieje prosty sposób na dodanie formularzy kontaktowych bez żadnych umiejętności technicznych. Dzięki odpowiednim narzędziom można łatwo utworzyć formularz, który pasuje do potrzeb witryny. Rozwiązuje to problem ręcznego udostępniania adresu e-mail, co może prowadzić do spamu i nieodebranych zapytań.
Po zbadaniu popularnych narzędzi stwierdziliśmy, że tworzenie formularza kontaktowego za pomocą WPForms jest najłatwiejszym podejściem. W tym przewodniku przeprowadzimy Cię przez każdy krok, zapewniając szybkie skonfigurowanie funkcjonalnego i atrakcyjnego formularza kontaktowego.
")
Dlaczego potrzebujesz formularza kontaktowego WordPress?
Możesz się zastanawiać, po co ci formularz kontaktowy; czy nie mogę po prostu dodać mojego adresu e-mail na mojej stronie internetowej, aby ludzie mogli do mnie pisać?
Jest to bardzo częste pytanie zadawane przez początkujących, ponieważ obawiają się, że dodanie formularza kontaktowego wymaga wiedzy z zakresu kodowania.
Na szczęście możesz użyć wtyczki WordPress, aby po prostu dodać formularz kontaktowy do swojej witryny WordPress bez znajomości kodowania.
Poniżej znajdują się 3 najważniejsze powody, dla których formularz kontaktowy jest lepszy niż wklejenie twojego adresu e-mail na stronie.
- Ochrona przed spamem – Boty spamowe regularnie skrobią witryny internetowe w poszukiwaniu tagu mailto: adresu e-mail. Gdy wpiszesz swój adres e-mail na witrynie internetowej, zaczniesz otrzymywać wiele spamowych wiadomości e-mail. Z drugiej strony, twój formularz kontaktowy może zablokować spam w formularzu kontaktowym i zatrzymać prawie wszystkie spamowe wiadomości e-mail.
- Spójne informacje – podczas wysyłania wiadomości e-mail ludzie nie zawsze wysyłają wszystkie potrzebne informacje. Dzięki formularzowi kontaktowemu możesz powiedzieć użytkownikowi dokładnie, jakich informacji potrzebujesz, takich jak numer telefonu, budżet, szczegóły projektu i inne.
- Oszczędność czasu – formularze kontaktowe pomagają zaoszczędzić czas na więcej sposobów, niż można sobie wyobrazić. Oprócz spójnych informacji, możesz również użyć potwierdzeń formularzy, aby poinformować użytkownika o kolejnych krokach, które powinien podjąć. Możesz na przykład obejrzeć film lub poczekać do 24 godzin na odpowiedź, aby nie wysyłać wielu zapytań.
Mając to na uwadze, pokażemy ci krok po kroku, jak łatwo utworzyć formularz kontaktowy w WordPress. Oto wszystkie kroki, przez które przejdziemy w tym przewodniku:
- Step 1. Choosing the Best WordPress Contact Form Plugin
- Step 2. Install a Contact Form Plugin on WordPress
- Step 3. Create a Contact Form in WordPress
- Step 4. Configuring WordPress Form Notification and Confirmations
- Step 5. Adding WordPress Contact Form on a Page
- Step 6. Adding WordPress Contact Form in a Sidebar
- Bonus Tip: Taking Your WordPress Contact Form to the Next Level
- Video Tutorial
Przejdźmy od razu do rzeczy!
Krok 1. Wybór najlepszej wtyczki do formularza kontaktowego WordPress
Pierwszą rzeczą, którą musisz zrobić, jest wybór wtyczki formularza kontaktowego WordPress.
Chociaż istnieje kilka darmowych i płatnych wtyczek do formularzy kontaktowych WordPress, my używamy WPForms na naszej witrynie i uważamy, że jest to najlepsza opcja na rynku.
Poniżej przedstawiamy trzy powody, dla których uważamy, że WPForms jest najlepszy:
- Jest to najbardziej przyjazna dla początkujących wtyczka formularza kontaktowego. Możesz użyć kreatora przeciągnij i upuść, aby łatwo utworzyć formularz kontaktowy za pomocą zaledwie kilku kliknięć.
- WPForms Lite jest w 100% darmowy i można go użyć do stworzenia prostego formularza kontaktowego (korzysta z niego ponad 6 milionów witryn).
- Gdy będziesz gotowy na bardziej zaawansowane funkcje, możesz dokonać aktualizacji do WPForms Pro.
Aby dowiedzieć się więcej, zapoznaj się z naszą szczegółową recenzją WPForms.
Teraz, gdy zdecydowaliśmy się na wtyczkę formularza kontaktowego, przejdźmy dalej i zainstalujmy ją na twojej witrynie.
Krok 2. Zainstaluj wtyczkę formularza kontaktowego na WordPress
W tym poradniku użyjemy WPForms Lite, ponieważ jest darmowy i łatwy w użyciu.
Możesz zainstalować tę wtyczkę na swojej witrynie, logując się do kokpitu WordPress i przechodząc do Wtyczki ” Dodaj nowy.
Następnie w polu wyszukiwania wpisz “WPForms” i kliknij przycisk “Zainstaluj teraz”.
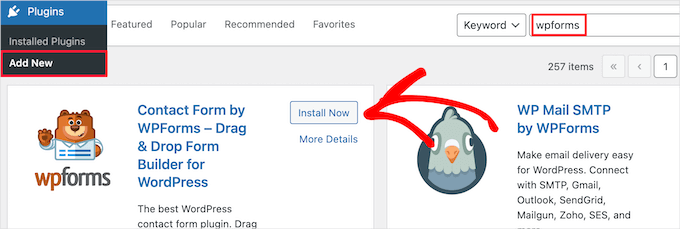
Spowoduje to automatyczną instalację wtyczki na twojej witrynie.
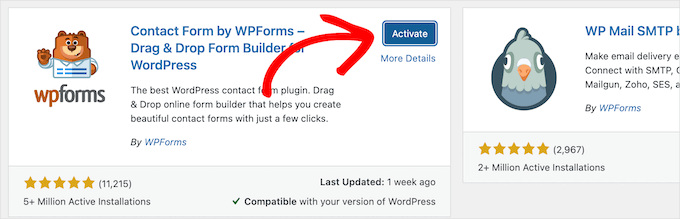
Następnie należy włączyć wtyczkę, klikając przycisk “Aktywuj”.
Jeśli nie widzisz menu wtyczek lub chcesz uzyskać bardziej szczegółowe instrukcje, możesz zapoznać się z naszym przewodnikiem na temat instalowania wtyczek WordPress.
Krok 3. Utwórz formularz kontaktowy w WordPress
Teraz, po włączaniu WPForms, jesteś gotowy do utworzenia formularza kontaktowego w WordPress.
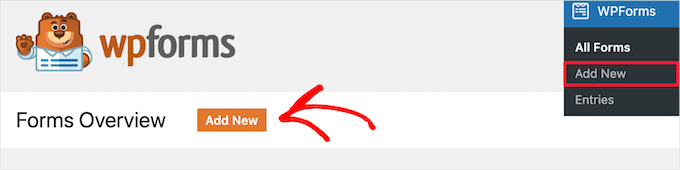
Aby to zrobić, przejdź do WPForms ” Wszystkie formularze w panelu administracyjnym WordPress, a następnie kliknij przycisk “Dodaj nowy”.
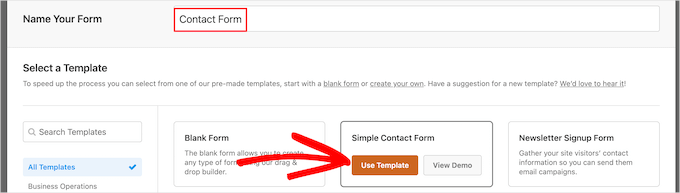
Spowoduje to otwarcie biblioteki szablonów kreatora formularzy WPForms typu “przeciągnij i upuść”. Zacznij od nadania nazwy swojemu formularzowi kontaktowemu, a następnie wybierz szablon formularza kontaktowego.
Aby wybrać szablon, wystarczy najechać na niego kursorem i kliknąć przycisk “Użyj szablonu”.
WPForms Lite zawiera ponad 20 darmowych szablonów formularzy do wyboru. Możesz ich użyć do stworzenia dowolnego rodzaju formularza kontaktowego.
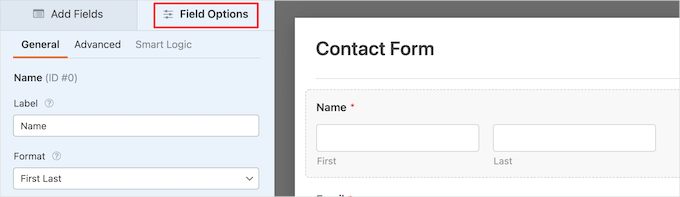
W tym przykładzie wybierzemy szablon “Prosty formularz kontaktowy”. Automatycznie doda on pola Nazwa, E-mail i Wiadomość.
Możesz kliknąć dowolne pole formularza, aby je edytować.
Po kliknięciu pola formularza po lewej stronie pojawi się panel “Opcje pola”, w którym można wprowadzić zmiany.
Możesz także przeciągać i upuszczać pola za pomocą twojej myszy, aby zmienić ich kolejność.
Oto przykład:

Jeśli chcesz utworzyć nowe pole, po prostu wybierz je z dostępnych pól na lewym panelu bocznym.
Możesz przeciągnąć go do twojego formularza lub kliknąć na niego, a zostanie on automatycznie dodany do twojego formularza.

Po zakończeniu dostosowywania formularza należy kliknąć przycisk “Zapisz”.
Krok 4. Konfigurowanie powiadomień i potwierdzeń formularzy WordPress
Po utworzeniu twojego formularza kontaktowego ważne jest, aby poprawnie skonfigurować opcje powiadomień i potwierdzeń formularza.
Potwierdzenie formularza jest tym, co widzi odwiedzający twoją witrynę internetową po przesłaniu formularza. Może to być prosta wiadomość z podziękowaniem, strona, na której przesłano pliki PDF do pobrania lub cokolwiek innego.
Powiadomienie o formularzu to wiadomość e-mail otrzymywana po przesłaniu formularza kontaktowego na blogu WordPress.
Aby dostosować wiadomość potwierdzającą, kliknijmy kartę “Ustawienia”, a następnie “Potwierdzenia” w kreatorze formularzy.
Istnieje już domyślna wiadomość z podziękowaniem.
Jeśli jednak chcesz, możesz dostosować to w polu “Wiadomość potwierdzająca”.

Jeśli chcesz przekierować użytkowników po pomyślnym przesłaniu formularza zamiast wyświetlać komunikat, wybierz opcję “Przejdź do adresu URL” z menu rozwijanego “Typ potwierdzenia”.
Następnie wprowadź adres URL, na który chcesz przekierować użytkowników.

Jeśli wprowadzisz tutaj jakiekolwiek zmiany, kliknij przycisk “Zapisz”.
Następnie możesz upewnić się, że ustawienia powiadomień formularza są prawidłowe. Wystarczy kliknąć kartę “Powiadomienia” w tym samym menu “Ustawienia”.
Najlepsze w WPForms jest to, że domyślne ustawienia są idealne dla początkujących. Po przejściu do ustawień powiadomień wszystkie pola zostaną wstępnie wypełnione dynamicznie.

Powiadomienia są domyślnie wysyłane na adres e-mail administratora skonfigurowany podczas tworzenia witryny.
Jeśli chcesz wysłać powiadomienie na własny adres e-mail, możesz to zmienić. Jeśli chcesz wysłać powiadomienie na wiele adresów e-mail, oddziel każdy z nich przecinkiem.
Pole “Temat e-maila” jest wstępnie wypełnione twoją nazwą formularza. Pole “From Name” jest automatycznie wypełniane nazwą twojego użytkownika.

Gdy odpowiesz na zapytanie z formularza, zostanie ono wysłane na adres e-mail, którego użytkownik użył do wypełnienia formularza kontaktowego.
Nie zapomnij kliknąć przycisku “Zapisz”, jeśli wprowadzisz tutaj zmiany.
Jeśli chcesz wysłać wiadomość e-mail z formularzem do wielu osób lub różnych działów, możesz zapoznać się z naszym przewodnikiem na temat tworzenia formularza kontaktowego z wieloma odbiorcami.
Jeśli masz problemy z otrzymywaniem wiadomości e-mail z formularzy, zapoznaj się z naszym przewodnikiem na temat tego, jak poprawić problemy z niewysyłaniem wiadomości e-mail przez WordPress.
Krok 5. Dodawanie formularza kontaktowego WordPress na stronie
Po skonfigurowaniu formularza kontaktowego WordPress nadszedł czas, aby dodać go do strony.
Możesz dodać go do istniejącej strony kontaktowej lub utworzyć nową stronę w WordPress.
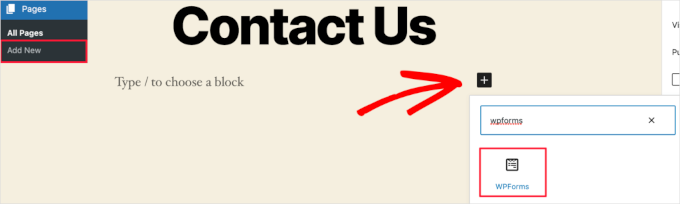
Jeśli chcesz utworzyć nową stronę formularza kontaktowego, po prostu przejdź do Strony ” Utwórz nowy, a następnie nadaj swojej stronie nazwę.
Będziemy używać bloku WPForms, aby dodać formularz na stronie. Wystarczy kliknąć przycisk dodawania bloku “Plus” i wyszukać “WPForms”.
Następnie można kliknąć na blok “WPForms”.
Blok WPForms pojawi się teraz w obszarze treści strony.
Należy kliknąć menu rozwijane, aby wybrać utworzony wcześniej formularz.

WPForms będzie wczytywać podgląd twojego formularza kontaktowego wewnątrz edytora. Możesz teraz kliknąć przycisk “Opublikuj” lub “Aktualizuj”, aby zapisać twój formularz.
Aby uzyskać więcej informacji, zapoznaj się z naszym przewodnikiem na temat osadzania formularzy w WordPress.
Teraz możesz odwiedzić swoją witrynę, aby zobaczyć go w działaniu. Oto jak wyglądał formularz na przykładowej stronie kontaktowej WordPress:

Jeśli chciałeś tylko dodać formularz kontaktowy na stronie, to tutaj skończyłeś. Gratulacje.
To powiedziawszy, WPForms zawiera również krótki kod formularza kontaktowego WordPress. Możesz go użyć, odwiedzając WPForms ” Wszystkie formularze, a następnie kopiując krótki kod obok swojego formularza.

Następnie wystarczy otworzyć stronę, na której chcesz go dodać, kliknąć przycisk dodawania bloku “Plus” i wyszukać “Krótki kod”.
Następnie kliknijmy blok “Krótki kod”.

Następnie wklej do pola krótki kod, który skopiowałeś powyżej.
Następnie możesz kliknąć “Aktualizuj” lub “Opublikuj”, a Twój formularz kontaktowy będzie dostępny w Twojej witrynie, tak jak powyżej.

Aby dowiedzieć się więcej na temat krótkich kodów, zapoznaj się z naszym przewodnikiem na temat dodawania krótkich kodów w WordPress.
Krok 6. Dodawanie formularza kontaktowego WordPress w panelu bocznym
WPForms zawiera również widżet formularza kontaktowego WordPress, którego można użyć do dodania twojego formularza kontaktowego do panelu bocznego lub dowolnego innego obszaru obsługującego widżety w twoim motywie WordPress.
Aby to zrobić, musisz przejść do Wygląd ” Widżety, a następnie kliknąć ikonkę bloku dodawania “Plus” w obszarze widżetu, w którym chcesz dodać twój formularz.

Następnie wyszukajmy “WPForms”.
Następnie możesz kliknąć blok “WPForms”, aby dodać go do paska bocznego.

Następnie należy wybrać formularz kontaktowy z listy rozwijanej.
Spowoduje to automatyczne wczytywanie podglądu twojego formularza.

Następnie kliknijmy przycisk “Aktualizuj”, aby zapisać zmiany.
Teraz możesz przejść na swoją witrynę i zobaczyć swój formularz kontaktowy na żywo na panelu bocznym lub w innym obszarze widżetów.

Aby dowiedzieć się więcej o widżetach, zapoznaj się z naszym przewodnikiem na temat dodawania i używania widżetów w WordPress.
Wskazówka bonusowa: Przenoszenie formularza kontaktowego WordPress na wyższy poziom
Oprócz tworzenia prostych formularzy kontaktowych, WPForms Pro zawiera ponad 2000 gotowych szablonów formularzy, które można wykorzystać do szybkiego tworzenia dowolnego typu formularza WordPress, którego potrzebujesz.
Dostępne są zaawansowane funkcje, takie jak logika warunkowa, ankiety i sondaże, zbieranie podpisów elektronicznych, porzucanie formularzy, dane geolokalizacyjne, konfigurowalne kody kuponów i wiele innych.
Ponadto pozwala łatwo akceptować płatności online za pośrednictwem Stripe, PayPal, Authorize.Net i Square. Nawet darmowa wersja WPForms pozwala na zbieranie płatności Stripe.
Nie wspominając o tym, że integruje się z tysiącami narzędzi marketingowych i biznesowych, takich jak Google Sheets, HubSpot i inne, aby pomóc Ci usprawnić przepływ pracy.
WPForms dodał również narzędzia do dostosowywania formularzy, takie jak strony docelowe formularzy, formularze konwersacyjne, formularze potencjalnych klientów i formularze kalkulatorów, które pozwalają dodawać interaktywne formularze do witryny bez wysokich kosztów.

Aby uzyskać więcej wskazówek, możesz zapoznać się z naszym przewodnikiem na temat tworzenia bardziej interaktywnych formularzy w WordPress.
Doświadczasz błędów formularza kontaktowego? Pozwól WPBeginner Pro Services je rozwiązać! Oferujemy niedrogą pomoc techniczną WordPress w nagłych wypadkach, aby szybko rozwiązać i poprawić błędy formularza kontaktowego. Zaoszczędź czas, zyskaj spokój ducha i upewnij się, że twoi klienci mogą do ciebie dotrzeć. Zaplanuj pomoc techniczną WordPress już dziś!
Film instruktażowy
Jeśli uczysz się przez oglądanie, spodoba ci się nasz poradnik wideo:
Mamy nadzieję, że ten artykuł pomógł ci stworzyć prosty formularz kontaktowy w WordPress. Zachęcamy również do zapoznania się z naszymi najlepszymi kreatorami formularzy online lub naszym przewodnikiem po korzystaniu z formularzy WordPress.
If you liked this article, then please subscribe to our YouTube Channel for WordPress video tutorials. You can also find us on Twitter and Facebook.


 in 2024")

Shamli
Hi, I’ve done all the steps as mentioned above, but I cannot see the Contact page when I preview.
Please help me to solve.
Thank you.
WPBeginner Support
Hi Shamli,
You need to edit the page, insert the form, and then click on the preview button. Your contact form will only appear on the page where you insert the form.
Admin
Brenda
HI – We are using this contact form and it’s fine but I would like to add Captcha and, more importantly, some text that can be overwritten in the message box. There is a local company with a very similar name so we are constantly receiving messages which relate to this other company. We want to have some text, that has to be overwritten, to reiterate what our company is to try and reduce these messages. Is this possible?
Brenda Donovan
I redid the form and rechecked the add recaptcha on the confirmation settings and it worked this time. I had done it before but somehow didn’t take.
now on to the mail problem. thanks
safi
sir how can i know which email system notify or receive message i did everything but don,t which i will receive the email from client i am beginner with wp
WPBeginner Support
Hi Safi,
Please see how to fix WordPress not sending emails issue
Admin
Yamin Kamboh
Thank you, was really helpful.
Sarah Zubair
So how do I access the library of media (if I’ve an option of attaching some files in my WP forms) then where do they all get stored?
WPBeginner Support
Hi Sarah,
By default, the user-uploaded files are stored in the WPForms folder inside the Uploads directory of your site.
If you’d prefer to upload the files to the WordPress Media Library, click on the File Upload field in the form builder. Then, under Advanced Options, check the box next to Store file in WordPress Media Library.
For more details see this guide.
Admin
marypeter
This is truly helpful. I can say it is my first time to leave a review in any website. The information you have provided has prompted me to do this. Thank you a thousand times!!
Eston
Hi
how do i set it up that i recieve emails in Gmail, and be able to reply to customers right there in Gmail.com?
WPBeginner Support
Hi Eston,
You can go to settings section of any form and click on the confirmation tab. From here you can add any email address where you want to be notified.
Admin
Cathy
I found this very helpful in setting up, however, after completion I ran a test, so did a friend of mine, I cannot figure out why we are not receiving the email tests sent from the web site? Although I’ve gone through the steps a second time to be sure all was correctly set up, I am not receiving messages from the web site, I hope you can assist with constructive suggestions to aid in problem solving, much appreciate the assistance…
Lori Jo
I am very new, easily confused! Regarding the assigned admin email address in my WP blog site, can that actually be used to receive messages from the contact form? I think the address looks more professional and it would be nice to have all site messages responding back to the actual site instead of an outside email like my Gmail. I did a test and I could not find the reply, installed Flamingo and I did see it but there is no reply option like regular email.
Please let me know, thanks!
Ron Isaac
Thanks, this was a great help to me!
Yoshi
I’m looking to build my own contact form plugin because the contact forms in the market I’ve tried slow down my site. Is this the best alternative?
Srinivas Goud
What is the easiest way to add products in wp
Shirley
Thank you so much! Your help saved my hours of banging my head against the wall.
Eslam Tolba
Hi,
Is there a way to add onClick code for the submit button for WpForms lite?
Thanks
gigi
hi, i have key in my email address in the notification but i’m yet to get any notification from my email even though i have done few testing.. how do i solve this matter? please guide, thanks
Al Kadam
I have contact form plugin installed but customization is very limited and the code is too long and complicated. Now I plan to copy a simpler .php code and install it myself. is it better to do it this way? is there security issue accessing the .php file from the page where the contact form is placed?
Ashley
Hi, I have tried several different forms and this keeps happening. Whenever I go to the contact page, under the title it says “>contact”. I can remove the word “contact” by removing the page title, but that little carrot ( > ) is still there. how do I get rid of that? Thanks.
Joe Tittiger
The mail does not arrive from this form.
Is there a video on how WP handles email so that I can fix this?
Keith
Thanks guys, a real easy process that let me set up my first contact form in like 10 minutes; tested and works
Dave
Hello. I’ve had wpforms set up for a couple weeks and have tried to send to it from two other email accounts, from two separate login locations….but I’ve yet to receive an email to my admin email account. Please help.
WPBeginner Support
Hi Dave,
Please take a look at our guide on how to fix WordPress not sending email issue. If that doesn’t help, then please contact WPForms support and they’ll be able to help you fix it.
Admin
olx
Hello
i tried inserting form after creating it but on the add page the form did not insert. my wordpress seems to be limited and cant add and form. please help
pratima Shrivastav
Hi,
I have created the Wp form as mentioned but when I test it out I am receiving any email notifications. i have turned on the notifications by clicking on email Notification section of the form. Am I missing any other settings? Please guide me to this
WPBeginner Support
Hi Pratima,
Please see our article on fixing WordPress not sending email issue.
Admin
Yvonne
I have set up the form, just like it was explained, but it isn’t showing up on the page I told to add the form.
Rodrigo
Hello, is it possible to use html / css in forms construction?
WPBeginner Support
Hi Rodrigo,
Yes, you can add HTML and custom CSS with WPForms.
Admin
david
Can I export this contact form to an Excel file?
Rebecca Yurkanin
WP forms is super easy to set up, but DOES NOT work. I tried several times to send an email to myself. It worked once! The other 20 times did not. I went back and tried to change things around. It still did nothing. I am familiar with shortcodes, so that wasn’t the problem. And never saw a recaptcha. And wpforms doesn’t even have a contact form to fill out so I can contact them! What a joke!
WPBeginner Support
Hi Rebecca,
To fix the email issue, please take a look at our guide on how to fix WordPress not sending email issue.
If you are using the free version of the plugin, then you can ask for support on the plugin’s support page on WordPress.org. If you are using the paid version of the plugin then you can contact support on plugin’s website.
Hope this helps.
Admin
Brenda
My blog isn’t even launched yet. I have a Coming Soon Page. I have been working on getting a Contact Form to appear for what seems like hours. I had added a new Contact Page on my menu. I saved the code on my Contact Page. Published. And, The Contact Form is not showing up when I live preview Contact on my primary menu. I’m following your tutorial. This seems so easy, and yet…not so much! Does this work with Genesis child? I’ve tried WPForms and Contact Form. I don’t know what I’m doing wrong. Since I’m a newbie, I’m having trouble with menu + page connection and menu category drop downs. This blog setup is more difficult than I thought. Any advice?
zelda zerafa
When I go on SETTINGS it looks different to your video.
I get 3 tabs : General, Integrations and System Info as follows:
General > Form Styling/ Email/Re Captcha/Validations
Integrations > Integrate Constant Contact with WP forms
System info
I have no idea what to fill in for Validations and Email.
Under validations there are also two mysterious fields : Number and Confirm Value
Please help!
WPBeginner Support
Hey Zelda,
The screen you are viewing is for the plugin settings. Click on WPForms » All Forms and then edit a form or go to WPForms » Add New to launch the WPForms’ form builder interface. There you will see a screen like the screenshot above with a Settings tab. These settings are specific to the form you are creating.
Admin
MAINUDDIN
When i instal wpforms another page not working only wpforms page is showing
WPBeginner Support
Hi,
Can you please share the link of your website? You can also contact WPForms support.
Admin
Maciej
Hi,
Is it possible to add a simple text to the form like: “The file must be max 2mb”?
Saumya
Please help me to resolve the issue of email,i am not getting e-mail notification.
Myri
Is this setup (Form plugin) recommended for creating a form with ~500 entries per month where users upload images + complete payments. Eg. Now I am using contact form 7 plus cc7 paypal addon to create a “submit your images + pay” type form. Is this sustainable or is it better to use a professional form builder service?
Catherine O
Thanks for this. Easy to follow!
Dock
excellent blog, very rich in content and correctly thought out, personally I found
here much interesting and useful…..Well! let know my friend as well.
Heather Pooley
I followed this tutorial and I got the contact form working. But when I tried to send a test email through it to my blog email address from my personal one, it didn’t get to me. Any advice on how I can fix this?
WPBeginner Support
Hi Heather,
Please see our guide on how to fix WordPress not sending email issue.
Admin
Prats
Unable to add contact form as sidebar. Already created form using WPforms, added to WordPress widgets (Appearance-widgets) but unable to see the form on page (But getting the title form the form on the sidebar widget area). Tried several times, so frustrated, Can you help ?
FYI, I am using live composure and beaver page builder to design page.
Thanks in advance
WPBeginner Support
Hi,
Try adding a form to a post or page to see if it appears correctly there.
Admin
Kathy Broyles
Hi! created the form and linked the page – works great! but… when i do a test and hit submit, I get this:
how do I fix that?
thanks,
Kathy
Kathy Broyles
think I’ve got it!
WPBeginner Support
Hi Kathy,
You are seeing this error because you have set an invalid email as the from email address in your form settings. You can fix it by adding a valid email address.
Admin
Calli Jacobs
Hello,
For some reason, the shortcode doesn’t work, and the “add form” button doesn’t, either. It just gives me the shortcode in both “text” and “visual.” What am I doing wrong?
Asking you because I used the suggested plugin.
WPBeginner Support
Try to deactivate all other WordPress plugins on your site and then test. If it works, then probably a plugin on your site is causing the conflict.
Admin
Roxanne
Thank you, this was super helpful!
Joe Andrews
How long does it take for the wpforms contact me plugin to work? I set it up on my wordpress site and the submit appears to work and the reply message appeared as expected. I have tested it 3 times (now an hour later on the last one) and have yet to receive any of the notices. I tried it first to the admin, and then changed it to my regular email. 0-3 have been received. I have checked the spam folder.
WPBeginner Support
Hi Joe,
If you are using the PRO version of WPForms, then you can go to WPForms » Entries to confirm that the message you submitted using contact form was actually submitted.
In most cases it is the problem with how your WordPress hosting provider handles emails generated from WordPress. Please take a look at our guide on how to fix WordPress not sending email issue.
Admin
Ediwin
Thanks for sharing.
stephen thomas
how do I use the same form but know what page it has come from automatically. I want to design a simple form and have custom made a few for every page I place it on. I’d rather it just emailed me and somewhere tells me ‘came from contact us page’ or ‘enquiry came from price list page’
Kevin
Hello thanks for the post. Is there away to change the font color? The font is black and our web page, thus you can’t see the words.
Thanks
WPBeginner Support
Hi Kevin,
Please see this guide to learn how to change colors and style your form.
Admin
The Mayflower
This is awesome information. Thank you so so much.
Neil Hanes
I’m brand new to blogging and this guide is fantastic! Thank you. I have a couple of follow up queries:
– If I fill in a custom email address, can I respond to the inquiry through my website? If so, how?
– Is there any way to change the font of the form to be more in line with my website theme? I’m thinking maybe I just want to unbold the title and field headings.
Thanks
Neil
WPBeginner Support
You can respond to emails using an email service. Yes you can use custom CSS to adjust fonts and styles.
Admin
Alicia
After building up the contact form, (yes, i did add the email address for notification) do not receive any notification. I had trouble with Contact Form 7 so I am now trying WPForms and it shows the same problem! How to make WPForms work? Thx.
WPBeginner Support
Please see our guide on how to fix WordPress not sending email issue.
Admin
Saher
From:domain name [mailto:info@domain name]
Sent: Sunday, May 15, 2016 4:53 AM
To: info@domain name
Subject: Contact from domain name
Name : XYZ
Email :]xyz@gmail.com
Message :This is testing email
Hi ,
when I used short code of contact form & send testing email to check I got email with 1st paragraph . I don’t need this info can you help how can I stop it ?
WPBeginner Support
We are not sure we understand your question. The first part is added by your email client. It shows you where this email message is coming from.
Admin
Harsha
I installed. I filled info in the form to test it and clicked “sumbit”. It said “Thank you, will be in touch with you” And nowhere it appeared in the mail. Where to see that info???
WPBeginner Support
Please see Step 4: Configuring Form Notification and Confirmations in the article. By default the plugin will send email to the admin address provided in WordPress settings, you can add more email addresses in the notifications.
If you still don’t receive email, then please take a look at our guide on how to fix WordPress not sending email issue.
Admin
Harsha
I have set up email using go daddy C panel. Is it same for WordPress also? Or Do I have to setup a different admin email id in WordPress? Please guide me.
However I have included all email ids in the notification settings separated by commas (Cpannel id & personal gmail id)
But nowhere I received any mail regarding the info I filled in the contact form for testing purpose.
Also, I went through the link “how to fix WordPress not sending email issue” and installed Gmail SMTP it didn’t work either. I tried troubleshooting by configuring port with 587 (with TLS encryption), 465 (with SSL encryption). 25 with TLS first and then SSL. Nothing worked.
Lesley Jackson
Hi,
This all looks very useful but when I want to use some of this I can’t seem to find it on my admin site. I wanted to create a contact form but can’t find any way to add a new plug in. Are these tips and suggestions just for people who have a self hosted WordPress blog?
WPBeginner Support
Yes, these are just for people using self hosted WordPress blog. Please see our guide on the difference between self hosted WordPress.org vs free WordPress.com blog.
Admin
jo dewberry
Thank you so much. I am new to blogging and your step by step information was easy to understand and I installed my Contact plug in first time.
WPBeginner Support
Glad you found it helpful.
Admin
Jayne Bodell
Thanks for the information. I installed the form, easy peasy.