
Przypadkowe zamknięcie strony bez przesłania twojego komentarza lub z formularzem wypełnionym do połowy może być bardzo frustrujące. Niedawno jeden z naszych użytkowników zapytał nas, czy możliwe jest pokazanie swoim czytelnikom wyskakującego okienka potwierdzającego nawigację.
To małe wyskakujące okienko ostrzega użytkowników i zapobiega przypadkowemu opuszczeniu przez nich w połowie wypełnionych i niezłożonych formularzy. To dobry sposób na poprawę doświadczenia użytkownika i zapobieganie konieczności rozpoczynania czegoś od zera.
Jeśli jednak funkcja ta nie jest skonfigurowana prawidłowo, może być irytująca i zakłócać działanie twojej witryny, frustrując użytkowników. Będziesz potrzebował niezawodnego sposobu, aby dodać ją płynnie i uniknąć tych problemów.
Dlatego chcemy pokazać, jak to zrobić za pomocą własnej wtyczki. Nie martw się, to łatwiejsze niż myślisz!
W tym artykule pokażemy, jak wyświetlić wyskakujące okienko nawigacji dla formularzy WordPress.

Co to jest wyskakujące okienko nawigacji? Dlaczego go potrzebujesz?
Załóżmy, że użytkownik pisze komentarz na twoim blogu WordPress. Napisał już kilka linijek, ale rozproszył się i zapomniał przesłać komentarz. Teraz, jeśli zamknie przeglądarkę, komentarz zostanie utracony.
Wyskakujące okienko nawigacji z potwierdzeniem daje im szansę na dokończenie komentarza.
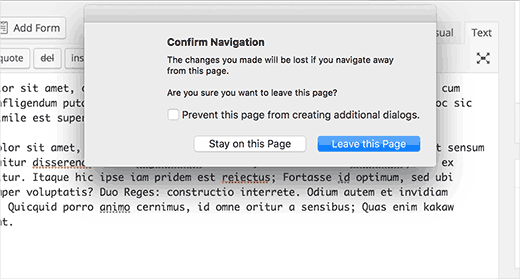
Ta funkcja jest pokazana w działaniu na ekranie edytora wpisów WordPress. Jeśli masz niezapisane zmiany i próbujesz opuścić stronę lub zamknąć przeglądarkę, pojawi się wyskakujące okienko z ostrzeżeniem.
Ustawienie wyskakującego okienka potwierdzającego nawigację może poprawić wrażenia użytkownika, współczynniki konwersji i zaufanie użytkowników.
Oto jak to zrobić: Dając użytkownikom funkcję ostrzegania, pokazujesz, że dbasz o doświadczenia twoich użytkowników, co może pomóc w budowaniu lojalności i ponownych przejściach na stronę. Użytkownicy są bardziej skłonni do wypełniania formularzy lub komentarzy, jeśli wiedzą, że nie stracą swoich postępów.
Mając to na uwadze, pokażemy ci, jak dodać tę funkcję ostrzegawczą do komentarzy WordPress i innych formularzy na twojej witrynie. Oto krótki przegląd wszystkich rzeczy, o których będziemy mówić w tym przewodniku:
Gotowy? Zaczynajmy.
Wyświetl wyskakujące okienko Potwierdź nawigację dla nieprzesłanych formularzy w WordPress
W tym poradniku będziemy tworzyć własną wtyczkę, ale nie martw się. Możesz również pobrać wtyczkę na końcu tego poradnika, aby zainstalować ją na twojej witrynie internetowej.
Aby jednak lepiej zrozumieć kod, poprosimy Cię o próbę stworzenia Twojej własnej wtyczki. Możesz to zrobić najpierw w lokalnej instalacji lub witrynie pomostowej.
Najpierw musisz utworzyć nowy katalog na twoim komputerze i nazwać go confirm-leaving. Wewnątrz katalogu confirm-leaving należy utworzyć kolejny katalog i nadać mu nazwę js.
Teraz otwórzmy zwykły edytor tekstu, taki jak Notatnik i utwórzmy nowy plik. Wewnątrz po prostu wklej następujący kod:
[/php]
[php]<?php/*** Confirm Leaving* Plugin Name: Confirm Leaving* Plugin URI: https://www.wpbeginner.com* Description: This plugin shows a warning to users when try they forget to hit submit button on a comment form.* Version: 1.0.0* Author: WPBeginner* Author URI: https://www.wpbeginner.com* License: GPL-2.0+* License URI: http://www.gnu.org/licenses/gpl-2.0.txt*/functionwpb_confirm_leaving_js() {wp_enqueue_script('Confirm Leaving', plugins_url('js/confirm-leaving.js',__FILE__),array('jquery'),'1.0.0', true );}add_action('wp_enqueue_scripts','wpb_confirm_leaving_js');
Ta funkcja PHP po prostu dodaje plik JavaScript do front-endu twojej witryny internetowej.
Zapisz ten plik confirm-leaving.php w głównym katalogu confirm-leaving.
Teraz musimy utworzyć plik JavaScript, który będzie wczytywany przez tę wtyczkę. Możesz to zrobić, tworząc nowy plik w twoim edytorze tekstu i wklejając w nim ten kod:
[/javascript]
[javascript]jQuery(document).ready(function($) {$(document).ready(function() {needToConfirm =false;window.onbeforeunload = askConfirm;});functionaskConfirm() {if(needToConfirm) {// Put your custom message herereturn"Your unsaved data will be lost.";}}$("#commentform").change(function() {needToConfirm =true;});})
Ten kod JavaScript wykrywa, czy użytkownik ma niezapisane zmiany w formularzu komentarza. Jeśli użytkownik spróbuje opuścić stronę lub zamknąć okno, wyświetli wyskakujące okienko z ostrzeżeniem.
Następnie zapisz ten plik jako confirm-leaving.js w katalogu js.
Po zapisaniu obu plików, tak powinna wyglądać struktura twojego katalogu:

Teraz musisz połączyć się z twoją witryną WordPress za pomocą klienta FTP. Aby uzyskać instrukcje krok po kroku, możesz zapoznać się z naszym przewodnikiem na temat korzystania z FTP do przesyłania plików WordPress.
Po podłączeniu należy przesłać folder confirm-leaving do katalogu/wp-contents/plugins/ na twojej witrynie internetowej.

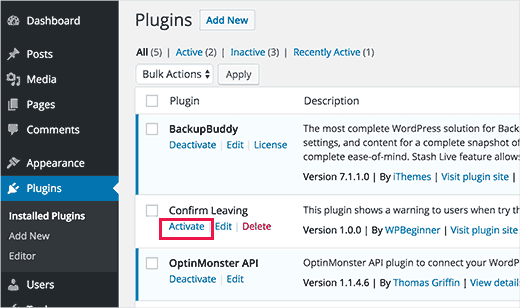
Następnie należy zalogować się do obszaru administracyjnego WordPress i przejść do sekcji „Wtyczki”.
Z tego miejsca powinieneś zobaczyć wtyczkę „Confirm Leaving” na liście zainstalowanych wtyczek. Następnie możesz kliknąć odnośnik „włącz” znajdujący się pod nią.
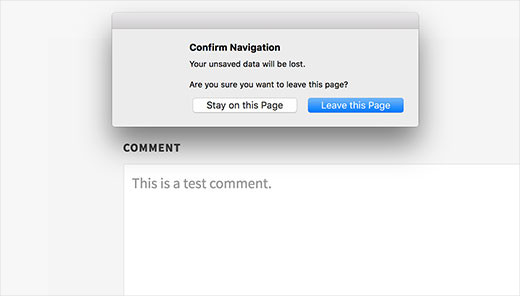
To wszystko. Możesz teraz przejść na dowolny wpis na twojej witrynie internetowej, napisać jakiś tekst w dowolnym polu formularza komentarza, a następnie spróbować opuścić stronę bez wysyłania.
Pojawi się wyskakujące okienko z ostrzeżeniem, że Zamierzasz opuścić stronę z niezapisanymi zmianami.
Dodaj wyskakujące okienko z ostrzeżeniem do innych formularzy na twojej witrynie WordPress
Możesz użyć tej samej bazy kodu do kierowania na dowolne formularze na twojej witrynie WordPress. Tutaj pokażemy przykład użycia go do kierowania na formularz kontaktowy.
W tym przykładzie używamy wtyczki WPForms do utworzenia formularza kontaktowego. Instrukcje będą takie same, jeśli używasz innej wtyczki formularza kontaktowego na twojej witrynie internetowej.
Pierwszą rzeczą do zrobienia jest przejście do strony, na której dodałeś swój formularz kontaktowy. Następnie najedź myszką na pierwsze pole twojego formularza kontaktowego, kliknij prawym przyciskiem myszy, a następnie wybierz „Sprawdź” z menu przeglądarki.
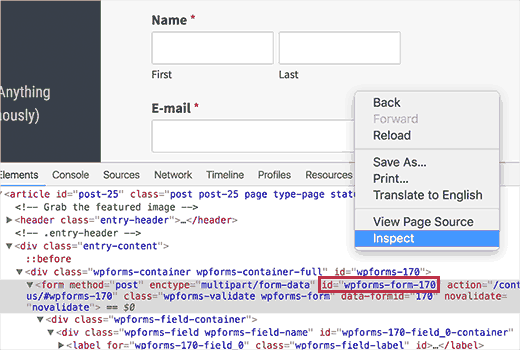
Z tego miejsca będziesz chciał zlokalizować linię, która zaczyna się od tagu <form>, aby znaleźć atrybut identyfikatora. W tym przykładzie identyfikator naszego formularza to wpForms-form-170.
Po znalezieniu tagu, skopiuj atrybut identyfikatora.
Teraz edytujmy plik confirm-leaving.js i dodajmy atrybut identyfikatora po #commentform. Upewnij się tylko, że oddzielasz #commentform identyfikator twojego formularza przecinkiem. Będziesz musiał również dodać znak # jako prefiks do atrybutu identyfikatora twojego formularza.
Twój kod będzie teraz wyglądał następująco:
[/javascript]
[javascript]jQuery(document).ready(function($) {$(document).ready(function() {needToConfirm =false;window.onbeforeunload = askConfirm;});functionaskConfirm() {if(needToConfirm) {// Put your custom message herereturn"Your unsaved data will be lost.";}}$("#commentform,#wpforms-form-170").change(function() {needToConfirm =true;});})
Jeśli wszystko wygląda dobrze, możesz zapisać zmiany i przesłać plik z powrotem na twoją witrynę internetową.
Teraz możesz wpisz dowolny tekst w dowolnym polu twojego formularza kontaktowego, a następnie spróbuj opuścić stronę bez wysyłania formularza. Pojawi się wyskakujące okienko z ostrzeżeniem o niezapisanych zmianach.
Możesz pobrać wtyczkę confirm-leaving tutaj, a następnie zainstalować i włączać wtyczkę w zwykły sposób. Jeśli potrzebujesz pomocy, możesz zapoznać się z naszym przewodnikiem na temat instalacji wtyczki WordPress.
Zwróć uwagę, że jest on skierowany do formularza komentarzy, ale możesz edytować wtyczkę, aby kierowała twój formularz rejestracji użytkownika, ankiety, formularz uwagi, formularz podania o pracę lub inne formularze.
Dodatkowa wskazówka: Popraw wydajność twoich formularzy WordPress
Po dodaniu wyskakującego okienka nawigacji z potwierdzeniem warto śledzić, jak często użytkownicy porzucają swoje formularze.
Wiedza o tym, ile osób opuszcza witrynę bez jej ukończenia, może pomóc w sprawdzeniu, jak dobrze działa twoja witryna. W ten sposób możesz dowiedzieć się, co może powodować ich opuszczenie i wprowadzić ulepszenia.
Jednym z najlepszych narzędzi do śledzenia porzucania formularzy jest MonsterInsights.

Jest to najlepsza wtyczka Google Analytics, która ułatwia sprawdzenie, w jaki sposób użytkownicy wchodzą w interakcję z Twoimi formularzami i gdzie mają tendencję do porzucania, a wszystko to z kokpitu WordPress.
Więcej szczegółów można znaleźć w naszym przewodniku na temat śledzenia i ograniczania liczby porzuceń formularzy.
W razie potrzeby można również przeprowadzić test podziału A/B. Oznacza to wypróbowanie różnych wersji twoich formularzy, aby zobaczyć, która z nich działa lepiej.

Możesz na przykład zmienić treść wyskakującego okienka nawigacji potwierdzającej lub dostosować swój formularz. Analizując wyniki, można określić, co utrzymuje zaangażowanie użytkowników i pomaga zmniejszyć współczynnik porzuceń.
Thrive Optimize jest najlepszą wtyczką do tego zadania. Umożliwia ona przeprowadzanie testów A/B bez konieczności kodowania i zapewnia bezpieczeństwo twoich danych.
Aby dowiedzieć się więcej, możesz zapoznać się z naszym przewodnikiem na temat przeprowadzania testów podziału A/B w WordPress.
Mamy nadzieję, że ten artykuł pomógł ci pokazać wyskakujące okienko nawigacji dla formularzy WordPress. Możesz również zapoznać się z naszymi eksperckimi typami najlepszych kreatorów formularzy online i naszym przewodnikiem na temat dodawania lepszych własnych powiadomień.
If you liked this article, then please subscribe to our YouTube Channel for WordPress video tutorials. You can also find us on Twitter and Facebook.
")


Igor
Tried to use your code in bbpress forum. Unfortunately no popup message appears after user dose not post his comment. Tried all variations of changing id in JS file but still nothing appears.
Bob Garrett
Further to my previous query I have now tried using the form’s parent div id and modified the code. This almost works but…
The text shown by the pop-up is not the text entered in the code.
Even if the form is completed and submit hit, then going to another page still results in the warning.
How can I resolve this?
Tom Kelley
Have tried this vvvvv to no avail. Working with Gravity Forms. All else works well, but the warning still comes up when hitting the submit button on a completed form. Any advice?
WPBeginner Support
Nov 27, 2016 at 6:52 am
Hi Bonnie,
We tested the plugin with WPForms and it worked. You will need to edit the confirm-leaving.js file and replace #commentform with the wpforms container div id. Typically it is wpforms-12 where 12 is the ID of your form. You can also see it using the inspect element tool in your browser.
Bonnie Ramthun
I’m still trying to figure out how to make sure the popup DOESN’T appear when the user presses the „Submit” button. The confirm leaving popup shouldn’t appear if the user has entered all the information required, but this code makes it pop up every time.
I would so appreciate the help, if there is a solution available.
Swayam Dhawan
I Need the same function when someone navigate from particular page in website and while click on stay , they must navigate to home page of the website.
waiting for the response.
Bonnie Ramthun
I am so happy for your wonderful confirm navigation code! I need it desperately because many of my clients users can’t get it through their head that they need to press the „Submit” button on the form.
The code works perfectly, except for one problem. When I press the „Submit” button on my WPForms form, the confirm navigation code pops up. I would like the „confirm navigation” to happen only when the user doesn’t press the „Submit” button. I can’t figure out how to do this. Can you help?
WPBeginner Support
Hi Bonnie,
We tested the plugin with WPForms and it worked. You will need to edit the confirm-leaving.js file and replace #commentform with the wpforms container div id. Typically it is wpforms-12 where 12 is the ID of your form. You can also see it using the inspect element tool in your browser.
Admin
Will C
I have two separate multi-page gravity forms on my site. When this plugin is active, I get a confirmation popup when clicking „Next Step” on one of the forms (undesired), but not the other. Are you aware of any issues with gravity forms and „window.onbeforeunload”? Thanks
Nipa Sarker
Having same issues with buddy press create group steps.
Nipa Sarker
I ma using the code for buddy-press multi step create group from.It is working fine except while clicking on the next step button or save button it is showing the same alert.
I ma using the form id „#create-group-form” instead of the #commentform
Luis Zarza
Hi, nice post!
It helped a lot. But your solution won’t work while logged in. It only works for users that fill in the form and are logged out. I need it also to work for logged in users, please!
Could you provide a solution for that?
Thanks.
Luis Zarza
Sorry, it does actually works when you create the plugin. At first I did it only throwing the JS to the page I wanted without creating the plugin, because I didn’t want the script to be loaded on all the pages of my site.
Alain Aubry
Hi
Contact Form 7 does not use an ID in their form, how can I make this work?
WPBeginner Support
Contact Form 7 uses an ID with all the forms. The line that contains form ID will look something like this:
<divrole="form"class="wpcf7"id="wpcf7-f85-p11-o1"lang="en-US"dir="ltr">1-click Use in WordPress
In this example, the form’s ID attribute is
wpcf7-f85-p11-o1. Hope this helps.Admin
Betty L Van Fossen
I have two problems. One I get these pop up in my mail all the time,q it’s aggravating. I’m 89 in yrs.therefore a little short on patience and I start using my pointer to fast hitting other things, so I get myself in lots of problems. Two –guess(I know) I have to many cookies they say. What are the cookies –how do I eleminate them? What do you mean subscribe without commenting. I prefer the e-mail. O.K..to personal and meaningful conversation.
Betty L Van Fossen
Does Pop Ups work the same for e-mail as WordPress for removing?
WPBeginner Support
We are not sure what you mean. Can you please explain?
Admin
Betty L Van Fossen
Safari said I could not get in cause I had to many cookies. In the meantime I was on my e-mail and the pop ups came on, while on my e-mail they are always popping up. I got on google and asked for help on cookies and pop ups and gave me lots to choose from. Now word press got in here, what is word press. I’m not going to write a book,just NEED HELP. Answer by e-mail. I’m turning you off now I’m really tired now.
Betty L Van Fossen
I will wait for your reply in my e-mail as I’m tired so will turn off now.