You probably have seen our graphic comparing Self Hosted WordPress.org vs. Free WordPress.com, in which the Self-Hosted version wins by far in terms of more control, extra plugins, extra themes and much more. Often when users are ready to move to their own independently hosted blog, they go through a very long process of transferring. Ofcourse a lot of users use our Consulting package, and have us do it. But now WordPress had made it a bit easier to transfer by adding the option of Offsite Redirect.
One of the key issues when moving from WordPress.com was: “How will I redirect my users to the new blog?” or “Will I be able to keep all the SEO link juice such as backlinks etc?”. Previously, you could redirect your WordPress.com traffic to your new blog, but it was a long process of changing DNS, and then rechanging it again. And it would only get you a 302 redirect. From the tags of the official announcement post, it seems that this new offsite redirect will be a 301 redirect which is better for SEO.
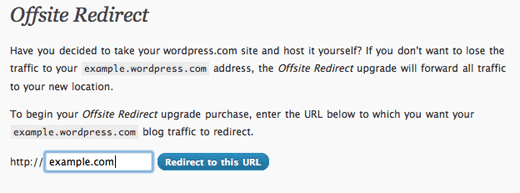
Now how do you go about doing this? You can purchase the upgrade from the Upgrades screen in your dashboard. Then you will need to enter the new domain where you want your wordpress.com traffic to be redirected. Type the URL into the blank field, and click the blue button that says Redirect to this URL. In the image below, the example is example.com as an illustration.

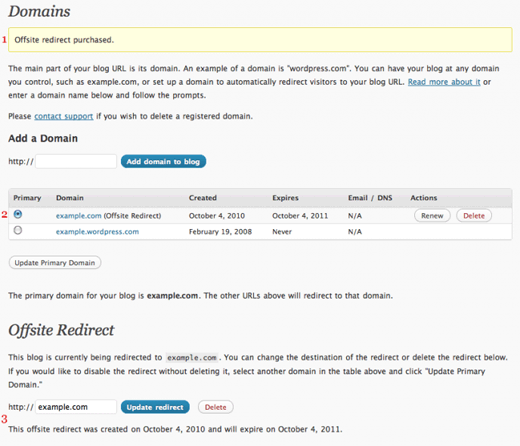
Once you have confirmed the purchase, you’ll be taken to the domains management screen at Upgrades > Domains. You’ll notice a few things, numbered on the image below.

The image above displays that your purchase has been confirmed, so the Upgrades > Domains screen now includes management for your new Offsite Redirect upgrade. Second, the redirect is in effect. The radio button shows the offsite domain as your new Primary domain. You can change the destination URL at anytime by editing the URL field and clicking Update redirect, or you can delete the redirect altogether. If you want to turn off the redirect for a while but don’t want to delete it, all you have to do is click on the radio button next to your original wordpress.com domain, and click the Update Primary Domain button, as shown in the image below.
This is really easy, and we really hope that the tag is right and it is a 301 redirect. Another useful feature. What are you waiting for now? Are you ready to make the switch?


Tim Maxey
We have been using mutiple Wordpress sites to create cool content, but not only that, be able to use them as backlinks etc to help others sell there products and services. Not sure if many people know you can have one account with Wordpress, then setup mutiple blogs and have fun.
On a side note, would be nice to have some soft of javascritp module add on with out having to use your own server…