長年にわたり、カスタマイザーについて、またユーザーがWordPressサイトでカスタマイザーを最大限に活用する方法について、多くのご質問をいただいてきました。
カスタムフィールドは、投稿やページに追加データや情報を追加できるWordPressの便利な機能です。WordPressの人気プラグインやテーマの多くは、カスタムフィールドを使って重要なデータを保存しています。
私たちはWordPressカスタムフィールドの経験があります。この投稿では、いくつかのヒント、トリック、ハックを使ってWordPressカスタムフィールドの使い方を紹介します。

この投稿は長いので、ナビゲーションしやすいように目次をつけました。以下のクイックリンクから読みたいセクションにジャンプしてください:
- What Are WordPress Custom Fields?
- Adding Custom Fields in WordPress
- Displaying Custom Fields in WordPress Themes
- Troubleshooting: Can't Find Custom Field in Dropdown on Post Edit Screen
- Creating a User Interface for Custom Fields Using Advanced Custom Fields
- How to Hide Empty Custom Fields With Conditional Statements
- Adding Multiple Values to a Custom Field
- How to Search Posts by Custom Field in WordPress
- Displaying Posts With a Specific Custom Key
- How to Add Guest Author Name Using Custom Fields
- How to Display Contributors to an Article Using Custom Fields
- How to Display Custom Fields Outside the Loop in WordPress
- Display a Custom Header, Footer, Sidebar Using Custom Fields
- Manipulating RSS feed Content With Custom Fields
- How to Manipulate RSS Feed Title With Custom Fields
- How to Set Expiration Date for Posts in WordPress Using Custom Fields
- How to Style Individual Posts Using Custom Fields
WordPressカスタムフィールドとは?
WordPressのカスタムフィールドは、編集中の投稿やページに追加情報を追加するためのメタデータです。
初期設定では、投稿やページ、その他のコンテンツタイプを新規作成すると、WordPressはそのコンテンツを2つの異なる部分に分けて保存します。
最初の部分は、WordPressのコンテンツエディターを使って追加するコンテンツの本文です。
第二の部分は、そのコンテンツに関する情報である。例えば、タイトル、投稿者、日付、時間など。この情報はメタデータと呼ばれる。
WordPressサイトは、作成した投稿やページに必要なメタデータをすべて自動的に追加します。また、カスタムフィールドを使用することで、独自のメタデータを作成して保存することもできます。
初期設定では、カスタムフィールドオプションは投稿編集画面では非表示になっています。表示するには、画面右上の三点メニューをクリックし、メニューから「環境設定」を選択する必要があります。
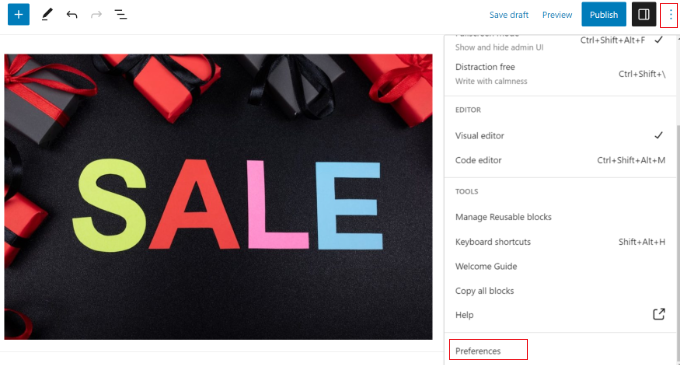
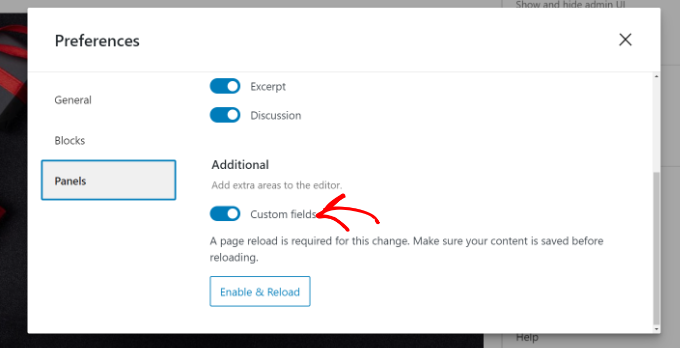
ポップアップが開きますので、「パネル」タブに切り替えて、「カスタマイザー」オプションを有効化してください。
その後、’Enable & Reload’ボタンをクリックするだけで、投稿エディターが再読み込みされます。
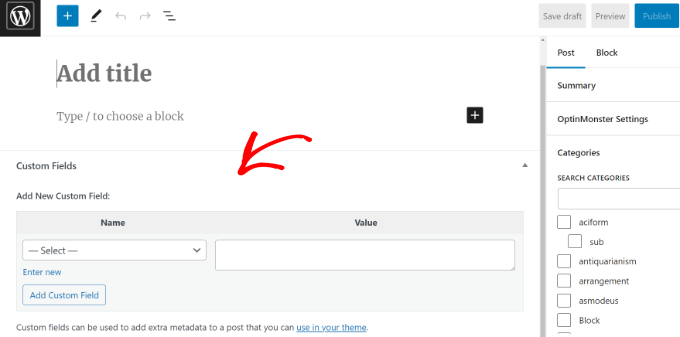
投稿エディターがリロードされ、コンテンツエディターの下にカスタムフィールドパネルが表示されます。
カスタムフィールドは、投稿、ページ、その他のコンテンツタイプに関連するあらゆる情報を追加するために使用できます。このメタ情報をテーマに表示することができます。
ただし、そのためにはWordPressテーマファイルを編集する必要があります。
注:このチュートリアルは、すでにテーマファイルの編集に慣れているユーザーにお勧めします。また、自分のテーマやプラグインでカスタムフィールドを適切に使用する方法を学びたいWordPress開発者の方にも役立ちます。
それでは、WordPressでカスタムフィールドを追加して使用する方法を見ていきましょう。
WordPressにカスタムフィールドを追加する
まず、カスタムフィールドを追加できるように、投稿またはページをブロックエディターで開く必要があります。次に、カスタムフィールドのメタ情報に移動します。
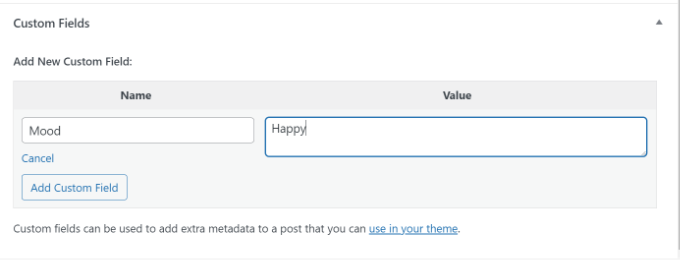
次に、カスタムフィールドの名前を入力し、値を入力します。Add Custom Field’ボタンをクリックして保存します。
フィールドはこのように保存され、カスタムフィールドメタボックスに表示されます:
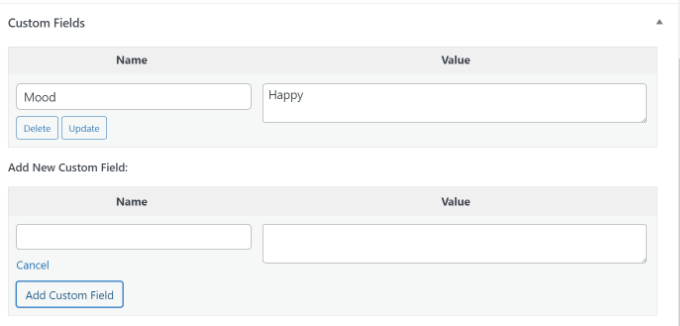
このカスタムフィールドはいつでも編集でき、「更新」ボタンをクリックするだけで変更が保存されます。不要になったら削除することもできます。
カスタムフィールドの設定を保存するために投稿を保存する必要があります。
WordPressテーマでカスタムフィールドを表示する
カスタムフィールドをサイトに表示するには、WordPressテーマファイルとコードスニペットを編集する必要があります。
ちょっとしたミスでサイトが壊れてしまう可能性があるため、テーマファイルを直接編集することはお勧めしません。より簡単な方法は、WPCodeを使用することです。
WordPressのダッシュボードからカスタマイザーの追加やスニペットの管理ができる、WordPressのための最高のコードスニペットプラグインです。
コピー&ペーストをしたことがない場合は、WordPressでコードをコピー&ペーストする方法についてのガイドを読むことをお勧めします。
まず、無料のWPCodeプラグインをインストールし、有効化する必要があります。詳しくは、WordPressプラグインのインストール方法の初心者ガイドをご覧ください。
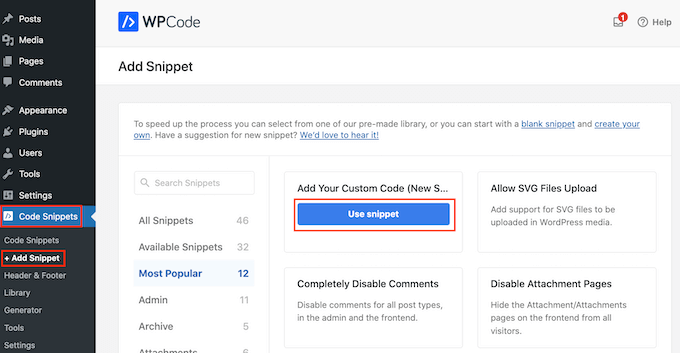
有効化したら、WordPressダッシュボードからCode Snippets ” + Add Snippetに移動し、’Add Your Custom Code (New Snippet)’ オプションを選択する必要があります。
このコードをコピーして、テーマ・ファイルに追加してください:
1 | <?php echo get_post_meta($post->ID, 'key', true); ?> |
keyをカスタムフィールド名に置き換えるのを忘れないでください。
次に、コードを「コードプレビュー」エリアに入力し、コードタイプを「PHPスニペット」に変更します。
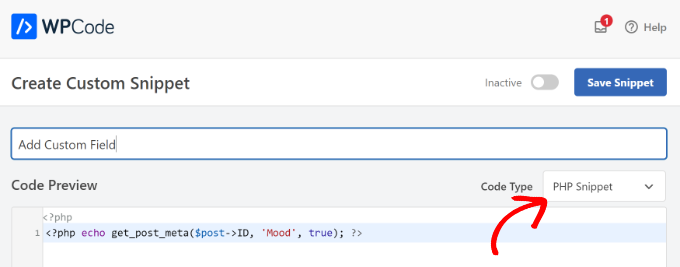
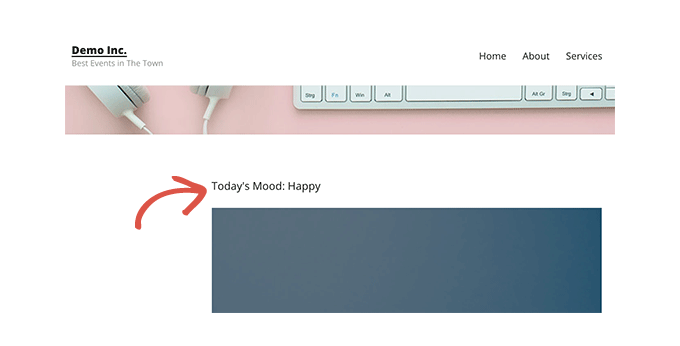
例えば、私たちのデモテーマではこのコードを使用しました:
1 | <p>Today's Mood: <?php echo get_post_meta($post->ID, 'Mood', true); ?></p> |
ここから、インサーターセクションまでスクロールダウンすることができます。
ここで、コードを実行する場所を選択できます。初期設定では、WPCodeはコードを自動挿入し、サイト上のあらゆる場所で実行します。
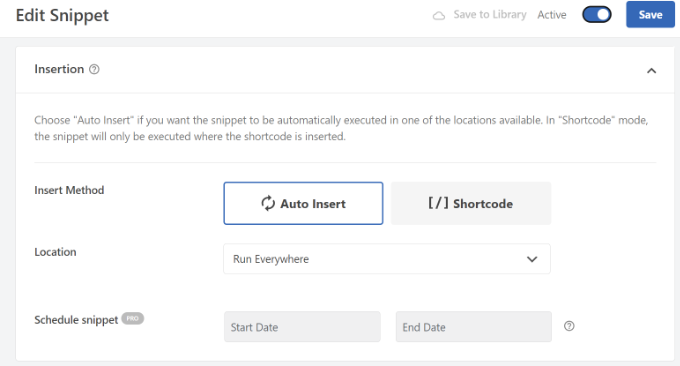
しかし、これを変更し、カスタムフィールドを表示させたい場所を選択することができます。
例えば、「Page Specific」タブを選択し、「Insert Before Post」オプションを選択する。こうすることで、カスタムフィールドがブログ投稿の先頭に表示されます。

これで変更を保存して、カスタムフィールドを追加した投稿にアクセスし、その動作を確認することができます。
このカスタムフィールドは、WordPressの他のブログ投稿でもすべて使用できます。
また、ブログ投稿ごとにカスタムフィールドを簡単に調整することもできます。新規投稿を作成するか、既存の投稿を編集するだけです。
次に、カスタムフィールドのメタ情報に移動し、ドロップダウンメニューからカスタムフィールドを選択し、その値を入力します。
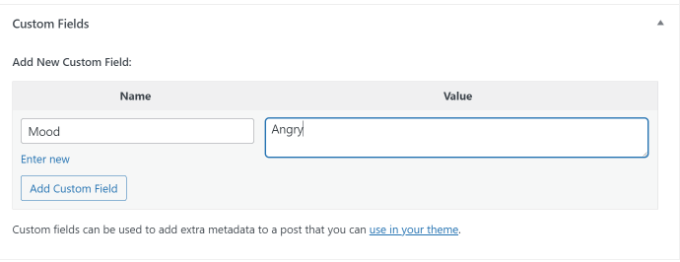
完了したら、「カスタムフィールドを追加」ボタンをクリックして変更を保存し、投稿を公開または更新します。
トラブルシューティング投稿編集画面のドロップダウンでカスタムフィールドが見つからない
初期設定では、WordPressは投稿編集画面のドロップダウンメニューで30個のカスタムフィールドしか読み込みません。
すでにカスタムフィールドを使用しているWordPressテーマやプラグインを使用している場合、それらがドロップダウンメニューに最初に表示され、新しく作成したカスタムフィールドが表示されないことがあります。
この問題を解決するには、テーマのfunctions.phpファイルに以下のコードを追加するか、WPCode(推奨)を使用する必要があります:
1 2 3 4 | add_filter( 'postmeta_form_limit', 'meta_limit_increase' );function meta_limit_increase( $limit ) { return 50;} |
上記のコードは、この制限を50に変更します。それでもカスタムフィールドが表示されない場合は、制限をさらに増やしてみてください。
高度なカスタムフィールドを使用したカスタムフィールドのユーザーインターフェースの作成
ご覧のように、一度カスタムフィールドを追加すると、投稿するたびにフィールドを選択し、値を入力する必要があります。
WordPressのカスタムフィールドがたくさんあったり、サイトに複数の投稿者がいる場合、これは理想的なソリューションではありません。
ユーザーがフォームに入力してカスタムフィールドに値を追加できるユーザーインターフェースを作れたらいいと思いませんか?
実際、これはすでに多くのWordPressプラグインが行っていることだ。
例えば、人気のAll In One SEOプラグイン内のSEOタイトルとメタ説明ボックスは、カスタマイザーボックスです:
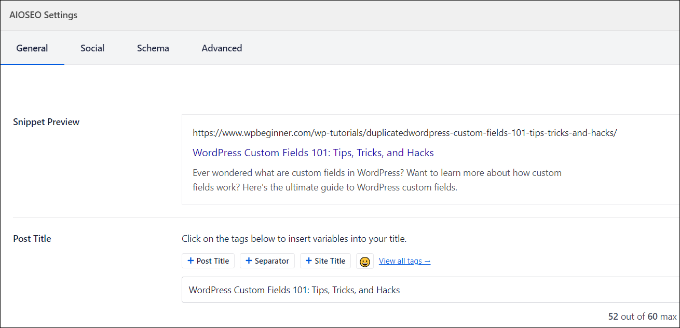
カスタムフィールドを追加するユーザーインターフェースを作成する最も簡単な方法は、Advanced Custom Fieldsプラグインを使用することです。
最初に行う必要があるのは、Advanced Custom Fieldsプラグインをインストールして有効化することです。詳しくは、WordPressプラグインのインストール方法のステップバイステップガイドをご覧ください。
有効化した後、ACF ” Field Groups “ページにアクセスし、’Add New’ ボタンをクリックする必要があります。
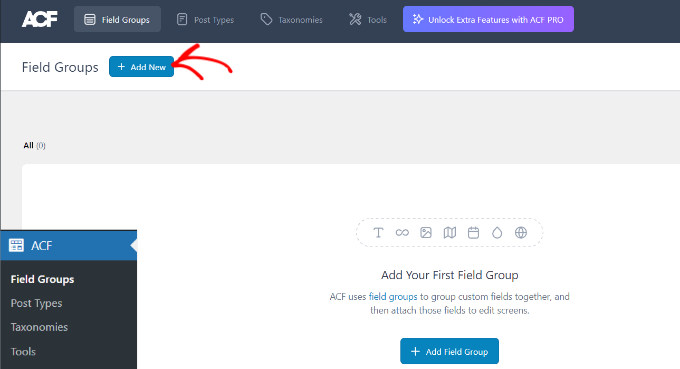
フィールドグループは、カスタムフィールドのセットを持つコンテナのようなものです。複数のカスタムフィールドのパネルを追加することができます。
次に、フィールドグループのタイトルをプロバイダーで指定し、右上の「+ Add Field」ボタンをクリックします。
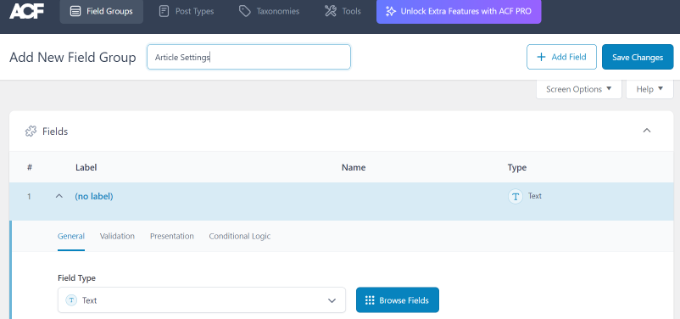
これでフィールドタイプを選択できる。
アドバンスドカスタマイザーでは、テキスト、画像アップロード、数値、ドロップダウン、チェックボックスなど、あらゆる種類のフィールドを作成できます。
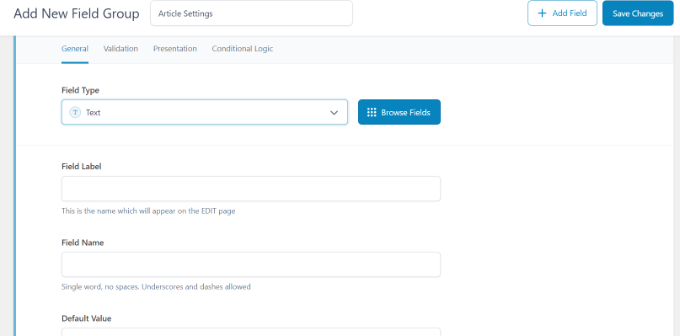
次にスクロールダウンすると、フィールド名、フィールドラベル、初期設定値など、特定のフィールドの他のオプションを見ることができます。これらをあなたの必須項目に変更することができます。
必要であれば、フィールド・グループに複数のフィールドを追加することもできます。完了したら、「変更を保存」ボタンをクリックしてください。
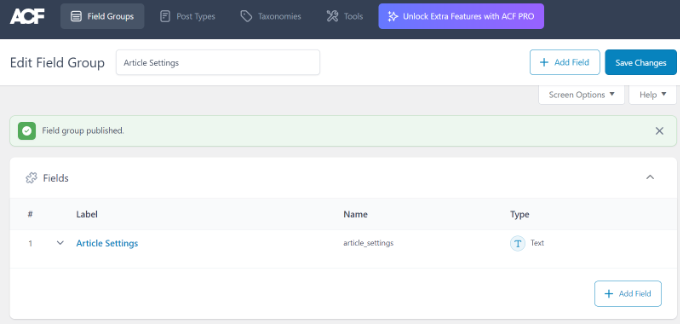
次に、投稿を編集するか、新規投稿を作成すると、コンテンツエディターの下にWordPressカスタムフィールドのある新しいパネルが表示されます。
詳しい手順については、WordPressの投稿日と投稿タイプにカスタムメタボックスを追加する方法をご覧ください。
条件文で空のカスタムフィールドを非表示にする方法
これまで、カスタムフィールドを作成し、テーマに表示する方法を説明してきました。
では、カスタムフィールドを表示する前に、カスタムフィールドが空でないことをチェックする方法を見てみましょう。そのために、まずフィールドにデータがあるかどうかをチェックするようにコードを修正します:
1 2 3 4 5 6 7 8 9 10 11 12 13 14 15 | <?php $mood = get_post_meta($post->ID, 'Mood', true);if ($mood) { ?><p>Today's Mood: <? echo $mood; ?></p><?php } else {// do nothing;}?> |
Moodをあなたのカスタムフィールド名に置き換えることをお忘れなく。
カスタムフィールドに複数の値を追加する
カスタムフィールドは、同じ投稿で複数の値を追加するために再利用することができます。フィールドを再度選択し、「値」ボックスに別の値を追加するだけです。
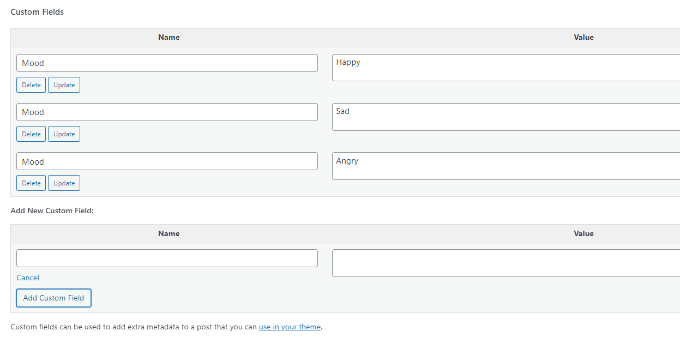
しかし、上記の例で使用したコードでは、個別値しか表示できない。
カスタムフィールドの値をすべて表示するには、コードを修正して配列でデータを返すようにする必要があります。以下のコードをテーマファイルに追加する必要がある:
1 2 3 4 5 6 7 8 9 10 11 12 13 14 15 | <?php $mood = get_post_meta($post->ID, 'Mood', false);if( count( $mood ) != 0 ) { ?><p>Today's Mood:</p><ul><?php foreach($mood as $mood) { echo '<li>'.$mood.'</li>'; } ?></ul><?php } else { // do nothing; }?> |
この場合も、Moodをあなた自身のカスタムフィールド名に置き換えることを忘れないでください。
この例では、get_post_meta関数の最後のパラメータをfalseに変更しています。このパラメータは、関数が個別値を返すかどうかを定義します。falseに設定することで、データを配列として返すことができ、それをforeachループで表示することができます。
WordPressで投稿をカスタムフィールドで検索する方法
WordPressの初期設定は、サイト上のカスタムフィールドでは動作しません。あなたや訪問者がサイト上で探している投稿を見つけるためにコンテンツのみを使用します。
しかし、SearchWPは WordPressの検索を改善することでそれを変えます。投稿コンテンツを使用するだけでなく、WordPressカスタムフィールド、PDFドキュメント、カスタムテーブル、テキスト、ファイルなど、あらゆるものをインデックス化する最高のWordPress検索プラグインです。
SearchWPを使えば、コードを編集することなく検索アルゴリズムを調整することができます。プラグインをインストールし、WordPressの管理エリアからSearchWP ” Algorithmに移動するだけです。
その後、「エンジン」タブに移動し、「属性の関連性」スライダーを調整する必要があります。これにより、検索時に各属性に与えられる重要度が変わります。
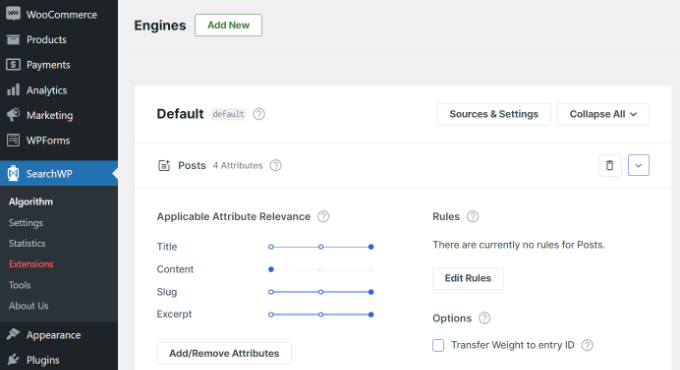
例えば、カスタマイザー・スライダーを最大に設定し、それに応じて他の属性のスライダーを調整することができます。こうすることで、SearchWPはWordPressでコンテンツを検索する際に、カスタムフィールドのデータを優先的に表示するようになります。
SearchWPを使用するもう一つの利点は、Advanced Custom Fields (ACF)、メタ情報、Podsなど、最も人気のあるカスタムフィールドプラグインと連動することです。
詳しくは、SearchWPでWordPressの検索を改善する方法についての初心者向けガイドをご覧ください。
特定のカスタムキーを持つ投稿の表示
WordPressでは、カスタムキーとその値を持つ投稿を表示することができます。例えば、特定のカスタムキーを持つ投稿をすべて表示するカスタムアーカイブページを作成しようとしている場合、WP_Queryクラスを使用してそれらのフィールドに一致する投稿をクエリーすることができます。
次のコードを出発点として使うことができる:
1 2 3 4 5 6 7 8 9 10 11 12 13 14 15 16 17 18 19 20 21 22 23 24 25 26 27 | $args = array( 'meta_key' => 'Mood', 'meta_value' => 'Happy');$the_query = new WP_Query( $args ); <?php // the query$the_query = new WP_Query( $args ); ?> <?php if ( $the_query->have_posts() ) : ?> <!-- the loop --> <?php while ( $the_query->have_posts() ) : $the_query->the_post(); ?> <h2><?php the_title(); ?></h2> <?php the_content(); ?> <?php endwhile; ?> <!-- end of the loop --> <!-- pagination here --> <?php wp_reset_postdata(); ?> <?php else : ?> <p><?php _e( 'Sorry, no posts matched your criteria.' ); ?></p><?php endif; ?> |
meta_keyと meta_valueのパラメータを独自の値で置き換えることをお忘れなく。
カスタムフィールドを使用してゲスト投稿者名を追加する方法
ゲスト投稿を追加したいけれど、その投稿のためだけに新しいユーザープロフィールを追加したくないですか?もっと簡単な方法は、カスタムフィールドとしてゲスト投稿者の名前を追加することです。
これを行うには、テーマのfunctions.phpファイルに以下のコードを追加するか、WPCode(推奨)を使用する必要があります:
1 2 3 4 5 6 7 8 9 | add_filter( 'the_author', 'guest_author_name' );add_filter( 'get_the_author_display_name', 'guest_author_name' );function guest_author_name( $name ) {global $post;$author = get_post_meta( $post->ID, 'guest-author', true );if ( $author )$name = $author;return $name;} |
詳しくは、スニペットをWordPressに貼り付ける方法をご覧ください。
このコードは、WordPressのthe_authorと get_the_author_display_name フィルターに関数をフックしている。
この関数は、まずゲスト投稿者の名前をチェックします。もし存在すれば、投稿者名をゲスト投稿者名に置き換えます。
次に、ゲスト投稿者の名前を表示したい投稿を編集する必要があります。カスタムフィールドのメタ情報に移動して、ゲスト投稿者の名前を追加し、最後に「カスタムフィールドを追加」ボタンをクリックします。

詳しくは、WordPressのカスタムフィールドでゲスト投稿者の名前を書き換える方法の投稿をご覧ください。
カスタムフィールドを使って投稿の寄稿者を表示する方法
多くの人気ブログやニュースサイトでは、多くの投稿者が個別記事の執筆に参加しています。しかし、WordPressでは個別投稿しかできません。
この問題を解決する一つの方法は、Co-Authors Plusプラグインを使用することです。さらに詳しく知りたい方は、WordPressの投稿に複数の投稿者を追加する方法のガイドをご覧ください。
もう一つの方法は、カスタムフィールドとして寄稿者を追加することです。
まず、共著者や寄稿者を表示したい投稿を編集する必要があります。次に、カスタムフィールドメタ情報までスクロールダウンし、共著者カスタムフィールドとして投稿者名を追加します。
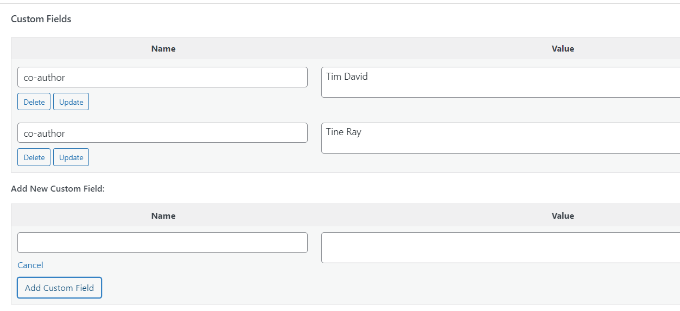
次に、共著者を表示したいテーマファイルにこのコードを追加する必要があります:
1 2 3 4 5 6 7 8 9 10 11 12 13 14 15 16 | <?php $coauthors = get_post_meta($post->ID, 'co-author', false);if( count( $coauthors ) != 0 ) { ?><ul class="coauthors"><li>Contributors</li><?php foreach($coauthors as $coauthors) { ?> <?php echo '<li>'.$coauthors.'</li>' ; } ?></ul><?php } else { // do nothing; }?> |
投稿者名をカンマ区切りで表示するには、以下のカスタムCSSを追加します:
1 2 3 4 5 6 7 8 9 10 11 12 13 14 15 16 | .coauthors ul { display:inline;}.coauthors li { display:inline;list-style:none;}.coauthors li:after { content:","}.coauthors li:last-child:after { content: "";}.coauthors li:first-child:after { content: ":";} |
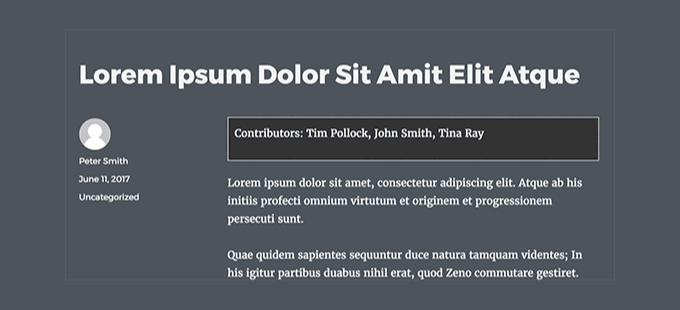
デモサイトではこのように表示されました。
WordPressでカスタムフィールドをループ外に表示する方法
個別投稿のサイドバーにカスタムフィールドを表示する必要がある場合は?
WordPressのループの外側にカスタムフィールドを表示するには、テーマファイルに以下のコードを追加します:
1 2 3 4 5 6 | <?phpglobal $wp_query;$postid = $wp_query->post->ID;echo get_post_meta($postid, 'key', true);wp_reset_query();?> |
keyをカスタムフィールド名に置き換えることをお忘れなく。
カスタムフィールドを使ったカスタムヘッダー、カスタムフッター、カスタムサイドバーの表示
通常、ほとんどのWordPressテーマは、すべてのページで同じヘッダー、フッター、サイドバーを使用します。
サイト上のページごとに異なるサイドバー、ヘッダー、フッターを表示する方法もたくさんあります。WordPressの投稿やページごとに異なるサイドバーを表示する方法については、こちらのガイドをご覧ください。
これを行う一つの方法は、カスタムフィールドを使用することです。異なるサイドバーを表示したい投稿またはページを編集し、カスタムフィールドとしてサイドバーを追加するだけです。
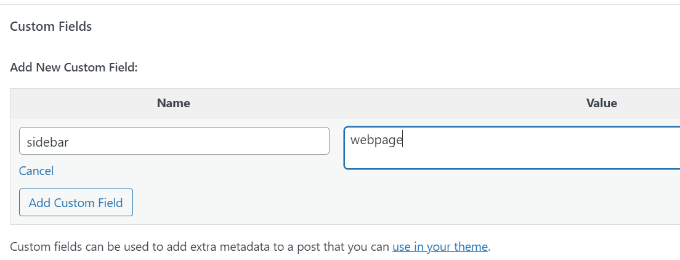
次に、カスタム・サイドバーを表示したいsingle.phpなどのWordPressテーマ・ファイルを編集する必要があります。以下のコードを探してください:
1 | <?php get_sidebar(); ?> |
この行を以下のコードに置き換える:
1 2 3 4 5 6 7 | <?phpglobal $wp_query;$postid = $wp_query->post->ID;$sidebar = get_post_meta($postid, "sidebar", true);get_sidebar($sidebar);wp_reset_query();?> |
このコードは、サイドバー・カスタムフィールドを探し、テーマに表示するだけです。例えば、サイドバーカスタムフィールドとしてwebpageを追加した場合、コードは表示するためにsidebar-webpage.phpファイルを探します。
テーマ・フォルダーにsidebar-webpage.phpファイルを作成する必要があります。あなたのテーマのサイドバー.phpファイルからコードをコピーすることができます。
カスタムフィールドでRSSフィードコンテンツを操作する
RSSフィードユーザーに追加のメタデータやコンテンツを表示したいですか?カスタムフィールドを使用すると、WordPress RSSフィードを操作し、フィードにカスタムコンテンツを追加することができます。
まず、テーマのfunctions.phpファイルに以下のコードを追加するか、WPCode(推奨)を使用する必要があります:
1 2 3 4 5 6 7 8 9 10 11 12 13 14 15 16 17 | function wpbeginner_postrss($content) {global $wp_query;$postid = $wp_query->post->ID;$coolcustom = get_post_meta($postid, 'coolcustom', true);if(is_feed()) {if($coolcustom !== '') {$content = $content."<br /><br /><div>".$coolcustom."</div>";}else {$content = $content;}}return $content;}add_filter('the_excerpt_rss', 'wpbeginner_postrss');add_filter('the_content', 'wpbeginner_postrss'); |
あとは、「coolcustom」というカスタムフィールドを作成し、好きな値を追加するだけです。広告、画像、テキスト、何でも表示できます。
詳しくは、ウェブ上のコードをWordPressにコピー&ペーストする方法をご覧ください。
カスタムフィールドでRSSフィードのタイトルを操作する方法
RSSフィードユーザーのために、投稿タイトルにテキストを追加したい場合があります。例えば、スポンサー投稿やゲスト投稿を公開する場合に便利です。
まず、テーマのfunctions.phpファイルに以下のコードを追加するか、WPCodeを使用して、サイトを壊すことなくカスタム・コード・スニペットを追加する必要があります:
1 2 3 4 5 6 7 8 9 10 11 12 13 14 15 16 17 18 | function wpbeginner_titlerss($content) {global $wp_query;$postid = $wp_query->post->ID;$gpost = get_post_meta($postid, 'guest_post', true);$spost = get_post_meta($postid, 'sponsored_post', true);if($gpost !== '') {$content = 'Guest Post: '.$content;}elseif ($spost !== ''){$content = 'Sponsored Post: '.$content;}else {$content = $content;}return $content;}add_filter('the_title_rss', 'wpbeginner_titlerss'); |
次の投稿では、タイトルフィールドに追加テキストを表示したい投稿を編集する必要があります。
次に、カスタムフィールドとしてguest_postとsponsored_postを追加します。
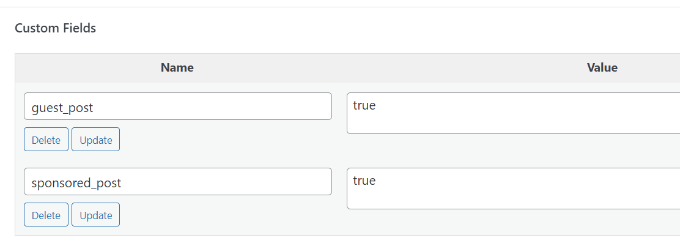
これら2つのカスタムフィールドのどちらかが値 “true “で見つかった場合、コードはタイトルの前に適切なテキストを追加します。このテクニックは、好きなものに合わせていろいろな使い方ができます。
さらに詳しくRSSフィードハックを知りたいですか?WordPressのRSSフィードにコンテンツを追加し、操作する方法についてのガイドをご覧ください。
カスタムフィールドを使ってWordPressの投稿に有効期限を設定する方法
WordPressサイトの投稿に有効期限を設定したいですか?アンケートや期間限定のキャンペーンなど、特定の期間のみコンテンツを公開したい場合に便利です。
手動で投稿コンテンツを削除するか、Post Expiratorのようなプラグインを使用する方法があります。
もう一つのオプションは、カスタムフィールドを使用して、特定の時間後に投稿を自動的に期限切れにする方法です。テーマファイルを編集し、WordPressのループをこのように変更する必要があります:
1 2 3 4 5 6 7 8 9 10 11 12 13 14 15 16 17 18 19 20 21 22 | <?phpif (have_posts()) :while (have_posts()) : the_post();$expirationtime = get_post_meta($post->ID, "expiration", false);if( count( $expirationtime ) != '' ) {if (is_array($expirationtime)) {$expirestring = implode($expirationtime);}$secondsbetween = strtotime($expirestring)-time();if ( $secondsbetween >= 0 ) {echo 'This post will expire on ' .$expirestring.'';the_content();} else {echo "Sorry this post expired!"}} else {the_content();}endwhile;endif;?> |
注:テーマに合わせてこのコードを編集する必要があります。
このコードを追加したら、有効期限を設定したい投稿に有効期限カスタムフィールドを追加します。本当に〜してもよいですか?
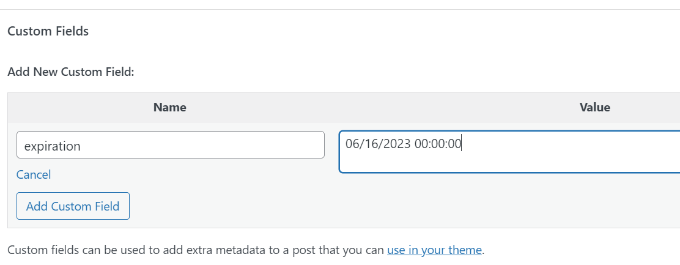
カスタムフィールドを使用して個々の投稿をスタイリングする方法
CSSを使って個々の投稿の見た目を変えたいですか?WordPressでは投稿ごとに自動的にクラスが割り当てられ、それを使ってカスタムCSSを追加することができます。
しかし、カスタムフィールドを使うことで、独自のカスタムクラスを追加することができ、それを使って投稿のスタイルを変えることができます。
まず、スタイルを変更したい投稿を編集する必要があります。カスタムフィールドボックスに移動し、投稿クラスカスタムフィールドを追加します。
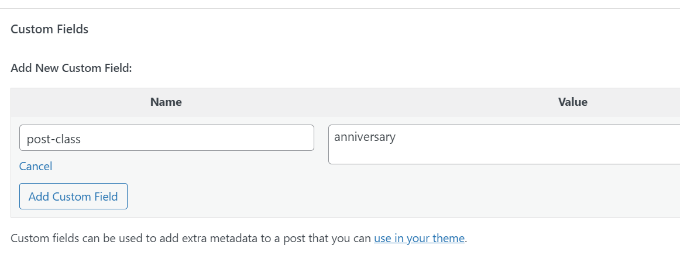
次に、WordPressテーマファイルを編集し、WordPressループの最初にこのコードを追加する必要がある:
1 | <?php $custom_values = get_post_meta($post->ID, 'post-class'); ?> |
ここで、post_class()関数のある行を見つける必要がある。
デモテーマではこのように表示されました:
1 | <article id="post-<?php the_ID(); ?>" <?php post_class(); ?>> |
この行を次のように変更して、カスタム・フィールドの値を含める必要がある:
1 | <article id="post-<?php the_ID(); ?>" <?php post_class($custom_values); ?>> |
ここで、Inspectツールを使って投稿のソースコードを調べると、カスタムフィールドのCSSクラスがpost-classに追加されていることがわかります。
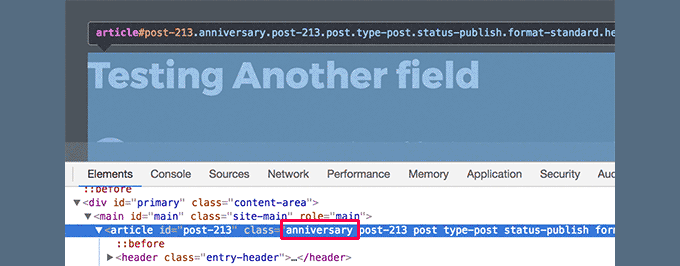
このCSSクラスを使ってカスタムCSSを追加し、投稿のスタイルを変えることができます。
この投稿が、WordPressカスタムフィールドについてより詳しく知っていただく一助となれば幸いです。投稿日: にカスタムフィールドを自動的に追加する方法や、サイトを思い通りにデザインするのに役立つWordPress ページビルダー プラグインもご覧ください。
If you liked this article, then please subscribe to our YouTube Channel for WordPress video tutorials. You can also find us on Twitter and Facebook.


Moinuddin Waheed
This is hands down the most detailed illustration about the custom fields in WordPress.
I have used many custom fields but never knew what exactly it was and how it was behind the scene.
This guide is very relevant and helpful for me to increase my understanding about the custom fields.
Thanks wpbeginner for this tutorial.
Jiří Vaněk
Custom fields in WordPress are still something I know of, vaguely understand how it works, but I’ve never really delved into it. Whenever I read guides on discussion forums, many people refer to it. This guide will finally help me to get started, study this topic better, and fully engage with it.
WPBeginner Support
Glad we could help clear this up
Admin
Himanshu Gautam
I have done the same
but every theme has different files.
so its works well after putting the code in meta.php to display all the custom meta fields on the posts page.
but on another website with a different theme, I can not understand where to place the code.
WPBeginner Support
If it is not working with a specific theme then we would recommend reaching out to that theme’s support and they can normally assist with how it would work with their theme.
Admin
Peter
Is it also possible to use custom field values in functions.php?
For example a true/false value to avoid enqueuing a special script which i just want to use at special posts/pages?
WPBeginner Support
Yes, you could do that if you wanted.
Admin
Tony
If i use custom fields to store data for CF7 such as the email address related to an individual branch page, do i need to alter or add anything into the theme folders? I dont want to display this content in the page, but have it available for use by CF7……if that makes sense.
WPBeginner Support
You would want to reach out to the plugin’s support for how to set that up. By default, your theme wouldn’t display that data.
Admin
Tamer Ziady
Is there a way to force custom fields? I.E. if a post doesn’t have a specific field filled out; can the author be told they have to fill out this field?
WPBeginner Support
While we don’t have a recommended method at the moment, we will be sure to take a look.
Admin
Mike Claggett
What are you using to build the Table of Contents” on this page?
Are you doing it manually or are you using a plugin.
It’s SUPER COOL – I LUV It.
Thanks for all your hard work.
MC
WPBeginner Support
We are creating it manually at the moment
Admin
SK
Hi,
I had the Custom field installed on WordPress 4.3. Due to there is a need to upgrade of WordPress to latest version, after done the upgrade, the Custom Fields seems does work properly. I saw the menu, but in Post or Page I went to screen option i cant see the tick for custom field.
WPBeginner Support
If you’re using the block editor then you would want to click the verticle ellipsis, go to options, and there you can enable the custom fields the same as you would for screen options.
Admin
Ian
Hi,
For Manipulating RSS feed Content with Custom Fields, and for other changes, when you say add the following code in your theme’s functions.php file, where exactly are you adding this? I am in Edit Themes and have gone under functions.php and see the code but am clueless on where to add the above example for instance.
WPBeginner Support
You can add it wherever you like in the file but we normally recommend the end of your functions.php so you can easily remove it should you want in the future
Admin
Dionisis
What if we would like to add a custom field to the post title?
For example if we would like to add a date at the right of the title?
( i am using forms with custom fields for my visitors that’s why i need a custom field in the title)
WPBeginner Support
For how to set something like that up, you would want to check the displaying custom fields section in the article here: https://www.wpbeginner.com/wp-tutorials/wordpress-custom-fields-101-tips-tricks-and-hacks/#displaycustomfields
Admin
Norman Murray
Excellent article with many useful illustrative examples
WPBeginner Support
Thank you
Admin
Jasmine
Hi, I want to create a form that will ask users different questions and then have the following page show up with a sidebar menu customized to the answers that the user put in the form. Is this possible with custom fields?
WPBeginner Support
That is possible but it will likely require custom coding or a custom plugin to set up user-specific displays
Admin
Bill
Custom Fields DO NOT SHOW in my screen options drop-down. I am running WP 5.2.3 and the Twenty Nineteen theme. Thus, I cannot get to step one. How do I fix this? Thank you.
WPBeginner Support
For the block editor, screen options would be under the three dots in the top right, then go to options
Admin
Hasse
What´s the best way to automatically assign a custom field value from the unique blog post ID? The users shouldn´t be able to see or change it. It´s just used for matching data in the text step.
WPBeginner Support
It would depend on what your goal is with the custom field value. Custom fields are normally for editing content on a post by post basis. If you need the id while editing a post you should be able to get it from the url of the post if you’re using it while editing a specific post: https://www.wpbeginner.com/beginners-guide/how-to-find-post-category-tag-comments-or-user-id-in-wordpress/
Admin
Trang
Thank you, I’ve spent half a day looking for a way to add a subtitle section without using a plugin. It turns out that I can do that with the custom field.
WPBeginner Support
You’re welcome, glad our guide could help
Admin
Guilherme R. C.
I am new to WordPress, and this article has helped me to understand this tool a little more, very easy to follow.
This is great. Thank you!
WPBeginner Support
Glad our article could help
Admin
Moxet Khan
One of the most comprehensive article over custom field, highly appreciate the step by step explanation.
Yogesh Gautam
Thanks WP Beginner!
I was looking for a way to embed a javascript as a custom field in header of specific posts. I didn’t found any accurate and satisfying method to do so.
Thankfully your post helped me to do it in a sec.
Thanks once again!
Arqam Saleem
This article is really fantastic, please tell me one more thing. How to add custom field for an image ??
Sally Bowles
Just want to say a BIG THANK YOU!!!!
Tamie
I want to add a counter to my blog to track the number of visitors, how do I do this?
WPBeginner Support
Hi Tamie,
Please see our guide on how to install Google Analytics in WordPress.
Admin
Charles
i want display some custom-fields in all posts that they are in one category.
can I do it? would you help me?
Krish
I want to place a counter displaying number of posts in a category on Homepage section.
Is that possible with custom fields.
Bob
Hi there,
Very interesting article indeed…
Actually i need some help related to this subject if possible of course..
1- I have a WordPress website
2- I want user to have a section called my vehicles as part of their profile
3- Users can add or remove vehicles
4- Vehicle record is of 3 related fields : Year / Make / Model
5- The above 3 fields data can be collected from the Carquery API WP by placing short codes in any page as per their instructions.
I am stuck in how to make this process :
1- A user will open a page called my vehicles
2- He can add / remove / edit vehicles
———————————————————————————————————
I don’t mind if there any other way available to achieve what i am looking for..
Thank you in advance…
Jeff Cohan
Great subject nicely covered!
I’m confused, however, as to why, In the “Set Expiration Date for Posts…” example, the third parameter of get_post_meta() is set to false (NOT single value), and then the code uses implode() to concatenate expiration values if there are multipies. Shouldn’t there be (at most) ONLY ONE expiration value per post? And if there WERE multiples, wouldn’t the implode() function generate an unusable time value?
James Shapiro
Great article! Any chance you can go into this much depth for adding user fields to the users data base and then using this data for conditional displays at the site? Thanks….
WPBeginner Support
Hi James,
Please see our guide on how to add additional user profile fields in WordPress.
Admin
Nazgyl
This article is awesome! thank you for this.
What if I want to have a custom field, and the values are preset and displayed to the author as a dropdown, or a multiselect.
Is that achievable? Would you kindly share a code snippet?
Editorial Staff
Yes you can most definitely do that with Advanced Custom Fields plugin mentioned above in the article.
Admin